In that step by step master class we will learn how to install a heated towel rail ladder with a lower connection. We will carry out the installation and wiring of pipes to the riser, we will fix the plumbing in accordance with regulatory standards.
Step 1: Marking and chasing the wall
In the bathroom, one of two types of heated towel rail is purchased: electric or water. The first option is easier to install, but it requires more energy. Therefore, most often install a water heated towel rail. It is connected to a common heating system or hot water riser.
Connecting a heated towel rail to heating is impractical. The duration of the heating season is 6 months, keep the pipes hot all year round will not be possible, in contrast to the connection to the hot water riser. This option is also possible difficulties. You will need to get permission to turn off the water in the entire house. IN heating season it will be problematic, there is a high probability of an emergency. Therefore, we recommend connecting the heated towel rail to the DHW riser.
Replacing the old Soviet-style heated towel rail in the bathroom is done with the help of a grinder, a coil is cut out along with a riser.
After dismantling and shutting off the water, we make markings. We mark with a pencil the places of the lower connection and the location of the pipes for divorce. When installing this plumbing, we adhere to SNiP. According to the regulations, the installation height of the heated towel rail should be at a distance of 1.2 m from the floor level and located at least 0.6 m from the sink, bathtub and other plumbing equipment.
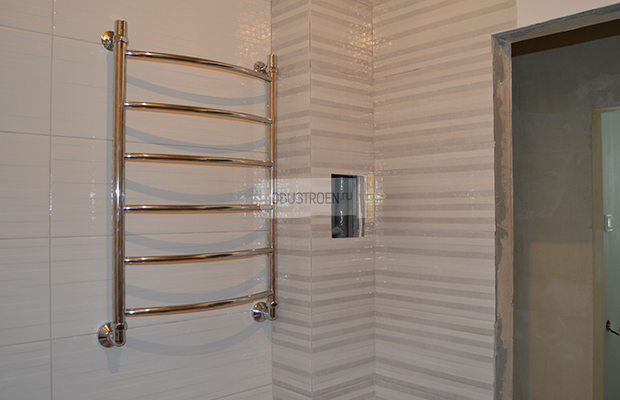
The heated towel rail can be installed above washing machine providing unhindered access to equipment. A ladder-type dryer, as in our case, is mounted at such a height that a person of average height can freely reach the last crossbar. When marking, also keep in mind that the heated towel rail should not be located at a distance of more than 2 m from the riser, otherwise the installation will provoke large heat losses.

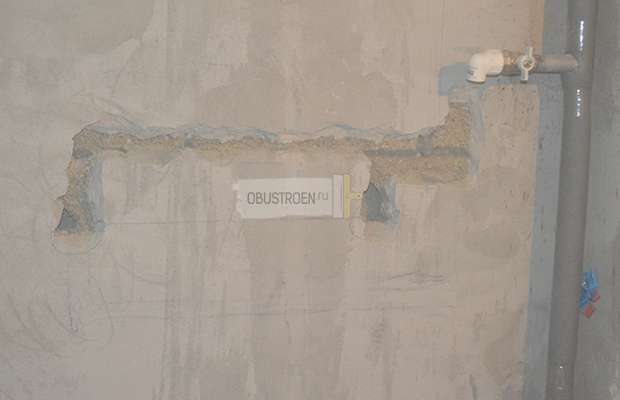
Further we hollow out in the lined part of the wall of the cavity under the pipes. To make a strobe, you can use a special strobe cutter or an ordinary grinder with a drill. Wear a protective mask and goggles while shredding. If you are leaving pipes in plain sight, skip this step. We install ball valves at the ends of the riser for the outlet of plastic pipes, thanks to them you can shut off / resume the water supply at any time.
Step 2: Wiring and piping to the heated towel rail
The general scheme for connecting a heated towel rail is the same for all types of device. From one end, water is supplied, and from the other, water is withdrawn from the system. Let's get to the split. We solder polypropylene pipes from ball valves to the water supply to the dryer. Cooking additional tools and materials that will be needed during work - a soldering iron and scissors for polypropylene pipes, connecting fittings (corners and American couplings). For divorce heating system use plastic pipes with fiberglass d=20 mm. Screw on the plugs.

Temporarily fasten the heated towel rail into place without final fixation and winding, set it exactly horizontally and vertically, fasten the plumbing to the dowel-screws. American couplings should protrude from the wall by the thickness of the tile with which it will be faced.

Step 3: Punching and cladding
After installing the heated towel rail according to the level, we moisten the wall from dust and seal the strobe with putty.

Outside, we leave the outer part of the threaded polypropylene fitting, putty the rest.

As soon as the putty hardens, remove the heated towel rail. We will finally mount it when we tile the walls.

Step 4: Installing Cams and Fasteners
The tile is laid, now comes the final installation of the heated towel rail. From the side of the riser, we cut a window in the tile for the inspection door. Through it we make sure that the taps are closed, we unscrew the plugs.

Included with the heated towel rail are eccentrics with narrow and wide threads, ½ and ¾ inches with offset. We screw the eccentric manually into the thread coming out of the wall, inserting it with a narrow part, after winding the sealing thread. We install it evenly, without distortions, we do not reach it slightly so that we can adjust the position of the heated towel rail. Tighten the connection with a wrench.

Do not forget about the installation of gaskets, we put reflectors on top, which will hide the junction of the pipe with plumbing. We wind the heated towel rail by hand, set it according to the level, turning the eccentrics.

We fasten the device and make marks where the top attachment of the heated towel rail to the wall will be located. Last time remove the heated towel rail, drill holes for the dowel-screws in the marked places using a special drill on the tile to avoid cracking the tile.
To fix the plastic, we will use Point 96 liquid nails. This is a crystal-clear fixative that, after application, creates an invisible seam, suitable for almost all surfaces. Another feature is the primary fight. No additional bolts or fasteners are required.

The hatch is installed, if necessary, it can be easily opened for inspection and shutting off the taps.

The bathroom will become much more convenient if you equip it with such a functional device as a heated towel rail.
Its installation allows you to solve several significant problems at once.:
- drying towels and small items;
- maintaining optimal temperature conditions;
- prevention of dampness formation.
Installing a water heated towel rail
First you need to assemble it - install shut-off valves with detachable connection, which in the future will provide an easy replacement of the heated towel rail or the elimination of some defects without draining the riser. The assembled dryer can be attached to the wall anywhere by bringing pipes from the riser to it.

Important. When installing a heated towel rail, it is necessary to act strictly in accordance with the instructions attached to it.
Connection order:

Features of installing a combined heated towel rail
Since water dryers usually work only during the heated period, many residents of high-rise buildings solve this problem by installing a universal heated towel rail, which can work both from the heating system or hot water supply, and from electricity. To do this, you need a drying ladder, in the left lower connection of which an electric heater with a thermostat is mounted. The installation of the heated towel rail itself is carried out in the manner described above.

Thus, the following scheme of work is obtained. When the shut-off valves are closed and the device is filled with water through the left upper connection (where the Mayevsky tap is installed), the heated towel rail can be heated by electricity. When disconnecting it from the outlet and opening the shut-off valves, heating will be provided hot water from the central system.
Important. Connecting an electric heated towel rail requires some electrical wiring requirements.
Energy consumption similar devices quite high (1 kW or more), which requires a separate outlet, the connection of which is carried out with a cable with a cross section of at least 2.5 squares and powered directly from the electrical panel. This wiring line must be protected by a separate "machine".

It is necessary to provide a place for a socket with grounding for a heated towel rail
Very important point- grounding. Manufacturers took care of connecting ready-made heated towel rails and self-made ones (with “ladder” equipment with a heating element with a thermostat) to the protective ground. Therefore, it is enough just to install a special socket with grounding, laying a three-wire wire. If there is no grounding in the apartment, then you can perform a "zeroing" when the ground wire and zero in the wiring are bridged. Such re-grounding must be done as close as possible to the electrical panel.
This is how the installation and connection of the heated towel rail is performed. Before starting work, you need to decide whether you can handle such work on your own or not. Even if you decide not to do it yourself, at least you will understand the installation sequence, which will help you control the quality of the work of hired specialists.
A heated towel rail is necessary not only for drying clothes, but also for creating a favorable microclimate in the bathroom - dampness and high humidity are prevented. But installing a heated towel rail in the bathroom with your own hands requires not only the appropriate skills and equipment, but also good instructions. And you will find it in this article.
Installing a heated towel rail in the bathroom with your own hands
Preparation
First you need to prepare consumables and equipment. The work will require:
- in fact, a heated towel rail;
- two ball valves
- mounting brackets;
- fittings with couplings for connection (polypropylene);
- polypropylene pipes;
- special knives for cutting PP;
- soldering iron for PP pipes.


Towel dryers in the interior of the bathroom
Of course, if you plan to replace the heated towel rail, then you should first remove the old one. To do this, follow these steps.
Step 1. First, shut off the hot liquid supply to the pipe to which the coil will be attached. To do this, you need to write a corresponding application to the chairman of the cooperative or to the housing office, after which - shut off the desired valve.

Step 3 If the device is welded to the pipeline (or the thread is not unscrewed), then cut it off with a grinder and remove it from the room.


Note! It must be cut in such a way that the remaining section of the pipe is sufficient for threading.
Bypass installation
As already noted, the bypass jumper is an ordinary pipe (in our case, made of polypropylene). To install it, mount ball valves at the ends of the product (as shown in the image), which will block the water flow if necessary. With a bypass, water will circulate in the riser even if the heated towel rail is turned off.


Note! It is also desirable to install another ball valve in the bypass itself, with the help of which air will be removed. Due to this, the working fluid will circulate freely through the coil.
It is important to check the evenness of the pipes in the horizontal and vertical plane

Faucet installation
After that, you can proceed to the installation of cranes. If the old device was cut off, then on the remaining pipe sections, cut new thread using a die of the required diameter for this. And if the coil was removed “civilized” and the thread remained in place, then simply “drive” it with the same die in order to improve the quality of the connection.

Once the threads are in order, install the shut-off valves (in other words, taps). This armature will perform two functions at once.
- Adjusting the intensity of the coil by closing / opening taps.
- Shutting off the water in case of need for repair or replacement of equipment in order to carry out the required actions.
Installing a heated towel rail
Step 1. First, brackets are attached to the walls.
Step 2. Then the heated towel rail itself is hung on the brackets. In some cases, you will have to ditch the wall.


Step 3. Finally, the heated towel rail is connected to the valves on the bypass. For this, as already noted, both special fittings and bushings can be used.
Note! After installation, open the taps in turn (do this smoothly). In this case, the coil will be filled with liquid gradually, and the risk of water hammer will be minimized.

Air release through the Mayevsky crane


Everything, the installation of a heated towel rail in the bathroom with your own hands is completed. If you are interested in how much all this will cost, then it is difficult to name a specific figure, since it depends on the complexity of the work, the type of coil, and a number of other factors. But if the installation is done by hand, then all costs will be associated only with the purchase of the device and additional consumables.
How to install a new coil?
Connecting a heated towel rail to hot water supply pipes, as noted earlier, is regulated by SNiP. What is this SNiP, and also what does it say about our problem.


And if it is planned to install a new device, then segments of PP pipes should be attached to the pipeline, and already the coil itself should be attached to them. The connection procedure is not difficult. You just need to connect the ends using a special soldering iron for polypropylene pipes.
Note! At the same time, maintain a slight inclination of the supply pipe, directed towards the movement of hot liquid. The slope should be approximately 0.5-1 centimeter for the entire length of the segment. Water must move down the coil from top to bottom, for this reason the supply is connected to the upper socket of the product.
We also add that there are also limiting distances that must be maintained between the walls (both lined and finished with plaster) and the heated towel rail. They are listed below:
- 5 centimeters if the diameter of the pipes exceeds 2.3 centimeters;
- 3.5 centimeters if the diameter of the pipes is less than 2.3 centimeters.
So that the walls are not subjected to excessive loads caused by thermal deformations hot pipe, the structure is not fixed rigidly, but is hung on the mounting brackets.
Once all steps are completed, carefully examine the connections - they should remain dry.
Video - Features of installing a heated towel rail
Choosing a heated towel rail and other important points
In other countries, this device is an element of the heating system, while in our country it is connected to hot water supply. Therefore, it also compensates thermal expansion pipeline, in connection with which it is installed directly in the riser. Therefore, errors during installation are unacceptable.

Of course, you must first choose the right device. The modern assortment is huge, but there is no need to hurry with the purchase. The fact is that imported heated towel rails are incompatible with water pipes, so you need to buy domestic models. But if the device is installed in a private house, then you can make a choice in favor of foreign manufacturers, but with the obligatory consideration of water quality and pressure.
Note! IN apartment building you only need to install products domestic production, and do it in accordance with GOST and SNiP.
In order to properly install, you should know about the main points of this process.
- It is not recommended to use components made of different metals in the system, otherwise electrolytic corrosion will occur with all the ensuing consequences. To avoid this, all connections are sealed with Teflon gaskets.
- If possible, a pair of ball valves should be installed on the riser, thereby forming a jumper (bypass). This will allow not to shut off the water in the entire riser in case of an unforeseen situation.
- It must be remembered that if you connect a heated towel rail to the heating system, then it will only work during the heating season. Therefore, it is better to embed the device in the DHW system.
- If you plan to install a model of the "ladder" type, then it is better to resort to side connection with a center distance of 50 centimeters.
- If you still want to connect the device to the heating system, then it is better to choose a combined model for this.
Video - Choosing a heated towel rail
Now consider the main types of products. There are only three of them.
- Water models are coils in which hot liquid circulates.
- Electric models work autonomously, but, of course, they need an uninterrupted supply of electricity.
- Finally, combined devices combine the characteristics of the first two varieties, but are quite expensive.
Note! It is desirable to connect the device to the riser with the help of "American" - detachable type connections with a cap nut.

Possible connection methods
Before proceeding with the installation, you should select the appropriate connection option. Often in buildings built back in Soviet times, heated towel rails are zigzag tubes on the walls, and if replacement is planned, then you should choose a model of a suitable diameter, designed for a bottom connection.


But if the bathroom was renovated and the pipe was drowned, leaving only the entrances, then it is possible to install a heated towel rail in the bathroom with your own hands with a side connection. It will be more laborious, but the design itself will look aesthetically pleasing.
Note! When conducting installation work all connections must be properly insulated, since it is very difficult to eliminate leaks in a pipe that is recessed into the wall.

Features of installation of electric drying
Coil connection procedure electric type should be considered separately. IN this case milestone this procedure is the correct connection to the mains, due to which the risk of fire or short circuit will be minimal. For this reason, the following steps are required:
- coil grounding;
- its connection through a special protective shutdown device, which in everyday life is simply called "automatic".

And if you plan to connect the product to an outlet that is located right in the bathroom, then it (the outlet) must necessarily be with a moisture-proof housing. Simply put, it should be sunk into the wall, and the hole remaining outside should be closed with a special insulating cap.
If you carefully read the information that was provided in this article, then installing a heated towel rail in the bathroom with your own hands will not cause any difficulties.
Video - Installation of electric drying
Why is the heated towel rail not heating? We analyze the main reasons
So, the coil is installed and everything seems to be in order, but it completely refuses to warm up. Let's find out why this can happen and what should be done in this or that case.

That's all. Now you know how to install a heated towel rail in the bathroom with your own hands. Good luck with your work!
11562 0 0
How to install a heated towel rail in the bathroom yourself - 6 steps to replace an old towel dryer
Performance overhaul in the bathroom means not only re-laying floor tiles and cosmetic finishing of walls and ceilings, but also full or partial replacement of all plumbing fixtures. Agree, it is unlikely that any of the tenants will want to use outdated and outdated plumbing in a renovated and updated bathroom.
Along with the installation of a new washbasin, bathtub or shower cabin, an equally important and responsible task is also the replacement of a heated towel rail in the bathroom, since the old towel dryer loses its former beauty over time and gradually becomes unusable.
What is a heated towel rail for?
Despite the obvious and understandable name of this plumbing fixture, it should be borne in mind that it functional purpose is not limited to drying wet towels after a shower, or drying small items of clothing after hand washing.
- First of all, I want to draw attention to the fact that the bathroom usually does not have its own, and the heated towel rail is often the only heating device;
- In addition to heating the room itself, it improves natural circulation air, and helps to ventilate the room faster.
- This allows for a short time get rid of water vapor and condensate, which will certainly form on the walls after taking a hot bath;
- Together, all these factors allow you to maintain an optimal microclimate in the room, and not to freeze while taking water procedures, and after their completion, normalize high humidity air, which can lead to bad smell and the development of mold fungus;

For those who do not know at what height to hang a heated towel rail in the bathroom, I recommend doing it in such a way that any adult family member can freely reach the topmost crossbar or shelf with his hand, while optimal distance from the bottom edge to the floor, should be within 1100-1200 mm.
Stage 1. Buying a heated towel rail
In fact, all household heated towel rails are universal and can be used for installation in almost any bathroom or combined bathroom, however, according to the connection method and the type of coolant used, they can be divided into three types:
- Water models of heated towel rails are connected to a common vertical heating or hot water riser, therefore, the coolant in this case is the circulating hot water:
- The advantage of such systems is their high reliability and durability, good heat transfer and high energy efficiency, as well as relatively low operating costs;
- The main disadvantages of such models, I can attribute the rather high complexity of installation and connection, as well as the fact that during a seasonal or unscheduled shutdown of hot water supply and centralized heating, the heated towel rail pipes will also remain cold;

- Electric models are connected to the household power supply, and their heating is carried out exclusively by built-in tubular electric heaters (heaters). Such devices cannot be called plumbing fixtures, since they do not require connection to a hot water supply or central heating system, and have nothing to do with domestic plumbing;
- The main advantage of such a heating device is that it can operate practically without restrictions at any time of the year, regardless of the presence of water pressure in the pipes of central heating or hot water supply;
- Also to the benefits electrical models do-it-yourself simple and quick installation can be attributed, since no plumbing work is required to install and connect it;
- The main disadvantage of an electric heater is that during operation it constantly consumes expensive electricity, so the total average annual cost of operating such devices will be much more expensive than water ones;

- Combined heated towel rails are not often found on sale, however, in my opinion, this option can be considered the most successful, since it combines all the positive qualities of the two previous models. The fact is that such devices can be connected at the same time, and to the hot water supply or central heating system, and to the household electrical network;
- During the heating season, heating is carried out from circulating hot water, so most of the time the device operates in normal mode and does not require any additional costs;
- After the end of the heating season, or in the event of an unscheduled shutdown of hot water, electricity is connected to it, and further heating occurs from tubular electric heaters;
- The only drawback of combined models, at first glance, may seem to be their rather high price, but this disadvantage is offset by ease of use and economical mode of operation.

Flowing water heated towel rails can be connected not only to centralized system heating, but also to the water circuit of the autonomous heating system residential buildings, along with conventional heating radiators or underfloor heating systems.
Stage 2. Selecting a connection method
Having decided on a purchase suitable option, and having opted for a water or combined model, you need to understand how to properly install a heated towel rail in the bathroom, since you can use one of the two methods below to connect it to home communications.
- Connecting to a central heating riser, in my opinion, is an undesirable option, because in this case, for several months of the year, the pipes of the heated towel rail will remain cold. Such a connection can be found in old houses Soviet period buildings, but at present such a scheme is practically not used anywhere;

- Connection to a centralized or autonomous hot water supply system is considered the preferred option. With such a connection scheme, the heating of the pipes of the heated towel rail occurs uninterruptedly throughout the year, since the coolant circulates in them constantly, as hot water is consumed by household consumers.

In the event that the bathroom is being renovated in an old housing stock, where the coil is connected to the heating riser, I recommend that you immediately abandon such a scheme. To do this, before replacing the old heated towel rail with a new one with your own hands, connect the supply and return pipes to the hot water system of a residential building.
Stage 3. Dismantling the old coil
Despite the fact that primary housing in new buildings is most often sold without plumbing fixtures, almost all bathrooms in residential apartments secondary real estate market, initially already equipped with all household plumbing. For this reason, before changing the towel dryer with your own hands, in most cases you must first dismantle the old coil pipe:
- First of all, it is necessary to completely shut off the water supply to the common vertical riser. to which the old heated towel rail is connected, and wait a while until the pressure in the system decreases;

- If the existing pipe is installed relatively recently, and is attached to the main riser with union nuts, you just need to unscrew the threaded connection, and, if necessary, cut off the old mounting brackets with a grinder, and then remove the old coil from the wall;
- In houses of an earlier period of construction, the supply pipes are in most cases welded to a common riser using gas welding. In this case, they must be carefully cut with a grinder, then also cut off the mounting brackets, and remove the old heated towel rail;

- If old pipe connected to the DHW riser, it must be cut in such a way that small bends 80-100 mm long remain near the riser, on which it will be possible to cut the thread, or weld new threaded pipes to them;
- If the old coil was connected to the heating system, the pipe can be cut off at the very base, and the holes formed in the riser can be hermetically sealed with plugs.

To replace a heated towel rail connected to a central heating system, I advise you to plan the work on spring-summer period. This is explained by the fact that in the absence of an emergency situation, the housing maintenance Management Company is unlikely to agree to turn off the entire heating riser in the cold season.
Stage 4. Connecting water pipes
If you have the opportunity to use gas acetylene welding, then the supply and removal of hot water to the heated towel rail is best done using metal water pipes. If this is not possible, then polypropylene pipes can be used to connect the coil to a common riser. water pipes with appropriate shut-off valves.
- On the outside of the remaining metal bends, you need to cut external thread at least 40 mm long, and then screw shut-off ball valves onto them;

- If for some reason it is difficult to do this, ready-made threaded pipes can be welded to them, after which ball valves can also be installed on them;
- Often there are situations when the heated towel rail coil is connected in series, into a break in the pipeline of the DHW riser. In this case, between the inlet and outlet pipes, in front of the stopcocks, you need to install a jumper (bypass) from the same water pipe with another stopcock in the middle. It is necessary for the free passage of hot water bypassing the coil, in case of failure or dismantling of the heated towel rail;

- Before you hang the coil in its place, you need to attach it to the wall, and mark the location of the inlet and outlet pipes, and then mark up for laying water pipes;
- In order to perform a hidden laying of supply pipes, you need to drill shallow channels in the wall with a puncher and a grinder, and after laying the pipes, putty them with a gypsum putty mixture.

After connecting, laying and connecting the supply pipes, it is necessary to install hermetic plugs on the outlet holes, and test the system under the working water pressure. I highly recommend doing this before doing fine finish, since in the event of malfunctions or leaks, it will be very problematic to eliminate them behind the laid wall tiles.
Stage 5. Installing a new heated towel rail
Different types of heated towel rails can have different variants wall fixings, and differing sizes of threaded nozzles, however, in general, general principle installation and connection for all models is approximately the same.
Wall mounting is most often presented in the form of clamps or telescopic brackets that allow you to adjust the relative distance from the wall, as well as the position of the coil relative to the vertical and horizontal. For connection to water threaded pipes, union nuts with a rubber gasket are used, which are popularly called "American".
To adjust the horizontal and vertical position, eccentric threaded adapters are installed. At the same time, I must remind you that the final installation and connection of the heated towel rail can only be carried out after complete completion interior decoration bathroom walls:
- After the appropriate threaded adapters are installed at the outlet of the supply pipes, the heated towel rail must be put in its place, and after making sure that the supply pipes are coaxially positioned, first fix it to the wall using mounting brackets from the standard delivery set;

- The union nuts located on the pipes of the coil must be screwed onto the threaded outlets that protrude from the wall, and if everything went well the first time, tighten them to the right moment using an adjustable wrench;
- If, for some reason, a distortion occurs, then before installing the coil, a threaded eccentric adapter must be installed between each union nut and the supply pipe. It will allow, within acceptable limits, to correct the position of the heated towel rail relative to the horizon;
- After connecting and aligning the coil, it is necessary to tighten the threaded pipes, and finally fix the adjusting screws of the mounting brackets in the desired position;

- This must be done in such a way that the distance between the wall facing tiles and the rear surface of the heated towel rail was at least 35 mm for a coil with a diameter of less than 23 mm, and 45 mm for a coil with a diameter of more than 23 mm;
- Before connecting the hot water supply to the common riser, you need to slightly open the drain air valve(Mayevsky's crane), located in the upper part of the device, in order to release the air accumulated in the pipes to the outside;
- After de-airing and flushing the system by draining some hot water from the nearest tap, the water heated towel rail will be completely ready for operation.

All connecting and shut-off valves, during the operation of the heated towel rail, are under the operating pressure of hot water, therefore, soldering and crimping of polypropylene pipes must be carried out in full compliance with the technology, and when assembling all threaded connections apply fluoroplastic sealing tape (FUM).
Stage 6. Installation and connection of models with an electric heater
As for the installation and connection of electric models, in this case, installing a heated towel rail in the bathroom with your own hands is considered much simpler, since it does not require plumbing pipes, and does not limit the choice of the location of the device in any way.
The only difficulty lies in the installation of hidden electrical wiring, however, if the bathroom has not yet been completed exterior finish, then there should be no problem at all.
- First of all, you need to decide on the exact location of the heated towel rail., and bring to one of the attachment points, near which the terminal block is located, a three-core electrical cable suitable section;

- The cable for hidden electrical wiring should be laid in a plastic corrugation laid in a pre-cut strobe, by analogy with the hidden laying of water pipes;
- Safety regulations and rules for installing household electrical equipment in the bathroom require mandatory use protective earth, therefore, the connection of such devices must be carried out with a three-core cable through a separate differentiated machine or residual current device (RCD);

- Upon completion of the fine finishing of the walls, it is necessary to connect the power cable to the terminal block. At the same time, I want to remind you that the conductor in brown insulation is connected to the phase terminal, the conductor in blue insulation is connected to the operating zero terminal, and the wire with yellow-green insulation is connected to the protective earth screw;
- After connecting the wires, you need to perform a control connection of the device to the electrical network, and making sure that it normal operation, mount on the wall using the mounting brackets supplied.

Some potential buyers are wondering if the heating of an electric towel warmer can be removed or reduced to reduce electricity consumption. I can say that many models are equipped with a built-in thermostat and voltage regulator, which allows you to either turn it off completely, or perform step temperature control.
Conclusion
After reading this article, it is easy to see that there was presented detailed instructions for installation and connection of water and electric models of heated towel rails. As for the combined models, their installation and connection should be carried out in exactly the same way, taking into account all the tips and recommendations described. The main difference is only that they will need to be connected to both water pipes and a power cable.
If, after reading this material, readers have any additional questions, I will be happy to answer them at the bottom of this article, in the comment form, at any time.
August 24, 2016If you want to express gratitude, add a clarification or objection, ask the author something - add a comment or say thanks!
The heated towel rail performs two functions: it serves as a place for drying wet things (and not only towels) and additionally heats the room. Older models of devices, if they were installed, do not satisfy modern users in many respects, they are increasingly being replaced with new ones. And during new construction, the presence of a heated towel rail is a prerequisite for arranging a bathroom.
Currently available for purchase Various types devices that differ in many ways. In order for the choice to be conscious and take into account maximum amount features of bathrooms, heating systems and water supply, you should familiarize yourself with their features and brief performance characteristics.
| Distinctive characteristics | Technical indicators |
|---|---|
| Most often there are products made of thin-walled stainless steel pipes or steel with anti-corrosion decorative coating. For all indicators stainless steel answers existing requirements, this material is very resistant to chemical compounds, does not oxidize, has high strength and thermal conductivity. According to the design characteristics, it can be used in any interiors of bathrooms. In second place are devices made of stainless alloys. In terms of cost, they are superior to stainless ones, and in terms of performance they are inferior to them. The main drawback, besides high price, surfaces gradually oxidize, change color, react negatively to direct contact with aggressive chemical compounds. To prevent these phenomena, the surfaces are chrome-plated. | |
| Heating is done by water or electricity. Water can be taken from the heating system or from an autonomous hot water supply system. Electrical plugs into an outlet. Most modern models can be combined: the user independently connects the devices to hot water or turns on the electric heating. Each type has its own serious drawbacks, we will discuss them in detail below. | |
| Can be horizontal or vertical. The final choice is influenced existing scheme hot water supply, the size and layout of the premises and the style of interior design. |
heated towel rail
If desired, a heated towel rail can be made independently from metal or plastic pipes. For the manufacture of metal, you will need professional equipment and fixtures. Plastic ones do not require much effort, but they do not meet the requirements in many ways. Conclusion - you should not engage in the manufacture of what you can buy in stores for affordable price and with excellent quality.
During the installation work, it is necessary to unquestioningly comply with the provisions of SNiP 2-04-01-85. A very important point to consider when installing heated towel rails in the bathroom. Especially it concerns apartment buildings With common system heating and vertical input risers. Incompetent installation of the heated towel rail can cause it to bad work or violations of the heating system or hot water supply to adjoining apartments and will have to answer for it. If you are changing old appliance new and at the same time do not redo anything, then such work can be performed without fear. And if the device is installed from scratch, then you need to get permission from homeowners or service organizations.
SNiP 2-04-01-85. Internal water supply and sewerage of buildings
Unskilled actions without taking into account the peculiarities of hot water supply can cause an imbalance in the hydraulic balance of the entire system at home. Below we will look at examples of common mistakes. And the last thing - remember that heated towel rails will only work when there is a coolant. If you are connected to the heating system, then they function during the heating season, etc. If to the hot water supply system, then only when the hot water tap is opened in the kitchen or bathroom. You will have to dry the towel with the tap constantly open, which is very expensive and uneconomical.
What are the connection schemes for heated towel rails?
The device is also a continuation of the vertical hot water riser.
The system does not increase the hydraulic resistance, the heating works in the calculated modes. Disadvantage: Difficulty in carrying out repair work, when repairing it is necessary to turn off the heating. During installation, it is necessary to ensure that the narrowing of the pipe section does not occur in the fittings, their passage diameter cannot be less than the diameter of the riser.
Towel dryer - section of the DHW riser.png
It is strictly forbidden to install shut-off valves in front of such a heated towel rail - the entire vertical riser will turn off. The installation of shut-off valves is only permitted if there is a bypass of the same diameter as the riser.
It is impossible to narrow the bypass section for two reasons. First, it will worsen the heating system. Secondly, it will not have any beneficial effect. The heat consumption in heated towel rails is so small that the existing circulation is sufficient. Of course, it is also forbidden to mount a shut-off valve on the bypass.
Connecting a heated towel rail to the hot water supply. Scheme
Diagonal or vertical serial connection of the coolant to a vertical riser.
Water supply and drainage is carried out in different heights of the riser. The most simple circuit, shut-off valves can be installed at the inlet and outlet of the device. With their help, if necessary, the heating temperature of the heated towel rail is regulated.
During connection, it must be ensured that all pipelines of the device are below the tie-in point, otherwise air may accumulate in them. If for some reason it is not possible to fulfill this condition, then in the highest place it is necessary to install an air bleed device (Mayevsky crane). It is desirable to insulate the supply pipes, the maximum distance from the riser should not exceed 4.5 meters.
Connection with offset bypass.
The method is used when connecting devices to old heating systems. To simplify the work and not change the riser, a bypass is attached to it, and then a heated towel rail is connected. To improve heating, it is recommended to increase the nominal diameter of the passage of pipelines.
Bottom connection.
The inlet and outlet of the coolant is located at the bottom at the same level. Pros - slightly improved appearance, work is simplified. Disadvantages - the likelihood of education air locks. It is used quite often, but requires attention during operation. A narrowed bypass improves the circulation of the coolant in the heated towel rail, but may adversely affect the functionality of the heating system. Use it with caution.
Variants of schemes for connecting heated towel rails "ladder"
Practical advice. If you are connecting a heated towel rail to an already existing system, then we do not recommend either reducing or increasing the diameters of the central hot water pipelines. Such measures should be provided for at the design stage.
What should not be done while connecting the device?
- Make a large “hump” on the top eyeliner section. This is how some masters act in order to disguise the pipe under a hinged or stretch ceiling bathroom. Small air bubbles constantly circulate in the water, and over time they will inevitably accumulate in this loop. It is not advisable to install a Mayevsky crane for bleeding air under the ceiling.
- The point of insertion of the lower outlet into the riser is located above the bottom of the heated towel rail. In this case, the movement of water is inhibited due to the pressure difference between cold and hot water. The water that has cooled in the heated towel rail descends and, instead of entering the riser, is forced to rise again. At best, such a heated towel rail works very inefficiently, at worst, it does not work at all. The presence of two loops on one device at once most often causes a complete failure of the heated towel rail.
Conclusion - do not rush to make a decision. Before purchasing a heated towel rail, familiarize yourself with the existing engineering system, take measurements, think over the places of probable installation. Do not forget about our advice, choose options that will not disrupt the operation of the existing heating system and at the same time function effectively. And already in last turn pay attention to design features. If, of course, the heated towel rail is installed for use, and not for admiration.
Step by step installation instructions
Step 1. Turn off the water supply and install two taps on the riser. One for the inlet, the second for the outlet of water from the heated towel rail. At the same time, immediately keep in mind that the taps must be at the level of the supply pipes, do not allow knees to appear. About this typical mistake we mentioned above. Cranes should not change the diameter of the riser to a smaller side, the distance between them should be equal to or exceed the dimensions of the device.
Practical advice. Cranes at the points of connection of pipelines to the riser are recommended to be installed only in those cases when, after closing the supply networks decorative elements have access to them.
Risers in most cases are closed with plasterboard slabs, they will have to make special revision doors. The work is quite complex. If you do not have the opportunity to provide access to the taps on the riser, then it is allowed not to install them there, but to mount them directly at the outlet near the heated towel rail. So much easier and more convenient, you can quickly close the tap in case of emergency. Today in the implementation there are small cranes with beautiful design, you can choose options that will not adversely affect the appearance. In addition, the valves are located behind the vertical pipes of the heated towel rail and are almost completely obscured by them.
Step 2 Make a marking of pipelines, do the work efficiently, do not spare a few extra minutes of time, then it will take much longer to correct errors.
How is markup done?
- Swipe on the wall horizontal lines at the level of placement of cranes, pipelines should be mounted on them in the future. Draw lines under the level, they must all be strictly horizontal. The functionality of the heated towel rail largely depends on the quality of the markup.
- Mark the position of the device and draw two vertical lines on the wall according to its dimensions. At this stage, you can still change the position of the heated towel rail, choose the most comfortable spot. But remember that it is not recommended to change the horizontal position of the pipelines for supplying and draining water. If this is necessary, then at least avoid knees, let the height difference be smooth, this will allow air bubbles to remove themselves. As a last resort, consider installing a Mayevsky crane to bleed air. But practitioners do not recommend installation a large number additional reinforcement, the more it is, the higher the likelihood that some element will fail or leak. The dimensions of the heated towel rail circuit are indicated on the packaging.
Step 3 Fasten construction clamps along the contour of the device. They are fixed with plastic dowels. Using a corner, adjust the height of the clamps, this will be the distance of the heated towel rail from the wall. Recommended distances are indicated in the manufacturer's instructions and depend on the diameter of the pipes. The number of clamps is at least four, if there are concerns about strength interior partitions, then put more fasteners. Clamps must be completed with a heated towel rail.
Clamps are fixed according to the markup
Step 4 Fix the heated towel rail on the clamps, check its position with a level. If there are deviations from the horizontal, then correct the position, the clamps allow this to be done without problems. Pay attention to whether the centers of the inlet and outlet coincide with the drawn diagram.
Important. When pre-installing the heated towel rail, take into account the condition of the walls.
If they are planned to be finished in the future, then increase the distance between the draft wall and the device by the thickness of the finish. For plastering and further painting minimum increase for finishing plasterboard boards maximum.
Step 5 If the wiring is hidden, then along the drawn lines you need to ditch the wall. At the same time, prepare recesses for pipe sockets.
Step 6 Insert plastic pipes into the prepared places, connect one end to the taps installed on the riser, and the other to the outlets for connecting the heated towel rail. To seal the joints, use the FUM tape, it has excellent performance in all respects. In addition, unlike traditional tow for sealing, the FUM tape does not need to be tightly tightened. And all modern fittings are made of fragile alloys and react very negatively to great efforts.
Step 7 Make indentations under mounting sockets pipelines. They are fixed to the wall, the fixing elements must go deep into the wall. Attach them to the surface and beat off the contour, increase its size by a few centimeters. Use a perforator to make neat indentations. Take your time, try on sockets several times and thus control the installation depth.
Important. Do not forget to take into account the thickness of the wall finish.
The depth of the hole in should be such that after finishing the walls in the bathroom, only the end of the threaded part of the socket is on the surface.
If the hole turned out to be deeper, then you need to fix the situation like this:
- drill holes for dowels;
- install at the level of the outlet, secure with dowels, make sure that they are in the same line and at the right distance;
- insert pieces of bricks or wooden wedges into the gap between the wall and the sockets;
- put a heated towel rail against the wall and once again check the correct location of the outlets;
- throw the installation places with a solution.
Do not forget to close the inlets with plugs immediately after installing the sockets.
Step 8 Close the grooved grooves with pipes with plaster or other mortar. The choice of material depends on the method of finishing the walls in the bathroom.
After the mortar has hardened, begin to cover the wall with ceramic tiles. Everything is ready - you can start hanging the heated towel rail.
Hanging a heated towel rail
Step 1. Remove the plugs from the sockets, clean them of dirt.
Step 2 Check all connections of the heated towel rail, tighten them with a hex wrench.
Practical advice. Due to the fact that sometimes with force it is necessary to adjust the position of the coupling, rubber gaskets do not always withstand. We recommend that you replace them with plastic or paronite gaskets, such gaskets can be clamped with great force, which facilitates the process of adjusting the position of the limit switches and eliminates leakage.
Step 3 Screw decorative reflectors onto the transitions, wind the sealant around the thread, press it firmly and only then screw it onto the thread. Make sure that the tape does not slip or slip. If such a phenomenon is found, then unscrew the adapter and repeat all the operations from the beginning. Install the adapters in a vertical position. Make sure that the top leads are at the same distance from the wall.
Step 4 Install the gaskets inside the adapters, attach the heated towel rail and screw on the nuts. If the design of your device has its own fasteners, then mark the installation locations of the dowels with a sharp pencil. If the structure is fixed on construction clamps, then the method of their installation was described by us above. Accurately mark the position of the dowels. The adapters have eccentrics to adjust the position, but they can only correct a few millimeters of error. Live the device.
Step 5 Unscrew the bottom nuts and remove the heated towel rail. Drill holes in the wall for the fixing dowels. Work very carefully, do not allow cracks to appear on ceramic tiles. Remember that perforation can only be enabled after the tile has been completely traversed. The length of the holes for the dowels should be several centimeters longer than the dimensions of the plastic parts, this will greatly facilitate their entry.
We cut off the protruding parts of the dowels with a knife flush with the tile
Step 6 Place the heated towel rail against the wall again and tighten the nuts a little. Fix its position with dowels. It is not necessary to drive the dowels all the way until they are all inserted. Due to this technology, it will be possible to slightly correct errors when marking and drilling holes. Let metal part fasteners will go in a little at an angle, it's not scary. The main thing is that after tightening, they all sit in their places.
Practical advice. The stops have two or three holes for dowels, but there is no need to install so many fasteners. Fix them only on those holes that are easy to reach. There is no big load on the heated towel rail, one dowel can easily withstand it.
Work only with sharp drills and serviceable tools. To reduce floor contamination while drilling holes, place pieces of paper at the bottom. There is another effective method to prevent floor contamination - while drilling, keep a hose from the vacuum cleaner turned on near the drill. But such work must be done with an assistant.
Step 7 Tighten the bottom nuts of the heated towel rail to the stop. Turn on the water and check the tightness of the connections and the heating efficiency.
To minimize the risk of air pockets, the first switch-on must be performed in the following sequence:
- the outlet tap must be closed, open the tap at the water inlet to the heated towel rail;
- place a bowl on the floor under the outlet pipe and slightly loosen the fixing nut;
- wait for air to escape from the system and tighten the nut tightly;
- open the tap at the outlet and check the tightness of the threaded connections.
The towel warmer should warm up. If over time its temperature does not drop, everything is fine, hot water circulates. If the heating decreases, then you need to repeat the process of removing air pockets.

White heated towel rail with side connection
Video - Installing a vertical heated towel rail