Features of slab fencing, types of such fences, their advantages and disadvantages, pre-treatment of wood and construction installation technology.
Features of slab fences

Croaker is a wood processing product. This is a board, the outer side of which remains part of the tree trunk with an untouched texture. The material is divided into two types: wood slab, which is used as fuel, and business. Temporary walls and partitions, formwork and fences are made from industrial slabs.
Unrooted commercial croaker has a pronounced texture. However, over time, its bark peels off and falls off. Skillful homeowners use debarked and polished croaker for their fences, which has a more noble appearance. Its price depends on the type of wood, the quality of processing, the length of the board and the size of its cross-section.
The type of slab fence determines the location of its dies. It can be horizontal or vertical, with gaps, overlapping or end-to-end. The edge of the fence can be shaped using a hacksaw: a pointed picket fence, a truncated top like “cat ears,” convex, concave.
Advantages and disadvantages of a slab fence

A slab fence, despite its simplicity and low cost, has very tangible advantages. It is environmentally friendly and, with sufficient massiveness, can provide high reliability. The service life of such a fence can exceed 15 years, provided correct processing its wood.
For installation of a slab fence specialized knowledge will not be required. And if you show a little imagination, you can implement many design solutions in the fence.
A solid slab fence perfectly protects the yard from noise from the street and dust. In addition, it is not interesting for disassembly by vandals - the fence cannot be sold as recyclable material, like metal.
The disadvantages of such a fence include the need for choice suitable boards from a large amount of lumber, since the slab cannot have the same dimensions.
Another problem is the need to prepare slab boards before making the fence. They need to be processed more than once manually protective equipment. Otherwise, the service life of the structure will be limited to 3-5 years.
Slab fence installation technology
Before building a slab fence with your own hands, you need to acquire an unedged board, support posts, nails, and also prepare a simple set of tools, including an axe, a shovel, a hacksaw, a tape measure, a cord and a building level. Supports can be made of wood, concrete, brick or natural stone. Further actions must be performed sequentially.
Preparatory work

They include preparing the material and marking the area for the fence. First you need to remove the bark from the croaker. All this can be done with the help of a sharpened shovel or a scraper. Cleaned boards need to be dried in fresh air. Depending on the weather, this procedure may take about three days.
The dried material should be treated with an antiseptic to protect it from wood pests, and then with varnish or a composition, the recipe of which is described below. It will help the wooden fence withstand exposure to the sun and precipitation.
For self-cooking there is a protective agent for croaker good recipe. If you do not deviate from it, the resulting composition will guarantee the safety and strength of the wood even after a single application. It is more durable than Oil paint, it can even be used to process freshly cut wood. The plasticity of the applied coating is due to the fact that the protective composition is not on the surface in the form of a film, but penetrates 1-1.5 cm deep into the lumber.
You need to prepare it like this:
- Pour 2 liters of water into a clean bucket, then heat it, add 190 g rye flour and mix until a paste is obtained.
- Then add 90 g to the resulting mass. iron sulfate and the same amount of salt.
- After stirring the mixture for five minutes, add 90 g of red lead to it, and then 100 ml of drying oil. The resulting paint will be thick, so it should be diluted with 1.5 liters of water.
When marking a slab fence for a dacha, you need to transfer all the characteristic points of the future fence from the drawing to the area. To make it even, this work should be done using a tape measure, pegs and a cord stretched between them. The distance between support pillars must be no more than 2 meters. In their locations, it is recommended to dig holes about 0.7 m deep
Installation of supports for a slab fence

The method of installing supports depends on their type:
- Wooden supports. As source material Pine, oak, and even better larch wood is suitable for them. The diameter of the logs should be at least 200 mm, and their length - 2.3 m. Before installation, the bottom of the support, which will be in the ground, should be treated with an anti-rotting agent and wrapped with roofing material in several layers. Instead of roofing felt, you can coat it with hot bitumen. After processing, the logs must be placed strictly vertically along a plumb line and secured in this position with stops made of bars. The holes can then be filled broken brick, cement mortar, carefully tamping everything down.
- Concrete supports. IN additional processing they don't need it. If these are prefabricated products such as piles or beams, they should also be placed in a vertical position, secured with stops, and the openings in the holes should be partially filled with broken bricks and compacted. After this, the remaining part of the excavation should be filled with concrete. To make monolithic supports, you will need to make a vertical formwork box, place a volumetric reinforcement frame in it and also fill it with concrete. After it has set, the formwork must be removed.
- Metal supports. These can be pipes or channels. Before installing them, it is necessary to make a cement-crushed stone cushion at the bottom of each pit. The dry components must be compacted, supports placed in the holes, secured with stops and the sinuses filled with a solution with a cement to sand ratio of 1:3.
- Stone supports. They are quite massive and therefore require a full-fledged strip foundation. First, you need to dig a trench about 0.5 m deep along the perimeter of the future fence. Then you need to cover it plastic film, and install wooden formwork on top, which will form aboveground part foundation. After this you should install metal racks, serving as reinforcing rods for stone supports, reinforcement cages and fill the trench with formwork with concrete. The racks should first be connected by welding to the frames. When the concrete hardens, the formwork must be removed and the metal posts must be lined with stone or brick. After finishing the masonry, it is recommended to put protective decorative caps on the supports, and cover the concrete base with tiles, porcelain stoneware or other suitable material.
Fastening purlins and sections for the fence

After installing the supports, there is a reason to start installing horizontal purlins and wooden fencing. In the manufacture of crossbars, i.e. purlins, you need to choose the longest slab boards. On each workpiece you should draw two longitudinal parallel lines delimiting the block, and carefully cut off the excess circular saw. The cross-sectional size of the resulting timber should be 50x30 mm.
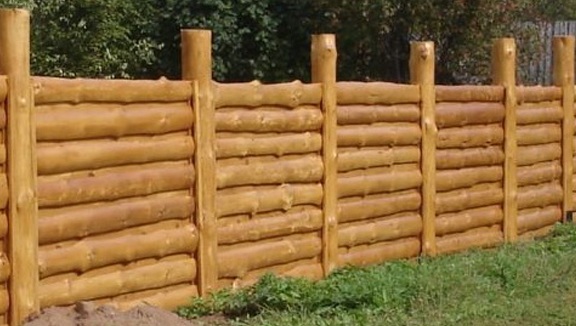
The slab can be attached to it horizontally and vertically. For horizontal installation the beam must be fixed on supports on both sides. After this, a 150 mm slab should be attached to it with an overlap. It is recommended to lubricate the fasteners with drying oil before driving them in.
For vertical installation, the slab must be sawn lengthwise. Then the resulting parts should be fixed on the purlins with the convex part inward. It is necessary to leave gaps of 40-50 mm between the boards. Then they must be covered with the remaining boards, which should be fastened outward with the convex part.
Initially, the croaker follows the shape of a tree trunk: at the bottom it is wide, and towards the top it narrows. Using this, when installing a fence near the previous board with a widening, you need to install the next one with a narrowing. To ensure maximum adherence of the boards, protruding knots should be trimmed with an ax during work.
If you cut the products so as to align them in width, you can give the wooden fence an exquisite decorative effect. Boards that fit tightly and are positioned horizontally create the appearance of a fence made of round timber. And the vertical joints of the slab, covered with overlays, give the fence good quality.
Finishing a fence from slab

It is advisable to think about the design of your wooden slab fence at the stage of preparation for work. If you have artistic taste and indefatigable imagination, the look of a completely budget fence can be made stunning.
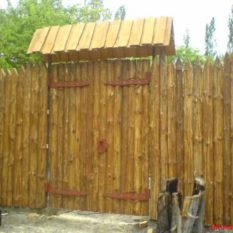
The upper edge of the fence can be made straight or curly, removing extra centimeters, and equipped with a gable roof, which will cope not only with the decorative function, but also protect wooden fence from rain and snow.
In order to radically change the appearance of a fence, it is enough to simply paint it, and not necessarily in a single color. For example, you can practice graffiti or paint a landscape. It will be exclusive and unusual. If you do not have such talents, a guest artist can help with this matter.
If you have experience in wood carving, you can decorate the fence with fancy figures, and if you add forged parts to them, the beautiful effect of an ancient fence will be ensured.
The durability of a wooden fence, as mentioned above, is given by protective compounds. These are various varnishes, paints or impregnations. You can buy them ready-made or make them yourself. Varnishes need to be rubbed into the wood three times in dry weather; the impregnation is applied from a sprayer, mixing it with colored stain.
How to make a fence from slab - watch the video:
In conclusion, I would like to express the opinion that if there is creative approach and following the technology of working with wood, even from such a cheap material as slab, you can make an excellent fence for your site. And with the money saved as a result of this, you can buy something useful for your household.
Every owner of a private home dreams of creating something with his own hands. But what if the budget is limited? Then the croaker comes to the rescue. What kind of material is this? How to build a fence? 
Croaker as a material for fence
The material is often used for heating private houses, but nothing prevents you from creating beautiful fence.
Croaker is popular, and it won’t be difficult to find it (it’s available at any sawmill).
Advantages and disadvantages
The benefits are as follows:
- massive fence - high reliability;
- with proper treatment, the fence has a long service life (minimum 15 years);
- ease of installation. Every owner of a private house can create a fence from a slab with his own hands;
- beautiful view. All you have to do is dream a little and you will get a real design solution;
- ecology. Fences are non-toxic and have a positive effect on the citizens around them;
- The fence is not of interest to vandals - it cannot be turned in for metal or sold.
Flaws:
- the need for a large amount of material (croakers are never the same shape, so there may be a need to select it);
- after installation, the material is treated several times with protective agents, otherwise its service life will be short (3-5 years);
- preliminary preparation of slab strips is carried out exclusively by hand, and this is a labor-intensive process.
Instructions
Before you understand how to make a fence from a slab with your own hands, you need to prepare a list of tools:
- material in the required quantity (depending on the area);
- support pillars. Many experts in this field recommend using exclusively wooden supports, since homogeneous material fits best together. But if you wish, you can, of course, use: channels, concrete supports, even those made of stone;
- wooden logs;
- grinding machine;
- shovel, axe;
- consumables: screws, nails.
Installation of slab fencing
The slab fencing is installed in several stages, namely:
- Preparation of necessary material.
- Marking the area where the fence will be installed.
- Installation of support pillars.
- Installation of the logs and the slab itself.
Preparing the necessary material
Initially, the croaker should be prepared. This is done as follows:
- The bark is removed from all planks.
- The treated planks are dried in the sun (depending on the air temperature, this can take up to 3 days).
- Then sanding (giving a beautiful look).
- The prepared material is treated with an antiseptic against various pests.
- Finally, the material must be coated with your choice of drying oil or varnish. This will serve as reliable protection against temperature effects.
Marking the area for future installation
Marking is carried out using a regular cord and pegs. Thanks to them, future locations for installing support pillars should be marked.
Due to the fact that a fence made of such material is very massive, it is necessary to maintain a distance between posts of approximately 2 meters. Allowed less distance, but in no case more, since he may simply be “overwhelmed.”
In places where support pillars will be installed, it is recommended to make holes for subsequent installation approximately 70 centimeters deep.
Installation of support pillars
Depending on which support pillars are selected, the type of installation is determined:
- wooden supports. Before installation, it is necessary to pre-treat it with protective mixtures, which are purchased in construction stores (price 200 rubles). Part of the support is immersed in the ground and wrapped in roofing felt. After this, the supports are installed in a vertical position, and then broken bricks and construction waste are compacted;
- If we talk about concrete supports, it’s enough to simply install them in a vertical position, and then compact them with construction waste, crushed stone, and broken bricks. The support must be securely fixed in the ground. Fill with solution (cement + crushed stone);
- when using metal pipes or channels, the pit must first be filled with a mixture of sand and crushed stone. The components are mixed, compacted in the pit, a support is installed, and filled with cement mortar in a ratio of 1:3 (cement/sand);
- When forming a stone support, a foundation is initially made. To do this, a hole up to 50 cm deep is dug, and then filled with cement mortar mixed with crushed stone. Once the mortar has hardened, the brickwork is done.
Installation of logs and slabs
If the fence includes a vertical arrangement of boards, the logs are installed in a horizontal position. Before installation, the logs must be pre-treated with a solution to protect them from pests and temperature influences, and then fastened with self-tapping screws to the support posts.
If the fence has a horizontal form of mounting boards, the slab must be secured using bars pre-filled on it.
Finishing
Despite the fact that the slab fence refers to budget view fences, which are often used by owners of private houses, something does not interfere with making its appearance elegant. It is enough to add a few decorative elements.
One of the easiest ways to improve its appearance is to simply paint it. 
It is not necessary to use solid colors when painting - with a little imagination you can get a beautiful pattern.
The croaker is coated with drying oil varnish. Paint will not only improve its appearance, but will make the fence resistant to harmful insects
If you have wood carving skills, you can create some beautiful figures or it’s trivial to make the croaker the same size, thereby the appearance will be different. 
On the contrary, you can emphasize it different shape. It's easy to deal with glazed paint.
Many owners of private houses install a gable roof on top of the fence, which does an excellent job of decorating and protects the structure from snow in winter and rain in summer.

You can decorate not only the fence itself, but also the supporting pillars. Just paint it and the appearance will be completely different.
If metal supports were used, stone is used as decoration - the material is expensive, so it will fully emphasize the individual style. 
How much does a slab fence cost, price for work if you hire people to build a fence
If for some reason it is not possible to build a fence from a slab yourself, order it.
Prices for work largely depend on what its height will be. On average, prices are:
- height 1.5 meters – 1000 rubles per meter of fence;
- height 1.8 meters – 1100 rubles per meter of fence;
- height 2 meters – 1300 rubles per meter of fence.
This price includes:
- material;
- installation work.
It is necessary to understand that the prices are for a “bare” fence. If you need to paint, varnish or add decorative elements, the starting price is from 2 – 2.5 thousand rubles per meter.
Options in the photo
Anyone who wants to build a slab fence can first look at all the options that are popular with owners of private houses.
Self-built fences can be seen in the photo. 
If you have wood carving skills, you can achieve such a beautiful fence. All you need is to add small elements from forged metal and cut out any shapes from the slab. 
This option is perfect for those whose land is on the rise. Using this fencing option, you can achieve the effect of a fortress. 
Despite its individual style, the fence is perfect for any interior, regardless of whether the house is built of brick or wood. However, it is better to use it if there is beautiful green space on the territory. 
The option belongs to the classic style, although it is extremely difficult to achieve this look. It is necessary to carefully process the material, install it, and only then open it with varnish or paint it. 
The option of wooden “wattle fences” allows us to say with confidence that if you have imagination, you can get a fence from a slab of any design. 
Forging combined with wood carving - nothing else is needed to achieve such a fence with the effect of an ancient estate. If desired, you can cover the fence with other decorative elements.
What to watch from the video
Find high quality video on the Internet, where experts share secrets on how to build a fence from slabs. But it was a success.
This video does not reveal the secrets of building a fence, but at the same time it allows you to understand the essence of how it is done.
In woodworking, a slab is a side cut of a whole log along with the bark. It looks like this - one side is cut, the second part is the untouched surface of the trunk.
According to grade, the material is divided into 2 types:
- Wood-burning,
- Business.
Wood slab  Unprocessed business croaker
 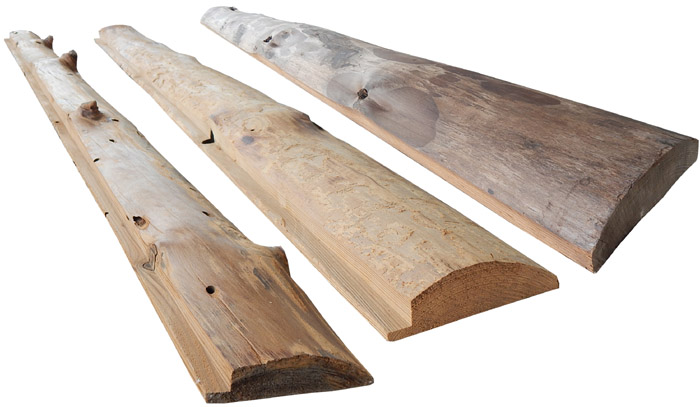 Processed business croaker
  Processed and sized business croaker
The first one goes for kindling, as is obvious from its name. But the second one can be used not only for fences, but also for formwork, manufacturing external cladding(mainly outbuildings), floors for attic spaces
Therefore, the fence is built from business slab.
Features of fences
The disadvantage is a lot of work. If you buy a slab for a fence, it must not only be dried and brought into decent condition, but then also covered with anti-rotting agents and painted.
Despite the complexity of installation, wooden fence from slab is a candidate for the top three popular and most budget-friendly fences, along with corrugated sheeting and chain-link fencing.
Photo gallery


Also, a disadvantage, compared to metal or concrete structures, can be considered fragility. A fence made from slab boards, even with constant touch-up and repair, has a service life of no more than 10 years.
Design advantages:
- Natural environmental friendliness. Fences made of slabs and unedged boards not only do not harm environment, but also have a beneficial effect on health, since they are made from natural, untreated wood.
- Low cost. Being a product of the woodworking business, croaker is affordable for any owner.
- Easy to install. And at the same time finished product there will be an attractive aesthetic appearance. You can even make an antique fence from slabs.
- In any embodiment, this structure will perfectly protect the site from unwanted glances and uninvited visitors.
So valuable and accessible natural material, like a croaker, cannot but interest those who are looking for suitable inexpensive material for building a fence. Moreover, you can build a fence from slabs with your own hands.
Preparation of material A
When choosing a croaker, you need to be aware that you will have to work a lot.
First of all, it needs to be pre-processed: 
- First, sorting occurs and the highest quality boards are selected.
- They are then cleared of the bark with an axe. You can’t leave the bark - under it, despite treatment and prevention, there will definitely be bark beetles, which will reduce the life of the structure by three times.
- After cleaning the bark, the material must be dried. Then sand the surface and cover with antiseptic in several layers.
After final drying, you can begin installation.
How to do it?
Video of the construction of a fence from slab:
Prepare materials and tools:
- Gorbyl.
- Support pillars.
- Beam for crossbars.
- Screws and nails.
- Hammer, screwdriver, axe, shovel or drill.
- Cement mortar, crushed stone.
You need to build a slab fence at your dacha with your own hands in several stages:
- Marking
Marking is necessary because without it it is impossible to build a beautiful slab fence.
Having marked the boundaries of the site, the line of the fence is marked and the installation points of the support pillars are indicated.
- Installation of pillars
When constructing this type of fence, the following principle is used: fastening the boards to the support posts one after another.
You can install a fence in spans, that is, first knock down one completed span, and then attach it to the poles.

But this method is heavier - the span weighs more than tens of kilograms, so most builders prefer the first option.
Holes are dug in the marked area to allow the installation of support pillars. They are buried by a third (for a one and a half meter fence, a hole half a meter deep is drilled).
A wooden pole is installed in the hole. The base is covered with crushed stone and filled with cement mortar.
Knocking down a fence
Knocking down a fence horizontally
There can be two options here - the boards are nailed vertically or horizontally:
- If horizontal, the boards are attached to support posts.
- If vertical - to the cross beam.
Can be secured with nails or screws. You can nail the slab in a row or overlap.

Knocking down a fence vertically
The top part can be trimmed decoratively with a jigsaw or saw, cut into a pattern or geometric shapes, sharpen.
The finished fence may or may not be painted, but it must be processed. Especially if you didn’t pre-coat the boards with anything when preparing them.
What to process?
Wood processing products
Antiseptic for wood, stain and any composition available to you that can protect your structure from dampness, mold, fungi, beetles and natural influences.
After processing, if you do not want to paint over the wood texture, coat the surface with varnish.
This will extend the life of the fence for several more years.
In most cases, when renovating a private home, the issue of fencing is of secondary importance, since there is often not enough finance and building materials for this.
But in the unfenced area, winds constantly blow, bringing leaves, sticks and other debris. Optimal solution in such a case, build a homemade fence from slabs designed to protect and decorate the area.
Pros and cons of the material
Croaker is wood waste left over from sawing logs at a sawmill. This material is similar to unedged board; one side is smooth and the other is covered with bark. The photo below shows all the sections where the logs were cut into boards and beams:

According to qualitative parameters, two types of slab are distinguished:
- wood;
- business.
The first type has the appearance of being unsuitable for construction work boards, and the second is wood boards used as fuel for the stove. Business variety the croaker is thicker and of higher quality; used for designing fences, utility structures and other non-residential buildings.
This material has a number of advantages that make it possible to use it both for the installation of temporary buildings and for more permanent structures. Processed croaker is used in landscape design, How finishing material when creating fences.
Let's list the main advantages of the slab:
- This material is considered budget. It can be purchased from any wood processing company. Its cost is always affordable, this material can be purchased with a good supply.
- Another advantage of croaker is environmental friendliness. No chemical components are used in the production of processing boards.
- Slab fences provide reliable protection from wind gusts.
- Installing slab fences does not cause any particular difficulties and does not require professional construction skills.
- Parts made from slabs that have undergone processing have a presentable appearance; they are often used as decorative elements when designing fences in a country house.
- Fences from of this material do not need to design a massive base: simply fill the lower part of the pillar with concrete.
The disadvantages of slab include the following points:
- One side of the workpiece is not processed. The bark is needed in mandatory clean it off, as in the future wood-destroying insects will settle in it and fungus will develop.
- Before using wood for fencing construction, it must be treated with antifungal agents and antiseptics.

Preparing for construction: calculating the area of the fence
A slab fence will not take up much space around the perimeter of the garden area. Calculations should be made based on it. The size of the excavation for concreting the support is determined based on its thickness.
One span should have a maximum width of 2-2.5 meters. As the width increases, the fence will become less stable.
The optimal height of the fence is 1.5-2.2 meters.
Having decided on the parameters of the fence spans, it is easy to calculate its area in order to calculate in subsequent calculations general meaning. To determine the area, use the geometric formula: multiply the width by the length.
For example, the width is 1.7 m and the length is 2.2 m, which means the area will be 3.74 square meters.
After this you can easily calculate total area for the entire fence. Simply multiply the resulting figure by the number of flights.
3.74x6.52 = 24.38 sq. m. Round up to 24.5 sq. m.

Before designing the fence, you can make a schematic sketch.
Choosing an unedged board
When choosing an unedged board, it is advisable to buy the material packaged in bundles: they contain already sorted wood.
The type of wood should also be taken into account: for example, poplar is not recommended to be used to create a fence. The fact is that after a while, the poplar wood slab will begin to collapse under the influence of the rotting process. You also need to be careful with birch wood: after drying, it hardens. It is difficult to drive a nail into dried birch, therefore, you will need to use electric drill for drilling holes for nails.
Attention! Nails driven into wet birch wood will come out after drying, and the material will become deformed.
Cheap material has a lot of unevenness, knots and other defects. If you are going to make a fence from just such a slab, you will need grinding machine.

If you have purchased a wet croaker, dry it not in the sun, but in the shade, in a draft, otherwise it will quickly dry out and formations will form on its surface. large cracks.
Avoid purchasing material more than 25 cm wide. Over time, long cracks will appear on such a slab.
If you are planning a horizontal arrangement of the slab when installing a fence, do not buy boards that are too narrow - the fence will look unsightly.
When choosing a slab, keep in mind that over time the material will lose about a couple of centimeters in width. This happens due to the drying out of the tree. Taking this point into account, perform installation with an overlap.

Material calculation
If the fence supports will be filled with concrete, you need to calculate the total amount of the mixture.
In areas with soft soil, a columnar type base is used (0.2 m wide and 0.7 m high). To calculate how much cement is required for one support, you should use the mathematical formula for calculating this value for a cylinder: V=πR²h:
- π = 3.14;
- R – diameter;
- h – height.
Let's make the calculation: 3.14x0.2x0.7=0.4396 m³.
To determine the amount of concrete solution required for all fence supports, you need to multiply the resulting value by the number of pillars. For example, if there are 14 supports in the fence, then 6.1544 m³ of solution (0.4396x14) will be required.
The amount of sand is calculated in the same way. For one support you need approximately 10 centimeter layer. Knowing the size of the hole, it is not difficult to perform the calculation. Just substitute the values to get the size of the cylinder: 3.14 x 0.2 x 01 = 0.0628 m³ - this is the amount of sand required for one support. If there are 14 spans, then there should be 15 supports:
0.0628x15=0.942 sq. m.
The stability of the fence is enhanced by a strong frame. The frame is made of metal pipes with a square cross-section, with sides 7-8 mm wide. To install the fence support, the pipe is placed in a hole, deepened by 1-1.2 m. The pillars rise above the ground by approximately 1.5-2.3 m.
To build a slab fence you will need the following equipment:
- axe;
- shovel;
- concrete mixer;
- containers for solution and water;
- grinding machine;
- skobel;
- electric drill;
- apparatus for welding (if the supports are metal);
- rope with pegs;
- roulette;
- plumb level;
- screws and other fasteners.
Instructions for making a fence
After all the sketches have been made and the tools have been prepared, materials have been selected and purchased, you can begin the construction of the fence.
Before carrying out work to prepare the land for construction (creating holes for supports), you need to find out about the characteristics of the soil, the depth of its freezing and the location of groundwater. This is very important, since unstable soil under the fence will cause deformation of the fence or lead to its destruction.
The soil that contains a large number of sand, during periods of precipitation or after the snow cover has melted, it can shift, forming landslide phenomena. In such a case, it is best to use screw piles, using them as supports for the fence. They are driven into the ground below the freezing level.
The presence of a large amount of clay impurities and sandy loam in the soil increases the depth of soil freezing and deprives it of stability. In such soil, it is unacceptable to concrete supports, otherwise, with the arrival of cold weather, the base containing clay will increase in volume, and this will lead to the foundation being squeezed out, the fence will be deformed and lose its original appearance. Under the influence of rain, quicksand are formed. It is for these reasons that the use of screw piles is desirable.
Soil with gravel inclusions does not freeze much and practically does not move under the influence of water; such soil is optimal for concreting supports.
Rocky soil has similar properties: such soil is much harder. When constructing fences in such an area, all types of foundations can be used, with the exception of pile foundations.

The process of creating a slab fence includes the following steps:
- Prepare wood material, sort the slab by size and configuration, clear each board of bark. This is necessary to give the tree an aesthetic appearance and leveling favorable conditions for the proliferation of fungus and harmful insects. For this purpose, a tool called a carpenter's staple is used. It can be replaced with a sharpened axe, spatula or knife. Using a grinding machine, the surface of the material is leveled, burrs and exfoliated wood are removed. Then the croaker is treated with antifungal agents and antiseptics.
- The next step is working with the soil. The site must be cleared of bushes, boulders and debris. The construction area must be leveled for subsequent marking.
- After this, markings are made, indicating each hole for supports. The markings ensure that the fence is level. For this purpose, a stretched rope and pegs are used.
- Holes are dug in the marked areas. To prevent soil from falling into holes during work, it is preferable to use a screw shovel or auger. The tool is screwed into the ground and the contents are pulled out, going 15 cm deep. The optimal width of the hole is 20 cm, depth is 70 cm.
- Sand is poured into the bottom of each hole and compacted. To increase the density of the pillow, the sand is wetted. The thickness of the sand layer should be 10 cm. A 10-centimeter layer of crushed stone is poured on top of the sand - it is also compacted.
- Having prepared the pillow, install the pillars in the holes. If wooden supports are chosen during construction, they must be treated with agents that prevent the formation of fungus. The part of the post placed in the ground must be burned and protected from water. For waterproofing, roofing material or bitumen mastics having a liquid consistency.
If iron pipes are chosen as supports, their end parts must be coated special compounds to protect metal from rust. Metal plates with a diameter of 5x10 cm are welded to the supports. They are placed parallel to one another at the bottom and top of the column. The logs in the fencing sections will be attached to them when the slab is mounted vertically.
- The prepared supports are placed in the holes. Using a sledgehammer, drive them into the ground to secure them more securely at the bottom of the holes. Level the supports using a rope and a plumb level. To fix the supports in the desired position, secure them with stops made of boards or iron corners with a length of at least 70 cm. Rest one side of the corner or board against the ground, and the other against the support.
- Place a small layer of crushed stone into the post holes, ensuring it is evenly distributed around the posts. Compact the gravel.
- Taking into account the fact that the concrete base will be located above the ground at a height of 10 cm, make a formwork from boards to hold the unhardened concrete: the width of which is equal to the diameter of the foundation. The formwork will resemble appearance a box without a bottom, with walls 15 cm high. The frame elements are secured with self-tapping screws and then mounted on the pit. So that during work this design did not change position with each outside Pegs are driven into the ground.
- After this, you need to reinforce the concrete base. This frame will strengthen the columnar base and prevent its destruction. To do this, it is necessary to design a three-dimensional iron frame. The frame is made of reinforcement measuring 8-10 mm. The rods are combined with wire, resulting in a structure 50 cm high. The rods are placed at a distance taking into account the support built into the pit. The fittings should not come into contact with it.
- You can start pouring the columnar base.
Pour the mortar into the holes with the supports and reinforcing bars built into them, so that the concrete is located 10 cm above the ground. Please note that a large number of air bubbles will remain in the poured solution; they can be leveled using a reinforcing rod lowered into the solution and removed from it.

Upon completion of this procedure, the concrete foundation should be protected from uneven hardening and water evaporation - this can cause cracks in the foundation. Cover the foundation with cellophane or other waterproofing material. It takes 3-6 days for the solution to completely harden. The colder it is outside, the longer it takes to harden.
- After the concrete has hardened, begin installing the fencing sections. The slab is attached to the supports in both horizontal and vertical positions - your choice. To vertically secure the material, you need to install logs and fill dies on them. They are attached in a horizontal plane to internal parties bases above and below.


Advice: To make the fence look neat, do not mount the boards end to end, remember that the edges of the slab are uneven - leave a small distance between the elements.
If you want to design a fence without gaps, attach the tiles with an overlapping herringbone pattern. Slabs can also be installed on the other side of the fence, creating a resemblance to a board made of wood with padded boards.

When installing the slab horizontally, you can do without logs; The dies will serve as guides. As in the first option, the slab is attached to the supports. The dies begin to be installed from the bottom, the bottom of each element should be secured overlapping the previous one. If you leave a distance of less than 10 cm, gaps will form in the fence in the future, as the wood shrinks when it dries.
When used more than wide boards After drying, cracks will appear in them. A fence made from too narrow elements looks unpresentable.

On a note! To paint a slab fence, choose deep-penetrating dyes.
Before application antiseptics or paint on the outer part of the slab, it is necessary to clean the material from old paint and peeling. By performing this work efficiently, you will increase the service life of the protective coating.
To create a protective layer on a slab fence, the following means are used:
- used machine oil. Many summer residents use this tool. A tree coated with machine oil will not allow reproduction harmful microorganisms, and water will not be absorbed into the material. Attackers do not dare to climb over such a fence, because it leaves oil traces. This remedy is affordable and effective;
- copper sulfate;
- self-prepared paint;
- liquid glassine is a product that provides protection for croakers in high humidity. Penetrating into the pores of wood, it displaces moisture. During polymerization, glassine closes the pores of the material, thereby creating an environment that is unfavorable for the life of harmful insects and fungi.

Homemade protective paint recipe
It is not difficult to prepare such paint (popularly called “Swedish”). To prepare a liter of dye you will need the following components:
- 53 ml drying oil;
- 97 gr. dark rye flour;
- 43 gr. copper sulfate, salt and red lead;
- color;
- 750 ml water.
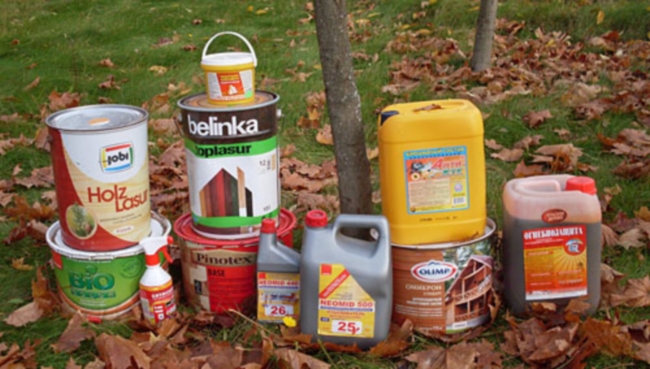
This volume is enough to paint 3.5 square meters. m of fence. The dye is applied to the fence in two layers. Such a coating will provide long-term protection of the structure (for a couple of decades). For front side for croaker fence, it is preferable to use products from well-known manufacturers, for example, “Neomid”, “Belinka”, “Pinotex”.
How and with what to decorate a country fence
Using a slab to build a fence, it’s hard to believe that such a fence can look presentable. The material looks natural and can be combined with foam block, stone, iron or brick.
Many people use slabs to build sections of fences with stone supports. A fence made of slabs with an arc-shaped upper edge looks unusual. An easy way to transform a rough structure is to arrange flower pots.
Another way to steal such a design is to use a hacksaw to create shape-shaped cuts on the end parts of each board, creating a special, presentable design.

A wooden fence looks attractive, on the upper edge of which there is a small gable roof. The fence takes on a complete appearance and becomes similar to the fences that were used in Scandinavia and Ancient Rus'.
The upper parts of vertically placed elements can be made in the shape of a cone, creating an imitation of a palisade fence.
A fence with vertically fixed herringbone-type elements looks impressive.
For more design options, see the photo below:


Using your imagination, it’s easy to turn a slab fence into a beautiful and presentable hedge.
Video
Watch a video on how to make a budget fence on a site from slab:
Croaker is great for making fences for summer cottage. Such designs fit perfectly into landscape decor and are in harmony with structures made from other materials. Croaker is easy to process and install with your own hands, so building a fence from it is not at all difficult.
As a rule, when improving a personal plot, the issue of fencing the territory fades into the background, since there is always not enough Money And suitable materials. However, in such an area the wind constantly blows, bringing with it leaves, branches and other debris. That's why you can make a fence from a slab with your own hands. He will protect and decorate the territory.
Advantages and disadvantages of the material
Croaker is a material that is wood waste when processing logs on a sawmill. It looks like an uneven board, one side of which has a smooth surface, and the other is not cleared of bark.
According to the quality of croaker, there are wood and business. In the first case, it consists of boards and wood scraps unsuitable for construction, which are used as firewood for kindling. Business croaker- it's more quality material having a large thickness. It is suitable for making fences, outbuildings and other non-residential buildings.
This material has a number of advantages that allow it to be used not only for the construction of temporary structures, but also capital buildings. With appropriate processing, it becomes a subject of inspiration landscape designers who use it as a decorative material in the manufacture of fences.
TO positive qualities the following can be attributed
- Croaker is an inexpensive material. You can always find it in any woodworking enterprise. The price for it is never high, so this wood can be purchased with a large supply.
- The material is environmentally friendly. When making boards and beams, logs are not treated with any chemicals.
- Structures made from slab reliably protect from wind and noise.
- Installation of this material is not difficult and does not require special knowledge in construction.
- Processed slab elements have a beautiful appearance and often become decorative elements in fences.
- A fence made of this material does not require the construction of a heavy foundation; you can simply concrete the base of the post.
Among the disadvantages are:
- One side of each slab board is covered with bark. It must be removed, as subsequently it will become an excellent place for the life of wood-boring insects and the proliferation of fungi.
- Before using for construction purposes, wood must be treated with antifungal impregnations and antiseptic agents.
Photo gallery: options for slab fences
 The carving of each die decorates the entire structure
  The distance between the wood visually makes the section even
  The slab goes well with stone pillars, metal frames and tiles
  The fence will be neat if you select the dies same size
  Fastening the material in a herringbone pattern creates the impression of majesty of the fence
  Ordinary flower beds on a massive fence will make it more attractive
Preparing for construction: calculating the area for the fence
A slab fence will not take much usable area plot. Calculations must be carried out on its basis. The diameter of the hole for concreting a pillar depends on its thickness.
The span width should be no more than 200–250 cm. If it is made larger, the fence will become unstable.
The height of the fence should be from 150 to 220 cm.
Knowing the dimensions of the fence spans, it is easy to calculate its area in order to determine the total value in further calculations. To do this, you need to remember the school geometry course, namely the formula for finding the area of a figure (S=a b, where a is the width of the span, b is the length).
Let's say a = 1.8 m, b = 2.3 m, which means the area is 4.14 m².
4.14 6.52=26.99 m². The number should be rounded to 27 m².
How to choose an unedged board
When choosing, you should give preference to the material laid in bundles, since the wood in it is already sorted.
You also need to take into account the type of wood, for example, poplar is not suitable for building a fence. This is due to the fact that after some time such a croaker will begin to rot. You should also be careful when handling birch wood, as it becomes hard when it dries. Hammering a nail into dry birch is problematic, which means you will have to use an electric drill to drill holes for each nail.
If you drive nails into wet birch wood, when the material dries, they will come out and the slab will warp.
The cheaper the slab, the more knots, irregularities and other defects it contains. Therefore, without grinding machine can't get by here.
If you bought wet material, then you need to dry it not in the sun, but in a shaded place. outdoors. Otherwise, the croaker will dry out quickly. As a result, deep cracks will appear on its surface.
You should not choose a slab whose width is more than 20–25 cm. This is explained by the fact that after some time large cracks will appear on such wood, running horizontally along its entire length.
If the slab will be positioned horizontally, then you should not choose too narrow boards for this. The fence will look unaesthetic.
When choosing a croaker, you need to take into account the fact that after some time it will become 1.5–2 cm narrower. This will happen as a result of the wood drying out. Therefore, installation must be done with an overlap.
Material calculation
If the fence posts will be concreted, then you need to know the total volume of the mixture.
In an area with soft soil, a columnar foundation is used (height - 70 cm, diameter - 20 cm). To find out how much cement is needed for one column, you need to use the geometric formula for finding this value for a cylinder (V=πR²h, where π – mathematical quantity equal to 3.14; R - radius of the figure; h is its height). Let's substitute the values: 3.14 0.2 0.7 = 0.4396 m³. Now it is easy to determine the total volume of concrete required for all posts in the fence. To do this, you need to multiply this figure by the number of bases. For example, if there are 15 posts in the fence, it will require 6.594 m³ (0.4396 15) of the mixture.
Using the same principle, the volume of sand required is calculated. For one columnar base, a layer 10 cm thick is required. Knowing the diameter of the hole, it is easy to make a calculation. Substitute the values to calculate the volume of the cylinder: 3.14 0.2 01 = 0.0628 m³ - sand is needed for one column. Now, if you have 15 spans, then there should be one more pillars. Therefore, the total sand required is 0.0628 16 = 1.0048 m³.
A rigid frame gives the fence stability. As such, metal pipes with a square cross-section with a side width of 70–80 mm and a thickness of 2.5 to 4 mm are used. To erect a fence post, the pipe is placed in a hole to a depth of 100–120 cm, while the height above the ground ranges from 150 to 230 cm.
To build a fence from a slab, you cannot do without:
- screw and bayonet shovels;
- concrete mixer;
- containers for water and mixture;
- grinding machine;
- ax;
- skobel;
- electric drills;
- welding machine (if the poles are made of metal);
- cord and stakes;
- building level and plumb line;
- measuring tape;
- bolts, nuts, washers, nails.
How to make a fence from slab: step-by-step instructions
When all the necessary drawings have been drawn up, tools have been prepared, identified and purchased necessary materials, you can begin building a fence from a slab.
Before carrying out excavation work when digging holes for pillars, it is extremely important to know the composition of the soil, its freezing point and the level of groundwater. It has great importance, since an incorrectly selected base for the fence will lead to deformation or destruction of the building.
Soil with a high content of sand can shift during rains or after snow melts, forming cracks or landslides. In this case, it is recommended to use screw piles as fence posts. They are screwed into the soil to a depth below the freezing point.
The high content of clay and sandy loam in the soil contributes to deep freezing of the soil and makes it unstable. It is impossible to concrete pillars in such soil, since when frost sets in, the clay base expands, causing the foundation to be squeezed out, and the fence to deform and lose its original appearance. The impact of weather precipitation on this soil leads to the formation of quicksand. Therefore, the use of screw piles is recommended.
Soil containing a large amount of gravel is not subject to deep freezing and displacement under the influence of moisture. This soil is ideal for concreting pillars.
Solid stone or rock soil has similar properties, with the only difference being that it is harder. When building a fence on such a site, you can use all types of foundations, except pile foundations.
All work on making a fence from a slab consists of several steps:
- Before earthworks it is necessary to prepare the croaker for use. To do this, you need to sort the material by shape and size, remove the bark from each board. This is done not only to give the wood a pleasant appearance. This way you will remove favorable environment for the habitat of fungus, mold and bark beetles. To do this, use a carpenter's staple. If such a tool is not available, then sharp axes, knives or bayonet shovels will be effective. Then, using a grinding machine, you need to make a smooth surface, removing burrs and chips of wood. After which it is recommended to treat the croaker with special antifungal agents and antiseptic substances.
- Now you can go to earthworks. First of all, it is necessary to remove bushes, stones and debris from the area. The area to be built should be leveled so that small bumps do not interfere with the marking.
- Then you need to make markings indicating each hole for the post. This determines how level the fence will be. To do this, use a stretched cord and stakes.
- After this, you need to dig holes in the marked areas. To prevent the earth from crumbling into the hole during work, it is better to use bayonet shovel, but a screw or special drill. The tool must be screwed into the soil and the contents removed every 15 cm of the depression. Some builders have the same success using a drill to drill holes in ice. The width of the hole should be 20 cm, depth 70 cm.
- Then you need to pour sand into the bottom of each of them and compact it. To make the pillow denser, bulk material needs to be moistened. The evenly compacted layer should have a thickness of 10 cm. Gravel should be poured on top of it, in a layer of 10 cm. It also needs to be compressed.
Now it's time to install the supports in the hole. If wooden poles are chosen during construction, they are pre-treated with antifungal impregnations. That part of the material that will be in the ground must be burned and protected from moisture. As waterproofing material You can use roofing felt or special liquid mastics based on bitumen. If metal pipes are used as pillars, their ends must be welded to prevent moisture from getting inside. This material must be treated with special substances that protect the metal from corrosion. Metal plates measuring 5x10 cm need to be welded to the pillars. They are placed parallel to each other in the upper and lower parts of the support. They will serve as fasteners for joists in fence sections when vertical installation croaker.
Place the prepared pillars in the holes. Using a sledgehammer or hammer, hammer them in with a few blows on the top end. This way they will be more firmly attached to the bottom of the hole. Using stretched cords, a building level and a plumb line, align the posts with the ground and each other. In order for the pillars to remain in this position, they need to be reinforced with stops. Boards or metal corners at least 70 cm long. They must be installed in the following order: one end of the material rests on the ground, and the other on the pole.
After this, you need to fill the holes with pillars with a small layer of gravel. Distribute it evenly around the posts and compact it.
Because concrete base will rise 10 cm above ground level, it is necessary to make formwork that will hold the uncured concrete. Wooden boards are used for this. A structure is made from them, the width being equal to the intended diameter of the base. In this case, the formwork has the form of a box without a bottom, with a wall height of 15 cm. The frame boards are secured using self-tapping screws or nails. Then install it on the hole. To prevent this structure from moving during operation, stakes must be driven into the ground on each of its outer sides.
Next, you need to reinforce the concrete base. This frame will strengthen the columnar foundation and prevent it from collapsing. To do this, you need to make a three-dimensional frame from metal rods. As such, reinforcement with a diameter of 8 to 10 mm is used. These rods must be fastened together using wire. The result should be a structure 50 cm high. The distance between the rods is made taking into account the diameter of the post installed in the hole. The fittings should not touch it.
Now everything is ready for pouring columnar foundation. For these purposes, it is necessary to use concrete grade M 200. Using a concrete mixer, it is much more convenient to maintain the mixture in a uniform, thick state.
Pour the mixture into the holes with pillars and reinforcement installed in them so that the concrete is 10 cm above ground level. It should be noted that a lot of air bubbles remain in the poured mixture, and to remove them, use a reinforcing rod, which is lowered into the mixture and removed from it.
When this procedure is completed, it is necessary to protect the concrete base from uneven hardening and evaporation of moisture, which can lead to cracking of the base. To do this, the foundation is covered with polyethylene or other waterproofing material. It takes 3 to 6 days for the mixture to completely harden. The lower the air and soil temperatures, the longer this process lasts.
When the concrete base has become completely solid, you can begin installing the fence sections. The slab can be attached to the posts both vertically and horizontally. To attach the slab vertically, it is necessary to install logs onto which the dies will be placed. They are fixed horizontally to the inner sides of the post at the top and bottom. To make the fence look neater, do not install the slab end-to-end. Due to the uneven edges of the material, your fence will have an untidy appearance. Therefore, small gaps are left. If you do not need gaps in the fence, the dies can be overlapped. This method of installing a slab resembles a “herringbone”. There is another way - the gaps are closed with installed dies on the other side of the fence. Visually, it resembles a wooden board with stuffed boards.
To install the slab horizontally, it is necessary to use logs; there is no point in doing so, since the dies will simultaneously act as guides. As in the previous method, the material is attached to the pillars. The installation of slab dies must begin from the bottom. The bottom edge of each subsequent board should overlap the previous one. If this distance is left less than 10–15 cm, cracks will appear in the fence over time. This is explained by the fact that when drying, the wood can shrink by the specified amount. The optimal width of a fence for a fence with horizontal fastening is in the range from 20 to 30 cm. If you use a wider material, cracks will appear in the middle when it dries. It is also not worth using narrower dies, as the design will have an unaesthetic appearance.
If the fence is located in the open sun, then it is more susceptible to changes in humidity and drying out. In this case, painting with deep penetration paints is required.
Before applying antiseptics or painting the surface of the slab, you need to remove old paint, mold, rotting damage. The durability of the protective layer depends on how well you do this.
Effective folk remedies to protect a slab fence are:
- Treating the fence surface with used machine oil. This remedy is popular among summer residents and gardeners. Wood treated with this product is unsuitable for the life of microorganisms. Moisture will not be absorbed into the slab. Criminals will not want to climb over such a fence, since it gets dirty, so no one will steal such boards. Therefore, this tool is very convenient and affordable.
- Other no less effective remedy- treating wood with iron or copper sulfate.
- Homemade paint is widely used. People call it “Swedish”.
How to make Swedish paint with your own hands
The recipe for its preparation is simple. To make 1000 g (1030 g to be exact) of paint, the following ingredients are needed:- drying oil - 53 ml;
- rye flour - 97 g;
- iron or copper sulfate - 43 g;
- salt - 43 g;
- iron lead - 43 g;
- color;
- water - 750 ml.
How and with what to decorate a slab fence at the dacha
Using slab as a building material for building a fence, many find it difficult to imagine that their fence can be made beautiful. You don't need to be a designer or have an artistic education to decorate this fence.
The material is natural natural look. Croaker goes very well with stone, brick, foam block and metal.
This material is often used to construct fence sections with stone pillars. A slab fence takes on a completely different look if the top edge is made not even, but, for example, arched. Ordinary flowerpots with flowers, hung in a checkerboard pattern, will transform a rough design.
You can use a hacksaw or grinder to make curved cuts at the ends of each die. In sections of the fence they will look unusual and attractive.
A fence made of slabs looks very nice, on the upper edge of which there is a small gable roof. It has a finished look and resembles ancient Russian or Scandinavian fences.
The upper ends of the vertically installed slab dies can be made cone-shaped. Such a fence will look like a palisade.
A fence in which the slabs of the slab are fixed vertically in a herringbone manner looks unusual and beautiful.
Video: beautiful fence and slab
Croaker should be considered as a complete building material. The fact that it is a waste product does not make it suitable only for the construction temporary fencing. It fits into the landscape and is combined with buildings made from other materials. The methods for processing and installing slabs are so simple that it is very easy to build a fence from it yourself.