How to protect concrete from moisture? In this article we are going to look at several popular solutions that are applicable both for waterproofing foundations and basements, and for protecting main walls from precipitation and seasonal humidity fluctuations.
Our goal is to give the concrete hydrophobic properties.
Classification
All waterproofing materials are divided into three main categories.
Useful: roll and coating materials usually applied on the side of the foundation or enclosing structure on which there is excess static water pressure. Otherwise, there is always a risk of peeling off the protective layer and compromising its integrity. Penetrating waterproofing does not have this limitation.
Obviously, we are most interested in the last category of waterproofing. It is with her that we will get to know each other better.
Possible solutions
Ironing
The simplest and cheapest surface treatment (applying cement laitance to it). Cement penetrates into pores and microcracks, completely or partially clogging them. Of course, such waterproofing is not enough for the foundation; but the ironwork cement plaster facade will significantly reduce water absorption.

Liquid glass
If you add to cement-sand mortar sodium liquid glass (aqueous solution of Na2O(SiO2)) in a ratio of approximately 1:10, you will get moisture-resistant concrete with a very short (no more than half an hour) setting period. This recipe is often used to seal the seams of sewer and water wells, block foundations and cracks in basement floors.

The photo shows domestically produced sodium liquid glass.
Treatment liquid glass is quite capable of reliably waterproofing the surface of a finished reinforced concrete product. Doing this work with your own hands is more than simple: the material diluted with water in a 1:1 ratio is applied to the concrete with a brush, roller or spray.
Hint: undiluted liquid glass, applied in one layer, penetrates concrete by an average of 2 millimeters. If the treatment is carried out with an aqueous solution and in several stages, the depth of impregnation will increase to 15-20 mm.
Water repellents
How to treat aerated concrete from moisture if it is used for construction external walls residential building?
In this case, hydrophobic primers will come to the rescue. silicone based. The instructions for their use are also extremely simple: the composition, ready for use or diluted with water in the concentration specified by the manufacturer, is applied to the surface of the facade in two or three layers without preliminary drying.

Protecting aerated concrete from moisture using a water-repellent solution solves several problems at once.
Let us clarify: silicone-based water repellents are intended not only for aerated concrete. They can process all porous materials: heavy concrete, limestone, plaster, etc.
The composition is applied to a dry base. A concrete moisture meter will help you assess the moisture level of a structure - it’s not difficult electrical device, measuring resistivity surface area.
Average price of water repellents Russian production is 150 rubles per kilogram. The only drawback of the solution is the limited adhesive properties of the facade after treatment: it can be painted only after six months.
Crystallizing compounds
Penetron, Crystallisol and their numerous analogues differ from the solutions listed above in their operating principle: simply put, they do not transport material to fill pores through capillaries from the surface, but create it on the spot ().
Chemical additives cause accelerated crystallization of calcium salts (the main component of Portland cement) upon contact with water. The crystals reliably fill the pores of concrete.

What is the result?
- The most obvious result is the impossibility of moisture penetration into the thickness of concrete when external treatment designs. If the basement walls are treated with the same Penetron from the inside, groundwater will no longer find its way inside the room: the impregnation penetrates 40-60 centimeters into the concrete.
- Of course, you can also forget about efflorescence and mold.. Moisture is necessary for their appearance.
- Frost resistance of concrete increases by an average of 100 cycles. From a practical point of view, this means increasing the service life of capital walls by 150-200 years.
- Finally, moisture impregnation for concrete increases its compressive strength: the absence of pores prevents the material from crumbling under load.
It is curious that Penetron and its analogues provide a kind of self-healing waterproofing. Where water begins to penetrate into the concrete through new cracks and pores, the growth of calcium salt crystals immediately resumes. What is especially pleasing is that waterproofing measures can be carried out with damp walls or foundations.
Where do new cracks in concrete structures come from? The main reasons are movements and frost heaving of soils, as well as installation work. For perforation technological holes and openings, shock vibration is destructive to concrete.
What to do?
- In the first case, the problem is solved by enhanced reinforcement of structures. A foundation connected by reinforcement into a single rigid frame will not deform during any movement of the soil.
- In the second - using less destructive methods of work. Thus, cutting reinforced concrete with diamond wheels, and cutting reinforcement with a gas cutter or a regular abrasive wheel, is much less destructive than using a jackhammer. Diamond drilling of holes in concrete is much more preferable than using a hammer drill.

Conclusion
As part of a short review, we have listed only a small part possible solutions. As usual, the video in this article will offer the reader Additional information ().
A brick wall looks like an insurmountable obstacle to dampness, but this impression is deceptive. The fact is that brick has pores through which moisture can penetrate. Dampness can also pass through a not very tight connection between individual bricks and get on the inner surface of the wall. Thus, water penetration into the home is possible even in cases where dense bricks were used in the construction of the house, concrete blocks or stone. Moisture that has penetrated the walls destroys floors and other wood parts. Moreover, heat loss with wet walls is 50% higher than that with dry walls. Thus, external waterproofing housing seems to be a very urgent task. The best protection there may be a layer of plaster prepared on cement based, or a special protective coating. The first method is more difficult to implement, but much cheaper.
The plaster is applied in two or three layers; its outer surface can be given different kind from flat to lumpy structure. The appearance of the wall is largely determined by the tastes of the owner of the house, but the number of layers depends on the rate of moisture absorption. If the adhesion of the coating to the wall is good, then it is enough to apply two layers; in case of weak adhesion, apply another thin layer with a rough surface, which will serve as a base when laying other layers. This layer is also applied if the wall has an increased ability to absorb moisture. It is recommended to do a simple test: spray water on the wall and see how the wall absorbs moisture. If water flows down in the form of drops, it means that the wall repels moisture; otherwise, water is absorbed into the wall almost instantly. Having determined the number of layers that will be applied to the wall, prepare the surface for work. The wall should be cleaned of dust, mold and anything else that will interfere with tight adhesion to the coating; the same applies to the mortar between bricks.
If you doubt that you can do it yourself plastering work, then you can simplify the task and limit yourself to only painting the walls outside. The cheapest is the so-called cement paint, which is sold in powder form and mixed with water before use. You can also apply an emulsion to the wall, which has the advantage of being easy to apply and drying quickly. The emulsion has water-repellent properties and can subsequently serve as a base when applying subsequent layers. It should be borne in mind that the paint and emulsion are applied to a dense and thoroughly cleaned surface. If, when carrying out work on waterproofing walls, it is undesirable to change appearance structures, it is recommended to use colorless sealants. These sealants are applied by brush or spray; By clogging the pores of the brick, they prevent the penetration of moisture. If the manufacturer's instructions are strictly followed, the specified coating will last for 10 years; if the wall has too many pores large diameter, then a second layer of sealant should be applied. Be sure to seal all cracks and potholes before using such substances.
Renewing brickwork joints
1. Cleaning. Remove old mortar and crumbs; Lightly wet the inside surfaces of the seams. Prepare a solution: 1 part Portland cement, 3 parts fine sand and an amount of water sufficient to obtain an elastic mixture.
2. How to put the solution. Using a mortar and trowel, place the mortar into the cracks; press him down. After the solution has dried a little, press it into the seam with a tube with a diameter of 15 mm.

Application of a protective layer
Preparing for painting. Using a stiff brush, remove dust and grout particles from the surface. If there is mold or any vegetation on the wall, treat it with a fungicide, and then remove it with a brush and scraper. Apply a second coat of fungicide and let it dry. Finally, fill all cracks and gouges with fresh mortar. If the surface to be coated is smooth, then it can be painted with a regular brush or roller. For an uneven surface, a special coarse brush is required, shown in the figure. Once you dip your brush or roller into the paint, use even, slow strokes to get the paint into the cracks and gouges.

Choice of coverage. A typical covering is plank cladding. The boards are nailed to a slatted frame, with each board partially overlapping the underlying board. Architraves are made around windows and doors, which cover the ends of the boards. More difficult is joining the edges of the boards in a quarter. In this case, the boards do not simply overlap each other, but are connected by inserting part of one board into a groove on the other. This connection is more durable and prolongs the life of the nails used. However, the use of wood also requires appropriate care - painting or impregnation with drying oil. The picture shows a different coating that uses plastic or aluminum sections; it doesn't require special care. When applying the coating you choose, it may be necessary to simultaneously install thermal insulation; in this case, it is recommended to seek advice from a specialist, since this work is not so simple.

Plastering works
1. Installation of slats. Start by installing 10mm thick slats, spacing them 1.5m apart. The slats are nailed down with nails that are inserted into the spaces between the bricks. The nail heads should be above the surface of the slats so that they can be easily removed. A 15 mm thick strip should be nailed along the upper edge of the waterproofing layer; the thickness of the plaster should be the same. Finally, nail the battens around the doors and windows.

2. Preparation of the solution. Place sand on a hard, horizontal surface (such as a sheet of plywood). Add the lime and mix it all with a scoop until the mixture is evenly colored. Make a hole in the middle of the mixture and add cement; Mix the mixture components thoroughly again. After making the second hole, add water; the amount of water should be equal to approximately half the volume of the dry mixture. While stirring the solution, add water until you get an oily mass. Make sure that there are no lumps left in the solution. Transfer the solution to a special board mounted on a trestle or stool. Holding the falcon almost perpendicular to the surface of the board, take approximately 1 liter of solution (see figure). A typical solution recipe for brickwork looks like this: 1 part Portland cement, 1 part slaked lime and 5 parts dry sand. You can also add 1 part ordinary cement mixed with lime to 4 parts sand. For very dense walls(for example, concrete blocks or solid bricks) take proportions of 1:1/2:4 and 1:2 1/2, respectively. If you do not want to calculate all these proportions, then buy a dry solution in the store, to which you only need to add water. If you decide to do the work of preparing the solution yourself, then start with a ten-liter bucket of cement, adding the appropriate amount of sand and lime. If you can estimate the amount of solution that you can put in one hour (that is, the time after which the solution begins to set), then you can easily determine how much solution should be prepared.

3. Application of the solution. Holding the falcon in one hand almost horizontally, use a trowel to separate the layer of mortar. Tilt the falcon as shown in the picture and throw some of the mortar onto the wall with a sharp upward movement of the trowel. After this, distribute the solution over the wall, moving from one slat to another. Repeating this operation, fill all the space between the slats. After each movement, turn the falcon about a quarter: this will maintain alignment and make it easier for you to hold the falcon in your hand.

4. How to level the solution. Having filled the space between the slats, you should level the solution with a trowel. Make sure that there are no air bubbles left in the solution and that the coating adheres tightly to the wall.

5. Leveling the solution layer. The coating must have the same thickness. Take a mason's float (this is a flat board with a handle) and make the surface level, lying flush with the surface of the slats. If the grater pulls the solution along with it, then do the indicated work after the solution has set a little.

6. Filling grooves. After applying the solution to the entire wall, let it dry for three hours and then remove wooden slats. Fill the grooves remaining from the slats with mortar and level these places.

7. Why do they scratch the surface of the first layer? When the solution has hardened a little, cover the surface of the wall with scratches in the form of wavy lines. This is done so that the second layer clings tightly to the first. The lines are drawn using a special comb shown in the figure. You can make such a comb yourself by hammering several nails into a block of wood. After removing the slats around windows and doors, lay down 10mm thick mortar. After making scratches, install the slats so that they overlap the quarters of windows and doors by 5 mm. Having done everything specified works, leave the wall to harden for about a week. In warm, dry weather, spray moisture onto the surface of the wall - this will promote the hardening process.
After the construction of a house or basement is completed, you should not hope that all work is completed. For long term service of all floors and partitions is necessary. If you understand this process, then there is nothing complicated.
The need for internal waterproofing
In every building temperature regime The temperature inside is necessarily different from the temperature outside. To create a comfortable environment in summer time We try to ventilate more, and in winter we turn on the heating.
As a result, moisture condenses, especially on internal surfaces. Probably everyone at least once paid attention to wet wallpaper, this may lead to some undesirable consequences:
- Since most building materials able to absorb moisture, this can significantly shorten their service life.
- Most of the main communications are made of metal, which means they will be subject to corrosion in conditions of high humidity.
- Over time, a damp smell will begin to appear.
- The microclimate will be disrupted.
- Mold will begin to appear, and this is not at all good for human health.
Thus, we can come to the conclusion that protection from moisture inside the apartment is just as necessary as in the basement.
Types of waterproofing
Waterproofing can be classified in different ways, depending on its features. Therefore, based on the parameters, they divide it into several types.
Wall waterproofing
According to the intended purpose, waterproofing can be:
- Sealing.
- Thermal and waterproofing.
- Anti-corrosion.
- Anti-filtration.
Based on the location on the building, we can distinguish:
- External.
- Internal.
Depending on the object that is being protected from moisture:
- Foundation insulation.
- Cellars.
- Polov.
- Toilets and bathrooms.
- Walls in apartments.
The material used for this process may differ, so the following are distinguished:
- Painting waterproofing.
- Pasted over.
- Plastering.
Depending on its characteristics, the waterproofing layer can be:
- Single layer and multilayer.
- Reinforced and not reinforced.
- WITH protective layer or without it.
- Ventilated.
If you take the issue seriously, it is quite possible to do it yourself.
Basement protection
If your cellar is located under the house, then it should be protected from excess moisture in mandatory. Otherwise, the structure will begin to collapse over time from excessive dampness, and this will entail damage to the structures of the entire house.
If you are building a house with your own hands, then this problem must be taken care of at the construction stage, although the basement from the inside can be made at any time.
All work can be carried out using various means, which can be divided into several varieties:
- Anti-pressure type of insulation. It will protect against exposure groundwater, for this purpose they are treated with polymer-bitumen mastics.
- Non-pressure type will protect against influence melt water and various precipitations. The same material can be used.
- Anti-capillary insulation protects against moisture that can penetrate through the smallest pores in the floor. In this case, solutions, mastics and impregnating mixtures are used.
When choosing a material for work, it is necessary to take into account all its qualities and features of the floors.
In order for all waterproofing work to be carried out efficiently, it is necessary to follow some recommendations:
- Surface before application protective coatings must be cleaned of dust and dirt.
- If there are large irregularities, it is advisable to level them.
- After all the preparatory measures, you need to dry the walls thoroughly.
- Apply primer mixture.
- The next layer should be a waterproofing material.
The instructions are not at all complicated, but all of its points are very important.
As materials for work you can take:

Liquid wall insulation
- Binding compounds.
- Dry mixes.
- Roll materials.
- Liquid solutions.
- Metal sheets.
Choice the right material is quite important, the quality of the work performed will depend on it, and, therefore, the service life of this room.
The most suitable for work in the basement are:
- Cement based mastics. They are preferable when groundwater is close.
- Painting materials.
- Penetrating materials. To eliminate cracks that have appeared.
- Roll materials combined with insulation give excellent results.
Waterproofing from the inside of the basement with a solution of sand and cement is considered the most a good option. Modified additives are also added to the mixture, which increase waterproof properties. These can be: polymers, liquid glass.
Waterproofing with roll materials in the basement
If you decide to use roll materials, then the work must be performed in the following sequence:
- Produce a basement cement mortar.
- Glue the rolled waterproofing material in two layers.
- Build a clay brick wall to support the roll insulation.
- In this case, you need to retreat approximately 0.5 meters from the wall.
- Between the wall and clay castle you need to add soil.
- Coat all joints and cracks with bitumen mastic.
- Finally, you can also treat the surface with a coating mixture.

Roll insulation against moisture and water
Garage moisture protection
The garage is home to the car, which means it must also maintain an appropriate microclimate in which your four-wheeled friend will feel good.
Most of the machine parts are made of metal, so exposure to moisture is extremely contraindicated. This will lead to the appearance of rust, which may result in deterioration, that is, unnecessary expenses for repairs and replacement of spare parts. Even the most car enthusiast can spend a long time in a room with high humidity not entirely comfortable, so there’s no escape from waterproofing.
- Tape and roll materials. The most common of this group is considered to be roofing felt.
- Coating or liquid sealants. These compositions are prepared on the basis of a bitumen or rubber base.
- Concrete mixtures.
The entire process of waterproofing a garage comes down to the following procedures:
- Foundation waterproofing.
- Roofs.
- Wall insulation.
If you don’t have a cellar in your garage, then you can get by with a minimum of funds.
- During the construction of a garage, roofing felt is placed on the foundation.
- If the garage has already been built, then the foundation can simply be coated with mastic or plastered.
If a basement is provided in this room, then this process must be approached more seriously, almost the same as in a free-standing basement.
To insulate the roof, you need to choose a material based on its type:

Internal waterproofing
- If the surface is flat, then it is best to use roofing felt, warming up the joints well, and then fill the entire surface with resin.
- A roof with slopes must be covered with waterproofing material before laying the coating. To do this, they buy a special film and nail it directly to the rafters, and then the coating is laid on top.
- If you wish, you can use slabs. The seams between them must be sealed with sealants.
Waterproofing garage walls from the inside is extremely rare. But for greater reliability and maximum protection from moisture, this process is still better done.
- You can cover the walls with concrete mixtures. They are purchased ready-made and diluted with water according to the instructions. For better adhesion, it is advisable to moisten the wall surface with water before application.
- The second option is to use steam and waterproofing film. Before using it, it is necessary to make gaps.
Waterproofing an apartment from the inside
Very often in our apartments we notice dampness in the corners, and in winter you can even see snow and ice. One solution to this problem is to protect the walls from inside the apartment from excess moisture.
All work can be carried out at any time. And, if with interpanel seams everything is fine, then you will 100% be able to cope with this problem.
The work can be carried out in stages:
- To insulate the cracks, you need to prepare a groove with a cross-section of 20x20 mm. Empty spaces must be filled with foam, and then the fines must be hermetically sealed with Dehydrol Lux.
- Clean the surface of the wall in the desired area from the coating.
- Coat the concrete with special compounds.
Every man can carry out waterproofing inside an apartment on his own. To do this, sometimes it is enough to apply a special solution; most often, plaster is used.
This is not an ordinary cement mortar; various additives are necessarily added to it, which have excellent waterproofing properties.
When wet, these modifiers begin to seal the smallest channels, and water can no longer accumulate. This will provide a dry surface, and therefore protect you from the appearance of fungus and mold.
The advantage of plaster is its ability to breathe, as if everything is hermetically sealed, and the walls continue to exchange air.
The humidity level is important indicator for the normal functioning of our body, so waterproofing the walls from inside the apartment will come in handy.
Hydrophobic treatment brick facade provides protection against moisture penetration into the wall for many years - water will simply flow over its surface.
The weak point of external brick walls remains their mortar joints. Moisture penetrates the walls through them and heat escapes. The technology described below ensures their long-term protection from moisture and reduces heat loss.
Damp brick walls of houses cause significant damage. Freezing in winter, they make themselves felt by a lack of heat in the premises and an increase in heating costs. The water that penetrates into the seams of the masonry, turning into ice in winter, bursts them apart, gradually destroying the masonry and the brick itself. Energetic owners of their own homes, not understanding the nature of the discomfort that has arisen, strive to do internal thermal insulation walls and their subsequent finishing, at considerable expense. This, of course, makes it warmer, but it doesn’t stop the destructive processes in the walls. You should still start with repairing the facade, which may also allow you to abandon the insulation of the walls.
Search for reasons
Moisture penetrates the walls through poor-quality masonry seams or panel joints. This is confirmed by obvious stains, the formation of fungal mold inside the house, damage to the seams visible from the outside and greenery on them.
We offer two options for repairing such facades:
- if the seams are mostly in order, then the masonry is made hydrophobic by impregnating it with an appropriate preparation;
- if the seams are in poor condition, then they are sealed first.
Cleaning a brick wall
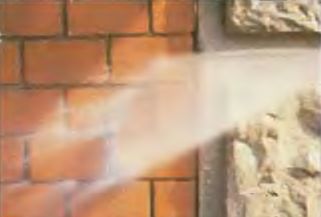
The walls are subject to annual inspection and any damage found is immediately repaired. Dirt and plants that appear on the walls can be easily removed with a cleaner. high pressure. A homeowner simply needs such a not very expensive and multifunctional machine (suitable for washing vehicles and removing old paint). If contaminants are difficult to remove, use mechanical cleaning or use a special paste. It is applied with a brush. After 30 minutes, it is washed off with the dissolved dirt.
Impregnation of brickwork
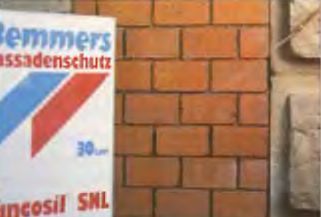
Even walls saturated with moisture can be treated with a hydrophobic composition. But it is better to do this a few days after dry and warm weather has established. The essence of this treatment is to close the pores in the mortar of joints and bricks. The porosity of the materials favors deep penetration of the drug into them. The preparation creates a colorless, stable, water-repellent and non-wetting film on the wall surface.
In the West, it is most often recommended to use the drug Funcosil (the domestic drug “Siloxil”), which can also be used on damp walls. The product does not contain solvents and is therefore environmentally friendly. However, when treating walls, it is recommended to cover nearby plants with film.
Preliminary sealing of brickwork joints
This is better called joint and masonry repair because the crumbling mortar is removed to create new fill. At the same time, individual decaying parts are also removed. facing bricks. The seams are first tightly filled with cement-sand mortar, and then sealed with a special mortar. It is better to seal with mixtures such as Betonite, Ceresit, Atlas or self-prepared cement-based mixtures. We suggest not sealing each seam separately, but applying and rubbing the solution onto a large surface at once.
Stages of work:
- clean the wall, removing crumbling grout;
- replace individual crumbling bricks;
- do preliminary impregnation of the wall;
- allow to dry;
- seal the seams;
- clean the wall and re-impregnate.
A minimum of 24 hours is required for the pre-impregnation to stabilize. After this, the seams are sealed with mortar.
For initial sealing of joints, a cement-sand mortar is prepared using sand up to 2 mm. For final sealing, a board with sponge rubber is used, with which the solution is rubbed. Using diagonal movements along the seams, the sponges remove the solution from the surface until it sets. Rinse a second time clean water, removing traces of the solution. Sealed seams cover straight lines sun rays. The second impregnation is carried out after 3 days.
|
A high-pressure steam cleaner will not only remove dirt and greens, but also old crumbling grout from the grout. |
Pre-impregnation will protect the old porous mortar in the masonry joints. It is carried out mainly at the seams. |
|
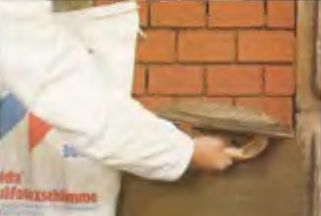
Seams that need sealing are tightly filled with cement mortar. It is prepared with sand in a 1:1 ratio. |
The final sealing of the seams is carried out with cement mortar rubbed in in a circular motion. Water is added to cement 1:4. |
|
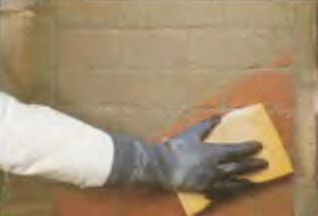
The wall is washed from the solution with diagonal movements with a wet sponge. It is washed twice. |
When the seams have dried, the wall is subjected to final impregnation - the facade is like new. |


Alternative to branded impregnation
The recommended impregnation is not available everywhere. But it can be used for these purposes natural drying oil or vegetable oil. They are applied to the wall in a heated form with a brush also twice. But pre-impregnation requires several days to dry.
What to do when mold constantly appears and the wall gets wet? To solve this problem, waterproofing the walls is best, but what material and method should be used?
We reveal the secret of why it is impossible to waterproof walls
Ordinary water creates big problems for residents of houses or apartments. Water comes from the ground, after rain into basements, or flows from the ceiling along the walls from sloppy neighbors who do not take care of their own plumbing and sewer systems. It happens that at first glance there is no water, but mold and mildew spread, which confirms the presence of excess moisture in the walls.
These cases are very common, and an error in the construction of buildings is to blame. Previously, they saved on waterproofing required places Houses. This often happens now. Such savings lead to the above problems with which people have been suffering for years.
What is waterproofing
Problem areas need to be waterproofed. These include:
- bathrooms;
- kitchens;
- basements;
- ground floors;
- roof;
- weak walls in terms of insulation.
For implementation they are used special materials and technology. First, let's figure out what waterproofing is.
Waterproofing is the protection of any structures and structures from moisture penetration. This means that applying a protective layer prevents the appearance of mold and unexpected influx of water, which protects against unplanned repairs and saves money.
Features of the method
 Construction waterproofing mixtures differ in their use and composition. At the same time, they are divided into several types according to the following criteria:
- By type of material: roll (film, roofing felt), powder (construction dry mixes), liquid.
- By chemical composition: polyethylene, cement, bitumen, rubber, acrylic, PVC materials, silicone (silicon).
- By method of implementation: sealing, penetrating, coating, membrane.
As you can see, there are many types of waterproofing, each of which has its own characteristics of operation outside and inside the premises.
Outside buildings
When applying waterproofing, it is very important to take into account the air temperature and the amount of sunlight on the base. The mixtures are used at temperatures from +50C to 350C. Superfluous solar lighting negatively affects the applied powder or liquid waterproofing, as it causes water to evaporate from solution very quickly. As a result of the hydration reaction, the composition will not achieve the declared characteristics and will not be able to perform its functions. That's why workplace must be protected from solar radiation.
Home distinctive feature facade waterproofing materials is the presence of such characteristics as frost resistance. This indicator is measured in freeze and thaw cycles. The material is considered frozen when negative temperature below the operational value indicated in the labeling.
Indoors
 The main indicator for internal use environmental friendliness and fire safety are considered. Therefore, materials made of PVC, bitumen, rubber are not recommended for interior works. Sometimes they cause allergic reactions.
There is also one important feature the use of waterproofing in rooms, which our builders forget about. Any powder and liquid formulations They perfectly protect against moisture penetration on planes, but do not work well in corners. Therefore, at the junction of vertical and horizontal surfaces treated with insulation, a special membrane tape with an elastic non-penetrating gasket in the middle should be used.
What waterproofing materials exist: varieties, how to treat moisture outside and inside
Let's take a closer look at the above types of waterproofing from the point of view of the area and method of application.
Sealing
 Sealing waterproofing is not quite the right phrase. It is correct to call products in this category sealant or joint waterproofing. It is used when it is necessary to insulate the junction of two objects, if the distance between them is up to 2 cm. An example is the junction of a wall and a sink or bathtub. For these purposes, acrylic and silicone compounds are used, most often produced in tubes with a volume of up to 300 ml. The silicone seam can be up to 5 mm, and a cavity of up to 2 cm is sealed with acrylic.
Waterproofing a swimming pool or shower stall is also an example of the use of sealants. It is recommended to use colored silicones as grout for tile joints. They protect adhesive composition from moisture getting into it, which increases the service life of the entire wall.
Sealant is a universal waterproofing of a wall when the application area is very small. In addition, these compounds have high adhesion and are often used as adhesives for decorative panels in places with humidity above 60%.
Thermal and waterproofing
 There is the concept of thermal insulation waterproofing of walls. But this is not entirely true. Part waterproofing mixtures does not include minerals that increase resistance to heat penetration. However, these mixtures and materials are used in insulation systems that include several layers:
- leveling (if necessary);
- waterproofing (if necessary);
- insulation (glue + insulation);
- protective (breathable);
- decorative.
Depending on the place of application, the layers may be swapped. The following are used as a waterproofing layer:
- film membranes if a ventilation façade and roof are being created;
- cement - when creating a plastered facade;
- bitumen, rubber - used in basement and roofing finishing.
Anti-corrosion
There are anti-corrosion waterproofing mixtures. Their composition is usually based on bitumen. But there is no point in using such a composition to waterproof walls, since only metals are susceptible to corrosion.
However, when as country houses they use the bodies of former trailers, cabins, buses or trolleybuses. In this case, the use of only such waterproofing will extend the life of the home and protect it from destruction.
Coating wall waterproofing
 A universal type and method is coating waterproofing. It is used for waterproofing walls in bathrooms, kitchens, showers, swimming pools, water tanks inside and outside buildings. To implement the method, one- or two-component cement, acrylic, silicon compositions and crystal-forming liquids are used.
Cheap alternative materials suitable for outdoor use
Some of the above methods and materials are often quite expensive and become inaccessible to the consumer. In these cases, you can use a cheap alternative - liquid glass and mixtures containing it.
The characteristics of the mixture with liquid glass are much inferior to the finished products. But this option can be used as a temporary one to save up funds and do everything right.
How is waterproofing carried out?
Depending on the type of waterproofing, it is applied with different tools.
On a brick wall
 For brick walls, silicon-based compounds are recommended. To apply them, use a brush, but to save time, use a fleecy or foam roller.
If another type of waterproofing is used for the wall, then it is advisable to level it in advance with starter or universal plaster. After that, coating waterproofing is carried out in the same way or with a smooth spatula.
When using membranes, it is not recommended to use hardware to avoid creating holes in the films. Over time, such holes become cold bridges and lead to the formation of mold and mildew. That's why plastic film glued to a special rubber tape or high-quality double-sided tape.
Inside the apartment
From the inside, use coating waterproofing on cement or acrylic base. It is applied with a spatula or brush.
The method is implemented as follows:
- I mix the cement composition with water or a special solution until it becomes semi-liquid. The finished product is first applied to the surface in vertical stripes over the entire area.
- After the first layer has dried, the second is applied perpendicular to the first, i.e. horizontal stripes.
- When using the composition in heavily watered environments, for example, swimming pools, shower trays, make a third layer, which is applied up to 5 mm thick, like a finishing putty.
Concrete walls
 Concrete walls are a special base because they do not absorb moisture and have smooth surface. This reduces the adhesion of some building mixtures. Because of this, when using cement and acrylic waterproofing, it is first necessary to apply an adhesive primer, called concrete contact.
When waterproofing concrete structures heavy profiles such as underground tunnels of metro crossings, sewers or parking lots, in the presence of water-logged soils, it is recommended to use penetrating crystallizing waterproofing.
This type is sold in buckets with a capacity of 5 liters and has the appearance of a clear liquid. It is applied to the base with a brush and penetrates 5-10 mm deep into the base. During operation, water seeps in, which reacts with waterproofing crystals and provokes their growth. As a result, all microcracks are plugged and a monolithic waterproof wall is obtained.
How long does the coating last?
Different types of waterproofing have their own service life.
The cement mixture lasts no more than 15 years on the facade of a building with periodic watering, and indoors it will last up to 20 years. Some manufacturers claim that their mixtures are ready to be used outside buildings for 25 years.
 Acrylic compositions are recommended for indoor use, where they are ready to last no more than 20 years.
Penetrating waterproofing is the most durable, as it lasts as long as a concrete base.
Polyethylene and fabric membranes are used for no more than 10-15 years, after which they need to be replaced.
Bituminous waterproofing materials are considered less durable. Depending on watering, they deteriorate within five years, but in some cases they last up to 10 years.
The use of waterproofing is necessary in all cases of presence of water and moisture. Depending on the amount of excess liquid that appears, simple and cheap materials(cement, acrylic, silicone), but with greater water content, more expensive penetrating concrete insulation should be used.
Useful video