Potbelly stove – perfect solution in conditions where it is necessary to provide heating for small spaces (garage, utility room, heating a bathhouse), spending a minimum amount Money. The ability to use materials that almost everyone has, as well as the ease of making it yourself, allows you to save money. Next, we’ll look at what you can make a potbelly stove from and provide specific drawings.
What tool is needed?
Regardless of the selected drawing or design features potbelly stove, to carry out work on its manufacture, in addition to materials, you need to prepare the following tools and equipment:
- Hammer.
- Bulgarian.
- Welding.
- Drill.
- Drill.
- Brush.
- Chisel.
- Pliers.
- Roulette.
It is understood that each of the listed tools is designed to work with metals.
Choose a type and start working
A potbelly stove can be made with your own hands from:
- Metal sheets.
- Pipe
- Can.
- Gas cylinder.
The type is selected based on the availability of materials, as well as the preferred complexity of the work performed.
Potbelly stove made of metal sheets
Let us present the features of making a stove from metal sheets that use different raw materials for heating: waste and firewood.
Furnace in production
To start working with your own hands, a metal sheet of about 5 mm is prepared (this is the width that allows the stove to quickly warm up and effectively heat the garage) and pipes (needed for the chimney and some other elements). For a more accurate understanding of the manufacturing principle, look at the drawing: 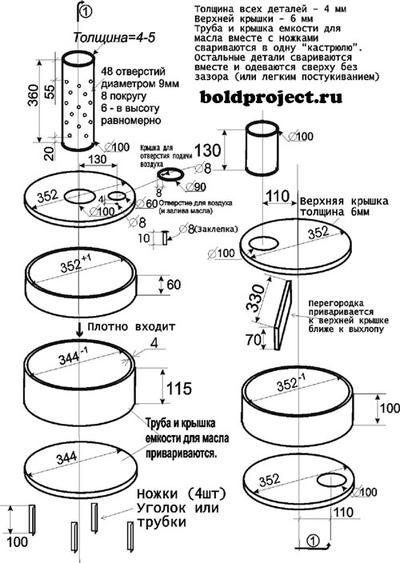
Let's get started:
- According to the given dimensions, you need to cut out the elements from the sheet from which the stove will be made. Try to clean up the cut edges as much as possible.
- The part for fastening the components of the potbelly stove is being prepared - a pipe with holes.
- Parts of the upper tank are prepared for installation of the chimney pipe. To do this, according to the data given in the drawing, you need to make a hole shifted to the left in relation to the cent. Also, another hole is made at the bottom of the tank (offset to the right) - it is intended for installing a connecting pipe.
- The component parts are welded together and a finished tank is obtained.
- The lower tank is welded in the same way. Only a hole is made to install the pipe in the center. You also need to make another hole with a slight offset - recycling will be poured into it. A special sliding lid is made over the filling hole.
- The lower tank is attached to the upper one (they are welded to the connecting pipe). Strengthen the structure using brackets.
- Don't forget to weld the legs to the lower tank.
- To increase service life, the stove is cleaned and painted.
You connect the potbelly stove to the chimney and try to heat the garage. To do this, pour fuel into the lower tank and set it on fire. When it flares up, you need to close the processing hole with a sliding lid.
Important: To paint the structure, use special heat-resistant paints.
Rectangular wood stove
This option is suitable when you need to heat a garage or bathhouse rooms intended for recreation.
The features of the model, the manufacture of which we will describe with our own hands further, are high heat transfer and the ability to adjust the traction force.
Our oven will have dimensions 45x45x80. These dimensions are enough to heat an average room. It will hold long pieces of wood and is easy to move.
In this case, we will not provide a specific drawing, and will try to explain it in words as much as possible. Before starting work, we buy:
- Steel 3-4 mm thick. A sheet of one and a half by two meters will be enough.
- A piece of pipe. Choose with a diameter from 90 to 100 mm. Length: 0.4 m.
- Reinforcement 16 mm. You need exactly 6.2 m.
- Five kilograms of electrodes.
- Four door hinges.
- A steel rod, half a meter long and about 10 mm in diameter.
- Seven meters of corner with a 40 mm shelf. The walls should have a thickness of 5 mm.
When everything necessary is prepared, we begin to work with our own hands in the following sequence:
- The future walls of the structure are cut out of the sheets.
- The corner is welded in such a way as to form a frame. When performing this and the first point, you need to remember the above dimensions of the stove (45x45x80).
- The reinforcement is cut and welded to the frame at intervals of 2 cm.
- The finished frame is scalded with tin.
- Along the diameter of the smooth rod in the section of the pipe that will be the chimney, you need to make 2 holes. The pipe is welded to the frame (before this you need to make a hole for it).
- A curved rod is inserted into the chimney holes. It must have a shape right angle. A piece of tin is welded to it round shape, slightly smaller in size than inner diameter chimney - will be used for adjustment.
- The potbelly stove must have doors. They are cut directly from the body. Loops are welded onto the removed piece of metal, with the help of which they are attached to the stove.
- The doors are equipped with bolts and handles that can be made to any convenient view. The main thing is that they guarantee maximum fixation of the door (if you don’t want to burn down the garage).
- When the work is finished, you can check the result of the work with your own hands and start heating the garage.
Important: To ensure traction, the doors are fastened so that there are small gaps.
Potbelly stove from a pipe
This option implies ease of doing the work yourself and an aesthetic appearance, which will allow you to heat not only the garage, but also small rooms in the country.
Work algorithm:
- The pipe is taken and cut to the required length.
- 2 holes are cut out in the side part: for the ash pan and the firebox. The distance between them is approximately 15 cm.
- The cut pieces of metal will serve as doors. Their size is increased by welding metal strips on top. You also need to immediately install handles that secure the door.
- Corner brackets are welded inside the future stove (they will support the grate, welded with your own hands from fittings or purchased in a store).
- The grate is installed.
- In the circle of metal that will cover the pipe opening (the upper part of the stove), you need to make a hole for attaching the pipe (smoke exhaust).
- The bottom and top of the stove are brewed.
- The pipe is welded.
- The hinges are welded and the doors are installed.
- The furnace at the weld joints is cleaned and painted with special paint.
- The last stage is connecting to a chimney that is led outside the premises.
If everything is done correctly, the potbelly stove will be able to completely heat a garage or other small room.
Can stove
You can make a potbelly stove with your own hands from any old can. For this you need:
- Can.
- A piece of pipe.
- Rebar or wire.
Let's get started:
- On a can installed in a horizontal position, mark the location of the rectangular pit. It should be placed under the cover.
- Cut a hole for the chimney. It can be in the bottom or wall.
- We make a grate. It is easier to make it from steel wire, which, in a bent form, is brought into the middle of the future stove and straightened. You need to position the zigzag in such a way that it is as convenient as possible to fill the potbelly stove with firewood.
- Attaching the legs.
- We weld the chimney.
The design implies a minimum of manufacturing costs and you do not need to have professional skills to complete the work. With its help you can safely heat the garage and other utility rooms.
Gas cylinder stove
If you have a gas cylinder lying around on your property, use it to create a potbelly stove.
Sequence of work:
- Cut off the tap and plug the hole.
- Cut a hole in the bottom for the door. Doors are made from the resulting piece of bottom, by scalding it with a strip of metal.
- A handle lock is attached to the doors and they are mounted on the cylinder using hinges that are welded.
- In the part of the cylinder that will be the bottom, you need to make a grate. To do this, just make holes.
- A tin box is welded under the holes in the bottom, into which soot and waste will fall. You also need to make doors in the front of the box - they will be used to adjust the draft.
- The stove needs to be lifted off the ground using the legs. For their manufacture regular one will do pipe.
- A smoke outlet is welded into the upper part of the cylinder.
- If necessary, you can organize on the surface of the structure hob.
Such a stove will heat a garage or small house in the country.
A potbelly stove is a fairly simple device for heating rooms. When performing work, remember that the stove must not only heat, but also meet minimum fire safety requirements.
In few films about war you won’t see a potbelly stove with blazing wood, next to which soldiers are huddled and conferring about something.
A simple shape in the form of a barrel, a knee placed outside through a window and a couple of logs could quickly and efficiently heat even a large room. Why this design was called a potbelly stove remains in history, but even today this stove enjoys well-deserved popularity. Below we will tell you how to quickly make a potbelly stove with your own hands, we will show you the most effective models, and we will also see photos and videos of the most successful stove models.
Advantages and disadvantages of using potbelly stoves
By analogy with any other heating devices, potbelly stoves also have certain pros and cons in their operation.
Among the positive properties, the following can be noted:
- use of unlimited assortment solid fuel- firewood, sawdust, coal, wood chips, briquettes, pellets, peat, etc. In some cases, even recycled motor oil is used as fuel;
- the ability to make a potbelly stove with your own hands (see drawings below) practically from scrap materials;
- compact size of the oven, which allows it to be placed even in a small room;
- there is no need to install a chimney, foundation and platform.
Negative characteristics include:
- the need to protect against combustion objects falling out of the firebox - embers, sparks, etc.;
- strong and rapid heating of the oven walls, which increases the risk of injury to others;
- high consumption fuel - it is rational to use such a stove only for short-term heating.
Types of furnace designs
Structurally, a potbelly stove is a rectangular or oval container equipped with a firebox with a door, an ash pan and an elbow for removing smoke (similar to a chimney).
The preferred material is stainless steel or cast iron. Cast iron accepts any type of fuel, but is fragile - sudden cooling of the potbelly stove body is prohibited.
On an industrial scale, potbelly stoves are divided into the following categories:
- oven with hob;
- pyrolysis;
- equipped with a heat transfer-increasing casing.
The main feature of a potbelly stove is that in most cases it is made in a handicraft way, using metal boxes, cans and other suitable containers. Next, we will tell and show how to make potbelly stoves with your own hands - drawings, photos, videos
Furnaces differ from each other in the following categories:
- manufacturing material - cast iron, steel, brick;
- functionality - with a hob, heaters and gas generators;
- type of fuel - solid and liquid.
Classic oven
A sheet metal stove is traditional option, which fully reveals the characteristics of the potbelly stove.
Manufacturing process
Necessary materials:
- metal sheet 4 mm;
- fittings with a diameter of 10-15 mm for the grate;
- corners;
- pipe (diameter according to the diagram);
- Bulgarian;
- welding.
Video 1 An example of making a beautiful potbelly stove with your own hands
Use a grinder to cut out all the body parts from a sheet of metal according to the drawing.

On the back and side walls, hot weld the corners, on which you will then lay the grate and another sheet (in the drawing), which will hold the bricks.

A properly made grate will help increase the burning time of firewood. If it's not solid steel sheet, but a stacked grille made of reinforcement (up to 15 cm in diameter), the smoldering fuel itself will suck required air, due to the burnout it will be more complete and lasting.
Next, cut out 2 doors (for the firebox and ash pan) and put them on the hinges. On the top part, cut a hole for the pipe, to which you weld a sleeve 200 mm high. After this, you weld or put on a pipe to the sleeve, the bending angle of which is 450.
The technology of the most efficient potbelly stove was presented by V. Loginov. The material used is a metal sheet, the grates are reinforcement, and for connecting parts - hot welding, for cutting - pneumatic scissors or grinder.

To increase heat transfer, it is necessary to ensure a certain resistance coefficient of the chimney.
How to determine the diameter of a chimney pipe
Calculate the volume of the combustion chamber (liter) in relation to the pipe diameter (mm) in the ratio 1:2.7. For example, if the volume of the firebox is for furnace gas, resistance must be created. From thermotechnical calculations the combustion chamber volume in liters should be 2.7 times smaller in digital terms than the pipe diameter in millimeters. For example, if the firebox volume is 70 liters, then the pipe diameter will be 182 mm.
Potbelly stove made from a milk can
The second most popular material for making a potbelly stove after metal sheet is a milk can. This is easily explained, since the airtight case is almost ready, and everything else can be done with your own hands literally within a couple of hours.

Manufacturing process
- Punch through with a chisel or cut out a crescent-shaped slot under the neck. This future is blowing
- At the bottom of the can, cut a hole for the pipe, where the sleeve will be inserted and put on chimney.
- It is better to make the grate in such a potbelly stove serpentine or made of reinforcement, but it is necessary to carefully insert it into the can so that there is no need to cut additional holes.
- The dimensions of the potbelly stove made from a can are in the drawing. Already finished design should be placed on legs or made of brick.
The longer the chimney, the less heat loss will be.
Potbelly stove from a gas cylinder
An excellent material is a gas cylinder, which also fully ensures the tightness of the structure and its safe use.

Materials and tools:
- waste gas cylinder;
- metal sheet 4 mm;
- pipe (diameter see above);
- fittings for a set of gratings;
- corners;
- combustion door;
- Bulgarian
- welding.
- To begin, knock off the top rim with the tap and cut out a crescent-shaped hole for the blower on the bottom of the cylinder
- Weld a pipe to the bottom of the cylinder where the sleeve will be inserted and the chimney pipe will be put on.
- It is better to make the grate in such a potbelly stove made from fittings; in this case, there will be a natural intake of air and the fuel will burn almost completely.
- The dimensions of the potbelly stove made from a cylinder are in the photo. The finished structure should be placed on legs or made of brick.
Video 2 An example of making a potbelly stove from a gas cylinder at home
The potbelly stove has survived the most different times and has proven that it is the most reliable and in a simple way heating small rooms. Despite the relative simplicity of the design, during its manufacture it is necessary to observe certain proportions in order to increase the burning time of the filling and, accordingly, the efficiency of the furnace.
Photos of the most effective potbelly stoves according to readers
.jpg)
.jpg)
.jpg)
.jpg)
.jpg)
Photo 11 Bubafonya type stove

Photo 12 Potbelly stove that works

Often homeowners prefer to assemble simple and useful homemade products from improvised and unnecessary materials, instead of buying ready-made. And a potbelly stove is one of these useful devices.
The main feature of a potbelly stove is that it heats up as quickly as it cools down. Therefore, the scope of its use is narrowed mainly to those rooms where it is necessary to provide rapid heating, while the appearance of the device is often completely unimportant for the user.
You can make a potbelly stove with your own hands, and, if desired, modernize it to achieve more efficient heat transfer.
Are you also thinking about assembling such a homemade product and don’t know where to start? We will help you complete the task - the article discusses the assembly procedure various options homemade stoves, drawings and diagrams are provided.
Methods for improvement are also discussed in detail. homemade potbelly stove, as a result of which the efficiency of the stove will become noticeably higher.
The choice of furnace design depends on what material is used as fuel. Each user himself determines the degree of its availability and economic feasibility.
It is the flammable material that has different temperatures and the nature of combustion dictates the principles for creating various modifications of the device.
The shape of the potbelly stove can be different, often it depends on the availability suitable material. It could be an old can, a gas cylinder, metal container- whatever is at hand. The main thing when choosing it is the thickness of the metal and the shape, which requires a minimum of alterations.
Image gallery
A grate made of grate (it can be welded from reinforcement) is placed at the bottom of the chamber, under which ash will accumulate. You can also organize a hob. It is easier to do this on a horizontally located cylinder by welding corners on it on both sides.

It’s good if the barrel initially has legs. If not, you need to weld them or install the stove on bricks.
A potbelly stove made from a gas cylinder can also be used as a basis for the further construction of a hot water column, as it is also called “Titan”. To do this, install on top of the stove stainless steel container, through which the chimney pipe passes.
The water in a wood boiler heats up quickly, and little firewood is used - in summer time One bookmark in a small firebox is enough.
A metal container with walls at least 3 mm thick is also suitable for a potbelly stove. The open top of the container is closed with a circle of metal sheet and brewed.
A hole is cut out in the lid or wall for the chimney. Its diameter should be at least 100-150 mm. The top of such a potbelly stove will heat up so much that you can cook food and heat water on it.
We also have more on our website detailed instructions with diagrams and drawings for manufacturing.
Features of a sawdust stove
If there is no shortage of sawdust on the farm, then this type of fuel will fully justify its use. Such a potbelly stove does not require frequent loading - the compacted sawdust inside does not burn, it slowly smolders, releasing thermal energy gradually and providing heat for a long time.

A self-made sawdust stove works on the principle long burning. The slow combustion process saves resources - heat does not immediately fly out into the chimney, heating the atmosphere
The basis of the furnace can be a metal barrel with an open top (if the container is sealed, the top is cut off) or a pipe with a diameter of 300 to 600 mm.
Then a metal circle is cut out of a sheet three or more millimeters thick, which should be smaller than the inner diameter of the barrel. In its middle, a hole with a diameter of 100 mm is cut under a cone for compacting sawdust.
The workpiece is welded to the walls of the barrel. Using this circle, the ash pit is fenced off - in it, with the help of shavings or wood chips, ignition will be carried out. The height of the ash pan should be 100-200 mm.
Below the welded circle, a window is cut out, which will serve as a blower. Curtains are welded to the cut piece of metal, making a door for the same hole.
An exit to the chimney is made in the lid of the container. The lid must fit tightly onto the potbelly stove and be made of a fairly thick sheet, otherwise it will quickly burn out.

In order for sawdust to burn gradually, it is necessary to ensure a limited supply of oxygen to the fuel compartment. To do this, a cone-shaped core is inserted inside the firebox, sawdust is poured around it and compacted. The cone is carefully removed, turning, and the lid is put on the barrel.
The same model can be improved by adding an additional cylinder. In this option, the sawdust will be in the inner chamber, and the space between the two compartments will serve to burn gases and increase the heating area. In this option, the outlet of smoky gases is arranged in the lower part of the stove.
How can you improve your potbelly stove?
An ordinary potbelly stove has a mass positive qualities, but also has many significant disadvantages. It is unable to accumulate heat and heats the room while the fire is burning. Requires continuous fuel supply, on average every 30-40 minutes.
Besides, a large number of heat flies out through the chimney into the atmosphere, bringing no benefit. That is why work on improving the potbelly stove is ongoing.
The standard design of a potbelly stove has many modernized designs that allow:
- save fuel;
- increase the efficiency of the stove;
- increase heat capacity;
- reduce the frequency of fuel filling.
The most common methods for increasing the efficiency of a potbelly stove are creating a slow burning mode, a gas afterburning system, and installing heat-resistant lining of the internal walls.
You can also improve the quality performance of the stove by increasing the heat transfer area using welded pipes and an installed fan that will drive air flows through them.
The industrial model of such a potbelly stove is called “Buleryan”, but besides it, there are many more various designs made in a handicraft way. We recommend watching detailed master class By homemade production.
You can increase the heat transfer time if you line the stove with brickwork. Such a potbelly stove will heat up more slowly, but will also give off heat longer, maintaining the temperature in the room for some time after the fire has died down.
Are you interested in brickwork? We have it on our website detailed guide do it yourself with diagrams and drawings.
Option #1 – stove with increased fuel load
This model is designed to increase efficiency and continuous burning time. The basis is taken as a horizontal rectangular potbelly stove on massive, stable legs and complemented with a cassette made of a blind sealed cylinder. Such design additions significantly increase its efficiency.
A flange is welded to a cassette cylinder about 400 mm high. After installing the cylinder into the burner hole, its edge should fall 5-10 mm below the stove plate. To make it easy to install and remove the cylinder, handles are welded to its body.

The cylinder is filled with firewood in such a way that there is some space between them and when installing it on the stove, they can immediately fall onto the burning coals
How does a potbelly stove work:
- The lower part of the firewood, falling on the coals of the preparatory ignition, flares up. In this case, the upper part, located in the cassette, will not burn due to lack of oxygen, but will dry under the influence of hot smoke.
- Under the weight of its own mass and as it burns, the firewood gradually falls into the firebox.
- The hot gas, which is in the cylinder for some time, gives off heat to it, thereby increasing the heat transfer area in the room. In this case, the cylinder cover can serve as a cooking surface.
- At the same time, the temperature of the exhaust smoke decreases, which means the heat capacity and efficiency of the potbelly stove increases.
As a result of this modernization, the time interval between laying firewood increases and the efficiency of using the stove increases.
Option #2 – long-burning potbelly stove “Bubafonya”
The low efficiency of a conventional potbelly stove is a fact that has long been known and verified by many users.
One of the methods to increase it is to slow down the combustion process by limiting the flow of air into the combustion chamber. This improvement can be found in such stoves as “Bubafonya” and “Filipina”.
This stove model is used in non-residential premises- workshops, greenhouses, others outbuildings. To work for 9-12 hours, one stack of small firewood, chips, and sawdust is enough. Coarsely chopped and damp firewood cannot be used in this heating device model.
A potbelly stove can be created from any metal tank. Most often they use a barrel of fuel and lubricants or an old cylinder.
Manufacturing is carried out in the following sequence:
- A combustion chamber is prepared from an accessible cylindrical container, in the upper part of which a hole is cut for the chimney.
- A circle is cut out of metal (at least 10 mm thick), slightly smaller than the inner diameter of the barrel.
- A hole with a diameter of 100-150 mm is made in the center of the circle ( Exact size depends on the diameter of the rod tube used).
- Ribs up to 50 mm high are welded onto one of the planes of the circle.
- A pipe is welded to the center of the circle. Its length is calculated so that the piston, when lowered, rises above the reservoir lid by approximately 100 mm. If you leave the pipe longer than necessary, draft will arise in it and it will begin to smoke.
- Next, they build a lid that will fit tightly on the barrel and cut a hole in it that fits the piston pipe
You can further increase the efficiency of this model by organizing the supply of air from the street into the firebox. Thus, heated air from the room will not fly out into the chimney.
Option #3 – furnace with secondary combustion “Filipina”
The furnace uses two methods to increase its efficiency, based on the principles of long-term combustion and pyrolysis. To make it, you will need two gas cylinders, which will serve as chambers for primary and secondary combustion.
The sequence of actions for making a potbelly stove is as follows:
- The cylinders are prepared for use by releasing the remaining gas from them and filling them with water. Without this procedure, it is absolutely impossible to cut them, otherwise the sparks that are formed during the operation of the angle grinder can provoke a gas explosion, a certain amount of which always remains in the cylinder.
- In the first cylinder, which will serve as a chamber for the firebox and ash pan, remove the tap and cut off the top (it is used to make the door), and cut out a hole for installing a chimney.
- Opposite the hole for the chimney, a pipe is welded, the other end of which should not rest against the lid of the second chamber, leaving free space for smoke to escape.
- At the outlet of the pipe from the first cylinder, a metal ring is welded; it will serve as a support for installing the upper cylinder. Holes are drilled in it.
- A metal ring is also welded to the second cylinder where the top is cut, in which the locations for the holes are marked, focusing on the holes already made in the first ring.
- Before finally installing the second cylinder, an air supply pipe is inserted into it.
- Place the upper chamber on the pipe, aligning the holes, wind a heat-resistant rope between the rings, and secure the connection with screws.
- The chimney exit is made from the bottom of the secondary combustion chamber.
To obtain a stable structure, reliable legs are welded to the lower chamber. Install the door on the awnings. It can be further improved by adding the ability to regulate the air entering the firebox.
The stove-potbelly stove always helped out in emergency situations and was a reliable assistant for summer residents, motorists with a garage, as well as owners of small private houses.
Today, it often takes on a new look, developed by interior designers, so it fits well into the halls of elite mansions. Is it possible to make this useful, and sometimes simply necessary heating device do it yourself if you don’t have enough experience in welding and cutting metal?
Of course, yes, and yes again, in order to cook a potbelly stove you only need to understand general principles welding metals, even if you end up with a crooked seam, you can always clean it up with a grinder; look at the photo below to see what kind of stove was welded by a beginner who had only used a welding machine twice in his life:
Tools required for work
For the manufacture of any metal structures you need a certain set of tools, which include:
- Welding machine, at least 200A and electrodes, protective mask and welding suit;
- Grinder (grinder), cutting and grinding wheels on metal. Some shaped parts can only be cut with a gas cutter.
- Skimmer(hammer);
- Metal brush;
- An ordinary hammer, chisel, pliers;
- Tape measure, folding meter and chalk for marks;
- Drill and drill bits for metal.
Types of homemade potbelly stoves
For different rooms you can choose your own type of potbelly stove that suits your needs best technical specifications and by appearance. They are made from metal tanks, medium-diameter pipes, barrels, gas cylinders and sheets with a thickness of at least 3-5 mm.
For heating in a garage, any of the potbelly stove options is suitable, but for use in a residential area, it is better to avoid some models.
Therefore, you need to consider the most popular options for potbelly stoves in order to find out which one to choose and make yourself.
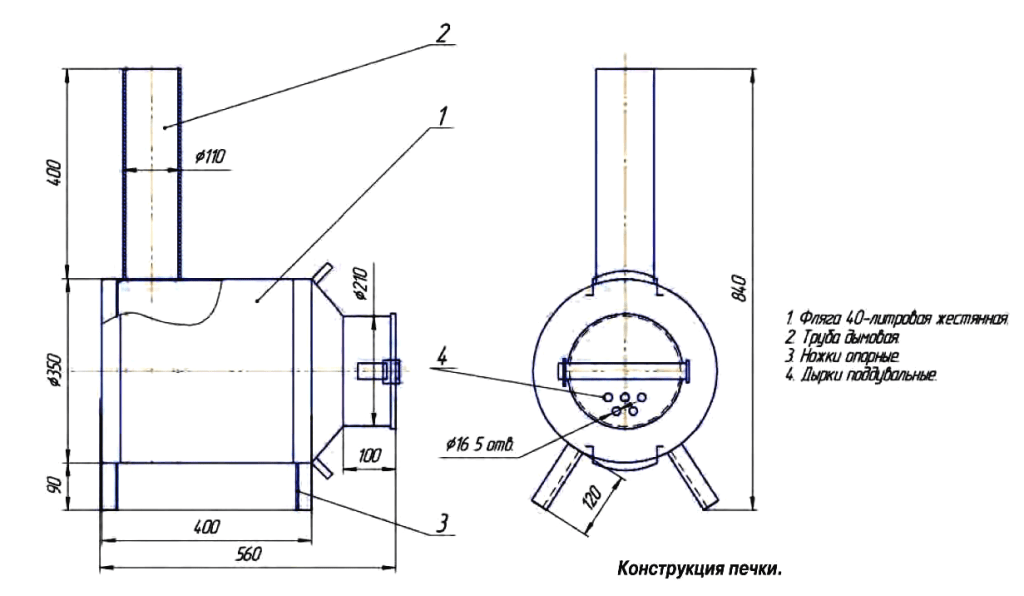
Potbelly stove for mining - simple and cheap
This is exactly the option that is not suitable for use in premises where people live. The explanation is simple: when burning, waste oil emits a specific smell, even if there is a good exhaust system.
For manufacturing you will need sheet metal thickness 4-5 mm, from which everything will be cut necessary details. A pipe is also needed for the manufacture of some elements of the potbelly stove and chimney.
In the diagram presented, everything is clearly visible dimensions of parts that needs to be prepared.
- All elements are accurately marked on a metal sheet and cut out using a grinder. All edges of the parts are carefully cleaned.
- Round holes are drilled in a prepared pipe of the required height. It will connect the upper and lower containers of the potbelly stove.
- A hole is cut in the upper plane of the upper tank, in the place indicated according to the diagram. required diameter. It is offset from the center to the left and will be intended for the chimney pipe. On the bottom wall, the hole is offset to the right side of the circle, and the connecting pipe will enter it.
- Two circles are welded to a section of pipe that will determine the thickness of the upper tank.
- The lower part of the stove is made in the same way. Only the hole for the pipe to enter is cut in the center of the circle. In addition, another one is cut out, which will serve as a neck for filling the stove. A sliding cover is attached to it.
- Three or four legs are welded onto the lower solid plane.
- For rigidity, the upper tank is connected to the lower one with metal brackets.
- To make the stove beautiful and not rust, everything welds are cleaned well, and then all surfaces are painted with protective heat-resistant paint.
- The last step in the work is connecting the stove to the chimney.
Such a furnace works as follows: waste is poured into the lower tank, then using a splinter or rolled paper, it is ignited through the hole. The sliding cover on the hole is closed after the waste inside the tank ignites. Oxygen entering through the holes in the pipe that connects the two tanks promotes intense combustion. Hot air passing through the top of the oven heats it to high temperature, so you can easily heat a kettle on its surface. Since there is always spent fuel in the garage, there will never be any problems refueling the potbelly stove.
Potbelly stove from an old barrel or pipe
This stove can be made from an ordinary metal barrel or pipes of a certain diameter. It is quite suitable for installation in a residential area of a summer house, and if it is beautifully and neatly designed, it can also be suitable for a residential building.
- At the desired level of the future furnace, mark and cut out two rectangular holes, which will be the entrances to the firebox and ash pit.
- The cut out parts will be useful for making doors. They are framed with metal strips, bringing them to the required size, and a special handle with a latch is installed.
- About ten centimeters below the firebox door, corner brackets are welded inside the barrel or pipe on which the grate will be laid.
- You can weld the grate yourself from reinforcement.
- If the stove is made of a pipe, its bottom and upper part are welded.
- The legs are welded to the lower bottom part.
- A hole for the chimney is cut in the top panel and a pipe is welded into it.
- Then the doors are installed on the fixed hinges. According to their location, the hook for the lock is marked and secured.
- In order for the stove to have an aesthetic appearance, everything welding seams must be thoroughly cleaned. If the oven is then coated with heat-resistant paint, it will be impossible to distinguish it from the factory product.
- Then, when the stove is completely ready, it is connected to a chimney leading outside.
Generally , good option potbelly stove, if there is enough room for it in the room, since this model will take up a fairly large area. It should be noted that top panel The potbelly stove is large enough, and you can easily install a kettle or, for example, a frying pan on it.
Potbelly stove made from a bad gas cylinder
The gas cylinder has an almost ready-made shape for a good potbelly stove.
- The top of the cylinder with the tap is cut off, and a plug is subsequently welded to this place.
- In its bottom part it is cut out square hole, which will serve as the entrance to the firebox. The cut out part should also not be thrown away. It is scalded, and thus the door panel will be ready.
- A handle lock is attached to it, and the door is installed on welded hinges.
- Holes are made on the wall of the cylinder, which will be the bottom of the future stove - they themselves will act as a grate.
- Under them, a box made of thinner metal is fixed by welding. This will be an ash pit for disposing of waste from burnt firewood, which will also act as an ash pit. The door must also be secured to the ash pan.
- After this, the legs are welded - they can be made from metal corner or pipes.
- In the upper rear part of the potbelly stove is cut round hole, a chimney pipe is welded into it.
- If necessary, you can also install a hob on top. To do this, on the top of the cylinder it is enough to weld a frame from steel reinforcement. On such hob It is quite possible to place two items - for example, for cooking and heating water.
A potbelly stove made from a gas cylinder is perfect for both a garage and a room in a country house.
One of the home craftsmen shares his experience on how to make a potbelly stove with your own hands from a cylinder with a vertical arrangement:
Video lesson on building a potbelly stove from a gas cylinder
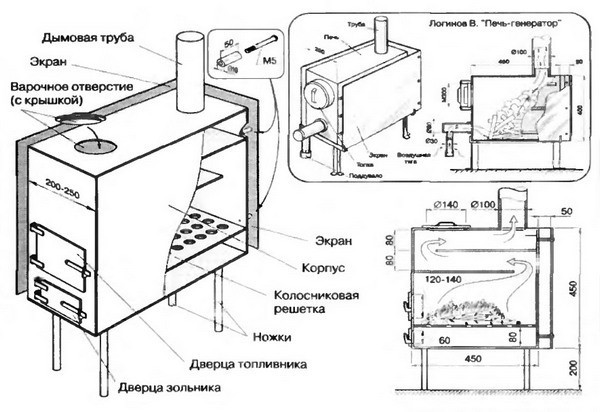
Potbelly stove made of rectangular sheet steel
This is probably the most optimal, aesthetic, compact version of all the potbelly stoves proposed above. It is best suited for heating residential premises. The design of this stove is clearly visible in the two diagrams presented.
Compact, easy-to-use “Gnome”
The first of them shows the “Gnome” stove. It has a simple structure: two chambers - a firebox and an ash pan, a chimney pipe and legs.
The second diagram shows a more complex internal structure potbelly stove, which will help it retain heat for a longer period. This potbelly stove is worth considering.
- To make this stove you will need sheet metal with a thickness of at least 3 mm, a corner 5 × 5 cm, a chimney pipe, and a burner cover.
- On metal sheets Markings are made and all the necessary details are drawn: the walls of the stove, the bottom of the potbelly stove, the hob; grate, two internal metal plates that direct the flow of burnt gases, their afterburning, and delay the rapid release of heat.
- Two rectangular holes for the firebox and ash pan are cut in the front wall of the stove. Here, doors with locks and latches for them will subsequently be attached to hinges.
- A neat opening for the burner is cut out in the upper plane (depending on the size of the purchased part), as well as a hole for the chimney.
- The legs are attached to the lower, bottom part.
- The place where the grate will be placed is marked on the side panels. Corners are welded to these places, they will become brackets for the grate.
- In order to make a grate, you can drill a large number of round holes in a sheet of metal, or weld a grid from reinforcement.
- In the upper part of the potbelly stove, at a distance of 16 cm from the hob, a plate is welded, its length being 8 cm less than the depth of the potbelly stove, i.e. it should not reach the back wall of the oven body by 8 cm.
- The same plate is welded to the rear wall, 8 cm higher than the first plate; it should not reach the front panel by 8 cm. Thus, after installing all the parts, a labyrinthine a corridor through which hot air will pass, heating these plates and preventing the heat from immediately escaping into the pipe.
- Next, you need to assemble all the parts of the potbelly stove together by welding. All joints of parts in mandatory reinforced with a metal corner.
- IN last resort the chimney pipe is welded and all welding seams are cleaned.
- To give the potbelly stove a spectacular look, it is painted with heat-resistant paint.
Rules for safe installation of a potbelly stove
In order for a homemade one to bring only comfort and warmth to the house, and not create problems, it is necessary to follow safety rules.
- The stove is installed on a fire-resistant surface. It can be arranged from tiles or in the form brickwork. The walls around the stove also need to be protected from overheating. This can be done using fireproof special drywall or other non-combustible material.
- Flammable materials must not be placed near the firebox.
- In the room where the stove will be located, there must be good system ventilation. This is important to ensure that there is no risk of carbon monoxide accumulation in the room.
- To make any potbelly stove, you must use only high-quality material.
The potbelly stove will serve effectively and for a long time, will be a good helper in household chores and will warm you up on winter evenings. The main thing is to think through the model well, make it carefully, and comply with all the requirements for safe handling during operation.
Since homemade wood stoves remain the simplest means of heating garages and cottages, in this article we will look at making a potbelly stove with our own hands. With the help of our instructions and drawings you can make a heater from available materials– gas cylinder, steel pipe and even rims.
Making a stove from a cylinder
From old 50-liter propane cylinders, home craftsmen have gotten the hang of making several types of wood-burning potbelly stoves:
- simple vertical stove;
- long-burning unit Bubafonya, where fuel is burned from top to bottom;
- horizontal furnaces - conventional and with a secondary pyrolysis chamber.
Note. From a former gas tank installed in a vertical position, you can weld a dropper furnace using waste oil and diesel fuel. How to do this correctly is described in.
There is no point in disassembling the simplest designs of country and garage potbelly stoves - there are plenty of similar drawings on the Internet. We propose to consider more efficient, and therefore economical, models with modifications that increase heat transfer and efficiency of iron furnaces.
Instructions for disassembling a gas container
Combustible propane-butane mixture, filled in gas cylinders, heavier than air. To safely cut the tank for making a potbelly stove, the remaining mixture must be displaced with water. The correct disassembly technology looks like this:


When the reservoir is partially empty, continue working and remove the lid. Whatever design of the homemade stove you choose, the cylinder will have to be cut, so the procedure of filling it with water is mandatory.
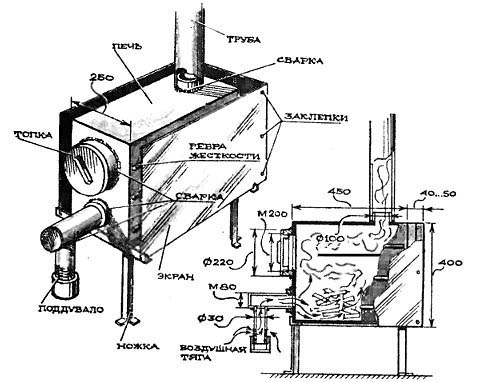
Vertical model with air chamber
The structure of a potbelly stove - a wood-burning housekeeper - is shown in the diagram below. The modernization consists of adding a separate chamber with a heat exchanger in the form of steel fins, blown with air through 2 pipes in the upper part of the heater. Increased efficiency is achieved through forced air supply by a fan, which allows you to quickly warm up the room.

Important point. An additional chamber isolated from the firebox can also serve as a water circuit connected to registers or heating radiators. One caveat: this inexpensive version of a boiler for a summer house or garage must work with forced circulation coolant from the pump.
For production you will need Additional materials from the list:
- sheet metal 3 mm thick for the doors and chamber partition;
- scraps of thick iron for the heat exchanger;
- fittings Ø16-20 mm for grates;
- pieces of pipes with a diameter of 40-50 mm for the air connection and Ø100 mm for the chimney;
- asbestos cord, ready-made handles.

Drawing of a heating stove of a vertical design
If a propane tank is not available, make a potbelly stove from big pipes with a diameter of 300-500 mm with a wall thickness of up to 5 mm. The assembly technology is the same in both cases:

Note. When making a stove from a pipe Ø300-500 mm, you will need to install the bottom of the ash pan (2 mm steel), and the air chamber will be cylindrical.
To prevent the potbelly stove heating stove from smoking into the room, install a chimney with a height of at least 4 m (counting from the grate). If you plan to burn sawdust, then the distance between the grate bars should be kept to a minimum.

Thanks to its small dimensions and forced submission It is convenient to use heated air for a variety of purposes - to heat a garage, cottage or greenhouse. The technology for assembling such a heater with your own hands is demonstrated in the video:
Horizontal two-chamber stove
IN in this case The design improvement consists of installing an additional chamber with partitions for afterburning pyrolysis gases released in the firebox during the slow smoldering of firewood. The emphasis is on long burning, so the useful volume of the firebox is not taken away by the ash pan - it is taken outside.
To increase the efficiency and heat transfer of the potbelly stove, the outside of the housing is equipped with flat heat exchange fins, which is reflected in the drawing. According to the principle of operation, the heater is similar to Buleryan-type stoves: before exiting, the flue gases bend around 2 partitions in the secondary chamber, giving off heat to the iron walls.

In addition to two tall 50-liter cylinders or a steel pipe with a diameter of up to 500 mm, for manufacturing you will need:
- 3 mm metal for the ash pan and doors;
- 2 mm steel strips on the ribs;
- any suitable rolled metal for legs;
- a pipe with a diameter of 10 cm and a length of 15 cm for the chimney pipe;
- fittings for strengthening the grating;
- asbestos cord for door sealing.

Trimming and joining propane vessels, installing door frames and ash pans
The manufacture of the stove begins traditionally - with disassembling the cylinders. One is cut off bottom part, and in the second, an opening is made for the doors and slot-like holes in the side wall - future grate bars. In order for combustion products to pass into the secondary chamber, a round hole with a diameter of about 10 cm is made on the other side. The further order of work is as follows:
- To prevent the grate bars from bending due to high temperature, weld reinforcement from the bottom with periodic profile reinforcement.
- Make a frame at the end and install the door, sealing it with asbestos.
- Weld the ash chamber with the door and install the legs.
- On the second cylinder, cut the walls in such a way as to connect it to the horizontal firebox at an angle of 90°. Inside, secure 2 partitions by welding according to the drawing.
- Connect the secondary chamber to the firebox, carefully welding the joining seam.
- Install the chimney pipe and external heat exchange fins.

Advice. It is better to make partitions in the vertical chamber from semicircular pieces cut from the sides of the second tank. This will increase the heat extraction from the flue gases.
The resulting potbelly stove for a dacha is quite capable of providing heating for various utility rooms, including a steam room in a bathhouse. It is easy to adapt it for cooking by making a flat cooking surface of 4-5 mm metal on top of the firebox.
Heater made from car rims
The advantage of rims is decent thickness metal If you make a potbelly stove from them, it will not burn out for a long time, although such a product cannot be called beautiful. Let's give some recommendations for production:

If there are only two rims on the farm, you can collect combined option potbelly stoves by inserting a section of steel pipe of suitable diameter between them. How to make such a stove, watch the video:
Classic steel stove
We propose to weld the wood-burning stove shown in the photo from iron sheets 3-4 mm thick. Externally, it is similar to a classic rectangular potbelly stove with low efficiency (up to 40%), but inside the design has been modernized. To make it more economical, two smoke teeth are installed above the combustion chamber, like brick fireplaces.

The partitions inside the body, shown in the drawing, block the section of the firebox in the horizontal plane and leave a small passage 10 cm wide for combustion products. The flow of heated gases through two smoke circuits increases heat transfer by 5-10%, which is much better than factory cast iron stoves.
Advice. The dimensions of the heating unit indicated in the drawing are not an axiom; you can change them at your discretion. The main thing is to maintain the size (height) of the flues. We do not list the required materials, since their list is obvious - sheet metal, cuttings of pipes for the chimney, and rolled metal for grates and legs.

The manufacturing procedure is as follows:
- Weld the body of the potbelly stove, starting with the bottom sheet. The primary assembly of parts is performed using tacks.
- Cut and install 2 partitions. For the lower one, located above the flame, it is worth taking thicker iron - 5-6 mm.
- Make a grate and place it on supports made from corners welded from the inside to the side walls of the firebox.
- Attach a cover and chimney pipe, install simple doors with locks.
- Finally weld all seams.
If you plan to heat your potbelly stove with small fractions of coal or sawdust, make a grate from steel corners with the profile facing downwards. Make the distance between them minimal - 5 mm.
Conclusion

Design engineer with more than 8 years of experience in construction.
Graduated from Eastern Ukrainian National University them. Vladimir Dal with a degree in Electronics Industry Equipment in 2011.
Related posts:
