Method of obtaining finishing coating, in which the application of decorative plaster is used, in Lately very popular. The simplest explanation for this is big choice source material, obtaining any coating color and a wide variety of, often unique, finished surfaces, examples of which can be seen below.

If you try to find an accurate, established and unified definition of what decorative plaster is, then it will only be a waste of time. There is simply no generally accepted definition, each of the authors and specialists has their own concept and interpretation, but everyone agrees on one thing - decorative plaster serves to create an original finishing coating thanks to the materials used and methods of applying decorative plaster.
Often, it is the composition of the material that determines all further operations for its use, and the methods of applying the usual mixture make it possible to turn it into decorative plaster and obtain relief and original surfaces.
Plaster composition
The generally accepted classification of such materials is based on the type of binder and the size of the filler particles. Typically, two types of binders are used - synthetic and mineral. Cement or lime are used as mineral binders, and synthetic resins (polyvinyl acetate, styrene-acrylic, acrylic, etc.) are used as synthetic binders. The most widespread are mixtures based on synthetic resins, in particular their aqueous solutions.
Mineral (cement) based mixtures are more often used for applying decorative plaster for exterior finishing.

The filler most often used is quartz, granite or marble chips, or mixtures thereof. In this case, the classification is made by the size of the filler; the larger the particle size, the coarser the mixture is considered. It is generally accepted that it is preferable to use fine-grained mixtures for interior decoration, and coarse-grained ones for exterior decoration, although there are no clear-cut rules, everything can be the other way around. The application of decorative plaster is related to the size of the filler fractions; the larger the fraction, the higher the material consumption when performing the work.
Types of plaster
There are several types of plaster on sale:
- ready-to-use, usually based on synthetic resins;
- dry mixture;
- decorative plaster for interior works, designed to create some type of coating (Venetian, bark beetle, etc.).
The result obtained when using a dry and ready-to-use mixture is usually the same, unless special cases are concerned. But finished plaster requires less time to complete. preparatory stage and is more often used when applying decorative plaster with your own hands.
A completely different case is when work is done using specially prepared decorative plaster - such as Venetian, bark beetle or some other. In this case, the technique for applying decorative plaster is predetermined, and if it is violated, the expected result will not work.
Methods of applying plaster
The technology for applying such material was discovered in the ancient world. During this time, many different ways of applying decorative plaster have been created. The most attractive and interesting are the embossed and textured surfaces. Let's try to consider possible ways to obtain some of them. But before you get to work on obtaining such surfaces, you need to stock up on the necessary tools and prepare the base for applying plaster.
Tool used
If it is decided that decorative plaster will be applied to the walls, the technology for applying such a coating requires the use of the following tools, and this list is not exhaustive:
- container for diluting plaster;
- trowel;
- grater;
- scraper;
- various spatulas;
- rollers, baths, brushes, combs, brushes;
- drill with a mixer attachment.
It is best to use a forged tool of stainless steel. The fact is that a tool made of ordinary steel can leave invisible marks on the surface. rust spots, which then cannot be deleted.
Surface preparation
Regardless of what methods of applying decorative plaster will be used, work begins with surface preparation. It must be smooth, clean and dry, all traces of the old coating must be removed, cracks and irregularities must be repaired.
After this, a primer must be applied to the surface. It will ensure good adhesion and durability of the decorative coating. It is quite possible that some additional preparatory measures will be required; they should be set out in the instructions for using the plaster and must be complied with.
But after the surface is ready, you can consider various types of applying decorative plaster.
Spray method
The described method is the simplest option for creating a relief on a plastered surface, although it may be called something else, or the result of its application will have its own name, for example, “snowball” decorative plaster. The spraying method is carried out as follows - after applying and drying the first layer, a new one is applied on top of it. To obtain texture, various tools can be used, even using a broom.
It will look like this: take a broom in one hand, a stick in the other, dip the broom into the solution and hit the stick so that splashes of the solution fly onto the wall. On the surface of the plaster you will get flakes and splashes, the size of which depends on the broom and the thickness of the solution. The surface on which the plaster spray is applied can be pre-painted, e.g. Blue colour, and the applied stains should be white.
Similar to the described method is the so-called Italian finishing. Here all operations practically coincide with those described above. After applying the covering layer and leveling it, without waiting for it to dry, apply a second layer of a different color. So, if the first layer was green, then the second one can be yellow. When applying the second layer, it should cover most of the previous layer. Before the material hardens, it is smoothed out.
What is described in more detail will allow you to see the application of decorative plaster - the video below:
Creating a relief surface with a trowel
To create an original surface, you can use not only the usual tools. After the covering layer is completed, a little plaster is applied to the trowel, and with light movements along the surface it is transferred to the base, creating a peculiar pattern. The materials below will help you see how this is done - video methods for applying decorative plaster:
Textured method
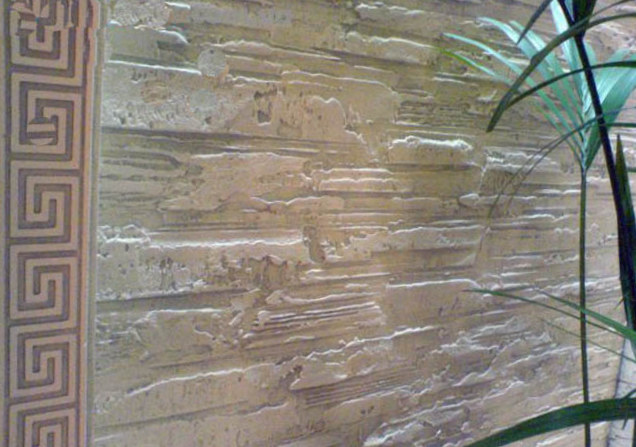
This application method allows you to decorate the walls in an antique style thanks to decorative plaster. To do this, you will need to create several layers of plaster and paint them. The technique of applying decorative plaster shows how to do this, the video below:
Hatching-combing
This option for creating a decorative coating is carried out on fresh plaster. It is processed with a metal brush. After this, the surface is dried for a day, and then particles of plaster that do not adhere well to the surface are removed with a sponge, spatula or rag. What the described operation looks like is clear from the photo below:

Roller stamping
Another way to obtain a relief image is to apply decorative plaster with a roller. To do this, you can use a roller with a special pattern. If this is not the case, then you can cut out some kind of design on the surface of a regular one or simply wrap a rope around its surface. The result will be a pattern resembling grass stems. You can see how to do all this in the video below:
Decorative plaster "sgraffito"
This technique of applying decorative plaster is more difficult to perform than those previously described, but you can do it yourself. To do this, you need to apply several layers of plaster and each of them must have its own color. The color of each layer is chosen at your discretion.
To create a pattern in the top of the applied layers, individual sections are cut out using a special stencil, pieces of plaster are removed with scrapers or cutters. If a sufficiently large amount is removed from the top layer, the remaining plaster looks like an applique against the background of the bottom layer. If you remove a little, you get a shaded picture. This type of plaster can be applied either over the entire wall or as a separate panel.
Other options for obtaining decorative plaster
Of course, all the methods outlined do not limit the possible ways of creating decorative plaster. Special ready-made mixtures are offered for sale, and they provide an individual application method for each of them.
For example, Venetian plaster is determined not by the composition of the material used, but by the method of application. Moreover, this method is intended only for obtaining the “Venetian”.
The same can be said about decorative bark beetle plaster. The resulting original pattern is determined both by the composition of the plaster and the method of its application.
But in any case, from the above review of various methods for creating a relief coating, it becomes clear that the surfaces obtained thanks to decorative plaster and various technologies its application are worthy decoration any interior.
Decorative plaster not only looks very attractive, but also significantly expands the capabilities of craftsmen in interior design. Cost of finished construction mixture For decorative finishing the walls are quite high, which significantly limits the possibilities of its use. In some cases, experts reveal their secrets of craftsmanship and show with examples that do-it-yourself decorative plaster is in no way inferior to ready-made solutions.
It is to such a master that I would like to express special gratitude for the clear and accessible video instructions that allow you to implement different ideas on the design of premises. The review includes the combined experience of the masters, which is collected in a separate publication. The recipe and tips will help you endlessly experiment with decorative design in any room where each wall can acquire a unique appearance.
Decorative plaster in different techniques
Versailles plaster from ordinary mixtures
How to make decorative plaster with your own hands like the walls in the Versailles apartments? It turns out that a similar texture can be achieved using regular dry starting material. gypsum plaster And finishing putty, which, when mixed and applied, give an attractive texture with light inclusions of the middle fraction. This finish requires the use of acrylic varnish, metallic paint and glitter. A detailed master class from the REDecoration studio is given in the video at the end of the publication.
Sequence of work on applying Versailles plaster:
- cover the perimeter of the future coating with plaster tape;
- prime the surface with quartz primer, which will ensure good adhesion and allow you to work longer with the model mass. Ceresit “Primer paint for thin-layer plaster and paint” is suitable for these purposes;
- The model mixture for decorative plastering work is mixed with water in a 1:1 ratio of finishing putty and starting gypsum plaster. The manufacturer of the mixture is not important, but you can use, for example, dry mixtures G-Start and Satenpro;
- the mixture is mixed with a mixer twice, the first time immediately after adding the mixtures, the second time after the mass has stood for several minutes;
- the plaster is applied to the wall in a layer of 2-3 mm using a spatula and trowel, making random streaks to create the desired texture, special attention is paid to the corners and the space near the ceiling molding and door;
- the model mass is applied in an even layer to the wall, and then an additional “textured” layer is made using a plastic trowel, which creates the desired volume;
- after the plaster has dried, the resulting unevenness is smoothed out and sanded using a spatula, a paint float and sandpaper (No. 60), the result is a beautiful smooth coating with a pronounced but shallow texture;
- on next stage a deep penetration primer is applied, thoroughly covering all irregularities and avoiding smudges;
- after priming the surface is painted, for this purpose it is mixed White paint with any selected dye, it will take about 2 hours for this layer to dry;
- the next layer is to paint the wall with metallized decor, silver is diluted on the primer in a ratio of 1:1, then applied with light movements foam roller on the first layer of paint, without filling all the irregularities (pay attention that there are no traces left from the roller);
- The finishing layer of the surface is made with varnish with the addition of glitter. First, the varnish is diluted with water by 30% to avoid a varnish “crust” on the finished coating, then glitter is added at the rate of 1 tsp. for 1 l. While working, the varnish must be stirred regularly to “lift” the settling glitter.

Obviously, in this way you can make plaster in any color, finished with metallic paint of any shade and decorated with colored and plain glitter. You can also change the manner of applying plaster, creating different textures. The varnish gives the coating quite high strength and protects the wall from fading in the sun; both matte and glossy varnish coatings can be used for the coating.

Flemish plaster - two-color tinted in mass
Working with Flemish plaster differs from the above Versailles and Venetian plaster in the method of application and finishing; it is also made from ordinary putty based on model mass, the recipe for which is given above. The approximate consumption of such plaster is 80 g per 1 sq. m.

The key difference between this coating is that the finished decorative putty is tinted in the mass, that is, the dye is added specifically to the finishing plaster mixture, and is not applied as a separate layer. The video tutorial uses yellow-brown and coffee plaster, which is applied with a large spatula to the prepared surface in a back-to-back motion, thus creating a beautiful two-color texture.
At the next stage, the wall is smoothed using a trowel or spatula. There is no need to achieve perfect smoothness. The main goal is to mix two colors of plaster and create an interesting two-tone finish.
Flemish plaster is applied in three layers, using spatulas of different sizes, reducing their size from layer to layer. On the second and third, you can use a 20 cm tool. Subsequent layers are applied in such a way that a texture is formed on the wall and irregularities are formed inside the smooth surfaces. The size of the “islands” will depend on the volume of the mixture used in one putty application cycle. The more model mass there is on the spatula, the larger the “islands” of a smooth surface can be made on the wall. The last layer can be applied with a Venetian trowel using the “press and smooth” pattern, in which case a different texture is obtained.
After applying the plaster, the wall is painted with a deep penetration primer. After complete drying, the plastered area is covered with glaze using a trowel. The mixture can be prepared according to the following recipe (consumption 120 g per 1 sq. m):
- glue for non-woven wallpaper, diluted according to instructions - 2 parts;
- panel varnish – 1 part;
- paint “Silver” – 0.5 parts.
In its structure, glaze is a regular wax, which is used to cover plaster as a finishing layer. Please note that in the recesses the wax is not completely removed, resulting in a texture with areas of varying degrees of silvering. Instead of silver, mother-of-pearl or gold can be used to prepare azure, which allows you to achieve different lighting effects.
If desired, the wall can be additionally decorated with varnish, which will give the coating durability. Can be used for wet areas yacht varnish or waterproof facade plaster.

Prague plaster
Prague plaster or, as some masters call it, “Venetian fresco” is applied to a pre-tinted surface. To do this, add to the soil facade paint and color desired color. The main task is to create a colored base layer at the same time as applying the primer. When applying the primer layer, it is not necessary to achieve uniform “covering”.

To prepare a model mass of decorative Prague plaster, any acrylic putty, 1/10 of the sand and color are added to it (preliminary consumption 1.5 kg per 1 sq. m). The first layer of putty is applied with a Venetian trowel, forming an uneven surface in the form of “islands”. The sand results in a more voluminous texture and a richer finish.
The second layer of putty is applied to the wall using the trowel trimming method. The movements involve pressing the trowel with the mortar against the wall in a chaotic manner. Please note that the required two coats are applied one after the other. First, approximately 1 sq. is done. m of surface and the first layer is applied, then the same area is decorated with texture using the trimming method.

The next area is covered with the solution in the same way. After this, you need to return to the previous area and smooth the plaster “along the tops” using a 20-centimeter spatula, removing the remaining mortar from the tool. After about five minutes, the finished surface needs to be polished with a Venetian trowel, without applying much effort. The degree of readiness of the coating for this operation can be determined by touching your hand; the putty should not stick to your fingers.
On final stage finished surface painted after applying a layer deep primer and its complete drying. For finishing coating it is used special composition paints based on Venetian plaster, diluted with water (consumption 150 g per sq. m). Using Venetian plaster as a paint will result in a more interesting, slightly shiny surface.
At the final stage, the lined surface is covered with special wax for decorative plasters; this is done using a plastic wallpaper spatula. For these purposes, the so-called Parmesan blue can be used, which gives a very beautiful effect of noble shine.

Decorative plaster for finishing facades and fireplaces - stone finish
The proposed method of decorating surfaces can also be used for finishing facades and fireplace portals, but other mineral fillers are used for these purposes. A good option The choice of stone-like finishing can be considered dolomite plaster, but, unfortunately, its price is quite high for finishing a facade.

To reduce the cost of the initial decorative mixture, dolomite flour is used, which is added to a stylor-acrylic dispersion (UCAR™ Latex DC 640) for external work, which has a high water-repellent ability, or acrylic putty (Sniezka Acryl-Putz) for internal work. IN ready material dye, metallized filler, glitter or mother-of-pearl are also added.
Dolomite putty must be applied to the fireplace in two layers, first in an even layer with a large Venetian trowel, then a painting layer is made by trimming the surface, followed by smoothing using the same trowel.
The surface is lightly sanded sandpaper No. 150, primed and then decorated with Venetian plaster. It is applied diluted with water like paint using a regular roller. After application, the plaster is polished with a trowel.
The natural texture of stone is always distinguished by shiny inclusions, so the dolomite-like surface is also decorated with a coating with a metallized filler. To do this, copper is added to the wax and it is applied along the texture of the surface, bypassing the smooth areas of the cladding. At the final stage, the surface is covered with wax without glitter and polished with a soft trowel. Two-color stone-like plaster can be obtained using the Flemish application method described above. As you can see from the examples, do it yourself decorative rock on any surface it is not at all difficult and it will not cost much, but the effect will exceed all expectations.

Facade decorative plaster
After gaining experience in applying decorative plaster for interior work, the question arises about exterior finishing. For this purpose, you can use liquid glass, with which you can make a waterproof version of plaster:
- first apply a primer layer using a diluted solution liquid glass;
- a model solution of waterproof (hydrophobic) plaster is mixed in the following proportions: used ready solution plaster mixture in a ratio of 7:1 with liquid glass, or prepare plaster 1:2:5 from liquid glass, cement and sand.
Video instructions for applying decorative plaster
In conclusion, we provide examples of how to make decorative plaster with your own hands, video using all the mentioned methods. Good luck. The examples given will help you make expensive repairs in your home at low cost.
Today there are many different finishing materials. The most popular of them is decorative plaster.
Its leadership in the market is due to the fact that it has many advantages. It is durable, easy to care for, moisture resistant, and its cost is low.

Let's look at how to make decorative plaster yourself.
Types of plaster
This material for decorating premises and facades may have various properties. Depending on the:
- Chemical composition and components.
- Texture and style.
- Number and size of granules.

Chemical composition and components
Mineral, excellent value for money. Made from cement and lime. In stores it is sold in the form of a dry mixture. Therefore, before starting work, it must be diluted in water.

It is used not only for interior work, but also for decorating facades. Since it contains water-repellent substances.
In addition, it has a number of advantages:
- vapor permeability;
- fire resistance;
- resistant to mechanical damage.

Acrylic plaster is sold ready-made, in the form of a water-dispersed material for decoration.

In its production, a polymer solution is used that connects the filler. This type The plaster is tinted, so you can choose any shade.

Silicone is used to decorate external walls. Because it has various positive characteristics:
- Long service life.
- Elastic structure.
- Self-cleaning material.
- High vapor permeability.
- Weather resistant.

Silicate or mineral plaster is very expensive, however, reliable and practical. Since the main component is potassium glass. This will protect the walls from the appearance of fungus.

This plaster is usually used in finishing the facades of buildings. But you can find it in the decoration of interior walls.

If it is not possible to buy a ready-made mixture, then at home you can make decorative plaster from putty. With its help you can create textured images.
Texture and style
Venetian creates walls from marble. In the photo of decorative plaster, you can see how much the room is transformed. It is made from an aqueous solution, lime and marble sand. This type of material is applied only to smooth walls.

Structural is a heterogeneous mass with granules. It is made from latex and water. Its granules can be of any color. The color range is customized at the factory. However, choosing a color will not be difficult, as manufacturers offer a large palette of different shades.

Textured is the most popular among consumers. Because with its help you can create a relief or image on the wall in the interior of a room.

Note!

Flock turns the wall into a mosaic. As a rule, it is sold in two containers. The first contains glue, the second contains mosaic elements. They are already pre-painted by the manufacturer. It is applied to the wall in stages, first with glue, then with mosaic particles.

Lacquering is used in cases where it is necessary to create a certain effect on the surface of the wall. For example, the effect of silk, velor, sandstone. Decorative plaster can be applied to the façade of a building.
Instructions for applying decorative plaster yourself
You need to do some preparatory work first. You need to remove the old finishing material.

The surface is cleaned, and if there are cracks and holes, they are puttied. Afterwards, the wall must be treated with a primer.

After all the preparatory work is completed, the plaster is applied using a construction tool. The material is placed using horizontal or vertical movements. The thickness of the application is measured by granules. After application it dries for about a day.

This completes the application of decorative plaster. If desired, it can be painted a different color or decorated with different design elements.
Note!


Decorative plaster of walls is a great way to quickly and inexpensively change the interior of a room.

Photo of decorative plaster with your own hands


Note!


The content of the article:
Decorative plaster of walls is one of the most sophisticated ways of decorating facades and interior decoration. It allows you to imitate leather, natural stone, paper and other materials. At the same time, the coatings always look original and exclusive, since even with a great desire to repeat the applied relief it is impossible. Despite the many finishing materials available on the modern market, decorative plaster not only maintains its position, but is also gaining immense popularity due to its properties.
The main types of decorative plaster
Typically, decorative plaster comes to the market in the form of dry ready-made mixtures containing synthetic astringent components, fillers consisting of stone chips, sand, fibers, and useful additives - dyes, thickeners, antiseptics, which give the material additional properties. The grain size of fillers varies from 0.5 mm to 5 mm in diameter and affects the degree of relief, the finished appearance of the coating and material consumption.
Decorative plaster is classified according to many indicators. Its conditional division implies interior and façade options. Coverings made from facade plaster, have high frost resistance, moisture resistance, do not fade in the sun and for a long time retain their attractive appearance.
Interior plasters are intended for interior work and are divided according to the chemical composition of the base into mineral, acrylic, silicate and silicone materials:
- Mineral. Such plasters are not afraid of fungus; they prevent its appearance and spread over the surface of the walls. The material is not afraid of dampness, has a variety of shades, but is not elastic enough. For exterior finishing, this reason can cause cracks on the surface of the facade.
- Acrylic. They are used quite often, they are durable and have good elasticity. The disadvantages include the easily soiled surface of the applied coating and its high price.
- Silicate. The coating made on the basis of this material is durable, elastic, does not require much maintenance and is easy to clean. Its high price is often justified.
- Silicone. Of all types of decorative plasters, this is the most durable, reliable and durable material. High cost is its only drawback.
- Structural coating. It consists of several materials that differ in stability and properties: quartz, small stones, fibers or mica. A striking example of such a coating is the “bark beetle” structure. The coating can be made on a lime-cement or synthetic base; it is easy to apply and quite plastic.
- Mineral coating. Includes lime, marble granules, mineral components and cement. This composition gives the coating thermal insulation properties. The modifiers included in it, in contact with lime, make it resistant to moisture. Mineral coating is used for interior and exterior work. The main advantage of plaster is its low consumption.
- Stone plaster. Contains quartz or marble chips. Its particles are quite large, so the coating creates a play of light on the surface. Stone plaster is ideal for outdoor use; after polymerization it becomes moisture resistant.
- Venetian plaster. It has been known since the Middle Ages. Most often, the mixture includes ground marble, the dust of which creates the illusion of a natural mineral finish on the surface. Natural and synthetic substances are used here as binding components. Venetian plaster is an elite coating; it requires careful surface preparation, is applied in a thin layer and is used exclusively for finishing interior walls or ceilings.
Advantages of decorative plasters

The use of decorative plaster when finishing walls has a number of advantages:
- The external characteristics are excellent and are manifested in the material by its rich range of colors, different textures, and allow you to create relief designs and patterns on the coatings.
- Water resistance. Thanks to its dense structure, the decorative coating prevents the penetration of moisture into the enclosing structures, thereby protecting their thermal insulation layer.
- The plaster does not corrode, it is frost-resistant and can be used for coatings operating in different temperature conditions.
- Price. It is almost the most important weapon in the fight against numerous competitors present on the market. Considering the price of the material, doing decorative plaster on walls with your own hands has become a widely available option.
- The material is easy to use. Its application does not require special skills or sophisticated equipment. Quite enough simple tools and even improvised means.
- The use of coarse-grained decorative plaster reduces the time for preparing the surface of the walls, since careful leveling and putty are not required in this case.
- After polymerization of the applied material, the walls have a finished look and a durable, durable coating.
- The appearance of walls decorated with plaster can be changed in a matter of hours: you just need to paint them in the color you like. The relief of the coating will be preserved, and its effectiveness will only increase.
Preparatory work before decorative plastering of walls

Before working with decorative plaster, preparing the walls is a top priority. This work is simple, but requires patience. The surface must be cleaned of paint, chalk coating, peeling plaster or old wallpaper. All these procedures should be carried out very carefully so that in a couple of years you do not have to do repairs again.
If there are cracks on the walls, they should be cut and puttied. For some types of coatings, for example, Venetian plaster, the walls need to be leveled to perfect condition. In other cases, such careful work is not required, but there should be no grooves or bumps on the surface. After leveling, the walls should be coated with a primer and wait until it dries.
When planning a combined finish, when one part of the wall is painted and the other is decorated with plaster, you can separate surfaces that have different textures masking tape or self-adhesive tape, depending on the straightness of the dividing lines.
Like any work, decorative plastering of walls requires the availability of the tools necessary to obtain the result. Despite the various techniques for applying the composition to the surface and the associated abundance of devices, the minimum set of tools is always the same - a trowel, a plastic grater, a set of spatulas different widths, rollers, stamps, brushes and improvised means for applying patterns. In addition to tools, you will need a container for mixing the textured solution.
With these things on hand, you can move on to choosing plaster. If you are too lazy to experiment with its composition, you can buy a ready-made mixture. Decorative plaster can be made independently from finishing gypsum putty.
In addition to this, you will need PVA glue and pure water. All these components are mixed in the following proportion: PVA glue - 200 g, gypsum putty- 6 kg, water - 2 liters or a little more. Mixing should be thorough until a homogeneous mass is obtained. After this, the decorative plaster will be ready for use.
Technology of applying decorative plaster to walls

The technology chosen for decorative plastering of walls is directly related to the type of coating desired. It can be very simple or quite complex to perform, requiring certain professional experience. This applies, for example, to Venetian plaster. It is applied in a special way in layers, and the top is covered with special wax. Each stage of working with this material requires strict adherence to the rules and great care.
Silicone materials are also not easy to apply to walls. Allowing the creation of relief and very beautiful images, they require the performer to have artistic taste, clear movements worked out with experience and the greatest patience.
For self-execution Decorative bark beetle plaster works well. It is easy to apply and can help create a beautiful textured surface without application. special effort. To work with this material you will need a grater, a spatula and skill in working with these tools: it is impossible to spoil the “bark beetle”.
The technology of work allows you to create a relief in its various variants. The depth of its grooves is determined by the size of the grains that make up the plaster. It should be taken into account that the large texture of the material increases its consumption. But there is also a positive factor: there is no need to carefully level the walls, since textured “bark beetle” plaster perfectly masks their minor defects.
Decorating walls with textured plaster is done in the following order:
- According to the instructions on the packaging of the material, you need to prepare a solution of a certain consistency. Its quantity should be such that the mixture can be worked out immediately, without taking breaks in the work, since when it hardens, it is not re-diluted. In addition, the joints between fresh and dried layers of plaster are always noticeable and look ugly.
- An ordinary grater and spatula become universal tools in skillful hands. Before applying decorative plaster to a wall, on a small area of its surface, you must first practice spreading the composition in a thin layer. As soon as it thickens slightly, you should lightly go over the plaster with a trowel to create a pattern.
- For beginners, there are several techniques available that allow you to get good decorative effect. This can be a wave, straight or oblique rain lines, various circles or crossed lines. Simple and interesting option is a horizontal relief. Movements during work should be soft and confident without unnecessary effort. You shouldn’t spend too much time decorating a certain area: you may lose the desired surface effect.
- The texture on a fresh plaster solution is also obtained using improvised means: sponges, brushes, crumpled paper and others. An interesting effect is achieved even without equipment, but with the help of your own hands. Using a special roller to create a relief is the simplest method that guarantees a decent result. The drawing should be done as quickly as possible, since the coating also does not take long to dry. Otherwise, you can get a non-uniform texture on the plaster. Sharp boundaries and layers should be avoided in the joining areas of the coating.
- After applying the coating, after 15-20 minutes, its surface begins to lose its shine as it dries. At this time, it is necessary to slightly reduce the protrusions of the relief with a wet trowel. There is no need to press it with great force to avoid deformation of the pattern. During this procedure, the instrument must be periodically cleaned and moistened generously.
- When using tape to separate sections of a wall with different textures, it should be removed before the surface dries, otherwise the dividing lines may not be clear due to chipping of the contours.
- It takes about a day for the decorative plaster to dry completely. After its polymerization, the surface of the wall should be treated with fine sandpaper to polish and remove excess “hanging” particles of material.
Painting the wall surface

Since walls covered with decorative plaster have a generally finished look, many people stop there. However, not all. Fans of bright colors and those who want without special costs To quickly update the interior, people often resort to painting surfaces decorated with plaster.
For this purpose, it is recommended to use high-quality, sun-resistant paints. First of all, the textured part of the wall is painted to prevent particles of dry plaster from getting on the smooth surface. After a couple of hours, the remaining sections of the wall are painted. After the first layer has dried, you need to apply a second one. The decorative effect achieved is impressive, despite extra hassle. The paint is applied with a short-nap roller. The tool must be semi-dry when working. To highlight the pattern, you can use paint in lighter colors.
Adding color to decorative plaster can be done when selecting it or at the stage of preparing the mixture. The store usually offers a huge assortment of various shades of decorative plaster. For testing, you can apply a small amount of it to a piece of plywood and let it dry completely, since the shade of the sample will depend on its humidity. If you are not satisfied with the color, you can choose another one. This method has clear advantages: the tone is uniform, and if there is a shortage of material, you can easily order it with the desired shade.
If you have the desire, you can experiment with the color of the plaster yourself. There is nothing complicated about this: the pigment of the desired color needs to be added little by little to the mixture, mixed well, and be sure to do test applications on a sample.
How to apply decorative plaster on walls - watch the video:
If you follow these simple recommendations, you can easily carry out decorative plaster on the interior walls with your own hands, achieving a good result. This type of decoration looks great in any interior, but you should remember that it needs to be done within one day. With some effort, you can create a cozy atmosphere in your home, and most importantly, forget about repairs for years. Good luck!

A good and justified reason for pride is decorative plaster with your own hands. This is also an opportunity to emphasize the individuality of a home or room interior. There are a variety of materials on the market with which you can realize your wildest, most incredible fantasies. The great advantage of this method of decorating a house or apartment is the ability to create a unique pattern. Even with similar material it is difficult to create on different walls the same finish, and, given wide choose the proposed options, it is quite easy to achieve the uniqueness of your home.
Types of decorative plaster
Before deciding on such a finish, you should find out what decorative plaster is? This is a decorative wall covering that creates a certain artistic effect. Depending on the method by which it is achieved, plaster is divided into two types:
- structural - the decorative layer is formed due to the composition of the mixture, various additives (granules, fibers, etc.), used for finishing facades and interior decoration;
- textured - is the result of the work and artistic imagination of the master.
Of course, such a division is conditional. You should not think that it is enough to simply apply and smear structural plaster on the wall and you can get a masterpiece. It's the same with textured look By spraying a cement “coat” with a broom onto the wall of the barn, in essence, they create a texture. But the aesthetic value of such “art” is extremely low.
To create quality, beautiful coating on the walls, appropriate materials, tools, and knowledge of the basic basics of work are required. It also doesn’t hurt to apply decorative plaster with your own hands. steady hand and good taste .
Mineral plaster
This is the most common plaster, the binding element of which is cement (gray or white) or gypsum. Basically, mineral plaster consists of natural ingredients. However, in last years More and more different additives are being used (polymers, fibers, etc.). Widely used for both exterior finishing buildings and for interior work.
One of the advantages mineral plaster is vapor permeability. Due to its high alkalinity, it is characterized by high resistance to the formation of fungus and mold. However, it has low elasticity, which can cause cracks to form on the surface. As a rule, mineral plaster is white or gray colors. However, it can be painted according to personal preferences.
To protect yourself from unaesthetic stains on the façade or interior wall, if suddenly the paint is damaged and a different color appears underneath, you should use paint-painted plaster (colored). At the same time, it is worth considering that the range of colors of plaster is limited.
Acrylic plaster
The most popular type of plaster, which combines high quality with a reasonable price. Acrylic plaster is also highly resistant to mechanical damage. The color lasts for a long time without the need for touch-ups. This decorative plaster is used for walls inside and outside buildings.
The disadvantage of this type of plaster is that the acrylic dispersion is a breeding ground for microorganisms, as a result of which, after a few years, pigment spots in colors ranging from green and blue to black may appear on the surface of the plaster.
To prevent this, manufacturers offer immunization packages for decorative plaster against mold and mildew (biocides). Contaminated acrylic plaster can be saved. However, this comes with additional costs.
The facades of houses located in places of high humidity (near seas, lakes, rivers, ponds), near large concentrations of trees (forests, parks), are most susceptible to the formation of fungus. rural areas and interior rooms with high humidity. In such places, other types of plasters, painted in the paste, are recommended. It is worth adding that decorative acrylic plaster, given its low vapor permeability, should not be used for plastering mineral wool.
Silicate plaster
Silicate plasters are produced on the basis of potassium liquid glass. Due to this, their resistance to the formation of fungus or mold is very high - it is ideal in places where decorative acrylic plaster will be subject to intense corrosion and biological effects. The cost of this type of plaster is slightly higher compared to acrylic counterparts.
With appropriate flexibility, silicate plaster has a significantly lower coefficient of diffusion resistance against moisture vapor. It follows that it works well in a thermal insulation system using mineral wool.
In addition, it is more impervious to dirt and has high color fastness (provided that the manufacturer used mineral pigments exclusively during the painting process). High Quality). The disadvantages of this type of plaster include a small palette of colors for ready-made plasters, as well as its application during DIY repairs - it requires a significant level of skill.
Silicone plaster
Without a doubt, the best and most expensive type of plaster. Combines the advantages of high elasticity, hydrophobicity, with low diffusion resistance. In addition, it is extremely resistant to biological corrosion, mechanical damage and contamination. The price is high, but no matter how much it costs, it matches the quality.
Mosaic plasters

Mosaic plasters are often called “pebble” plasters because of the stone grain they contain (marble, granite, quartz chips). These are decorative thin-layer plasters, that is, those that are applied in layers with a thickness contained in the aggregate mass, usually from 1 to 3 mm. The basis of mosaic plasters is transparent acrylic resin. Compared to other decorative mixtures used in construction, they are more flexible and more resistant to damage.
They withstand cleaning without problems - you can wash them frequently without the risk of damage. They can be used to cover areas subject to mechanical stress and pollution, both for interior wall decoration and outside buildings.
Currently, manufacturers of insulation systems offer, in addition to the four types listed, hybrid plasters, for example, acrylic-silicone or silicate-silicone. It's a mixture various types plasters, created to combine their different properties.
A separate group can be divided into plasters, which, due to historical prerequisites or technological (geographical) features, fall somewhat out of the general range and even have their own names.
- Venetian - decorative plaster for interior decoration is made on the basis of lime or lime-gypsum mortar with the addition of marble, granite dust or other stones. It can be made on the basis of various synthetic binders. As a rule, ready-made mixtures are sold (diluted and prepared for use), and can also be purchased in the form of ready-made dry mixtures. Its surface is perfectly smooth and slightly glossy. To achieve a good effect, it is necessary to apply up to five (sometimes ten) layers to the wall, which is labor-intensive process requiring special skills and patience. It is difficult to do such artistic plaster with your own hands without sufficient experience.
- Japanese plaster is a decorative finishing material that can be applied to the surfaces of walls and ceilings. Something between plaster and wallpaper. Do-it-yourself decorative plaster of walls made with this material is the easiest to work with. Contains cotton, silk, cellulose fibers, mineral fibers, dyes and various decorative additions. The coating made from it hides all wall defects well. This plaster is suitable for almost any type of walls and ceilings: concrete, wet plaster or paint, walls covered with gypsum plasterboard, wood, polystyrene foam and much more.
- Travertine is an exclusive material for finishing works, created on the basis of natural binders and marble powder, is used both in interiors and exteriors. Most often for decoration: walls, ceilings, fireplaces, columns, etc. Due to the resistance of this coating to fungus and mold, as well as its ability to diffuse moisture from the base, it can be used in kitchens and bathrooms. The finishing made by him successfully imitates natural travertine, along with its original structure and patterns. This material consists of natural lime binders, aggregates, marble and dolomite chips. After finishing the walls with decorative travertine plaster, they are coated with special wax or varnish. To protect outdoor surfaces, appropriate soils are used to protect them from the effects of adverse weather conditions.
- Tadelakt is an exotic plaster of “Moroccan origin”. This is a waterproof plaster surface used for finishing bathtubs, sinks, ponds, interior and exterior walls, and ceilings. It is made from a lime plaster base that is compacted, polished and treated with soap to make it waterproof and water-repellent. Tadelakt is a labor-intensive material to work with, but very remarkable - it has a “living”, wavy structure. Pigment can be added to give it any color, but dark red is considered traditional. It can be shiny or matte, but looks best when it resembles a stone with a velvety sheen.
French plasters from various manufacturers are widely known. With their help, you can create various structures - from the effect of an adobe wall to surfaces that accurately imitate polished stone.
Finishing with decorative plaster
Artistic plastering of walls can be done independently. To do this, you need to prepare the tools and be patient.
Tool
When applying structural plasters, you need to use several basic tools, which are usually used when plastering works And special devices to create the desired texture on the surface. The tool set looks like this:
- container for plaster mass;
- a set of spatulas from the smallest to the widest;
- graters - metal (Venetian), wooden, plastic;
- metal grater;
- electric drill with mixer attachment;
- trowel (trowel);
- masking tape.

You should also prepare rollers of different widths and with different piles, sponges, wide brushes, and templates with patterns.
To apply decorative plaster with your own hands, you can use many other somewhat less professional accessories available in the house. For example, a regular comb or brush can be used to create the texture of denim or corduroy. Striped patterns are obtained through the use of children's (toy) rakes. Even with your own palm, “armed” only with a glove, you can create original patterns on walls covered with decorative plaster. Various devices are also sometimes used for automatically applying structural plasters.
You should finish finishing a section of the wall that can be completed in one day, preferably from corner to corner. If you leave half the wall unfinished and continue the next day, you will create a joint that is impossible to get rid of. If this is not feasible (the wall is too large), then seal the joint with masking tape - this will disguise it a little.
Preparation
The base for thin-layer structural plaster must be strong, free of grease and dry; free from stains and efflorescence of biological and chemical origin. All loose layers not connected to the base (for example, peeling plaster) must be removed. If the surface unevenness is significant (from 5 to 15 mm), the wall should first be leveled. Wet plaster can be used for this.

For small unevenness (up to 5 mm), the base can be leveled and smoothed with a layer of putty. Absorbent substrates should be primed with a suitable preparation before applying leveling solutions and/or putty. The application of mortars, putties and/or compensatory measures must be carried out in accordance with the technical data sheets of these products. In the case of applying the mass to newly completed mineral substrates (for example, concrete, cement and cement-lime wet plaster), an appropriate curing period must be observed (for acrylic and mineral plasters at least 3-4 weeks, and for silicate plaster at least 2 weeks). Before applying the solution, the base should be primed with a preparation appropriate for this type of plaster. To limit the possibility of the color of the base showing through the texture of the plaster, it is recommended to use a primer that matches the color of the plaster.
The final result of the completed plaster may be affected by the type of base, therefore, in the case of a non-uniform base, it is recommended to cover the entire surface with a layer of putty. To avoid color differences, it is necessary to complete the surface in one working cycle, using the “wet on wet” method. During application and drying of the solution, the temperature should be kept between 5°C and 25°C.
Application
How to apply decorative plaster with your own hands? The process does not cause any particular difficulties, but some subtleties are worth taking into account. Using a drill with a mixer installed, the solution is mixed exactly in the appropriate proportions (specified by the manufacturer) with water or other additives, dyes, for example, pigments.
If a ready-made (diluted) mass is used, it is simply mixed. When the primer has dried, the prepared plaster is applied to the wall. You should try to do this evenly, keeping the layer thickness from 2 to 5 mm. The easiest way to do this is with a metal trowel.
To obtain an imitation of some natural surfaces, for example, marble, granite, travertine, concrete or velvet, you need to be patient. To achieve the desired effect, at least two layers of decorative plaster should often be applied. After applying each layer, the surface must also be subjected to additional processing. The technology for performing the work is different for each type.
When creating a surface for travertine, characteristic samples of this stone are purposefully formed, imitating pits and depressions. It is best to do them with the edge of a Venetian grater applied to the wall at an angle of 90 degrees. Then the surface should be leveled by sanding with sandpaper. Finally, the wall is covered with decorative varnish to secure and protect it.
To create a surface that imitates concrete, after applying the solution twice, it is successively “torn” and rubbed with a Venetian grater. The surface is moistened immediately before grouting, which makes it easier to give the desired structure.

The most difficult decorative plaster to do with your own hands is probably Venetian. After the wall has been prepared and the soil has dried, the solution is painted, since after purchase it has a natural White color. Pour the dye into it and mix thoroughly. Then they begin to apply it to the wall. The plaster is applied in stages, layer by layer, using a trowel.
Spread, pressing tightly, in a thin layer over the entire surface of the wall, then wait for the time indicated on the package. The dried layer is sanded, smoothing out irregularities. Then you need to clean the wall from dust, and then apply another layer. At this stage it is necessary to distribute the product so as to obtain a smooth, shiny surface. Wait until it dries again. Apply a third layer. The first layer is the base layer, the rest form a pattern, so they are applied in chaotic strokes and then smoothed out.
Each layer (there can be 5 or more) is sanded. Then you need to wait until it dries last layer, and apply wax. The wax is applied to a small fragment of the wall, after which it must be distributed over the remaining part.
The Japanese one can simply be leveled with a regular paint roller. In more detail, the contents of the package are poured required quantity water (according to the instructions indicated on the package) and mix until a homogeneous mass is obtained. The prepared plaster is left for an hour to be completely saturated with water.
To apply Japanese plaster you will not need special tools. Just a grater, a roller and a spatula, which is used to apply the mass to the wall, stretching it evenly with a grater. The applied layer of material should be as thin as possible. Using a roller, compact the plaster, smooth it with a spatula and level the edges. The applied mass dries in about 48 hours.
Japanese plaster can be used several times. To do this, clean the applied layer of plaster after thoroughly moistening it first. Mix the skimmed mixture well, adding enough water to get the correct consistency. Apply again using a trowel and roller.
“Bark beetle” is essentially an ordinary wet plaster, the texture of which is formed by the granules it contains. The applied solution (preferably with a metal float) is leveled with a plastic float, forming a pattern. The most common - “rain” is obtained by moving the grater up and down. The type of wall depends solely on the imagination of the master; there are many options (right-left, “snowflake”, etc.). If the wall has been previously leveled, it is impossible to spoil the “bark beetle”.
An interesting option for interior work is magnetic plaster - it creates magnetized walls with decorative plaster. The method of application and painting is no different from ordinary gypsum plaster.
The application of decorative plaster is interestingly shown in the video:
Painting works
Most mixtures come already colored, but if of this coverage no, it’s okay, painting walls covered with decorative plaster is practically no different from ordinary ones painting works. Painting is done in two layers with a long-nap roller, and hard to reach places- with a brush.
It is advisable to adapt the selection of shades to the interior design, but you can forget about conventions and paint the walls in contrasting or flashy expressive colors - this will be an interesting artistic decoration. To decorate this type of surface, metallic paints with shine have proven themselves well, which, by reflecting light, additionally emphasize the elaborate texture of the wall. Paints can be applied either with a roller or brush, or with a sponge or cloth - in each case, obtaining a completely different end result.
So what is decorative plaster? In addition to aesthetic criteria, decorative plaster has high strength characteristics, it is easy to keep clean, so it is used almost everywhere. Ideal for high traffic areas such as stairwells, hallways, kitchens and bathrooms.
In addition, it is used for finishing figured architectural elements, for example, fireplaces, cornices, columns, as well as decorating furniture. Prepared and decorated accordingly, it can successfully decorate any building or interior.