Lightning is one of the most terrible enemies for a private home. Its destructive power is so great that you can lose your home in a matter of seconds. Of course, the case of lightning striking a house is not the most common reason property losses. Many are simply lucky to have a home near lightning rods, power lines or high towers. However, as long as there is a danger of sudden and complete destruction of all property, it is hardly possible to live in peace.
The probability of lightning striking a house increases many times over if it is located on a hill or near bodies of water. In such cases, the implementation of a lightning protection circuit at construction work Necessarily. SNiP classifies all private buildings as third class buildings fire safety, which means they are subject to lightning protection in mandatory. As a rule, lightning protection is designed together with the house and installed during its construction.
How necessary is lightning protection for a private home?
 To properly build lightning protection, you need to know the nature of lightning. Due to the accumulation of a large electrical charge in rain clouds, an impulse of enormous force occurs, in other words, a discharge of electric current at the highest point on the terrain.
The current strength of an electric discharge during a lightning strike reaches 100 thousand amperes, and in some cases up to 200 thousand amperes. Every second, about two hundred lightning strikes occur on the planet. Even if we take into account that the probability of it hitting a particular house is not so great, it is still better to secure your home in advance and install a structure that protects the house from a lightning strike.
During the passage of an electrical discharge Colossal thermal energy is released through the materials of the house, which causes fires and destruction. As you know, most suburban buildings are built from wooden materials, namely they are most at risk of rapid combustion.
Based on this, lightning protection of a house becomes an important and mandatory task during its construction. Moreover, regardless of the location of the residential building in the city or outside it and the types building materials used for its construction, there must be lightning protection.
Operating principles and types of lightning protection
Lightning protection for a private home can be of two types:
- Active.
- Passive.
Traditionally, the first type of protection is used - passive, which consists of an lightning rod, a current outlet and grounding. The principle of operation of such protection is very simple. Lightning striking the receiver passes through a lightning rod, which directs the discharge into the ground. When designing any lightning protection system, it is necessary to take into account the characteristics of the material from which the roof is made, the roof structure and its features.
Active lightning protection works on a slightly different principle. The electric current discharge is intercepted by a lightning rod, which creates an ionized field around itself, attracting lightning. Further, the operating principle is identical passive protection. At the same time, its active type operates within a radius of up to one hundred meters, while its passive type protects only the house itself.
Active lightning protection is the most preferable and is installed in many countries to protect the house and the entire surrounding area. However, she has high cost, that its installation may not always be advisable.
Do-it-yourself lightning protection of a private house
You can ensure the safety of a residential building with the help of lightning protection made by yourself. The lightning rod circuit is quite simple, it’s easy to do it yourself. Any similar security system for a private home is based on the manufacture of a lightning rod from available building materials.
Any lightning rod has three main components, as shown in the diagram:
- Lightning rod.
- Down conductor.
- Ground loop.
Lightning rods
 A metal conductor whose task is to take on electrical discharge lightning is called a lightning rod. It is installed at the highest point of the roof, while on a roof that has complex design, install several such lightning rods.
According to their own design features lightning rods can be of several types:
- metal pin;
- metal cable;
- metal grid.
Metal pin
With this method of lightning protection for a house, it is made metal pin, length from 20 centimeters to one and a half meters. It should be mounted on the highest point of the roof of a private house.
The material used is copper or galvanized steel due to its high resistance to oxidation. Such a pin can have any shape. The cross-sectional area should not be less than 100 m2. If the pin has round shape, then its diameter must be at least 12 millimeters. It is possible to use a hollow pipe, but in this case its diameter must be slightly larger, and the end facing upward must be welded. This is a way to protect your home from lightning suitable for any type metal roofing, including for metal tiles.
Metal cable
 A device with a metal cable is also quite easy to make with your own hands. The entire structure consists of a cable and a pair of supports, which can be made of metal. However, in this case they will have to be isolated.
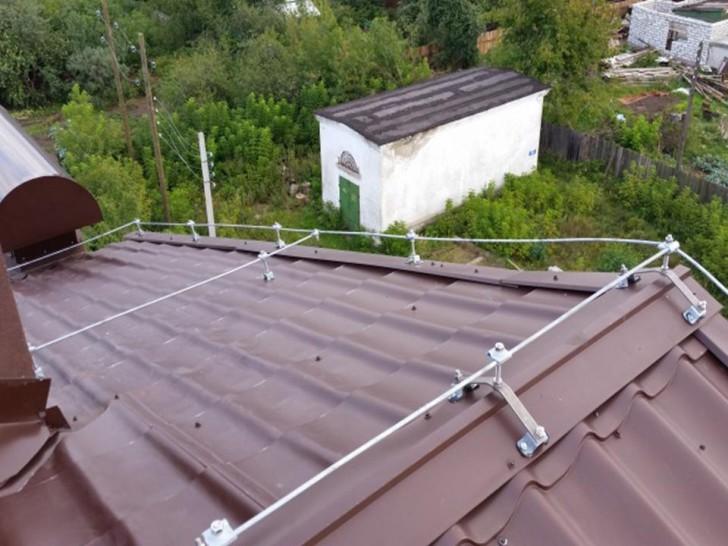
Along the ridge of the roof they stretch steel rope, with a diameter of at least 12 mm, and secure it along the edges. The cable should be at a height of 1–2 meters from the roof ridge.
Metal grid
Lightning rod with receiver from metal mesh is the most the best option protection for tile roofs.
When installing the mesh, it is attached along the roof ridge with branches from down conductors that have reliable grounding throughout the entire roof area.
All lightning rods on the roof must be connected to stairs, gutters and any other metal objects.
When large and tall trees grow next to a private house in the immediate vicinity, you can use one of them as a lightning rod. To do this, the metal pin should be installed so that it is one and a half meters higher than the tree crown, and then connected to the down conductor. An important condition is the height of the tree- it should be 10–20 cm higher than the house.
Creating a down conductor
A down conductor is one of the components of a lightning rod, which is responsible for conducting an electrical discharge from the lightning rod to the ground loop. It is made of steel wire with a diameter of at least 6 mm. One end of it is welded to the base of the lightning rod, and the other to the ground loop. Special attention must be paid to the quality of welding to avoid breakage at the fastening point. The current that passes through the down conductor can reach 200,000 amperes.
The down conductor must be secured along the contour of the roof and house using insulators at a distance of 2–3 cm from the roof and walls . If there are several down conductors, then the distance between them should be at least 25 meters.
Do not fasten the wire near doors or doorways. When installing, avoid sharp bends and places where it could be damaged by snow or debris. The down conductor should be as short as possible, and it should be located in places with the greatest risk of lightning strikes: on sharp protrusions, edges of gables, etc.
Lightning rod grounding
 A ground loop completes any lightning protection device design. Its task is to ensure reliable contact of the entire device with the ground. Externally the structure looks like three large electrodes that are interconnected and recessed into the ground.
To assemble the device responsible for grounding, you will need steel with a cross-section of 80 m2 or copper with a cross-section of 50 m2. In a pre-dug trench, about one meter deep and 3 meters wide, you need to drive two metal rods made of copper or steel along the edges. Then they are connected to each other by welding and a down conductor from the house is welded to them. The entire structure is driven to the ground into the ground.
When assembling the grounding device, you need to remember that it must be located no closer than five meters from doors or windows, passages, porches and paths. Distance from the walls of the house must be at least one meter.
Lightning protection care
 Every year before the start of the thunderstorm season, special attention should be paid to preventive inspection of lightning protection at home. All components of the lightning rod and mounting points must be inspected and, if necessary, painted or repaired.
Every three years it is necessary to conduct a major inspection of the entire system. Check the connections between the down conductor and the ground loop, clean and tighten the contacts there. Defective clamps - replace.
Every five years, the ground loop electrodes are inspected. To do this, they need to be removed from the ground and carefully checked for corrosion. If due to this reason the cross-section of the electrodes has decreased by more than a third, then they should be replaced.
Arrangement of a lightning rod at summer cottage – important condition safety of being on it during bad weather. Discharges of electric current of enormous power in the presence of a lightning rod do not affect the structure of the house and other elements located in the protection zone. However, do not think that a lightning rod prevents lightning strikes. Things are different. It becomes a conductor for discharging the discharge from the house, diverting a current of up to 100 thousand amperes into the ground electrode.
Lightning rod design options
A classic lightning rod can be made in one of two options: in the form of a single rod or a system of cables stretched between lightning rods. The first option is usually used to protect separate house, while the second is to create a safe zone in the entire area. A cable lightning rod is also recommended for buildings of considerable length.
Components of a lightning rod
First of all, houses with a roof made of metal or metal tiles need protection from lightning, since such options do not have grounding, so they accumulate electrical charges during a thunderstorm.
In case of metal roof without an insulating layer, having a coating thickness for iron - 4 mm, for copper - 5 mm or for aluminum - 7 mm, a simplified lightning rod device is possible, when its surface takes on the role of a lightning rod. In this case, grounding is carried out every 20 meters of the roof. Here you need to take into account the quality of the roof, because if there are any breaks, then such a lightning rod will not have the desired effect.
In other cases, the lightning rod must consist of the following elements:
- lightning rod (1) in the form of a thin electrode or a system of electrodes installed above the house at a certain height;
- down conductor (2) – cable connecting the receiver to ground;
- ground electrode (3), which conducts current into the ground.

Lightning rod
The element into which, in the presence of a lightning rod, lightning strikes is the lightning rod. It is usually made in the form of a rod made of steel, copper or other material with similar conductivity. There is no need to cover it with paint or varnish to avoid corrosion, otherwise it will lose its desired properties.
Sectional area: for steel – 50 sq. mm, for copper – 35 sq. mm, for aluminum – 70 sq. mm.
Lightning rods can be installed on different sides or in the center of the roof. If several lightning rods are installed, they are connected into a common circuit closed to a grounding conductor. The rod can be placed not only on the roof surface, but also on chimney or the nearest tall tree. The optimal height would be no more than 15 meters. If it is installed on a tree, then the fastening is done in such a way that the rod rises above the crown by at least 0.5 m and 10–15 cm above the house.
In addition to rods, options for a protective mesh (reinforcement 6 mm thick) and a cable system are possible. The second method is more rational for country house, since the cable is tensioned at a height above the roof level, and the mesh is placed on the roof itself. A cable with a diameter of at least 5 mm is pulled along the roof ridge on racks, and then lowered down, where it is connected to the ground electrode. Thus, it performs both the function of a lightning rod and a down conductor.

Also, individual parts of the building (drainpipes, metal fencing). Their use is permitted if they have a cross-section larger than needed for normal protection.
The down conductor is designed to connect the lightning rod and the grounding conductor. It is made of aluminum or copper wire large section. For these purposes, a twisted wire is suitable, which is used for laying air lines power transmission The down conductor is fastened using terminal blocks, couplings or crimp tubes.

The distance between the lightning rod and the ground electrode should be minimal, so the wire is directed straight down. The number of down conductors depends on the area of the house. For cottages with an area of about 200 sq. m, it is recommended to install 2 down conductors at a distance of approximately 20 m from each other.
It is fixed on a special pole or directly on the wall of the house using plastic fasteners. To protect the down conductor, you can isolate it from exposure environment using a cable channel.
Ground electrode
Since the ground electrode is needed to divert a lightning discharge into the ground, it must have a small electrical resistance. Suitable for these purposes: expensive materials, such as copper, aluminum, brass and other stainless metals, as well as cheaper ordinary steel. The ground electrode should not have any damage or traces of rust, as they may cause a decrease in the diameter of the rods due to metal destruction.
For high-quality grounding, not one, but several rods can be used, which are immersed in the ground away from paths and roofing, especially if it is made of flammable material. IN dacha conditions any large one can also be used as a grounding conductor metal object, available at hand: backrest from old bed, cast iron bath, reinforcing mesh and the like.
The type of grounding depends on the parameters of the house and the characteristics of the soil. Dry soil is different low level groundwater. In order for the current to reach moist soil, vertical grounding is necessary. The ground electrode in this case is made of two rods with a cross-section of 100 mm and 2-3 m in height, driven in at a distance of 3-4 m from each other. The rods are connected to each other by wire, cable (copper, aluminum) or tinned iron plates, to the center of which a down conductor is welded.
More typical for wet soil high level groundwater, so you can avoid vertical grounding by replacing the rods with corners of strip steel, water pipes or other similar metal elements. A horizontal grounding conductor is laid to a depth of 1 m.
IN in this case The role of a grounding conductor can also be performed by a down conductor laid in the ground in such a way as to occupy the largest possible area of contact with the soil. The connected structure can have the shape of a scallop (the letter W) or a triangle. It is unacceptable to use hand twisting and pliers when fastening the wire; only regular or cold welding is allowed.

The placement of the ground electrode should be given special attention. This should be a place remote from the house and paths, inaccessible to children and pets, preferably fenced. Minimum distance the distance to the house must be at least 1 m.
Since water is an excellent conductor of electric current, it is better if the soil around the ground electrode is moist, then the discharges will quickly go into the ground without accumulating on the rod. Additional moisture can be provided by flowing rainwater from a roof drain or by targeted watering of the soil.
For each building it is necessary to calculate the lightning rod, since each configuration is capable of providing a protective zone of various sizes. The parameters of this zone can be calculated independently, taking into account the features and dimensions of the country house.
A single rod forms a protective zone, which in geometry is close to a cone with an apex angle of approximately 45°. The top of this cone will be at the highest point of the lightning rod. In a cable-type lightning rod, the protection zone has a more complex geometry, in which the cable serves as an edge, and each rod forms its own cone.
The protective zone of a single rod can be calculated using the following formula:
where R is the radius of the zone above the highest point of the house, h is the distance from the highest point of the house to the peak of the lightning rod.

To find out if the rod height is sufficient to protect a certain area at ground level, you can use the following calculation. Let's say the height of the cone will be designated h o, radius on the ground – R o, building height – h x, radius at the building height – R x, rod height – h. Then, taking into account the height of the existing lightning rod and the height of the house, the unknown values will be calculated using the formulas:
R x = 1.5*(h-h x /0.92).
In practice, the calculations look like this: if the rod has a length of 10 m, then the radius of the protection zone on the ground will be 1.5 * 10 = 15 m, the remaining parameters are calculated similarly.
To calculate the required length of the rod, you can use the same formulas, substituting the desired radius of the protective zone into them. In the case of complex geometry of the lightning rod, you need to draw a graphic model of the house and the lightning rod and calculate the protection zone geometrically.
The height of the lightning rod should not exceed 12 m, therefore, if it is not possible to meet these restrictions using a single rod, it is recommended to use several masts to expand the protective zone.
Lightning rod installation
To ensure that the lightning rod is installed correctly, you should adhere to the following method:
- Measure the height of the roof and determine its geometry. For clarity, draw a diagram by which you can determine the future protective zone.
- Decide on the type of lightning rod. For square houses, a single rod is sufficient; for long buildings, the use of a cable system is optimal.
- Calculate the protective zone and determine the required height of the rod(s). The minimum cross-section of the lightning rod must be related to its height in the proportion of 5 square meters. mm per meter.
- Determine the mounting point of the lightning rod and fix it on the roof or wall.
- Dig a hole for the ground electrode and place it at the required depth.
- Connect the grounding conductor and lightning rod together.
- Check the lightning rod with a multimeter. Its resistance should not exceed 10 ohms.
You can also install a lightning rod on a tree, which is 2.5 times taller than the house and located at a distance of at least three meters from it. In this case, the lightning rod is mounted on a long metal pole, fixed to the tree using synthetic cord clamps. The connection to the ground electrode is made with a wire of at least 5 mm in cross-section.

Further operation
The installed lightning rod does not need special care. It only needs to be periodically checked for damage and quality. metal connections. If the lightning rod has decreased in diameter or the joints have lost integrity, then these elements require replacement. The location of the ground electrode should also be checked, and the ground around it should be kept moist.
No one is safe from money or prison, and even more so from a lightning strike. After a blinding flash and a deafening roar, the most pleasant thing is to get away with a slight fright and delight from the impressions you experienced. It's not good if the electronics in the house burn out. It's even worse when there's a fire. It is completely unacceptable for a person to be struck by lightning. The conclusion is simple: we make a lightning rod!
A lightning strike to a house cannot be called beautifulWhere does lightning come from?
The reason for this is cheerful clouds, which, as a thunderstorm approaches, gradually grow and turn into dark cumulus-type masses. The upper layers of moisture in the air turn into small ice crystals, while the lower layers remain as water droplets. This is how we got two plates of a giant capacitor.
Huge structures move in the air and are charged as a result of friction: the upper layers accumulate positive ions, the lower ones – negative electrons. There is a limit to everything, and the accumulated potential turns into an electrical discharge. As a result, it “breaks through” where there is the least resistance: tall trees, roofs of houses and... lightning rods!
How does lightning protection work?
From the above, the strategy for a lightning protection device follows: to direct a possible electric discharge along a path that is safe for us and thus insure ourselves against troubles. For this purpose, an lightning rod is installed at a sufficient height, which is designed to capture a lightning discharge.
 Lightning rod device diagram
 Next, an electric current of about 100,000A passes through the down conductor to the ground electrode. The latter provides communication protective system with soil. Thus, the lightning strike bypasses the protected objects and is absorbed by the ground.
This protection system is widespread and is called passive. There are active lightning rods that have an ionizer that provokes a lightning strike. This increases the likelihood of protecting the target from damage. This type of lightning rod costs a lot, and its installation is difficult to do with your own hands.
Lightning rod options for a private house
There are three main types of lightning rods based on the type of design:
- rod lightning rod;
- in the form of a grid;
- cable lightning rod;
- roof covering as a lightning rod.
 You can purchase a pin lightning rod or make it yourself
 An air terminal in the form of a rod is the most famous and widespread. There are industrial products with ready-made fasteners. For those who like to create with their own hands, it is possible to make an elegant structure that decorates a building. In any case, a steel pin must have a cross-section of at least 70mm2, and for a copper product 35mm2 is sufficient. Thus, its diameter can be 7-10mm.
The length of the rod can vary between 0.5-2 m, and it must protrude at least half a meter above all objects surrounding the building. The lightning rod accepts the charge at one point and is especially effective in protecting small buildings.
 Lightning rod in the form of a mesh is convenient for a large roof
 An air terminal in the form of a mesh is made of wire with a diameter of about 6 mm. In the photo you can see what a structure of this kind looks like in practice. Already exist ready-made designs with cell size 3-12m. This type of lightning protection is convenient for use on the roof large area. To prevent the fire of the sheathing, the lightning rod is mounted at a distance of 0.15 m from the roof surface.
 The cable lightning rod can be conveniently placed on the ridge
 In a private home, it is more convenient to use an lightning rod in the form of a cable. It is mounted on the roof ridge, secured to two supports on opposite gables. It is also possible combined option, when pin lightning rods are installed on the mentioned supports in addition to the cable.
The cable must have a diameter of more than 5 mm and be mounted on safe height from the roof. This type of construction is usually used on a roof with a non-metallic covering.
 Seam roofing as a lightning rod
 Metal roofing roof, with certain conditions, can also act as a lightning rod. In this case, the thickness of metal tiles, corrugated sheets or galvanized sheets must be at least 0.4 mm. It is tempting to provide lightning protection without using additional materials.
In practice, this is not easy to do, since there should be no flammable materials under the decking, while the sheathing is most often made of wood.
Moreover, it will be necessary to connect the down conductor to each individual sheet of coating, which is labor-intensive. This option is suitable for seam roofing, where the metal sheets are already securely connected. In this case, ignition of the sheathing is impossible if the coating is laid on a metal sheathing.
How does a down conductor work?
Ideally, for a self-made structure, the material of the lightning rod, down conductor and grounding conductor should be the same and connected by welding, that is, steel. This solution ensures reliability and durability of protection. In practice, it is possible to use galvanized and copper-plated elements, as well as various materials. Their connection is ensured by using clamps with bolts and nuts.
 Down conductor on the roof, wall and basement of the house
 A steel conductor in the form of a rod or strip must have a cross-section of at least 50mm2, an aluminum conductor allows a size of 25mm2, and a copper wire can be used with a cross-sectional area of 16mm2, which approximately corresponds to a diameter of 8.6 and 5mm, respectively.
The down conductor is placed so that it connects the lightning rod and the ground electrode along the shortest path.
In this case, sharp bends are not allowed, which can lead to a spark discharge and ignition in this area. For the same purpose, the conductor is placed at a distance of at least 100 mm from the surfaces of combustible materials of walls and other elements of the building.
Requirements for the ground electrode
 This is what a ground loop ready for testing looks like:
 Please note that it is not recommended to use a protective ground loop to connect a lightning rod. In the case of using a common grounding conductor during lightning discharge on surfaces household appliances may arise dangerous voltage. To protect electrical wiring and household appliances In a private house, against lightning strikes, impulse noise protection devices (SPDs) are installed on the input switchboard.
Grounding for the lightning rod is placed no closer than 5 m from the porch and paths and the horizontal connector is buried at least 0.8 m. This is necessary to reduce the likelihood of injury to people in the event of a lightning discharge.
Lightning rod protection zone
You should not be under the illusion that a lightning rod on a neighboring house or a metal tower located nearby will completely protect your home from a lightning strike. The lightning rod's protective zone has very specific boundaries. In any case, the dacha will have to arrange its own lightning protection.
 The size of the protected zone is determined by the height of the lightning rod placement
 The safety cone created by the rod lightning rod has an angle of 45-50°. This rule is valid for lightning protection installation heights of up to 15 m. The above sketch shows that at an angle of 45°, the radius of the protective zone is equal to the height of the top point of the rod above ground level. At a value of 50° the protection zone will be slightly larger.
Thus, the higher we place the lightning rod, the larger the area of the protected surface will be.
Anyway, a private house must fall completely within the protection cone area.It is highly desirable that all buildings in the yard be protected according to the same rule. Thus, it is convenient to place a lightning rod on the roof of the house. It can be easier to fix the pin on one side of the building than in the center, and the likelihood of lightning hitting the roof is reduced.When large plot It may be necessary to install another lightning rod. It can be mounted on a special mast.
We install lightning protection with our own hands
First of all, you need to select an air terminal in accordance with the above recommendations and the materials at hand. The easiest way to install an ordinary steel pin on the roof of a country house. Galvanized pipe or aluminum rod will work even better. When using a pipe, its upper end should be plugged.
If you have a piece of cable of the required length and diameter, it will not be difficult to stretch it along the ridge. On a large roof area it is more effective to use a grid option. An air terminal of any design should be secured so that it is not disturbed by the wind.
Please note: it is easier to ensure electrical contact of the entire system by making all three components of the lightning rod from the same material.
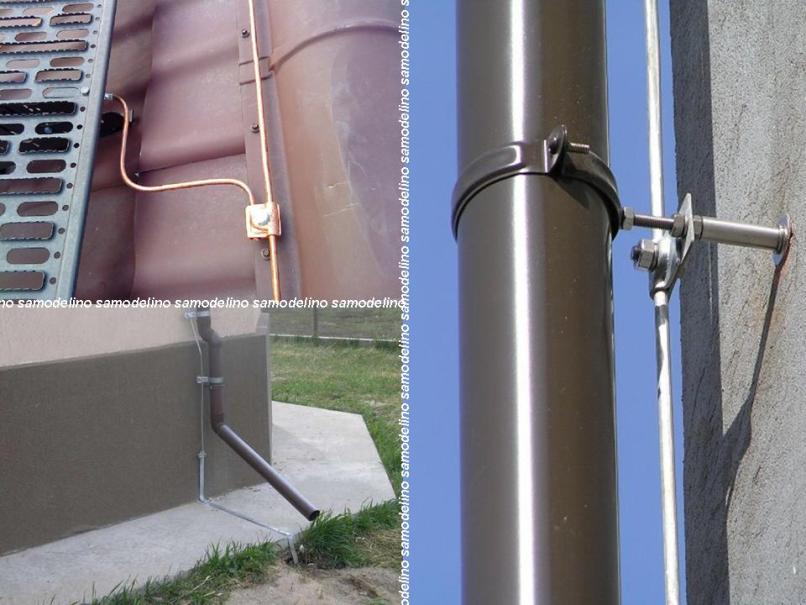
If you do not have welding in mind, it is easier to make a down conductor from thick copper wire in accordance with the recommendations above. Reliable connection with lightning rod can be provided using galvanized clamps with bolts and nuts. Practical to secure the conductor to the supports drainpipes.
 Dimensions of the ground loop in the form of a triangle
 It is best to install a grounding loop where there is the least likelihood of people being present. It is also beneficial to place it in a place where moisture is always present. This will improve the contact of the ground electrode with the ground. It wouldn't hurt to install a warning sign next to it. Bolted connection with a grounding conductor, it is better to perform it above the ground on the base of the building, and ensure contact in the ground by welding.
After installing the entire system, the electrical connection from the lightning rod to the ground can be checked with a multimeter. The resistance of the ground loop can only be checked with a special device. Its value should be no more than 10 Ohms if there may be people nearby. For a separate lightning rod installed far from the house, the grounding resistance should not exceed 50 Ohms.
 Standard device for measuring ground resistance
 At least once a year, it makes sense to check the integrity of the entire system visually. Once every few years, you should dig up the grounding and assess the degree of metal corrosion. If the rods in the ground become noticeably thinner, they need to be replaced.
The tall tree will help us
To equip a lightning rod at your dacha, you can use it as a mast tall tree, growing nearby. The lightning rod should be fixed to its crown so that it protrudes at least 0.5 m above the crown. It should not be forgotten that the tree grows and changes its size.
 Pyramid poplar will protect the house from thunderstorms
 This means that the lightning rod and down conductor should be secured with plastic clamps that will not damage the barrel. It is better to use flexible stranded copper wire and it should be laid with a spare length. In addition, once every few years you will have to climb up and move the lightning rod above the top of your head.
Country houses are usually built from flammable materials, and the fire station is located far away. Yes, and you can’t drive up to every building, and you shouldn’t expect anything good from the strong wind that accompanies any thunderstorm.
Sometimes from a lightning strike Entire holiday villages are burning down.
We’ll tell you how to make an effective lightning rod on your own and eliminate the risk of a direct hit from a “heavenly discharge” into your house.

In simplified terms, the physics of the process can be described as follows: source lightning are cumulonimbus clouds.
During a thunderstorm, they turn into peculiar giant capacitors. On the upper plus part, a huge positively charged ion potential accumulates in the form of ice crystals, and in the lower minus area, negative electrons accumulate in the form of water drops.
During the discharge (breakdown) of this natural battery, lightning appears between the ground and the thundercloud - huge electrical spark discharge:

This discharge will always flow through the circuit least local resistance electric current. The fact is well known and verified. Such resistance usually occurs in high-rise buildings and trees. Most often, lightning strikes them.

The idea of a lightning rod is to install it near the house area of minimum resistance so that the lightning discharge passes through it and not through the structure.
If you don’t have a lightning rod at your dacha, it’s time to think about building one. The cheapest and easiest way to make it is to do it yourself. What do you need to know for this?
So, a lightning rod (lightning rod) is a lightning protection (lightning protection) device, ensuring the safety of the building and people's lives, located in it, from the destructive effects that can occur during a thunderstorm with a direct lightning strike.
This corrosion protected, bare conductor - that is, a well-conducting material with as large an area and a larger cross-section as possible (minimum 50 mm²).

A lightning rod (lightning rod) is assembled from thick copper wire or steel rod, pipes the required section or from steel, aluminum, duralumin rods of various profiles, corners, strips, and so on.
It is better to use galvanized steel materials. Since they are less susceptible to air oxidation.
What does lightning protection consist of: device

Lightning rod (lightning rod) simplest design comprises 3 parts:
(descent).
Let's talk about each element in more detail.

A metal conductor mounted on the roof of a building or on a separate support (tower). Structurally divided into three type: pin, cable And mesh.
When choosing a lightning rod design focus on the material, which covers the roof of the house.
1. Shtyrevoe(or rod) lightning rod device is a metal vertical rod rising above the house (see figure below).
Suitable for roofs made of any material, but it is still preferable for metal roofing. The height of the lightning rod should not exceed 2 meters. And it is attached either to a separate load-bearing support, or directly to the house itself.

Materials for production:
Steel pipe (20 -25 mm diameter, with wall 2,5 mm thick). Its upper end is either flattened or welded into a cone. You can also make and weld a special needle-shaped plug to the upper edge of the pipe.
Steel wire (8 -14 mm). Moreover, the down conductor must be exactly the same diameter.
Any steel profile (for example, angle or strip steel of at least 4 mm in thickness and 25 mm in width).
The main condition for all these steel materials- section minimum 50 mm².
2. Trosovoye the lightning rod device is stretched along the ridge at a height of up to 0,5 m from the roof cable with minimum cross-section 35 mm² or wire.
Galvanized steel rope is usually used. This type lightning rod is suitable for wooden or slate roofs.
It is fixed on two ( 1-2 meter) supports made of wood or metal, but insulators must be installed on metal supports. The cable is connected to the down conductor using die clamps.

3. Mesh the device of the lightning rod system is a mesh laid over the roof with a thickness 6 -8 mm. This design is the most difficult to implement. Used for roofs covered with tiles.

4. Well, it’s very rarely used covering device lightning protection is when metallic lightning rods act as lightning rods structural elements the house itself (roof, trusses, roof railing, drainpipe).
All considered designs of lightning rods securely connected by welding with a down conductor and through a down conductor with a single- or double-sided grounding conductor welded seam minimum 100 mm in length.

(descent) - the middle part of the lightning rod, which is a metal conductor with a minimum cross-section for steel 50 , for copper 16 and for aluminum 25 mm squared.
Main purpose down conductor is to ensure the passage of discharge current from the lightning rod to the ground electrode.
Ideal path for electric current to pass- the shortest straight line directed straight down. Avoid turning at sharp angles when installing the lightning rod. This is fraught with the occurrence spark discharge between nearby sections of the down conductor, which will lead to inevitable ignition.
The most popular material for current conductor- bare steel wire rod or strip. It is carried out only on fireproof surfaces. Metal brackets should be installed on flammable walls, which themselves, being in contact with the flammable surface, will protect the down conductor.
Minimum distance from the wall to the down conductor 15-20 cm.
It must be laid out so that there were no points of contact with elements of the house such as a porch, Entrance door, window, metal garage doors.
We know that It is better to connect parts of a lightning rod by welding, but if this is not possible, it is allowed to interface the down conductor with the grounding conductor and lightning rod using three rivets or two bolts. The length of application of the current conductor to other parts of the system with a rivet connection is equal to 150 , and with a bolted one - 120 mm.

The end of the non-galvanized wire rod and the point where the down conductor wire is attached to the steel parts to ensure reliable contact needs to be cleaned, and it is enough to wash the galvanized one from dust and dirt. Then a loop or hook is made at the end of the wire, washers are placed on both sides and the whole thing is tightened as tightly as possible with a bolt.
The joints (if it is not welding) also need to be wrapped in several layers of electrical tape, then with a coarse cloth, twisted on top with a thick thread and covered with paint.
To improve contact you can treat the ends of the wire with tin and solder.

(grounding electrodes) - located in the ground, the lower part of the lightning rod, providing reliable contact down conductor with ground.
How to properly arrange grounding is described in GOST oh and SNIP ah, but for the most simple option it is enough to have at least one meter from the edge of the foundation and no closer 5 meters from the entrance to the building to bury P-shaped structure made of metal conductors.
Able to cope with the task conventional ground loop(it is made for household electrical appliances).

This 3 electrodes driven and buried in the ground, connected to each other at the same distance by horizontal ground electrodes. The grounding structure should be buried below the maximum soil freezing level. From 0,5 before 0,8 meters deep.
For a grounding conductor take rolled steel cross section 80 mm, less often copper cross-section 5o mm squared. Vertical grounding electrodes are 2-3 meters in length, but the closer the groundwater level, the shorter they are.
If the soil at your dacha is constantly wet, then a meter or half meter pin will be enough.
On what depth to drive and how many electrodes will be necessary can be found in energy service at your place of residence.
It must be remembered that the quality of grounding depends on the size of the contact area of the ground electrode with the soil and resistivity the soil itself.
Grounding conductor for lightning rod need a separate one, you should not ground the lightning rod to the household circuit. Categorically We do not recommend experimenting. It is fraught with consequences.
We invite you to watch the video from visual diagram installation of lightning protection:
According to regulatory documents, for private residential buildings installation of lightning protection systems optional. And only you can decide the feasibility of installing a lightning rod (lightning rod) at your dacha. We hope that the article will help you make the right decision.
People living in private houses are afraid of lightning striking their homes. Some of them, in order to protect themselves from this, are thinking about protecting the building. Their concern is understandable, since there are regions where lightning intensity can reach up to 80 hours a year. In such areas it is necessary to install lightning rods. The construction of such a structure naturally requires certain costs. However, in some cases they can be minimized if you do all the work on creating a lightning rod yourself.
Protection zone

Currently, structures that protect against lightning are distinguished based on the degree of reliability. There are two types:
- type A;
- type B.
Lightning rods of the first type provide 99% protection, which allows them to be called the most reliable designs against lightning. Structures of the second type provide 95% protection.
Device
 If you are seriously afraid of lightning getting into your home and, in order to protect yourself from this, you have decided to install a lightning rod, then in this case, during work you will need to create the following elements of this building:
- lightning rod;
- down conductor;
- ground electrode.
Lightning rod
 This is a device that looks like a metal rod. After installation, it will rise above the roof of the building. This is where lightning strikes will fall. This ensures reliable protection of the structure. In addition, such a device is able to withstand severe voltage loads that occur when struck by lightning. When creating this element, you can use various materials.
The best choice - strip or round steel, whose cross-sectional area is at least 60 square meters. m. This element is subject to certain requirements in terms of length. This parameter must be at least 20 cm. The device must be placed strictly in a vertical position. The most high building on the site is an ideal place to secure it.
Down conductor
 The current conductor has the form of a thick wire with a diameter of 6 millimeters. To create it the best choice- Cink Steel. Regarding its location, it is better to choose areas where lightning is most likely to strike. For example, good place the edge of the pediment can be used to accommodate it. It can also be placed on the ridge. This lightning rod element is secured close to a private house, but with a slight offset of 20 cm.
If the house has a roof made of materials that are easily flammable, then in this case a gap is all the more necessary. To secure the down conductor special fasteners must be used: nails and staples. For greater reliability of fastening this element, you can use clamps.
Ground electrode
 It is necessary to divert a current strike from lightning to the ground. When choosing a material to create this lightning rod element, you must use one that conducts well electric charge. It is also necessary that the material has minimal resistance. If we talk about its location, then this lightning rod element is placed not far from the porch of a private house, at least 5 m. It is not recommended to install the ground electrode in the immediate vicinity of paths, as well as in places where people may be. After placing it, you can create a fence around it to make sure it doesn't cause harm.
When installing a fence from the ground electrode, it is necessary to make an indent of 4 meters, and the fence itself should be arranged along a radius. If the weather is good outside, it will not do any harm. But if it’s cloudy, and especially if a thunderstorm has begun, then standing in close proximity to it can be dangerous to your health. The ground electrode is installed in the ground. The decision regarding the depth of this element is made by the owner of the house himself. The following points must be taken into account:
- soil type;
- availability of groundwater.
For example, if the site is dominated by dry soil and the groundwater level is low, a ground electrode consisting of two rods is installed. The length of each of them should not exceed 3 meters. Components of this element must be secured to the jumper, whose cross-sectional area should be 100 square meters. m.
When this is done, the grounding conductor is secured to the down conductor by welding. After this, it is immersed in the ground to a depth of 0.5 meters. In the event that the soil on the site is peaty and has high humidity, and located close to the surface groundwater, then there is no possibility of grounding for half a meter. Therefore in this case nessesary to use metal corners , which will act as a grounding conductor. They are immersed to a depth of 80 cm.
 If under construction multi-storey building, then in this case, work on installing a lightning rod is carried out by specialists. These structures have their own protection zone radius, which makes it possible to place them on every building. Before installing this structure, it is checked whether the already installed lightning rods are capable of providing lightning protection to the constructed building or whether it is necessary to construct a new one.
In the case of individual houses, the issue with the lightning rod is decided by the owner himself. There are a number of factors in the placement of buildings that can minimize the risk of lightning striking a house:
- if a house is located in the lowest place on the site, the probability of lightning striking it during a thunderstorm is small;
- if there is a building next to the dwelling high altitude, then when lightning strikes it is more likely to be hit by lightning. This way your home will be safe;
- If a lightning rod is installed on a neighboring house, then its protective zone may extend to your house. And in this case there is no great need for a lightning rod.
Thus, it cannot be said that a house that does not have a lightning rod is at high risk of being struck by lightning.
Options for creating a lightning rod
 If you have inspected your and neighboring houses and as a result discovered that nearby buildings do not have such protection as a lightning rod, then in this case the most reasonable thing is to do the work to create it yourself. Particularly dangerous are buildings whose roofs are covered with metal tiles or steel sheets. Although such a roof looks attractive, the lack of grounding increases the risk of lightning striking such a house.
In most cases, installation of this roofing is made on a lathing made of wood. This ensures charge accumulation. Discharge of such a device can only occur after a thunderstorm. A person touching it can receive a current discharge of several thousand volts. In addition, do not forget that a spark may occur after a lightning strike, from which a wooden house can easily ignite.
If you want to avoid such unpleasant situations, then you need to think about grounding, which should be located every 20 cm. If your home has a metal roof, then in this case you can refuse to create a lightning rod. The roofing material itself will be an excellent lightning rod.
 To save your home from lightning strikes, you can install a lightning rod on its roof. However, other options are also possible. If there is a tall tree next to your home, then you can install a lightning rod on it with your own hands, but provided that it is located at a distance of three meters from the building, and its height is 2.5 times greater than that of your house.
If you find this lightning rod option attractive and decide to arrange it, then you will need 5 mm wire. First you need to prepare it, then one end needs to be buried in the ground, having previously welded it to the ground electrode. The other end will act as a lightning rod. It must be placed at the very top of the tree.
If there is no tall tree on your site, you can use an air-termination mast with two metal rods. Their installation is carried out at opposite ends of the roof. The drain in this case will act as a down conductor. Great importance has the material of its manufacture. It must be metal. In this case, you should also not forget about the device of the grounding electrode.
Conclusion
Regardless of which method you choose to install the lightning rod, you must remember that by properly installing this structure, you will ensure comfortable living in your wooden house. But it is necessary to periodically check the condition of the lightning rod created with your own hands. Special attention must be paid to its connections. There should be no violations in them. Only in this case you can not be afraid of lightning striking your house.