Modern market offers a sufficient selection of children's furniture, including cribs.
A child will be able to sleep in his crib for a maximum of four years, then he will have to change it to a more adult-sized version. And the price of furniture is not cheap at all, so there is an option to make a comfortable crib with your own hands. It's not as difficult as it seems at first glance!

It is not at all necessary to be a professional in this field and spend a lot of time on assembly.

The first step is to purchase only high-quality environmentally friendly materials and take this issue seriously, considering the entire upcoming process.
The photo of a do-it-yourself crib shows how to make one for a five-year-old child, but all of the specified parameters can be increased to a larger size.

The benefits of a self-made bed
When you go to a furniture store, you can find a lot of options for children's beds from various materials(plastic, fiberboard, chipboard, wood). The best material, of course, wood, which provides safety, durability and is the most durable option.

A finished wooden crib is quite expensive. Not every family can afford such costs, especially since it will only last a few years.

The cost of a hand-made design will be several times less and has the following positive aspects:

- reliability in use of the design. Children often love to play and jump on the bed, and you won’t have to worry that it will break under the load;
- can be made strictly individual bed. Which will suit the style and interior of the children's room and has individual sizes;
- The creation process will help you spend time with interest with your child, who will probably not refuse to help his parents.
Purchasing the necessary material and preparing tools
To begin with, you should carefully prepare the room in which the planned process will take place. If it will take place directly in the room, it is wise to cover the floor and furniture with film, since a lot of dust and sawdust will appear during the work.

Then you need to properly prepare exact drawing DIY cribs for a newborn, or find a suitable sketch on the Internet.

You will need a number of materials:
- self-tapping screws of different diameters;
- wooden panels for furniture;
- special wheels with which the drawers will be pulled out;
- sheet of plywood or metal grill for the base of the bed;
- sandpaper for processing cuts.
The set of tools is absolutely minimal: electric jigsaw, grinder and regular drill.

It is important to first, before drawing up the drawing, measure the mattress that will be placed in the crib, since later it will be more difficult to choose the right size!

Step-by-step making of a baby crib with your own hands
Having decided on the size and design of the children's bed, you can begin the actual work:

- All necessary markings are carefully applied with a pencil, not forgetting about the edges.
- Then, using a jigsaw, you need to carefully cut out all the parts.
- Needs to be cut metal corners the right size, immediately drilling holes in them (maximum five), into which self-tapping screws will be mounted in the future.
- To make the base of the mattress, you need to screw the corners to the bottom of the sides.
- Having conveniently placed the crib on its side, you need to assemble all the necessary parts.
- Use sandpaper to smooth out possible irregularities and sharp corners.
- There are spacious drawers at the bottom of the furniture.
- It is wise to coat the crib with varnish or a similar coating, which will give it an aesthetic appearance.
- The final stage: place the mattress on the bottom of the bed and spread the bed linen.
Accessories for baby's bed
A crib for a small family member must be equipped with sides that will serve as protection for the baby. It’s very easy and fun to sew the sides of a crib with your own hands.

Their most popular type is the option that protects all four sides and is secured with regular ties.

Note!

When choosing fabric for children's bumpers, you should opt for lightweight materials with not too “pretentious” patterns, since the baby will have to study the patterns around him for quite a long time.
A cape over the crib protects the child from insects and possible drafts. It is also possible to make an original canopy for the crib with your own hands by choosing the right fabric.

It is better to buy two different cuts (quite wide for the allowance) natural material: weightless, light, summer fabric and denser fabric for winter. First, you need to purchase a frame that attaches to the bed. Then draw a pattern according to size, cut out the parts and sew them in the right places.

With imagination and minimal skills, you can make an original, unique crib that will serve and delight both you and your baby for several years!

DIY crib photo


Note!


Note!


One of the main advantages of making furniture for your home by hand is the ability to make it the right size from a material of the right quality and color. Everything is limited only by the imagination of the creator and the area of the children's room.
For example, for a boy’s room, you can make a do-it-yourself bed house in marine colors. As a result, the child will receive not only a wonderful place to relax, but also a real military headquarters. The girl will be pleased with the decor in the form of multi-colored flags, a delicate tulle canopy and other cute little things.
Preparation and manufacturing process
Children's premises, especially those with design Scandinavian style, very often include a bed in the form of a frame or frame house as required element. In a workshop or store, such interior elements are quite expensive. However, you can make such a bed with your own hands., even with a very modest budget.
Equipment and materials
To make a children's bed-house with your own hands, drawings are easy to make. All you need is the dimensions of the future structure and a couple of blanks.

You can purchase the material at a hardware store. The timber from which the structure of the bed house is made is also sold there. To make a children's bed for a mattress that is 165 centimeters long and 80 centimeters wide, you will need:
- Wooden beams in the amount of two pieces 40 by 70 with a length of 1660 millimeters.
- Four wooden beams 40 by 70, 1200 millimeters long.
- Two flat slats 10 by 70 by 1660 millimeters.
Step-by-step instruction
The implementation of this bed idea can cost about fifty euros. You can reduce costs and use parts and bottoms from old bed on slats.
Making the base
 First you need to make a base of four beams, each 1200 millimeters long. This structure is the vertical support of the bed. After installation and fastening, a small piece is sawn off at the top of each support beam at an angle of 45 degrees. This is necessary for further formation beautiful roof with two slopes.
The cutting line must first be marked with a pencil using a square or rulers. Here the wood posts are marked and cut down using a regular hacksaw. But in specialized construction stores you can purchase a device for cutting at one angle or another.
Roof assembly
For the manufacture of roofs they are used wooden beams in the amount of four pieces with a length of 730 millimeters. After fixing them, you should perform the same procedure as with the base boards - file their edges where they meet the roof at an angle of forty-five degrees.
Important! You should immediately pay attention to the resulting cuts. To prevent the child from getting injured, it is necessary to treat the cut areas with a piece of sandpaper. The structure of the house itself is assembled from cut 1200 mm vertical supports. All this is attached to the roof ridge, made of 730 mm beams. The upper part of the ridge is attached to the general structure of the future bed using pre-prepared wood glue.

The joints of all parts of the roof and vertical supports must be additionally glued, preferably two or three times. After this, the entire upper part should be seated on 40 mm self-tapping screws. Bolts and screws must be screwed in at a distance of up to 4 millimeters from the junction lines of the two parts of the roof. This must be done without pressing too hard, since the wood tends to delaminate.
A little tip: when you drill the entire structure, use a vice. You don’t need to drill very quickly, use only high-quality drills, suitable for the tree material. After screwing two roof strips to the supports, the frame of the future house is obtained.
Gradually our creation takes on its final shape. The procedure is repeated with the remaining parts. As a result, we get two identical frame structures - these are the end walls of the bed house.
Frame attachment

To completely complete the end frame composition, you need to screw an 820 mm block downwards. This baluster is a transverse support, holding mass on itself vertical racks designs. This measure keeps the entire bed in balance.
The distance from the transverse beam of the bed to the floor of the room is 150 millimeters, since the project implies the presence of legs for the bed. But this does not mean that you are obliged to repeat everything thoroughly. The bed may have no legs. In this case cross beam you will need to screw it flush to the bottom edge of the vertical supports, without any indentations.
Please note that an eccentric tie was used to assemble the side parts of the crib. It is also important to note that for such fastening techniques, your calculations must be very accurate. The result will be hitting the appropriate point. If such gluing turns out to be too difficult for you, then it would be better to use self-tapping screws. Then you need to buy extra flat angles measuring thirty by thirty millimeters. This approach significantly speeds up the process and simplifies the assembly itself.
If a design with corners is easier and faster to assemble, why do some people still stop at gluing? The answer is simple - iron corners look less stylish and aesthetically pleasing. The eccentric adhesive liquid firmly and reliably holds all parts together, their connection is hardly noticeable.
 Related materials and items for the screeding process can be purchased at specialized stores for repairs and construction. For something like this hidden installation you need to drill holes in the bottom beam of the bed using the previously specified 11mm drill bit. The hole should be located clearly along the middle line on the crossbar. Please note that the hole is through. Its depth reaches 130 millimeters.
The hole is separated from the edge of the crossbar block by about 40 millimeters. Here it is worth paying attention to the size of the bolts and screws used. The next step is to drill a neat hole from the side, right in the middle of the beam, with a six-millimeter drill. It should fit clearly into the recess we made earlier. A screw must fit into the resulting opening, then the entire structure is secured with an eccentric.
Another good tip. You can plant everything wood parts beds onto long screws, having previously treated them with an adhesive. Please note that the connection in mandatory must be balanced using corner-type brackets.
Assembling the base of the house
 To assemble this part, we will need several thick beams with a section of 40 by 70 by 1660. They will meet the characteristics of the sides of the crib. WITH inside Thin strips (10 by 70 by 1660) are screwed to the wood blocks using self-tapping screws.
Be sure to keep an eye on so that the screws are always at an equal distance from each other. These plates serve as support for the installed frame that supports the bottom of the bed house. We have already assembled the frame frame using a gluing liquid - screed. At this stage, it is critically important to accurately measure and adjust everything, and to avoid mistakes in your own calculations.
Make it in advance from a piece wooden block template 6 centimeters long. Several holes are made in it for self-tapping screws. They are located at a fixed distance of 25 millimeters from each other. With its help, the proposed holes are measured on all other future racks.

With help wooden template and a pencil mark the location for the holes. It is important to draw marks on both sides of the bars on all four crib posts. It is important to accurately place the upper end of the template at the level of the upper edge of the crossbar.
After finishing the basting, take a 6 mm drill and make through holes in the designated places. This procedure is performed only four times - the vertical posts are tightly and securely connected to the sides of the bed.
On the inside of the longitudinal post you need to mark a place for the future hole into which the eccentric is placed. It is made with a 10 mm drill. The outer side is processed, after which longer screws are screwed into it - up to 10 centimeters.
It is important to take into account that the bolts on the self-tapping screws should fit smoothly into the prepared holes, connecting the verticals with the side parts of the bed. You can also additionally glue the structure.
Particular attention should be paid, of course, to the joints. After all the operations performed, adhesive liquid is poured into the holes in the lower tier, and then the bolts are tightened. You need to carry out a similar operation with all parts of the frame structure, then connect it all to the sides of the bed-house.
Attaching the general frame
 The sides of the bed house are already securely screwed to the ends. Now comes the strengthening of the overall structure. This is done using four bars. For this we will use parts 1660 millimeters long.
It is imperative to take into account that the length of the beams must exactly match the length of the sides of the crib. All components are secured in the same way as in the previous stages - using an adhesive mixture and self-tapping screws. Do not forget also about additional strengthening of the composition with the help of corner fasteners.
Making rack bottom
 In this case, the crib contains slats from an old slatted bed. If you do not want to use the old bottom or do not have one, then a hardware store can offer you an excellent alternative - specialized slats. These beds will fit standard mattresses.
The slats are fixed directly on flat strips; on the sides they are attached to the four sides of the frame base. You need to screw all the parts together so tightly that parts of the screws do not stick out from your product. You can also leave a small gap between each plank - in this case it was 8 centimeters. For the bottom of a standard mattress, it was necessary to screw 14 slats.
Tip: from the pieces left after cutting the slats, you can make a wonderful side. For small children this is a mandatory safety element. It is assembled using one or more brackets secured at each corner. That's all, work on the crib house is finished. The time required was about noon.
Children's bed with drawers
All parents know that the child’s mood and well-being throughout the day directly depends on how well he slept. Furniture stores offer a wide range of children's beds, but the most the best option sleeping place for the baby will be a bed made with caring hands dad or grandfather.
We make a crib for a child ourselves
 Children tend to sleep much more than adults, so it is very important that their bed is comfortable and comfortable. Parents can take care of arranging a place for him to sleep even before the birth of the child. Even a man who has never held carpentry tools in his hands can easily cope with making a bed for a baby. The entire process may take up to 12 days.
 A wide variety of cribs for children makes it possible to make for your child exactly the kind of bed that he will like and will fit perfectly into the design of the children's room. You can find many ideas for original cribs on the Internet. You can create your own bed drawing or use a ready-made one if the dimensions of the product suit you.
What parts does a child's bed consist of?

Children's bed assembly diagram
1. Mattress – preferably orthopedic. Don't try to do it yourself. This is exactly the crib part that is best to buy. From birth, the child’s skeleton is formed, so there is no need to save money and risk the health of your baby.
2. Frame – depends on the size of the mattress. The material for the frame will be dry planed board.
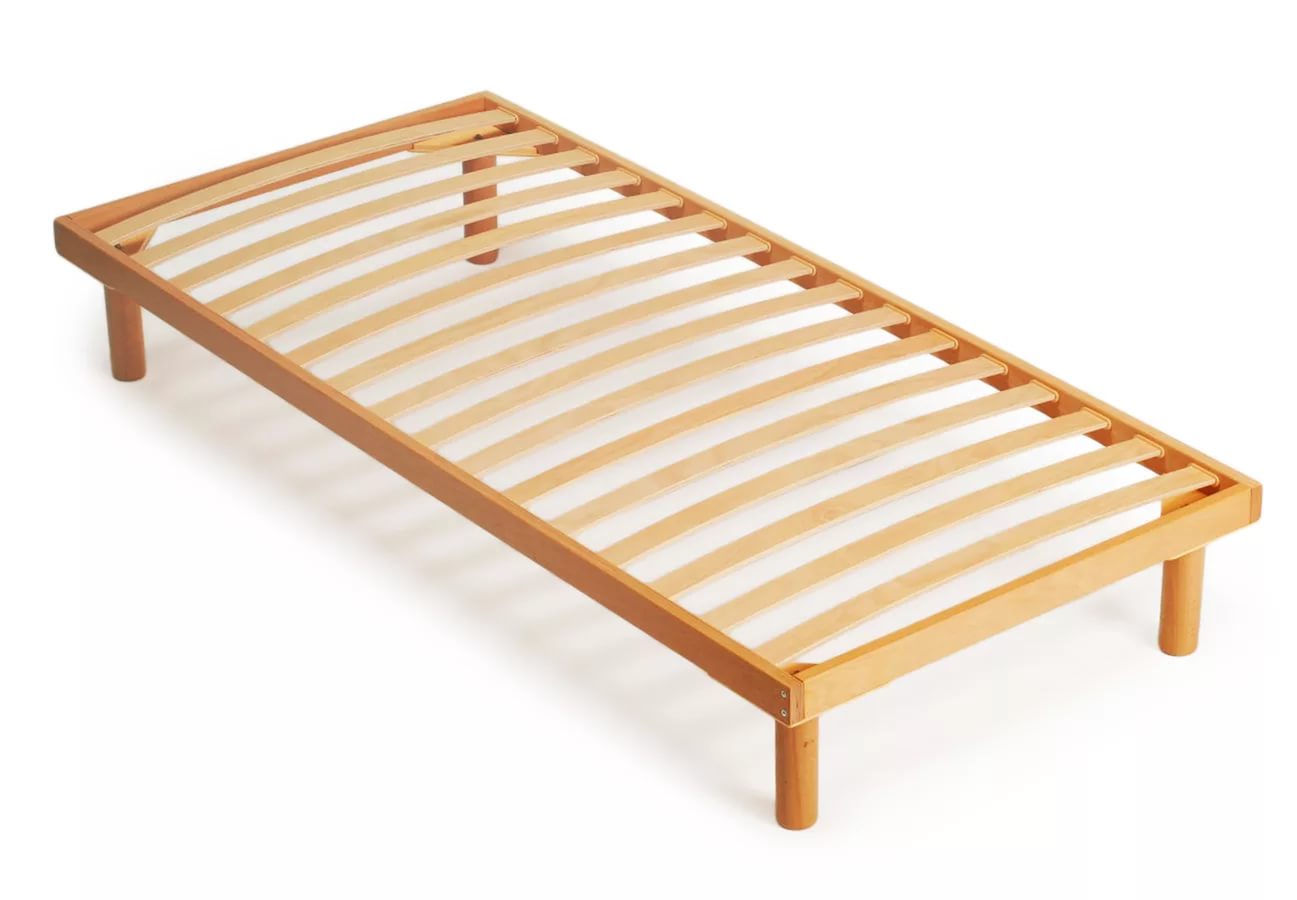
3. Lamels - are a lattice of slats, which is located in a sheet of thick plywood or frame. They have ventilation holes with a diameter of up to 50 mm. They are installed in the bed frame to support the bottom of the mattress.
4. Sidewalls – for the safety of the child, they act as a fence. Can be lattice or solid.
5. Byltsa - at the head they are higher than at the foot.
6. Legs – can be attached separately or located in a monolithic plane with the sidewalls. You can buy it at a furniture store, in the accessories department, or make it yourself.
What do you need to make your own baby bed?
As you know, parents always choose the best for their child, so the crib should be used environmentally clean materials.The visible parts of the bed are made of MDF. You can choose the wood and texture based on your budget. The crib may need to be moved frequently, so it is best to choose lightweight wood. A suitable option There will be blanks measuring 16 mm. Internal parts can be made of plywood or wooden blanks having a thickness of no more than 20 mm. MDF is easy to process and cannot be laminated. Therefore, you can glue the parts even with PVA glue, which is absolutely safe for children. A laminated surface can only be glued with nitro adhesive, which contains dangerous substances. chemical compounds.
Advice! It is recommended to buy MDF not in a store, but to order it from a furniture shop. This is much cheaper and more convenient, since furniture makers will be able to immediately cut it into pieces of the required sizes and edge the edges.
To make a bed for a child you will need lumber. These will be 5x5 cm timber and 2x10 cm boards. It is best to take the timber with a total length of approximately 8 m. If it is impossible to purchase a whole timber, take individual pieces. You need up to 10 boards. Even ordinary plywood will work well. Choose your sizes carefully. They must correspond to the future dimensions of the bed. All lumber must be edged and planed. You will cut the boards yourself to the required size and select the quarters and grooves.
Advice! It is not recommended to use chipboard as lamellas. This material is not elastic, so it may not be comfortable for a child to sleep on this bed base.

Child bed with ladder and table
Crib making process
In order to know what size your child’s bed will be, the first thing you need to do is purchase a mattress. Standard sizes children's mattress are 1200x600 mm. It is best if it is made from coconut fiber and impregnated with latex. Now you can start determining the size of the bed.The bottom surface is determined according to the height, so that it is convenient for the child to climb onto the bed independently. For a child 4-6 years old, it can be up to 35 cm. There should be a distance of no more than 12 cm between the walls of the bed and the rods. This is necessary to ensure the safety of the child, since all children love to stick their heads between the rods of the side walls of the bed when playing.
After all the calculations have been made and materials have been purchased, you can begin making the bed itself. The first stage in carrying out any work is preparatory. You should devote most of your time to it.
1. The boards are processed on a machine. Their width should be 7 mm and thickness 35 mm. You can use timber as a frame. For it you will also need 6 bars, which are laid across as a base for the mattress. In each of them, nests measuring 25 mm are made.
2. For convenience, it is best to mark them simultaneously. This way you will save time and reduce errors. Nests are made using a milling machine or slotting machine.
3. It is necessary to calculate the backrest frame. To do this, 600 mm is folded with a wall thickness on the sides of the crib in double size and add 25 mm.
4. For the rods, use 20x20 mm slats.
5. We connect the poles and backs with the side walls with blind spikes.
6. Glue the back and connect the sides. We fasten all parts of the children's bed with bolts.
7. Cover ready bed three layers of varnish.
The bed for your baby is ready! If desired, handicraft mothers will be able to independently decorate their child’s crib with side protection, a canopy and pillows. All this can also be purchased in the store.

Crib parts
Crib options for children
So, there are many options for cribs. Here are examples of popular models of sleeping places for children:loft bed;
transformable bed;
bunk bed;
pull-out bed;
rocking bed;
bed in the shape of a car.
For children from 5 years old most suitable model there will be a loft bed. You can place a cabinet under the bed, which is very convenient for storing toys and various things. This bed is very convenient for small children's rooms.
Transformable bed allows you to save money usable space in a room shared by several children. Their convenience is that during the daytime the bed is removed and a table is moved in its place, or part of the room is simply freed up. To do this, a frame is attached to the wall into which the bed is placed. The front of the bed, which will be visible when raised, is best decorated. Transformable beds can be vertical (bed-wardrobe, folded out lengthwise) and horizontal (bed-dresser and sofa-bed).
 Bunk bed
Great for two kids. Can be made on wood or metal frame. For an apartment with low ceilings, this bed option is not acceptable.
Bunk bed
Great for two kids. Can be made on wood or metal frame. For an apartment with low ceilings, this bed option is not acceptable.
Pull out bed grows with your child. It can be used long time. Has safety sides. Consists of two parts. There are wheels on the bottom that allow you to slide it under the top.
 Bed in the shape of a car
- the dream of every child. In stores, such beds are not cheap, so dad can easily make one himself. The main thing is to find successful drawing and choose a mattress.
Bed in the shape of a car
- the dream of every child. In stores, such beds are not cheap, so dad can easily make one himself. The main thing is to find successful drawing and choose a mattress.
Suitable for your baby from birth rocking bed . You can easily rock your baby with one movement of your hand, providing him with sweet Dreams. The inconvenience is that such a crib is suitable for a child up to about a year old. Having learned to walk, he may accidentally fall out of it.
In anticipation of their first child, many parents prefer to prepare a room for the baby in advance by purchasing furniture items such as a wardrobe, chest of drawers, or sofa. It is worth considering that one of the really necessary things in the first months is a crib, in which the child will spend almost all the time.
Selection of material and model
There are families in which dad can easily make a sofa equipped with powerful springs, neatly draped in exquisite fabric. For such a craftsman it will not be difficult to do with my own hands a cozy bed for your child.
Rocking bed - optimal model for a newborn. It is believed that you should not accustom your baby to holding hands, as this can significantly complicate the mother’s life in the future. Therefore, the option of a bed that can be rocked rhythmically will become the best solution. The child will not get used to the hands, but will fall asleep much faster.
There is no need to waste time making newfangled models such as a rocking sofa, a ring-shaped bed, etc. The child is growing quickly, and after about 1.5 years he will need another bed, with a larger size. It's better to pay attention to classic version, in which the parents themselves once slept comfortably. Making the sofa can be done later, when the baby can go to bed on his own.

Today there are a lot of designs on sale made of wood, modern plastic and metal. According to experts, the optimal crib should be made from natural wood.
First of all, it is worth considering that plastic can cause an allergic reaction. Metal is too much cold material, quickly heating up in summer from the action of sunlight. Wooden bed- an ideal place to relax, bringing pleasant dreams. Natural wood practically does not cause allergies, does not decompose in sunlight, does not heat up in direct rays like metal and looks great in appearance.
A beautiful bed assembled by dad provides deep sleep no worse finished sofa from a famous brand.
Return to contents
Technological process
To make a crib you will need:
- plywood covered with beech veneer, thickness 4, 15 and 18 mm;
- sample;
- 4 bolts M8-60;
- washers, nuts;
- nails;
- screws;
- wooden dowels with a diameter of 8 mm;
- wood glue;
- hacksaw or jigsaw;
- screwdriver or screwdriver.
- sandpaper;
- drill.
- milling machine;
- paint brush;
- primer;
- water-based paint.
The main part of the parts is made from a sheet of plywood. The balusters of the side railings are made from sheets whose thickness is 4 mm. Each side rail baluster is made from 2 blanks glued together in thickness.

To assemble the rocking chair with your own hands, you need to complete the following elements:
- backrests - 2 parts, 828x620x18 mm;
- shelf - 900x450x18 mm;
- side wall - 900x270x18 mm;
- handrails, 2 parts - 900x4x18 mm;
- support bars, 2 parts - 60x18x18 mm;
- runners, 4 parts - 760x80x15 mm;
- stoppers, 4 parts - 190x70x15 mm;
- linings for walls, 2 parts - 680x470x15 mm;
- side wall overlay - 800x90x15 mm;
- base - 900x470x15 mm;
- elements for balusters, 40 parts - 240x25x4 mm.
All parts are cut from a plywood sheet of a certain thickness using a hacksaw. A drawing of the parts is first applied to the plywood. When gluing the balusters, you need to give them a slight curvature using a special template. After gluing and removing the clamps, the block hardens very quickly, straightening out. Therefore, it is recommended to make a template with a slightly smaller radius than the desired bend of the baluster.
Holes for dowels are made in the side walls using a drill with a stop-limiter. Grooves are made in the handrails and side walls to accommodate balusters. Balusters are glued between handrails and side rails, thoroughly cleaning the surface of all elements sandpaper. It is better to give the balusters a slight curvature during gluing by pressing the clamps to the surface of the template. This will give the crib a pleasant appearance. When assembled, the concave side of the balusters should be with outside fencing.
If a master who can easily assemble a sofa decides to use decorative overlays, they should be strengthened before assembling the entire structure. They are attached to the front, back, and, if desired, to the side wall using clamps. As soon as the parts are glued, it is necessary to carefully sand the surface of the elements. This task can be optimally accomplished using an orbital sander. You can use decorative nails for fastening, drowning their caps as deeply as possible into the tree.
Before assembling the entire structure, it is advisable to round and carefully sand the edges. This procedure is especially carefully performed with handrails and the upper edges of the panels, which can be easily reached by an older child. Grinding and rounding are done with a milling machine.
The support skids are equipped with 2 stoppers that prevent the structure from turning over when swinging. Stoppers are cut out of a plywood sheet 15 mm thick. The front and back walls are secured with dowels and glue with runners. All parts are secured using self-tapping screws.
To make the crib look no worse than a purchased sofa, you should prime the surface of the entire model and, after complete drying, paint over the parts water-based paint. Lucky and oil paints It is not advisable to use them, as the smell from them lasts for a very long time and can negatively affect the child’s health.
Any children's bed, created with your own hands for a baby, is not only convenient and inexpensive, but also a great memory. Despite the fact that modern manufacturers offer many models of ready-made cribs, many parents want to create a sleeping place for their child on their own. Those who do not have practical skills in this matter will need expert advice.
Factory models have standard sizes, which mainly determine the dimensions of the sleeping place. The height of the backs and sides should be sufficient to prevent the child from falling and comfortable for the mother leaning towards the baby.
In order to decide how to make a children's bed optimally suitable for both the child and the mother, standard sizes must be adhered to:
- The width of the backs is 60-70 cm.
- Back height – 90-100 cm.
- The length of the side rails is 125-130 cm.
- The height of the rear side is 65 cm.
- The height of the front side is 50 cm.
Knowing the dimensions, prepare necessary materials it won't be difficult.
Selection of materials
To ensure that the bed you make is safe for your baby, you must use environmentally friendly materials that are not harmful to health.
The best option would definitely be natural wood(array):
- Linden;
- birch.
MDF can also be used on a budget and safe for the child. The visible parts of the future crib are mainly made from this material.

To make the structure you will need:
- bars at least 5 cm wide and 3 cm thick;
- slats 1.5 cm thick, width 2.5-5 cm.
For ease of movement, the crib can be additionally equipped with wheels..
Necessary tool
The best option for making crib parts would be to have carpentry or lathe. If such equipment is not available, you will have to use hand tools:
- Chisel, hammer and construction knife for removing wood from holes for installing vertical elements in horizontal guides.
- File and sandpaper for sanding parts.
- Construction meter and pencil for marking.
- A hacksaw with a miter box for cutting workpieces. A miter box will be needed to ensure that the cuts are even. If you use a triangle with a right angle when cutting material, you can do without unnecessary equipment.

It’s easier to assemble a crib with your own hands, the drawings of which do not include chamfers and other elements created professional tool. How simpler scheme, the less you have to think about how to make and what the completed element will look like.
You will also need:
- wood glue;
- wood screws;
- putty;
- steel corners;
- stain or paint;

Assembling the base for the mattress
The minimum size of children's mattresses is 120 by 60 cm. Based on this, the base is made with a small allowance; it is assembled, like the rest of the bed elements, from 2 bars, between which transverse slats will be located. To ensure the reliability of the base, grooves are made in the middle of the longitudinal elements into which the slats will be inserted.
This is the only part of the crib where continuous recesses can be used. To secure the slats, wood glue must be used. Short self-tapping screws can be used as additional fasteners. Their length should be less than the width of the bar. The length of the longitudinal elements of the mattress base depends on the chosen pattern. In some cribs, their length corresponds to the sides; they are secured to the vertical elements of the back with long screws or bolts. In others, where the base is placed on the transverse elements of the backs, allowances of 1.5-2 cm are made on each side.
Assembling the backs
Both backs are done the same way. Between the two bars, assembled gratings are placed, consisting of two transverse and several vertical elements. Holes are cut in the transverse upper and lower thick slats according to the size of the slats. The ends of the slats coated with glue are inserted into the grooves. The lower and upper elements of the resulting lattice are fixed between the bars. To add rigidity to the structure, another wide element is attached 5-10 cm below the grille.

The sides are assembled in the same way as the backrest lattice. They are also attached to bars that serve as the legs of the child’s bed. If you plan to put the crib on wheels, then before attaching the sides, you need to drill holes at the bottom of the bars. The pins of the rotating wheels will be inserted into them. Another design of furniture wheels is fastened with two screws, but they are static and only drive straight.
Painting a wooden product
When the crib assembly is completed, all that remains is to give it a finished look. To do this, you need to decide how to paint the crib and how to decorate it. For coloring, it is best to use stain, as it is relatively safe for the child’s body after drying. It happens different colors, but one of its qualities is unchanged - it does not hide, but emphasizes the texture and protects the wood from rotting. Despite the fact that the stain is absorbed well, the surface of the product will have to be coated with it in several stages to get the maximum effect.

Depending on the type of stain you use, it may have a specific odor that is difficult to get rid of. Therefore, it is better to carry out work on outdoors. After treatment, the crib should be varnished, which will protect the wood from moisture.. Instead of stain, you can use acrylic and acrylate paints.
On video: how to cover wood.
Also, a variety of decor will give the bed a beautiful appearance. You can use almost anything as it, for example, ribbons, textiles, etc. Don't limit your imagination to create sleeping place The child has a complete, logical and individual appearance.
Advice. For coloring, it is best to use stain, as it is relatively safe for the child’s body after drying.
Original cribs made of wood

Having skills in working on woodworking machines, the most simple bed for a child it can be turned into a masterpiece. Photo of a self-made children's bed using milling machine CNC, shows that manufactured by standard scheme the crib can become an interior decoration. By choosing multi-layer thread for the wide elements of the crib, thanks to computer program, it is easy to repeat. It will take from 30 minutes to several hours to make the elements, depending on the complexity of the design. When compared with the time that our great-grandfathers spent, masterfully wielding with hand cutters, this is mere nonsense.

For home craftsmen who only have an electric jigsaw at hand, you can try their hand at cutting ornaments. A heart, a clover trefoil, a bell are the simplest shapes, but they will become a wonderful decoration for the crib..
Typewriter
For older children, you can make a bed with a more intricate shape. For example, today a model in the form of a typewriter is very popular.

Using a woodworking machine you can make the contours of a future bed. Such a car will be made from several separate parts:
- The outer end part is the bumper, headlights, and radiator grille.
- Side elements – wheels and side rails that imitate car doors.
- A simple board headboard will be decorated with a wooden spoiler.
Such a frame can be built by fathers and grandfathers who understand the intricacies not only of woodworking tools, but also of cars. To make this crib comfortable so that the mattress does not slip, a mattress base installed below the sides of the machine will help.
Drawings of children's beds show that the ideal base for any external design is wooden grate, installed on legs.
