All photos from the article
Along with sideboards, the whatnot has returned from the recent past - a very convenient vintage piece of furniture. It is useful everywhere: in the kitchen, on the balcony, in the bathroom, in the hallway, and is irreplaceable in the country house.
Where the mass necessary little things waiting for a comfortable arrangement on the shelves.

Types of furniture

When choosing a bookcase for household purposes and decoration, pay attention to its shape.
The models are made not only for beauty, but also for maximum convenience, which is why various options are offered.
- Square or rectangular analogue. Classic version, in most cases suitable for any room configuration.
- A corner wooden shelf will fit perfectly into the corner of the room, without disturbing anyone and taking up a minimum of free space.
- Oval furniture takes up more space, but the disadvantage is compensated by originality and smooth lines.
- Non-standard analogues complex shape Most often they are made to order, but you can also buy interesting and unusual things in the store.
Installation Methods
Since the item consists of fastened shelves in several tiers without doors, it should be positioned so that all the contents are at hand, but not in the way.
- On one floor stand in the middle, which also serves as a shelf mount. Moreover, shelves are often made different sizes: smallest on top, slightly larger on the bottom. A ready-made or hand-made wooden shelf will fit anywhere. Shelves can be made to rotate around a support.
Note! The most stable and durable model is on four legs. It will withstand even quite heavy objects, for example, flower pots. In the kitchen, she will help the housewife in storing cans of preserves or food.
- Hanging shelves are ideal for small-sized homes, where every centimeter matters. Moreover, several well-chosen models hung around different walls or corners, will visually increase the space.
Purpose

After thinking carefully, you can choose an accessory for one or several purposes at once. Today we are looking at a thing that can be both useful in the household and pleasant to contemplate.
Decorating any room with plants is the desire of most. A DIY flower rack made of wood will fit perfectly into the interior.
Moreover, it is easy to make it from the materials left over after the repair. Plywood, chipboard, slats, profiles or pipes, bars for legs - everything is useful for the process.
To make the product a decoration in itself, you can purchase an exclusive item with many original additions. Carved patterns, bent legs, forged elements, inlay. Of course, the price for many copies is steep, but the demand for designer items often exceeds supply.

This piece of furniture can also become an assistant in the most visited place - the kitchen. There are never enough shelves here; there is always something to fill them with. A do-it-yourself wooden bookcase, made and solemnly presented to your wife, will definitely be a pleasant surprise for her.
There is not always room for a bulky cabinet to store books in small quantities. But the bookcase will serve faithfully here too. thanks to its presence, your favorite book for bedtime will be at arm's length.
Tired of scattered shoes in the hallway? Get a compact bookcase. Moreover, in her case you will not be annoyed by doors that do not exist at all.
Cute wooden shelves in retro style as a worthy place for services, figurines, awards and things dear to the heart are more fashionable today than ever. Friends will appreciate your choice, especially if the product is made with taste.
How to make a bookcase yourself

First of all, prepare everything you need. Special abilities and higher carpentry qualifications are not required for the process of creating a bookcase. What is important is desire, a little free time and basic skills left over from school labor lessons.
Tools
- Hacksaw or jigsaw.
- Hammer.
- Tape measure, pencil.
- Drill.
- Screwdriver and screws.
- Emery cloth of different numbers.
Materials
Here the fact of no small importance is whether the bookcase is being made for the kitchen, hallway, bathroom or purely for decorative purposes. In the first three cases, it is advisable to provide hygienic protection. Otherwise, spilled liquids, dirt from shoes or wet underwear will quickly ruin an unprotected tree.
So, the following will suit us:
- Slats, boards or sheets of plywood.
- Varnish or waterproof paint for protection against moisture.
- Round or square beams or blanks for legs.
Note! If you wanted to make round legs and lathe no, go to the hardware store. An affordable option is several rolling pins of the same diameter or shovel handles.
Product assembly
But if you are confident in your skill and can build robust construction from prefabricated racks, feel free to start working.
- Decide on the height and number of shelves, as well as the dimensions.
- Cut out 3-4 shelves of equal size and mark the four corners of each for fastening the supports.
- Be especially careful when measuring and cutting the legs. Misalignment in millimeter or uneven corner cutting will provoke instability and unreliability of the entire product.
- If each leg is monolithic from bottom to top, fasten the strips with self-tapping screws for installing shelves.
- For a prefabricated structure, start at the bottom and attach all the quartets in stages, one on top of the other.
- When finished, sand and coat all parts with varnish or paint in any color. For example, a white wooden shelf will fit into almost any interior style.
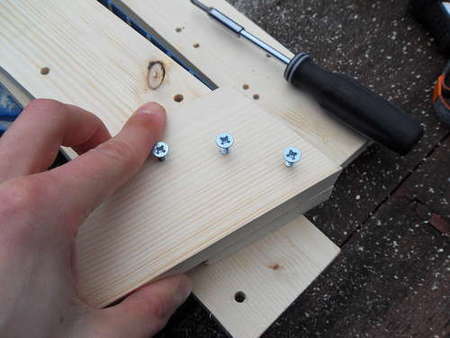
Presented to your attention step-by-step instruction on how to create a bookcase with your own hands. For the example of making this shelf, a used picket fence will be used, but any lumber will do. The shelves are made independently and attached to vertical slats.
Tools
To create a bookcase with your own hands you will need the following tools:
- Hammer
- Combined square
- Roulette
- Pencil
- Hacksaw or circular saw
- Anti-dust mask
- Protective glasses
- Work gloves
- Miter saw or backed hacksaw and miter box
- Tsulaga
- Grinder
- Universal plane
- Electric drill
- Drill 6.5 mm
- Wire Disc Brush for Electric Drill
- Four C-clamps
- Socket wrench with 11 mm head
Necessary materials
Additionally:
- Sandpaper: ten sheets of each grit 25 and 12 according to GOST (60 and 120 according to ISO);
- PVA glue;
- finishing nails 60 mm;
- nails 30 mm with a flat head;
- four synthetic polishing sponges;
- clean rags;
- teak oil with wax or finishing material of your choice;
- eighty-four bolts 3x50 mm with a mushroom head and washers.
* The old picket fence is well dried and should not deform. However, you will have to adjust the width and depth of your shelving to match your picket fence. If desired, you can use 95 mm wide hardwood boards.
The final height of the structure is 1500 mm; width 795 mm; shelf depth 378 mm. Lumber is indicated with nominal dimensions.
Preparation of material
1. Remove nails from the picket fences, if any. Choose carefully best planks that is, the most even, with the same thickness. In total you will need approximately thirty-five pickets.
2. Take the material for the frames, mark it and cut the parts. Make markings using a square across the face and on the edges to ensure the squareness of the ends when sawing. Saw close to the pencil line on the waste side. Place a combination square on the material to act as a guide for the circular saw. If you are not very good at circular saw, use miter saw or an axing saw and tsulaga.
3.
 The pickets usually rot on the bottom, but the top is in pretty good condition. Stack two or three planks and saw off the perpendicular ends evenly. When you have sawed off the ends of all the pickets at one end, mark them and cut them to a length of 1500 mm. Trim the corners of the top ends as shown in the picture on the side. Do not try to make the cuts absolutely identical - small irregularities will emphasize the rustic style of the product.
4 . Cut the shelf strips as described in step 2.
5. Using sandpaper with a grain size of 25 according to GOST (60 according to ISO), sand all parts. Sew the top edges only of the frame material to make them even. Make a small 2 mm chamfer on the frame parts.
Frame assembly
6. Clamp the frame jumper in a vice with one of the ends facing up. Apply some PVA glue to the end and rub it into the wood with your finger. Then apply glue to the end of the piece. This will strengthen the connection. Take the crossbar and drive a 60mm nail into the face of the material near the end of the piece. Place the crossbar on the header so that the ends are flush and the planed edges are neatly aligned. Hammer the nail and adjust the fit. Hammer a second nail into the joint and repeat the process at the other end. Check the squareness of the frame by measuring the diagonals. If they are equal, then the corners of the frame are right.

7. Add middle crosspieces to the frame. They should be evenly spaced, but the position accuracy is not of great importance, as long as the surfaces are flush with the top of the frame.
8. Make two more shelf frames and a plinth frame with shorter lintels.
Assembling shelves
9. While the frame glue is drying, clean and sand the picket strips. Wear safety glasses and gloves and, if possible, use a wire wheel brush in a power drill to clean all surfaces of each picket fence. Special attention focusing on those places where there is rot. You can use a regular wire brush, but the process will be more labor-intensive and time-consuming. When all the planks have been wire brushed, sand them with 25-grit sandpaper according to GOST (60 according to ISO). Be sure to sand the edges thoroughly to remove flakes and nicks; work along the grain, not across it. For getting smooth surface Treat the parts also with sandpaper of 12 grit according to GOST (120 according to ISO). Soft cloth remove wood dust.
10 . Check if the glue is dry. Glue the plinth frame (it is narrower) with PVA glue and nail the bumper board with flat-headed nails, aligning its upper edge with the top of the frame.
11. Apply a liberal amount of glue to the area on the plinth frame where the front picket strip will be located, and place the picket strip on the frame so that it extends beyond front side base by no more than 10 mm. Make sure it is flush with or slightly over the side of the frame and nail in place with flat head nails. Apply a little more glue to the frame, place the next plank and nail it, lining up the ends. Repeat the process for the third plank. Leave the fourth strip for now: it will be too wide and will require trimming
12. Attach three strips to each shelf frame in the same manner, positioning them flush with the front of the frames.
13 . Place the four planks in place and mark the required width along the frames. Secure them to a suitable work surface and cut to width. Nail the final planks into place.
Finding racks in frame houses
For attaching a shelf to a wooden one frame wall you will need to find the frame posts. This can be done in several ways.
- Use the structural member finder (post and beam indicator). This battery-operated device is available from retailers.
- Lightly tap the wall and identify places with dull sounds.
- At shelf level, try to find the studs using a nail.
- Look for nail marks on the drywall as they may indicate studs.
- In the under-roof space, find the ends of the racks. Measure the intervals between them and the distances to the corner.
Preparing the side and back slats

14. On one of the side strips, measure 60 mm from the bottom. Set aside another 400 mm from this mark to determine the position of other shelves. Draw a center line along the strip to provide drilling points. Using an electric drill with a 6.5 mm drill, make holes in them.
15 . Use the first picket as a template for drilling the remaining pickets. Stack two or three planks with the template on top. Secure with a clamp and drill everything together in the appropriate places.
16. Apply finishing material to all planks and frames (these areas will be difficult to access later). We used teak oil and wax to give it a rustic, simple look as it brings out the texture. Rub the wax in properly using rotational movements polishing sponges. This will also remove any small splinters left behind after sanding, so wear protective gloves. Use a dry, clean cloth to remove excess wax. The bolt heads were painted matte black. Bolts stuck into corrugated cardboard so that only the heads were visible, which were painted from an aerosol can.
Alternative Decoration Materials for bookcases
- Natural wax. Very popular, but requires increased rubbing and high consumption.
- Teak oil. For good results make several layers.
- Matt lacquer. Make a couple of layers of aerosol.
Assembling the shelf 
17. Make room for assembly. You may need an extra pair of hands at this stage. Place the base shelf on its end. Place the first side strip so that it is flush with the bottom edge of the plinth and the front edge of the shelf strip. Clamp it with a clamp. Clamp the remaining shelves into their respective positions flush with the edge of the strip, ensuring that the bolts go through the middle of the shelf frames and that there is room for the end wrench. The holes for the bolts in the plinth will have to be tilted slightly to prevent them from falling into the frame, but this will not affect the final appearance of the product. Insert 3x50 mm bolts into the holes, put on washers and tighten by hand.
A bookcase is a piece of furniture that consists of several shelves combined into a single structure. Shelves can be made of wood or metal, with shelves open on all sides or partially closed.
This piece of furniture is distinguished by its simple design, so if you have free time and desire, anyone who knows how to work with hand tools can make a bookcase with their own hands from wood or other material.
When creating furniture with your own hands, this applies to all types of furniture, advantages compared to samples industrial production, are:
- The cost of self-made products is significantly less than when purchasing ready-made analogues.
- Possibility of creating furniture in individual style, corresponding to the design ideas of the room or other space where it is supposed to be installed.
- The quality of manufactured furniture is controlled by the manufacturer, so successful operation for a long time is guaranteed.
- A person who makes furniture with his own hands enjoys the work he does and can be proud of its result.
- When making furniture, a person acquires new work skills that will be useful in the future.
- Making furniture with your own hands can be a type of business that provides a certain income to the manufacturer of such products.
Required tools and materials

To make a wooden shelf with your own hands you will need:
- Materials.
For the manufacture of shelves and a shelf frame, it can be used edged board various breeds wood (pine, spruce, birch, oak, aspen and others), as well as sheet material a, made from wood processing waste (chipboard, plywood, OSB sheets).
- Tool.
When making blanks and assembling the structure you will need: a circular saw, electric jigsaw or a hacksaw, a set of chisels and carpentry tools, clamps, plane, fasteners and wood glue.
To process the assembled bookcase - paint brushes, varnish, paints, as well as special tool and substances that make it possible to give the structure an “antique” look, if necessary.
Structures and connections
The design of the shelf depends on the scope of its use, the designer’s flight of fancy and the type of materials used.
This can be a bookcase for books or shoe storage, for arrangement flower pots or children's toys, as well as storage of other items.
When using sheet material as shelves, the frame of the shelf is made of solid wood, and the connection can be made in the form of a cut or using fastening elements (corners and plates), as well as in the “overlay” method.
The “overlay” method is characterized by the fact that the shelves do not lie directly on vertical racks, and are mounted on horizontally located frame elements.
If the frame is made of chipboard, plywood or similar material, then the connection is made only by using fasteners.
The design of the shelves can be different, which is also determined by the scope of use of the shelf, such as: flat shelves used for storage various items and box-shaped things - used for planting flowers and plants.
The shelves can be located in the same vertical plane or offset relative to each other.
Rack-type shelves are assembled by installing special spikes and then gluing the joints of the structural elements.
Modular shelves can have different designs, depending on the material used in their manufacture. Typically, this is sheet material assembled using fasteners.
How to make a wooden shelf with your own hands

The work of making a wooden shelf yourself can be divided into several stages, these are: preparatory, assembly, decoration and installation.
Preparatory stage
At this stage of the work, a drawing (scheme) of the shelf is selected or developed, and the need for its decoration is determined.
Based on these parameters, the required material is selected.
When the drawing has been developed, the material has been selected and prepared, the tools and other materials that will be required to process the assembled structure are prepared.
Installation of whatnot
Using prepared materials and tools, workpieces are manufactured and processed.
The workpieces are sawed in accordance with the existing drawing or sketch, after which the cut points are cleaned in order to remove irregularities in these places. When using boards, they are planed and sanded.
The shelf is being assembled.
Options for fastening workpieces to each other depend on the material used and must provide the required structural rigidity.
Methods and locations for installing fastening elements should be thought out at the stage of developing a product sketch.
Decoration of the structure
The simplest option for finishing an assembled product is to coat it with varnish or paint. This also applies to lumber. various types, as well as plywood and OSB sheets. At using chipboard only edge processing is required, for which edge material is used, glued to these sections of the structure.
When using lumber and trying to make a “antique” shelf, several processing methods can be used, these are:
- Brushing is a method when it is performed mechanical restoration wooden products metal brushes, followed by polishing and treatment with wax-containing substances.
- The use of stains that are used to process the manufactured product.
- Patination is a method by which painting is performed wooden surface paints of various tones in several layers.
- Craquelure is a method of processing painted surfaces special composition, craquelure, which gives the product an “antique” look.
Product Installation
After the shelf is made and decorated, it is installed at the intended location.
Depending on its purpose, the bookcase can be rigidly fixed to the surface of the wall or floor, and can also be freely positioned in relation to them.
The mounting option depends on the material that was used in the manufacture of the shelf and the structure of the walls and floor in the room where it is installed.
Nowadays, thanks to the Internet, you can always find drawings of any furniture, including whatnots various designs, which can be used for their self-production. And the variety of materials and technologies allows you to bring any creative ideas to life.
Using a bookcase for various purposes is its very advantageous advantage. Some people store shoes on such a multi-level shelf, others use it for decoration and giving the room a certain style. Masters in the beauty industry constantly move such a bookcase around their office while working: the shelves perfectly accommodate cosmetic products and other items that should always be at hand. Most often, such furniture is purchased, and few people know that making a bookcase with your own hands is a fairly simple matter.
Materials used for manufacturing
When thinking about how to make a bookcase, first of all decide on the color, size and material. When choosing materials for the manufacture of any furniture, it is necessary to calculate the quantity Money that you plan to spend on production. Most often, the following materials are used for bookcases:
- metal;
- plastic;
- wood;
- Chipboard, laminated chipboard;
- plywood;
- glass.
Before choosing a material, also consider what the bookcase is used for. If for decoration, choose a color that will fit the furniture into the interior, but at the same time will contrast with the walls. By making a multi-level shelf for decoration and placing various objects on it, you can develop your own own design. If your room is decorated in an antique style, for example, in the style  Provence, great solution there will be a cast bookcase with glass shelves. The technology of its manufacture is complex, but in the interior such furniture will look stylish and expensive.
For a model that is located in the office, you can use chipboard or laminated chipboard - these materials are cheap, but look no worse than wood. In addition, when purchasing chipboard sheets, it is a good idea to immediately order them cut into pieces certain sizes– this will greatly simplify your work and speed up the production process.
Wood, unlike chipboard, is more expensive, but is natural material, and sometimes even has a pleasant smell. Such environmental friendliness is very important for many lovers of beautiful furniture, and wood in this case will be an excellent solution. In addition, a huge number of types of wood and its colors will provide  same wide choose material.
Manufacturing process
When creating a piece of furniture, you need to go through several stages.
- Choice the required material or materials.
- Determination of design - furniture dimensions, number of floors, availability additional elements structures (for example, walls, partitions or wheels).
- Making shelves that will be located horizontally.
- Production of supports.
- Connecting shelves with supports.
- Decoration, addition various elements decor.
 If the first two points are simple enough (select optimal size and color, as well as measure the future location of the shelf), then subsequent questions may arise. If you decided on chipboard and ordered the sheets to be cut to the sizes you need, you have greatly simplified your work, especially when the support is the same chipboard - now you just need to assemble the furniture from the resulting pieces of material. If necessary, you can seal the edges of the places where the sheet is cut. This will make the furniture look more beautiful.
To create a cosmetic shelf, in addition to the material that will serve as shelves, you need to prepare supports. Metallic cylindrical legs (made from pipes) are best suited - they are very strong, easy to attach, look stylish and match any color of the shelf. If the beautician plans to move the cart, you can purchase 4 furniture wheels and place them at the bottom of the lowest shelf. If there is no need to move, install 4 legs.
When purchasing sheets of material, also buy everything for fastening. Please note that the size of the screws should not exceed the thickness chipboard sheet or other material. It is better to perform assembly using a screwdriver - this way you will reduce assembly time and simplify your work.
You can decorate the resulting furniture with available materials or pre-prepared decorations.
Application of whatnots
Multi-level furniture is an excellent solution for placing various items on it. For example, a bookcase would be very useful for a hallway - you can put all your shoes in it without taking up extra space.
Very popular bookcases used for indoor plants. Such furniture consists of shelves, each of which is removed from the rear plane at a certain distance, and often the bottom shelf is removed as far as possible, and those higher are closer. This ensures access to all levels of furniture. You can place flower pots on the shelves, or equip the furniture so that these pots are already built into the shelves.
A PVC bookcase for cats would also be an excellent solution: at the very bottom it would be a good idea to assemble a small cat house and make several shelves so that the animal can move freely along the resulting “stairs”.
If you already have a bookcase, but it doesn’t suit you with its color, style or something else, consider restoring it. You can easily replace the supports or decorative elements, change the color thanks to a special self-adhesive for furniture, unscrew the legs and install the wheels or vice versa.
If your home does not have storage space for any group of items, be it books, work tools, etc., then you probably had to deal with the fact that as their number increased, the apartment gradually began to become cluttered. At first glance, it’s quite simple to arrange a storage room or additional wardrobe, however, owners of small apartments do not always have such an opportunity due to lack of free space. How to organize things in this case? The simplest and practical solution Arranging a wooden rack with your own hands will solve this problem. But this is far from the only case when shelving for the home, including wooden ones, can be useful. The use of a rack is appropriate both in the garage, which without proper systematization of the space often turns into a dump of things, and on the balcony, where it will help to place seedlings or indoor plants in the most compact manner. Also, with the help of a rack you can zoning the space. Despite the fact that arranging a rack does not cause difficulties and is accessible even to a beginner, in this article we will tell you in detail how to make a wooden rack with your own hands.
Using shelving: main types
The wooden rack is a spacious wooden structure consisting of large quantity shelves that are mounted on special racks. Moreover, the number of tiers depends only on the individual preferences of the owner. A prefabricated wooden rack can be used to store various items: books, dishes, tools, etc. It will fit perfectly into almost any interior, be it country or classic. Functional purpose The rooms in which a wooden shelving would be appropriate are also diverse.

- They will look most harmonious in a children's room, where, thanks to the presence open shelves, children will be able to conveniently place their toys and subsequently have free access to them;
- The functionality of an office or library can also be expanded with wooden shelving, which can be used to store books, documents and any important small items;

- Often, the rack complements the interior of the kitchen, where some housewives place dishes, cereals or spices that are used daily.
- An integral point of using wooden shelving is their use for arranging indoor plants and seedlings. In this case, you need to know a little trick known to professionals. It is known that most indoor plants, like seedlings, need barely perceptible heating of the soil, which will promote efficient growth and life activity. To implement this principle, modern manufacturers offer expensive racks with automation, which can easily be replaced by laying wooden shelves foam plastic shelving. This unique material, being an effective heat insulator, is able to reflect thermal radiation that is formed in moist soil, returning it to the pot and thereby implementing the principle of minimal heating.

Structural types of wooden shelving:
- Stationary rack. Its design is a frame consisting of racks and crossbars, on which a sufficient number of shelves are fixed. To increase the reliability and strength of a stationary wooden rack with your own hands, the photo of which is presented below;
- Mobile racks - constructive option, most suitable for those who cannot decide on their location. Due to the fact that such racks are equipped with wheels, there is no need to unload the contents while moving them;
- Rotating racks- a design that is suitable for storing various small items needed in the household: spices, dishes, hygiene items used daily;
- Hanging racks- a design that allows you to optimize space and use it rationally in the future. It consists of several shelves combined into a single structure.


Original options for installing wooden shelving
Many people believe that a shelving unit is a rather primitive design, consisting of a rough frame with shelves. However, such options are used mainly on the balcony, basement or garage, where the furniture in use must be durable and practical, while for residential premises experts recommend giving preference to more original designs. For example, a rather nontrivial construction for home interior there will be a rack consisting of a pair oak boards and several glass bottles installed as shown in the photo below. And if, at first glance, the structure does not seem stable enough to you, cast aside all doubts and feel free to exploit it to the maximum, storing not only books, but also layouts of collection wines.

No less original are rope racks, for fastening them, unlike traditional frame structures, you only need two hooks on the wall. Of course, you won’t be able to store heavy jars with winter preparations on them, but you can easily arrange photographs, souvenirs, books, dishes and other small items. Rope racks, being temporary structures, can also be used for premises to be renovated. In this case, it is enough to make a structure from scraps of sedges or laminate, attached to a rope suspension. Fastening the structure will be easier if in the room where it will be located there is a heating pipe running under the ceiling - it will be enough to tie a rope to it.

Guided by next advice, you can make an equally original wooden shelving unit without a back wall, which will be a successful addition to an industrial-style interior. To make it you will need not only wooden boards, but also a couple water pipes, as well as fittings. It is necessary to pay attention to original way installation of shelves - in this case they are “attached” to the pipes like a children’s pyramid. Thanks to high rigidity water pipes reinforced with tees, we were able to abandon the rear support posts required when installing traditional structures.
If you decide to optimize living space in a private house where there is a staircase leading to the second floor, the space under it can be used to arrange a shelving unit, as shown in the photo.

Development of a drawing of a wooden shelving: general requirements
Development of a drawing is an obligatory stage and the key to arranging a convenient and practical rack. To make a drawing in accordance with all the requirements, first of all, you need to accurately measure the place where the rack will subsequently be located. If you plan to use the structure for storing work tools or cans of winter supplies, experts recommend giving preference simple forms. In this case, it will be enough to determine the height of the product, which depends on the height of the room and the individual preferences of the owner. As for installing a wooden rack in the garage with your own hands, it is recommended to do it the full height of the wall. The width of the shelves of the rack depends on what items will be stored on them - to arrange cans or books, shelves 25-40 cm wide are suitable, shelves for storing working tools are mounted taking into account their dimensions. The length of the shelves is another parameter that depends on the purpose of the rack. If shelves 1.5 meters long are suitable for storing toys, figurines and other small items, then for heavy books you need to choose shelves whose length does not exceed 90 cm, which will prevent them from sagging.

To summarize, let's take a quick look general recommendations that must be observed during the development of the drawing:
- The width of the rack is calculated taking into account the free space - its width corresponds to the width of the free space, however, for ease of installation, the resulting figure is reduced by 5-10 cm;
- The width of the shelves should be no more than 1.5 m, which will prevent their deformation;
- As for the depth of the shelves, the most optimal value here is 50 cm. If, despite the recommendations of experts, you increase this figure, be prepared for the fact that difficulties will arise when getting items from distant shelves;
- Most optimal height shelves - 30-60 cm, while the bottom shelf may be a little deeper, which is especially important if you plan to store large items on the rack;
- In the process of developing a drawing, it is necessary to make an approximate estimate of the dimensions of the items that will be placed on the shelves of the rack, and taking into account the 10-15 cm gaps necessary for the free placement and removal of items from the rack, calculate the length of its shelves;
- Don’t forget about the rule of rational load distribution. It is preferable to place the heaviest and most bulky items on the lower shelves of the rack, on the middle shelves - objects of medium weight and size, on the top - voluminous but light items (boxes, clothes).

Important! If you are planning to arrange a structure for storing things in small room, most suitable option a corner wooden rack will be for you. Its installation involves joining two racks at an angle of 45 degrees, which must be reflected in the drawing.
Materials and tools for making a rack
Before you start making the rack, prepare necessary materials and tools:
According to experts, in order to make a high-quality rack, it is advisable to use boards from natural wood. The most preferable in this case, there will be pine, oak or mahogany. It is not recommended to use boards made on the basis wood shavings, since they are an impractical material with a short service life. When choosing wood for making shelving, it is important to ensure that its moisture content does not exceed 12%. Before making the rack, the material used must be prepared - treated with antiseptic solutions and special impregnations, after which the boards must lie in the room where installation will take place for several days.

Besides wooden planks, to make a rack you will need the following set of materials and tools:
- shelf holders;
- metal corners;
- wooden blocks that will be used to secure the shelves transversely;
- furniture legs on wheels;
- plywood;
- self-tapping screws;
- wood varnish and brush;
- wood glue;
- electric jigsaw and grinder;
- drill;
- hammer;
- tape measure and pencil, which will be needed for marking.

How to make a wooden rack?
- The first stage of installation activities is the selection of the lower base. To make it, select a thick board (its thickness is selected so that a 3 cm long self-tapping screw fits freely into it). As for the remaining design parameters, the length and width of the board are equal maximum length and the width of the rack, selected by you yourself. At the bottom of the base, in increments of one meter, experts recommend nailing transverse bars, the length of which is equal to their width. This will give the structure additional strength.
- The next step is to work on the side walls of the rack. To reduce the cost of construction, thick plywood can be used instead of boards, marking it so that its width is equal to the width of the base. The height of the plywood is chosen arbitrarily. Cutting out the side walls required sizes, do on them inside shelf marks. At the same time, remember that most often the height of the shelves is 21 and 42 cm. These two values can be alternated, which will allow you to equip the rack with spacious and, at the same time, neat shelves.

- Next, cut out the wooden shelves. Their length must correspond to the inside of the rack so that they fit tightly and, at the same time, freely into the rack. The width of the shelves corresponds to the depth of the rack. As for the thickness of the shelves, it should be at least 2.5 cm, but experts recommend fixing them with transverse bars, which will give them additional strength. To nail the bars, you can use regular small nails.
- Once you have cut out the shelves, you can begin making the back wall. To simplify the task, experts suggest abandoning the installation of the back wall, but this is only if you are completely satisfied with the texture and color of the wall to which the rack is adjacent. If mounting the rear wall is necessary, it is cut out of ordinary plywood in accordance with the dimensions of the rack.

Assembling the rack: step-by-step instructions
- After all the parts have been prepared, it is necessary to proceed to the next important stage of manufacturing a wooden rack - assembling the structure. At this stage it is important to use different kinds fastenings: from wood glue to screws and nails.
- At the first stage, take the lowest shelf, which will be used as a base, and attach the back wall of the rack to it using self-tapping screws. If the design of your wooden shelving for a balcony or other room does not include a back wall, immediately begin working with the side walls. Previously, you have already made markings for attaching the shelves, which will facilitate the subsequent stages of assembling the rack.

- At each of the marks, parallel to each other, it is necessary to attach special metal or plastic (depending on the expected load on the shelves of the rack) holders, on which the shelves will subsequently be placed. Then, using self-tapping screws, the side walls are mounted to the lower base, while maintaining the evenness of all corners. To increase the reliability of the structure, it is recommended to use metal corners as additional fixing elements.

- Above we described one of the common options for mounting shelves. It is not the only one and in terms of its reliability it is inferior to the method that will be discussed below. Another, more thorough method of attaching shelving shelves does not involve installing holders, since the shelves are attached directly to the side walls. First of all, using self-tapping screws, the side walls are mounted to the base. Then, to effectively complete the task, you will need the help of a partner who will place the shelves inside the rack in accordance with the previously made markings, while you attach them to the sides with outside using self-tapping screws. To increase the reliability of fastening, it is advisable to additionally fix from under the bottom of the shelf metal corners. Giving preference this method fastening shelves, it is important to remember that, along with greater reliability, it is considered more complex and requires ideal measurements of the length of the shelves. During the installation process, it is important to avoid even minimal distortions, as they can completely ruin the structure of the rack. To prevent this, you must use a building level from the very beginning.

Having prepared the main part of the structure, proceed to attach the cover, which will give the future rack a finished look and prevent dust from getting onto the top shelf. Self-tapping screws are also used in the fastening process.

Another way to increase the reliability of the shelving structure involves coating the holes after drilling with wood glue, which will provide additional strength. It is recommended to use furniture legs on wheels as the legs of the future rack, which will make moving the structure more convenient and, at the same time, will prevent distortions of the rack when exposed to high loads.
If you used to make a rack chipboards or MDF, add finished design more aesthetic and complete appearance You can by gluing a melamine film to all ends of the parts, which can be done using a regular iron. The edge is laid on the end, pre-treated with fine-grained sandpaper, and smooth it with a hot iron. If there are any excess edges remaining, they are removed using a utility knife.

To add originality to the rack, some shelves can be closed with doors or even turned into an entire wardrobe. Additional design the shelving, which will give it a decorative effect, can be achieved by painting it with stain or varnish, using decoupage or craquelure. The latter depends only on your imagination and individual preferences.
DIY wooden rack video