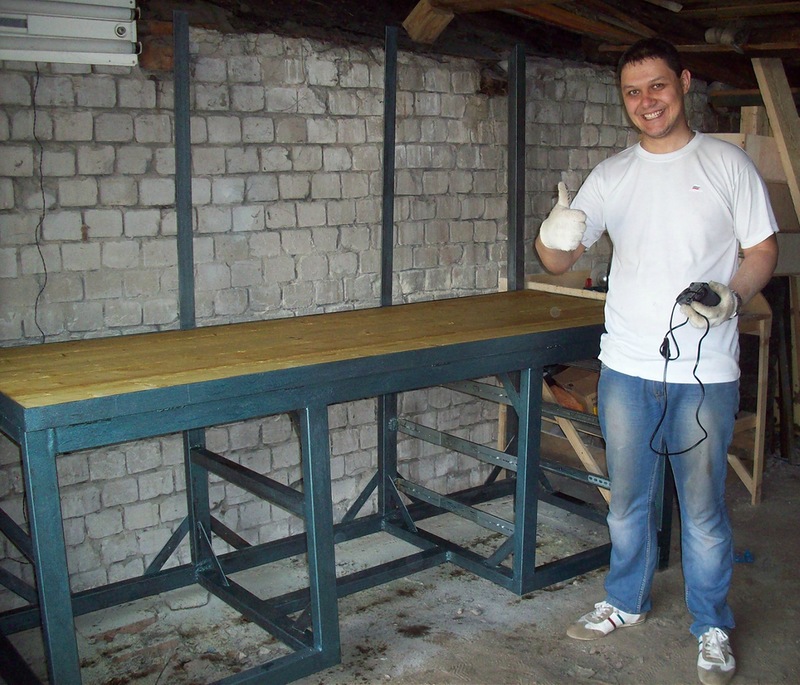
This carpentry workbench has a reliable frame, durable working surface and many branches for convenient storage tools and devices. You will make the main structure with your own hands in two days, and you will add various useful additions gradually.
Tools for work
To process solid wood and sheet materials you will need the following tools:
- Hacksaw.
- Electric planer.
- Circular saw.
- Grinder machine.
- Drill and drill bits.
- Clamps.
- Screwdriver.
- Pencil.
- Square.
- Roulette.
- Brush.
Carpentry workbench frame
Take even pine boards without large knots with a cross-section of 50x150 mm. Dry the raw lumber: the lower the moisture content of the boards, the less likely the structure will warp. Considered carpentry workbench designed for comfortable work by a craftsman with a height of 170–180 cm. To change the height of the structure, make the legs higher or lower.


Table 1 - list of frame parts
|
Name |
Finish dimensions, mm |
Material |
Quantity |
|||
|
Leg detail |
||||||
|
Lower spacer |
||||||
|
Upper spacer |
||||||
|
Cross leg |
||||||
|
Cover cross member |
||||||
|
Longitudinal leg |
||||||
|
Longitudinal drawer |
||||||
|
Bottom shelf |
||||||
|
Table top spacer |
||||||
All elements of the base of the carpentry workbench are paired, so mark two parts of the same length on a 150 mm wide board at once.

File everything wooden blanks in length, with the exception of spacers: it is more convenient to cut short ones already planed, and long ones should be sawed off later “in place.”
Measure the width of the board, subtract the thickness of your disk circular saw and divide the result in half. Set the calculated size on the measuring scale and make sure it is perpendicular saw blade. Unfold the boards exactly in the middle.

Sharpen the parts and sand them with medium-grit sandpaper.

File the bottom spacers and sand the ends. After cleaning the surfaces from dust, apply glue to the small leg and to the end of the leg.

Squeeze the parts together with a clamp, wipe off the squeezed out glue and drill holes with a countersink drill.

Fasten the workpieces with 6.0x70 screws. Prepare the remaining legs of the woodworking bench frame.

Bevel the bottom ends to reduce the likelihood of the wood splitting when the workbench moves.

Prepare the joints connecting the legs with the longitudinal legs for gluing. Fasten the parts with screws, setting a right angle.

Screw all four legs into place.

Place the frame halves and longitudinal drawers on the floor, measure the length of the upper spacers.

File the parts and secure them with glue and screws.

Assemble the top frame of the woodworking bench on a flat surface. Fasten the bars with wood glue and 6.0x80 mm screws, drilling guide holes for them.

Assemble the lower frame of the workbench, using clamps and auxiliary boards for convenience.

Replace the top frame and level the entire structure. Connect the frame parts with screws.

Cut from sheet material 16 mm thick bottom shelf and secure it to the bars

Workbench table top for carpentry work
Use sheets of MDF, chipboard or plywood 16–20 mm thick for the workbench cover. Glue the slabs in two layers and get a tabletop 32–40 mm thick.

Drawing and arrangement of the workbench cover: 1 – edge strips (birch, maple); 2 – working surface (hard fiberboard); 3 – load-bearing slab(chipboard, plywood or MDF).
For the countertop you can take chipboard sheets left over from unnecessary furniture. For example, walls are suitable wardrobe. Take them as a base and add small pieces so that the carpentry workbench lid measures 670x1940 mm.

Place narrow slabs toward the back wall and toward the center of the workbench. Large sheets place in top layer countertops. Glue the cut pieces together.
Fasten the sheets with self-tapping screws, deepening them into the countersunk holes. Trim the edges with a hand-held circular saw 20mm from the edge.

Align the tabletop with the frame and secure with screws.

Sharpen slats for edge trims. Saw off the 45° bevels and cut the planks to length. Place a piece of fiberboard on the lid of the workbench, add a flat panel on top and secure it all with clamps.

This makes it easier to attach the pads. Align the ends with the edges of the tabletop and press the rail against the panel - the top plane will be flush with the workbench lid. Holding the bar with one hand, drill pilot holes and secure the parts with screws.

Move the device to the other side and install the remaining pads. Sand the slats with a sander.

Drill a hole in the corner of the slab so that the fiberboard can be easily pushed out of its recess when replacing it.

Clean the surfaces from dust and cover the wooden parts of the frame with stain. Place the fiberboard in the recess of the lid. If you are using pieces of material, secure them with double-sided tape. Place a carpenter's vice on your workbench.

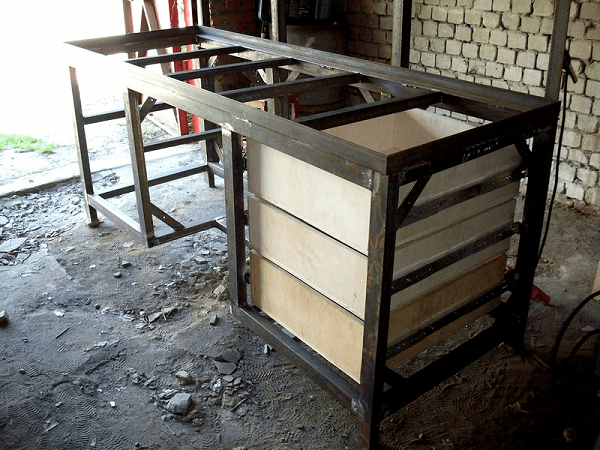
Boxes for storing tools in a carpentry table
When filling the space under the cover of a carpentry workbench, use a modular principle. It’s easier to make individual blocks and more convenient to change them later when you need space for a new tool. There will be a certain waste of material, but the weight of the workbench will increase and its stability will be enough to work with power tools.

Scheme of organization of storage places: 1 – full extension drawer; 2 – spacious plywood box; 3 – chipboard container; 4 – wide box; 5 – compartment for a portable tool box; 6 – space for cases and workpieces.
Use boxes from old furniture
Select suitable sized junk boxes desk or chest of drawers.

Sign wooden elements and carefully separate them. Clean the glue from the spikes and eyes.

Trim the planks to width, removing worn corners and cracked grooves. If the original bottom of the box is flimsy, prepare thicker plywood or fiberboard. Make new grooves on a circular saw.

Assemble the box “dry”, adjust the parts if necessary. Clean the surfaces and glue the structure. Use mounting angles to accurately assemble right angles.

Once the glue has dried, sand the corners and sides of the box, securing it in place for ease of work.

Prepare guide strips and calculate the dimensions of the module.

Calculation of a block for three drawers
File the bottom, top and side panels. Screw the guide rails with screws.

Assemble the panels into a module and test the movement of the drawers. Place the block inside the workbench with supports underneath it.

Drill pilot holes, countersink and tighten the screws. Attach the chipboard to upper bars and to the legs of the workbench.

Install front covers on the drawers. Having marked the location of the housing, secure it with one screw. Insert the drawer into place and adjust the position of the panel. Carefully remove the drawer and tighten the remaining screws.

Secure the remaining linings - the module with wide drawers is ready.

Carpentry table compartment for portable box
The middle module is made to the full height of the bench to enhance the rigidity of the carpentry workbench. For the body, take 16 mm thick chipboard and cut out two sides, a bottom and a lid.

Middle module housing: 1 – frame diagram; 2 – side wall; 3 – lower and upper panels.
Attach the guide strips to the sides, assemble the frame with screws and install it close to the right block.

Prepare the parts for the drawer.

Drawings of box elements: 1 – long wall; 2 – short wall; 3 – bottom; 4 – front trim; 5 – rail.
Use a circular saw to select grooves in the walls, which can be done with a regular disk. Set the cutting depth to 6 mm and the width to 8 mm. Run all four parts through. Move the saw fence 2 mm and make a test cut. Check the groove and adjust the stop if necessary. Run the rest of the workpieces.

Assemble the module and install the rails underneath that protect chipboard edges from chipping and providing a smoother ride.

Secure the front panel with screws and place the drawer in place.

How to make modules with convenient drawers
The design of the housings of these modules is identical to the previous designs. The retractable container placed on roller guides is made taking into account the installation gap, so its width will be smaller internal size housings by 26 mm (for common guides with a thickness of 12 mm).

Module structure and box parts: 1 – assembly diagram; 2 – back and front walls; 3 – front panel; 4 – bottom; 5 – side walls.
Before assembling the housing, attach the limiting bars to the sides. wooden slats and metal guides.

Installation diagram of guides on the walls of the housing.
Secure the finished module under the workbench lid.

To install the drawer rails, unclip the latches and pull out the small rails.

Fasten the parts to the walls. Determine the required distance from the edge to the guide yourself based on the specific design and the 10 mm gap between the drawer wall and top panel frame.

Pull out the middle rails all the way.

Insert both rails at the same time, holding the middle rails with your fingers. If the drawer is too tight, take it out and try again.

Replace the front trim.

How to make a carpentry workbench drawer from plywood
Saw the box body blanks from 10mm plywood, and for the bottom take a 5mm thick sheet.

Part cutting diagram for two plywood boxes: 1 – front panel; 2 – rear liner; 3 – side wall; 4 – front liner.
Sand the workpieces with a grinder.

Make grooves for the plywood bottom in the side walls, back and front liner. Remove burrs with sandpaper.

Glue and screw together the parts of the front and back walls.

Apply glue to the joints and into the groove.

Assemble the structure using angles and clamps.

Fasten the parts with screws, drilling guide holes.

Assemble the second plywood box with your own hands.

Install a panel on the back wall of the carpentry workbench designed to increase the rigidity of the structure and to accommodate hand tools.

Cover finishing composition boxes and cut ends of particle boards.

Connect power to your homemade workbench and start filling the containers with tools.
A garage equipped with a bench and associated tools turns from a place to store a car into a full-fledged workshop. Using this equipment you will be able to perform a variety of repair and maintenance work, repair household appliances and design furniture.
In this article we will talk about how to make a workbench with your own hands. Their varieties and design will be considered, a list of necessary tools and materials will be provided, and step-by-step instruction for the execution of work.
1 What is a workbench?
A workbench is a table designed for manual or instrumental processing of parts made of wood and steel, on which electromechanical and any types of installation work. To expand the functionality, the workbench can be equipped with auxiliary devices - a vice and stops; the presence of compartments (shelves, drawers) for storing tools and accessories is also useful.
The standard height of a workbench varies between 90-100 cm (depending on the height of the master), the width is 70-80 cm, the length is from 120 to 150 cm. There are also adjustable work tables, the height of which can be changed in the range of 50-150 cm - They are more convenient, but it is quite difficult to make such a workbench with your own hands.
There are 3 types of workbenches:
- carpentry;
- carpenter;
- metalworker
Homemade workbench locksmith type consists of a frame (made of a square profile) and a wooden tabletop 25-30 mm thick. A powerful tabletop is a mandatory attribute of a metalworking workbench, for additional protection It is advisable to cover it with a sheet of galvanized metal 1-2 mm thick. In this case, the table cover can easily withstand hammer blows and other mechanical impacts.

Other types of workbenches are radically different from the design considered - the carpenter's table is long (up to 6 meters), it is equipped with special stops for fixing the workpieces being processed. The dimensions and structure of a carpenter's workbench are similar to a metalworker's, however, its tabletop is designed to handmade and does not imply the possibility of various fastening of workpieces, which limits the variability of the use of power tools.
1.1 Guide to making a workbench (video)
2 Making a workbench for the garage with your own hands
Since the bench is the most versatile and compact option, for installation on a balcony or in a garage it makes sense to use it. Typical designs There are quite a lot of such tables, some diagrams are given in this article, but the dimensions and design of the table are best selected individually. When drawing up a drawing, take into account what work will be carried out on the table and what dimensions of the workbench will be optimal for their implementation.
To make a metal workbench with your own hands you will need the following materials:
- corner 50×50 (thickness 5 cm) - length 6.5 meters;
- corner 60×40 (3 mm) - 25 m;
- corner 40x40 (4 mm) - 7 m;
- metal strip 4 mm - width 45 mm, length 8 m;
- sheet for table top 2 mm - dimensions 220*75 cm and board of similar dimensions 40 mm thick;
- guides and plywood for drawers 15 mm thick (size depends on the number of drawers);
- self-tapping screws, screws, bolts;
- acrylic paint.
The above materials are designed for homemade workbench 220 cm long and 70 cm wide. These dimensions allow you to optimally distribute equipment on the tabletop - a vice and a circular saw so that they do not interfere with each other during work.

For power tools, you will need a grinder, a jigsaw, a drill, a screwdriver and welding machine. Also prepare a level, tape measure, sandpaper, paint brushes and a metal brush.
Do-it-yourself metal workbench - step-by-step instructions:
- We cut according to the drawing steel profile and a strip into pieces of the required sizes. The corner will be used to construct a power frame, the strip will be used to install guides for fastening the side panels of the table.
- Using a welding machine, we connect the load-bearing frame, initially welding the upper rectangle of the tabletop - for this we use two pipes with a length of 220 and 70 cm. Inside the rectangle, transverse stiffeners are welded in increments of 40 cm, and a corner is fixed along the upper end in which the wooden tabletop will be placed. Next, side legs 90 cm long are welded to the upper part, which are reinforced with belts coming from the central jumpers.

- After basic part The frame is ready; it is necessary to weld the panel for the power tool; it can be made folding, but the fixed structure is more reliable. As load-bearing elements for the panel, a corner 220 cm long and four segments of 95 cm are used. Two of them are fixed in the central part of the frame, two more - along the edges, after which a long corner is welded along their upper contour.

- All that remains is to finalize the frame - strips need to be welded to the load-bearing elements for further plywood sheathing, then the frame will need to be strengthened using jumpers in its corner parts.

- When making a workbench for the garage with your own hands, you cannot neglect the installation of drawers, since their presence will make the table more convenient to use. The boxes are made of 15 mm plywood, which is cut to size and connected with screws; guide elements are fixed on the side walls of the structure.

- Before laying the tabletop boards, the wood must be coated with an antiseptic, which will significantly extend its service life. The boards can be laid along or across the frame (depending on their length), after which the surface of the tabletop is sanded and covered steel sheet, which is fixed with self-tapping screws and painted.

- Next, we install the drawers, securing them with guide bolts screwed to the table. On the opposite side of the table you can make several open shelves, they are quite practical and convenient.
Required attribute metalwork table are a workbench vice that is placed in one of the corners of the tabletop. The vice is attached using anchor bolts, it will be useful to place a steel plate 1-2 cm thick between the vice and the table top for more reliable fixation of the tool.

The functionality of such a workbench with a vice can be further expanded by installing a circular or miter saw, stationary jigsaw or drilling machine. Like a vice, each of the tools is mounted in the corner of the workbench.
2.1 Requirements for a homemade workbench
A mechanic's workbench is a structure designed to work with cutting power tools and other potentially dangerous equipment, so it can only be used if the following safety requirements are met:
- when making a mini-workbench for installation in a small garage or on a balcony, it is necessary to ensure maximum stability of the structure; if necessary, the table is rigidly fixed to the flooring;
- there should be no sharp edges or protrusions at the corners of the tabletop;
- when installing a vibrating tool, it is necessary to use vibration-damping rubber gaskets;
- The workplace should be regularly cleaned of chips and oil stains.
The workbench design described in the article, with correct production, can withstand loads of over 200 kg. More requirements for desktops can be found in regulatory documents GOST 20400 and GOST 22046.

If you are not confident in your skills and the instructions presented seem too complicated, the best solution would be to purchase a ready-made factory workbench. The world's leading manufacturer of such products is Workbench (Germany), which supplies the market with a wide range of products, which includes large-sized, compact and collapsible workbenches for plumbing, joinery and carpentry work.
The cost of Workbench desktops varies in the range of 7-20 thousand rubles, depending on the size and functionality. The Worckbench 110 model is best suited for domestic use - it is a collapsible aluminum table with retractable elements for fixing power tools and auxiliary equipment, which has proven itself well among masters all over the world.
A garage is not only a building for storing a car and various utensils. It can repair cars and other products. In this case, you cannot do without a good metalworking workbench. You can assemble it with your own hands, but it is important to understand the features of its design and take into account the mistakes that are often made when assembling such structures. This article will cover the requirements for a good workbench and provide ideas for self-assembly.
Build errors
It is important to have a good understanding of what not to do when designing and building metal workbench. The first thing you should pay attention to is the place where the bench will be installed. Often when pouring a floor in a garage, they are guided by the rule “it will do.” But this leads to large differences plane, which negatively affects the metalworking bench. For example, some craftsmen who decide to make a workbench for themselves with eight or six supports are faced with the fact that after installation, half of the supports are in the air, and the workbench itself is thrown from side to side.

Working at such a bench is very inconvenient, and small parts are constantly lost. A way out of this situation could be the construction of adjustable supports. In this case, powerful bolts are installed in the lower part, which will allow you to level the bench in a horizontal position. Another option would be preliminary preparation surfaces. To do this, remove part of the screed that has already been poured and pour in a new one, which is clearly leveled along the horizon. In this case, there will be no need to manufacture additional parts for the metalwork table supports.

Another solution to this error is to reduce the number of supports to 4 pieces. In this case it will be easier to achieve correct position even on uneven surfaces. With proper design and construction of the frame, there should be no problems with the stability of the entire structure. Additionally, a shelf or several shelves are built at the bottom of the bench for storing consumables and tools. One of them should be as close to the floor surface as possible. In this case, a heavy tool that can be placed on it will act as a balancer for the entire frame.
Design nuances

There is always an opportunity to avoid assembling a locksmith table yourself. In this case, you can buy cheap consumer goods or a product that was used by a craftsman. But each of these options has its own significant disadvantages. In the first case, there is no guarantee that such a workbench will last a long time, since cheap options are assembled from production waste, and not quality material. Used products may offer excellent durability and attractive designs, but may not always meet the specific needs of the garage where they will be installed. That's why the best way there will be assembly own design according to the developed drawing.

There are several factors that allow you to assemble the most convenient design for your needs in plumbing work. When designing, it is important to consider:
- height;
- width;
- depth;
- strength.
The first and one of the most important factors is correct selection heights for the future plumbing structure. If the workbench turns out to be lower than required, then there will be a greater load on the back, since you will have to work in a bent state. When too high altitude With a metal workbench, you will have to strain your legs and arms to reach the parts. The ideal option is when the tabletop is at the level of the navel. In this case, the forearms and hands lie perfectly on the plane and there is no need to strain your back.

Regarding the width of the bench, no strict rules. It all depends on what products will be placed on it. IN classic version The width is adjusted to the height of the person. In this case, standing in the middle, you can reach any point on the workbench. The depth of the product should be such that you do not have to bend over to reach an object lying in the depths. Usually 50 or 60 cm is enough. Particular attention should be paid to the strength of the structure. It is impossible to overdo it with this indicator, because on a metalworking bench you have to work with heavy tools and sometimes cause strong blows to parts.

Advice! The construction of a workbench for metalwork should be made only of metal. Wooden structures are not able to withstand the required load, even if you select hard wood and sheathe them with metal.
DIY making

For sample for self-made you can take a table with two side tables. This table has four supports. In place of one cabinet you can build shelves for easy access, and on the other you can install drawers, in which it is easy to store small things. To implement the entire project you will need the following material:
- profile pipe with size 6×4 cm;
- corner 5x5 cm;
- sheet metal for countertops.
From profile pipe it is necessary to prepare horizontal beams. You will need three or four of them. The length will depend on personal needs, but two meters is usually sufficient. Vertical posts are selected in accordance with your own height, as described above. They are made from the same profiled pipe; you will need four pieces. The wall thickness of the profiled pipe should be at least 2 mm.
Additionally, ten blanks are prepared for the metalwork table frame for shelves and drawers. You can use the dimensions given above as a guide. To strengthen the structure, you will need jibs that will be fixed in the corners. From the purchased corner, vertical posts are prepared on which the stand for hand tools will be attached. You will need four of these racks. Their height is usually 2 meters.

Note! To complete the entire workbench project, you will need approximately 225 meters square pipe. Corners for racks will require 8 meters, and tires with a thickness of 4 mm and a width of 40 mm will require approximately 10 meters.

A square pipe by itself does not have the required fracture toughness. That is why it is welded around the perimeter of the workbench metal corner. Thanks to correct location corner it turns out to be a frame into which it will be easy to lay a metal sheet, which will act as a tabletop. The workbench tabletop does not have to be made of thick sheet metal, since its cost can be quite high. Another option would be to install durable boards that cover sheet metal with less thickness. This design better absorbs sound during impacts and has less recoil.

Advice! Additionally, between the board and the metal sheet of the workbench tabletop, you can lay a layer of rubber, which will act as a shock absorber.

Frame assembly
Assembling the structure of a mechanic's workbench is not difficult if you have the skill to work with a welding machine. Thanks to the prepared parts, everything becomes simple and clear. The best solution will be the use of a semi-automatic device, not arc welding. In this case, the material is heated to the required temperature and does not burn out from the electrode. The seams are neat and durable.

The first thing you need to do is make a rectangular base for the construction of the bench. To do this, you will need two blanks, the length of which is equal to the depth of the table, and two blanks, the length of which is equal to the width of the workbench. The ends are cut with a grinder at an angle of 45 degrees to ensure an ideal junction. The workbench blanks are laid out on a flat horizontal surface. Initially, they need to be fixed with small tacks and trimmed if necessary. Next, a full suture is applied to the structure. In this case, it will be necessary to make penetration on the other side.

The next step is to install the four bench posts. They are welded to the prepared frame. They must be positioned vertically. After this it is executed bottom harness on three sides. At the same stage, vertical stands are welded under the stand for the tool, which will be located above the bench. The next step is the installation of frames for drawers and shelves, as seen in the photo above. In this case, an additional crossbar is fixed between them, but it is welded offset to the middle, so that it is convenient to stand behind the bench.
Final work

When the frame is ready, you can weld a corner for the bench top on top. The board is cut to the dimensions obtained and placed in the grooves. Before this, it must be treated with an antiseptic and fire retardants so that it does not catch fire while working on the workbench. This is especially true in cases where two parts are welded on a bench or a tool is used that causes sparks to fly. After laying the board, you can place a metal sheet on the workbench, as seen in the photo. To the high vertical posts sheets of plywood are screwed into which holes for the tool are drilled.

To prevent the instrument from spilling out on the sides, it is necessary to sew up the walls using plywood or other suitable material. In the bedside table on the left, holders are built for partitions that will act as shelves. On the right in the workbench, according to the drawing, drawers are planned, which can be assembled from a board that was placed under the workbench table top.
The metal is corroded by moisture, so the surface must be protected with paint. Before painting, it is necessary to clean the frame of the bench. grinder and degrease. After this, a layer of primer is applied. After complete drying, the workbench frame is covered with finishing layer enamels. It should be paint that is resistant to temperature and mechanical stress.

Typically, a bench is equipped with a vice and a small anvil. Under them it is possible to provide additional basis. Such modules are mounted on the left hand side of the bench so that they are easily accessible and do not interfere with the main work. Another important device for a mechanic's workbench is lighting. It should be installed on top so that it is not blocked by the master’s head and hands. LED spotlights can be used as light sources for a metalworking workbench. Several of them are installed permanently and several must be moved along the plane of the workbench. In this case, it will be possible to choose best angle lighting.

Before starting work on a new bench, it must be loaded to its maximum to ensure stability, as discussed above. Some owners additionally fix the supporting legs to concrete base using anchor bolts. A video showing the assembly of another version of the locksmith table is below.
Summary
As you can see, the design of the locksmith table can be assembled independently. Help may be needed during welding work, because this requires special skills and abilities. A second person can help during assembly when there is a need to hold the parts being welded.
A metalworking workbench is a workbench with a wide range of purposes. It allows you to carry out plumbing, repair, electric installation work, processing various materials. A workbench is a must have in any home workshop. Craftsmen prefer to design it with their own hands in order to make it as convenient as possible for themselves.
Components of the device
- nuts and screws;
- file and hammer;
- paints with a brush.
The structure of a mechanic's workbench is a rigid metal base (made from corners or a square pipe). To decorate the tabletop, it is better to use a 50 mm timber. A steel plate up to 6 mm thick is placed on top of it. To fasten all metal parts together, use welding, but you can also screw in bolts.
Installation of the workbench frame and tabletop base
Before proceeding directly to assembly, carefully look at the prepared drawing. Make sure once again that the dimensions of the future workbench fit into the dimensions of the room where yours will be located. locksmith tool(garage, shed or workshop). Installation of the table begins with creating a frame:
- From the corner, cut 4 legs of the same size.
- Connect them at the top with horizontal bars made of the same material. Use welding. The result should be a rectangle (top view) of the given size.
- Additionally, make a line of rigidity by once again fastening the legs in the same way with horizontal jumpers at approximately a height of 15 cm from the floor.
- If you have a cabinet with drawers on the side under the workbench lid, then weld a couple of additional supports for it.
After this, you can begin assembling the tabletop:
- make holes around the perimeter of the horizontal metal crossbars for bolted connections;
- cut the boards to the length of the table;
- lay them next to each other without cracks or gaps, secure them in this position;
- make holes in the wood that match the holes in the corner.
Advice. The holes on the top side of the boards should have expansions. The bolt heads will go deeper into them so that wooden surface The countertops remained level.
The final stage of assembling the workbench
The tabletop will be ready after covering with metal. To do this, simply cut a fragment of the required size from the prepared sheet and fix it to the wood base using self-tapping screws. Please note that after screwing them in, burrs may remain on the metal. They should simply be filed with a file.
If you have included drawers or shelves in the design of your workbench, use a simple technology for their manufacture. The material used is regular 15mm plywood. The boxes are assembled with screws. There are approximately 15-20 pieces per one. It’s easier to attach shelves to a corner, but for drawers you’ll have to additionally buy guide strips—sleds. They are welded to the frame.
The same plywood can be used to cover the sides of the table and make a screen on its back side. For greater stability, craftsmen recommend attaching rectangles or pieces of corner to the supports from below. A welding machine will help in this matter. If necessary, screw a vice to the workbench. Finally, treat all steel structural elements with metal paint to avoid rust.
Making a workbench for metal work is not very easy, but it is quite possible if you approach the matter responsibly. But you will be convinced that not one purchased table The quality cannot be compared with a product assembled by yourself.
How to make a workbench: video
A carpentry workbench is usually called a table of a special design with a hard and durable surface that allows various devices and mechanisms to be mounted on it. In addition, the surface of such a table must be adapted to rigidly attach additional stationary equipment (a circular saw, for example, or a small router) used for processing common materials such as wood or metal.
Before making a carpentry workbench with your own hands, it is advisable to familiarize yourself with the basic requirements for this device, as well as some of the design options that are especially popular.
Design requirements

The operating characteristics of the workbench table are:
- Its height, adjusted to the height of the user, allows you to work in comfortable conditions without slouching, maintaining a fairly comfortable position. For people of average height, this value can range from 70 to 90 cm.
- Dimensions of the tabletop, chosen based on the possibility of placing everything on it the necessary tool, as well as taking into account the size of the workpieces being processed.
- A set of devices mounted on a workbench, determined by the need to perform certain operations and providing for the presence of several stops and a clamp (screw vice).
- Adaptation “to the hand” of its owner, who may also be left-handed.

The most suitable option for self-production is the option of a prefabricated workbench, consisting of a frame base with a tabletop installed on it. The length of such a structure usually does not exceed 2 meters (with a tabletop width of about 80–100 cm).
Before starting work, you should decide whether your workbench will be a stationary device, or whether it should be folding (collapsible).
Material selection

The most suitable material for constructing a stationary workbench is considered to be wood, from which the load-bearing base with support frames, as well as the tabletop itself, are made. For the manufacture of frames, standard planed timber with a cross section of 100×70 mm is best suited. The same timber, but with a slightly smaller cross-section (100×50 mm, for example), can be used as auxiliary jumpers that increase the rigidity of the frame base.

The workbench table top can be made from well-planed and tightly fitted boards, at least 5 cm thick. In addition, a ready-made solid piece (an old solid door, for example) or a blank cut to the size of the table can be used for its manufacture. laminated chipboard with a reliable and durable coating.
When choosing a material, preference should be given to hard wood, such as beech, oak or maple.
Assembly of the structure

Making a workbench begins with assembling a frame base, onto which a tabletop of the type you have chosen is subsequently installed. The order of operations performed is as follows:
- First of all, the supporting sidewalls are assembled, arranged in the form of two frame structures made of timber with a cross-section of 100×70 mm.
- Then these frames are connected at the top by two longitudinal beams, which, together with the upper lintels of the frames, serve as supports for the tabletop. (Note that in order to reliably fasten individual elements together in the design we are describing, it is best to use a classic “tenon-to-groove” connection with mandatory gluing of the joining areas).
- Lower parts support frames are fastened with longitudinal jumpers made of 100×50 mm timber, which are mounted at a level of 15–20 cm from the floor. (To fasten them, it is best to use a bolted connection recessed from the body of the beam).
- In the process of manufacturing frame supports, grooves and tenons are first prepared in the workpieces, after which the entire structure is assembled in one step (after applying glue to the joint areas).
During assembly Special attention it is necessary to pay attention to the next working point, which determines the quality of all subsequent installation. When preparing the base of the workbench, at each stage of the work performed, it is necessary to ensure that the dimensions of individual elements correspond to the design data, and also to control the horizontalness of their installation using a building level.

If the tabletop is made from planed boards, the latter must be tightly fitted to one another, so that there are no cracks in which debris usually accumulates. Its dimensions should be slightly larger (1.5–2 cm) than the dimensions of the supporting base formed by frames and longitudinal bars, which guarantees the convenience of placing auxiliary equipment on the table.
When assembling the tabletop, the boards are nailed or screwed with self-tapping screws to transverse bars located on its reverse plane. At the very base, special grooves must be prepared for these bars. The surface of the finished countertop is first carefully sanded and then treated with a protective solution (drying oil is usually used for these purposes). To secure it to the base, special metal corners can be additionally used.

Regarding the installation of working devices and mechanisms (vises, stops, etc.) on the workbench, the following can be said:
- It is most convenient to place the working vice at the end of the tabletop, having previously prepared a small recess for fasteners at the installation site. WITH reverse side In the fastening area of the table, it is necessary to provide a plywood pad to protect the surface from damage.
- In addition, special stops should be located on the surface of the tabletop to fix the workpiece in work area and making it easier to work with. On wooden tabletop It is most convenient to mount rectangular stops (pegs), which are adjusted in height to the workpiece being processed and securely fix it.
- Sometimes stops are made by simply extending the table top using bars suitable thickness, fixed at its edge and closed on the reverse side with a limiting strip.

When there is not enough space in the garage or workshop, you can make a folding workbench consisting of a table top that folds against the wall and a special folding frame.
This design is very easy to disassemble and when folded takes up very little space. When making it, you should pay attention to the fact that the width of the support posts of the folding workbench does not exceed half the length of the tabletop (so that they do not interfere with each other when folding).
It is also necessary to ensure that the upper cross member on the supports is located below the board with the hinge of the folding tabletop. The material for making a folding workbench table can be any monolithic piece of chipboard.
The supporting frames of the structure are made of 100x40 millimeter bars, the articulation of which is made using pre-prepared metal plates, secured to the posts and lintels using bolts of the appropriate size.
Video
This video shows the process of building a carpentry workbench:
Photo


