If you need temporary housing for personal plot, then it’s worth purchasing wooden dacha cabins. Compared to permanent buildings, they cost much less, are mobile, their installation does not require permission, and over time you will no longer be able to do without a change house. The structure will serve as a holiday home, your separate office, it can be converted into a kitchen near the barbecue or just a place for guests.
When comparing a wooden structure and a metal one, it is worth paying attention to distinctive features timber cabins:
- The tree has a more aesthetic appearance near the natural environment.
- The material is much lighter, which makes it easy to transport the cabin to remote areas. There is no need to resort to the use of heavy equipment for unloading.
- Possible self-assembly or dismantling a temporary structure.
- The product is undeniably environmentally friendly.
- Low cost of a cabin compared to a container or trailer.
How is the interior of a cabin lined?
Finishing with modern building materials allows the change house to compete with stationary houses. The interior space of country cabins depends on the tasks that are assigned to it. Of course, if you need a change house only for storing tools, then insulation will not be required, but they will be suitable for walls regular panels OSB or hardboard.

But most often, wooden dacha cabins are needed for temporary residence. Therefore, everything inside the structure must be equipped for this: the walls and ceiling are lined with clapboard or MDF panels, conduct electricity and heating, reliably insulate the space between the facade and the wall to reduce heating costs in the cold season. Wooden cabins are more heat-resistant; one radiator is enough to heat them in winter.

Zoning of cabins is common: vestibule, bedroom, kitchen area, bathroom and shower. Everything should be at hand in such a moving house. The cabins will equip two bunk beds, thereby saving free space. Capacious and small at the same time, the cabins have a standard size of 2.5m*6m, which allows them to be easily transported on roads.
| Name | Description |
| Dimensions | 2.5*6*2.3 m |
| total area | 13.8 sq. m |
| Design | Frame – panel structure from a bar 5*5 cm |
| Flooring | Unedged boards are laid on the joists, hydro- and vapor barriers are applied, insulation is done with 50 mm thick mineral wool, and a tongue-and-groove board is laid on top |
| Walls and ceiling | Interior finishing with clapboard or OSB boards, or hardboard |
| Window | Single (summer cabin) or double glazing |
What kind of facade can wooden dacha cabins have?
Country wooden cabins are often sheathed with dried clapboard, which is budget option finishing. But today manufacturers offer several types of lining, which will be discussed further. Therefore, if you are planning to install a change house for a long time, then you should choose a more quality material for the facade or even for interior work.
Finishing imitation timber will allow you to quickly and independently sheathe a temporary shed, since the material has connections in the form of groove-pinches. The difference between such timber and planed timber is that the lumber has a moisture content of 16-18%, so over time you will not see cracks or blue stains on the shed. coniferous species ah wood.

Eurolining different from usual high quality, since it is produced on imported equipment. Permissible humidity material - no more than 15%, the connection is also in the form of groove-pinches. The surface of the lining has no defects and is perfectly smooth. The length varies from 1.5 to 6 m, and the thickness and width are unchanged 12.5 * 96 mm. Prices differ depending on the type of eurolining: per m2 from 120 to 200 rubles or per m3 from 9.5 to 16 thousand rubles. Installation of the material occurs in most cases vertically using staples or fasteners-clayers at an angle of 50 degrees. Galvanized self-tapping screws are also suitable, but you should avoid nails, as they can ruin appearance cabins.
Country wooden cabins can be lined with a block house, which has relatively recently appeared on the lumber market. It externally imitates a galvanized log or log house and has unique properties: an improved processing process contributes to increased wear resistance of wood; the material itself serves as insulation and protects the structure from destruction.

Externally the block house is convex with front side and even on the back. There are narrow and wide standard sizes of this lining, the price for which ranges from 300 to 550 rubles per m2, from 12.5 to 15 thousand rubles per m3. It is possible to produce a block house according to your dimensions. Installation of the material occurs quickly using stainless steel screws.
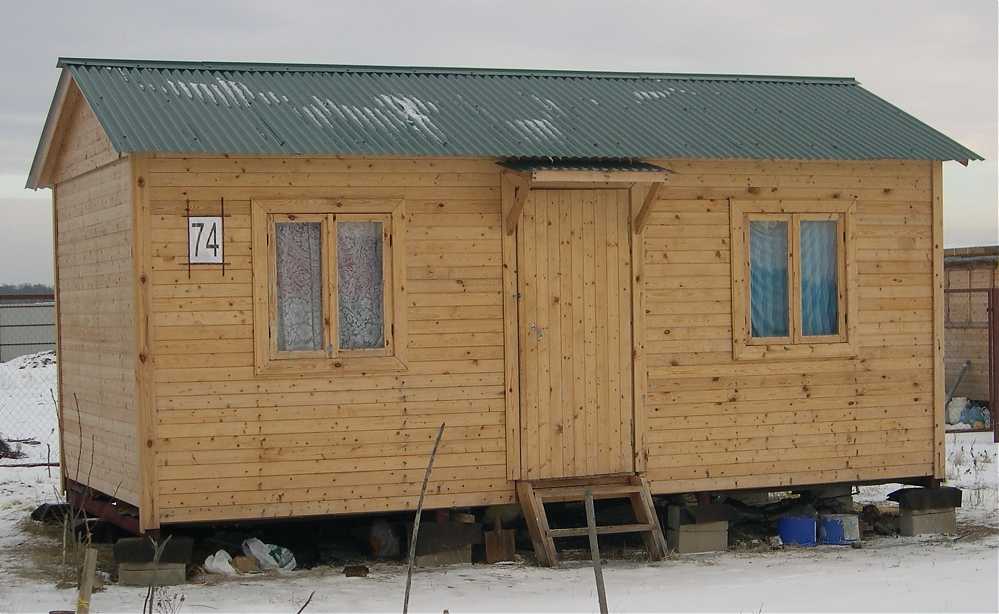
Having bought a plot of land, you think about the fact that you need to live somewhere while building a house. Such a temporary abode at the dacha or garden plot is a change house. A small insulated structure, usually 3*6 or so in size. There are a lot of offers on the market: both wood and metal. But their quality is more than doubtful; the cheapest materials are used in construction. You can easily verify this by calculating the costs that you will incur if you decide to make a change house yourself. With the same dimensions, you most likely won’t be able to do it cheaper, and if there is a saving, it will be small. You will consider normal materials, and not the cheapest ones. But in terms of quality and durability, homemade cabins are many times superior to purchased ones.
The change house on the site is the first (or second after) structure that appears on the site
What and how are they built from?
Almost all cabins are built according to frame technology. The building materials for the frame are wooden beams of at least 100*150 mm or profiled metal pipe 60*60*2 mm.
For cladding, the choice of materials is much wider. Use:
- edged board;
- sheet material - , ;
- profiled sheet;
- siding.
In any case, the cladding is done on both sides - outside and inside. The outside can be metal, but the inside is often made of either lining or stuffed with plywood or OSB.
Thermal insulation is laid between the two skins. Although the structure is temporary, spring and autumn, and sometimes summer nights, can be very cold. Therefore, without insulation there is no way. Any insulation can be used. Better - mineral wool, cheaper - polystyrene foam. The most best characteristics- extruded polystyrene foam, but also the most high price Same. Just when choosing insulation, keep in mind that foam plastic almost does not muffle sounds, so those who are particularly nervous will not be able to sleep. That's why optimal choice- mineral wool. What layer? If in mind, then in Middle lane Russia, preferably 100 mm, but at least 50 mm.
Please note that the floor also needs to be insulated. Especially the floor. There is a lot of pressure from below. Therefore, it must be double: first, rough, on top, across the board, logs are laid, insulation between them, and then the finished floor.
Layout and drawings
Despite the fact that the building is considered temporary, it often turns into a bathhouse or guest house. That’s why even in a change house there is such a thing as a layout. Even temporary housing should be relatively comfortable.
Cabin trailer
There are two main types of cabins: trailer and vest. In a “trailer” type building, the entrance is on the side, there is no separation inside; in extreme cases, a partition is installed - 1.5-2 meters from the entrance. This room is used as a vestibule-dressing room and a warehouse for storing instruments. This is the simplest possible option.

The drawings will contain graphic and digital symbols, their explanation is in the photo below.

Baby vest
The most popular layout is the vest. This is when the entrance is in the middle. Moreover, the middle is fenced off and used as a vestibule, storage room, etc. The purpose of the other two rooms may be different. Some people use both as bedrooms, others use one as a kitchen.


Change house with toilet and shower
Not everyone agrees, even at a construction site or at a dacha, even temporarily, to lead a Spartan lifestyle. At least basic amenities are required. Although, it is probably better to build them separately.

The sanitary block is located on the edge - a wiser decision, especially if you make a separate entrance

With toilet
Having chosen a drawing, do not forget, when developing a frame for a change house, that racks must be installed at the junction of the walls. If doors are attached to the racks, they must be reinforced - double.
Foundation for a change house
Since the structure is temporary and light, the foundation is usually columns or blocks. More often - blocks. Preferably concrete, standard. No - any construction materials can be used, but high density and not hollow.

They are placed on a prepared base. If the soils are normal, you can simply remove the turf and level the areas. For greater reliability, dig a small pit for each block about 20-25 cm deep. Medium-fraction crushed stone is poured into it and compacted well. Blocks are placed on such a substrate.
Note! The top edge must be level (in the same horizontal plane). It is also necessary to check the geometry of the foundation: the angles are strictly 90°, the diagonals are equal.
With a cabin width of no more than 2.5 m and used for a frame wooden beam, place blocks in each corner, as well as under those places where the partitions extend. If the building is without partitions, the spacing - every 1.5-2 m - depends on the cross-section of the timber and the planned cladding, as well as the weight roofing material. With a width of 3 m or more, an intermediate beam and a base under it are required. In this case, three rows of blocks are obtained.

To prevent dampness from entering the premises, waterproofing is laid on the blocks. You can use two layers of roofing material, you can use another waterproofing material, even films. Another option is to miss bitumen mastic. At this point the foundation can be considered ready.
Step-by-step instructions: photo reports with explanations
It is difficult to understand some things from the description. No matter how much you read, you won’t understand until you do it, or at least watch how others do it. This is why photos of the construction of cabins are useful: you can look at how the units were made and find a solution for yourself. This is a kind of manual for those who decide to build on their own.
Construction of a wooden cabin
A cabin was built from wood at the dacha. Dimensions 3*6 m, insulated - for temporary residence during the construction of the house. The following materials were used:

Since prices for materials greatly depend on the region, there is no point in talking about the cost of construction. But on this list You yourself can determine with fairly high accuracy how much a home you built yourself will cost.
Please note that this list does not include roofing material (ondulin was planned) and there is no glass. Also, lining for interior decoration.
Before construction began, all wood, with the exception of the lining, was treated with Senezh Ultra antibacterial impregnation. Covered in two layers. So the quality of processing should be normal.

They marked out the area for the building. We decided to put blocks on sand bedding. They dug holes 25-30 centimeters deep, poured sand, and compacted it. Blocks were placed. First we set up the two outermost ones, put a flat board on them, and a level on it. This is how the outer blocks were set up. Then the intermediate ones were adjusted to the height of the boards. So on all sides.


The next step was to lay the floor joists. They were placed every 50 cm, and we will also install the racks every other one. They were made from a 50*100 mm board placed on a narrow part.

We decided to immediately assemble the racks with rafters on the ground, strengthen the connections with corners, and then finished form install. They were assembled from the same 50*100 mm board.

We knock down the front pillar - it is longer, the rear one and the rafters


The posts were nailed down with long nails. Then, for reliability, all attachment points were reinforced with corners and plates. They were already mounted on self-tapping screws.
50*50 mm bars were nailed to the sides of the joists. The result was “nests” for laying polystyrene foam. He was placed on polyurethane foam: both hermetically and securely. A floor board was nailed on top.


Now comes the plating itself. On the short side, a lining of 3-meter packs was used, and on the long side, six-meter ones were nailed.

Having completed the sheathing halfway, we laid the sheathing under the roofing. A 25*150 mm board was nailed in increments of 30 cm, with increments of 20 cm at the edges (so that the overhang could withstand). Then we continued with the paneling.
In the places where the windows will be located, they installed mortgages - a board that lies across the counter. The window frame will rest on it. They were fastened with nails all the way through, but the joints were additionally reinforced with corners.

When the back and blank side walls were sewn up almost to the top, roofing felt was rolled out onto the roof. He will lie there until we buy ondulin.


The outer skin is almost ready. The doors were bought without finishing - only the frame covered with fiberboard

While we were finishing nailing the clapboard outside, work was also in full swing inside - they were installing foam plastic. The width of the sheet is 100 cm, the distance between the posts is 95 cm. We have to cut thin strips.

To prevent it from “falling”, we grab it on top with thin corners, which we attach, of course, only to the beam of the rack.


We started lining the inside, but the lining ran out. For now we have switched to painting the outside. It turned out well, it seems.

We bought additional lining and finished the interior decoration.

We started making the partition. It was assembled from the same boards - 50*150 mm. The joints are traditionally reinforced with corners. They covered it with clapboard.


We started insulating the roof. They used the same polystyrene foam and the same technology - they propped it up with corners.

The joints with wall insulation were foamed with polyurethane foam.

Then we started covering it with clapboard.


The ceiling trim is finished
Started installation roofing. We bought ondulin and laid it with overlap on one wave. They were attached to each wave with special hardware purchased along with ondulin.

Mounting ondulin on the roof of a garden shed
Then we started finishing up the interior. The partition was also insulated with polystyrene foam and lined with clapboard on the other side.


This is how the wall looks in the final version
The lining inside is varnished on water based. It gives only a light tint of a little more dark color. There seems to be no film on the wood. If you look directly, it generally seems that the tree is not covered with anything. Only when viewed from the side at a certain angle is the shine visible.

On the floor, the varnish is already with a film: so that the wood does not wear out. Covered in two layers.
Then we started finishing the overhangs. They were sewn up with the same clapboard. In general, working with the clapboard took the most time.


And this is a side view
Metal frame for a change house
Metal was chosen as the basis as it is more reliable and durable. The thought that the change house might have to be moved also played a role. If the frame is made of metal, she will not be in any danger.

The dimensions were determined based on the length of the angle rods: 11.7 m. The following dimensions emerged: 2.8 * 5.8 m, height - 2.5 m. The frame was welded from an angle with a shelf 75 mm, thickness 6 mm.
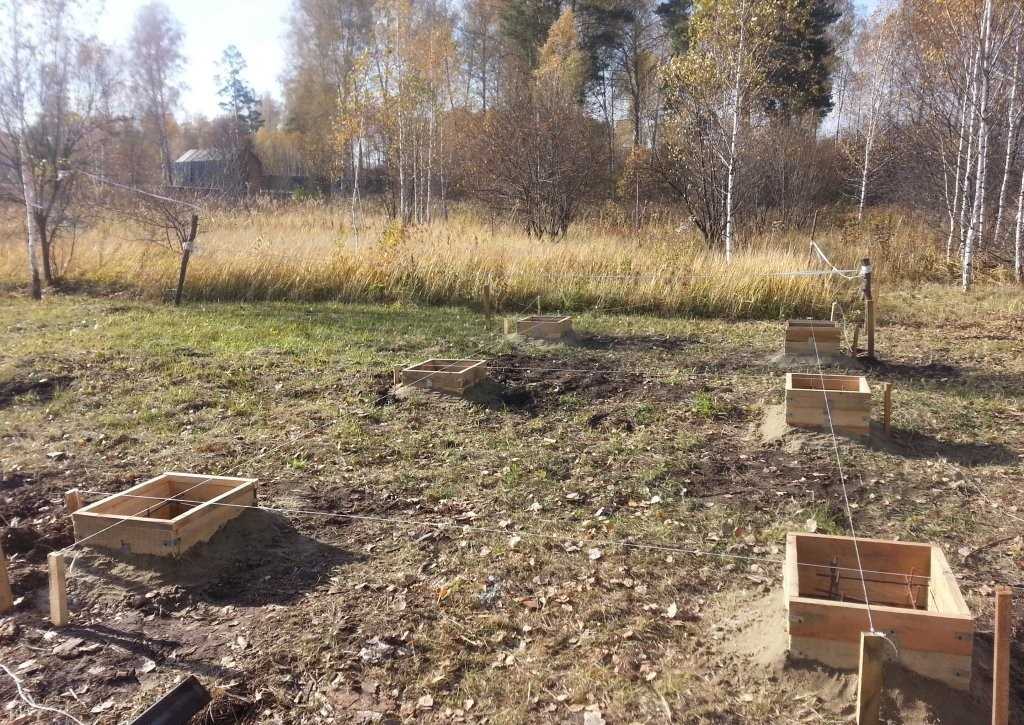
The foundation is made on pillars cast independently: construction began in the fall, and there’s still nothing more to be done. So it was decided to fill in reinforced columns: six pieces. First, the area was marked, after which the locations for the foundation columns were determined.

Holes were dug 50*50 cm, total depth about 30 cm. Crushed stone was poured onto the bottom in a layer of about 10-15 cm and compacted tightly. There is the same amount of sand on top, also with a tamper. As a result, the bedding came to the same level as the ground.
Roofing material is laid at the bottom so that moisture does not escape from the concrete, and it “ripes” normally and does not dry out. Next, the formwork was assembled and the reinforcement was laid in it.

The area is dry, the water drains normally, so there should be no problems. , so it’s not clear whether the reinforcement is welded or twisted.
Everything is filled with concrete, covered with film: the end of October, and in order for the concrete to be of normal strength, it needs to be wrapped.

The frame frame took a long time to cook - all winter: frosts, workload, did not allow us to operate with the required frequency. The base was made from a 75 mm corner, 6 mm thick, and 40*2 mm was used for reinforcement.

The beginning of the cabin frame from metal corner- lower harness
The side parts were cooked entirely, then with the help of 4 people they were placed in a vertical position and fixed in this way. Profiled pipes 40*40*2 mm were used on the racks to which the window and door frames would be attached.

The most inconvenient moment is measuring diagonals alone. You have to constantly monitor them, but doing it alone is inconvenient. But it is necessary to set everything, otherwise there will be a distortion.
To give greater rigidity, I welded strips of metal in the corners. I got them by loosening the corner (40 mm). It was possible to buy an additional strip, but I used cuttings of a corner.

Strips for rigidity in the corners of the frame

View from inside the corner
It was difficult when we were installing the frames: in the cold we only wore thick gloves, and it was difficult to hold them firmly. That’s why they propped it up with boards and whatever they could. But the angle was strictly maintained.

To ensure a rigid attachment to the frame, metal plates are welded at an angle.

The entire frame was gradually assembled.


We finish cooking the plates in the corners: top and bottom

We weld several beams at the top. Now the frame for the change house is “iron”

Now all that remains is the casing. It can be anything: even the same lining, block house, or an economical option - plywood and OSB. To attach the bleach to the corner, it is more convenient to screw the beam, and then attach the sheathing and everything else to it. The same situation for rafter system: a block is screwed around the perimeter with self-tapping screws and pre-verified, and the rafters are attached to it.
Video on the topic
If you are the lucky owner summer cottage, but the construction of the house is still ahead, it is necessary to take care of a small utility room - a change house. The change house is useful for storing tools, building materials, work clothes and just to relax after a hard time working day. Of course, you can already purchase finished design and put it on the site, but building a cabin with your own hands will cost much less, and besides, a wise owner suburban area never misses an opportunity to gain useful experience and skills. In this article you will find step by step instructions for the production of cabins.
The change house is utility room in the form of a small house where you can store all kinds of garden tools and construction supplies. But there are no clear rules for using a shed - you can turn it into a shed for storing unnecessary things or turn it into a cozy guest house. Depending on the future purpose of the cabin, the features of its construction also differ. So, if this is a tool shed, then there is no need to insulate it too thoroughly. And, on the contrary, if you plan to accommodate guests or relatives in the cabin, isolation and improvement should be approached in a special way.
In some cases, you can make a small garage out of a change house for garden equipment or a motorcycle. With the onset of cold weather, many people move there poultry, bees or rabbits, placing the animals for the winter. However, regardless of how you use the change house, it will come in handy in any case.
Types of cabins
There are several design options for cabins depending on the construction technology. This, in turn, determines the cost of work and the operational characteristics of the building.
There are the following types of cabins:

To save time, you can purchase a used cabin, but in this case, pay attention to the degree of wear. Carefully inspect the structure outside and inside. Keep in mind that the cost of transportation and crane rental will be added to its cost. Before you decide to buy even an old cabin, add up all the amounts of upcoming costs and compare them with the cost of building materials - perhaps it will be cheaper and easier to build a cabin with your own hands.
Construction technology
Despite the fact that the change house is considered a secondary utility room, its construction should be approached responsibly. And the best place to start is with a drawing. The layout of the change house should include the dimensions of the walls, the area of the roof, floor, insulating layers and points of attachment of elements. With the help of a sketch, you can imagine how the structure will look on the site and how it can fit into the landscape. Only after creating a detailed drawing of the cabin (or even several) can you calculate the required amount of materials (add 15% of the stock to the received amount) and go to the store.

If you plan to store in a shed garden tools or Building tools, there is no need for windows there. In the event that it will serve as a guest house or summer kitchen, it is better to take care of the full natural light(will help save on electricity).
Speaking of electrification of cabins. Electrical wiring should also be shown on the drawing (preferably on a separate one). You will find more information on this topic in the articles and.
Where to put the change house?
When all the building materials have been purchased, you need to choose a place to install the change house. First of all, you should consider the duration of use of the building and the possibility of moving it to another location if necessary. For example, if you are going to build summer house for a couple of seasons, and then transport it to another site or sell it. In this case, it is better to locate the change house closer to the entrance to the site or provide vehicle access to it.
It is also necessary to think through all options for using the structure. If gardening equipment and tools will be stored in the shed, it is better to place it closer to the center of the site and create easy access from all sides. If you make a bathhouse out of a cabin, you can “hide” it in a secluded corner of the garden behind the trees. The farther the cabin-sauna is from a residential building, the better in terms of fire safety.
If the change house is planned to be used as a greenhouse, it is better to choose the highest and sunny place Location on. However, regardless of the purpose of the building, a site should be prepared for it.
How to install a change house:
- The selected area must be cleared of weed and any vegetation.
- Next, you should remove the fertile layer of soil. Depending on the characteristics of the soil, the thickness of the turf can range from 15 to 30 cm.
- Having leveled the site, you need to cover it with construction polyethylene (a film 200 microns thick is quite suitable). It is not recommended to use greenhouse film because it is not strong enough. The film layer should cover the entire area under the future cabin and extend to the edges by 20 cm on each side. Film is the simplest waterproofing for the foundation. You shouldn’t feel sorry for it, much less neglect this step, otherwise in 2-3 years you will notice signs of destruction of the foundation.
- The mixture should be poured over the film river sand and crushed stones in a layer of 20 cm. This will fix the waterproofing and at the same time level the surface.
- To ensure that sedimentary water moves farther away from the cabin without hindrance and does not linger near it, you can make a slight slope around the building of 2 cm per meter.
Cabin foundation
A change house is not a very heavy structure, no matter what materials are used, so there is no point in pouring a powerful, expensive foundation under it. The best option– columnar base. It's inexpensive, fast and quite simple. Plus, columnar foundation leaves a ventilation gap in the underground, which extends the life of the building.
Helpful advice: If you think that a cabin on such a foundation will not be warm enough, there is perfect solution– create formwork around the perimeter, pour the solution over the entire area to create a border 7-10 cm high. It is quite enough to properly insulate the floor. Use expanded clay as floor insulation.
In our case, the pillars are concrete blocks, but they can be made from brick, reinforced concrete and other materials. You will find more information on this topic in the article.
Progress:
- Install concrete pillar blocks in accordance with the shed plan.
- Cover the top ends of the posts roll waterproofing (regular will do roofing felt).
- Using a timber for the base and a building level, adjust the horizontal position of the pillars so that they are strictly in the same plane.

Cabin frame
As you already understand, we are building frame cabin, the material for the base of which was a timber with a section of 100x150 mm. You can take a little thinner - 100x100 mm or 100x120 mm.

How to make a change house:

Roof of the cabin
How to make a roof for a shed:

The roofing material can be anything you like. In our case, this is ondulin - practical and inexpensive. If the change house is residential, the roof should be carefully insulated, since it is through it that most of the heat usually escapes. To do this, first attach a vapor barrier to the sheathing, then insulation, waterproofing film and only after that - finishing coat(corrugated sheeting, ondulin, metal tiles, etc.).

House windows and doors
As for windows and doors, they should be installed in the same way, focusing on the functionality of the structure. Even if you are going to store shovels and rakes in the shed, you should make at least one ventilation window for ventilation, otherwise mold will very quickly grow inside.

The location of windows and doors should be established at the time of design, so that during the construction of the frame, additional reinforcing racks can be installed in the openings. If you forgot to include them in the project, then you can organize the openings after the construction of the frame. During operation, be sure to use laser level or water level to avoid distortions.
Cabin floor
With an uninsulated floor in a change house, everything is clear - make a plank flooring and you're done. Another thing is to make the floor so that you can walk on it without shoes in winter and not be afraid of getting sick. To do this, you must first lay the subfloor, then the insulation and the finishing coating.
Expanded clay, vermiculite, polystyrene foam boards or mineral wool. To eliminate drafts from under the door, it is better to make a threshold at the entrance. It can be cut into the base beam itself or attached separately by nailing a strip.

How to build a floor in a shed:


Insulation and finishing
To make the change house warm and cozy, the walls need to be properly insulated. To do this, first cover the entire surface with thick plastic film - it will protect interior space from wind and moisture.

Then you can lay the insulation and cover it again with film for additional protection. In principle, this process is no different from insulating a roof or floor. For exterior wall cladding, you can choose siding or other weather-resistant material. The widest range allows you to choose an option exterior finishing, which will fit into any landscape.

The inside of the change house can be lined with clapboard or the interior can be made more comfortable by upholstering the walls with wooden panels. All those finishing options that are used in ordinary residential premises are acceptable here: wallpaper, paint, plaster, tiles, etc.
As for household amenities (lighting, water supply, sewerage), they must be taken into account when creating a drawing. The articles “” and “” will help you understand these questions.
The construction of cabins in practice is not so difficult. And if you are planning to build a residential building with your own hands, then a change house will be an excellent training before a large-scale undertaking.
Change houses: photo


Change houses or, in other words, block containers, have earned popularity due to their versatility and multifunctionality. These useful qualities using interior decoration. It is the interior decoration of the block container that determines the completeness of the functions contained in it and the effectiveness of the tasks being solved, that is, how convenient it will be for living, working process, and storage. Therefore, in order to build a change house with maximum efficiency, it is necessary to pay maximum attention to its finishing.
Any type is suitable for finishing a shed. Construction Materials, but the undisputed leaders are the following:
- DVPO;
- Lining;
- Chipboard.
The individual properties of each material make it possible to create a change house, the best way suited to its purpose.
Let's look at each material in more detail.
Fiberboard
The second name of the material is hardboard. It meets the idea of an ideal finishing material in a number of ways. Thus, hardboard is very affordable, has satisfactory strength, is durable and easy to use. The downside is the external nondescriptness. However, when equipping a change house, for example, as a warehouse, shed, storage room and any room that does not provide for long-term stay of people, the last circumstance loses its significance.
MDF
Medium-density fiberboard is superior to fiberboard in density, reliability and durability, but is more expensive. Has different color scheme, suitable for a variety of finishing (for example, lamination); In this regard, the material is in demand, popular and finds the widest application.
Due to its qualities, MDF is suitable for finishing cabins adapted for residential, work, commercial, office rooms, construction headquarters, security posts, meeting rooms, mini-workshops, etc. Modular buildings, made up of two or more containers, are also finished with MDF.
DVPO
 The abbreviation stands for refined fiberboard. What distinguishes Fiberboard from ordinary fibreboard is the presence of a painted front surface, often with an original texture and different decorative elements. The advantages of this material are visual appeal, good resistance to negative impacts of various kinds - high humidity, solar radiation, mechanical loads.
Temporary workers' cabins are made from DVPO - locker rooms, foreman's rooms, rooms for workers' rest, and the like; can even be used for car repair shops.
Lining
Natural material, attractive in appearance and easy to use and maintain. Looks aesthetically pleasing and presentable, creates a internal space feeling of reliability. Excellent for cabins intended for temporary housing, as well as for other purposes related to people staying indoors. Thus, clapboard-lined cabins can house offices, meeting points, small shops, construction headquarters, small industries, and so on. It is also an excellent material for finishing modular buildings.
laminated chipboard
Density, excellent resistance to any negative factors and aesthetics - these are the properties of laminated particle boards. The beauty of the material is given by laminating films, with different colors, texture and texture. As a finishing material for cabins, laminated chipboards are very practical and durable, but such finishing will be more expensive than those made from other materials. Which finish to choose - high-quality or inexpensive - depends, first of all, on the purpose of the cabin, as well as on the available budget.
In a laminated chipboard shed you can place a small office, a store, a production facility, temporary housing, and so on. Modular buildings are also successfully finished with laminated chipboard.
PVC
Plastic Wall panels beautiful, do not absorb moisture and, accordingly, do not rot. They will be appropriate in a change house adapted for an office, a store, or temporary housing. Also, this material has no equal when finishing showers and toilets.

How to decorate the walls and ceiling in a change house
The walls and ceiling are usually finished with the same material. However, this is not mandatory rule, and the choice of materials for finishing the ceiling and walls can be arbitrary. In cabins where people are planned to stay for quite a long time, there will inevitably be a need to boil a kettle and cook food, and these actions involve the use of water. Therefore, it is better to make the ceiling from moisture-resistant PVC.
The finish of the floor is greatly influenced by the purpose of the container unit. Most often used edged board- V pure form or covered chipboards. The floor is also covered with linoleum and laminate.

Interior decoration of a cabin: when there are really many options
Interior decoration of a cabin: when there are really many options
What does it cost us to build a house? Let's draw, we'll live. But how to live is another question. Residents' comfort dacha cabins depends not only on the quality of the house and its design, but also on how and with what material it is made internal lining cabins.
From the right choice finishing material largely depends on how the cabin looks from the inside, its final cost and performance. Today you can order a change house with interior decoration wooden clapboard, MDF panels, fiberboard sheets, plastic panels made of PVC materials, siding, laminated boards Chipboard and other materials.
How to sheathe the inside of a change house? Sheathing materials
Most often for cladding the internal surface country houses And construction cabins used lining based on deciduous or coniferous wood. This material has an affordable price and has excellent sound and thermal insulation properties. The interior decoration of the premises with wooden lining gives the interior a special coziness.
They are often used in the finishing of construction trailers. fiberboard sheets– fibreboard. It is relatively inexpensive and practical finishing material, it does not deform or lose its attractiveness over time, is easy to use and does not require special care.
For change houses intended for offices, finishing is often chosen laminated chipboard . It's quite affordable and aesthetic option finishing. Laminated particle boards They are distinguished by a wide range of textures and shades, resistant to elevated temperatures and mechanical deformations.
For rooms where great importance acquires good thermal insulation, sound absorption and hygiene, cladding is an excellent choice MDF panels. This material is ideal for interior decoration of office buildings, security posts, canteens and workshops. MDF panels are easy to clean - to clean them from dirt, just periodically wipe them with a damp cloth.
The inner surface of the walls of commercial cabins is often lined with plastic decorative panels from PVC material. Plastic panels are easy to install, much lighter than their wooden counterparts and are affordable. Finishing with plastic MDF panels is often found in canteens, first aid stations, security posts, and plumbing facilities.
Another common material for internal lining cabins - plastic panels ( siding). This coating has high decorative properties, the panels are resistant to mechanical damage and fires, guarantee period The coating service life is about 50 years. Siding has become widespread in both residential and commercial buildings. More often, plastic panels are used to decorate walls in rooms with high humidity– in the kitchen, dining rooms, showers and toilets.