Despite all the benefits of growing seedlings at home, even an avid gardener may one day get tired of cups and boxes that create chaos in the most visible areas of a house or apartment. Of course, in garden centers always is ready-made solutions in the form of various shelves, however, functional and aesthetically pleasing products are not cheap.
It is much more profitable to make a rack for seedlings on the windowsill with your own hands. This great option organizing a mini-garden without compromising your wallet or design.
A window rack with seedlings provides plenty of extra space.
In the imagination of a housewife growing seedlings for the first time different cultures right on the windowsill, neat green beds are drawn, decorating the kitchen or living room. However, in reality, the first experience can also be the first disappointment - the seedlings, experiencing a sharp temperature difference between the warmth of the window sill radiator and the coolness of the glass, wither and grow poorly. And the lack of natural lighting, scarce in early spring, leads to its stretching.
When the sun begins to shine more actively, the seedlings may burn out, especially for plants on window sills on the south side of the house. Constant movement of containers to more suitable places cannot be called a rational pastime, and all kinds of structures - screens or curtains - clutter up the already limited space.
To rid yourself of these problems, which at first glance are insignificant, but in fact determine the quality of the future harvest, you should take the trouble to arrange the rack. With the right approach, it will allow you to use maximum space and create favorable conditions for seedlings and will fit perfectly into the style of a modern room.

A mini-greenhouse on the windowsill may well become its decoration
To homemade rack fully justified for seedlings, its design must meet several key requirements:
- provide maximum light transmission;
- contain required amount seedlings with compact dimensions;
- do not create inconvenience in caring for sprouts;
- have an attractive appearance.
The simplest structure is a wooden, plastic or metal tray, which is quite capable of protecting the window sill from dirt, and the plants themselves from the direct flow of air heated by the radiator. The disadvantage of this solution is the limited area, which means that it will not be possible to grow a significant volume of seedlings with its help.
Increase usable space it is possible by arranging several shelves built into the frame, which is placed on the window sill or on the floor near the window opening.
The floor system should be equipped with wheels for comfortable movement, and the rack built into the window opening should be collapsible so that it can be conveniently stored out of season.

Example of a metal floor rack
It is recommended to use as a material for the frame wooden beam, galvanized or stainless steel profile, PVC pipes are also suitable. To arrange the shelves, you can take a solid sheet of plywood or knock down a longitudinal lattice from a thin board, the strength of which will be sufficient to support the weight of the containers. This way you can lighten the weight of the entire structure and provide more light to the plants.
Step-by-step instructions for installing a mini-greenhouse on a windowsill
Greenhouse conditions, vital for sprouts in the first weeks of their life, imply constant temperature, normal humidity and sufficient light.
Maintaining a certain microclimate on the windowsill is more difficult than it seems at first, but it is quite possible if the rack is equipped with heat-insulating and additional lighting devices.
Creating a wooden support for attaching shelves
Before you begin assembling the shelving base built into the window opening, you need to calculate its dimensions. They depend on several factors:
- window sill depth, window width and height;
- planned planting area;
- heights of future plants.

Scheme of a wooden rack for seedlings
Thus, the width of the base is determined by the width of the window, the height of the seedlings affects the distance between the shelves, and based on the depth of the frame, you can pre-select the optimal size containers for seedlings. Installation of the side walls of the frame with shelves begins with the preparation of the beams and looks like this:
- Beam with a cross-section of 20x20 (it is better to choose hardwood - birch or ash) is thoroughly soaked with an antiseptic and allowed to dry.
- Cut it into 4 segments with a length corresponding to the height of the top shelf of the rack.
- Using self-tapping screws, connect the segments in pairs with pre-prepared beams of a smaller cross-section. Their length corresponds to the width of the rack.
- Attach to the racks strictly opposite each other required quantity crossbars providing support for shelves.
- Cut sheets of plywood 12 mm thick to fit the dimensions of the shelves and cut corners around the entire perimeter where they adjoin the racks.
After this, it is recommended to temporarily place the side walls on the windowsill, install the shelves and check their level. If necessary, the horizontal must be adjusted by placing a pad of any material of appropriate thickness under the shelf.
How to make a rack for seedlings with your own hands
After checking, you can finally attach the shelves to the supports and paint almost finished frame in white color.
Ways to organize space on shelves
The usual cultivation of plants in boxes does not protect them from less than ideal indoor conditions. You can grow stocky, strong seedlings by arranging unique home greenhouses for seedlings. The principle of a grow box can be taken as a basis, with the only difference being that the window structure should be covered not with a rigid panel, but with foam foam rolled into a roll.
Illumination of shelves with seedlings
In frosty weather or in the evening, when the cold blows from the windows, the thermal insulation should be lowered down, thus covering the seedlings. In warm weather and during the day protective material you just need to lift it up and open access to natural light.
As for additional lighting for seedlings on the windowsill, it must be equipped with energy-saving types of lamps:
- specialized specifically for growing different cultures(phytopanels) - convenient for installation and useful for plants, but expensive and unprofitable for small gardening;
- sodium lamps high pressure– it is believed that HPS lamps are suitable for large greenhouses, since their spectrum stimulates fruiting;
- LED devices - low energy consumption and lack of overheating makes them very effective option for additional lighting, but high price a complete set keeps many from purchasing it.
Instead of overall wooden boxes It is better to sow seeds in lighter containers, for example, store-bought egg trays, each cell of which is filled with fertile soil.

Containers for seed germination
Homemade or purchased cardboard cups with a removable bottom, as well as seedling cassettes made of plastic or thin plywood, are quite useful.

Mini-greenhouse with peat tablets
From such containers, it is convenient to transplant seedlings into mini-greenhouses, which can serve as plastic food containers with a lid and drainage holes at the bottom, houses similar to gable greenhouses in miniature, transparent bread bins and even a broken down aquarium. The plants will feel warm and cozy in them, which means that all efforts will be rewarded with a rich harvest.
Seedling. We make the rack ourselves.
Homemade rack for seedlings
|
|

Many summer residents grow seedlings at home, in their apartments. And, as a rule, there is not enough space on the window sills.
The question arises, where to place the seedlings in the apartment?
When I faced such a problem, I decided to make a rack for seedlings with my own hands. And not just a shelving unit - but something like a growbox.
Almost all of my windows face north, so it was immediately decided that the racks would be placed in a regular room, or even on a loggia, and the seedlings would be illuminated with fluorescent lamps, and later with LEDs.
The requirement for the racks is that they accommodate more seedlings, and that they are easily dismountable, so that when the need for them ends, they can be easily disassembled and put away until the next season.
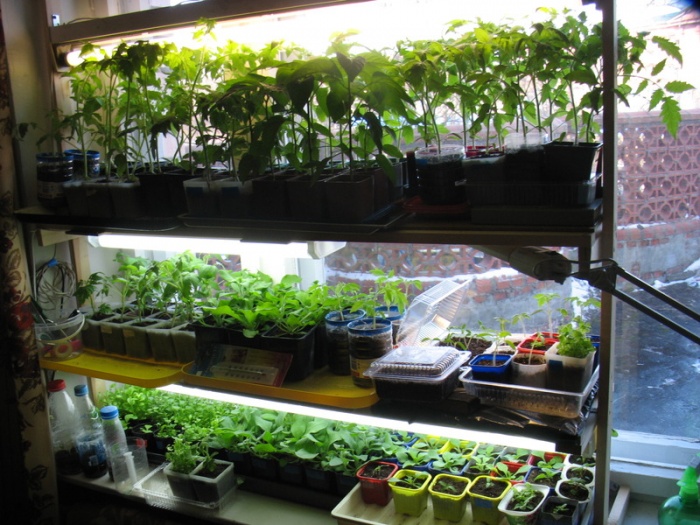
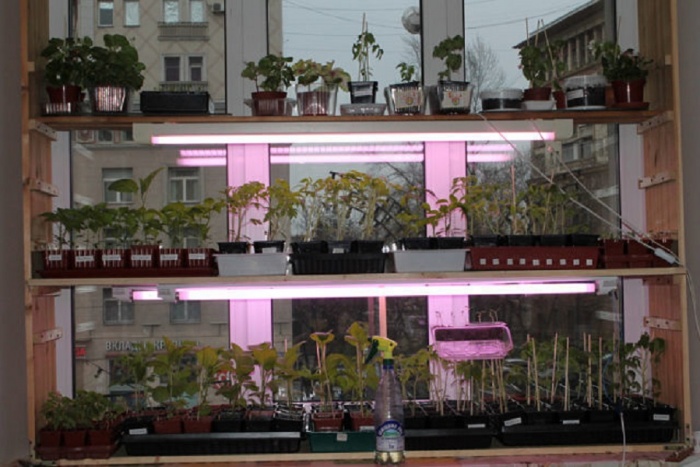
This is what we get as a result.

Here you see two shelves that stand in the room (not near the window), one shelf has three shelves, the other has four.
The inside of the racks is lined with thin insulation, penofol, and foil inside.
Illumination is provided by CFL lamps (compact fluorescent lamps), and one shelf, where purple, LEDs.
My racks are standardized for convenient drawers for seedlings, having 16 cells for seedlings, and which can also be easily disassembled for the winter.
Let's start manufacturing.
I made the racks from wooden blocks with a cross section of 45*20 and a length of 3 m.

I won’t indicate the dimensions, you will still have to make it for yourself, the main thing is the manufacturing principle.
Sidewalls.
The photo above shows how the sidewalls are made. We reinforce them diagonally with a small profile made from plasterboard.
Rack for seedlings with lighting: making your own, cost of finished products
We make two of them.
Shelves.


Click on photo to enlarge.
Shelves in this form not only serve their intended purpose, but also hold the sidewalls together.
Those. the shelf is placed in such a way that the side rail is inserted between the two shelf slats (see photo below, highlighted in red)

We install all the shelves, install a crossbar at the back, but you can do without it.
That's all, all that remains is to fix the insulation with a reflective layer from the inside and our rack - the mini-groove is ready!

I made a new shelving unit (you can see that it has become wider), and my son immediately made a “shop” out of it. 🙂
Spring is getting closer, and every gardener has a time of new worries related to upcoming work on summer cottage. One of them, perhaps the most important and troublesome, is growing seedlings. For this you need suitable soil, good seeds, humidity and suitable temperature, but most importantly - a large space with the required level of lighting. In a city apartment or even a small private house, this is not easy to implement. Special racks for seedlings come to the rescue. We will talk about how to make them yourself in this article.
Why do we need a rack?
If you have been interested in gardening for a long time, then you have probably grown seedlings more than once. Traditionally, it was placed on window sills and tables placed close to windows to provide the plants with as much sunlight as possible. Agree that surfaces filled with pots and cups do not look aesthetically pleasing. But in the end it often turns out that there is still not enough space. And that's not all the problems. When placing seedlings on windowsills, you will get the following troubles:
- light falls on plants unevenly;
- due to sudden changes in temperature, seedlings may freeze or wither;
- seedlings may burn out;
- the window sills will be dirty.
But by installing a rack, you will get a lot of convenience.
This design fits easily into the interior, especially if you made it yourself, taking into account the characteristics of the room. You can make the most of the free space, provide favorable conditions for seedlings, their growth and development. You can attach wheels to the rack and move it if necessary. Besides, modern models racks can be equipped with lighting, providing long-lasting and intense illumination.
When choosing a rack for seedlings in a store, or making it yourself, you must consider the following requirements for this design:
- aesthetics;
- strength and reliability;
- possibility of repeated use;
- resistance to moisture;
- comfortable conditions for seedlings;
- ease of access for inspection, watering and loosening the soil.
The rack is equipped with 3–6 shelves so that the distance between them is 40–50 cm. Optimal width each shelf is up to 60 cm, and the length corresponds to the size of a standard fluorescent lamp that will be installed for illumination.
Types of racks for seedlings
Of course, the easiest way is to buy a ready-made rack in a store. But, as practice shows, factory products are not reliable and often break down, since, as a rule, they save a lot on their production. In addition, standard shapes and sizes do not always fit well into the room. But the prices for the racks are not at all encouraging. It turns out that the only plus finished design the fact that you don’t need to waste time and effort on making it. Although in fact, making a rack yourself is not at all difficult, and it will cost you much less than the store-bought version.
First you need to decide what type of shelving you need.
- A stationary structure is simply necessary for those who want to grow seedlings regularly. This option is relevant when the living space allows the installation of a non-demountable shelving unit. It is attached “tightly” in several directions, which ensures strength and reliability. It is very important to correctly calculate the dimensions and take into account all the nuances of the product before manufacturing it, otherwise in case of an error you will have to redo the entire structure.
- Collapsible rack - a good option, if you plan to grow seedlings only in season, or there are few in your apartment free space. This design is installed temporarily, after which it can be disassembled and hidden in a closet. It is more difficult to manufacture, but you can adjust its size and move such a rack as needed.
- A window or proofing rack is placed on the window. This design is limited in size both in height and width. Most likely, you will be able to place no more than 3 shelves on such a rack, taking into account optimal distance there is 50 cm between them. But the racks on which it is installed give additional strength, and after planting the seedlings you can easily remove the rack.
Suitable materials
Particular attention should be paid to the materials from which the structure will be made. Traditionally they use:
- tree;
- metal;
- plastic.
The choice depends on your desire and financial capabilities, but you should keep in mind that the rack should serve you as long as possible, while being reliable and practical. For supporting posts, take a wooden beam, plastic pipes or metal tubes with perforation, and for shelves - metal sheets, wooden lining, plastic panels or plexiglass.
Please note that shelves made of metal and wood (plywood, chipboard) can be seriously damaged by moisture. Therefore, in the first case they will have to be painted, and in the second case they will have to be covered with polyethylene.
IN Lately Racks made of metal corners with perforations are increasingly appearing. They are stable, reliable, and very easy to use due to the fact that you can change the location of the shelves at any time without much difficulty.
Photo gallery of easy-to-make seedling stands
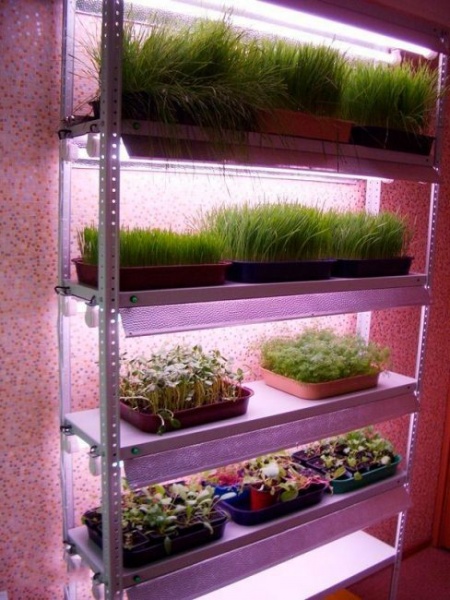
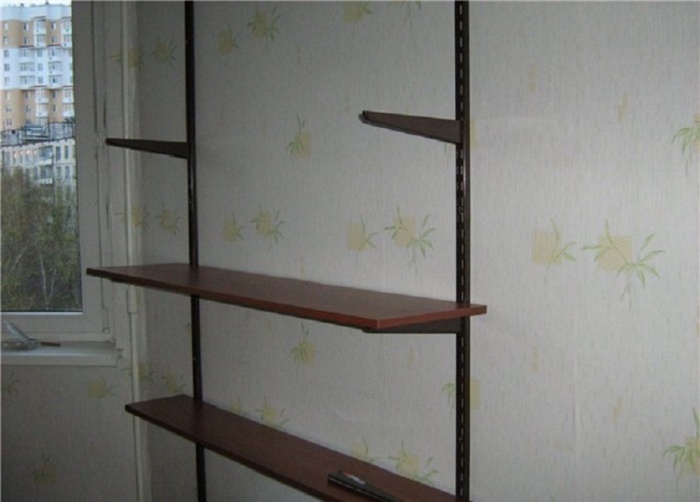
A light, high wooden rack can be placed anywhere A balcony window is an excellent place for a collapsible wooden rack. A light rack made of timber and a metal corner can be installed on a window. A window sill is a traditional place for placing a rack for seedlings.  Simple metal portable shelving stationary shelving made of metal pipes and plastic, it is advisable to place it closer to the south window. A stationary shelving made from a profile with lighting allows you to grow seedlings and herbs all year round
Backlight
Seedlings are grown in February-March, but this is not the best solar time of the year. Plants may absolutely lack the light necessary for photosynthesis and mass growth. To solve this problem, additional lighting is installed on the racks. There are several types of lamps suitable specifically for growing seedlings.
- The most affordable and simplest option is incandescent lamps (17 Lm/W). They are ineffective because they provide little light and at the same time generate a lot of heat, which can harm the seedlings.
- Low power fluorescent lamps, type LB or LBT daylight(70–100 Lm/W). They produce cool light with a low proportion of red radiation.
- Long-lasting and economical LED lamps (80–110 Lm/W). Their advantage is the ability to select the desired intensity and suitable spectrum.
- Metal halide sodium lamps (up to 100 Lm/W) are efficient and economical, and are also easy to use. The downside is that they do not contain a portion of the blue spectrum.
- Gas-discharge sodium lamps (200 Lm/W). Their yellow-orange glow is not irritating to the eyes, but they will require a regulating device.
- The glow of mercury lamps is as close as possible to the level of daylight.
- Phytolamps are very popular among gardeners, including for lighting seedlings. They are compact, environmentally friendly, economical and durable. Even if the seedlings are located close to such a lamp, burns will not form on the leaves.
- Also used are xenon gas-discharge lamps (100 Lm/W), halogen (25 Lm/W), linear (47 - 93 Lm/W), and neodymium.
When choosing lighting fixture pay attention to the presence of a throttle. It gets very hot and heats up the shelf on top. Therefore, leave a gap of 4–6 mm between the shelf and the device. Lamps with electronic ballast do not have heating problems.
Whatever type of lighting you choose, keep in mind that seedlings will do better on the south side. To increase lighting efficiency, install reflective foil screens on the sides and back of the rack. Do not forget that each plant has its own level of illumination. You can adjust the intensity by changing the height of the lamps above the plants.
Installation of LED lighting
Due to their ease of installation and operation, LED lamps have become the most common among gardeners growing seedlings. You will need:
- red and blue LEDs;
- hot glue or thermal paste;
- a base for placing strips of LEDs (can be made of any material);
- a power supply that will provide the required voltage and current stability;
- electrical wire and plug.
To provide the required number of rays of a certain spectrum, alternate the LEDs on the strip: 1 blue, 2 red, and so on until the end of the strip.
- Solder the diodes together using paste and lead them to the driver.
- Connect the driver to the switch and plug.
- Attach the LED strips to the prepared base.
- Collect everything into a single chain.
You can also use an automatic timer, setting it for 14 hours of lighting. This is very convenient if you do not have the ability to control the illumination of seedlings in the evening and at night.
Illumination from fluorescent lamps
If you plan to install on a rack fluorescent lamps, then take their length into account when calculating the size of the rack. In order to pass the electrical wiring, you will need to drill additional holes V metal corner. Or you can carefully distribute the wire along the metal elements.

Remember to follow safety precautions when working with electricity. Bare wires should not be in open access. All work must be done with the power off.
Video: illuminated rack for seedlings
DIY options
We bring to your attention master classes on making simple shelving, which you can easily handle with minimal skills in such work.
From wooden beams
You have already decided on the place where the rack will stand and its size. You will need the following materials and tools:
- wooden beams with a cross section of 45 X 30 or 45 X 45 mm for racks;
- cross slats for crossbars and planks;
- shelves made of selected material;
- screwdriver or screwdriver;
- screws - self-tapping screws;
- jigsaw or hacksaw;
- roulette;
- level;
- chisel;
- hammer;
- pencil.
You can make shelves from timber in the form of a longitudinal lattice. They will be stronger than plywood ones, although the rack will become more bulky and heavy.
Be sure to draw a diagram according to which you will assemble the product.
- Cut 4 racks 1.5 m long from the timber. Align each rack from the bottom edge so that it stands level on the floor. Pendulum saw It is convenient to make a strictly perpendicular cut.
- Make the required number of crossbars from timber up to 3 cm thick and up to 6 cm wide. They can be cut from timber for racks.
- Mark the mounting locations of the cross members on the racks. Take measurements from the supporting end in contact with the floor so that the shelving shelves are positioned as evenly as possible.
- Using a chisel and hammer, make grooves for the crossbars at the markings.
- Combine all prepared parts with each other. By inserting the crossbars into the grooves of the sample. If you find any irregularities, correct them. When the structure looks solid, drill holes in the beams and connect the posts and crossbars with 4 cm long self-tapping screws.
- You can coat the parts at the fastening points with wood glue. But in this case, the structure will become non-demountable.
- It's time to make the shelves. If you don’t want to waste time, you can lay sheets of plywood, plastic, or plexiglass cut to size. For a shelf made of timber, cut it into equal pieces, equal in length to the width of the rack. Lay them flat on the crossbars between the rack sidewalls, leaving a gap of no more than 1 cm between the boards. Carefully screw them in with screws.
The rack is ready. If you did not coat the joints with glue, then such a structure can be easily disassembled by unscrewing the screws and self-tapping screws and removed until next year. Or move the rack to another place and store books, tools, jars with preparations for the winter on it.
Metal collapsible structure
Considering the height of the racks and the length of the shelves, calculate the amount of material. We will make this version of the rack from a metal corner: racks, crossbars between them and load-bearing sides for the shelves.
You will need:
- metal corner 3 X 3 cm or 4 X 4 cm;
- plexiglass or thick glass for shelves;
- welding machine;
- metal drill;
- powerful electric drill;
- metal bolts.
You don’t have to make glass shelves, but in this case you need to adjust the width of the crossbars to the size of the boxes with seedlings. They should be securely located in the opening, and not slip into it.
Avid gardeners usually do not have enough standard apartment window sills for growing seedlings. Racks made from scrap materials yourself will help you get out of this difficult situation. Descriptions of structures, installation methods and practice-tested drawings will be a reliable help in resolving the issue.
The main reasons for installing shelving
A window sill as a platform for seedlings is not the best place. In addition to the small size, there are other reasons for installing shelving:
- Flaw natural light. They begin to plant seedlings in February, when the weather is often cloudy. Yes and Sun rays do not have sufficient power to warm the soil. Equipping the rack with lamps completely solves the problem.
- Low temperature. Optimal temperature regime for seedlings it ranges from 20-25 o C, but the cold from the glass often causes a decrease in the required parameters.
- Small area. To obtain good harvest, you will need a lot of seedlings. Window sills are usually not enough. Shelving of any type greatly increases the area where seedlings can be placed, without taking up much space in the apartment.
Once you have spent the energy to make a rack for your seedlings, you long time you will enjoy the results of your labor.
Design options
Rack structures can be classified according to several criteria:
- Material: wood, metal, PVC pipes, plastic, plexiglass.
- Installation type: stationary, mobile, wall bracket, window.
- One-piece frame or with the possibility of disassembling the structure.
- Presence or absence artificial lighting.
Typically, the shelving design includes 3-6 shelves with gaps between levels of up to 70 cm. The optimal width is 50-60 cm.
The choice of material depends on the experience of the master, planned costs and wishes for the final result. If the stand for seedlings is made of wood, give preference to hardwood, they do not absorb moisture well. Otherwise, the shelves will have to be protected with film or oilcloth. It is better to make a metal rack from stainless steel. It is advisable to make shelves from plastic or plexiglass, a budget option structures for seedlings - plywood covered with moisture-resistant material.
Stationary rack
The stationary design is optimal for regularly growing seedlings, when the housing area allows you to install a rack without sacrificing free space.
Attention! Fixation of stationary structures usually occurs in several directions; this gives them stability, but does not allow for quick relocation.
The material for manufacturing can be wood or metal, the latter option is preferable due to its durability. Naturally, if the seedling rack has undergone preliminary anti-corrosion treatment.
The key point in manufacturing is detailed calculation of dimensions; subsequently remaking the design is extremely problematic. Selection quality materials- another factor that determines the lifespan of the seedling stand.
Collapsible shelves
Small housing is not an obstacle to growing seedlings. A collapsible structure will come to the rescue, which after planting the plants is folded and stored in the pantry. The manufacturing process is more complicated than a stationary stand, but the collapsible design has a number of advantages:
- As necessary, the rack is moved to different parts of the room.
- The distance between shelves can be changed.
- Most of the time the design does not clutter the space.
To make the frame, it is better to use metal parts; periodic procedures for installing and dismantling the structure will quickly damage the integrity of the wood, and the rack will have to be replaced with a new one.

Window shelving
Excessively limited living space forces you to turn to window version growing seedlings. Usually the frame is attached to the window in such a way that the racks expand between the window sill and the top of the opening. The disadvantage of a window rack is the height limitation; usually it is possible to install only three shelves.
The choice of design depends on many factors, and the final decision rests with the person who likes to grow seedlings.

Manufacturing methods
Having experience working with certain materials is often a key factor in the manufacture of shelving. Wood is easier and faster to work with; metal is aesthetically pleasing and durable.
Wooden rack
Consider a simple process of forming a wooden structure for seedlings:
- Initially, the side parts of the frame are prepared. Two bars of the required height are connected by crossbars in the amount of 4 pieces. The gaps between the transverse bars are selected depending on the height of the future seedlings; a distance of 50-60 cm is considered suitable.
- The crossbar for the bottom shelf is attached 10-15 cm from the edge of the vertical stand.
Advice! A profile fixed diagonally will help strengthen the opening.
- The second end of the frame is made in a similar way.
- Between the two posts, 4 more crossbars are attached for three shelves for seedlings. Top beam will not be used for a shelf, but serves to fix lamps.
- When the frame of the rack is ready, proceed to the installation of shelves.
- Foil on the surface of the shelves, reflecting the radiation of the lamps, will help increase the efficiency of artificial lighting and improve heating.
- On final stage Two lamps are screwed onto horizontal crossbars above each shelf.

Advantages of the design for seedlings: mobility, simplicity and low manufacturing cost. Disadvantages: inability to change the spacing between shelves for seedlings of different heights.
Metal stand for seedlings
Any design needs a preliminary design, a rack for seedlings is no exception. Detailed drawing on paper is carried out in compliance with proportions, this will allow you to identify and promptly eliminate shortcomings in individual details. To work you will need:
- Pencil with tape measure.
- Building level.
- Drill with a set of drills.
- Bulgarian. A hacksaw will also work, but the process will take a little longer.
For individual designs A welding machine may be required, so in the absence of the proper experience and equipment, it is better to choose a different design for a rack for seedlings.

Approximate list of materials:
- Profile pipe 20x20. For a massive rack, it is better to take a 20x40 pipe, which can withstand a heavy load.
- The support for the shelves is a 25 mm corner.
- Plywood with a thickness of 1 cm or chipboard.
- Fasteners in the form of bolts and nuts. To fix the rack to the wall you will need anchor bolts.
- Lamps and a set of elements for electrical wiring.
Advice! It is advisable that the length of the lamps exceed the size of the shelf by 5 cm, this will ensure more uniform heating of the seedlings.

Algorithm of actions:
- From profile pipe 2 rectangles are formed along the height of the rack.
- The lower and upper parts of the side posts are connected with a ligament to give the structure stability.
- Holes for anchor bolts are drilled in the horizontal pipe in contact with the wall.
- The vertical racks of the future rack are equipped with holes at intervals of 25 cm on each pipe. This will allow you to adjust the height of the shelves, focusing on the growth of seedlings.
- The corner is cut in accordance with the width of the shelves of the rack. Holes for fasteners are also prepared on it.
- When all the frame elements are ready, proceed to painting.
- After complete drying, begin assembly and fixation. stationary structure for seedlings.
- Then they move on to cutting out the shelves. When the need arises to move them around the rack, just unscrew the bolts that secure the corners.
It is recommended to install the lamps on the structure in such a way that they can move in height. For the full development of seedlings, the same distance is required between the artificial light source and the crown of the plants.
Features of brackets and mobile structures
The stationary rack can be made in the form of a bracket. Initially, two are attached to the wall vertical racks with holes the right size. Brackets are inserted into them, onto which shelves are laid. The top shelf serves as the basis for mounting a lamp that heats the seedlings at the previous level of the structure.
Assembly algorithm mobile shelving not much different from the formation of a stationary structure. Key moment- additionally install a horizontal support at the bottom, which is 2 times the width of the rack. This measure will prevent the risk of the structure with seedlings tipping over.
Window shelving
The window structure for seedlings is similar to a stationary rack, but there are no fastenings to the wall. The manufacturing process includes the following steps:
- The window opening is measured in height, width and depth.
- Two side posts are formed from the pipe. Their width and depth correspond to the size of the window opening, the height is 5 cm smaller.
- The upper and lower parts of the rectangular structure are equipped with nuts.
Note! To prevent scale from getting on the threads during the welding process, a bolt must be screwed onto the nut.
- Corners for shelves are fixed in a manner similar to a metal stationary rack.
- After painting the parts and assembling the frame, they proceed to installing a rack for seedlings in the window opening.
- The bolts are screwed into the nuts, the structure is placed on the window sill and the bolts are gradually unscrewed until spacers are obtained. The work requires care, so as not to damage the window finish, rubber gaskets can be placed in the places of the spacers.
- The final stage involves the installation of shelves and lamps.
Removing the window rack is very simple.

There are many options for designing shelves for seedlings. Having determined suitable material and the type of construction, following the proposed recommendations, it will not be difficult to do the work yourself.
Preparing for gardening work begins long before the ground is exposed from the snow. From late February to early March, experienced gardeners begin to work on seedlings that need generous access to sunlight. Beginners are also interested in the intricacies of preparation.

Planning
The key question for future success is how successfully the issue with seedlings has been resolved. In addition to sowing time and seed quality, it is also important:
- correctly place the boxes in the right quantity;
- provide sufficient lighting;
- not to disturb household members and not to disrupt the usual course of things while young plants are present in the living room;
- minimize financial costs for the rack.
Decide on a place
In what places are boxes and trays with seedlings usually placed:
- on the windowsill;
- on a well-insulated loggia;
- inside the room, additionally providing the structure with artificial lighting.
IMPORTANT. The imagination of gardeners is not limited by anything - no one forbids inventing an original “recipe” for a rack for seedlings and placing it even on the staircase of the entrance to a residential building. The main thing is to maintain the comfort of those around you.

Determining the size of the rack
As experience shows, usually:
- the length of the shelves does not exceed 1-1.2 meters, in rare cases it is 1.5-1.75 m (we are talking about the total length, although the shelf can be divided into sections, and vertical risers of the supporting structure are installed at the places where they join );
- the height of the racks ranges from 1.25 to 1.65-1.80 m (depending on how much local conditions allow the use of space);
- the width of the shelves varies from 20-25 cm to 45-60 cm (on wide shelves, narrow drawers are installed perpendicularly, right next to each other);
- In general, sizes are individual - final solution only for you.
IMPORTANT. On average, count on the number of shelves being 3-5, with a width of no more than 70 cm, and a height between shelves of at least 50-65 cm (even low-growing seedlings require normal air circulation).
Deciding on materials
Everything that can be used to make a stable, practical structure is used:
- metal tubes with perforation (purchased at the store building materials);
- metal sheet, which is cut to make shelves (this option is relevant for people who, by virtue of their profession, have access to metal and its processing - cutting, bending, welding);
- wooden block for load-bearing risers (the simplest and affordable option, which even a person who is far from the intricacies of construction and installation can easily get used to);
- plastic tubes (pipes), which are used for installation of heat and water supply systems (sold in hardware stores);
- plexiglass (requires additional guides, as it is highly flexible and will bend under the weight of the load);
- glass sheet (used for making shelves, the thickness should be at least 5-6 mm).
IMPORTANT. Glass shelves provide a special level of security. Each glass shelf must be securely fastened in the load-bearing grooves, the edges should be insulated with film or sanding (to avoid cuts on your hands during operation of the rack).

The main requirement for all materials is that they can be processed for installation of fasteners, and also withstand a certain weight load and do not create a risk of injury.
Video - making a rack for seedlings with lamps with your own hands
Rack made of wooden blocks
Once you have decided on the dimensions, prepared the materials and found the time, it’s time to start making. The following instructions are not strictly mandatory. Their goal is to help you create your unique masterpiece.
Project development
Presumably, a wooden block with a cross-section of 45x45 or 45x30 mm will suit you (the standard length of each block is 3 m). It is sold at any building materials store. You can also buy plywood sheets for shelves there.

IMPORTANT. The plywood will have to be cut with a sawing tool - hand saw cannot be done (it is very labor-intensive and there is no guarantee of cutting accuracy). An alternative is to make shelves from the same block in the form of a lattice. After all, the boxes don’t pretend to be a solid shelf anyway.
- draw a sketch (a diagram with which it will be convenient to monitor the progress of work);
- make sure that all materials and tools are at hand.

Manufacturing of racks
Your actions:

IMPORTANT. It is necessary to trim the bottom edge to ensure that the rack is stable. Store-bought blocks usually have uneven ends.
Making crossbars
Cross members are horizontal bars between the posts. The following shelves will be located on the crossbars:

Connection of racks and crossbars
The strength of the rack depends on the quality of work at this stage. Do everything carefully, do not rush:

IMPORTANT. Always start measurements from the end that will be the supporting one, that is, in contact with the floor. This will eliminate the risk of inaccurate shelving levels.

IMPORTANT. Additionally, it would be a good idea to coat the selections with wood glue. Only in this case the rack will turn out to be non-dismountable - keep in mind that the structure cannot be disassembled and reassembled.
Video - wooden rack and instructions for its manufacture
Making shelves
These elements can be made from the original block - unchanged or cut into boards. This is the simplest option. More complex ones involve plywood (it needs to be sawed, and this is labor-intensive), plexiglass, plastic sheets etc.
All these materials are quite a hassle. Therefore, the block is rightfully considered the optimal solution:
The set of tools is determined by you - what is convenient for you to work with, then do it. If you don't have a power saw, use regular saw. The result will come a little later, but the process itself will be no less exciting.
Think again about the moment of assembly and disassembly. Glued connections give high stability designs. Throughout the year, perhaps, there will always be a use for the rack - at least for homemade pickles or for your children’s toys.
Making a collapsible metal rack
First, let's analyze the design without taking into account lighting. You can think about it a little later. Moreover, it may not be needed if the rack is placed in a sufficiently illuminated place.
Materials and tools
You will need:

IMPORTANT. The rack can be made without glass. Just make the width of the crossbars so that it matches the size of the boxes with seedlings. They should fit tightly and not fall out into the void.
- welding machine (do the welding yourself or invite a specialist);
- metal bolts for assembly;
- high-strength metal drill;
- a powerful electric drill to drill holes for the bolts.
Operating procedure

IMPORTANT. The welded side gratings can be put away in a closet, and can also be used in the household as a ladder. Without welding, the side parts of the rack can be easily disassembled into small parts. As a result, the rack is completely collapsible.

IMPORTANT. Grinding glass edges at home is not accessible to everyone. The ideal solution will turn to specialists in a construction store. There the glass is cut and the edges are processed.
Lighting installation
Glass shelves mean that light will pass through them unhindered. When you are planning the width of the rack (not the depth, but the length of the shelves) - at that moment it is advisable to take into account the length LED lamps, which are sold in an electrical store.

IMPORTANT. Don't forget to drill holes in the metal corner if you want to pass electrical wiring through them. An easier way is not to burden yourself with these subtleties, but to distribute the wire carefully along each metal element.
- Attach each lighting element so that it is located under the top shelf and illuminates the bottom one;
- For fastening, use metal wire or cut tin tape (any other fastening methods are also allowed).
IMPORTANT. Remember safety precautions when working with electricity - do not leave exposed electrical wires in free access. All preparatory work Perform with the electricity turned off.
Making a rack does not take much time. The design is obtained in the dimensions and with the functionality that is preferable for you. Sowing seedlings can begin at any time. In winter, grow salad greens on the same shelves.
Video - shelf for seedlings on a plastic window
To grow good seedlings, in addition to high-quality soil and timely watering, a sufficient amount of light is required. Lack of lighting will cause plants to become sick, growth and fruiting will be delayed. Well, of course you need a place to place all the seedlings. Special racks will help solve the placement problem. Ready-made racks for seedlings can be purchased in the store. And for those who want to show their imagination and creativity, you can make a rack for seedlings with your own hands, which will match the home interior. You can’t place it, but even if there is lighting in any convenient location. Before the onset of cold weather, take it out onto the balcony or veranda.
Selecting material for the rack
What can you make a rack for seedlings from?
First, let's decide on the material that we will use in production. It can be either wood, iron or plastic. It all depends on material capabilities and engineering and design wishes. If you prefer wood, it is better to choose hardwood that will not absorb moisture well. If it's metal, it's better. stainless steel. It will protect the structure from corrosion. You can use plywood, plastic or plexiglass as shelves. Here, preference is given to plexiglass and plastic. Such materials will last a long time without losing their appearance. Shelves made of plywood will have to be covered with polyethylene so that they do not deteriorate under the influence of moisture.
Basic requirements for a rack for seedlings
Whatever design the rack for growing seedlings has, it must meet the requirements:
- have strength, reliability;
- be resistant to moisture;
- designed for repeated use;
- provide comfortable conditions for plants;
- quick access (watering, inspection, loosening);
- have an aesthetic appearance.
The number of shelves can vary from 3 to 6. The length of the shelves should be such that standard fluorescent lamps can be installed. The width of the shelves should not be more than 60 cm with a shelf height of 40 - 50 cm.
Making a shelving unit for the windowsill
Having initially calculated the number of floors of the rack (in our case there will be 4) and its parameters, we proceed to construction. For simplicity and convenience, we take ready-made furniture panels to the size of the window sill, length 1200 mm by 200 mm. For the side racks we install furniture panels 1500 by 200 mm long. We fix it using the format. The height of the shelf in our case is 350 mm. If desired, for greater stability, the structure can be additionally secured to the slope or frame. You can make a rack for seedlings with lighting by attaching lighting to a ready-made structure.

Why do seedlings need lighting?
 IN winter time plants especially lack natural light. As a result, photosynthesis proceeds sluggishly, normal development and biomass growth slows down. The lack of light is compensated by installing artificial lighting. In stores you can buy lamps of various designs and powers. But how many lamps and what power is suitable for growing plants? First, let's decide which lamps are suitable for lighting.
Choosing the right lamp for seedlings
Suitable for illuminating seedlings:
- Incandescent lamps (17 Lm/W)– simple, affordable, but not the most effective method lighting devices. They provide little light and heat up a lot.
- Fluorescent lamps (70 – 100 Lm/W) type LBT or LB daylight with low power. Provide cold light. Have a low proportion of red light.
- LED (80 – 110 Lm/W)– durable, economical lamps. With them it is easy to select the required spectrum and intensity.
- Sodium metal halide lamps (up to 100 Lm/W)– easy to use, economical, effective, but they lack the blue spectrum.
- Domestic sodium gas discharge lamps (200 lumens per watt) emit a yellow-orange glow that does not cause eye irritation. Require additional installation regulating device.
- Mercury. They have the largest “cross section” in the area of daylight.
- Phytolamps– economical, environmentally friendly, efficient, compact and durable. The most popular for lighting seedlings. Even close proximity of such lighting will not lead to leaf burns.
- Other: halogen (25 Lm/W), linear (47 – 93 Lm/W), xenon gas-discharge lamps (100 Lm/W), neodymium.
In order to illuminate a shelf 50 cm wide and 140 cm long, it will be enough to install a “warm” lamp and a “cold” spectrum lamp with a power of 36 W. The best way to make up for the lack of sunlight is fluorescent lamps or special phytolamps. Reliable and efficient sodium gas-discharge lamps will also help illuminate racks for growing seedlings.
When choosing a lamp with throttles, take into account the strong heating of the throttle and the shelf above it. To reduce heating, the gap between the shelf and the lamp is 4–6 cm. If you use a lamp with electronic ballast, there will be no problems with heating.
Regardless of the type of lighting chosen, try to place the seedlings on a south-facing window. For greater effect, you can install additional reflective screens on the sides and back of the seedlings. The lighting intensity is selected individually for each plant. Depending on the requirements of the plant, the intensity can be adjusted by increasing or decreasing the distance from the lamps to the plant.

Let's take stock
Having picked up required material By calculating the parameters of the shelves, you can easily make a rack for seedlings with your own hands. Do not forget about the need for additional lighting for plants.
Having decided on the choice of lamp (phytolamps, fluorescent, sodium lamps are considered optimal), you can make a rack for seedlings with lighting.
Video: seedling rack with LEDs