The question of what a brick cesspool is and what advantages it has is becoming increasingly relevant, as modern people have begun to increasingly value the comfort and benefits of civilization. Of course, it is better to connect your house to the central sewer system, but this is not always possible, which is why you have to make a cesspool and sewer system with your own hands.
For a summer residence, a cesspool is the most common way to organize a sewage system. And this is not at all accidental, since the operating principle of such a structure is incredibly simple: wastewater and sewage, used water and kitchen waste flow through pipes into a storage tank located on the site. As it fills, you can clean it yourself or call a vacuum cleaner. Let's figure out how to build a brick cesspool with your own hands.
Advantages and disadvantages
Any local sewer system has both its advantages and disadvantages. Of course, a cesspool is no exception. Advantages of a brick cesspool:
- Environmental friendliness. Sewage is either effectively cleaned or transported by sewage trucks to special drainage stations.
- Preventing soil pollution and groundwater, since when the volume of wastewater is more than 1 cubic meter, installing a storage tank without a bottom is prohibited. With a small volume, bacteria living in the soil will provide natural cleaning.
- Easy to operate and install. Even a novice builder can complete all the work on constructing a brick pit.
Note! It is not at all necessary to have much experience to lay brick walls. Since they will still be hidden from prying eyes, then this is a way for beginners to practice bricklaying.
- The storage tank does not depend on the groundwater level or soil type.

Disadvantages of a brick cesspool:
- Possibility of unpleasant odors. Timely cleaning and the use of special preparations that accelerate waste decomposition processes will help you cope with this problem.
- They are not very durable. If you have a brick cesspool, the sewer system will last about 15 years. Over time, it will become unusable due to the gradual decomposition of wooden struts and brickwork, which turns into clay with prolonged exposure to water.
- The need to frequently call vacuum cleaners.
Stages of creating a brick pit
Building a cesspool with your own hands is a process that includes several steps:
- Choosing the location of the cesspool. The distance to residential buildings must be at least 5 meters, to the fence - at least two meters. In addition, it should be located as far as possible from the source drinking water and lower in level. Otherwise, there is a risk of infection.
Note! When choosing a place for a cesspool, you should ensure that the suction pump can reach a distance of closer than four meters. Otherwise there simply won't be enough hose.
- Preparation of the necessary tools and materials for construction will require: a bayonet shovel with a regular and long handle; shovel with special sides and a long handle; pegs for marking and fencing; roulette; ladder; building level; buckets; Master OK.
- Layout of sewer channels and volume assessment. The storage capacity is determined as follows. On average, one person living in a house requires 0.5 m3. As a result, a family of five will need at least 8 m3.

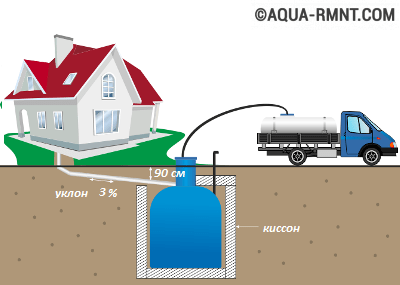
The approximate dimensions of the cesspool are: depth - 3 meters, length - 3 meters, width - 1 meter. These sizes are approximate. Also remember that the fill level should be one meter below the soil level. Otherwise, the drainage of the cesspool will be disrupted and wastewater may flow beyond the storage tank.
Note! The depth of the sealed cesspool should not exceed three meters, otherwise pumping out wastewater with a sewage disposal machine will be difficult.
- Digging a pit. You can dig a hole either yourself or using special equipment. Of course, the second option is much more expensive, but the services of an excavator will save you time and effort.
- Installation of a septic tank (if necessary). The septic tank allows you to provide effective cleaning waste.
- Ventilation arrangement. Ventilation is necessary for the release of methane released during the process chemical reactions decomposition. If the gas is not removed, there is a possibility of an explosion. Ventilation is carried out through the hatch, which must be free of soil, and also through the ventilation pipe.
Work on the construction of a cesspool
The actual process of constructing a cesspool begins with excavation work - a very long and labor-intensive process. The walls must be leveled and protected from collapse; the bottom must have a slope towards the hatch, which will be installed after the walls are erected.

The easiest way is to make a hole in a square or rectangular shape. A sand cushion 15 centimeters thick is installed at the bottom. A layer of concrete of the same thickness is placed on the cushion so that the concrete sets well; it must be left for about 7 days. Then a cement-sand screed is made at the bottom.
Note! The bottom can be made of a ready-made reinforced concrete slab, but it must also be placed at an angle.
Now you can move on to building the walls. If you decide to use burnt brick, then you should prepare in advance clay castle. The masonry will be carried out on a base made of sand-clay mortar. After the wall is erected, it is plastered with the same mortar.
Note! The thickness of the masonry must be at least 25 centimeters, and the thickness of the partitions must be at least 12 centimeters. It is best to carry out the masonry by tying the bonded row and every fourth row with a strong cement mortar.
To reduce the water permeability of the brick and increase the service life of the cesspool, the walls must be additionally covered with a layer of waterproofing. For this, experts recommend using modified bitumen or bitumen mastic.
Note! Apply bitumen waterproofing should only be applied to a dry brick wall surface.
The next step is to install the ceiling. The ceiling must be very reliable and durable, capable of withstanding heavy loads. It is better to use reinforced concrete structures as flooring. The sides of the pit must be blocked by at least 30 centimeters. And don’t forget to leave a hole for the hatch so that pumping and cleaning can be done.

To create the ceiling, formwork is made. The dimensions of the formwork should be at least 30 centimeters larger than the dimensions of the pit itself.
Concrete for formwork is poured in two layers: the first layer is 7 centimeters, then reinforcement with rods at a distance of 10 centimeters, then the second layer of concrete is poured.
Note! If you want to make a concrete floor yourself, then you need to pour the structure at the same time as creating the floor. Then the ceiling will be able to gain the necessary strength.
After the concrete has set well, the ceiling must be covered with a waterproofing material, for example, roofing felt or plastic film. Then the ceiling is covered with soil, slag or soft clay. The manhole cover must be made double.
This will prevent freezing in winter and unpleasant odors in summer. The first cover must be installed at ground level, and the second at floor level. Then the space formed between the covers is filled with slag, expanded clay or lined with insulation, for example, mineral wool or polystyrene foam. It should be noted that the top hatch cover must be completely waterproof.
Now that all the work is done, you can enjoy an excellent DIY sewer system. It’s just important not to forget to clean it periodically, and then you won’t have any problems. Bring on country cottage area or to a country house, urban comfort turned out to be not so difficult, but the result was beyond all expectations.
It's hard to imagine life without comfortable living conditions. Sewage is considered the main part of a comfortable life. In its absence, a brick cesspool will provide those amenities that are missing. Septic tanks are chosen in different ways: from concrete rings and monolithic structures. They perform a storage function. A brick septic tank also performs a filtering function, in addition to storage.
Advantages
The main advantage of a homemade septic tank is accessibility and ease of installation. You can line a drainage hole with bricks without the help of specialists yourself, and after repairs in a country house there is always a small amount of brick left. Most likely, there will be no need to purchase bricks. In addition, such a septic tank can be installed on any type of soil. Although, if the soil absorbs, then there is no point in calling sewer trucks to pump out the hole.
Return to contents
Disadvantages of a brick cesspool
The main inconvenience that a brick drainage pit will provide is that it is not completely sealed. With absence proper care behind the pit (pumping, adding special bacteria) it emits bad smell. Some types of soil will require frequent pumping of wastewater, which can be a little more expensive.
The legislation of most countries prohibits the installation of bottomless sewers with a volume of more than one cubic meter.
 The structure should not be very deep.
 Another disadvantage is that the pit must be up to 3 meters deep, since the power of the cesspool pump will not be enough for a deep hole. If a wooden structure was used as a support, then the disadvantages include the fragility of the structure. For this reason, it is recommended to use a metal frame.
Return to contents
Where to choose a place?
For cesspools, there are sanitary standards, according to which the place for digging a hole is determined.
First of all, the pit should be at least 5 meters from the house. The distance from the septic tank to the source of drinking water should be 20-50 meters, depending on the type of soil. Sanitary standards also stipulate that the pit should be located at least a meter from the neighbor’s property. In addition to sanitary and hygienic standards, it is necessary to ensure that the sewage system is easily accessible to sewer trucks. In addition, possible stench is taken into account.
Return to contents
Materials
First of all, to line a hole with brick, you will need the brick itself. The brand or type of material does not have special significance. When choosing a brick, they are guided only by price, but if price is not the main factor, it is better to choose clinker brick. It is moisture and frost resistant, which is more suitable for these purposes. To create the structure, you will need dry cement and sand to mix the cement-sand mortar.
Return to contents
What tools are needed?
 Using a bayonet shovel, you can dig the hole itself.
 - A shovel is the main tool for constructing a cesspool. You will need two of them:
- bayonet - for digging a pit;
- shovel - to throw out soil.
- A tape measure and four pegs with strong rope are used to mark the future hole.
- Staircase - for descending into the pit. If there is none, then building it yourself will not be difficult.
- Construction level to control how level you can lay it.
- A construction trowel and a container are needed for mixing cement.
Return to contents
Stages of work
Layout
First, they plan how big the septic tank will be and how the sewer pipe will go. To plan the volume, take into account that on average a family of 3 people needs a hole of 8 cubic meters. Next, they calculate how much pipe will be needed and plan how it will go. Avoid gas pipes and cables buried in the yard, otherwise they may be accidentally damaged.
Return to contents
 After marking the site, you need to dig the pit itself.
 The next stage is the most labor-intensive - digging and forming a pit. First, take measurements of the future hole with a tape measure and place pegs in the corners, which are connected to each other with thread. A bayonet shovel is used to dig a hole, and a shovel is used to throw out soil. Do not immediately throw away the remaining soil, as it will be needed when compacting the pillow.
Return to contents
Laying the pillow
Next, make a sand cushion about 15 centimeters thick. It is important to compact the pillow tightly. This is where you will need the soil stored after digging. After the pillow has been tightly compacted, it is covered with a layer of concrete 4-5 centimeters thick. We must not forget that cement mortar must be strong to withstand the load that will fall on it.
Return to contents
Bricklaying
As soon as the concrete dries, the main stage begins. The bricks are laid in a checkerboard pattern in half a brick, but if resources allow, it can be in a quarter. The second method of laying makes the sewer more airtight, and the masonry stronger and denser, which will allow it to last much longer and not crumble after filling. It is correct to use a strong sand-cement mortar.
Return to contents
Sewer cover
 The best option sewer covers - concrete slab.
When the brick structure is dry, begin to cover the pit. For these purposes it is better to use concrete slabs. An alternative is a simple structure made of tightly packed logs. The overhang of the ceiling beyond the walls is at least half a meter. For effective protection against stench, they attach from above waterproofing material, for example, roofing felt.
Return to contents
How to apply it correctly?
To make a brick cesspool durable, strong cement is mixed. In this matter, cement is the main component. The thickness of the masonry should exceed 25 centimeters, and the thickness of the partitions should be more than 12 centimeters. If it is concluded that waterproofing the cesspool is necessary, then it is worth remembering that bituminous materials are applied only to a dry surface. We must not forget that a drain is needed, and first leave a place for it if it was not drained at the time of laying.
etokirpichi.ru
Sanitary restrictions
To avoid penalties and litigation with neighbors, when choosing a location for a drainage pit, the following sanitary and technical requirements should be taken into account:
The storage pit for domestic wastewater is located only on the territory of a private household; you do not have the right to place it outside; distance from the fence – from 1 m;
In order to avoid wastewater getting into drinking water if the seal of the pit is broken, it is necessary to place it at a distance (at a distance of 10 m) from the water supply branch; a distance of at least 20 m from the drinking water well (on loams up to 30 m, on sandstones – 50 m);
The close location of such a pit when it is drowned or washed away can lead to the destruction of the foundation, so the distance from residential buildings(including neighbors) – 10-12 m;
The depth of the hole depends on the occurrence of groundwater, the maximum depth is 3 m.
When choosing a place for treatment plant The possibility of access to special equipment for pumping out should also be taken into account.
To avoid the appearance of an unpleasant odor in the house, you should not place it near windows - you should retreat at least 5 m.

Distance to cesspool
Violation of sanitary standards is fraught with more than just fines. In the event that a sewage spill causes damage natural environment or the health of others, a criminal case may be opened against you (Article 250 of the Criminal Code).
Types of drainage pits
A variety of materials can be used to construct a storage tank for domestic wastewater:
Concrete (including concrete rings);
Plastic;
Rubber tires.

Brick drainage pit
Due to their low airtightness, wood and rubber tires are used only for the construction of small drainage structures. Most often, cesspools are constructed of concrete or brick.
Calculation of storage capacity
The size of such a container depends on the number of residents, the number of installed plumbing fixtures, the presence of a shower or bath, bathhouse, dishwasher, washing machine, pumping frequency and other nuances. The generally accepted norm for drainage per person is 30-50 liters (0.03-0.05 cubic meters) per day.
Thus, provided that the drainage pit is pumped out once a month for a family of 3 people, you will need at least:
svoimi-rukamy.net
The principle of operation of the drain pit
A drain or cesspool is one of the oldest sewage systems on earth. You can build it even without any experience construction work.
Moreover, such a device is often created on the site at the very beginning of construction work in order to provide builders with a minimum set of amenities.
Technically, a drainage pit is the simplest septic tank or human waste storage tank. A sewer pipe leading from the house is connected to this tank, located underground.
The pipes of a separate toilet, bathhouse and other premises located on the site are also connected to it.
One common cesspool on the site is not the only option for organizing such a system. If desired, you can make a separate small container for each room.
This solution may be convenient, for example, if the bathhouse is located at a considerable distance from other buildings.
Waste is gradually accumulated and partially disposed of, depending on the type of structure. As the pit fills with wastewater, it must be cleaned to prevent the structure from overflowing.
Modern means allow waste disposal to be carried out with a fairly high degree of efficiency.
Types of cesspools
You can build any type of cesspool from brick:
- hermetic;
- with permeable walls;
- without bottom;
- divided into several sections.
Each building has certain characteristics. For example, sealed pit used in areas with high groundwater levels. This design prevents the possibility of contamination environment drains.
Permeable drainage pits, intended for the processing and disposal of gray waste, are installed with a meter-long sand and gravel filter in the bottom area.
If the throughput capacity of the underlying rocks is insufficient, they are equipped with small holes in the walls through which the liquid part of the waste is disposed of.
In the so-called pits without bottom the lower part is not concreted. The walls of such structures are erected on a concrete base with a gap, into which a sand and gravel filter is laid directly on the ground.
Liquid effluent will slowly percolate through this natural filter and then enter the underlying soil strata where it undergoes final treatment.
Divided into several sections. Big hole can be divided by partitions into two or three sections, which are connected by overflows.
Such a device, similar to a sewer septic tank, allows you to repeatedly separate the bulk of solid and liquid waste and increase the degree of their processing with the help of bacteria.
Features of brick sewer
Using brick to build the walls of a cesspool has a number of advantages. This material perfectly holds impurities and is durable. Using brickwork you can create a structure of any size and configuration.
When using concrete rings, you have to adapt to their standard dimensions. Pouring monolithic concrete is no less labor-intensive process than bricklaying.
It is not necessary to use high-quality material for the cesspool; bricks that have already been used before will also work.
Masonry work requires certain skills; it is a real art of construction. It is best to master such operations during construction sewerage structures, since all the flaws will be hidden underground in the future.
And yet you shouldn’t do the laying completely carelessly. An uneven brick wall may collapse over time.
The brick storage has one useful property— it is stable at almost any level of groundwater, and has good resistance to soil swelling when freezing in winter.
Such a drainage pit can be constructed both on light sandy soils and on heavy clay soils.
Subtleties of brick sewer construction
Before starting work, you need to decide on the size of the future cesspool, and also find a suitable appropriate place.
Stage #1 - preliminary calculations
The simplest calculation option is based on the average standard. The number of people permanently living in the house is multiplied by the norm of 0.5 cubic meters. meters.
After this, you need to calculate the parameters of the cesspool depending on its configuration. The container is usually made in the form of a cube or cylinder. The first option is preferable, since it is easier to line a container with straight walls with bricks.
The depth of the pit should be no more than three meters, but practice shows that it is possible to service a sewer with a depth of less than two meters or less. The volume of the pit now needs to be divided by the selected height. The resulting figure will be the area of the base.
It remains to choose the length and width for a container with a rectangular base. If you decide to dig a cylindrical hole, you will have to use the formula for the area of a circle:
- S- area of the structure;
- π - number “pi” equal to 3.14;
- r- radius of the structure.
The resulting area should be divided by 3.14, i.e. to the number "pi". From the result, which is the square of the radius of the circle, you need to extract the root, obtaining the actual radius of the base of this cylinder.
Before marking, all parameters must be increased by the size of the brickwork and concrete base. This role is usually performed by a concrete slab 30-40 cm thick.
The concrete screed should have approximately the same dimensions. The thickness of the brickwork for sewer structures should be 25 cm on the outer contour, and for interior walls 12-13 cm is enough.
When choosing the parameters of the container, you should remember that filling it more than two-thirds is undesirable, so the depth of the pit for the cesspool should be increased to the required size. When choosing a location for a structure, a number of sanitary standards should be taken into account.
For example, the distance from a sewage storage tank to a residential building must be at least five meters, to a fence - at least two meters, to a source of drinking water - at least 25 meters, etc.
In addition, in areas with uneven terrain, sewerage devices should be located lower than the water source. Finally, it is necessary to provide access for sewage disposal equipment.
The machine does not have to be in close proximity to the cesspool, but the distance between them should not exceed a limit of four meters.
Stage #2 - excavation work
After the marking is completed, you can begin digging a pit. The easiest way is to order the services of an excavator, but if you need a small capacity and want to save money, you can do it manually.
The technology of work is very simple: the ground is dug with a bayonet shovel, and as the pit deepens, it is removed using a bucket on a rope. A ladder will be useful to get out of the hole, as well as a regular building level to control the quality of the work.
The walls of the pit are usually made vertical, but the bottom is given a slight slope so that the contents of the container accumulate in the corner, above which the maintenance hatch will be located.
In the future, this point will make it easier to pump waste out of the container. On light soils, the walls may need to be protected from crumbling, for example, with the help of temporary wooden structures.
Stage #3 - installation of a concrete base
If the bottom of the pit is supposed to be made airtight, then either a concrete slab must be placed down or concreting work must be done. In the first case, everything is simple: choose iron concrete structure suitable sizes and install it below.
If the decision is made to concrete the bottom, then first a sand cushion about 15 cm thick is laid down. The sand must be leveled and compacted, observing the previously made slope.
Then a reinforcing mesh is placed on the bottom and a cement-sand screed is poured. After this, you need to wait until the concrete base hardens.
It takes about four weeks for it to dry completely, but when constructing a cesspool, work usually continues seven days after the base has been poured.
If you plan to build a cesspool without a bottom, you should fill only the space above which the walls will be built with a concrete screed.
Leave in the center open ground, on which a sand and gravel filter is subsequently laid. For correct execution When pouring a concrete base, in this case you will need to build wooden formwork.
Stage #4 - making brickwork
To prepare masonry mortar you will need the following ingredients:
- cement grade M400 - 1 part;
- construction sand- 3 parts;
- water- 0.8 parts;
- slaked lime or clay - 0.5 parts.
Sand and cement need to be sifted so that there are no solid inclusions, this will make the solution homogeneous and bring it to the consistency of liquid sour cream.
First, a clay castle is made on the base, and the first row of bricks is placed on it. The masonry is immediately leveled using a level. The thickness of the clay castle will be uneven, since the bottom is made with a slope.
First, beacon bricks are placed in the corners and their position is carefully leveled. Next, the laying is carried out using rope beacons, which are pulled for each row.
Experienced craftsmen can lay three rows at once or use a special ordering strip. Beginners are advised to first check literally every brick they lay with a level.
A plumb line is used to control the quality of the masonry vertically so that the wall is level.
Depending on the thickness of the wall, a brick laying scheme is chosen. If you need to make a wall 25 cm thick, then lay it “in one brick”, and if it is 12 cm - “in half a brick”. The length of the brick corresponds to the width of the wall.
Of course, this is not how a permeable cesspool is made. Usually it is laid “in half a brick,” with gaps made between individual bricks so that liquid drains can escape through these holes.
In any case, you should adhere to the rule: vertical seams between bricks in adjacent rows should not coincide. The laying is done as follows: a small amount of mortar is applied to the surface of the base using a trowel.
A brick is placed on top and pressed, gently tapping it with a trowel so that it takes the correct position.
Then the excess solution is picked up with a trowel. There is another technology: the solution is applied to separate brick, then it is installed in place. Here are a few useful tips for masonry work:
- The dimensions of the mortar-filled joint between the bricks should be about 6-8 mm.
- There should be a seam everywhere same size everywhere, this will improve the quality of work.
- Bricks should be placed along the walls in small portions to reduce work time (you won’t have to bring every brick from a common pile).
- Before laying, the bricks are watered, this improves the adhesion of the surface to the mortar.
- Every fifth row is recommended to be laid using a special reinforcement mesh.
Of course, a sewer pipe needs to be connected to the cesspool. The entrance site should be thoroughly treated with the solution to avoid leaks.
The pipe must be properly insulated and laid below the freezing level of the soil, maintaining the required slope. After the masonry work is completed, the walls need to be plastered.
Stage #5 - waterproofing and top flooring
A layer of waterproofing material, for example bitumen mastic, is placed on the plaster. These measures will help extend the life of the sewer system.
When applying waterproofing materials, you must strictly follow the instructions. For example, mastic requires a dry base.
Now you can install the top floor. To do this, it is best to purchase a ready-made concrete slab with a hole and a lid.
Alternatively, you can consider a self-made concrete structure or a timber floor. The latter option is no different in strength; such an overlap will have to be replaced every few years.
If you decide to make a concrete floor yourself, you should start making it simultaneously with the base and using a similar technology. Pouring is done into wooden formwork.
The parameters of the upper ceiling must exceed the dimensions of the hole that it will cover by at least 30 cm.
First, a layer of mortar of several centimeters is poured, then the reinforcement is installed and the main layer is poured. This element must dry within four weeks. It is necessary to make another hole in the upper ceiling - a ventilation hole.
The sewer system needs proper ventilation, because over time, wastewater begins to release methane, which is a dangerous gas.
To organize natural ventilation, use a plastic pipe with a diameter of about 100 mm. The top of the pipe is covered with a protective device; it also wouldn’t hurt to equip its lower part with a grill.
After installing the ceiling, a layer of waterproofing should be applied over the structure; roofing material or even thick polyethylene film will do.
A soil and plant layer is usually laid on top to improve the area and protect the cesspool from freezing in winter.
Features of device operation
Basic care for a cesspool comes down to emptying and cleaning it in a timely manner. Significant assistance in the recycling and disposal of waste can be special bacteria, intended for cesspools.
Such preparations are usually supplied detailed instructions and very easy to use. They need to either simply be poured/poured down the drain, or pre-mixed with some water.
Such microorganisms are able to process wastewater, decomposing it into safe components. At the same time, the smell characteristic of sewerage devices disappears.
But it should be remembered that contact with some types of household chemicals is destructive for bacteria, so you will have to check the composition of the washing and cleaning products that are available in the house.
After the cesspool has been cleaned, it does not hurt to inspect it and check the integrity of the brick walls. If necessary, carry out minor repairs to the structure: replace damaged bricks with whole ones, restore damaged waterproofing, etc.
Conclusions and useful video on the topic
The process of laying bricks when creating a permeable cesspool is clearly presented here:
This video describes the process of creating a cesspool in an area with high groundwater:
A brick cesspool is a reliable and convenient structure. Making such a device is not easy, but all efforts will pay off, since if the technology is followed, such a device can last for many years.
sovet-ingenera.com
Choosing a construction site
The text describes simplified sewage system options suitable for self-construction. Therefore, we have the opportunity to choose materials within a wider range, in comparison with the construction of a drainage pit according to a standard project. To choose a place to build a drainage pit with your own hands, you need to take into account.
- terrain;
- nature of the soil;
- depth of groundwater;
- the presence of nearby wells with drinking water.

Also, the location of the drainage pit, which you are going to make with your own hands, is subject to sanitary requirements, according to which the distance from the house to the pit must be at least 6-8 meters. This requirement is based on the fact that the waste that will be located in the drain pit will emit toxic gases, which in turn should not have an impact negative impact on the residents of the house.
Return to content
Determine the depth and diameter of the drain pit
So, the place chosen for constructing a drainage pit with your own hands should not disturb the neighbors on the site. The pit should not serve as a potential cause of contamination of wells. If the drainage pit will only be used in summer. then the depth of the drainage pit can be made up to one to one and a half meters, sometimes less (depending on the number of drains). If the wastewater is supposed to be drained during the cold season of the year, the depth of the pit will be calculated taking into account the fact that it should lie 0.5 m below the freezing point of the soil.
In order to determine the volume of excavation work for the construction of a drainage pit with your own hands, for example a bathhouse, you need to select a volume of soil equal to one or two volumes of the tank in which the water is heated on the bathhouse stove. Experience shows that such a volume of a drainage pit built in loamy soil is sufficient for reliable daily operation of the pit in summer period for a long time.
Return to content
Unsealed drainage pits mainly for summer use
For the construction of drainage pits of this type, boards, metal and plastic barrels, old car tires and more.
Return to content
Drain pit made from old car tires
This is a proven version of a reliable DIY drainage pit. Benefits of use car tires for a leaky drain pit:
- no corrosion of rubber, the pit will last a long time;
- rubber tires are lightweight and can be easily delivered in parts to the construction site;
- tires can be found in large quantities even for free;
- ease of processing of the material; in order to cut off the side parts, use a hacksaw.
Flaws:
- rubber tires have a relatively small diameter;
- Tire drain pits have limited use for small drain pits only;
- Large tires are difficult to prepare; in this form it is easier to use concrete rings or bricks.
To equip a bathhouse drainage pit, 4-5 old tires from a minibus or medium truck are enough.
Before installing tires one on top of the other, it is necessary to cut off the sidewalls. It's easy and quick to do. A hole is made in the side of the tire large enough for the hacksaw blade to pass through; it is important not to get into the metal cords that reinforce the rubber. Next, use a hacksaw or a good knife to cut off the unnecessary diameter side part tires on both sides. It will take 40-50 minutes to trim the side parts of one tire. This is done so that water entering the drain does not accumulate in the sides. To route the drain riser inside, a hole is made in one of the tires for the diameter of the drain, approximately 15-20 cm. You will have to tinker with this hole, cutting through the steel cords in the thickness of the rubber.

Photo 1. Do-it-yourself drainage hole from old car tires
We dig a hole in a pre-selected place with a diameter corresponding to or slightly larger than the diameter of the tire. We install the tires one on top of the other. Insert into one of the top tires drain pipe running from the lower level of the bathhouse floor to the drain. We take into account the slope towards the drain, sufficient for the rapid evacuation of waste water. We lay a thick sheet of metal or other durable sheet material that is not subject to corrosion on top of the mounted drain. You don't have to make a hatch to inspect the condition of the drain pit. Cover the lid covering the pit with a layer of soil. On my site, such a system, with daily drainage of 30-100 liters of water, has been operating autonomously for more than five years. Moreover, the location of the drainage pit is not visually determined, and a layer of turf has formed on the soil covering the drainage roof.
Return to content
Drain pit in the form of a wooden box
Boards are a convenient material for arranging a drainage pit with your own hands. Tree - good alternative for the temporary arrangement of drainage before a permanent, reliable sewage system appears on the site.
The advantages of using wood for the construction of the underground part of the drainage pit:
- you can always find substandard boards;
- Anyone can put together a drainage box;
- the box is easy to install and dismantle;
Flaws:
- fragility, however, if the material is pre-impregnated modern means to prevent wood rotting, the service life of the box will increase significantly;
- small volume of drainage pit made of wood, usually the side of the box cannot exceed one meter; a larger size leads to a decrease in the strength of the box.
Making a drainage pit with your own hands from wood begins with determining the dimensions of the future box. As mentioned above, one side of the box is no more than a meter. We make four shields from boards. We nail the boards loosely to the bars. We install shields in a pre-dug hole with smooth edges matching the dimensions. We install spacers that rest against the opposite panels. They are not visible in the figure below, but the presence of spacers will significantly strengthen the structure. It should also be provided that the two sides are secured by resting on adjacent boards.
Shield dimensions:
- width – one meter,
- height – one meter and fifty centimeters

Photo 2. Drain pit made of wooden panels
On top, for strength, we lay two or three metal pipes. We cover the structure on top with 40 mm boards or pieces of small diameter logs. Cover the top of the board with roofing felt or other material with water-repellent properties. We fill it with soil. A wooden drainage pit can last up to five years without inspection, subject to summer operation. Be sure to place the pit in an inaccessible area of the site. This will prevent premature collapse of the structure.
As an alternative to the above examples of drainage pits, you can use metal or plastic barrels of suitable sizes.


Photo 3. Drain pit made from a metal barrel
Return to content
Unsealed drainage pits for all-season use
Do-it-yourself drainage pits for all-season use are made mainly from concrete rings and bricks. The depth of such a pit is two or more meters. Volume 2-3 cubic meters or more. The design provides for installation on top of an inspection or inspection hatch. Leaky structures of impressive size, it is recommended to install them separately for sewerage standing houses, in farmsteads and on streets without dense residential buildings. This is due to the fact that the deep location of drainage pits with nearby residential buildings causes extensive contamination of the adjacent soil. Often, drains are made with intermediate settling tanks, see photo 4. This option can be alternative option with dense residential buildings.

Photo 4. An example of a combination of a sealed and non-sealed drainage pit in a permanent design
Return to content
Drainage pits made of concrete rings
The most convenient drainage pits for all-season use are made of concrete rings.
Advantages:
- strong, durable material;
- prefabricated structures;
- There are different standard ring sizes;
- It is easy to find support plates included with the rings.
Flaws:
- To build a concrete drainage pit you can’t do it yourself; you need to use special equipment
- To install the rings, it is necessary to hire specialists who have skills in working with lifting equipment.
The sequence of installation of reinforced concrete rings for the construction of a drain.
- Using an excavator or manually, dig a pit of the required depth, level the bottom to install the lower ring
- Rings are installed sequentially on top of each other, their number is determined by the estimated volume of collected wastewater. It is recommended to fasten the rings together. Methods for fastening the rings are known to invited specialists.
- Usually two or three rings are installed. They may have holes to allow runoff to seep into the soil. However, it is better to purchase solid rings and ensure the tightness of the structure when connecting.
- The upper part of the ring should be 0.2-0.3 m above the ground level

Photo 5. Example of installing rings with holes

Photo 6. Example of installing solid rings
Return to content
Brick drainage pit
As an alternative to concrete rings for constructing a drainage pit with your own hands, it is recommended to use brick. Currently this is a fairly expensive material. However, if there are old stocks of substandard bricks on the site, then this option can be considered and successfully implemented.
Advantages:
- Brick is a strong and durable material;
- If you have minimal mason skills, you can safely confirm our principle - we build a drainage pit with our own hands;
Flaws:
- The rectangular or square shape of the drain pit will not withstand heavy loads and in conditions high humidity may collapse;
- It is much more difficult to build a round pit made of bricks; you need to have good construction skills;
- If you need to build a sealed drainage pit with your own hands, you will need a fairly large amount of cement and sand to prevent water from seeping through the brick.
If you have the desire, it is not difficult to build a brick drainage pit with your own hands. The principle of operation is the same as when constructing a concrete pit. In view of the fact that brick is currently rarely used to make drainage pits, this amount of information will be sufficient for future builders.


Photo 7. Examples of a brick drain pit
Currently, sealed drainage pits are increasingly used. They are made in factories from special plastic. Such containers are easy to install independently. Installation instructions are available from retailers of such systems. However, self-cleaning sewage systems are the most promising. To install and adjust such structures, one cannot do without professional training.
Return to content
vse-postroim-sami.ru
Advantages and disadvantages
Describing a cesspool, one cannot do without listing its advantages and disadvantages, and the system has approximately equal numbers of both. Among the advantages:
- Ease of construction: even a novice builder who has never tackled such projects before can make a cesspool on his own site. The pit construction scheme is simple and unpretentious, and due to its exclusively functional role does not need decorations; Environmental protection. The design of the pit prevents the release of untreated sewage into groundwater, which means it protects wells, boreholes and the garden itself from contamination.
- Clear operation. The pit is used only as a reservoir for storing waste; there are no complex parts in it that could render this structure inoperative. Sewage is either cleaned using filters or removed by vacuum trucks.
There is no perfect system without flaws. There are also disadvantages to cesspools:
- Unpleasant odors. They will inevitably appear when the pit is filled with waste, but their timely cleaning or removal using sewage disposal machines will eliminate this drawback.
- Exploitation. Sooner or later, the pits will fill up and in order to get rid of this deficiency, you will have to call the vacuum cleaners. Especially often, residents of private houses are forced to resort to the services of sewer trucks due to the use of household appliances that increase the volume of sewage; in such cases, the machines are called out weekly.
- Best before date. cesspool made of brick has its own, very limited shelf life - on average 15 years. Over the years, the brickwork gradually collapses under the influence of chemical elements water. The service life can be increased if the brickwork is repaired in a timely manner by inserting concrete inserts.
Types of pits and where to install them
There are two types of cesspools:
- Without a bottom, which is easier to build than a system of the second type. However, it is prohibited to erect a structure without a bottom in areas where the volume of wastewater per day exceeds 1 cubic meter. Wastewater, once in the tank, is purified, penetrating through a natural filter - soil, while solids Over time, the hole is filled. After filling the tank, dig a new one. Before starting to build a pit without a bottom, it is important to examine the type of soil on the site; the rate of seepage of wastewater into the ground depends on it. In some cases, if there is a lot of wastewater and it goes into the ground quickly, the dirty water does not have time to be cleaned and poisons the groundwater, which then flows into the wells.
- Sealed differs more complex design, which does not allow waste to leak outside. The pit is dangerous because explosive methane gas can form in it, and it also requires periodic cleaning with vacuum trucks. A brick drainage pit can be either sealed or built without a bottom.
Having chosen the type of pit, the second thing you need to do is find a suitable place for construction.
This is not a simple matter, since there are whole regulations that must be followed in order to avoid environmental disasters and fines.
- The pit is prohibited from being placed close to residential buildings and other buildings on the site, since sewage can contribute to flooding of the foundation. However, you should not install a pit too far from the house. The optimal distance between buildings and the cesspool is 5 meters.
- There must be a space of at least 1 meter between the pit and the fence.
- The distance from the reservoir to drinking water sources varies depending on the type of soil. On sandy loam, a cesspool dug on such soil should be located as far as possible from the well, at least at a distance of 50 meters, and on clay - from 20 meters or more.
- Due to the fear of mixing wastewater and groundwater, the former should be separated by more than a meter. Groundwater level is measured in spring when melt water increase the amount of groundwater and raise its level to the maximum possible distance from the surface.
- The number of people living in a house usually accounts for 150 to 180 liters of wastewater per day per person, but it is important to consider that if you plan to use household appliances, the volume of wastewater increases by 500 liters.
- It is also important to add to the calculations the frequency with which the tank will be cleaned: once a week or twice a month.
- For added caution, the volume of the pit should be three times greater than that obtained as a result of calculations.
Pit construction: first stage
To build a hole with your own hands, you will have to acquire construction equipment: a bayonet shovel with cuttings of different sizes and an ordinary garden shovel. These tools include a bucket, a ladder and a trowel.
- First of all, choose a location and determine the size of the hole– this stage of work may exceed subsequent construction in duration. After making a decision, they begin to dig a pit, and be sure to tilt it towards the future hatch. Fertile soil thrifty owners usually use it for garden beds, and the rest is partially taken out and partially left for last stage work on the pit. A brick cesspool can be square or round; in terms of design, the latter is preferable, but a square hole is easier to dig. They either dig traditionally, with shovels, which will take longer, or they call in special equipment - it costs more, but it only takes an hour.
- The walls are leveled and strengthened so that they do not collapse, and a sand cushion of 10 or 15 cm in size is placed on the bottom. Concrete of approximately the same thickness as the cushion is placed on the cushion and left for a week to harden. After hardening, a thin 4 cm cement-sand screed is placed on top of it. Instead of concrete, the bottom of the pit can be laid with a reinforced concrete slab, but even in this case it should be inclined towards the hatch.
- The next stage is the creation of brick walls. The masonry is made on a base of sand and clay. The masonry is assembled in half a brick and in a checkerboard pattern, on average the thickness of the masonry should be 25 cm, and the thickness of the partitions should be 12 cm. For waterproofing, the walls are covered with bitumen and plaster. To prevent labor from being in vain, it is recommended to apply bitumen only to dry masonry.
Last stage of construction
The floor must withstand heavy loads, so the best floors are reinforced concrete. The ceiling should cover the tank on all sides by 30 or 50 centimeters, leaving another hole for the hatch so that wastewater can be pumped out of the pit. Create an overlap according to the following scheme:
- The formwork is made in two layers of concrete, between which reinforcement is inserted. Concrete takes seven days to harden, so it is recommended to do the covering at the same time as concreting the bottom of the pit.
- For waterproofing, the ceiling is covered with roofing felt or polyethylene, and covered with soft clay or soil on top.
- In winter, the contents of the cesspool freeze, which is not desirable. Installing a double hatch will help avoid freezing, and this design will also be beneficial in the summer when the tank begins to emit unpleasant odors. People place them at ground level and the ceiling, and fill the space between them with expanded clay or foam plastic.
A drainage pit made of brick with your own hands is an excellent sewerage system on the site. It will take very little time and money to create it, but if you clean it in a timely manner, it will last a long time and faithfully.
vodospec.ru
Pros of use

The principle of the design and use of a cesspool is very simple - all waste from the house flows into it, after filling it is cleaned with vacuum cleaners and the process begins again. The advantages of brick construction include:
- a simple device that a novice master can perform;
- you can make any convenient shape;
- The drainage pad device cleans drains and increases the time of use.
This design is not without its drawbacks: it may cause an unpleasant odor, a short service life and a frequent need to call the vacuum cleaners. This makes it not the best option.
Selecting a location

To ensure that the cesspool does not cause trouble and functions normally, when planning a place for it, you should take into account sanitary standards:
- the distance from the house should be 5 m;
- the distance from a well or other source of drinking water should be 30 m, for sandy soil - 50 m;
- the depth of the pit is no more than 3 m, otherwise the sewer truck will not be able to pump it out to the very bottom, since it will not have enough pump power;
- there must be a distance of one meter to the neighboring area. The need for periodic cleaning of the pit requires provision for the possibility of access by a sewer truck. The volume of the cesspool should be calculated based on the number of residents of the house. When choosing a location, pay attention to the topography of the site, because sewage will move through the pipes by gravity. For unhindered movement, a straight highway running at a slope to a lower point is preferable. The location of groundwater plays an important role - it should not fall into the cesspool and fill it, moreover, when high level dirty water will mix with them, seep into the soil and pollute underground sources.
Design options

Depending on the volume of wastewater and the groundwater level, the design of the cesspool is chosen. It can be quite simple to implement and inexpensive in cost, like a brick pit without a bottom or a permanent structure with a concrete base.

The construction of a leaky pit makes it possible to rarely use the services of vacuum cleaners, since most of the wastewater goes into the soil after filtration. The main limitation is the volume of water used daily; if its amount exceeds 1 m3, then such a device will not cope with it. To construct a pit, it is necessary to dig a pit according to the calculated size. Its bottom is covered with a drainage layer consisting of crushed stone of various fractions, broken bricks and sand. The thickness of the base is made at least 20 cm. The walls are laid in a checkerboard pattern with spaces between the bricks, which helps the liquid escape. To construct a pit, it is not necessary to purchase new bricks; you can use used ones. Such structures have a short service life because they quickly silt up and stop absorbing liquid, and are then covered with earth. Large crushed stone is poured into the pit around the masonry. Along the perimeter of the pit, a trench is dug under a concrete belt to cover it. The sides of the formwork will be brickwork and an earthen wall; this gap is filled with concrete. The top can be covered with the selected floor slab.

Capital pit with concrete bottom and waterproofing walls. Construction consists of several stages. The main labor costs are for excavation work. You have to dig a pit of the required volume; for a family of three it will be at least 1.8 m3 (200 l per day × 3 × 3 = 1800 l). The shape of the pit can be round, square or rectangular; its choice does not affect efficiency. The design needs a slight tilt towards the placement of the hatch. After the foundation pit is ready, its base is filled with sand and compacted to create a cushion. Next, the bottom is poured with concrete to a height of 10 cm. Brick laying is carried out in a checkerboard pattern on a sand-cement mortar; it should be 25 cm thick.
It is necessary to leave a hole for the drain pipe.

The inner surface is plastered and covered with layers of waterproofing. A clay castle is made around the finished pit.
Waterproofing
With significant daily water consumption, a large volume of wastewater is generated. To receive them, a design is required that prevents contaminated liquid from entering the soil. To ensure the environmental safety of the cesspool, a structure with a concrete bottom and protection from a layer of waterproofing is used. Bitumen mastic- the most common material used to waterproof a cesspool. The work is carried out on finished masonry that has dried after plastering. For the first primer layer, bitumen is heated and mixed with kerosene. Liquid solution applied to a brick wall. After drying, the procedure is repeated; you can apply the bitumen with a roller or brush. Without waiting for complete drying, fiberglass is applied to the still sticky surface. Bitumen waterproofing is again applied on top.
There is a more modern material - bitumen emulsion, which does not require preheating; for priming, it is enough to dilute part of the composition with water.
Installation of ceiling and hatch

Densely laid logs or reinforced concrete slabs. The transition beyond the walls of the cesspool should be 0.5 m on all sides. The size of the hatch is 70 cm. Waterproofing material is laid on top of the ceiling for this purpose optimal choice is roofing felt. Installing a double manhole cover will protect the pit from freezing in winter and from spreading odors during hot periods. The first cover of boards is installed flush with the ground, and the second - at the ceiling level; it must be protected with waterproofing. The distance between them is filled with insulation or expanded clay.
A cesspool is easy to install, but its importance for comfortable living in the house is simply enormous.
The simplest local sewer network in a suburban area is a structure that includes a cesspool. It can be made from different materials: reinforced concrete rings, brick or concrete blocks, containers of different sizes and types. This article will look specifically at a brick cesspool.
The construction of a brick pit for collecting sewage consists of several stages. But at the very beginning, you need to decide where this collection container will be located, what size it will be, and so on.
Choosing a location for a cesspool
Determining the location of the cesspool:
- No closer than 5 m from the foundation of the house;
- No closer than 2 m from the fence (site fencing);
- No closer than 30 m from the water intake well or well.
Plumber's advice: It is necessary to ensure that the cesspool is located conveniently for access by a sewage disposal truck, if in the future you plan to clean the pit with its help, and not with your own hands
Determination of volume
It is believed that a person needs 200 liters of water for domestic needs. Multiply this number by the number of people living in the house. This will be a daily filling of the pit. A certain percentage of wastewater will go into the ground, a small percentage will evaporate. In addition, it is necessary to take into account that the drains should not overflow, so it is recommended to take the volume of the cesspool with a small margin.
And one moment. Don't build the hole too deep. The optimal depth is 3m.
Stages of constructing a brick cesspool
Excavation
If the location of the well is established and its volume is calculated, you can proceed to the construction processes. The most time-consuming of them is to dig the hole itself. It’s not difficult to do this with your own hands using shovels, but you will have to spend a lot of time and effort.
The optimal shape for a cesspool is square or rectangle. To prevent the walls of the pit from collapsing, it is necessary to dig it with a narrowing towards the bottom. At the same time, it is necessary to compact them.
Please note that the bottom of the pit should be slightly sloping towards the location of the hatch. This will make it more effective to clean the well from sewage.
Preparatory stage
The bottom of the pit is covered with sand 15-20 cm thick. It must be compacted and watered. Then a concrete solution is prepared, which is used to concrete the bottom. It is imperative that a reinforcing frame made of metal fittings or mesh. A concrete layer 15-20 cm thick must be kept for more than a week for the material to become durable.
I would like to note that you can purchase ready-made concrete bottoms on the market, which can be installed at the bottom of the pit using a crane.
Bricklaying
For this you can use ordinary burnt brick. But the masonry mortar should be clay-based with a small sand content (15-20%). This is a waterproof material that will repel water from the brickwork itself, which will increase the life of the cesspool.
Brick laying is done according to conventional technology with a sling. Experts recommend making a kind of screed based on cement-sand mortar every fourth row, on which the next row is immediately laid. The thickness of the masonry is at least 25 cm.
As soon as the masonry process is completed, it is necessary to coat the walls of the pit both inside and outside with clay mortar. This is a protective screen that, in essence, will act as waterproofing. And the thicker the layer of clay, the better. Of course, inside it will reduce the volume of the well itself, so it is better to increase the thickness of the clay layer on the outside of the brickwork.
Now you need to wait for the clay to dry thoroughly. After which it must be treated with hot bitumen or special bitumen mastic.
Final stage
The cesspool is almost ready, all that remains is to install the lid. There are two options here:
- Order a floor from the reinforced concrete products factory, which can only be installed by a crane. But this option is guaranteed to be of high quality with a hatch and a hole for ventilation;
- Make the ceiling yourself.
To do this, you will have to construct formwork, make a reinforcing frame and pour the floor with concrete right at the installation site. It will have to stand in the formwork for at least a week. Don’t forget to install a hatch and ventilation pipe in the lid.
Often the cesspool cover is poured into formwork on the ground, and after drying it is installed on the edges of the brick well. But also in in this case You can't do it without a crane. The ceiling is poured in several layers:
- First, a concrete layer 7-10 cm thick is poured;
- Then, until the concrete solution has dried too much, a reinforcing frame of reinforcement with a diameter of 8-10 mm is laid. The frame will have to be pre-made with cells of 10x10 cm;
- Then a second layer of concrete 10-12 cm thick is poured.
Plumber's advice: The size of the ceiling should be half a meter larger than the size of the pit itself along the edges
And lastly, the space between the walls of the brickwork and the pit is filled. For this purpose, soil that was removed from the pit is used. The ceiling is also covered with soil to hide the well and not spoil the landscape of the suburban area. All that remains is to install the pipe on the pipe exhaust ventilation and hatch. It is better to make the hatch double with insulation.
For the citizens, the problems of drainage and disposal of household waste are solved by municipal services, but adherents of free-living country life have to think through such pressing issues on their own. If the owner of an estate intended for the residence of a large family most often has to order the installation of a bulk septic tank or local treatment station on the site, then a summer resident can easily build a cesspool with his own hands from inexpensive or waste materials. It will cope with the important sanitary function perfectly, and will not require the allocation of too much money for arrangement.
The simplest and most cost-effective options
The historical predecessor of this sewer facility was a simple hole dug in the ground, the walls of which were coated with clay and reinforced with boards. Then they began to bury old barrels, tanks, and other used containers into the ground. Nowadays, such “reservoirs” for collecting and partially filtering wastewater are installed only if the daily amount does not exceed 1 cubic meter. m.
A simple cesspool for a toilet can satisfy the needs of summer residents who stay on the site a couple of days a week during the summer season. However, its device is not approved, and sometimes completely prohibited by sanitary and epidemiological services, often accompanied by the imposition of administrative penalties.
Elementary cesspool: from the simplest container lined with boards for a toilet to a tank made of concrete rings
Attention. The depth mark of the bottom should be at least 1 meter higher than the maximum (spring-autumn) groundwater level.
If the owner of a suburban area really doesn’t want to spend money on building a structure, and he has a certain amount of worn-out tires, this material can be put to good use. You just need to lay the tires in the dug pit, fastening them together with bolts. If the pit is located outside the house or toilet, a hole must be cut in the side of the tire placed on top to connect the sewer pipeline. Afterwards, the pit around the makeshift treatment plant is filled with soil, and a concrete slab with a hole for ventilation pipe and a hatch for pumping out.

The owner of a N-number of worn-out tires can use them to build an excellent reservoir for collecting waste
Common types of structures
According to characteristic design differences, cesspools are divided into absorption structures and sealed containers. The functions of collecting, accumulating and treating wastewater are also performed by septic tanks. They are more complex in technical aspects installations with forced stimulation of wastewater movement inside and with biological and chemical treatment methods.

Violation of sanitary and epidemiological standards for the location of a cesspool is unacceptable
Containers without bottom - absorbent
Direct descendants of the “people's” cesspool. Their characteristic– absence of a bottom, due to which the liquid component of the wastewater, having undergone purification by coarse filtration through a layer of a mixture of sand, gravel, broken brick and other “ingredients”, passes into the ground. The absorbing option is considered the most economical, in addition, the construction of the pit of this type It may well be carried out by a contractor who has absolutely no experience in the field of construction. Another saving: due to the partial infiltration of purified water into the ground, there is much less need to call sewer trucks.

Structural diagram of a cesspool without a bottom - wastewater is filtered through crushed stone
The absorbent type of pit is chosen if there is no need for drainage large quantity drains, if the country house does not have a jacuzzi, dishwashers and washing machines. The land will not be able to process and accept a large volume. In addition, the cleaning carried out cannot be classified as a 100% effective procedure, which means that wastewater from the absorption pit will still pollute the environment.
Sealed waste water tanks
Their name contains a direct hint indicating the main design feature. Essentially, these are closed containers made of water-tight concrete, brickwork, plastic, and gas silicate blocks that require constant emptying after filling. Sealed structures will ensure the complete absence of odors typical of wastewater, but will force the owners to regularly call a sewer truck to remove accumulations.
Important. A cinder block is not suitable for building a cesspool; it will collapse too quickly from contact with water.
The easiest way is to buy and bury a factory-made plastic container in the ground to collect waste water, and bring it to it. sewer pipeline and periodically call vacuum cleaners to empty
The simplest scheme for constructing a wastewater tank would be to install a store-bought plastic container. It does not need to be sealed, however, it is advisable to fill the bottom of the pit with a kind of cement screed and strengthen the walls with reinforcement. In principle, if the owners are not embarrassed by the unpresentable appearance, then there is no need to bury it in the ground. Another very compelling argument in favor: a plastic structure can be installed regardless of the close level of groundwater. There will be no harm to the environment anyway.

The tank should not be completely filled with sewage; there should be at least one meter between the manhole cover and the liquid level; if the level exceeds the limit, the container should be emptied
The simplest homemade septic tanks
These are more complex structures that not only perform deep cleaning, but also process wastewater into fertilizer valuable for gardeners. Most often they are a system of two or three chambers, in the first of which only collection and rough processing takes place. mechanical cleaning, and in subsequent chambers specific bacteria enter the battle, finally processing the polluting inclusions of the wastewater.
A cesspool with an overflow purifies water so well that it can be successfully used for economic and technical purposes, for example, for watering or for cleaning the area. But in order to make a septic tank with an overflow, considerable effort will be required.

The operating principle of a three-chamber septic tank is based on multi-stage wastewater treatment: in the first tank, the collected wastewater is subjected to coarse filtration, in the following chambers finer purification is performed
If you don’t mind the effort, but there is no surplus of financial resources, you can again resort to worn-out car tires. In the sense of “bald”, but not worn-out tires. Moreover, the owner will save money not only through waste building materials. To install a septic tank made from tires, you do not need a powerful concrete foundation, just a compacted cushion of crushed stone with sand with a thickness of 30-40 cm and a ten-centimeter screed.
- To increase the volume of the created reservoir, the sidewalls of the tires must be cut off.
- A concrete pipe is installed vertically in a well made of tires; its diameter should be approximately two times smaller than the same size of tires. The upper cut of the concrete pipe is located 10 cm below the well made of tire rubber.
- The bottom of the pipe is filled with concrete to form a monolithic concrete cylinder.
At the top you will need to make holes for infiltration and for installing pipes that provide overflow.

Design of a cesspool with overflow: the pipe entering the chamber must be located higher than the overflow pipe
- The sewer pipe must be inserted into a concrete container located inside the tires.
Places where sewer pipes enter vertically installed concrete pipes needs to be sealed.
Let's consider the stages of installation of several design options.
Absorbing
Owners of small country estates who decide to make a basic sewer system with their own hands most often choose this option. The simplest design and the ability to not resort to the services of sewer trucks too often are attractive. The walls can be made of bricks or gas silicate blocks, but it is easier and faster to build them by placing concrete rings on top of each other.

It is much faster to build walls from gas silicate blocks than to lay them out of brick, and it is even faster to make a pit from concrete rings, but to install them you will need a crane

Sealed
The construction principle is similar, only there is no need to form holes for the infiltration of treated wastewater and the bottom must be completely concreted. It is advisable to reinforce the lower concrete platform by laying a concrete mesh on the bottom before pouring. To prevent the reinforcement from “drowning” in the concrete, it must be slightly raised above the surface and secured on pegs.
An important aspect: it is recommended to seal the walls. Cheap option for internal insulation - bitumen; the outside of a home-made sewerage facility can simply be coated with clay. If the walls of the pit were built of brick, they can be plastered.

The standard design of a sealed cesspool with a concrete bottom; the walls can be built from concrete rings, lined with bricks or gas silicate blocks, make a monolithic container, pour concrete into the formwork
Brickwork will take significantly more time than installing concrete rings. At the bottom, by analogy, they arrange concrete screed, and you can lay bricks either in a circle or by “drawing” a square or rectangle in the perimeter. The poured concrete platform must “mature” before starting masonry, standing for 7-8 days.
Important. During the masonry period, it is necessary to form holes for the supply of sewer pipes. The connection point is located below the freezing level recorded by local weather services.
The sewer pipeline to the waste collection point should be slightly inclined to ensure spontaneous movement of the contaminated mass.

The pipe introducing wastewater into the pit must be located below the freezing level, the pipeline must be laid at an angle to ensure spontaneous movement of wastewater
Installation of ready-made complexes
It’s impossible to think of anything simpler and more convenient than their use; the arrangement of a cesspool from precisely sized components is carried out extremely quickly. The only drawback: the volume parameters specified by the manufacturer. But they produce a factory product mainly with the average consumer in mind. That is, finding the necessary kit is not difficult at all.

There are many ways and methods to make a cesspool. From the variety of options, it remains to choose the optimal type of design that meets your needs. Which costs are more important, what is best to save on, is up to the owner and contractor to choose, and knowledge of the design differences will help make the right decision.
To connect plumbing fixtures to the water supply network, a flexible water supply is used. It is in demand when connecting faucets, showers, toilets and other water intake points, and significantly simplifies the installation process. Flexible liner is also used during installation gas equipment. It differs from similar water devices in its manufacturing technology and special safety requirements.
Characteristics and types
The flexible hose for connecting plumbing is a hose of different lengths made of non-toxic synthetic rubber. Thanks to the elasticity and softness of the material, it easily takes the desired position and allows installation in hard to reach places. For guard flexible hose The upper reinforcing layer is designed in the form of a braid, which is made from the following materials:
- Aluminum. Such models can withstand no more than +80 °C and retain functionality for 3 years. At high humidity, aluminum braiding is prone to rust.
- Of stainless steel. Thanks to this reinforcing layer, the service life of the flexible water line is at least 10 years, and the maximum temperature of the transported medium is +95 °C.
- Nylon. This braid is used for the manufacture of reinforced models that can withstand temperatures up to +110 °C and are designed for intensive use for 15 years.
The fasteners used are nut-nut and nut-fitting pairs, which are made of brass or of stainless steel. Devices with different permissible temperatures differ in the color of the braid. Blue ones are used for connecting to a pipeline with cold water, and red ones for connecting to hot water.
When choosing a water line, you need to pay attention to its elasticity, reliability of fasteners and purpose. It is also mandatory to have a certificate that prevents the rubber from releasing toxic components during operation.
Features of gas connections
When connecting gas stoves, water heaters and other types of equipment, flexible hoses are also used. Unlike water models, they are yellow and are not tested for environmental safety. For fixation, end steel or aluminum reinforcement is used. Distinguish the following types accessories for connecting gas appliances:
- PVC hoses reinforced with polyester thread;
- made of synthetic rubber with stainless steel braid;
- bellows, made in the form of a corrugated stainless steel tube.

Santekhkomplekt holding offers engineering equipment, fittings, plumbing and devices for connecting it to communications. The assortment is represented by products and materials from famous foreign and domestic producers. Discounts apply for bulk purchases, and product quality is confirmed by standard certificates. For information support and assistance, each client is assigned a personal manager. The ability to arrange delivery within Moscow and to other regions of the Russian Federation allows you to quickly receive the purchased goods without unnecessary hassle.
Drainage is a drainage and drainage measure to remove excess groundwater.
If water does not leave the site for a long time, the soil becomes gleyed, if shrubs and trees quickly disappear (get wet), you need to urgently take action and drain the site.

Causes of soil waterlogging
There are several reasons for soil waterlogging:
- clay heavy soil structure with poor water permeability;
- aquifer in the form of gray-green and red-brown clays is located close to the surface;
- high groundwater table;
- technogenic factors (construction of roads, pipelines, various objects) that interfere with natural drainage;
- disruption of the water balance by the construction of irrigation systems;
- The landscape area is located in a lowland, ravine, or hollow. In this case, precipitation and the influx of water from higher places play a big role.
What are the consequences of excess moisture in the soil?
You can see the results of this phenomenon yourself - trees and shrubs die. Why is this happening?
- the oxygen content in the soil decreases and the carbon dioxide content increases, which leads to disruption of air exchange processes, water regime and nutritional regime in the soil;
- oxygen starvation of the root-forming layer occurs, which leads to the death of plant roots;
- the supply of macro and microelements by plants (nitrogen, phosphorus, potassium, etc.) is disrupted, because excess water washes out mobile forms of elements from the soil, and they become unavailable for absorption;
- intensive breakdown of proteins occurs and, accordingly, the processes of decay are activated.
Plants can tell you at what level groundwater lies
Take a close look at the flora of your area. The species inhabiting it will tell you at what depth the ground water layers are located:
- perched water - it is best to dig a reservoir in this place;
- at a depth of up to 0.5 m - marigold, horsetails, varieties of sedges grow - bladderwrack, holly, foxweed, Langsdorff's reed;
- at a depth of 0.5 m to 1 m - meadowsweet, canary grass, ;
- from 1 m to 1.5 m – favorable conditions for meadow fescue, bluegrass, mouse pea, china;
- from 1.5 m - wheatgrass, clover, wormwood, plantain.
What is important to know when planning site drainage
Each group of plants has its own moisture needs:
- at a groundwater depth of 0.5 to 1 m they can grow on raised beds vegetables and annual flowers;
- water depth up to 1.5 m is well tolerated vegetable crops, cereals, annuals and perennials (flowers), ornamental and fruit and berry bushes, trees on a dwarf rootstock;
- if the groundwater is more than 2 m deep, fruit trees can be grown;
- The optimal depth of groundwater for agriculture is from 3.5 m.
Is site drainage necessary?
Record your observations for at least some time. You yourself can understand how much drainage is needed.
Maybe it makes sense to simply redirect melt and sediment water along the bypass channel, rather than allowing it to flow through your site?
Perhaps it is necessary to design and equip a storm drain and improve the composition of the soil and this will be enough?
Or is it worth doing drainage system only for fruit and ornamental trees?
A specialist will give you the exact answer, and we strongly recommend calling him. But after reading this article, you will gain some awareness on this issue.
Upon completion of technological and production tasks related to the arrangement sewer system V apartment building, industrial building, as well as in private households, it is required to test the involved system using the forced flow method. This task is used to identify possible defects or incorrect installation of the entire involved sewer part and a system testing report internal sewerage and drains will be material evidence of the work on acceptance of the object.

A visual inspection should be accompanied by inclusion in the test report of internal sewerage and drainage systems according to SNIP, which is currently represented by the current regulations of the “D” series appendix, which corresponds to SP 73.13330.2012 “Internal sanitary systems of a building”, recently a new one has been applied updated working edition according to SNiP 3.05.01-85.