Device wooden floor on joists on a concrete base - a common way to create a warm, well-ventilated structure that can serve fine coating when using tongue and groove boards or be an excellent basis for finishing facing material. At the stage of manufacturing such a floor, the question arises: what is the best way to attach the joists to concrete floor? This is what we will discuss in today’s material.
Despite the fact that the advantages of creating a flooring with joists rigidly fixed to the base are obvious, there are opponents of this method who claim that in this way the integrity and sound insulation of the room can be damaged due to the formation of acoustic bridges in the places where the fasteners are installed.
If the screed is destroyed during drilling, then this indicates its poor quality and should serve as a signal to dismantle it completely and fill in a new one. A high-quality screed does not change its integrity when holes are drilled in it using a drill.

Regarding sound insulation: a rigid structure transmits sound waves, but if you consider that between the lags insulation material, which dampens the sound, then this statement can be considered controversial. In addition, concrete is much denser than wood, and therefore the sound that is transmitted through the acoustic bridge to the concrete base will not reach the neighbors below.
One of the nuances wooden flooring along the joists there is the possibility of a squeak that can be heard even by the neighbors below. This occurs when structural elements (beams, joists and fasteners) are displaced relative to each other. By rigidly fixing the joist to the concrete base, these troubles can be avoided.

Important! If the logs are not firmly fixed, and their humidity stated by the seller does not correspond to reality, then soon, due to the process of warping of the wood, the floor structure will begin to deform and shift.
Proponents of abandoning rigid fastening of joists prefer floating floor designs, when the flooring is not fixed to the supporting structures. In this case, it is necessary to approach the choice of lag material very carefully. The stability of the floating structure will be ensured by the special fastening of the beams to each other - in the form of a lattice, into the voids of which insulating material is placed.

- The process of creating high-quality flooring on joists depends on the correctly selected material. Wood is the most preferred coniferous species, since it resists moisture better, contains natural antiseptics, and is therefore resistant to the formation of fungus, and is also a durable type of wood.
- The moisture content of the timber should not be higher than 18%. Before laying, the timber must undergo an acclimatization period of several days and get used to the microclimatic conditions in the room where it will be used. If during these days some joists begin to show signs of warping, they will be rejected and not used in the floor structure.
- Before laying, logs are treated with an antiseptic and fire retardant. It is better to do this before installation, because it is more convenient to process the entire product.
- It is important to pay attention to the choice of direction for laying the joists relative to sun rays– the beams are laid crosswise to ensure their uniform heating. Where the strength of the flooring is important (in rooms with high traffic), the logs are placed across the movement.
- The distance between the lags is selected in accordance with the thickness of the rough flooring. The larger it is, the greater the distance between the logs (40 - 50 cm). The distance from the wall to the beam should be 2 - 3 cm.

Materials and tools
The work of laying floors on joists does not require specialized equipment and tools. You will need to prepare:
- Hammer drill.
- Screwdrivers or screwdriver, hammer.
- Measuring tools - tape measure, level, pencil.
- Fasteners, depending on the method of fastening.
- Wood processing during work is carried out using a plane, hacksaw or circular saw.
You will need to purchase waterproofing material taking into account the overlap on the walls around the perimeter of the room by no less than 15 - 20 cm.

- You should not take to heart the assurances of lumber sellers that the more expensive and higher the grade of wood, the more reliable and durable the logs made from it will be. For flooring, you can get by with spruce, fir or pine.
- You can safely purchase wood of grades B and BC, provided that its humidity does not exceed 18%. External minor defects and shade of the material can be ignored.
- The main condition is the absence of traces of insect pests (bark beetles) and mold on the surface of the wood - even a minimal amount of it should be a signal to refuse to purchase wood from this batch.
- The cross-section of the beam is selected in accordance with the selected thickness of the flooring and the upcoming loads.

Mounting methods
There are several most common ways to attach joists to concrete. Each of them has its own characteristics.
Fastening joists using self-tapping screws
Although this method of fixing lags is the simplest, it is not suitable in every case. The process is simple:
- A hole is drilled in the concrete base for a plastic dowel.
- A hole for a self-tapping screw is also drilled in the wooden element.
- The dowel is placed in concrete hole, driving with a hammer, and fix the lag, immersing the head of the screw into the body of the wood a few millimeters.

The step taken when attaching the logs in this way is at least 50 cm.
Table 1. Installation of a wooden floor with fastening joists to self-tapping screws
| Illustration | Description |
|---|---|
 | Obvious defects on concrete surface sealed using mortar or foam. |
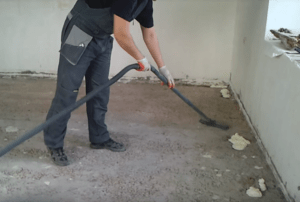 | The concrete base is dusted off and debris from this surface is removed using a vacuum cleaner. |
 | The floor is primed with a solution with antiseptic additives. |
 | The logs are pre-treated with antiseptics and fire retardants. |
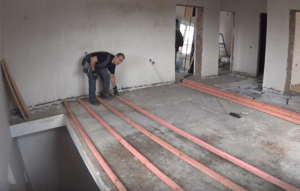 | The logs are laid in increments of 50 cm. |
 | Plastic wedges are placed under the joist and with their help the element is adjusted to the desired height. |
 | The height of the logs is controlled using construction corner or tape measure and laser level. |
 | Drill a hole for the self-tapping screw. |
 | Screw in the self-tapping screw. |
 | The wedges must be fixed in the specified position using foam. |
 | |
 | Lay a layer of vapor barrier. |
 | The OSB boards are fixed. |
Fastening joists using anchor bolts
Fixing lags using anchors is a durable and reliable method. Additional rigidity of the structure is provided by attracting the timber to the surface of the base.

An anchor is a more powerful fastener than a dowel; it can withstand high loads. When installing such a floor, you can rest assured that it is securely fixed to the concrete base. According to the technology of work, fastening timber to anchors is similar to fixing it to self-tapping screws. First, holes of the required diameter are drilled in the base and joists. A hole is made in the wood so that the head of the bolt can be hidden.
The number of fasteners is calculated taking into account the fact that an average of 4 anchors are required to fix one beam. The bolt into the locking element, inserted into the hole in the concrete, is driven through the wood. The length of anchor bolts varies from 45 to 200 mm. When choosing it, 6 cm is added to the thickness of the beam for penetration into concrete. The recommended diameter of the anchor bolt is 10 mm.

The popularity of anchor fastening is due to more rigid fixation wooden structure. With the help of this fastener, you can count on restraining the wood before the deformation process if it has not been sufficiently dried.
Table 2. Anchor installation
| Illustration | Description |
|---|---|
 | After the anchors are driven into the concrete base, using a 13mm wrench you will need to tighten each anchor nut to secure it more securely. However, you should not use too much force to avoid stripping the thread. |
 | After this, a lower nut is screwed onto each anchor and a washer is installed on which the log itself will be laid. The nut is installed with the reverse side and screwed in, guided by the markings on the wall. |
 | A puck is placed on top. |
 | A hole is drilled in the joists for the anchor head and under its body, taking into account the spacing of the anchors. |
 | The logs are attached to the anchors. |
 | Screw in the top fixing cap of the anchor. |
 | The nut is tightened in accordance with the level value. |
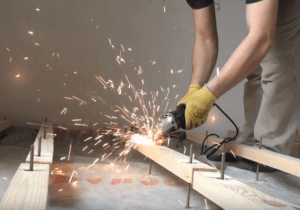 | Excess fasteners are cut off using a grinder. |
 | Insulation is laid in the space between the joists. |
 | Sheets of plywood are fixed to the joists. |
Attaching joists using corners
If the height of the logs exceeds 10 cm, then they are used for fastening metal corners. The corner shelf is secured to the concrete base using dowel nails, and to the joist - with self-tapping screws. IN in this case the corner is used to fix the position of the wooden element, and the load is distributed on the spacers.

Table 3. Installation of logs
| Illustration | Description |
|---|---|
 | Before attaching the corner to the joist, drill a hole for the self-tapping screw. To ensure a strong connection, the self-tapping screw is immersed into the wood at an angle. |
 | A hole is drilled in the concrete floor for the dowel. |
 | The dowel is immersed in the hole and the self-tapping screw is screwed in. |
 | A timber is inserted under the logs, which will allow the logs to be fixed to required height and ensure ventilation of the structure. |
 | The bars are also fixed to the floor using corners. |
 | Wooden flooring is made from tongue and groove boards. |
 | To fix the board at an angle, drill a hole for a self-tapping screw. |
 | The board is fixed using a self-tapping screw inserted into the groove at an angle of 45 degrees. |
Adjustable joists
The adjustable joist system is the most in a simple way installation of a level boardwalk in a room with a concrete base that has a significant difference in height. The anchors in this design are replaced with plastic posts, which are attached to the concrete using dowels. The convenience of using plastic racks is that you can adjust their height and the level of the logs using special rotating bolts. Excess posts protruding above the surface of the joists after adjustment are cut off.

Modern manufacturers offer universal racks, which make it possible to produce a perfectly smooth board covering in a room with big difference heights, regardless of the cross-section of the beams. Installation proceeds as follows. The supports are installed on a concrete base.

Lay the logs and, focusing on the level, set the horizontal plane, adjusting the location of the beams using special mechanism racks

Universal racks are equipped with an automatic tilt angle correction system up to 5%.

The boards are fixed using clips and screws.

Video - How to lay a floor using adjustable joists
At one time, timber was one of the most popular building materials used in construction. However, in Lately it began to be accepted more often as auxiliary element, combining with the latest developments or other mounting systems.
That is why the question of how to fix the beam with your own hands on different surface, very popular among novice builders.
Types of installation
At this point in time, there is a mass of different fastening materials, thanks to which any connection can be made various elements. They all differ in their technical characteristics and scope of application. At the same time, the installation instructions clearly regulate their use when working with timber.

Corner
In such cases, the timber is mounted into the wall during its manufacture:
- To do this, the material is first treated with moisture-proof impregnation, which not only protects it, but also increases adhesion.
- Next, it is installed on the masonry in the place where installation is planned.
- Then they continue to build the wall taking into account the walled up material.

It is worth noting that this method is also suitable for fastening timber to concrete. In this case, it is used as an additional reinforcing element. If the design of the house assumes that the walls will be built from slabs, then a concrete belt is created to organize the ceiling and install the timber.

Roof
Considering that the lags are fastened to the wall of a house made of timber by connecting them using a carved lock and bracket, many builders make the mistake that it is also possible to organize a connection on the roof. However this design involves a completely different approach, since it has its own operating conditions.
First of all, it should be noted that the type of connection of all roof elements must be developed in accordance with the project. They must withstand heavy loads and be strong enough. Therefore, to fix them, not only nails and locks are used, but also staples.

Typical fastening of rafters to ridge beam is performed by installing them at an angle of 45 degrees and connecting them using a fastener. Quite often, when creating a roof, bolted systems are used, which can provide increased reliability and quality of all components. However, even when using them, it is better to strengthen the structure with brackets.

Currently, there are a lot of different mounting elements for implementing all kinds of projects. similar designs. They are sold as finished products, and their price is quite affordable even for people with low income.
Advice!
When making a roof, you should not make changes to the project yourself.
This can lead to weakening of the structure and shortening its service life.

Suspension
Quite often, when finishing a room, it becomes necessary to secure the timber at a short distance from the ceiling. This may be due to various constructive solutions or with decorative elements.
Carry out such fastening of the beam to concrete ceiling possible using special hangers. They are purchased in specialized stores in accordance with the weight of the material they will need to carry.

The suspension is fixed to the ceiling using impact dowels, and special fasteners are mounted on the beam. Next, both elements are connected and as a result the necessary connection is obtained. The height of the material is regulated by a suspension system, which allows fixation at the required level.
It is believed that this installation method is not reliable, but in practice it turns out that it can withstand significant loads. However, if this material If used only as decoration, you can attach an imitation beam to the wall, which will create the desired effect without the risk of it falling on your head.
Such elements have their own fixation systems, which are designed for a specific product. They are usually supplied along with the material itself.
Advice!
If it is possible to avoid this installation method, then you should use it.
Usually, builders simply wall such beams into the wall, and install hangers for reinforcement or beauty.

Conclusion
In the video presented in this article you will find Additional information on this topic. Also, based on the text presented above, we can conclude that there are a lot of different principles. Moreover, they all have their own characteristic area of application, features and strength.
Floor on joists is a commonly used design, both in wooden houses, and in apartments. The advantages are undoubted: such a device allows you to use different materials for rough flooring, insulation and sound insulation. They can be used to level any base and carry any kind of material under the floor. engineering Communication. The option is simple to implement, affordable, and the result is a structure that creates minimal load on the foundation or floor slabs.
When installing such a floor on a concrete base, the question inevitably arises about how to connect such different physical properties materials. One more no less interesting topic, which is discussed on construction forums - is it necessary to attach the joists to the floor at all?
Opponents of fastening argue that such a procedure can destroy the screed; moreover, at the junction of the joists and the base, sound insulation is disrupted and so-called sound transmission bridges arise, and the neighbors below will definitely not like this. But supporters of rigid fixation cite examples from their practice when the deformation of wooden beams negated all efforts to repair the floor.
How is it really going? As for destroying the screed, doing this with a drill by drilling holes in the concrete will not work if the screed is strong enough. A solid foundation- one of mandatory conditions, without which they will not begin to repair the floor. The old screed, if it has already begun to fall apart, must be removed.
Regarding the violation of sound insulation, the issue is controversial. Yes, indeed, rigid structures are capable of transmitting sound, but is everything so bad? A layer of insulation is placed in the cells between the joists, which has soundproofing properties.
A shock-absorbing pad is placed under the joist supports, which also prevents the propagation of sound waves. The sound transmission bridge formed at the fastening site transmits vibrations into concrete, and this material is quite dense and does not conduct sound as well as, for example, wood. Therefore, the neighbors below are unlikely to notice the difference in noise levels before and after the renovation.
A floor on joists is a structure consisting of many elements: beams, fastening devices, rough flooring. All these parts, moving relative to each other, will emit a constant squeak, which is much worse and the neighbors will no longer like it. One way to avoid unpleasant squeaking is to firmly attach the joists to the floor.
Another argument in favor of fastening is fixing the lag. It is impossible to check the degree of drying of the wood by eye, so you have to trust the seller. Insufficiently dry beams can bend and twist after some time, and this will lead to shifts in the coating, so that the entire complex device will be skewed.
Those who are still wary can opt for a traditional floating floor, that is, a system in which the flooring does not have a rigid connection with load-bearing structures. This guarantees excellent sound insulation, but requires well-dried logs that will definitely not fade over time.
The rigidity of the floating floor is provided by beams securely fastened to each other, forming a lattice. Insulation is placed in its cells, and a rough flooring is attached on top, so that the entire structure is pressed to the floor by its own weight. If everything is done correctly, then such a floor will not deform over time and will last a long time.
However, most often the joists are still attached to the floor: there are more positive aspects than possible disadvantages.
Work order
- The main thing on which the success of the repair will depend is quality materials. Coniferous wood with a moisture content of no more than 18% is suitable for logs. The purchased beams need to be brought home and allowed to lie in the room for several days so that the material gets used to the microclimate of the room. Those logs that began to bend in the heat should be discarded. By the way, all wooden elements of the future floor must be treated with an antiseptic so that they do not become moldy and insects do not infest them. Processing will also be required special compounds, reducing flammability.
- You need to prepare the floor: remove all debris, smooth out cracks, knock down obvious protrusions. Necessarily applying waterproofing, since the tree needs to be protected from moisture. For this purpose, hydrophobic mastics, penetrating compounds, roll materials and even thick film.
- You will need to stock up on tools, fasteners and supports to raise the logs. Substrates must be rigid and not sag over time to prevent play from occurring at the support points. Thin planks and pieces of plywood will do, and you can buy special plastic backings at hardware stores.
- The logs are laid perpendicular to the sunlight falling through the window. Wood is subject to temperature deformation, and with this installation, each lag will be heated evenly. In rooms where there is a certain direction of movement, for example, a hallway, the logs are laid across it. This will make the floor more durable.
- Location step beams depends on the thickness rough coating. The thicker and stronger the sheets, the less often logs can be laid. Usually this distance is 40-50 cm. In this case, the outer bars are placed 2-3 cm from the wall, and the rest - depending on the width of the room.
- When the entire sheathing is assembled, it is placed in a horizontal plane. Perfect option– the presence of a flat base, some particularly diligent craftsmen even perform thin cement-sand screed. Of course, if the height difference allows. However, joists are good because they allow you to level even the most imperfect floor, so you can do without a screed. In those places where the beam needs to be raised, substrates are laid under it until the level shows the presence of a plane.
- Under all supports it is necessary to put a gasket - a piece of roofing material, linoleum or polyethylene foam. It will act as a shock absorber and also provide additional waterproofing to the tree. Under no circumstances should gaskets be made from soft material! Over time, it will sag under the load, which will lead to the appearance of play, and as a result, to creaking and other friction sounds of structural elements.
Now that the joist system is completely ready, all that remains is to attach them to the floor. The actual fastening is carried out in three ways: dowels + self-tapping screws, anchors and galvanized corners with self-tapping screws. Which one to choose is a matter of budget and personal preferences of the developer, since each method has its own characteristics.
Video - How to lay joists
Fastening the joists with self-tapping screws
Perhaps the simplest and cheap option, allowing to achieve excellent result. The beams are drilled through holes, and through them they are made symmetrical at the base. A plastic dowel is inserted there and a self-tapping screw is screwed in. Step – 40-80 cm depending on the situation.
The length of the screw depends on the thickness of the timber and should allow it to go 5-6 cm into the base. By the way, some craftsmen recommend self-tapping screws with a neck, that is, those in which the thread does not reach the head. This will allow the joist to be better pulled to the floor.
Fastening joists with anchors
Anchors guarantee reliability and durability of fastening. Their main advantage in this case is that they not only hold the beam in place, but also attract it to the floor, giving the structure additional rigidity.
Essentially, an anchor is the same dowel, but more powerful. Its advantage is resistance to tearing, so it is used when installing heavy structures that create a high load on the fasteners. A floor laid on joists will most likely not have such situations when its entire complex design will be completely torn off from the concrete surface, so you can limit yourself to self-tapping screws, but the use of anchors is a very common practice.
Fastening is carried out in the same way as in the previous case. Holes are drilled in the joists, which are then duplicated on the concrete base. The joists additionally need to be countersinked to hide the bolt head without damaging the wood.
As a rule, on a room scale, 3-4 anchors are enough to secure one joist. The locking part of the anchor is inserted into the holes in the floor, and the bolt itself is screwed into it through the beam.
The length of anchor bolts can be very different, from 45 to 200 mm. You need to buy those that will be buried in the base, stitching through the lag, by 6 cm. The recommended diameter is 10 mm.
Galvanized metal angles are another option for attaching wood beams to a concrete floor. To do this, one side of the corner is connected to the beam by screwing a self-tapping screw into the wood. The depth is 3-4 cm, and it is recommended to do it at an angle to increase strength.
The remaining side of the corner should rest on the floor. It is fixed on this base using the methods already described above: with dowels or anchors. As an option, you can use not corners, but a U-shaped profile.
An adjustable system costs more, but is easier to use and will make it easier to achieve horizontality. Here, instead of anchors, plastic posts are used, screwed into wood and attached to the base with dowels. The height can be adjusted by rotating special bolts, the protruding part of which is cut off after the adjustment is completed.
So, you will have to decide for yourself whether to attach the logs to the floor or not. This definitely should not be done in wooden houses, but as for rooms with a concrete base, fastening will not hurt. The technology is simple and accessible to everyone; the main thing in such work is to choose high-quality materials and strictly follow all the rules. Then none of the structural elements will become loose over time, and the floor on the joists will be reliable and durable.
Video - Attaching joists to a concrete floor
During construction or repair work Quite often it becomes necessary to attach wooden beam to the wall of the house. If you need to create a frame for facing material, install any element of furniture or household appliances, remodel walls or build an extension, in any of these cases you will need to attach a wooden beam to the wall.
From correct installation wooden blocks largely determine the further performance of the work and the reliability of the structure. First of all, you should select the installation method and the necessary fasteners.
As a rule, for the construction and finishing of walls the following is used:
- ·concrete;
- ·brick;
- ·tree;
- · aerated concrete blocks;
- · drywall.

Once you have established what material the wooden blocks will need to be installed on, you can decide on the choice of fasteners. Its quantity can be calculated based on the following standards: when the cross-section of the slats is from 2.5 to 4 cm, the distance between the fastening elements should be up to 60 cm; on a beam with a cross-section from 4 to 6 cm, they are placed at a distance of 70-80 cm from each other.
What will we talk about:
Installation of timber to a concrete base
To secure wooden slats to a concrete base, you will need to perform the following steps. First, prepare the timber by drilling holes in it for fasteners. Next, drill holes in the wall at the same distance. For more accurate markings, you can apply already drilled timber and mark the existing holes.

Drilling of concrete is carried out with a Pobedit drill or a diamond-coated drill. It is better to use a drill with a hammer drill function. When drilling a hole, the drill that gets too hot is dipped into water for a while and cooled.
Next, wooden chops are hammered into the wall, a beam is applied and a nail is driven through it into each chop. On next photo you can see what the mount looks like concrete base. You can also attach wooden slats to concrete using anchors (pictured below).

How to fix beams on brick
If the wall of the house is made of brick, you should use a slightly different installation technology. To do this, drill holes at a distance along the block with a wood drill, then change the drill to a pobedite one. By attaching the strip to the wall, through drilled holes We carry out the markings by drilling into the brick.
Then we remove the block and drill holes of the required depth and width in the brick wall. It is recommended to keep the drill straight and not loosen it, otherwise you may crumble the brick. You can attach the beam to a brick wall using dowels and self-tapping screws. You can also use anchors for a brick wall.
Features of installing wooden slats to aerated concrete
Recently, aerated concrete blocks have been used quite often for the construction of houses and other buildings. They are easy to process, so building construction is much faster. However, the specific softness of aerated concrete is associated with the peculiarities of installing beams on its surface.

First of all, the choice of fastening elements will depend on the magnitude of the future load on the beam. If the structure will not be loaded with a large weight, self-tapping screws or wedge-shaped bolts can be screwed into the aerated concrete blocks. Full length threaded screws can also be used for this purpose.
To ensure that the structure can withstand sufficiently large loads, steel or plastic dowels are used.
When choosing fasteners, you should also take into account the fact that aerated concrete blocks can have a destructive effect on the metal over time. Therefore, before purchasing, it is advisable to consult with the seller and find out all the possible risks.
Installation of slats to the wall of a wooden house
Quite often, when constructing walls, glued or profiled timber is also used. How to attach the beam to the wall timber house? Most often, perforated fasteners are used to connect wooden surfaces. They can be secured to the surface of the block and the wall using nails, self-tapping screws or self-tapping screws. Perforated fasteners are available various types. To secure elements located in the same plane, plates are used; if fastening needs to be done in different planes, angles are used.
If there will not be much pressure on the structure, you can use mounting tape. Using nails for fastening wooden elements you should stick to a few simple rules. If you have to hammer nails in hard to reach places, a bolt with a nut on the end should be used. It is also necessary to choose the correct length of nails.
To make the structure more stable, the nails are driven at a distance at a certain angle to one another. If the slats are made of wood different high density, while driving, hold the middle of the nail with pliers. Pre-drilling the holes will make it easier to drive large nails.

How to properly attach bars to drywall
If the slats need to be attached to a wall finished with plasterboard, installation is performed as follows. Due to the certain fragility of the material, the use of nails and screws is not recommended. As a rule, nylon or metal anchors are chosen to securely fix the bars to drywall. They are screwed into the sheet and secured with a self-tapping screw.
This is the easiest way. Drop-down anchors can provide a more stable fastening. Their special design provides additional support with reverse side. These anchors are inserted into the holes and tightened with a screwdriver until they are completely folded.
You can also use regular plastic dowels. To do this, drill a hole, insert a dowel, and secure the beam with a self-tapping screw. A rolled dowel can provide support on the back side of the sheet.
Find out in detail how you can attach the timber to the wall in the video below. As you can see from the video, there are enough a large number of ways to securely fasten a wooden structure.
Attaching timber to a wall is not a simple matter. Timber has always been popular in the construction of private houses. Nowadays, they are increasingly appearing Construction Materials with new properties, technologies are developing. The combination of timber with new building materials and installation systems sometimes raises questions - how will it be technically correct to attach timber to different surfaces?
Fastening material is required for fastening. Today there are many types of fasteners for any connection of elements. Their differences are the scope and specifications, which regulate permissible load on the fastening element and fastening technology.
Corner fasteners made of metal have holes for fastening with screws, nails or dowels. Metals for corners are used that are not subject to oxidation and are quite durable. The safety margin of the corner must be taken to be at least 2, that is, the corner must withstand a weight twice as large as the weight of the element that will rest on it. At the same time, you also need to take into account and calculate which structures will rest on this beam.

Wooden beams are attached to walls for different purposes - to strengthen hanging furniture on these walls, bookshelves or decorative elements interior, as well as household appliances. When installing door frames, for cladding outside and inside, for installing a canopy over front door or a canopy for a veranda, you also need to attach the timber to the walls. The main thing is that you first need to decide on the material of this wall, and approach aerated concrete blocks, plasterboard cladding and a brick wall, of course, will have to be completely different.

The choice of fastening method depends on the wall material and the features of the structure being created. Of course, in the context of aerated concrete, we are not talking about attaching purlins made of timber to walls made of cellular concrete or ceramic blocks; this is impossible without installing an armored belt or structures that reinforce the support, but only about attaching bars, for example, for sheathing under plasterboard.

Also, we are not talking about attaching timber to brick and concrete walls for the construction of floors or floors with logs made of timber, since in these structures the timber and its fastening must bear significant loads. The design of fastening the timber in this case is installation into the wall during the process of laying or concreting, or resting on an armored belt.

The end of the beam is additionally impregnated with a fire-biosacite composition before embedding or laying in the wall and protected with a layer waterproofing material. Antiseptics on oil bases It is not recommended to use them because they impede the evaporation of moisture. ends wooden beams cut at 70 degrees so that the moisture evaporates better. The gap between the niche wall and the beam is required; thermal insulation is placed in it, since the beam rests on the outer wall.

When laying timber beams on an armored belt, they are secured with special anchor plates coated with an anti-corrosion compound.
Angle fasteners are used to fasten timber to concrete and brick structures. A reliable and durable connection is possible when using high-quality metal corners that can withstand the load.
- Before installing the corner elements, mark the position and contours of the beam on the surface using measuring tools. You can use a regular plumb line and building level, But laser level will allow you to quickly make markings both vertically and horizontally at the same time.
- Then the corner elements are fixed with dowels, self-tapping screws, and nails are used for lighter structures. The screws are not fully tightened so that the position of the element can be slightly adjusted.
- The timber is inserted into the corners and attached to them with self-tapping screws, then the fastenings of the corners to the wall are tightened completely. The corner is clamped with fasteners, if necessary, adjusting its position exactly according to the markings.
Fastening timber to concrete and brick walls
You should drill the brick carefully, strictly at a right angle, without “losing” the drill, so as not to split the brick. Splitting can cause the brick to fall off. if a brick gets into the cavity, you will have to use an anchor-type dowel, which, when screwed into the wall, forms a knot, or a spacer dowel. Tighten the dowel carefully. Mechanical anchors for fastening wooden beams to brick walls much better than self-tapping screws and nails, both technologically and in terms of fastening strength.

For concrete, you need a drill with a hammer drill function and durable plastic dowels for self-tapping screws; sometimes, before driving a plastic dowel into the wall, it is additionally lubricated with glue.

Attaching timber to a wooden wall
Perforated fasteners of angle type or flat are used. Fasteners vary in size, metal thickness and coating. Nails, self-tapping screws and screws are used. For larger nails, pre-drill holes, especially when working with seasoned wood.

Fastening to aerated concrete and plasterboard walls
Aerated concrete blocks are a soft material; screws with full-length threads are suitable for them, but it is better to use anchors, mechanical or chemical. To properly install an anchor with bending ribs or a wedge-shaped one, pre-drill a hole with a diameter slightly larger than the anchor. One type of anchor is excellent for hollow blocks and blocks of cellular concrete- foam blocks, gas blocks, etc. The main “parts” of the anchor are a steel sleeve with ribs and a nut at the end. When the screw is screwed into the sleeve, the ribs bend and move apart, forming a “butterfly” that securely holds the anchor inside the material.


Chemical anchors hold even stronger, they are suitable for everyone wall materials from lightweight concrete and for plasterboard, and for any wall materials. The principle of operation is the ability of synthetic resins to penetrate deeply into pores and adhere to the base. The weak link of fastening to porous blocks and drywall is not the fastener, but the base material, especially under the action of a vertical load, and chemical anchors help solve these problems. A chemical anchor is inserted using a special gun. The adhesive mass is squeezed into the drilled hole under pressure, and a fastening element is immediately inserted - a threaded pin or rod. Adhesive composition fills the pores of aerated concrete or other porous block, and after hardening forms a durable and reliable fastening. The pullout force of a chemical anchor from a brick is more than 500 kg. Service time chemical anchors- for decades, they do not deform due to temperature changes, and are inert to aggressive environments. The latter is very important when working with aerated concrete, which is aggressive to metals. All fasteners for aerated concrete must have an anti-corrosion coating.


For attaching a block to aerated concrete or plasterboard, the anchor method of fastening is the most durable, although costly. It all depends on the density (grade) of aerated concrete and the required load. To fasten the sheathing, it may be sufficient to use mechanical anchors - wedge-shaped or "spiral nails" type. The latter are convenient because they are mounted into a wall made of aerated concrete, driven in with an ordinary hammer. When driven, the spiral nail is screwed into the block without disturbing its porous structure.
The dowel, similar in working position to the spokes of a half-opened umbrella, is worn pet name Molly is great for attaching wooden blocks to plasterboard partitions in order to secure pictures, light shelves or lamps on them. Molly is a type of expansion anchor bolt that has a sleeve with longitudinal slots, which, when the thread of the inserted screw is tightened all the way, folds and turns into an umbrella. Load bearing capacity excellent, but this mount has drawbacks - it can only be removed by breaking out part of the partition. In addition, it is impossible to work with Molly in tight spaces.

Fastening timber in roof structures
Logs made of timber are secured with a locking connection and brackets, but for a roof such a connection is unacceptable, since the roof is used in completely different conditions. All roof elements ( rafter system) are installed according to the design and calculations, and they are secured with special elements and bolt systems, sometimes additionally reinforced with brackets.

Fastening the timber to the suspension
In interiors, decorative elements are sometimes used that require the beam to be fixed to the ceiling on a free suspension or to imitate such a suspension. Sometimes beam suspension is needed for structural reasons. This type of fastening is performed using a special suspension designed for a certain load. A suspension system of this type can have additional opportunity adjust the height of the beam suspension.

The suspensions are attached to the ceiling with dowels, and the second part of the fastening is installed on the beam, then the elements are connected. Practice shows that such fastenings, contrary to expectations, can withstand considerable loads. But it’s still better not to have such a risk factor over your head, and for the design, imitate a suspension, and attach the beam securely to the wall. Suspension system in this case, they are installed to strengthen the fastening, and for design purposes, “for beauty.”
