Constant moisture and dynamic loads sooner or later lead to the fact that wooden floor coverings, common during initial commissioning, country houses, begin to rot, creak and sag.
A quality alternative flooring is concrete. Installation concrete base involves the complete removal of the existing floor. Wood fragments are removed; Rotten logs of the building must also be removed.
If the log beams are in good condition, they can simply be protected from moisture and covered with a layer of coarse sand or fine gravel between all gaps and on top. Replacing a wooden floor with a concrete one, if the joists are irreparably damaged, involves... Formation concrete screed should take into account the level of the floor covering.
What is needed to replace the flooring in a private home?
Replacing a floor is considered a job that you can do yourself with minimal construction skills. However, this requires the following tools:
- Tools for dismantling old flooring (boards, ceilings, wooden joists): crowbar;
- Shovel, trowel;
- The rule is building level, marking crayons and ruler;
- Coating for making a waterproofing and thermal insulation layer;
- Concrete mortar, expanded clay, sand, small crushed stone, stone or slag.
Scroll preparatory work before laying the screed will depend on the area of the covering, as well as the depth of the base under the logs. It is recommended to fill the space under the house, which will prevent the rise of moisture and the formation of dampness.
Step-by-step instruction
- Removing worn-out wooden flooring. The process includes the removal of damaged baseboards, joists (supports), and wood structures. Logs suitable for further use can be strengthened with gravel or sand and not dismantled.
- Next, you should clean the floor covering from dust and debris, and also lay it in insulating gutters. engineering Communication: cables, cords, etc.
- It is necessary to orient yourself regarding the height of the concrete floor covering. Concrete floors in wooden house should be formed according to the following scheme:
- Initial layer – stone or gravel – 10 cm;
- A layer of coarse sand (fine crushed stone) – 5 cm;
- Thermal insulation and waterproofing materials – 5 cm;
- Concrete thickness – 10 cm.
To create additional depth, it is worth removing excess soil. If the niche under the house is larger than necessary, it should be additionally filled.
- Additionally, it is necessary to place a plastic film over the sand layer. This will protect against rising moisture. Both the layer of stones and the layer of sand should be laid evenly. To do this, the material is compacted and a level is used.
- Laying concrete begins with dividing the room into strips. To do this, use slats, the upper edge of which must correspond to the stretched cords.
- In a wooden house, concrete floors should begin to be laid from the far corner. In this case, the coating is poured slightly higher than the level of the slats.
- Finally, it is necessary to level the concrete. To do this, use the 1.2 meter rule, extending it from the far corner towards you. The leveled areas are cleared of slats, and the resulting niches are filled with concrete. After completing the work on forming the floor, it is worth covering the individual strips with a special film and allowing the composition to harden. Do not forget about the need to moisten the concrete from time to time.
- After hardening, it is necessary to apply a screed. To do this, mix cement mortar with a number of strengthening and binding elements. Wooden slats are installed on the flooring. The height of the latter must correspond to the height of the final floor covering. The screed should be laid by analogy with a concrete floor: the material should be leveled according to the rule, and the guide rails should be removed. To smooth the screed completely, use a trowel. The laid screed should be left for half a day, and then lightly sprinkled with water for three days. After this, you should wait 2 to 4 weeks before starting to paint or lay a new layer of flooring. Various flaws when making screeds can be eliminated with a grater, sandpaper, and also with the help of special impregnations. If you are building a bathhouse, then look at the article
Floors from natural wood, despite the abundance of finishing materials, are still popular due to their environmental friendliness, good thermal insulation and the beauty of natural wood. When renovating, questions often arise: how to reinstall a wooden floor in an apartment, is it worth replacing it with other types of finishes? In this article, we will help you understand the intricacies of repairing a wooden floor.

How to understand that a wooden floor needs repair, partial or complete replacement? There are a number of signs indicating this:
- creaking when walking due to drying out of the joists, poor fastening of the boards to the joists;
- gaps between boards, longitudinal cracks are a consequence of wood drying out;
- subsidence of individual boards or parts of the floor due to rotting joists or damage by wood-boring insects;
- deterioration in appearance, areas of rotting on floor boards;
- unpleasant smell of rotting wood.
In addition, the floors in the apartment are re-laid when major renovation for aesthetic reasons, as well as when laying communications under the floor, when working on insulation and soundproofing of rooms.

The extent of floor repair is determined after an external inspection. If individual boards or sections of the floor have become unusable, you can limit yourself to replacing them. Creaks and cracks can also be eliminated without completely dismantling the floor.
Note! If the damage is more than 30% of the floor area, it is not practical to repair it.

Repair of wooden floors
For repair wooden floors resorted to in case of minor damage, creaking or increasing gaps between the boards.
Gaps between floorboards can be eliminated in three ways:
- foam with polyurethane foam;
- putty with wood putty;
- Seal the cracks with wedges made from wooden slats.

If the boards creak and sag when you walk, it is useless to seal the cracks with putty - it will crumble over time. In this case, you must first secure the logs and boards.

Creaking and sagging of healthy wooden floors in most cases occurs for two reasons.
- When installing the floor, unseasoned, raw wood was used. Over time, it dried out, its geometric dimensions changed and gaps appeared. As a result, the fasteners became loose and friction occurred on the wooden parts.
- The installation of the floors was carried out in violation of technology: the distance between the lags has been increased, too thin boards have been used, fasteners are located too sparsely.
There are several ways to eliminate squeaking without resorting to dismantling the floor. The simplest is to stretch the floors with screws or nails, increasing the number of points for attaching the boards to the joists. The length of the fasteners should be 2.5-3 times greater than the thickness of the floorboard.

Note! You can determine the location of the joists on the painted floor using a magnet. They are carried along the boards until the fastening nails are found under a layer of paint.

If the lags are sparsely spaced or they dry out, pulling may not be enough. In this case, it is necessary to create additional support points for the joists and boards. This can be done using mounting foam or support bolts.
Video - Eliminating squeaks using polyurethane foam
Video - Eliminating squeaking using support bolts
As a rule, after such repairs, a wooden floor is used as a base for laminate or linoleum, having previously covered it with plywood or a layer of dense insulation. Recovery decorative properties the floor must be completely removed old paint, seal the cracks, scrape the boards, and then varnish or paint them.

Replacing individual boards
Wooden floors often rot separate areas, for example, under the kitchen sink, under the window, near front door, in corners and under baseboards. In this case, you can limit yourself to replacing one or more boards.
Table 1. Replacing a fragment of a floorboard.
| Steps, photo | Description of actions |
|---|---|
| To replace a fragment of a floorboard, you must carefully cut it out and remove it. To do this on the board feather drill make several holes, then use a jigsaw to make two transverse and two longitudinal cuts, as shown in the figure. Pry up the middle fragment of the board with a nail puller, chisel or screwdriver and take it out, after which the remaining fragments are taken out. The tenon and groove of adjacent boards are cleaned of any remaining putty and paint. |
| Using a jigsaw, cut the free ends flush with the lags on both sides of the cut. The ends of the boards must be cut as evenly as possible so that the insert is invisible. |
| The support bars are attached to the joists using self-tapping screws. The width of the bars must be at least 50 mm, otherwise they may split during fastening. |
| Cutting out an insert from a board the right size. Cut off the bottom fold from the groove side and insert the tenon into the groove of the adjacent board. Gently knocking wooden hammer, put the board in place and attach it to the support bars with self-tapping screws. The cracks are covered with putty and painted to match the color of the floor. |


Note! If on bottom side The dismantled board shows traces of rot, fungus or mold, and there is a high probability of disruption of floor ventilation. In this case, it is better to completely re-lay the floor in compliance with the technology.
Prices for floor boards
floor boards
Complete replacement - how to re-lay a wooden floor
Replacing a wooden floor is not the best simple task, it consists of several stages. First of all, you need to decide on the type of wooden covering, installation technology and select high-quality material.

Types of natural wood floors
Wood floors can play a role finishing coating or bases for other finishing materials - laminate, parquet, linoleum. As a finishing wooden covering in the apartment, use a tongue-and-groove floor strip or massive board from expensive types of wood, as well as parquet. Dry is suitable for rough foundation edged board, plywood or OSB.

The choice of wood flooring and the method of laying it, based on personal preferences, depends on several factors:
- depending on the type of flooring in the apartment - concrete slabs or wooden beams;
- the need for thermal insulation and sound insulation of the floor;
- from differences in floor height and the possibility of leveling it.
Floors with joists make it possible not only to level the base and correct significant differences in height, but also to provide high-quality floor insulation. At the same time, they significantly raise the floor level - by 5-15 cm - and require additional materials. Only solid boards and parquet can be laid on a concrete base without a ventilation gap.
Table 2. Various schemes wooden floor installations.
| Name, photo | Short description |
|---|---|
| Used as decorative finishing or as a base for other coatings. Allows you to lay several layers of heat and sound insulation. Laying technology: · boards or sheets of plywood or drywall are hemmed from below to the beams; · heat and sound insulation mats are laid between the beams; · logs are laid and secured perpendicular to the beams; thermal insulation can also be laid between them; · a floorboard or plywood is attached to the joists. |
| Used as fine finishing or as a base for other finishing materials if it is impossible to level the concrete base. The laying scheme allows you to lay an additional heat and sound insulation layer. Laying technology: · on concrete floors install wooden joists; · heat and sound insulation is laid between the joists and covered with a waterproofing film; · a floor made of boards or plywood is laid along the joists. |
| Solid board is a premium finish. It can be placed directly on a concrete base using an adhesive layer. Laying technology: · the concrete base is leveled, if necessary, using a screed; · apply a waterproofing primer; · Apply a layer of glue and glue a solid board; · scrape, sand the floor and cover it with a protective compound. |
| Fine finishing, the technology is suitable for uneven concrete bases, and also allows you to lay additional thermal insulation. Laying technology: laid on a concrete base film waterproofing; · install wooden logs on adjusting bolts, attach plywood to the logs; · apply a primer, and after it dries, a layer of glue; · lay a solid board, scrape and sand it, cover it with a protective compound. |


Material selection
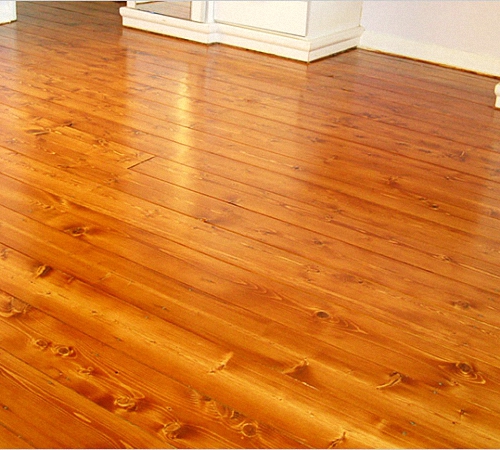
Coniferous and some boards are used as a finished wooden floor covering. hardwood: pine and spruce, larch and cedar, oak and ash, as well as exotic types of wood.


When choosing wood, you need to take into account the area of application and operating characteristics. Larch boards are moisture resistant and can be used in the kitchen, bathroom or open loggia. Pine and spruce change their geometric dimensions at high humidity, which leads to floor deformation, rot and destruction. They are used mainly in dry rooms, providing good ventilation. Solid oak and ash are recommended for use in rooms with high loads: hall, living room.

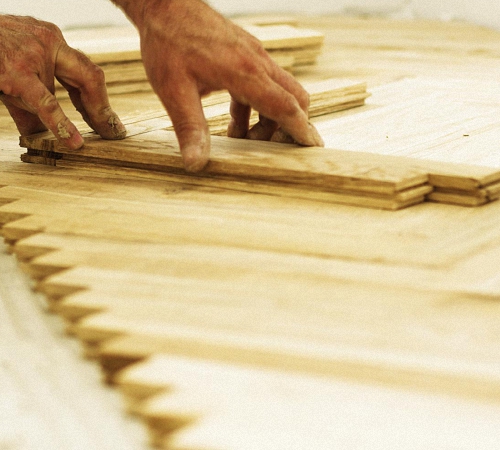
A 50 mm thick square block or a 100x50 mm board placed on its edge is used as a log. The thickness of the seam floor board must be at least 24 mm when laying logs in 50 cm increments and 36 mm in 60 cm increments.

Wood for flooring should have a moisture content of no more than 12%, which can only be achieved by forced drying. Otherwise, after one or two years the boards will dry out, creaking and cracks will appear.


Note! It's best to reinstall wood floors at the end. heating season, at this time the humidity in the apartment is minimal. The boards must be brought into the room being repaired, stacked, laying rows with slats, and left for several days to equalize their moisture content.
Removing a wooden floor
The old floor must be completely dismantled. Boards with a thickness of 40 mm or more without signs of rot or damage by insects can be used as lag.
Dismantling begins with the baseboards. If the plinth is secured with self-tapping screws, they are simply unscrewed with a screwdriver. If the baseboard is nailed to the floor, a nail puller is needed to remove it. Place its sharp side under the plinth at the location of the nail and gently press the plinth 2-3 cm. Do the same with all nails, gradually increasing the gap.

Floor boards secured with self-tapping screws can be dismantled quite simply: the fasteners are unscrewed, and the boards are removed sequentially, starting from one of the walls. Dismantling boards nailed to the nails begins from the largest gap in the floor. Place a crowbar into the gap between the boards where the joist with fasteners is located, and carefully lift its edge, pulling out the nails. Do the same with the other edge of the board. If there are no gaps in the floor, you can cut out individual fragments and pick up the boards with a crowbar.

Logs are dismantled in several cases:
- they show signs of rot or damage by insects;
- the logs are at different levels, the difference in floor height is noticeable;
- they do not correspond to the selected technology for laying the finished floor.
Note! It is better to immediately remove dismantled boards with nails from the room. It is easy to get injured by protruding nails.
Preparing the base
The concrete base must be cleaned of debris and dust using a broom and vacuum cleaner.

Significant damage, cracks and sinkholes impair the sound insulation of the floor, so it is better to repair them cement-sand mortar or polyurethane foam, after wetting it with water.

The floor is covered with a concrete primer to prevent the formation of dust. It is more convenient to do this using a sprayer. If the humidity of the concrete base is high, the room is dried for several days with a heat gun.

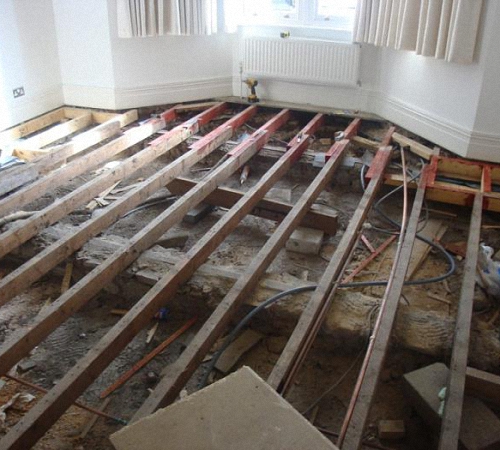
Laying lags
Before installation, it is recommended to impregnate the joists with a fire-retardant composition; this will increase the fire-fighting properties of the floor and protect it from rot and insects. Impregnation is especially relevant for ground floor apartments, where humidity is usually high.

By using laser level and markers on the walls mark the level of the finished floor. By departing from it a distance equal to the thickness of the floorboard, you get top level lag location

The logs are made in one piece, and if they are not long enough, they are spliced using boards fastened on both sides of the joint. Lay the outermost joist on the end along one of the walls, retreating 3-5 cm.

Level it using mounting wedges, focusing on the height marks.

Note! Penofol must be laid between the mounting wedges and the concrete base, as well as between the wedges and joists, to reduce impact noise.
The pitch between the logs is chosen based on the thickness of the floorboard and the width of the insulation boards; usually it is 50-60 cm. For convenience, you can make a template from a block with stops stuffed into it. Subsequent logs are laid at the selected pitch, using a bubble level at least 2 m long. For leveling, use mounting wedges, placing them in a checkerboard pattern.

TO concrete floor logs can be secured in several ways:
- by using metal corners- they are attached to the tree with self-tapping screws, to the floor - with dowel-nails;
- using concrete screws - dowels, screwed directly through the mounting wedges;


- using adjusting mounting bolts.

After attaching them to the dowels through mounting wedges, they can be foamed with mounting foam for additional fixation.

Insulation and sound insulation
For additional insulation floors use fibrous materials in the form of rolls or slabs - mineral and stone wool. Besides thermal insulation properties, they have high levels of protection against acoustic noise: music, voices, TV sounds.

Main disadvantage fibrous materials– loss of properties when wet, so a waterproofing film or penofol must be laid on top of the insulation. The film is laid in strips perpendicular to the direction of the lag with an overlap of 15-20 cm. The overlap area is additionally taped with mounting tape.

Plank flooring
Non-moisture resistant floorboards coniferous species– spruce and pine – before laying, it is advisable to impregnate the reverse side with an antiseptic. This will extend its service life and prevent the occurrence of fungus and mold.
Laying the boards begins from the window or from the wall opposite the door. The first board is placed with a tenon against the wall, leaving a gap of at least 10 mm, and when finishing the wall decorative stone or panels - at least 20-30 mm. The gap is necessary for ventilation and to compensate for the expansion of the boards when the humidity in the apartment changes.

Cut the board to the required length, place it on the joists and check the level; if necessary, adjust the height of the joists. Secure the board with 2 self-tapping screws into each joist, recessing their caps by 1-2 mm.

Each subsequent board is tapped through wooden slats close to the previous one using wedges. A bracket or stop is attached to the joist, wedges made from a piece of board cut diagonally are inserted, and gradually driving in the wedge, a minimum gap is achieved. The board is secured with self-tapping screws. Do the same with the other end of the board, after which it is attached to the central joists.

Self-tapping screws can be screwed either into the front surface of the board at a right angle or into a groove at an angle of 45 degrees - in this case the fastening is invisible.

The last board is cut to size, not forgetting to leave a ventilation gap, the tenon of the board is inserted into the groove and, tapping with a hammer through wooden plank, install it in place. Press tightly using wooden wedges and secure with self-tapping screws.

Video - Laying a wooden floor along joists
Rough coating of plywood and OSB
Installing joists under a plywood floor is practically no different from the above technology; the only point that needs to be taken into account is the step between them. It is better to choose it in such a way that sheets of plywood or OSB do not have to be adjusted and sawed again.

The sheets are attached to wood screws, recessing the cap 2-3 mm along the edge of the sheet with an interval of no more than 20 cm, as well as into all logs with an interval of no more than 30 cm.

Video - OSB flooring for decorative coating
Laying of expensive types of wood is carried out using a special technology using an adhesive layer. The process of laying solid oak boards is shown in the video.
Video - Laying solid oak boards
Decorative finishing of wooden floors
Finished natural wood floors are coated with varnish or paint to give them an aesthetic appearance. appearance and protect from moisture and dirt.
Use wood putty to seal the places where screws are attached, chips, cracks, and fallen knots. Putty can be mixed with fine sawdust. Dry the first layer of putty, sand it, and repeat the operation if necessary.

Note! After varnishing, the putty becomes lighter than the wood, so when choosing a shade you need to focus not on the color of the fresh wood, but on the color of the varnished sample!
If necessary, the floor is sanded using a sander or a block wrapped sandpaper with fine grain, vacuum and wet cleaning. Wait until the floor is completely dry.

Apply the first layer of paint or varnish with a roller or wide brush, starting from the corner farthest from the door. Dry the coating in accordance with the manufacturer's recommendations.

The first layer of coating is sanded in places of unevenness - brush hairs, small debris. Then cover it with a second layer of coloring composition.

Complete drying and strengthening of the coating takes from 5 to 14 days. At this time, you can walk on the floor in soft shoes and carry out dry and wet cleaning. It is not recommended to place furniture, walk in heels, or drop heavy objects.
Fastening skirting boards
The final stage of finishing work is attaching the skirting boards. For wooden floors it is used as wooden skirting boards, and plastic. It is better to fasten wooden skirting boards before painting or varnishing, plastic ones - after the coating has dried.
Wooden plinths are attached to the board with self-tapping screws using pre-drilled holes, and the caps are covered with putty.

Plastic skirting boards are usually attached to the wall with dowel screws or using special clamps.

Video - Fastening plastic skirting boards using clip-on clips
Wooden floors correct installation and care are very durable, their service life reaches 30 years or more. By reinstalling the wooden floors in your apartment with your own hands, you can forget about repairing the floor for a long time and enjoy the warmth and beauty of natural wood.
Most often, replacement of old floors is required in Khrushchev-era buildings or in private houses. After all, this is where the coating was used for a long time. The floors in such housing are usually wooden. Of course, this material is durable, environmentally friendly, affordable and has reliable heat-shielding characteristics. However, despite this, over time the tree begins to undergo deformation due to constant loads, temperature changes and air humidity. Eventually, the time comes when you have to do a major overhaul and decide to replace the floor. However, before carrying out such work, you will need to determine the degree of wear of the coating. This will allow us to consider possible options for its repair.
Carrying out diagnostics
Before starting work, you will need to decide on its type. Replacement of a floor made of wood is carried out in the following cases:
- The appearance of a significant number of longitudinal cracks on the boards. This indicates that the tree has dried out and will soon begin to simply fall apart. What do you mean by a large number of cracks? A dozen of them on the entire surface of the floor should already be an alarm bell for the owner. The reason for such cracking of floorboards is, as a rule, non-compliance with the humidity conditions in the room. As a result of this, they dry out.
- The occurrence of local wood failures. In this case, a mandatory floor replacement will be required. After all, the fact that the board breaks becomes clear confirmation that it is rotten.
Floor repairs are carried out when the floorboards creak. This is the least of the evils that can happen to an old coating. However, even at the same time, it is worth making sure that this creaking is not caused by rotten logs. And to do this you will need to tear off one or two floorboards in the place where the unpleasant sound is observed. If the logs turn out to be rotten, then replacing the floor will be simply necessary.
Consider coatings with a concrete base. Replacing the floors in the apartment in this case is assumed for two reasons:
- The presence of a large number of cracks. Floor screeding is done not only to make it more convenient to walk around the house or apartment. It is also needed for uniform distribution of loads on the floor slabs. A cracked screed does not cope with its functions. Its deformation leads to the concentration of loads in one place, which is fraught with bad consequences, especially for an old house.
- Shedding of the screed until it turns into sand. In this case, replacing floors in an apartment or in a private house is mandatory.
Preparing to install new wood flooring
After diagnostics have been carried out, convincingly proving the need to replace the floor when renovating apartments, it will be necessary to dismantle the old covering. To do this, you must first prepare:
- hammer with nail puller;
- mount;
- hatchet;
- screwdriver;
- shovel;
- an electric saw or jigsaw, which will be used to cut old boards;
- garbage bags.

The dismantling process begins with removing the baseboards around the entire perimeter of the rooms. Next, using a nail puller, they pull it out earlier hammered nails. If the floorboards were attached to the joists with self-tapping screws, then use a screwdriver. Filmed wooden elements should be taken out of the room, and then begin dismantling the logs. Often these parts are securely attached to the subfloor. That is why the logs are removed carefully, which will prevent damage to the floor slabs and save time on filling up the resulting holes.
After complete dismantling of the old covering, the room is thoroughly cleaned. And only after this is it possible to begin work on arranging new floors.
What kind of floor should I make in the apartment? Just like it was - wooden? Or maybe pour it indoors cement screed? As a rule, the issue is resolved in favor wooden flooring, if there was one there before. The only exception is replacing the flooring in the kitchen and hallway. In these rooms, the preferred covering option is tiles. And it is almost impossible to lay it on a wooden surface. But if tiles in these rooms are not included in the renovation plans, then the need for floor screed disappears by itself.
Anyone who has decided to replace the floor in a Khrushchev building with their own hands should still consider the option of arranging wooden coverings. After all, the screed has a significant weight, for which the floors in an old building may simply not be designed.
Arrangement of logs
How to replace the floor with your own hands in a Khrushchev-era building or in a private house? The technology for arranging a covering made of wood is not as complicated as it is described. On initial stage You will need to install logs. They should be located from each other at a distance of 600 to 800 mm and be strictly in the horizontal plane. To level the lags, bars are used. After obtaining a single plane, it is advisable to secure this base for the floor to the ceilings using U-shaped brackets. The principle of performing this work is similar to that used when installing ceiling profiles for placing drywall. You just need to perform all actions in mirror image.

Adjustable supports can be installed as joists. They are studs equipped with nuts and washers. Rotating the nuts allows you to raise or lower the joist, leveling it to the horizontal plane. How much does it cost to replace the floor in this case? It is worth keeping in mind that adjustable elements will significantly increase the amount of money invested.
When replacing the floor in a private house, you will need to inspect the condition of those support posts, which are under the logs. They must be in good condition. If there were no posts initially, then they need to be mounted. To do this, soil is removed and compacted in the designated places. Next, polyethylene film is laid. It is necessary for waterproofing the foundation. Afterwards, crushed stone is poured, reinforcing mesh is installed and formwork is mounted for the foundation under the column. The support itself is laid out of brick in two rows using cement mixture. The top of the posts must be waterproofed.
Laying wood flooring
On final stage work, planks are laid or OSB sheets. If you use the second of these two materials, the logs will need to be installed in increments of 62.5 cm. OSB is laid in two layers. The second of them is attached with self-tapping screws to the first and must be laid in the opposite direction from it.
Installing plank floors is simpler than using OSB way. However, there will be a lot more work with the floorboards. After all, each of them will need to be adjusted to size and at the same time carefully monitor the joining of the ends. They should not be outside the log.
Due to the labor-intensive nature of the work, many owners who replace the floor with their own hands give preference to OSB. In this case, the coating is more reliable and has fewer seams. Parquet, laminate, linoleum and other finishing materials can be laid on it without any further processing.

But in any case, it is important to pay attention to the space under the flooring. It must be provided with ventilation. To do this, experts recommend leaving a small (0.5 cm) gap between the walls and the floor along the entire perimeter of the room, which will subsequently be covered with a plinth. Often, when replacing the floor in a private house, holes are drilled in the corners of the rooms. They will ensure ventilation of the underground. Such holes, which are preferably located in criss-crossed corners, can be covered with decorative overlays.
Replacing cement screed
The technology for performing these works is much more complex than those described above. Replacing wood floors with concrete floors will require significant labor.
At the first stage, the floor slabs are also released, and the resulting garbage is removed from the apartment. After this, waterproofing is laid on the cleaned surface. A dense polyethylene film is used for it, which will not allow the water included in the composition cement mortar, appear on the ceiling of the apartment located on the floor below.

Replacing the floor covering, which begins with screeding, allows you to eliminate some of the unevenness of the base. This becomes possible through backfilling, as well as pouring the floor using a special composition that forms a perfectly flat surface. In addition, the screed allows you to strengthen the surface of the concrete slab and increase its strength characteristics. This technology comes in different forms. Today there are three existing options arrangement of the base for installation of the upper flooring. Let's take a closer look at them.
Standard screed
This option is used, as a rule, when performing major repairs of floors in private homes. The fact is that the main disadvantage of a standard screed for high-rise buildings is the presence in the solution of a large amount of water, which does not evaporate, but, looking for all sorts of loopholes, rushes to the ceiling of the neighbors of the lower apartment. Moreover, even pre-laid on floor slabs cannot save from such a lack of material. waterproofing film. This fact does not allow the use of such a screed option. And this despite its cheapness and ease of self-production.
Semi-dry screed
She happens to be an excellent alternative the previous option. Semi-dry screed is enough cheap option replacing the wooden floor in the apartment. A minimal amount of water is added to its solution. The result is a special mass that builders call prancing. It consists of cement mixed dry with sand, to which just a few drops of water are added. When laying such a mixture, a waterproofing film is laid only just in case, to be on the safe side. However, such a screed is difficult to level. Sometimes, to create a perfectly flat surface, it has to be additionally moistened with water. The cost of performing work using it turns out to be slightly higher than when using the standard option.
Dry screed
We can say that this option is ideal for creating the best floor in the apartment. This technology does not involve the use of water at all. Perhaps that is why it can be classified as a screed only formally. To a greater extent, this coating is similar to wooden flooring.
The implementation of a dry screed begins with the installation of beacons, relative to which a backfill is made at the horizon level, for which fine granular heat-insulating material is taken. Gypsum fiber boards are laid on top of this layer. According to their own technical specifications the resulting coating is similar to cement-sand screed floor. This allows it to withstand all emerging loads for a long time.

When using a dry screed, it becomes possible to replace a wooden floor with laminate, tiles and other types of floor coverings. There are no restrictions in this matter.
The only drawback of each type of floor screed is the cold. It is impossible to walk on such a surface barefoot. The only way to insulate it is to install heated floors.
Selecting the type of coating
After completing the screed, you can begin the final stage of major floor repairs. It consists of selecting and installing flooring. Which option for a house or apartment will be the most suitable? Here you can be guided by the following principles:
- personal preference;
- quality;
- durability, strength and reliability of the material;
- type of coating;
- at a price.
As a rule, porcelain stoneware or tiles are chosen for the toilet and bathroom (less often in the hallway and kitchen). In the rooms, parquet (sheet or piece), linoleum, laminate or carpet is laid.
Before choosing one material or another, you need to listen to the advice of experts. The best solution would be perfect match two factors: price and quality. But, be that as it may, it is necessary to purchase material that will maintain the strength of the floor for the next 10-15 years.
Repair
If the diagnostics carried out did not indicate the need to replace the floor, then there will be much less work with the coating. It will only need to be repaired.

How to do this? Let's consider options for such work for different genders.
- On a concrete base. If the floor covering is not located on the joists, then you will need to remove the existing damaged fragments. For example, a hole in linoleum can be closed with a patch from a new piece. It is advisable to remove moving or fallen tiles completely. But in both cases, the floor surface is cleaned of damaged material and a new solution is applied to it. After the concrete has completely dried, patches of linoleum, tiles or other material are applied. A special mixture or glue can be used as a solution. If restoration is required for the entire concrete base, then screed will have to be performed.
- Wooden floors, as a rule, irritate with their “senile” creaking. To eliminate this problem, you will need to explore the “vocal” zone. Often problems arise due to loose fasteners. If this is the case, then the floorboards will need to be additionally secured using galvanized screws or nails. If the “creaky” problem has deeper roots, then fighting it is possible using other methods. The most common reason unpleasant sounds is the ridge from the tongue that does not sit firmly in the groove. This can be corrected after carefully dismantling the baseboard and removing the outer board, and then all the squeaks reaching the area. You will need to remove nails from the dismantled floorboards and baseboards. Then you should check the logs, if necessary, making partial or complete replacement of damaged elements. Next, the floor is laid back and secured with self-tapping screws in places located 3 cm from the previous fixation point. If the creaking of the floorboards occurs due to their insufficient adherence to the joists, then this problem can be eliminated by laying a wedge, cardboard or a piece of roofing felt, which is placed under the board from the subfloor side. From the room, two additional screws are screwed into this area, which are placed at an angle both to each other and to the creaking board. Another way to get rid of squeaks is to pour talc or graphite powder into the gap between the floorboards. Sometimes when repairing a wooden floor, it is necessary to replace damaged boards. And if significant gaps have formed between the floorboards, then they should be cleaned and primed after preliminary grinding of the surface. Next, the floor is coated with nitro varnish and covered with a finishing substance.
- Minor damage to ceramic tile or laminate surfaces is usually masked. To do this you also need to know some secrets. For example, scratches on laminate flooring can be restored using a wax pencil. Special pastes are also used to mask minor defects. If the laminate is swollen or has a significant area of damage, the coating will require replacement. But the formation of cracks and chips on the tiles is eliminated with the help of cement laitance. But if the damage is significant and the defects cannot be hidden, then it is still advisable to replace the tiles.
These are the features of the process of replacing floors in private houses and apartments.
When the apartment has an ugly, shabby floor, the whole impression is good repair or beautiful furniture will be lost. But this kind of work - replacing the floor covering - is very labor-intensive process, which is not easy to decide on. But a simple change decorative covering will only give the result of a cosmetic update. Invisible processes will continue and, as a result, you will have to spend much more effort and money to restore the damaged coating. Let's consider the algorithm in detail repair work floors in the home, the procedure for carrying out the procedure on your own.
How to repair the floor in an apartment on a concrete base
If the floor covering is laid not on logs, but on a concrete base, pay attention to the advice of specialists. If the floor covering is worn out and requires replacement, then it is necessary to carry out the following manipulations:
- Whatever material the floor is based on, damaged fragments must be removed. If it's linoleum, there's a fun way to make a patch out of the new one. To do this, the old piece must be attached to the roll and the patch cut along the border.
- Any tile that moves or has fallen off should be removed.
- The places from which damaged fragments were removed must be cleared of debris and dust. Carefully using auxiliary tools, clean the surface of old material.
- The substrate may be damaged, in which case it is necessary to prepare a new solution and troubleshoot the problem.
- After the concrete has dried, you can lay patches, be it linoleum, tiles or other material. For this, glue, mortar or other necessary mixture is used.

Sometimes it happens that the entire concrete base requires restoration. In this case, it is necessary to perform a screed. If the surface of the concrete base is uneven, lumpy, then it should be leveled, this will affect the finishing coating and ruin it. Linoleum will become unusable and may tear, repeating the bends of the concrete covering, the tiles will sway due to different floor levels.
Methods for repairing the floor in an apartment
To avoid such troubles, you should level the surface concrete slabs on which the floor covering will be laid. This should be done like this:
- first you need to remove the old coating, if any, the substrate, remains of construction debris and dust;
- ideally, the base of the floor must be waterproofed, it is laid overlapping and strengthened along the walls;
- if you do not use waterproofing, you need to consider this important point- the concrete solution should be poured onto a previously wetted surface, this will allow the material to “grab” better;
- when leveling the surface, to make it ideally even, beacons and a building level should be used;
- After the concrete surface has dried, it is covered with any material.

When repairing a wooden floor covering, it is necessary to inspect the entire floor and remove damaged boards. The floor area is treated with special solutions against fungus; those places that are exposed to moisture are protected from water using special waterproofing materials. If cracks have formed as a result of the wood drying out, the following work must be done:
- grind the surface with special equipment;
- prime and clean the cracks;
- cover the floor surface with nitro varnish;
- After the solution has dried, cover it with a finishing substance.
If laminate or ceramic tiles have become unusable, you should try to disguise minor damage. A wax pencil can restore scratches on laminate flooring. Specially developed pastes mask minor defects. If the laminate is swollen or damaged, it must be replaced. If chips and cracks form on the tiles, you can try to apply cement laitance and hide the defects. But if the damage is significant and affects the aesthetic appearance of the room, the tiles need to be replaced.
When repairing linoleum on your own, you must remember that it is possible to repair the floor surface of such a material.
If the linoleum is swollen, cracked or torn, you can do this:
- inject glue with a syringe into the damaged area;
- place the load and let it sit for several days;
- If the result is not satisfactory, replace the area with a new one.

If the carpet fails, spare parts should be used:
- cut out the damaged area, glue a patch;
- the edges are treated with special glue to prevent fraying;
- Ideally, it is worth considering the pattern and direction of the fibers.
For stone flooring, the following steps must be taken:
- cracks and chips are leveled using grinding equipment, after which the surface is polished;
- polishing helps make the coating protected from dirt;
- You can perform such actions with the result when the cracking depth is no more than half a centimeter.

Complete replacement of the floor in the apartment
If you have decided to completely replace the floor covering in your apartment and even change the material, pay attention to a new product on the construction market - OSB panels. Replacement wooden version from boards to floors made from this material is a fairly practical result. Floor coverings made from OSB boards deserve attention, as the flooring is of high quality, durable and practical. The surface is not afraid of moisture and does not accumulate it inside. Using plates, you can achieve the following result:
- perfectly level the surface, which allows you to use any, even the most delicate and sensitive coating;
- high sound insulation allows you to absorb noise;
- two tasks are solved simultaneously - insulation and waterproofing are performed.

Use OSB boards It is possible both on a cement floor and on logs. Coating with the material is not difficult. The panels are easy to cut to required sizes. To work, you should prepare the following tool:
- plane;
- rubber hammer;
- building level;
- electromill.
Plates can be the finishing surface or base for any material.
Advantage using OSB- slabs, is:
- ease of operation;
- one slab can cover a large area of the room;
- speed of laying the coating;
- resistance to mechanical stress.

Instructions for repairing the floor in an apartment
After making a decision to replace the floor or overhaul it, it is necessary to decide on the scale of the work and the plan of repair activities. If we are talking about replacing the floor surface in an apartment, it should be noted that the basis is reinforced concrete slab ceilings Then there may be differences: in some apartments the floor covering is located on joists, in others it is laid on a concrete screed.
Wooden floor subject to destruction and wear. The first manifestations are considered to be creaking, “loosening” of some boards, there may be a smell of dampness, and gaps between fragments of the floor.
Not only the top coating can deteriorate, but also the screed, especially if the quality of the work was not the best high level. An extraneous sound may appear when moving, or the coating may “walk.”
A set of manifestations indicate the need for gender replacement.

Repair work on wood flooring
Provided that the coating defects are minor, you can partially replace the floor material:
- The surface is cleaned of the old layer of paint or varnish. This is easier to do with the help of a special technique - a grinding machine.
- Damaged boards should be removed.
- After this, the entire floor surface is checked for quality nailing. They pull out old, deformed boards so that the boards hold well; it is recommended to use self-tapping screws.
- If there are small distances between the boards, the cracks are sealed with putty for wooden surfaces; you can cover the places where the nails enter the base of the floor.
- If the gaps are large, you can fill the gaps with wood chips, cover them with putty, and rub the restoration area.
- After the putty material has dried, the floors are sanded manually or using a machine.
- When the work is completed, the floor surface is covered with paint or varnish.
Do-it-yourself floor repair when floorboards creak
You can restore the floor in an apartment, provided that the floorboards are fastened together, in the following way:
- first you need to listen to which area of the room the creaking is heard;
- between the board and the beam you need to hammer in wedges;
- this must be done carefully so as not to loosen the floorboard;
- a place for screws is drilled in the floorboards, they are screwed at a slight angle and the beam is screwed in;
- These manipulations can get rid of annoying squeaking.
If you only need to restore the appearance of the coating, this can be done quickly and easily:
- if it is not possible to remove the furniture and vacate the room, the repair work will be carried out in two stages: first on one side of the room, then the furniture is moved to the renovated part of the room and the second half of the room is repaired;
- Now you need to use a machine for scraping the floor, there is no point in buying equipment just for once, you can rent it for the duration of the work;
- you can do this work manually, but you will spend a lot of effort, time and sandpaper;
- after sealing small seams and final leveling, I varnish the clean and dry floor;
- It is recommended to use two to three layers of varnish, first allow time for the layer to dry.
Partial restoration of the floor in the apartment will allow you to get rid of the defect and not spend a lot of time on its elimination.

Removing old flooring
Before starting work, it is necessary to empty the room completely: remove furniture, remove paintings, and, if possible, lamps and chandeliers. The work is very dusty and if it is carried out in stages, then reliable and hermetically sealed dust protection should be provided for other rooms. It’s good if the room has a door, but it is advisable to cover it with an additional damp cloth and place a roller underneath. This will help protect the rest of the rooms a little from the spread of dust. This will not have any particular effect, and if other family members live in the apartment, it is better to move them to another place during the renovation work.
The procedure for dismantling the floor covering is as follows:
- in the room from which the furniture has been removed, the baseboards are dismantled; this must be done carefully so as not to damage the surface of the walls to which they are partially attached;
- after dismantling the baseboards, they begin to remove the old floor covering;
- if the material roll type(carpet, linoleum), laid without the help of glue, then it is carefully rolled up, but most often the material is removed with fragments of the screed, in this case the covering is removed in sections and the room is immediately cleared of debris;
- if the material has been glued and is difficult to remove from the base, it is necessary to use additional tools which will help remove the coating;
- old parquet, which can no longer be sanded and restored, is removed piece by piece and taken out of the room; if the material was glued with special solutions, then the process of dismantling the parquet can be difficult; in this case, the use of auxiliary tools is also recommended;
- tiles are removed using a hammer and chisel; if you can rent a hammer drill, the dismantling process will be much easier;
- if the floor consists of wooden boards, the most difficult thing to remove the covering will be the removal of the first floorboard; using a hammer, nail puller and pliers you can dismantle the plank covering, perhaps not all the material will be intended for disposal, you will have to sort it in parallel.

The most common question that arises when restoring a floor is whether it is worth dismantling the entire coating in the event of fragmentary destruction of the material. If you have started such a global undertaking, you need to completely replace the coating. It is possible that the process of rotting or destruction has affected all areas of the floor, but so far this is not visually noticeable. To avoid having to dismantle the covering again after some time, spend time and energy on a global restoration of the entire room.
Even an inexperienced builder can carry out floor repairs in an apartment with his own hands. Step by step instructions in the video will help you understand such concepts as partial and complete replacement coverage for repairs. After watching the video, there will be no questions left regarding the correct replacement of the ceiling or restoration of the surface.
If the old floor cannot be restored, then there is only one option left - replacing it. This process requires a considerable amount of time and physical effort. However, the result is a new floor covering that will serve its owners for decades. Let's look at how to replace floors with your own hands below.
Features of replacing a wooden floor
If the old floor cannot be restored, then there is only one option left - replacing it. This process requires a considerable amount of time and physical effort. However, the result is a new floor covering that will serve its owners for a long period of time. We’ll talk further about how to replace floors with your own hands.

If an old wooden floor constantly creaks and causes discomfort when walking on it, then you should consider replacing it. The procedure for measuring a wooden floor consists of several stages, the first of which involves dismantling the old floor covering.
To do this, you should prepare a special tool with which you can get rid of old boards. It is best to use a crowbar or a pry bar. These elements have the appearance of scrap steel, which is distinguished by the presence of a curved edge on one side with a small lever. It is with its help that the dismantling of boards is carried out quite quickly. Please note that before removing the old covering, you should carefully inspect the floor for the presence of communication channels, so as not to damage the wiring, pipes or ventilation system.
The time it takes to complete this process depends on the wear of the boards; if the floor is old enough, then removing the boards will not be difficult. If the floor covering is strong enough, then you need to work hard to dismantle it.
All debris, boards, logs, if any, should be removed and taken out of the room. This will create a level base, most often made of sand or soil. It is possible to place an old screed on the floor that has certain defects, slopes and irregularities.
To make a high-quality new floor, the old floor covering must be completely dismantled. After cleaning the floor from dirt, it should be leveled or a new screed should be poured.
Before this, the floor must be treated with a primer, which will improve the adhesion of concrete to the surface and have an antiseptic effect. Next, using bitumen mastic, waterproofing work is carried out on the floor.
Please note that you should proceed to the next stage of work only after the bitumen mastic has completely dried. In addition, it is possible to carry out an additional waterproofing works in the form of laying additional flexible waterproofing. It will help to effectively protect the room from moisture.
After rolling and laying roll material, all its joint areas are treated with the same bitumen-based mastic.
In order to reduce the amount of concrete mortar used for screed installation, work should be carried out to insulate the new floor. In addition, insulation can protect the room from extraneous sounds from below, for example, if the floor is being built in an apartment in a high-rise building. In addition, such a floor will be warmer and safer.
Slab insulation in the form of mineral or basalt wool, foam plastic, etc.
After fixing the reinforcing mesh, the solution is prepared and the concrete floor screed is installed. For these purposes, we recommend ordering a factory-prepared concrete mortar, since its quality is much higher than that of a regular mortar prepared at home. In addition, it is possible to use self-leveling mixtures, which allow you to make a high-quality floor screed. In order to calculate the amount of mortar, in the process of arranging the screed, you should calculate the length and width of the room, as well as the height of the screed, multiply all these indicators together and you will get the amount of mortar in cubic meters. For example, if you plan to install a screed in a room whose length is 4 m and width is 2 m, and the thickness of the screed is 5 cm, that is, 0.05 m, you should use 4x2x0.05 = 0.4 cubic meters of solution.
Next, the solution is laid on the floor surface and leveled. After this, you should wait at least 4 weeks until the screed hardens. To ensure that the floor is perfectly level, a self-leveling mixture is used, which is laid after the concrete screed has dried. After it has dried, the floor is ready for finishing, laying linoleum, laminate, parquet, installing joists, subflooring or tiles. The finishing option depends entirely on the preferences of the owners of the room.

Redevelopment, floor replacement: initial stage
There are many reasons that provoke the replacement of flooring in an apartment or in a private house. This includes wear and tear of the old flooring, repairs, the floor not matching the overall style of the interior, etc.
The process of replacing a floor and the complexity of its implementation directly depends on the type of flooring. The first and very important stage Replacing any floor involves installing the old floor covering.
We suggest you familiarize yourself with the procedure for its implementation using the example of floors of different materials:
1. Floor made of wood.
The process of dismantling an old wooden floor is the simplest, since it requires only an axe, a hammer, a screwdriver and a pry bar. You may also need an electric jigsaw or saw.
All work is carried out in the following sequence:
- First, the baseboards installed around the perimeter of the room are dismantled;
- if planned reuse boards, then the procedure for dismantling them should be extremely careful, using a nail puller, the fasteners are removed, and if the boards were fixed using self-tapping screws, then in this case, you cannot do without a screwdriver;
- if the boards are too worn and unsuitable for further use, a saw, pry bar and jigsaw are used to dismantle them; as you dismantle the boards, take them out of the room so that debris does not accumulate in it;
- Next, you should dismantle the logs, keep in mind that they are most often too tightly attached to the old floor, so in the process of dismantling them, be especially careful;
- After removing all the covering, clean the room and get rid of excess debris.
2. Replacing floors made of concrete is a more complex process. Work on dismantling an old concrete floor is carried out very rarely, since in most cases, such a floor is simply restored using special repair compounds.
However, if the old coating cannot be repaired, it contains a large number of peeling, cracks, it should be replaced. In addition, old screeds often have accumulations of fungus and mold on their surface, which negatively affect the health of the residents of the house. This is one of the first reasons for its dismantling. Another reason for replacing a concrete screed is the presence of too low ceilings in the room, and it is the replacement of the screed that helps solve this problem. Thus, it is possible to reduce the thickness of the screed using sound-hydro- and heat-insulating materials.
In order to remove the screed efficiently and quickly, it is recommended to use a hammer drill; it is with its help that it is possible to carry out partial removal screeds.
After the screed has been removed, you should clean the room and get rid of any excess debris generated during this work.

Replacing old floors: preparing the base
To improve the quality of laying a new floor, you should carefully prepare the base for its installation. To do this, it is recommended to perform a number of actions:
- clean the base as thoroughly as possible from dust, so you can detect minor defects on the floor in the form of cracks, chips, holes or crevices;
- if they are present, care should be taken to seal them using special compounds, since these areas will significantly worsen the heat and sound insulation of the room;
- used for these purposes polyurethane foam, cement-based mortar or sealants;
- the choice of one or another composition determines the type of defect, its size and quality of damage;
- if fungus or mold is observed on the surface, then these areas are treated with a special antiseptic;
- after the base has dried, the base is prepared; this stage of work depends on what type finishing coating selected for floor;
- Please note that if, after deformation of the old concrete floor, a wooden floor is installed, then the installation of a new small concrete screed will still be required.

Replacing a wooden floor with a concrete one: arranging a screed
Instructions for making concrete screed:
- using a self-leveling coating it is possible to hide small surface defects, if they were present on the floor; for these purposes you will need to purchase ready-made dry mortar, which will have a self-leveling effect;
- Please note that all work should be carried out in accordance with the instructions indicated on the packaging;
- after the solution is ready, it is applied and leveled on the floor surface; in order to distribute the composition, you will need to use a wide spatula, and with the help of a needle roller you will be able to get rid of excess air;
- a floor leveled in this way should be left until the composition dries completely, as it must gain the required strength.
After the floor has dried, the following work is carried out:
- installation of insulation and installation of the main floor covering;
- arrangement of plywood subfloor;
- installation of wooden floor.

Replacing floors in a wooden house: installing a screed with expanded clay
Another option for arranging a screed during the process of replacing floors in a house is to install a floor with expanded clay. This material features good heat and soundproofing characteristics. Expanded clay is also quite lightweight material, which does not load the building, is especially important for apartments or floor insulation on the second floor.
The construction of a screed with expanded clay requires the following actions:
- if you plan to install a screed on the first floor, located above the basement, then you should first carry out a series of works aimed at installing waterproofing;
- there are several ways to carry out this process: painting the floor, plastering, casting, gluing with special materials;
- Please note that waterproofing should be applied not only to the floor, but also to the walls that are in contact with the floor;
- waterproofing roll material is laid on the prepared surface, it extends 21-25 cm onto sections of the walls, and the joints between the sheets are 10-15 cm; special tape is used to connect the joints;
- a damper tape is installed on the film around the perimeter of the room, with its help, even with significant temperature changes, the screed will not lose strength;
- on the film, beacons are installed, which are mounted in accordance with the level; it is recommended to use a concrete composition to fix them;
- the beacons must have such a height that it compensates for the height of the expanded clay and concrete screeds;
- Next, expanded clay is poured, which should be thoroughly compacted. after that, the expanded clay is filled with a concrete composition, which is leveled in relation to the previously installed beacons;
- after the screed has dried and slightly shrinked, it is recommended to apply a small layer of self-leveling mortar, which will give it an ideal appearance;
- laid on this type of structure finishing material any type.
Replacing laminate floors photo:

Replacing the floor in an apartment with your own hands: features of screed construction
Another option for making a screed in an apartment is a screed without insulation. This type of screed is also used in the process of installing a wooden floor on it.
To make this type of screed, follow these steps:
- lay on the main floor waterproofing material in the form of a polyethylene film;
- Apply damper tape around the perimeter of the room;
- lay a metal or fiberglass mesh over the waterproofing;
- install beacons that will help make the screed as even as possible;
- pour the concrete solution and level it over the surface using the rule;
- The maturation time for this type of screed is 3-4 weeks.

Replacing the floor covering: installing a dry screed
Another option for floor restoration is dry screed. To make it you do not need to use “wet” concrete solutions, but rather dry materials that level the base of the floor. Most often, this type of screed is installed in an apartment. In order to replace the flooring using a dry screed, you must perform a number of steps:
1. Cover the floor with waterproofing in the form polyethylene film. Try to lay it with a margin near the walls and with an overlap in the joint areas.
2. B doorway place a limiter in the form of a wooden board, which will help prevent the dry composition from spilling out of the room.
3. Make sure that the mound fits tightly to the floor surface.
5. Please note that the beacons should not be fixed to the floor, since they must be removed after installing the screed. To check the evenness of the beacons, use a building level.
6. Pour filler material onto the surface of the film, for example expanded clay. Using the rule, level the dry mixture.

7. Special fiberglass-based boards are laid on the surface. This creates a dense base. To glue the plates together, you will need glue and self-tapping screws.
Replacing floors video: