It is very easy to make a stork from plastic bottles with your own hands, the master class will allow you to make this product in a short time. In this case, it is necessary to strictly follow all instructions in order to truly obtain good result. The product can be placed on a personal plot, which will make it possible to decorate the area.
A master class allows you to make a stork yourself, for which you need to use plastic bottles and other available materials. To make the craft look most realistic, you need to make blanks from plywood. Wings and a body are drawn on them. The prepared templates must be carefully cut out.
For work you will need the following materials:
- plastic bottles;
- insulating tape;
- self-tapping screws
It is better to take opaque (white) and dark bottles, and then arrange them, and only red electrical tape will do.
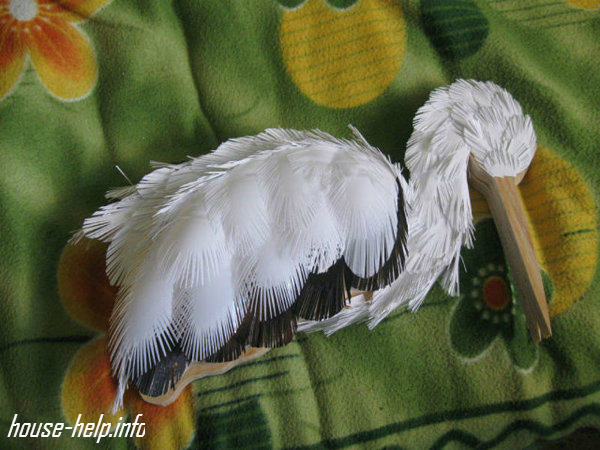
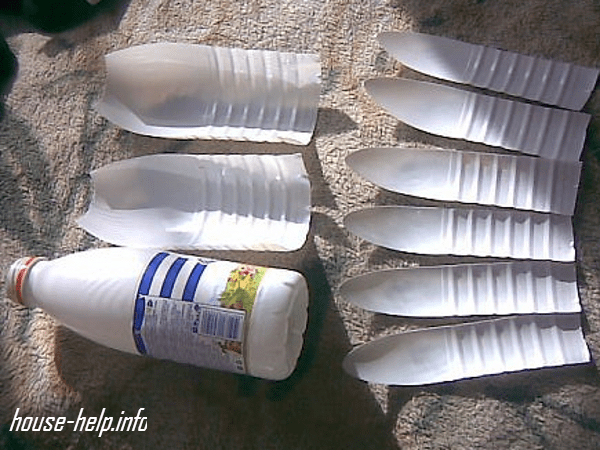
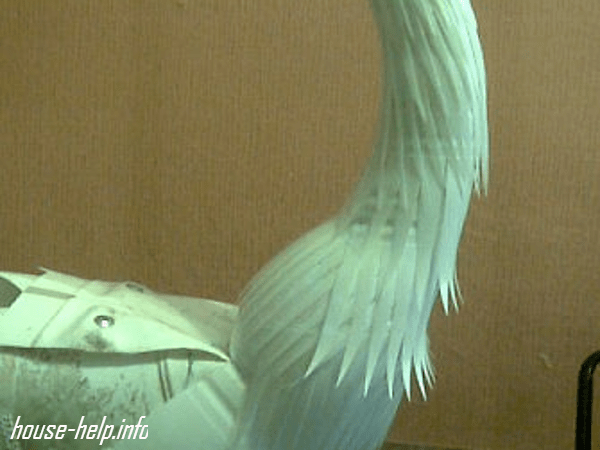
The previously prepared templates need to be combined. For this you will need self-tapping screws. To make feathers, they use white bottles, in which dairy products are usually sold. They need to be cut so that you get strips of the same width. You need to make a lot of shallow cuts along the edges to get the fringe.
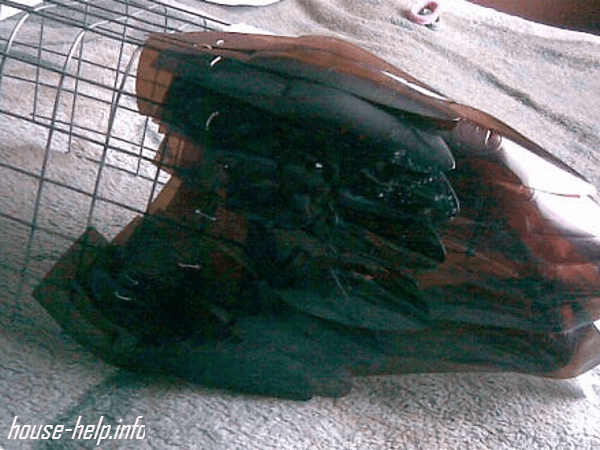
The resulting wings are fixed on the body of the bird. To make the fastening as strong as possible, use a glue gun. It must be applied carefully, without leaving traces of glue on the body. To make the tail and the rest of the body, which will be located below, you need to use dark-colored plastic bottles. For example, beer is sold in such containers.
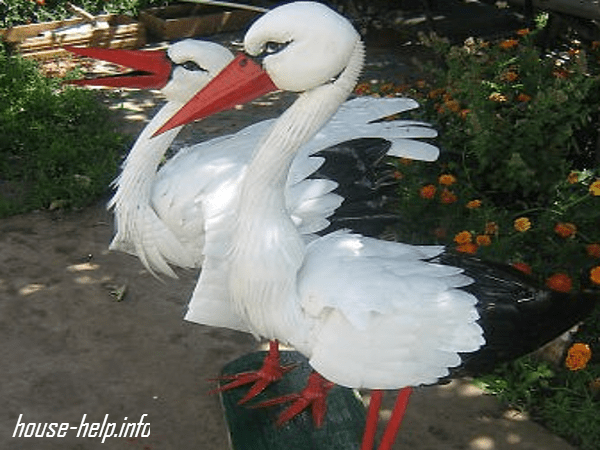
The beak can be obtained from a plastic bottle blank, since the stork has a red beak, the base is wrapped with red electrical tape. The stork also needs legs. To make them, you can use thick wire. For the eyes, take large beads, which are attached to the head with glue. This completes the DIY stork for the garden. It can be placed near a flower bed or on some kind of stand.
Manufacturing details of the second version
To make a talisman bird for your garden with your own hands, you should prepare the following materials and tools:
- empty plastic bottles;
- 2 wooden beams: thick and wide (will serve as a base);
- thick aluminum wire (you can use a rod) to make the lower limbs;
- polystyrene foam (thickness 10 cm);
- corrugated hose;
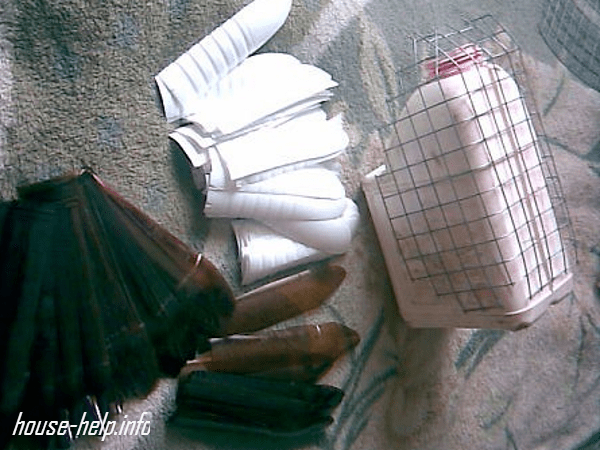
- plastic canister (2 pcs., capacity 5 l);
- metal mesh (under the wings);
- stapler

How to make a stork with your own hands? The procedure will take a little time, but the algorithm is simple. On the paths personal plot or a stork will appear in the garden after several hours of execution.
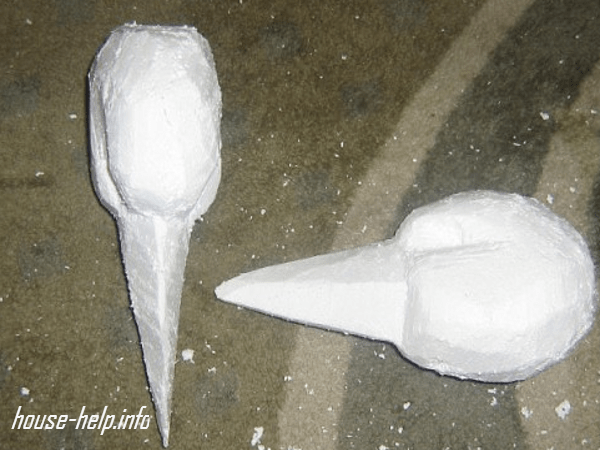
First you need to start making the head and beak of the bird. These parts are cut out of foam plastic. On the surface you can either paint eyes with black paint or glue 2 black buttons (you can use beads).
The beak itself must be cut from a dark plastic bottle. It will consist of 2 parts and is glued to the head. To make the bird's body, you need to cut off the handle from the canister.
Bending tightly around the contour of the canister, bend metal mesh. Remove excess material. You can do the lower limbs by bending a rod, the ends of which should be secured in a wooden block. Plastic feathers are cut from bottles. They are attached to the base of the canister. The tail should be attached first.
You can attach the neck to the stork by attaching wire to the fittings. The next step: put the prepared hose on the wire. Since the feathers on the neck should be small, they are attached with tape. The feathers along the body are fixed on a metal mesh.
Since the bird in the garden will be in an upright position, its wings will be folded. They must be secured with a stapler. The feathers should be positioned so that the details of each subsequent row overlap 1/3 of the previous row. This will give the craft a natural look and feel.
The master class ends with fastening the individual elements. To give the product maximum attractiveness, you can perform decorative tint on the beak, eyes, and legs. The craft can stand outside throughout the summer and is not afraid of bad weather.
Alternative product
An original do-it-yourself stork for the garden can be supplemented with a baby in the nest. Implementing this option will help make your home happy and bring prosperity and well-being to your home. To make a stork sitting in a nest, patterns from the Tilda bird are used as a basis. This is quite modern and fashionable today homemade toy from fabric matter. The patterns for it are simple.

From dense and durable fabric cut out individual elements crafts. The parts are sewn together with thread. To give the body volume, it needs to be stuffed with any filler, so there is no need to completely sew the bird together right away. The filler can be burlap, sawdust, straw, feathers, unnecessary scraps, etc. After completing the filling stage, the hole is completely sewn up.
The beak is made separately. To create it you will need durable red cardboard. Finished part attached to an already made head. You can sew clothes. To do this, you need to take measurements from the finished bird. At the final stage, the eyes are glued on, the baby is wrapped in a light cloth and placed next to the mother.
If you install a craft on the branches of trees in the garden, when it rains, you need to remove it from there so that appearance the product has not deteriorated. This bird is also placed on window sills; it will harmonize perfectly with indoor flowers.
Based on the fabric stork, the feathers are obtained from white plastic bottles in which milk or other dairy products are sold. They are fastened together. Eventually the wings come out.

Unusual option
The master class on making a stork, which is based on a large plastic bottle with a volume of 6 liters, is worthy of attention. To make the head, you need to use foam, which will need to be carefully cut out. Don't forget about the shape of the beak and eyes. Black pebbles can act as eyes and are fixed with glue.
The beak can be made from an ordinary plastic bottle. It also sticks to the head. A large plastic bottle will act as the body. You need to cut off the neck of it. Special metal mesh - wings. If the bird's wings are bent, it is necessary to make appropriate bends on the mesh.
The legs are made of wire, which is folded in several layers. Feathers will be from plastic bottles light shade. They are cut so that individual feathers look realistic. Fixation is done using wire to the wings themselves.
To make the neck look voluminous, the bottles need to be finely chopped to create a fringe. They are arranged in rows. Small bottles are placed on the paws, which are also cut at the base. If the fixation of parts seems weak, then the fastening process can be carried out using self-tapping screws.
Making a stork is not a very long and difficult undertaking. To bring your idea to life, you can use the recommendations provided. However, you can make certain adjustments to the idea that will allow you to create a unique and original product.
Every dacha is small paradise for its owner. And if for some reason this is not the case, something needs to be changed. For example, to make the area more comfortable and lively. Great for this garden sculptures, and it’s great if they are made independently.
One of the guardians of the site is a stork. At least, many summer residents liked this idea, because the stork nests only where they live good people. This bird is a symbol of prosperity, peace, tranquility, and a family nest.
Materials and tools
Let's try to make a stork on our own using a plastic container. We will need the following materials:
- a five-liter plastic bottle (for example, for drinking water);
- Styrofoam;
- polyurethane foam;
- wire;
- scotch;
- dye;
- brushes
We can use other materials in the decorating process. This stage depends entirely on your imagination and creative skills.
Now let's get down to step-by-step instructions.
- The plastic container is the body. We will attach the remaining parts to it. The neck is a wire, which is lined with pieces of foam plastic and secured with tape. We will attach the neck to the body with tape, that is, to the bottom of the plastic bottle.
- We place a piece of foam plastic on the neck - this is the head. We try to round it.
- We also make the hips from foam plastic by inserting equal pieces on both sides of the neck of the bottle. We fix everything with tape.
- The legs will be made from used electrodes. But metal rods will also work equal length, and just neatly folded wire several times.
- There will be a long nail as a beak. You can put a piece of wood on it.
- We apply polyurethane foam on top of the resulting layout with our own hands.
- We polish. All excess must be carefully trimmed.
- You need to paint the sculpture with acrylic paints.
- You can insert real feathers into the tail and wings.
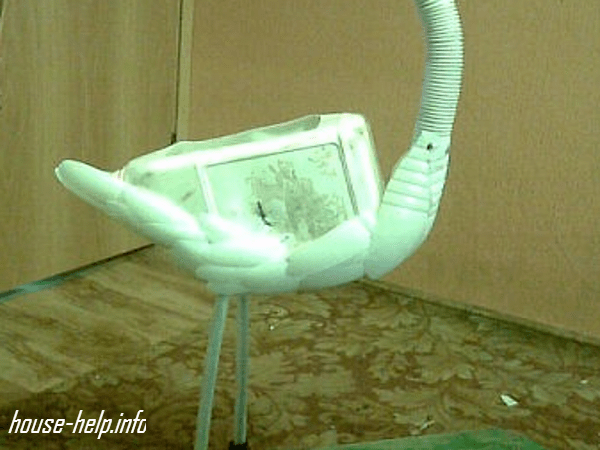
Here is our garden bird!
We will need:
- opaque black and white plastic containers;
- plywood sheet for template;
- self-tapping screws;
- glue gun;
- red electrical tape.
We cut out a template of the stork’s body and wings from plywood with our own hands. The templates are fastened to each other using self-tapping screws. Feathers are plastic milk bottles. We will cut them into strips and make a fringe. The stripes must be the same width. We take a glue gun and attach the feathers to the body of the bird. We make the tail and lower part of the body, the bottom of the wings from black bottles (for example, shampoo). We simply wrap the beak with red electrical tape. The legs can be made from wire and painted. You can draw eyes, or you can buy special decorative ones; any craft store has these (for toys).
The process is labor-intensive, but it turns out very beautiful.
Compositions with a stork
Of course, a garden stork can be a completely self-sufficient sculpture. But you can make everything more interesting by arranging a whole composition.
For example, you can build a stork’s nest with your own hands. Place dry branches on a bicycle wheel or an old cart. If necessary, secure them with threads together. Often branches are also painted with spray paint for structural strength.
Stork made from plastic bottles (video)
And your bird can become the founder of a whole bird family in the country. For example, a stork can open a bird gallery, but a homemade flamingo, peacock, heron will continue it... Fantasy is limitless! Some craftsmen simply paint the plywood blank and cover it with varnish. The result is a unique painting on wood, where fantasy images are combined with your own creative abilities.
Your garden will truly become a place of miracles.
What else can you make a stork from?
We list only the most popular options
- car tires (perhaps the most popular option);
- forged parts;
- plastic lids (but this is jewelry work);
- tree;
- shells;
- disks.
The simplest option is a plywood stork. You simply make a template with your own hands, according to which you cut out the future sculpture. Paint your bird of happiness on both sides with acrylic paints. Or with the ones you have, covering the top of the pattern with construction varnish.
DIY garden decor (video)
A stork in the country can be just the beginning of your creative experiments. As practice shows, appetite comes with eating: even people far from artistic work get the taste, and over time, other interesting characters appear on the site. And this is great, they delight not only the owners, but also the guests, who are becoming more and more numerous in connection with such dacha art.
They say that when luck and happiness do not come to the house, then they need to be lured. Place some positive, bright sculpture nearby. In this case, everything comes into play: birdhouses, funny ones and, of course, a stork from a plastic bottle. After all, it is always associated with a peaceful sky, sonorous children's laughter and love.
Master class: stork from a plastic bottle
Materials and tools:
- plastic canister 5 liters;
- white and black 2-liter plastic bottles;
- wire large diameter;
- corrugated plastic sleeve;
- a piece of foam;
- fine mesh netting;
- scissors, stationery knife, wire cutters;
- furniture stapler, sandpaper;
- acrylic paint, glue for plastic.

Making a stork requires a lot of preparatory work. Need to cut a large number of feathers: long - for future wings and tail, medium - for the body, small - for a slender long neck and head. It is advisable to place all the blanks in separate bags, this will make it easier to work when finishing the body.

After the plumage is prepared, it is necessary to make the frame of the figure. The role of the body is played by a plastic canister, the handle of which has been cut off. A wire or rod is inserted into the neck, after which you need to fix the position of the “neck” and put a corrugated sleeve on it. From a piece of polystyrene foam you need to cut out a stork’s head, proportional to the body. To make the bird look more neat, the head must be sanded and then painted.

Next, you need to attach a piece of fine mesh to the body, to which the feathers will be attached. To give your stork beautiful plumage, apply plastic feathers in an overlapping and checkerboard pattern. It is advisable to slightly fluff smaller feathers, for example, for the neck, by finely cutting the ends of the blanks in the form of a fringe and bending the strips in different directions.


Typically, the stork has white plumage with black edging on the edges of the wings. Therefore, you can either use bottles different colors when creating a bird, or color it at your discretion. It is important not to forget about the red paint, which is needed for the beak and legs. The limbs are made from a metal rod bent in half, which is threaded into pre-prepared holes in the bottom plastic canister- “torso”. The toes are easy to make from two brown plastic bottles, cut and folded outward.


There are other options for creating a stork, some of them are simpler, others are much more complicated than the above. Usually the bird is only decorated with feathers made from plastic bottles, but inside there is a hard and dense frame made of wood, plastic, polyurethane foam, metal, etc.


In this case, the frame is first prepared according to the sketch, and then the individual parts are connected together. Only after this are feathers glued to the entire body in several rows. Don’t forget about the beautiful ready-made eyes, which can be bought in all stores with sewing accessories. Then a beautiful flirtatious stork with long eyelashes, which will definitely bring love and peace to your home!
An ancient legend says that God gathered all the reptiles from the Garden of Eden into one bag and ordered the man to throw it into the sea with his own hands. And the curious Homo sapiens wanted to look at the creatures, untied the bag, and, of course, let them all go. The Lord became angry and turned this man into a stork so that he would protect other people from all kinds of toads and snakes. Since then, storks always settle near humans, feed on reptiles and bring us happiness.
Many ancient pictures depict a stork with a baby. U Slavic peoples It is generally accepted that this bird is responsible for childbirth and well-being. If storks have settled on the roof, the house will be full of happiness and children's laughter. And if you haven’t settled yet, then a wonderful stork with a baby can be made with your own hands from scrap material and installed on a ridge or on an apple tree in the center of the garden.
Happiness from bottles
Will need
To make a stork from plastic bottles for the garden, we need to prepare the following materials:
- empty bottles;
- thick wide board for the base;
- rod or thick wire for legs;
- a piece of foam plastic 10 cm thick;
- corrugated hose from a vacuum cleaner;
- 2 plastic canisters volume 5 l;
- metal mesh for wings;
- stapler
Master class on making happiness
In order for almost real storks to appear on the paths of your garden, you will only need a few hours of passionate DIY work.
- Cut out a head with a beak from a piece of foam plastic, draw eyes or glue in black beads with your own hands.
- Cut a beak in two parts from a dark bottle and glue it in place.

- We begin the master class on making a body by cutting off the handle in the canister. Then you need to bend the mesh with your own hands to the shape of the canister and trim off the excess.

- To make the legs, bend the rod and secure its ends to the board.

- We are conducting a master class on making plastic feathers.

- Attach the feathers to the canister, starting from the tail.
- The master class on attaching a neck begins with attaching the reinforcement wire. Then a hose is put on it.

- Attach small “feathers” to the neck with tape.

- Secure the feathers to the mesh.

- The stork for our garden will stand with its wings folded, so we simply attach all the feathers with a stapler with our own hands, overlapping each previous row by a third.

- We finish the master class by connecting all the details and decorative tinting of the eyes, beak and legs. You can install this bird with your own hands in the depths of the garden for the whole summer. It will not be damaged by rain and will not fly away.

Tilda stork
Fashionable toys today, hand-sewn from ordinary fabric simple patterns. We will not fully describe the master class on their manufacture.
- Cut out the details of the craft from fabric, sew and stuff with any filling.

- Separately, you need to make a beak (can be made of cardboard) and attach it to the head. All that remains is to make the clothes, glue the eyes, wrap the baby and hand it to the stork.

Of course, such a wet bird cannot be placed on the branches of a garden, but flower pot She can decorate the windowsill.
Stork with baby on the nest
Another way to make your home rich and happy is to make a stork on the nest. You can use tilde bird patterns as a basis. Cut feathers from white plastic milk bottles, staple them together and make wings, decorating the ends with real feathers. Place a few white feathers on the top of your head. Form a tail out of real feathers, sew or glue on eyes and a tie, and place the bird in the nest.

It can be made from ordinary rods, fastened with wire. To make a stork with a baby, put any doll in its wings. The master class on making a lucky amulet is over.

Simple happiness

These two rag birds cannot be left on the garden paths, and a master class on making the first stork requires a lot of time and materials. Don’t be upset and just build a nest and cut out a flat bird from PCB or plywood. Color it, put a string bag with a baby in its beak and that’s it, the stork and the baby have already settled on your roof.
A well-groomed and attractive garden will always please the eye. To make your garden more cozy, you can decorate it with various ones you have made yourself. Today we will talk about how to make a stork for the garden and what materials can be used for this.
Let's start with the simplest thing - PET bottles.
Option #1. Making a stork from plastic bottles
Before you start working, you need to take a small sheet of plywood and make templates from it. Templates need to be made in the form of the body and wings of a bird, as shown in the image. You will also need opaque plastic bottles (preferably white or black), red electrical tape and self-tapping screws. The procedure is as follows.

Step 1. First, you need to connect the previously made templates with each other using self-tapping screws. Plastic milk bottles will be used as feathers. The bottles should be cut into strips of equal width, and then a fringe should be made on the edges of each of them.
Step 2. Next, the finished feathers must be secured to the “body” of the stork using glue gun. It is typical that black PET bottles will be used for the lower body and tail (usually shampoo containers are used for this).
Step 3. The beak should be wrapped with red insulating tape.
Step 4. To make the legs, ordinary wire is used. Eyes for the bird can be purchased at any craft store. That's it, the stork is ready with your own hands!


Option #2. Making a stork from polyurethane foam
Now let's talk about another option for making a stork for the garden with your own hands. Now you need to first prepare a 5-liter plastic container, polyurethane foam, polystyrene foam and tape. The algorithm of actions should be as follows.

Step 1. First, the body parts are attached to the bottle using a container. For the neck, ordinary wire is used, lined with pieces of foam. The thighs need to be made in a similar way (using foam and wire). Quite as a key regular one will do large diameter nail.
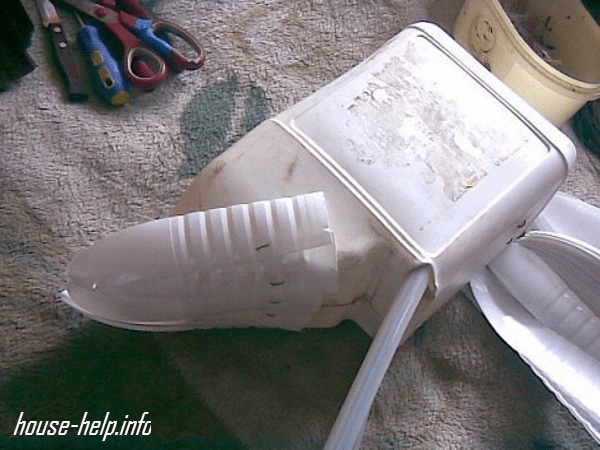
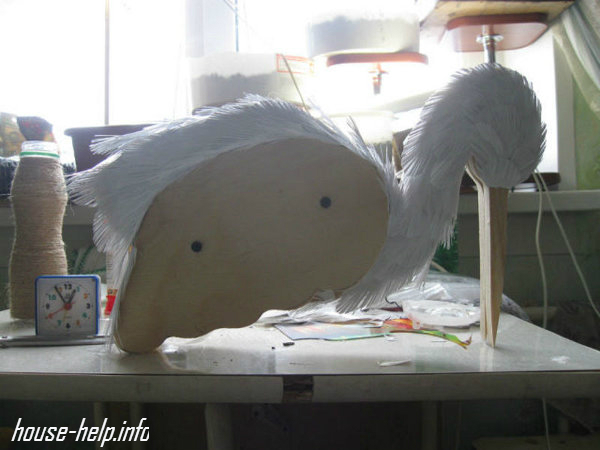
Step 2. The workpiece will look at the preliminary stage as shown in the image below.
Step 3. For the bird's legs (at least in this implementation) used electrodes are used. In the absence of electrodes, you can select a similar material - for example, thick wire twisted into several turns, or metal rods from thin reinforcement.
Step 4. So, all parts of the stork’s “body” have been assembled, but before proceeding to the next step, you need to carefully check the strength and reliability of the fasteners.
Step 5. After this, the entire layout must be covered with polyurethane foam.
Step 6. All excess is carefully trimmed off.
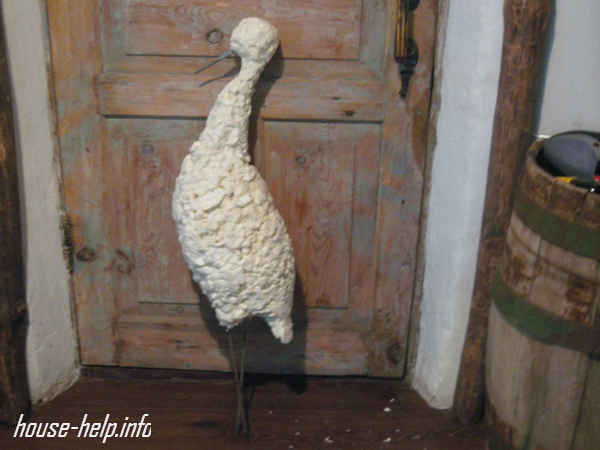
Step 7 Now the sculpture is almost ready. If the polyurethane foam has already completely dried, then the bird needs to be painted with acrylic paint.
Step 9 Natural feathers are inserted into the wings and tail to make the stork look as realistic as possible. Look what a wonderful garden stork you will make (if you do everything right, of course).


Option #3. Making a stork for the garden from a canister
Before you begin, make sure you have the following: Supplies:
· five liter canisters;
· plastic bottles (black and white);
· plastic tubes;
· thick wire;
· foam plastic;
After this, you need to perform the following sequence of actions.
Step 1. Cut out the foam blanks and use a knife to shape the head. Cut out the eye sockets and make the beak flatter.
Step 2. Use sandpaper to make the surface as smooth as possible. Place toy eyes in the eye sockets (we’ve already talked about where you can get them).
Step 3. Cut a beak from a plastic bottle and secure it with glue.
Step 4. Make a bird's body from a plastic canister and cut off the handle.
Step 5. Cut a piece of mesh large enough to wrap around the canister. Round the mesh a little so that it looks more like wings.
Step 6. A thick metal rod must be bent and legs made from it.
Step 7 Feathers for the stork are cut from white bottles.
Step 8 After this, you can proceed directly to assembling all the elements. Work should start from the “tail”.
Step 9 For the “neck”, a corrugation (for example, from a vacuum cleaner) or something similar is put on the wire. The feathers are attached using self-tapping screws. Due to the fact that our bird’s wings are folded, feathers can only be attached to the belly and slightly on the sides.
Step 10 White bottles are cut in half, and a fringe is formed at the cut sites. The bottles are attached to the “neck” using tape.
Step 11“Wings” must be made from one edge of the prepared mesh. It is important that the second row covers the first by 1/3. On the third row, white plastic is used.
Step 12 For the “legs” of the stork, appropriate blanks are cut out of 0.5-liter bottles.


Step 13 All that remains is to paint the bird’s “beak” and “legs” red. That's it, your DIY garden stork is ready!
For a more detailed introduction to this manufacturing method, we recommend watching the thematic video material.
A well-groomed and attractive garden will always please the eye. To make your garden more cozy, you can decorate it with various hand-made ones. Today we will talk about how to make a stork for the garden and what materials can be used for this.
Let's start with the simplest thing - PET bottles.
Option #1. Making a stork from plastic bottles
Before you start working, you need to take a small sheet of plywood and make templates from it. Templates need to be made in the form of the body and wings of a bird, as shown in the image. You will also need opaque plastic bottles (preferably white or black), red electrical tape and self-tapping screws. The procedure is as follows.

Step 1. First, you need to connect the previously made templates with each other using self-tapping screws. Plastic milk bottles will be used as feathers. The bottles should be cut into strips of equal width, and then a fringe should be made on the edges of each of them.
Step 2. Next, the finished feathers must be secured to the stork’s “body” using a glue gun. It is typical that black PET bottles will be used for the lower body and tail (usually shampoo containers are used for this).
Step 3. The beak should be wrapped with red insulating tape.
Step 4. To make the legs, ordinary wire is used. Eyes for the bird can be purchased at any craft store. That's it, the stork is ready with your own hands!


Option #2. Making a stork from polyurethane foam
Now let's talk about another option for making a stork for the garden with your own hands. Now you need to first prepare a 5-liter plastic container, polyurethane foam, polystyrene foam and tape. The algorithm of actions should be as follows.
Step 1. First, the body parts are attached to the bottle using a container. For the neck, ordinary wire is used, lined with pieces of foam. The thighs need to be made in a similar way (using foam and wire). An ordinary large-diameter nail is quite suitable as a key.
Step 2. The workpiece will look at the preliminary stage as shown in the image below.
Step 3. For the bird's legs (at least in this implementation) used electrodes are used. In the absence of electrodes, you can select a similar material - for example, thick wire twisted into several turns, or metal rods from thin reinforcement.
Step 4. So, all parts of the stork’s “body” have been assembled, but before proceeding to the next step, you need to carefully check the strength and reliability of the fasteners.
Step 5. After this, the entire layout must be covered with polyurethane foam.
Step 6. All excess is carefully trimmed off.
Step 7 Now the sculpture is almost ready. If the polyurethane foam has already completely dried, then the bird needs to be painted with acrylic paint.
Step 9 Natural feathers are inserted into the wings and tail to make the stork look as realistic as possible. Look what a wonderful garden stork you will make (if you do everything right, of course).


Option #3. Making a stork for the garden from a canister
Before you begin, make sure you have the following supplies:
· five liter canisters;
· plastic bottles (black and white);
· plastic tubes;
· thick wire;
· foam plastic;
After this, you need to perform the following sequence of actions.
Step 1. Cut out the foam blanks and use a knife to shape the head. Cut out the eye sockets and make the beak flatter.
Step 2. Use sandpaper to make the surface as smooth as possible. Place toy eyes in the eye sockets (we’ve already talked about where you can get them).
Step 3. Cut a beak from a plastic bottle and secure it with glue.
Step 4. Make a bird's body from a plastic canister and cut off the handle.
Step 5. Cut a piece of mesh large enough to wrap around the canister. Round the mesh a little so that it looks more like wings.
Step 6. A thick metal rod must be bent and legs made from it.
Step 7 Feathers for the stork are cut from white bottles.
Step 8 After this, you can proceed directly to assembling all the elements. Work should start from the “tail”.
Step 9 For the “neck”, a corrugation (for example, from a vacuum cleaner) or something similar is put on the wire. The feathers are attached using self-tapping screws. Due to the fact that our bird’s wings are folded, feathers can only be attached to the belly and slightly on the sides.
Step 10 White bottles are cut in half, and a fringe is formed at the cut sites. The bottles are attached to the “neck” using tape.
Step 11“Wings” must be made from one edge of the prepared mesh. It is important that the second row covers the first by 1/3. On the third row, white plastic is used.
Step 12 For the “legs” of the stork, appropriate blanks are cut out of 0.5-liter bottles.


Step 13 All that remains is to paint the bird’s “beak” and “legs” red. That's it, your DIY garden stork is ready!
For a more detailed introduction to this manufacturing method, we recommend watching the thematic video material.
Video – DIY stork
It's very easy to make from plywood. To do this, you don’t need to look for space in the garage or rent warehouse space: a spacious kitchen and a mother-in-law who is a big fan of crafts are enough.
To make the process go quickly, purchase a six-millimeter sheet of plywood and paint from the building materials market, which are used to update the facade of the house. If you don’t have enough tools, ask a neighbor or rent one. A DIY stork for the garden is an interesting craft, but a little capricious. Patience is the main condition when performing work, otherwise you can drag out the work so much that they would rather buy metal figurines than wait for inspiration to strike you.
To make a stork for the garden with your own hands in a matter of days, follow these tips:
- A piece of plywood should be rectangular shape, with sides of 850 and 580 millimeters.
- It is better to use white paint. Buy black and red dye for it. With proper dilution, you will get an exceptionally long-lasting color.
- Don't shy away from waterproof varnish: it will help protect your product from precipitation.
- Half a meter of sandpaper is enough.
- It is better to use an electric jigsaw.
- Brushes are at your discretion.
Using the help, transfer the outline of the stork onto the plywood, if the design is already applied to a thin sheet of newspaper, plug in the power cord of the jigsaw and carefully cut out the body of your stork. To “put the bird on its feet,” you can cut out a stand from the remains of plywood.
Sand the edges with pieces of sandpaper, cover with the first layer of varnish, and let dry. Now you can take up the paints. Prepare 3 types - red, white, black. The first tone is on the nose, the second on the body and up to the middle of the wing, the third is applied to free places. Leave for 8 hours. Check the paint for strength and apply another layer of varnish on top.
You can use thin reinforcement on your legs. Attach it to the body and stand, cover it with red, deepen the places for the eyes with several blows with a hammer, fill the potholes with black and leave for a day. If there is no reinforcement, then you can use the old Stork for the garden with your own hands and pave it on the roof ridge if desired, if you screw the body to a mop, the wide part of which goes under the rafters, where it is nailed.
What else can you do for your garden with your own hands? Fly agarics made from hemp and basin, animal figurines from tin cans, a unique bed in pink tones.

But the stork is somehow closer to the heart of a Russian person. You can also make this noble bird out of plaster and clay, and it requires one plastic bottle, 500 grams of plaster, gauze bandages and metal rods that bend well, 3 spray cans
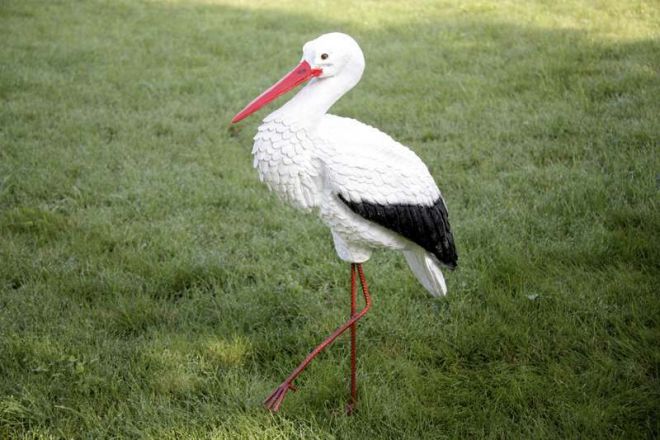
The beautiful and bright figure of the stork will add a touch of grace to backyard landscape, especially if it is made by hand. It may seem that making a stork is difficult and requires many years of practice in needlework, but the method of making it is simple and the materials are inexpensive. This sculpture will be an excellent addition to local area and decoration for flower beds, lawns and garden plot, symbolizing wealth, prosperity and family comfort his owners.
How to make a stork for your dacha with your own hands: master class
A DIY garden stork is one of the favorite crafts of summer residents and gardeners, and there are many variations of its execution on the Internet, but the manufacturing principle is approximately the same in all cases, regardless of the materials used and the richness of the decor. Read how to make beautiful wooden signs for your home.
First of all, the head, neck, torso, wing frame and legs are made, which are connected with fastening tools.
The remaining time is devoted to the rather painstaking procedure of cutting, fringing and decorating the feathers - they will make up the plumage of the bird’s body, neck and tail. There are homemade options without using plastic bottles, but they are less common. Let's take a closer look different variants making a stork in this article.
Materials and tools for garden figure
The stork figurine consists of a head, beak, neck, body, legs, wings and white plumage with layers of black feathers. All parts are fastened together with a furniture stapler and seated with universal glue.
The body of a stork can be cut out from wooden block the required size, polystyrene foam or a 5-liter plastic canister.
- 1.5 and 1 liter plastic milk bottles;
- plastic bottles of 1.5 and 0.5 liters for kvass or beer;
- canister 5 l;
- scissors;
- glue;
- self-tapping screws;
- a piece of foam;
- corrugated tube;
- steel rods;
- frame mesh;
- thin wire;
- sandpaper;
- furniture stapler;
- red acrylic paint.
The stork's plumage is also made from transparent bottles, but then the plastic under the feathers should first be painted with white and black acrylic paints.
Stages of manufacturing from plastic bottles
Having prepared necessary materials and tools, you can start making components crafts. About beautiful wooden fences find out with your own hands.
It is important that all parts of the stork’s body are proportional to each other.
Head
Using a sharp knife, the outline of the head with beak is cut out of foam plastic, after which the surface is sanded and the edges of the beak are leveled. sandpaper. If desired, the head can be painted with white paint - the coating will give the future product a rich White color and will create an additional barrier from the sun, wind and rain.
The beak consists of 2 plates, which are attached to the head with self-tapping screws. For the beak, the neck and bottom of a dark plastic bottle are cut off, and the remaining part is cut into rectangular plates. Triangles are cut from the resulting blanks, which will subsequently become the upper and lower parts of the beak.

The plates are bent in the middle and screwed to the junction of the head and beak.
Paws
The legs are cut from 2 half-liter bottles with dark walls, after first cutting off the bottom. The fingers of the future bird are cut from the very edge to the neck of the bottle - you should get 3 in front and 1 in the back, and are bent outward.

Each finger is shaped into a long, sharp triangle using scissors.
Plumage
Processing blanks for feathers to give them a beautiful natural shape with feather veins is the most labor-intensive and time-consuming part of the work.
To cut out feathers, the bottom and neck of the bottle are cut off, and the cylinder of the bottle is cut into 6 equal parts - 6 feathers. They will different sizes: for the body plumage – small, for the tail – longer. Each feather must be given airiness by creating a fringe edging around the edges. He will tell you about metal forged gazebos for summer cottages.
Feathering on the neck can be done in 3 ways:
- cutting out even smaller plates than for the belly, decorating them with fringe and curling them with scissors;
- cutting off large plates the length of the neck and notching their edges;
- cutting off half the bottle and making deep sharp cuts in the resulting plates.

Each feather is a rectangular plate made from a plastic bottle with a rounded or embossed edge.
Frame
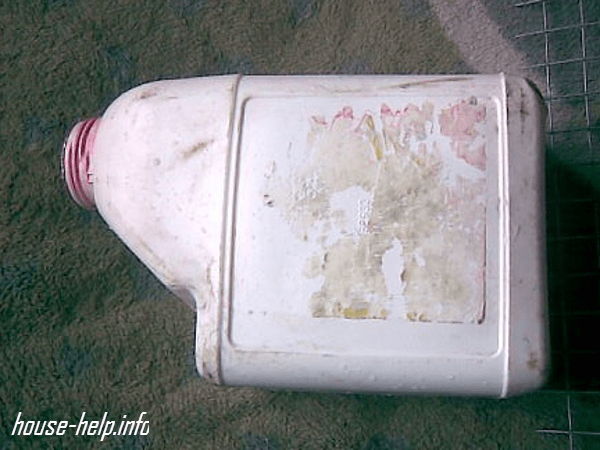
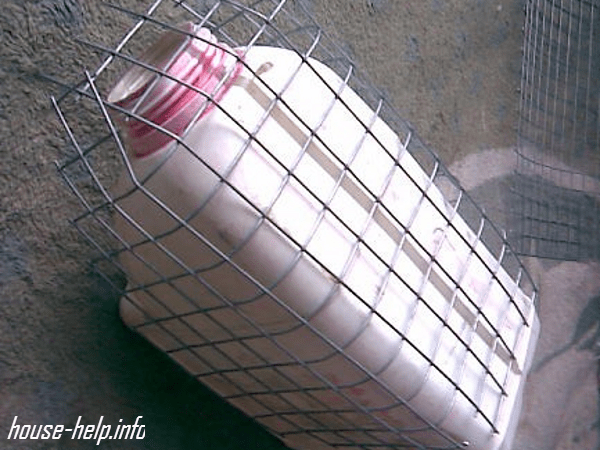
It is convenient to make the stork’s body from a 5-liter canister, the handle of which is first cut off. Then a mesh mesh is attached to the container, to which future feathers will be attached - it is bent and cut into the shape of a wing.
Next, you can begin assembling the main part of the product - a neck tube is inserted into the neck of the canister, and 2 holes are cut in the lower part, through which a long piece of thick rod bent in half is threaded - these are the legs.

The grids are fixed with wire or steel brackets on the canister.
Assembly and decoration
The stork is assembled starting from the head - it is connected with wire to a corrugated tube and additionally fixed with hot glue.
The feathers are secured with a stapler, starting from the bottom of the canister and then upward in layers. The tail is attached to the back of the figure. The feathering is also applied to the mesh in layers, starting from the outer edge, and fixed with wire. In this case, black feathers are located on the outer edge. You will get only about 6-7 layers of feathers. The outer row connecting to the tube is screwed with self-tapping screws.
Prepared plates with sharpened edges from bottle halves are wrapped around the neck.
The number of feathers depends on the location of the wings: the option under consideration is designed for folded wings, but when flapping, the wing mesh is covered with feathers on both sides and the back of the stork is also made.
After assembling the bird, you can begin to creatively design the craft.
The eyes can be bought ready-made in stores that sell parts for knitted and sewn toys, and glued with hot glue. For insert eyes, choose large black beads or balls. You can also paint the eyes - with simple black or colored paints to suit your taste.
If you used transparent bottles during the work, you need to paint feathers before cutting them, after wiping the surface of the coating with an alcohol solution.

The beak and legs of the product also need to be painted with red paint. Alternatively, you can wrap them with red tape.
What else can you make a stork from?
Craftsmen manage to create masterpieces from everything that is lying around in the garage, including, and also use leftovers building materials after repair. You can safely take note of several of these variations of garden storks - making them will not be more difficult than the previous option.
From polyurethane foam
In this way you can create garden sculpture, making a turning and giving the stork figure a realistic image. The “skeleton” of the product will be a steel frame - steel rods are welded to each other, and then other elements of the stork’s body are attached to them.
To make a stork you will need:
- 5-liter plastic bottle;
- polyurethane foam;
- steel rods;
- Styrofoam;
- dye;
- soil solution;
- scotch;
- rasp.
You need to put a bottle body on the frame, and attach sharpened pieces of foam plastic to each other with tape to the neck rod. Curly hips made of foam are secured in the same way.
Even with the use of waterproof plywood, the possibility of the sculpture getting wet during the cold season increases, so it is recommended to store it indoors until the weather warms up.
To make a stork you will need:
- plywood;
- plastic bottles with white and dark walls;
- hot glue gun;
- rods;
- jigsaw;
- self-tapping screws;
- scissors;
- screwdriver;
- furniture stapler;
- red acrylic paint.
It is advisable to first apply the elements of the body and wings on paper, creating a “pattern” of the parts before cutting them out on a sheet of plywood. The wings are screwed to the body with self-tapping screws. The legs are made of steel rods and are attached with staples to sheets of plywood that serve as the body. Sheets of plywood are also used for or.
Feathers are created from bottles, and each plate, in turn, is processed along the edges with scissors until an airy fringe is obtained. The plumage is applied to the entire surface of the stork, starting from the back: first, black feathers are laid out, and then white ones, from which the bird’s tail is also created.

Each workpiece is sanded along the edges and the surface is primed.
- a layer of red paint is applied to the plywood beak;
- You can draw the eyes yourself.
The rods of the paws can be sharpened from the bottom edge so that they can easily fix the product in the soil.
From foam plastic
Stork made of foam plastic – monolithic design, lightweight and easy to manufacture.
To work you will need:
- foam sheets;
- steel rods;
- universal glue;
- scissors;
- saw;
- furniture stapler;
- sandpaper;
- acrylic paint black and red.
First of all, the legs are made - the lower edges of 2 steel rods are sharpened, and the upper edges are bent for subsequent fixation in the foam body.
Main creative work working on such a stork is to create the correct foam blanks, because the finished bird will consist entirely of it. The body, head and neck are drawn in foam and cut with a saw. About plastic barrels for watering the dacha he will tell you.
Iron rods are stapled into the stork's body, its surface is sheathed with a layer of foam plastic for volume, and wing blanks are glued on top. The neck and head are mounted on a rod.

The stork's beak is painted red, and it is better to make inset eyes from beads or balls - this way the figure will be more expressive.
Next, the final modeling of the figure is carried out, giving it smooth and beautiful features with sandpaper and a knife. This is the case when you don’t have to make feathers for the bird - the embossed plumage can be cut directly on the body of the product, simply accenting the edges of the wings with black paint.
How to make a nest with a stork for the garden
The classic composition with storks in the nest traditionally symbolized cozy home With big family among the East Slavic peoples, indicated the fertility and cordiality of the owners. Installation of storks in the nest on own plot, a flowerbed, the roof of a house or a recreation area with children will help not only decorate the area, but also show guests that the owners are jacks of all trades. About street country washbasins will tell.
Old wheels from a bicycle, cart, trailer or wheelbarrow will fit under the frame of the nest. You can weave a nest from bushes and live or dry branches, securing the entire structure with steel wire and installing it on a special platform consisting of X-shaped pads.
Video
How to make a stork from plastic bottles, watch this video:
Conclusion
- The most labor-intensive work on a garden stork is creating its plumage - each feather must be worked on by hand, giving the edges a jagged or fringed shape so that they look like natural bird feathers.
- Feathers from transparent bottles should be painted white and black so that they imitate the natural plumage of a stork.
- Before painting the feathers, they need to be wiped off from dust and rubbed with an alcohol solution so that the paint goes on evenly.
- The easiest way to make a stork is to make it entirely out of foam plastic and sharpen it with a knife and rasp until the desired shape; the simplest wing without a frame is made from a piece of plywood, which is screwed to the homemade body with self-tapping screws.
- The body with a neck can be made from a plastic 5-liter canister with a cut off handle and neck, into which a corrugated tube is then inserted.
- You can make a garden sculpture from the remnants of building materials lying around after renovation, and it will cost almost nothing. Additionally, you will only need to buy acrylic paints in order to draw eyes and color feathers.
Bright garden crafts made from plastic bottles - simple and affordable way decorate your favorite area. Original sculpture of a stork from durable material will update the familiar landscape and create a joyful mood. A hand-made bird figure will make the garden unique and become a family symbol of goodness and happiness.
How to make a stork from plastic containers
To make such a craft, you need to stock up free time and get creative.
My patio is decorated with a stork figure, the basis of which is a plastic 5-liter bottle, covered with polyurethane foam and painted with acrylic facade dyes.
This wonderful stork is made from a plastic bottle and polyurethane foam
What materials and tools will be needed
Creating own design birds, you can assemble it entirely from plastic containers, fastening them with glue or staples. Or you can make the sculpture more expressive by adding plastic construction wood parts.
The frame of this bird is made of wood, covered with plumage made from plastic bottles.
Or make individual elements from foam plastic.
You can create such an exotic collection using ordinary plastic bottles and a piece of polystyrene foam.
For our impressive size craft you will need:
- A 5-liter plastic canister is the base of the body.
A 5 liter canister forms the base of the body
- Milk plastic bottles of 1 liter and 1.5 liters, from which white plumage is cut out. You can get by with transparent containers, but first paint them with white paint for exterior use.
- Dark plastic bottles of different capacities: 3 half-liter bottles will be needed for making legs and beak, one and a half liter bottles - for dark feathers.
Plastic containers dark color needed for feathers, legs and beak
- Polystyrene foam 10 cm thick, from which a stork’s head with a beak is cut out.
A bird's head is made from a piece of foam plastic
- Sandpaper.
- Scissors.
- Corrugated tube for the neck.
A long bird's neck is made from a corrugated tube
- Metal mesh as a base for the wings.
- Furniture stapler.
- Metal rod 6–10 mm thick for paws.
- Thin wire for fixing the wings.
Using wire, the wings are firmly attached to the body model
- Self-tapping screws.
- Glue gun or universal glue.
Universal glue quickly glues plastic and other materials
- Acrylic facade paints, brushes.
Stages of making a stork
Having purchased tools and materials, first prepare all the parts of the bird, then assemble it.
Head
From foam plastic sharp knife cut out the head with the beak.
A bird's head is cut out of a piece of foam plastic
Then the rough surface is sanded with sandpaper. You can coat the workpiece with white facade paint.
The workpiece is sanded with sandpaper to make the surface smooth
To strengthen the beak, use 2 triangular plates, which are made from a dark 0.5 liter bottle. Having cut off the neck and bottom, cut the resulting cylinder lengthwise and cut out triangles. The plates are bent in half and attached to the beak with self-tapping screws.
The beak is decorated with plastic, fastening it with self-tapping screws
Paws
They are made from the top of brown 0.5 liter bottles. Containers with the bottom cut off are cut lengthwise into 4 parts up to the necks, pointed at the ends and bent outward.
Paws with toes are cut out of dark bottles
Plumage
The most labor-intensive and time-consuming stage preparatory work- feather blanks. You will need a large number of them, different lengths, shapes and colors: for the design of the wings and tail - long, dark and white, for the body - light, smaller ones.
Light and dark feathers are used for crafts.
The neck and bottom of the bottle are cut off, the remaining middle part is cut lengthwise and strips are cut out of the resulting rectangle. One edge of the strip is made rounded. From liter bottle 6 large feathers are made.
A white bottle with a volume of 1 liter is divided into 6 parts
To feather the neck, small feathers are cut out and the ends are decorated in the form of teeth or fringes. You can decorate the long neck with large plates of milk bottle halves, which are finely chopped along the edges.
Figure frame
The body is made from a canister with a cut off handle.
A canister with a cut off handle is the body of our bird
As the base of the wings, a fine-mesh metal mesh is used, which is secured to the canister with wire or staples. The mesh is cut at the edges in the shape of a wing and bent down.
A fine mesh mesh is attached to the canister - the basis of the wings
A wire is inserted into the neck of the canister and bent, forming the frame of a long neck. Attach the wire to the metal rod of the legs and put a corrugated tube or hose from a vacuum cleaner on it.
Strengthen the wire for the neck and put a hose on it
A hole is made in the lower part of the container and a bent rod is threaded through it - these will be the legs.
The legs are made from wire by bending it and threading it through the hole at the bottom of the canister.
Or they pierce the canister from the bottom and insert curved rods, onto the ends of which they put the legs upside down.
Assembly of parts
After preparing all the parts, the structure is assembled.
- The head is placed on a wire and additionally attached to the corrugated pipe with glue.
- The body is covered with plumage starting from the bottom. Light feathers are secured to the canister with staples.
They begin to screw feathers from the lower part of the body
- A tail is formed from feathers, arranging them in rows and securing them to the body using a stapler.
- Screw the feathers onto the edge of the mesh wing with wire. To make a stork's plumage with black edging along the edges of the white wings, the first two rows are made of dark-colored feathers.
The wings begin to be decorated with feathers from the edge, using dark-colored blanks
- Subsequent rows are formed from white feathers, overlapping them.
The third and subsequent rows on the wing are made of white feathers
- A row of feathers is screwed at the base of the neck with self-tapping screws.
It's not difficult to make a stork with spreading wings
In this case, the feathers are screwed onto the entire canister, and the mesh base of the wing is covered with feathers on both sides.
On spread wings, feathers are attached on both sides
Decorating a garden sculpture
By decorating, a plastic craft can be made brighter, especially if only transparent bottles were used in its production. Acrylic paints for exterior use are suitable for this. Previously plastic container wipe with an alcohol-based solution and paint over with white or black paint before cutting out the feathers.
Acrylic facade paint moisture resistant and does not fade under the sun
The beak and paws are painted red or wrapped with red tape.
The beak and legs are painted red
Eyes are made from beads, decorative blanks for toys or small buttons that are placed on glue. You can simply paint them with black paint.
Acrylic paints become brighter after varnishing.
Master class on making a stork
There are many options for making a stork from plastic containers using elements made of wood, polyurethane foam, and polystyrene foam.
Such original composition The stork family in the nest is also made of plastic
Even a beginner can make such a garden sculpture, guided by video material from step by step instructions workflow.
Video: how to make a stork from plastic bottles
Storks made from plastic bottles - original decorative decoration personal plot and the subject of universal admiration. After all, they are made from ordinary garbage, transformed with skillful hands into works of art. Made of durable plastic, they are not afraid of rain and snow. Over the years, the figures will not swell, the paint will not fade or peel off.