Balusters for stairs are important element structure that connects the steps to the railings.
Balusters not only support the railings, but also make using the stairs safe.
In addition, they also perform a decorative function.
The types of balusters depend on the materials from which they are made.
There are these types of balusters:
- wooden;
- metal;
- forged;
- glass;
- stone;
- concrete, gypsum, cement.
Wooden elements are usually made from birch, beech, oak, pine or ash. Such products are considered the most environmentally friendly.
Most often they are ordered from craftsmen who make them by hand. Often, wooden products are entire works of art.
Varieties in the photo wooden balusters.
Variety wooden posts are carved balusters for stairs.
These are exclusive products, which are often made from precious wood. However, even pine carvings will look very attractive.
Wooden posts usually have standard size 50 by 50 mm.
But if necessary, you can order columns whose size will be larger or smaller so that your staircase fits into the interior.
Metal balusters are usually unusual design items. They are made of cast iron, bronze, stainless steel and various alloys.
Metal supports are produced from square and round rods, as well as from metal pipe or profile.
The shape of such metal products can be either straight or curved. The peculiarity of such products is very long term operation.
Forged balusters for stairs are a luxurious solution for connoisseurs of beauty and originality.
Forged products can have different shapes and styles, so each product is unique element, which is unlikely to be found in anyone else.
If you decide to decorate your staircase with forged balusters, then you should know that this is not only a beautiful and extraordinary element, but also a very durable support that will last for many years and protect your staircase.
In interiors country houses You can also often find cast iron elements.
Cast iron posts are very durable, they are a whole work of art, since casting can have any shape and size.
The photo shows examples of the use of stainless steel elements and cast iron supports.
Glass balusters look extraordinary.
These are made from crystal glass, resulting in a reliable, seamless element that is not only aesthetically attractive, but also carries the load of the entire staircase.
Some designers suggest supplementing glass products multi-colored lighting, resulting in fantastic interior elements.
Stone pillars are quite expensive and beautiful material, which will make any staircase majestic and solid.
Such a staircase will become the highlight of the interior and create an atmosphere of luxury.
Stone balusters can be made of the following materials:
- Granite - this material is resistant to temperature changes, so it can be used both outside and inside the building;
- Marble - this material will never become covered with fungus and mold, so it can also be used indoors and outdoors;
- Sandstone - such balusters can be polished or unpolished. Such products have a bright texture and a varied palette, are hardy and durable.
Glass and stone supports in the photo.
Stair safety
Balusters ensure the reliability and safety of the entire staircase.
No matter what shape or what your supports are made of, there is general rules fastening balusters to the stairs:
- The distance between them should be no more than 15 cm, whatever their size. This distance between the elements will ensure the safety and reliability of the railings, this is especially important when there are small children in the house;
- The height of the baluster, convenient for use, is 80-100 cm. If there are small children in the house, it is better to immediately increase the size of the railing to 120 cm. In addition, you can equip the staircase with additional railings, the size of which is 45 cm;
- Each baluster must be secured both at the top and at the bottom.
Balusters do not perform a load-bearing function, therefore the size, thickness or cross-sectional area do not matter, but it should be remembered that it is the distance between the elements that plays a role important role in the safety of the entire structure.
Select the thickness of the element in accordance with the style and design of the staircase and the room as a whole.
Columns from different materials are attached differently.
The upper and lower supports of the balusters perform the main protective function railings, so it is important that they are installed correctly.
However, the intermediate posts must also be secured according to all the rules. The fence must support the weight of a person up to 100 kg if he leans on the railing.
Do-it-yourself installation of railings can be divided into several stages:
- Installation of extreme pillars - supports (upper and lower);
- Marking the placement of supports. The distance between them can be marked with a cord or laser level. It is important that the distance between the balusters is the same on all sections of the railing;
- A mark is placed in the center of the baluster itself - the center of the axis;
- Prepare the upper edges of the supports. To do this, they are filed in such a way that the bevel matches the slope of the railing. The lower edge of the supports is filed when they are attached to the top of the bowstring.
How to fasten wooden balusters?
Fixing wooden elements is very simple and can be done with your own hands if you have minimal skill and strictly follow the recommendations.
The lower edge of the product is attached to stringers, steps or bowstrings using special pins, self-tapping screws or screws.
Wooden elements are attached to a wooden staircase only using active metal hardware so that the fasteners do not become loose during operation.
The use of nails, dowels and similar fasteners is strictly prohibited.
The upper edge of the product is inserted into a special groove, which is made in the handrail. Its dimensions should be commensurate with the cross-sectional area of the balusters.
A fixing strip is also attached between the handrail and the post, which is secured with wood glue and nails.
If the staircase needs to be installed between walls or its width is more than 1.5 meters, then the handrails additionally need to be secured to the walls with special brackets.
In order for the posts to make your stairs safe, their height should be 80-90 cm, and their cross-sectional side size should be 3-8 cm.
If you are buying posts and handrails, it is better to buy items from a set rather than separate ones.
Installation wooden elements with your own hands on video.
How to attach metal balusters?
If you have chosen metal products for yourself, they are usually purchased complete with by special means fastening to stone, wood or metal.
Usually these are brackets, hinges, fastenings to bowstrings, steps, stringers with special screws, which perform not only a fastening function, but also an aesthetic one.
If your staircase is decorated with forged elements, their fastening is usually provided by the manufacturer.
How to attach the products to the base will be described in the instructions; it is only important to do it correctly with your own hands.
In high-tech, industrial or techno style interiors, stainless steel supports are often used.
Polished or brushed metal will decorate any room with its beauty; moreover, such supports are convenient and practical to use, and are resistant to environmental influences.
Such elements are usually fastened using special hinges or brackets, which will not only securely fix the element, but will also become an excellent decoration for the structure.
Watch the video to see how to attach metal balusters to the stairs.
How to attach glass balusters?
In interior design, there are these types of glass balusters - flat and free-standing.
Installing glass railings with your own hands is also not difficult.
Most often, glass is fixed using hinges or flat parts are inserted into special metal attachments, which are attached to the base with screws.
Flat elements are also often installed in a sliding manner into a groove carved into wood.
For safety reasons, construction triplex is used in the construction of stairs - multilayer silicate glass, the balls of which are interconnected by a polymer film.
Such material cannot be broken, and upon impact, only cracks will remain on it.
How to fasten concrete and stone balusters?
If you have chosen concrete fencing, you should take care of the type of fastening of the posts in advance.
At the manufacturing stage, metal pins 10 cm long at the bottom and 5 cm at the top of the baluster are installed in the upper and lower parts of the baluster. In some cases, the reinforcement extends through the entire rack.
If the material of the stairs and railings is metal, then the pins are simply welded to the base.
When concrete base holes are drilled in the steps, into which the racks are inserted and filled with concrete mortar.
Stone balusters are also secured using metal pins, staples with pins and stone tenons.
After the markings and holes for the pins have been made, the pins are inserted into the sockets, then placed there cement mortar and fix the balusters until they harden.
Installation concrete structures on video.
No one a private house two or more floors cannot do without stairs. There are many requirements for such structures. And one of the key ones is safety in use, especially if there are small children living in the house. In order to make the staircase as comfortable and safe to use as possible, as well as to make it more aesthetically pleasing appearance, balusters are installed on it.

This publication will discuss installing balusters on a wooden staircase with your own hands. Due to the fact that there are various ways installation of these elements, from the information presented below you can choose the most suitable option for a particular case.
To begin with, perhaps in order to broaden your horizons, it makes sense to understand what balusters are and where they are used, except for framing flights of stairs. Perhaps this information can be useful when decorating other areas of a private home.
So, balusters are small racks that can have different shapes and thickness. They are made from a variety of materials and used in different areas of the building, depending on the style of its design.
It is interesting that balusters have been used since the construction of the palaces of the Assyrian rulers to the present day, almost in their original form. With change architectural styles, these elements changed shape, the masters used various materials for their manufacture. But at the same time, their purpose does not change, as well as their former demand in construction.
Thus, a row of balusters forms a balustrade, which has been widely used since ancient times. Moreover not only when fencing stairs, but also to support roof overhangs. In the latest versions, the balusters had very impressive sizes and were installed from the base of the facade to the roof. In addition, the balusters installed on the facades also served decorative functions, setting the design style of the exterior of the building.
IN last years, with the return of such architectural styles as Russian classicism, baroque and empire, the elements that are integral to these directions are again returning to widespread use. And balusters are among them.

Variety of balusters based on material of manufacture
If previously such architectural elements were made of stone, wood or clay, and later they began to be made of concrete, gypsum and metal, today polymers have been added to these materials (most often these are - polyurethane). And in order to understand how the racks differ from each other, and which of them can be used on a wooden staircase, it is necessary to consider them in more detail.
Plaster and concrete balusters
Balusters made of concrete and gypsum can be combined into one group, since they are made using the same technology. These types of figured racks are classic version, today they are mainly used for different zones external design of the building - this can be fencing of balconies, terraces, stairs, as well as eaves lines of flat roofs.

The framework for balusters made of concrete or gypsum is a reinforcement cage. It is placed in a special mold, into which the solution is then poured. After removal from molds finished products, if necessary, they are sent for the grinding process.

When completed, the “classic” baluster takes the shape of an elongated flowerpot, intercepted in a narrow place by a ring. Creating this most common The shapes of the staircase posts are attributed to the famous Italian scientist, artist and architect Michelangelo.
If cast balusters are intended for use outdoors, then they are impregnated special compounds and, if necessary, painted.
Previously, similar elements of balustrades and staircase railings were made as individual products, from which the overall composition was built. Nowadays, quite often sections are poured out entirely, and the entire fencing structure is assembled from them. Moreover, sections can be straight, curved at different angles or semicircular, depending on the shape of the staircase or balcony landing that they should enclose. In order for the sections to be precisely adjusted to the area intended for them, they are most often made to order, with the necessary measurements taken.
The disadvantage of these designs is their quite high price, as well as a very considerable mass of products. Therefore, both single balusters of gypsum or concrete, and sections of them are almost never used to enclose wooden stairs.
Stone balusters
The most durable, but also the most expensive in price, are stone balusters. They can be made in two ways. The first is by turning products from solid or separate pieces of stone, from which a baluster is then assembled by hand. Another option is balusters made from artificial stone. They, by analogy with concrete ones, are produced by casting. To do this, a special solution is poured into prepared forms. The solution consists of stone chips, sand, cement, fine gravel, and dye. As a reinforcing agent in Lately fiberglass is most often used.

Balusters made of natural or artificial stone are most often used for stairs or facades lined with the same material. They are ideal for such areas and add special respectability to the appearance of the building. Stone balusters are not installed on wooden stairs: firstly, because they are quite heavy, and secondly, because stone and wood still do not harmonize very well with each other.
Unlike concrete and gypsum, stone products can have a wider range of different shapes.
Metal balusters
Metal posts for fencing stairs and other areas of the building are produced by forging, casting or welding. They are usually made to order for a specific installation location, according to a pre-drawn sketch and precise calculations.

Metal balustrades, unlike other products, are used for fencing not only stairs and other areas of the house, but also for windows - as protective and decorative grilles. Moreover, products made by any of the three listed methods are suitable for this purpose.
Metal balusters can have various shapes, and be voluminous or flat. The last option can be found in multi-storey buildings, built in pre-revolutionary Russia.
Metal balusters made of thin elements can be used in combination with a wooden staircase. With the correct, not excessive combination and proportionality of parts, wood and metal are in perfect harmony with each other.
Polyurethane balusters
Polyurethane balusters are lightweight and can be given absolutely any shape. In addition, their price is much more affordable, unlike all the above options. Products are made from polymer high density and are not afraid of mechanical loads.

Such balusters consist of a shell made of polyurethane and a supporting frame, which is metal rod, which gives the product a certain weight, making the product more stable. In addition, the rod, embedded in a polyurethane body, has holes or mounting pads in its end sides for attaching balusters to the base and railings. Due to the fact that this type of product is light in weight and can be decorated to match any material, it can be used for installation on both stone and wooden stairs.
It is also interesting that polyurethane products can very reliably imitate almost any of the above materials.
Find out how to do it yourself from a new article on our portal.
Wooden balusters
Balusters made from natural wood, are traditional for Russian architectural styles. They can be made in the form of volumetric or flat relief elements. Volumetric products are turned from processed round timber, and flat balusters are cut from boards different thicknesses and width. That's why various options Such products may differ significantly in the method of installation and fastening.

On the facades of private houses built of wood, you can often see balustrades used as fencing for balconies, consisting of such figured columns. If available in your personal workshop lathe, you can easily make them yourself.
Flat balusters can also be cut out with your own hands from high-quality boards, using, for example, electric jigsaw. Well, then, with patience, you will have to process their edges until they are perfectly smooth.
Properly manufactured and processed wooden fencing They will probably last no less than stone or the other material mentioned above. Of course, for wooden stairs balusters, also made of wood, are best suited. They are perfectly combined in weight, texture and possible design solutions, opening up wide opportunities for the manifestation of the imagination of the home owners.
Staircase design and methods of attaching balusters
Place of balusters in a staircase structure
It makes sense to consider the general one and become familiar with the names of the parts that make up it. In addition, it is necessary to choose the option of installing and securing the racks of the enclosing structure.
Basic elements of wood interfloor stairs shown in the illustration:

When drawing up a drawing for the construction of a staircase, as well as when studying the description installation work to arrange it, you can refer to this diagram, since it indicates the location and name of all the main parts of the structure.
So, balusters can be installed on the edges of the surfaces of steps or on a string.
The top picture shows a staircase in construction which balusters are installed on the steps. In this case, the width of the steps allows you to install two wooden decorative fencing posts on their edges. In this case, the upper edge of the balusters is cut at the same angle at which the flight of stairs is installed.

If the string of the staircase structure has a large width sufficient for the size of the base of the balusters, then they can be installed on it in order to maintain the width of the flight of stairs. However, this installation option can be called more complex, since not only the upper, but also the lower side of the balusters will have to be cut to the desired angle. It is clear that the lower edge will have to correspond to the inclination of the bowstring.

This diagram shows the installation principle and fastening of balusters to a bowstring. If wooden balusters are selected, then they are cut at an angle of installation of the flight of stairs. If polyurethane or metal version racks, and they are supposed to be installed on a string, then on it for the balusters you will have to equip some kind of steps-stands. The horizontal surface of such steps must be parallel to the floor of the room.
However, due to the fact that the most commonly used ones are balusters made from natural wood, then options for their installation will be considered.
Attaching balusters to steps or strings must be done using dowels, pins or self-tapping screws. It is not recommended to fix retaining elements with nails, since in this case, the reliability and safety of the structure is difficult to guarantee. Considering that the staircase is constantly experiencing mechanical and vibration loads, the nails will quickly expand the hole through which they are driven into wood, as a result which does not rule out the possibility that the staircase railing structure will quickly become loose and become very unreliable.
Options for attaching balusters to studs
Using pins, balusters can be attached to the surface in several ways. In this case, either smooth or threaded studs are used.
- In order to fasten the balusters to smooth studs, markings are made at the end of the racks, since the hole must be drilled exactly in the center of the base of the product. Then, at the found point, a hole with a depth of no more than 80 mm and a diameter of 8 ÷ 10 mm is drilled.

The diameter of the hole is selected depending on the size of the end of the baluster and, of course, on the diameter of the pin. It should be about 1 millimeter larger. It must be drilled out very carefully, otherwise wooden product may crack. To prevent this from happening, it is recommended to first drill a hole with a drill with a diameter of 5 mm, and then expand it to the required size.
In order for the pin to fit tightly into its seat, wood glue is poured into it, and the end of the pin for a length of 50÷60 mm is not only processed adhesive composition, but can also be sprinkled with small sawdust. After the pin is prepared, it is inserted into the hole in the end of the baluster using a screwing motion. A part of it 70÷80 mm long should remain outside. Excess glue that appears is immediately removed, otherwise, after hardening, it will interfere with the installation of the baluster on the step or string of the staircase structure.
- Another option for using studs as fastening is to screw them in. In this case, studs are selected that have threads at both ends: On the one side metric, with the second - by type of screw.

In order to screw such a pin into the end of the baluster, a hole with a diameter of 1–2 mm less than the thread of the fastening element is drilled in it. Before screwing in, the hole is also filled with glue, and the pin is screwed into it with its pointed end. For screwing on metric thread two or three nuts are screwed in and locked, and screwing in will be easy with a regular socket wrench

To ensure that the second end of the hairpin is securely held in the step or bowstring, you can do this. A hole of the same diameter is drilled in their surface as in the end of the baluster, and then its upper part is expanded to glue one or more nuts, which must be recessed flush with the main surface.

The balusters can be installed in place only after the glue around the nut has completely dried. Before screwing the baluster into place, the hole will need to be filled with glue.
- Using a threaded rod and a nut, you can do it differently, but only if the baluster will be attached to a step that has a small thickness. In this option, the steps are drilled through hole, into which a pin is inserted, glued into the baluster. Then, with bottom side steps, a washer of the appropriate size is put on the stud, after which a nut is screwed onto the thread, which will press the baluster to the step. In this option, it is recommended that before installing the baluster on the step, coat its entire end side around the installed pin with wood glue.

- The next option for installing a baluster can be considered the use of a hairpin, the outer end of which, coming from the end, is also a kind of thick screw. Installation involves directly screwing the stud into the step board, pre-coating the end part of the baluster with wood glue.

Installation of balusters on wooden dowels
Now it’s worth considering securing wooden balusters to dowels. This method, by the way, is considered traditional for installing stairs. Dowels are easy to use, and in addition, they can be made independently. However, you can also buy it in a store furniture fittings They are not difficult, since their cost is very low.

For this process, you only need the dowels themselves of the required length and diameter, as well as wood glue. The diameter of the dowel can be from 8 to 12 mm, and the length is 100÷120 mm. To install a dowel, a hole is marked and drilled in the center of the end of the baluster and is 1÷2 mm in diameter larger than the dowel size and with a depth of approximately half the length of this fastening rod. Then, the hole is filled with glue and a dowel is inserted into it. Before continuing work, the glue must be allowed to dry thoroughly. Any excess that appears on the surface must be removed immediately after gluing the part. It is important to glue the dowel exactly vertically, otherwise the baluster will be installed crookedly on the stairs.
To secure a baluster to a string or step, their installation points are marked, which must be located along the same line. At the found points, holes for dowels are drilled. When the glue on the balusters has dried, their end is coated with a layer of the same glue, it is also poured into the hole on the step or string, and then the dowel is tightly inserted into the hole. After this, the baluster must be firmly fixed until the glue hardens. At the same time, the racks are aligned, which is controlled using a building level.
Fastening balusters with self-tapping screws
The simplest and most accessible way for any craftsman to fasten balusters, both on the string and on the steps, is to fix them with self-tapping screws 80÷100 mm long.

This type of fastening cannot be called traditional, however, it fully lives up to the expectations for a reliable and durable fastening. The self-tapping screw is screwed through the baluster into the string or step from the side, obliquely, into a pre-drilled hole for it of a smaller diameter than the fastening element itself. Since the head of the screw must be recessed into the wood, for it, the hole in the upper part is expanded (countersinked). After the self-tapping screw is screwed into the wood, the cap will disappear into the nest prepared for it; the holes will be masked with wood putty of a suitable color.

Balusters can also be fixed to the handrails with self-tapping screws. But for this purpose, fasteners of shorter length are usually chosen, since in no case should they pass through the railing. The head of the self-tapping screw is also buried in the countersunk socket in the same way, and then masked with putty.
The process of installing a wooden balustrade on the stairs - step by step
Now, having understood the methods of fastening balusters, we can move on to considering the stages of installation work on assembling the stair railing as a whole.
The instruction table below will present one of the options for assembling a staircase balustrade. However, it should be noted that this method is not the only one, since each master works according to his own template, developed over the years.
| Illustration | Brief description of the operation performed |
|---|---|
 | So, after the steps of the stairs are mounted, their edge area is marked. The installation line is determined support pillars and balusters. For marking you will need a flat metal or wooden plank, having a length equal to the length staircase, metal ruler, pencil and square. By the way, you can use a galvanized profile, which is used for installation plasterboard structures. The profile or plank is laid along the edge of the steps, approximately at the same distance from the edge. Then, the exact distance from the edge to the plank is measured across the entire width of the step, and a line is drawn at the points found. Thus, all steps are marked. At the end of the process, all lines on the steps must coincide with the common bar. |
 | The next step is to determine the locations for fastening the support pillars, between which the balusters will be fastened. The pillars should have a cross-sectional size larger than the balusters, approximately twice as large. For example, if the balusters have a size of 50x50 mm, then the pillars should have a cross-section of at least 80x80, and preferably 100x100 mm. You can use a pin, screw or dowel to secure the support posts. If the pole is installed on a wooden surface, the length of the fastening element should be 100 mm and the diameter 8÷10 mm. IN in this case These bolts are used with conical threads, similar to a screw. |
 | In the example shown, the upper platform on which the staircase rests is made of concrete. Therefore, calculating the action plan in advance, a so-called embed was built into the concrete at the edge of the site - this is a metal plate measuring 80×80 or 100×100 mm and a thickness of at least 4÷5 mm. On top of the plate, strictly vertically, the mentioned bolt-screw with a length of 100 mm and a diameter of 8 mm is welded. |
 | A hole corresponding to the diameter of the welded bolt is drilled in the lower end part of the support column. Then, the post is simply screwed onto a threaded pin welded to the mortgage. So that the pole is pressed tightly to the floor surface, the lower part drilled hole can be expanded a little. |
 | If the support post is installed on a plank surface, then a hole for the fastener is drilled in it, just like in the end of the post, according to pre-made markings. |
 | The post can be fixed to a horizontal surface using the same bolt. To do this you will have to wooden surface drill a through hole on the stairs, and then insert the fastener from below, having first placed a wide metal washer on it. You can fix the post with a dowel, gluing it into the end of the post, and then into the hole of the step, or with a pin, screwing it first into the end of the post, and then into the step board. In a word, by any of the methods discussed above, whichever seems more convenient. |
 | Typically, the bottom support pillar in a flight of stairs is mounted on the last step and pressed against the riser of the previous step, which gives it some additional rigidity. |
 | When installing support pillars, it is necessary to ensure that they are not only perfectly vertical, but also on the same line, otherwise the staircase railings will be installed crookedly or will not be able to fit into their designated place at all. |
 | Having installed the support pillars, you can proceed to determining the mounting points for the balusters. This procedure will require construction corner and a ruler. If the steps are wide enough, then it is best to attach two balusters to each of them. All elements of the balustrade must be located at the same distance from each other. Typically, when installing two balusters on each step, the distance between them is 70÷80 mm. The exact location is marked along a previously outlined general line. |
 | After the installation points for the balusters are determined, through holes are drilled through them, through which the racks will be fixed to the steps. If you choose the option of fastening using dowels or pins, then before gluing fasteners into the balusters, half of the racks will need to be shortened somewhat so that they are installed exactly under the handrail. Thus, the first baluster of the step remains at its original height, and the second, located closer to the bottom step, is shortened by approximately half the height of the step. In each specific case, the cut part will have its own size, depending on the width and height of the step. |
 | Balusters can be attached to the steps using any of the methods described above or, as in this case, using a bolt-screw screwed from below through a through hole in the step board into a hole drilled in the lower end of the baluster. A metal washer is put on the bolt, then it is inserted from the bottom of the step into the hole and screwed using a socket wrench-ratchet through the board into the hole drilled in the end of the baluster. A screw 80 mm long and 6 mm in diameter is suitable for this purpose. |
 | When all the balusters are secured to the steps, a straight guide bar is attached to them so that it passes through the upper corners of the balusters. The plank can be secured using clamps. After this, along the guide, on each of the balusters, a line for the future cut is drawn with a pencil. In addition, the vertical location of each of the racks is also marked on the guide. The balusters must be numbered so that there is no confusion during further assembly of the structure. |
 | After this, the balusters are carefully unscrewed and removed from the steps. Holes with a diameter of 5 mm are drilled in the center of their end upper part. Then using miter saw Sections are made along the marked lines. The next step, according to the numbering, is to return the balusters to their original place and secure them to the guide along the pre-made marking lines. |
 | Now you can move on to working on the railings. The first thing that needs to be done is to determine the cut angle of the ends of this part, since they should be used to connect it to the support posts. For this purpose, you can use a tool such as a malka. Experienced carpenters It is advised not to simply change the angle set on the saw for cutting down the balusters. Before making cuts, it is necessary to accurately determine the length of the railing. To do this, they are laid on the edge of the steps, from the supporting upper to the lower pillar, and their exact length is marked with a pencil, taking into account the oblique cut. The width of the railing should be equal to the width of the support posts. |
 | After this, oblique cuts of the railing beams are made according to the markings. Further cut end sides must be thoroughly cleaned using sandpaper. |
 | Now on the railing beam, along its entire length, it is necessary to cut a groove, the width of which should be equal to the width of the balusters. The groove depth should be 7÷8 mm. The groove should be in the middle part of the beam, that is, it is made at a distance of 12–15 mm from the edges. To make such a groove, of course, there is no way to do without a manual or stationary milling machine. |
 | To securely fasten the railing, you will additionally need a wooden railing strip with a thickness of 8÷10 mm and a width equal to the width of the groove cut in the railing. The underrail is screwed with self-tapping screws to the upper ends of the balusters while they are fastened with a guide rail. The bar will replace the last one and fix the racks in the required position. Once it is secured, the temporary guide can be removed. |
 | Railings are laid on top of the planks and screwed to it from below using self-tapping screws. |
 | Additionally, the railings, wherever they are installed, are fixed with long self-tapping screws to the support posts. To do this with outside a through hole with a diameter of 5 mm is drilled into the column. First, the hole is widened so that the self-tapping screw goes deep into the wood, approximately 20 mm, passes through the post and is screwed into the end of the railing by 30–40 mm. The length of the screw is calculated depending on the size of the support post. |
Additionally, it is necessary to recall that when installing balusters on their permanent place for any fastening, it is recommended to coat their end surfaces with wood glue. It is best to do the same when installing the railing strip, as well as the railing itself. The glue, when hardened, will strengthen the structure and make it more durable.
Not as easy as it might seem at first sight. To get a strong and reliable structure, you first need to carry out accurate calculations, taking into account the lifting height, the free space that can be allocated to it, ergonomic criteria and even the height and weight of the inhabitants of the house. In these calculations, every parameter is important, from the thickness and width of the steps, to the cross-section and height of the balusters, as well as other structural details. Therefore, in order for the staircase structure to be safe and reliable in operation, it is best to entrust its calculation to specialists. And if you plan to build the staircase completely on your own, then you will need to strictly follow the drawn up drawing, observing all the dimensions indicated in it.
Video: The final stage of installation of a home interfloor wooden staircase - installation of support pillars, balusters and railings
Balusters are architectural elements of a staircase railing that serve as vertical support for the railing. Wooden balusters not only perform a load-bearing function, but also serve decorative element staircase structure. The pliable structure of wood allows you to create a wide variety of balusters from simple shapes to original figured and carved products.
This is what classic wooden balusters for stairs look like
Balusters for stairs perform the following important functions:
- ensure safety of movement along a flight of stairs;
- perform a supporting function;
- add additional rigidity to stair railings;
- are the most noticeable element of the decor.
Wooden balusters are in high demand due to the special properties and advantages of wood products:

Types of wooden balusters
Balusters can transform even the simplest staircase thanks to a wide variety of shapes and sections:

Depending on the production technology, wooden balusters can be divided into three types:

What type of wood to choose
In order for the staircase to remain strong and presentable for a long time, it is recommended to make all elements: railings, balusters, steps from the same type of wood. When making supports for stairs, it is best to choose hard wood:

To make balusters with your own hands, it is important to choose wood of the correct moisture content, without cracks, knots and other defects. Overdried wood is very fragile, and wet wood can crack after drying.
 Different kinds carved balusters
 It would also be wiser for novice craftsmen to choose inexpensive types of wood - pine or birch, which are easy to process. Valuable species such as oak or walnut are too expensive to be damaged during the training process.
Making balusters
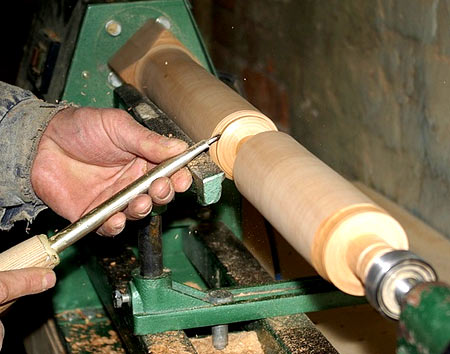
The process of creating staircase racks with your own hands is quite complex and requires specialized tools, certain skills and perseverance. The production of balusters is carried out in two stages: design and turning of the product on a machine.
Design
Before you start making balusters, you need to design their shape - many ideas and sketches can be found on the Internet.
A drawing of the future product is drawn up indicating the dimensions of all bends and cuts. Next stage- This is the transfer of a drawing onto a wooden blank. The applied marks must be numbered - each decorative part may require its own cutting tool.
Types of cutters for the machine
To create various shapes on wooden blank special cutters are used, each of which has its own purpose:

Turning figured racks
The production of balusters on a machine is carried out in the following sequence:
Balusters are short posts that are made using threads. Their main purpose is to support railings of balconies and stairs. The shape of the balusters can be different, it all depends on design solution and interior design. This addition can decorate even the most inconspicuous staircase.
Overview of the main varieties by material
Balusters for staircases made of wood are made from different species, and quite often they are decorated with dotted figured elements. The following grades are usually used for balusters, which determines the types of elements:
- birch;
- pine.
The cheapest are pine balusters, while those made of beech or oak are much more expensive.
Baluster sizes
Balusters for wooden stairs should be installed according to certain rules. Among others, it is worth highlighting the need to provide clearance between elements, which is usually 140 mm or more. The most suitable is 950 mm.
The supports should be fixed at two points - at the base of the stairs and in the area of the railing. The area and cross-sectional thickness of balusters play a decisive role in the issue of structural safety. This determines that the issue of choosing the dimensions of the described elements should be approached seriously. After all, they perform a load-bearing function. Balusters are usually chosen depending on the style of the room.
Classification of wooden balusters by grade and their description
Balusters for wooden stairs can be classified by grade. The highest is grade A, which involves a uniform selection of texture and color. This material provides a transparent finish with medium or light tint. Therefore, slight changes and minor differences in texture are possible. Such products may have eyes, healthy knots and closed cracks, but their diameter should not exceed 5 mm.
Balusters for stairs made of wood can be made in grade B. In this case, we are talking about products with a partial selection of texture and color. The blanks are tinted in dark shades. Changes may be contrasting, textural differences are possible. In one batch you can find products that will have eyes and healthy knots.
In grade C you can find balusters that are not selected according to texture and color. Knots can be dark or light, but their size should not be large. On inside products you can find dead knots. Individual balusters sometimes have fragments of sapwood. It is permissible to putty knots and cracks at the manufacturing stage.

Reviews of balusters in three quality categories
Balusters for stairs made of wood, the description of which will be useful to read before purchasing the product, are offered for sale in three quality categories. Consumers leave their reviews about each of them. By choosing products in the Economy Plus category, you become the owner of products that are subjected to milling during processing, as well as partial machine grinding. According to consumers, it is better to purchase such balusters for stairs that will be installed in corridors or hallways.
On sale you can find balusters of the “Prestige” category. They are milled and worked by hand, and also sanded. Such products are more expensive than previous ones, but, according to consumers, they have more high quality. The most durable and attractive in appearance are the balusters of the VIP category; they are milled and sanded by hand during processing, and the parts are finished separately. All elements are worked out as carefully as possible in the factory, therefore they are most often preferred by consumers.

Cost of wooden balusters
The size of the baluster for wooden stairs will affect the cost. For example, products with dimensions 50 x 900 mm will cost 85 rubles. a piece. In this and subsequent cases, the cost is indicated per pine element. With an increase in size to 80 x 80 x 900 mm, the price increases to 300 rubles. a piece. If you need to purchase a baluster with dimensions 100 x 100 x 900 mm, then one element will cost 360 rubles.

The Stavros company offers customers a huge range of high-quality elegant wooden balusters made of oak and other types of wood, decorated with carved elements, columns and many other parts for fencing and staircase systems. We offer to order exclusive products with carved elements, exclusive appearance and unique performance characteristics.
Wooden posts for stairs with photos: beautiful, exclusive, practical
Exclusive carved details of the staircase structure are the basis of the staircase design. Such details give the entire product a complete appearance, making the staircase original and unique. The craftsmen of our company “Stavros” are able to produce high-quality, amazingly beautiful and reliable structures for stairs made of natural wood. In this case, both budget and valuable wood species can be used.
We offer several basic options for balusters:
- Cylindrical. These carved parts for stairs, photos of which can be viewed in our catalog, are the simplest and most versatile. They have cylindrical shape, can be additionally decorated with carved elements. The price for which is quite affordable, both processed on a machine and made by hand by craftsmen;
- Flat. These and the staircase pillars in cross section have a rectangular shape. You can buy flat balusters for stairs made of this type of wood to decorate interiors with a laconic style;
- Sculptural carved elements made of wood - in the photo such products look surprisingly stylish, but are somewhat more high price. These are the most spectacular and bright products of the masters of the Stavro company. Carved balusters can become an exquisite decoration of any staircase and make the design exclusive. These products can be additionally coated with varnish - this allows you to give ready-made structures exclusive appearance, as well as additional protection from negative impact moisture.
The Stavros company is engaged in individual production decor for stairs. We can offer wood products that will fully comply with the architectural or historical style. The process of adjusting the style features, shapes and sizes of natural wood products can take place online. On our website you can find all the photos of the products.
Customers who want to buy railings and other wood products at a low price receive, in addition to everything else, convenient service, as well as inexpensive delivery. Each product, which our craftsmen work on manually, is a real work of art, which perfectly combines modern technologies, high quality materials and long-term traditions of work.