A mosaic tabletop will make your interior luxurious and exclusive. Wide choose Mosaic tiles in construction stores will help decorate a kitchen or bathroom in Italian or Oriental styles, giving the countertop strength and durability. You can do this decor yourself if you follow the advice of professionals.


Peculiarities
Ceramic mosaic tiles have excellent performance. In the first place is resistance to mechanical stress and abrasion. Mosaic produced by modern equipment and using advanced technologies, it is practically not susceptible to chipping and is not damaged by scratches. In addition, it is not at all afraid of moisture, which allows it to be used in rooms with high humidity: kitchens, bathrooms, saunas.

Mosaic has a high resistance factor when exposed to high temperatures, therefore, it is used to finish surfaces adjacent to a kitchen stove or a heating device for a sauna or fireplace with an open fire.
You can place hot objects (pots, pans) on the countertop without fear of burning the surface. The tile has good frost resistance, so it can be successfully used for finishing a balcony, cottage or barbecue area.


Retail chains offer a wide range of mosaics with high decorative qualities; a variety of colors allows you to choose the ones you need to create stylish interior. Consumers can choose from numerous compositions and mosaic panels. For ease of installation, mosaic tiles are mounted on paper sheets or meshes, they are glued to tile adhesive in blocks or cut out the required form construction knife.
The mosaic manufacturing technology makes the color and pattern of the tiles unchanged throughout their operation, the color does not fade or fade due to external factors: ultraviolet radiation, high temperatures, aggressive chemicals household products care This material is easy to keep clean.


Finishing technology
The strength and service life of a mosaic countertop depend on a properly prepared surface for finishing. The first step is making the frame. The structure can be made of wooden blocks with a cross-section of at least 50x50 mm or a metal profile. Metallic profile in rooms with high humidity it is preferable, since the wood can rot. Before starting work, draw a scale diagram of the frame on a sheet of paper and calculate required quantity material. After this, ruler marking lines are made on the walls and floor.
Then pieces of timber or profile are cut to the required length. The contours of the frame are secured to the screws on the floor and walls, vertical guides are screwed to them with screws and a rigid connection is made with the upper contour. Give required thickness tabletop. If you need a thin tabletop, then the edge of the profile will serve as an edge. The profile is available in various widths: 28x27, 50x40, 65x40, 75x40, 100x40 mm. Select the right size.


The design of the frame can provide shelves or storage spaces. To make curved elements, cuts are made on the sides of the profile in increments of 2-5 cm and bent by hand to the desired radius. Curved elements may require additional stiffeners.
After installation electrical wiring, sewerage, water pipes proceed to the second step - covering the frame. Professionals advise choosing plasterboard with high moisture resistance or DSP. According to the diagram, the cladding parts are cut out and attached to the frame with screws in increments of 10-15 cm, for complex shapes the fastening step is made smaller. A hole for the sink is cut in the plane of the countertop, kitchen stove or communications for supplying gas, water, electricity.


There may be radial parts in the frame - it is better to make them with arched plasterboard.
Flexible gypsum board is moisture resistant and has a thickness of 6.5 mm. It bends well even in a dry way due to the presence of a fiberglass layer in it. For steep relief lines, the wet method is used: one side of the plasterboard is rolled with a needle roller and moistened until saturated with moisture, avoiding soaking reverse side. On a pre-prepared template, from the most convex part, gradually bend a strip of gypsum board to the edges, fix it, leave it until dry and then attach it to the desired place.
Arched gypsum board – thin material. To give strength to the structure, it is laid in two layers. You need to cut parts from the sheet along the long side: the arrangement of fiberglass fibers does not allow bending in the transverse direction. The edges of all joints are cut at an angle of 45 degrees to a depth of 0.5 cm, glued with serpyanka using putty for drywall, primed and puttied to hide defects in the joints, since mosaics require a flat base. The frame is now ready for finishing mosaic.

The third step is gluing the mosaic. The choice of mosaics is huge.
- Mirror tiles. Visually enlarge the space and hide unevenness.
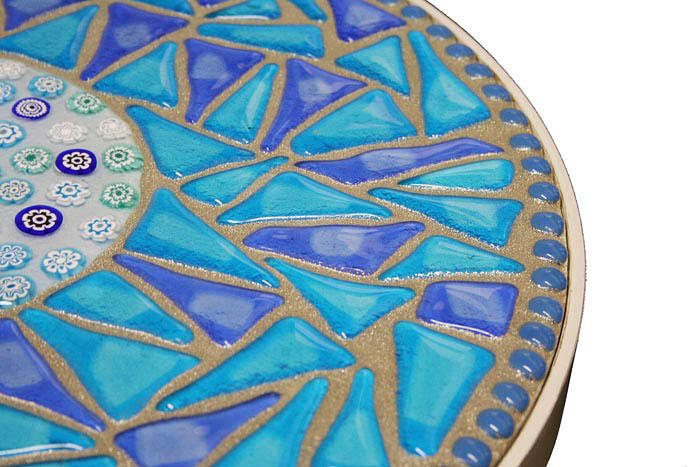
- Smalt mosaic- opaque glass, melted at special conditions mixed with permanent pigment. Gives a richness of color refraction. One of the most durable materials.
- Venetian glass- the most expensive and spectacular type of tile. It features a beautiful transition of color and transparency.
- Mosaic made of natural stone. It will add nobility to the finish, but not all types of stone can withstand high humidity in a bath or sauna - this information must be obtained from sellers before purchasing.
- Porcelain stoneware mosaic. A win-win option for durability, wear resistance and impact resistance different temperatures and moisture. It has a wide range of colors and textures.


The simplest option is pasting with tiled mosaics fixed on mesh, paper or silicone. The tiles are selected according to color, texture and composition already at the industrial production stage - the craftsman only has to glue the finished fragments. The surface is primed, and tile adhesive is applied with a special ridge spatula. Moisture-resistant glue is used; in the presence of a vibration factor, for example, the proximity of the subway, deformable glue is selected.
It is worth considering that transparent tiles will make the adhesive layer visible, so white tile adhesive is selected for glass.


They begin gluing from the front edge of the tabletop, and trim the details at the wall. The end part is finished in last resort: select the appropriate location of the tiles at the joint, observing accuracy and thoroughness of gluing - this will be the most visible part, which will be most exposed. All work is carried out using building level and constantly check that there are no voids under the mosaic tiles.

The fourth step is gluing the baseboard and grouting the seams. Ceramic plinth for tiled mosaic is selected to match the tile. It is also attached with glue. You can do without a plinth if you seal the joint with the wall well cement mortar. Grout the seams with a special grouting agent, which can be various colors. After this, you can install the sink, faucets and connect communications.

Italian sink
Anyone familiar with the architecture of Italy has probably paid attention to the beautiful mosaic ensembles in the interiors, where everything is made of mosaics: tables, sofas, flower vases, bath bowls and sinks. Today, anyone can install an Italian sink in their home. The technology is the same: decorate an old faience sink with mosaic or install a bowl cast from concrete. You can cast it yourself by using two dishes of different diameters instead of a silicone mold.
You will have to lay out the mosaic on the inside of the sink manually, one tile at a time, making sure that the edges of the tiles are in the same plane and do not protrude and do not create roughness. It's a painstaking job, but you'll be rewarded with a luxurious interior.


Mosaic from improvised materials
It is not necessary to purchase mosaics - you can use broken ceramic tiles and crockery shards. You can try your hand at an old wooden country table. The main condition is a durable tabletop. Sand the surface, treat it with wood primer, and fill deep cracks or chips. For ceramic mosaics, cut and glue fiberglass.
After this, apply tile adhesive and cover the surface with pieces, adjusting them in size and color. For execution complex pattern first it is applied to paper in life size or paint directly on the prepared surface. You can make an ornament from a pattern along the edge and in the center or arrange mosaic pieces along color scheme– here you need to use your creative inspiration.

Repairs are even easier dining table using decoration from computer disks. The discs are cut into pieces of the required size, arranged according to color, and the pattern is determined. By the way, shiny disk fragments do not need any specific pattern: they look beautiful even in a chaotic arrangement.
Mosaic is one of the oldest ways to decorate a room. Traditionally, the material is used to decorate walls and floors; less often, paintings are made from it. The range of technology applications has expanded significantly over time, mosaic tiles in Lately often used for pasting tables. It is worth noting that making a countertop with your own hands is not difficult; it requires minimal skills and a lot of patience.

There is quite a large number of types of mosaics. The most common are the following:
- Glass;
- Ceramic;
- Stone;
- Metal;
- Wooden;
- Porcelain stoneware.
Most the best option According to experts, the combination of colored glass with flexible tiles is considered. Flexible tiles are products made from crumbs processed to match a certain texture of brick or stone.


Advantages of flexible tiles:
- Moisture resistance;
- Long service life;
- Mechanical strength;
- Frost resistance;
- Resistance to aggressive environments;
- Preservation of color under the influence of moisture and sunlight.
The spectacular artistic image of the mosaic is ensured by its aesthetics and ease of installation; the material is ideal for covering the tabletop with a mosaic with your own hands.
Features of mosaic countertop finishing


Mosaic looks great in the kitchen; this decoration option perfectly refreshes the interior and makes it more original and bright. At proper care the tabletop will retain its original appearance for many years. It is not recommended to glue mosaic tiles to a set that is not very new - it is better to replace the old countertop with a new one.
You can purchase a new countertop at a building materials store. It can also be used as a board made of polyurethane foam of different thicknesses.
To make measuring and cutting easier, a centimeter grid is sometimes applied to the board.
A profile made from of stainless steel, which is glued to the edge of the product using the same glue as the mosaic. The glue used is a standard elastic composition; for glass mosaics, transparent or white glue is used, which is suitable for installing tiles of any color. This adhesive also functions as a sealant, which is ideal for kitchen furniture. Mosaic flooring involves many joints, which can lead to the formation of mold. To avoid this, special anti-fungal cleaners are used to clean the countertop.
How to decorate a countertop with mosaics

There are three main ways to make a tabletop with your own hands:
First way:
- Stage 1. The tabletop is cut out of the slab according to the dimensions, and its profile edge is also prepared. The edge with the perforated part up is placed on the edge of the board;
- Stage 2. The selected adhesive is applied to the surface and leveled using a notched trowel; the adhesive should also be applied to the upper edge of the profile;
- Stage 3. The upper perforated profile is laid on glue, which forms the edge of the tabletop;
- Stage 4. After the glue has dried, pre-cut tiles in the form of squares are laid on the surface. The same glue can be used as a sealant; a small part of it is rubbed over the surface of the countertop to grout the joints;
- Stage 5. Excess dried glue is wiped off with a damp cloth.
The finished tabletop is polished to a shine with a soft cloth; no additional coating is required, you only need to comply with the conditions for the care and use of mosaic surfaces.


Second way:
If the decor of the tabletop with your own hands does not involve complex artistic compositions, it is recommended to use the method of transferring drawings from paper to the tabletop.
- Stage 1. The mosaic sheet is carefully laid on a pre-prepared adhesive base, the paper layer should be on top;
- Stage 2. The paper is gently blotted wet wipe until it begins to easily separate from the surface of the mosaic;
- Stage 3. Remains of paper are removed without unnecessary effort, which can cause a shift in the position of the elements;
- Stage 4. After removal paper base the drawing must be left for a day, after which the joints are grouted;
- Stage 5. Excess grout is removed with a damp cloth.

Third way:
This method is considered the simplest; it involves laying mosaics using a mesh.
- Stage 1. The mesh base is immersed in glue solution, this must be done so that all its parts are evenly submerged to the same depth;
- Stage 2. The pattern hardens over the course of a day, after which grout is applied;
- Stage 3. To remove excess traces of grout that cannot be removed with a sponge or damp cloth, it is recommended to use light solvents (such as White Spirit). Solvents should be used a week after completion of work;
DIY mosaic installation in the kitchen (video)
All methods of making a countertop with your own hands have their advantages; with their help you can decorate any kitchen. It is not necessary to buy a mosaic; a beautiful pattern or paintings can be created from fragments of broken tiles or bottles.
Examples of mosaic countertops in the kitchen (photo)


_Stoleshnica_iz_mramornoy_mozaiki_.jpg)


Mosaic is one of the oldest ways to decorate a room. Traditionally, the material is used to decorate walls and floors; less often, paintings are made from it. The range of applications of the technology has expanded significantly over time; mosaic tiles have recently been often used to cover tables. It is worth noting that making a countertop with your own hands is not difficult; it requires minimal skills and a lot of patience.

There are quite a large number of varieties of mosaics. The most common are the following:
- Glass;
- Ceramic;
- Stone;
- Metal;
- Wooden;
- Porcelain stoneware.
The best option, according to experts, is the combination of colored glass with flexible tiles. Flexible tiles are products made from crumbs processed to match a certain texture of brick or stone.


Advantages of flexible tiles:
- Moisture resistance;
- Long service life;
- Mechanical strength;
- Frost resistance;
- Resistance to aggressive environments;
- Preservation of color under the influence of moisture and sunlight.
The spectacular artistic image of the mosaic is ensured by its aesthetics and ease of installation; the material is ideal for covering the tabletop with a mosaic with your own hands.
Features of mosaic countertop finishing


Mosaic looks great in the kitchen; this decoration option perfectly refreshes the interior and makes it more original and bright. With proper care, the countertop will retain its original appearance for many years. It is not recommended to glue mosaic tiles to a set that is not very new - it is better to replace the old countertop with a new one.
You can purchase a new countertop at a building materials store. It can also be used as a board made of polyurethane foam of different thicknesses.
To make measuring and cutting easier, a centimeter grid is sometimes applied to the board.
A stainless steel profile can also be sold as a kit, which is glued to the edge of the product using the same glue as the mosaic. The glue used is a standard elastic composition; for glass mosaics, transparent or white glue is used, which is suitable for installing tiles of any color. This glue also functions as a sealant, which is ideal for kitchen furniture. Mosaic flooring involves many joints, which can lead to the formation of mold. To avoid this, special anti-fungal cleaners are used to clean the countertop.
How to decorate a countertop with mosaics

There are three main ways to make a tabletop with your own hands:
First way:
- Stage 1. The tabletop is cut out of the slab according to the dimensions, and its profile edge is also prepared. The edge with the perforated part up is placed on the edge of the board;
- Stage 2. The selected adhesive is applied to the surface and leveled using a notched trowel; the adhesive should also be applied to the upper edge of the profile;
- Stage 3. The upper perforated profile is laid on glue, which forms the edge of the tabletop;
- Stage 4. After the glue has dried, pre-cut tiles in the form of squares are laid on the surface. The same glue can be used as a sealant; a small part of it is rubbed over the surface of the countertop to grout the joints;
- Stage 5. Excess dried glue is wiped off with a damp cloth.
The finished tabletop is polished to a shine with a soft cloth; no additional coating is required, you only need to comply with the conditions for the care and use of mosaic surfaces.


Second way:
If the decor of the tabletop with your own hands does not involve complex artistic compositions, it is recommended to use the method of transferring drawings from paper to the tabletop.
- Stage 1. The mosaic sheet is carefully laid on a pre-prepared adhesive base, the paper layer should be on top;
- Stage 2. The paper is carefully blotted with a damp cloth until it begins to easily separate from the surface of the mosaic;
- Stage 3. Remains of paper are removed without unnecessary effort, which can cause a shift in the position of the elements;
- Stage 4. After removing the paper base, the design must be left for a day, after which the joints are grouted;
- Stage 5. Excess grout is removed with a damp cloth.

Third way:
This method is considered the simplest; it involves laying mosaics using a mesh.
- Stage 1. The mesh base is immersed in the adhesive solution; this must be done so that all its parts are evenly immersed to the same depth;
- Stage 2. The pattern hardens over the course of a day, after which grout is applied;
- Stage 3. To remove excess traces of grout that cannot be removed with a sponge or damp cloth, it is recommended to use light solvents (such as White Spirit). Solvents should be used a week after completion of work;
DIY mosaic installation in the kitchen (video)
All methods of making a countertop with your own hands have their advantages; with their help you can decorate any kitchen. It is not necessary to buy a mosaic; a beautiful pattern or paintings can be created from fragments of broken tiles or bottles.
Examples of mosaic countertops in the kitchen (photo)


A mosaic tabletop has excellent aesthetic qualities and a long service life. Mosaic has not gone out of fashion for many years, attracting with its sophistication and convenience. The history of the use of mosaics goes back more than one millennium. Even in the Ancient East, masters of their craft used mosaics as decorative decoration, as evidenced by Persian boxes that have survived to this day. The materials most often used to make mosaics are ceramics, marble, natural stone, smalt and glass. You can also find mosaics made from artificial materials, which will significantly help save your budget.
- How to cover a table with mosaics
- DIY mosaic tabletop (video)
- Tabletop design: mosaic (interior photo)
What can be made from mosaic and the advantages of the material
Mosaic is a tile in miniature. The fragments are square, rectangular, round, or more complex and irregular shape. Particularly popular is the so-called Moroccan mosaic - a combination bright colors, the variety of shapes and textures of tiles allows you to lay out any design or create original geometric patterns.

Among the advantages of mosaic, it is worth noting a wide variety of colors and durability
The advantages of mosaics include:
- Moisture resistance;
- Heat resistance;
- Frost resistance;
- High mechanical strength.
Based on these parameters, mosaic has a wide range of applications. Most often it is used as wall cladding in the bathroom, apron in the kitchen and flooring. For rooms with high humidity and swimming pools, ideal option glass mosaic can serve.
All this is thanks to the feature of not absorbing water.
Mosaic tiles are used not only as finishing material for walls and floors, but also as cladding of building facades. Mosaics are often used to decorate decorative elements and furniture (fireplace, window sill, chest of drawers, kitchen apron, etc.).
How to cover a table with mosaics
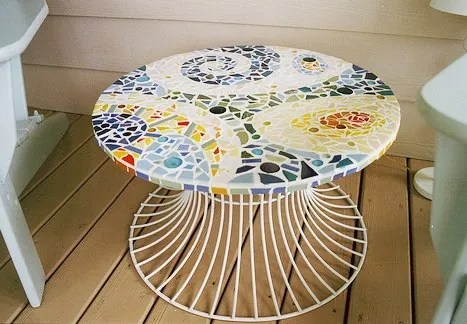
You can also make a table from mosaics, which will be an excellent addition to the interior in the living room or on the terrace in garden house. If you want to decorate such a table using mosaic techniques, but have no experience or skills in carpentry, then decorate the existing one coffee table It won't be too difficult.
For the final result to be original, it is not enough to completely cover the countertop in one color.

Before covering the table with mosaics, you should choose the composition that it will depict.
Drawing will help add some zest. And to save on buying ready-made mosaics, in this case you can use the fight ceramic tiles. The sequence of actions when covering a table with mosaic is simple.
To perform this work, you will need:
- Wooden table;
- Sketch of the drawing;
- Liquid nails or PVA for wood;
- Mosaic tiles.
The table is pre-cleaned and degreased. The drawing must be transferred to the tabletop. The glue is applied directly to the table surface. According to the image, the tiles are laid out by color. After the glue has completely dried, you can begin grouting the joints. Table with mosaic decoration ready and using the studied technology you can already move on to other, more complex work using mosaics.
DIY materials for mosaic countertops
A special atmosphere in the kitchen will be given by the finishing of the countertop, lined with mosaic tiles. Having decided to make the countertop yourself, you need to decide on the type of mosaic itself. It is better to opt for ceramic or glass, which is ideal for rooms with high humidity.

Materials for mosaic countertops are inexpensive, so everyone can afford them
Besides facing material, to make a tabletop you will need:
- Moisture-resistant drywall;
- Metallic profile;
- Self-tapping screws;
- Serpyanka;
- Primer;
- Epoxy or tile adhesive;
- Grout for joints;
- Bracket for fastening.
To reduce work time, you can purchase ready-made compositions in the store, attached to special paper or grid, rather than laying each element separately. Armed with the necessary building materials and having decided on the location, you can proceed to the implementation technology.
Before carrying out the main work, it is necessary to take accurate measurements and make outlines. After taking measurements, you should begin assembling the frame of the future tabletop using a profile and self-tapping screws. A hole is cut in the drywall where the sink will be located. Next, all sheets must be coated with a primer and allowed to dry. Using self-tapping screws, the tabletop is covered with plasterboard.
All existing joints are glued with serpyanka.
Glue is applied to the drywall, on top of which a pre-prepared mosaic is laid. The tiles should be laid out from the most visible corner of the product. The joints are being grouted. In the kitchen it is preferable to use grout based on epoxy resin(unlike cement analogues, it has better dirt-repellent and heat-resistant properties). After complete drying, the base of the tabletop is attached to the wall using a bracket.
DIY mosaic sink decoration
In addition to a mosaic countertop, you can also make a sink made of mosaic. uniform style. A ready-made one is used as a source kitchen sink made of stainless steel, cast iron or ceramics. With basic construction skills, you can try to make your own sink from concrete or wood.

A mosaic sink looks good in a classic-style bathroom interior
Having at hand necessary tools, which are not much different from those used in the manufacture of the tabletop, you can get to work:
Despite the fact that a mosaic sink is a very labor-intensive and painstaking task, the result will delight the eye with its beauty and practicality for a long time.
In this article News portal The “site” would like to invite you to make a table with your own hands, the tabletop of which will be decorated with mosaics.
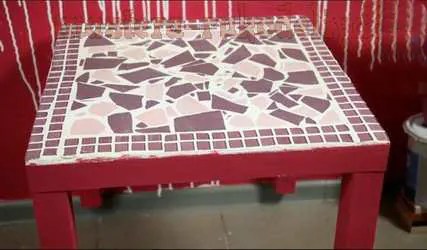
Making a mosaic table can be in an inexpensive way recovery old furniture, as well as a simple and cheap activity that you can do in free time.
 To create a table you will need following materials, which you can easily buy at any craft store:
- old tabletop (suitable old table);
- small tiles (as an alternative, you can use broken plates);
- grout for tile joints;
- glue on cement based;
- rubber gloves to protect your hands .
Table preparation
 In order to properly adhere the tiles to your future table, you must make sure that the tabletop is completely clean of any dirt that may have accumulated on the table.
Use a soft sponge and some warm, soapy water to thoroughly clean the countertop, then dry thoroughly. If necessary, sand the surface.
Before you start gluing the tiles, you should think carefully about where you are going to place the tiles. You may want to create some kind of pattern or even a design.
Application of tiles
You can use small tiles, or you can beat large ones.
 To glue the tiles to the countertop, you will need to use a cement-based adhesive. Don't forget to wear rubber gloves to avoid getting glue on your hands.
 Once all the tiles are glued to the countertop, you will need to use a soft tile grout to seal any gaps between the tiles. You can apply the grout with a spatula or by hand. rubber gloves.
 After applying grout, wipe off excess as quickly as possible. Do not wait for the solution to dry as it will be very difficult to remove.
 Your mosaic table is ready.
 Do you want to be original? Then instead of tiles, try using tin beer bottle caps or wine corks. In a word, any materials and your imagination are suitable for decorating the table.
