The basic design of a banquette is quite simple - a stool with a soft seat. Often the basis of the product is actually a stool. A larger banquette, if the size of the hallway allows, is no less easy to make. This will require minimal carpentry skills and the ability to hold a needle and thread.
Required materials and tools
The “raw materials” for the product are wood materials. Forged models or furniture with an iron frame will require much more serious skills and experience.
- Wooden beam - 30*40, 30*50 mm, if the design includes legs and strapping. Slats for plywood products have a smaller cross-section.
- Legs can be used ready-made - from a stool, bench, low coffee table.
- Plywood or MDF panels - a sheet of appropriate sizes for a one-, two-, three-seat product.
- Fasteners require furniture corners, screws, glue, and possibly pins.
The soft part of a wooden bench consists of a filler and a cover.
The latter is made at home from suitable fabric - velor, furniture upholstery, plush. The material must be sufficiently dense and wear-resistant. You can use leather or synthetic substitutes.
The filling material, as a rule, is foam rubber - it is quite elastic and holds its shape for a long time. If a very soft seat is being constructed, especially with carriage tie, then in addition to foam rubber, synthetic winterizer is also used.
The following tools will be required:
- jigsaw, screwdriver, drill;
- hammer, level, screwdrivers;
- needles and thread, possibly buttons;
- construction stapler for fastening fabric;
- sandpaper of different grits.
In addition, paint or stain and varnish may be needed.
Banquette made of plastic bottles, decorated decoratively with your own hands
How to make a banquette for the hallway with your own hands
The process consists of several stages. All of them are quite simple to implement and require only accuracy and due care.
The following video will help you make a bench with your own hands:
Preparation
At the first stage, it is necessary to create a drawing of the product, no matter how simple it may seem. The parameters of the hallway and the maximum possible dimensions of the product are determined.
The capacity of the banquette is calculated: one person occupies an area of 45*55 cm.
The following photos will tell you how to make various types of banquettes, including those with armrests, in the hallway with your own hands.
Drawings for making banquettes with your own hands

Wooden frame

With carriage tie

With soft seat

Single

Cylindrical

Product assembly
Photos of do-it-yourself banquettes

Plush

With rattan boxes

With a flower pattern

Leatherette
Do-it-yourself furniture upholstery
The method described above allows you to obtain a product with a smooth surface. But if on two- or three-seat models this option is quite presentable, then a single-seat banquette looks boring. A pouf with a carriage tie looks much more interesting.
To do this, you will need the same tools, including a hand cutter, softer and thinner fabric, since it needs to be folded, and large buttons covered with the same fabric.
This product looks very decorative and is quite simple to make.
The next master class will teach you how to sheathe a banquette with your own hands using the carriage screed technique:
Sew a cover
The model with a soft seat can always be upgraded. To do this, it is quite enough to change the covering or sew a cover. And if the first option requires effort and some experience, then the second only requires the ability to sew on a sewing machine.
A cover with frills is sewn for a banquette without a back and armrests, measuring, for example, 45*45 cm. A variety of fabrics are used for this, but it is advisable, if this product does not have a specific purpose, for example, for a wedding interior, to choose fabrics that are resistant to wear.
The photo patterns below will help you sew a cover for a bench with your own hands.
Photos of covers for a banquette


Making a banquette is not a difficult task at all. And everyone can decorate it to their own taste. The main thing is not to get carried away and remember that this furniture is intended for the hallway of an apartment, and not for an exhibition.
The following video will help you sew a cover for a banquette using a chair as an example:
Photo gallery (17 photos)

Banquettes with shelves for shoes can rarely be seen in small hallways, but they are often present in spacious rooms. Today they make various models banquettes, from which you can choose suitable option for your home. Based on the criteria of practicality and conciseness, they immediately became an indispensable element of minimalism and functionalism.
The bench combines a seat and shelves for shoes. Other models may include drawers. In any case, such organizers turn out to be a multifunctional item that does not take up much space and is used for several purposes.
Materials
In the manufacture of shoe racks The following materials are used:
- tree;
- metal;
- leather or its substitute;
- textile.
The last two materials are usually used for seat upholstery. Leather inserts may also be present on other surfaces of the organizer. To store the shoes themselves, metal or wooden shelves are used, which are less susceptible to deep contamination and can be easily cleaned with simple cleaning products. Forged models are amazing fine work and intricate patterns. High-quality models are made from strong and durable wood, so before you buy such an organizer, inquire about the quality of the material and its service life. It would be good if the model was additionally covered protective varnish. Then the set will serve you for a long time.
Banquette in the hallway with shelves for shoes
 The standard version of the banquette is considered bench with shelves underneath. It resembles a shoe rack, only the upper part is reserved for the seat. The organizer can have one or two shelves. Make at least one shelf high enough to accommodate tall shoes. The bench should be selected such a length that it does not take up much space in the corridor. Some samples are made with a low back.
Structures can be open or closed. Open ones are convenient because shoes can be removed from the shelves faster. Closed examples allow you to hide all your shoes from view and not once again clutter up the appearance of the hallway.
There are also models with a folding mechanism, where ankle boots and summer shoes are usually placed. The shelves are attached from the inside to the door of the closed case and, when opened, fold towards themselves, exposing accessories to view. Shelves can be either wooden or metal in a lattice design. For shoes, a shelf is often made so long that the heel ends up behind its edge, but is firmly fixed and does not get stuck in the lattice.
Dimensional options include several shelves divided into many small cells. This type of organizer is more suitable for fashionistas who have a large number of shoes and sandals.
Banquette-shoe rack with drawers
Another option for a shoe rack can be closed shelves that are hidden behind the door of the bedside table. Instead of a tabletop they will equip leather or fabric seat. The design really resembles a bedside table with several drawers, which vary in size and are intended not only for shoes, but also for storing other things.
There are some models of shoe racks that are often mistaken for just sitting. They resemble backless mini sofas that can seat several people. However, there are drawers hidden inside with several pairs of shoes that slide out from the bottom.
Bench-pouf
 It would seem impossible to imagine such an organizer. In fact, such a pouf (square or round) it turns out to be hollow inside, and it is possible to put shoes in the niche by removing the seat cover. Sometimes she just leans back. Other models have a drawer at the bottom.
There are banquettes in the form of soft stools that have a small shelf under the seat.
Of course, these organizers are not intended for large quantity accessories, but you can store seasonal shoes in them. Banquettes-poufs are produced in various designs, and due to their small size they fit even in a small hallway.
Design solutions
Since today shoe racks with shelves for shoes are again gaining popularity, they began to be performed in different styles so that they fit into the interior design:

Last two directions love unusual shapes, so even simple banquettes without shelves, but with enough space under them for shoes in an interesting geometric shape will always be appropriate.
For Provence and country wooden closed cabinets of bright and light wood species are suitable; The option with wicker inserts is interesting. Models painted in light colors with floral patterns, ideal for a romantic Provence.
Classic banquettes, made of dark wood with leather, velvet or velor upholstery, always look attractive and respectable. Forged items with openwork shelves and back will add a touch of the Middle Ages.
But most banquettes with shoe racks are made universal so that they fit into any modern interior.
Main criteria when choosing a bench, its shape, material, functionality and external design. And you should also consider the size of the product. For big family It is worth choosing elongated models with several shelves and drawers. A small organizer is suitable for one person. But if you have enough space in the hallway, you can buy a more spacious piece of furniture.
It must be said that such organizers are used not only in the hallway, but also in other rooms, such as the kitchen, living room or bedroom. A shoe rack hidden inside will in no way spoil the appearance of the place to relax.
DIY banquettes in the hallway
 Organizer banquets can be purchased at any furniture stores, and can also be ordered online. But it is also possible build your own banquettes in the hallway. Photos from the Internet will help you choose best option for making it yourself.
First, you need to decide on the size of the future product. If you are small and narrow corridor, then you shouldn’t make a bulky shoe rack. If you have a large space, it is better to make a spacious organizer in which you can put all your existing shoes. You also need to decide whether to make additional drawers and countertop shelves for various small items.
To make a simple wooden bench in the form of a small bench with shelves for shoes, you materials will be needed:
- wooden blocks the right size;
- stands for the structure (any legs from unnecessary chairs or stools will do);
- wooden layers;
- fabric for the cover;
- foam rubber (or synthetic winterizer);
- screws, glue;
- protective varnish, paint (optional).
Manufacturing stages:

Additionally, attached cabinets with drawers and countertops will make the banquette more functional.
Wrought iron banquettes, like other forged products, are quite difficult to manufacture, as they require skills in hot or cold forging. Therefore, many people find it easier to buy such items than to make them themselves.
If you have already dealt with this craft, then you need to purchase metal pipes different sizes and profiles from which the frame should be made. The curls and patterns obtained on the machine are welded together into openwork sheets for shelves and walls. The seat upholstery can be made of leather or leatherette with soft filling.
A forged bench-shoe rack is more difficult to make, but the stunning result in an elegant design will delight not only you, but also your guests.
Banquette with shoe box in the hallway


In order for your home to have a new convenient and original item furniture, you don’t have to go to the store and spend a lot of money. Of course, it’s better to buy a sofa or bed, but such an interior detail as an ottoman is not at all difficult to make with your own hands.
In addition, if you decide to start making an ottoman, you can make it the one that best suits your design.

It will be possible to choose the required form, material and color. However, this is not the only advantage of homemade ottomans, since its production may cost nothing at all.

Soft poufs
The easiest way is to sew a frameless soft ottoman yourself. To make it, you only need a piece of fabric, stuffing material and a sewing machine.
Although if there is none, then it is quite possible to do without it by sewing all the parts by hand. In order for your ottoman to be smooth and look beautiful, you need to make a pattern out of paper. It should be a square with triangles at the ends.
Using this template, you need to cut out 8 identical pieces of fabric, not forgetting to leave seam allowances. Moreover, you can use either one piece of fabric or materials of different colors and textures for each of the parts cut according to the pattern.
After all the parts are ready, you need to stitch them together to form a shape similar to a ball. And in order for the ottoman to be stuffed, bend the top of the triangle of each of its parts inward.

Filler
In order for the pouf to keep its shape, padding polyester or foam rubber are well suited. But other materials can also be used. Even fabric scraps are suitable as such.

To give the ottoman a finished look, you need to close the remaining hole by sewing on a circle of material with processed edges. If the edges of the part round shape If it is difficult for you to process, then it can be cut in the shape of an octagon.

You can simplify the task and sew a pouf from two round parts, which will be the top and bottom of the product, and two rectangular parts, which will be the sides of the pouf.

The height of the ottoman can be adjusted by the width of the rectangle. But the length should always be equal to half the length of the cut circle.

By sewing rectangular pieces, stitching a circle to them and filling them with filling, you can get a round ottoman that will be soft and light. It will become not only a practical piece of furniture, but also a wonderful toy for children that cannot be injured.

A cube-shaped ottoman is made in a similar way. In this case, instead of two rectangular pieces and two circles, you will need 6 squares. Making a cube out of them is not difficult. And if you sew into one of the edges hidden zipper, then you can change the filling and wash the cover.

Pouf made from plastic bottles
You can make an ottoman with your own hands and from plastic bottles. They, of course, must have the same volume.

To do this, the upper part of the bottle, where it begins to narrow, needs to be cut off and the part remaining without a cap must be put on another similar bottle. Repeating this procedure with other bottles, we form them into a round structure.

To ensure that the bottles do not deform and the pouf does not lose its shape, we fasten them with tape.
A little trick is that a bottle located inside other similar ones, fastened with ordinary transparent tape, can be pasted over with double-sided tape and glued to inside the remaining bottles.

Note!

In order to cover the upper and lower areas, you need to cut a circle out of cardboard or chipboard according to the diameter of the connected bottles. We glue foam rubber to these circles and wrap it around the outside of the pouf.

All that remains is to sew a cover for the finished ottoman. You can sew a zipper around its upper part.

Such furniture will save filler. And if the cover is made of raincoat or water-repellent fabric, then such furniture can even be placed outdoors.

Moreover, as can be seen in the photo, round ottomans made without a frame and containing inside plastic bottles, in appearance they are practically no different.

Pouf with lid
In order to make a pouf similar to those sold in stores, you need carpentry skills and some tools. To begin with, you should cut out 4 rectangular pieces from chipboard, 33 cm wide and 40 cm long.

Note!

Use wooden blocks to hold them together. A square with a side of 40 cm is attached to the bottom. As a result, you should end up with a kind of box.

This blank from the inside using construction stapler can be sheathed with material. The square, which will act as a lid, is also lined with material from below. And the top, before tightening upholstery fabric, pasted over with foam rubber in order to give the ottoman softness.

Along the entire outer perimeter, the pouf, like the lid, is wrapped with foam rubber. And only then they cover it with material. Hinges are used to attach the lid to the cube. To give this piece of furniture mobility, you can attach furniture wheels to the bottom.

It’s even easier to make an ottoman with a lid from a bucket, large saucepan or other utensils and equipment.
The main thing is that, like poufs, they have a removable or opening lid. Then you just need to wrap the workpiece with foam rubber or other soft material and put a cover on it.

All homemade ottomans can fit perfectly not only into the interior of an apartment, but they are also a great option for a summer cottage or outdoor recreation. After all, ottomans are lightweight, mobile due to their size, and comfortable pieces of furniture.
Note!


They are very suitable for children's rooms, giving little ones the opportunity to sit comfortably on them, or even build castles using poufs as blocks.

It is much more convenient to use such a piece of furniture to sit at a low coffee table, because homemade pouf can be made to any height.

Photo of a do-it-yourself ottoman


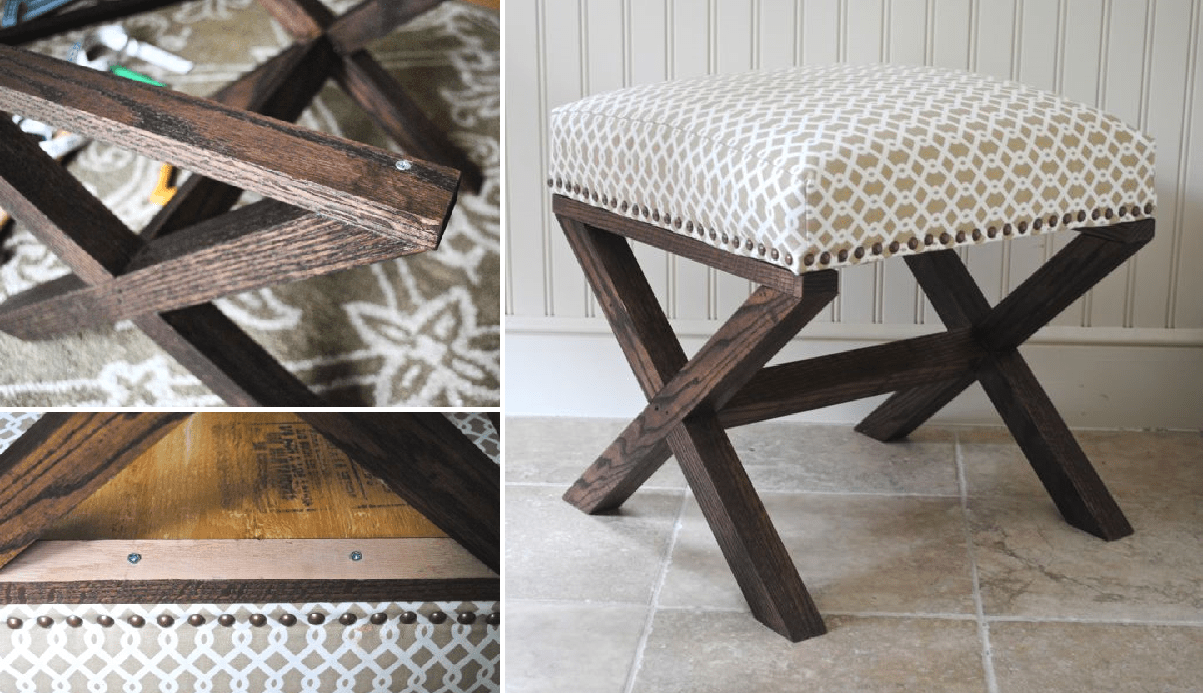
A soft stool, ottoman, or banquette is a good addition to the interior of a bedroom, living room and hallway. When we talk about a classic-style banquette, we often imagine a soft seat on curved legs. Differences may be in size and the presence of a low back.
You can make such a thing with your own hands, having at hand a set of the most popular power tools. You will need an electric jigsaw, a hand router, a grinder or a drill with sanding attachment, glue, clamps, varnishes.
Design classic type, assembly of parts on spikes, this is the most reliable connection for carpentry. The banquette consists of four legs, four drawers and a soft seat. Bent legs are the most difficult to make, so it’s best to start working with them.
Bent legs.
First, we make a life-size fiberboard leg template. Template length 410 mm. , maximum part width 60-65 mm. . The upper ends of the legs should ultimately have a cross section of 45/45 mm. . The lower sections are 30/30 mm. or so.
The template is drawn by hand, only first we mark the lower and upper ends using a ruler and outline the sectors along the bend of the figure.

Four blanks for the legs are glued together from planed boards to form bars with a cross-section of 65/65 mm. and a clear length of 410 mm. . It is better to leave the upper end with a reserve, the “tails” are sawed off after gluing the product, the lower part of the legs immediately ends up at a right angle.

Place the template on the edge, aligning the lower ends, and draw the outline with a pencil.
From this edge of the bar we draw a contour on the other edge. The rib from which the leg is marked will be inside during assembly.
Now you need to immediately hammer out the nests for the thorns, this can be done on drilling machine or using hand router. In this version, the sockets are 80 mm long. , 10 mm wide. , depth 35 mm. , they meet inside the leg. Work options in the article.

Now we need to do the trickiest part of the work. We file the legs along the markings on both sides, leaving a small margin of 1-2 mm. for sanding.

Then we put the flaps in their place and nail them with thin nails so that the caps do not fall on the cut line. Next, we turn the workpiece over to the other edge at 90* and file the part according to the second marking.

Bent legs are made only from durable wood, at least birch, otherwise the strength will not be enough. Use a jigsaw to saw a birch block 65 mm thick. It doesn’t work out quickly, you have to be prepared for it. Band-saw Of course it’s better, but not everyone has it on hand.

After filing, the curly edges remain uneven, so they must be sanded well. Sanding by hand takes too long, it's better to use sanding drum, a grinder, or at least a drill attachment.
Banquette drawers.
We prepare drawers, horizontal bars between the legs, taking into account the overall dimensions of the product.
The size of the bench base is 400/400 mm. along the outer ribs of the legs. The cross-section of the legs at the top is 45/45 mm. , therefore the length of the drawer is 310 mm. Plus we add the length of two 35 mm spikes. and we get the length of the workpieces 380 mm. .
Tsar width 90 mm. , thickness 25 mm. , with such strong sides there is no need to install additional bracing brackets inside.

We assemble the product dry, without glue, and adjust the spikes if necessary.
We disassemble, apply glue to the spikes and always inside the sockets, assemble and compress with clamps.

After the glue has completely set, we saw off the tails at the top and, if necessary, adjust the legs in height. The base is 410 mm high. , size 400/400 mm. along the upper ribs of the legs.
Seat base - furniture plywood 12 mm thick. , size 450/450 mm. .
During assembly, the seat overhangs from the legs will be 25 mm. from all sides. Approximately the projection of the seat can be at the level of the protruding parts curly legs, although this is not necessary.

We take foam rubber with a thickness of 30-40-50 mm. at your request, place the base of the seat on top and cut along the contour. It is advisable to first stretch a thin synthetic padding over the foam rubber
or batting.
Then we stretch the wallpaper fabric over the seat and staple it at the bottom.
Try to carefully align the material on the folds and corners to avoid hard wrinkles.

We attach the seat to the bench from below using 4 small furniture corners with self-tapping screws.
IN classic form the seat is attached to dowels, round inserted spikes. This is also not too difficult to do if you have round dowels and metal “dowel centers” on hand for marking counter holes.
Painted, varnished, bench without seat. Final assembly It is carried out with completely finished parts.
(Visited 562 times, 1 visits today)
Detailed information on forged sofas is in the section about them, here is only information on how to make it yourself.
A wrought iron sofa is a practical and elegant piece of furniture. Sofas act as the main attribute during many home entertainments: gatherings with friends, relaxing with a book, watching a movie. They are intended for placement in the hallway, living room and bedroom, and kitchen. Bathroom is average and large area also suitable for placing a comfortable sofa that is resistant to high level humidity and temperatures.
Manufacturers offer a wide range of forged sofas of various types, differing in shape, dimensions, design, and elements used for decoration.
An alternative is to make the product yourself. The following are detailed instructions for the production of a forged sofa.
DIY wrought iron folding sofa with soft seat and pillows for the hallway
- One of the ends of the square is 12 mm. it is forged on a machine, beaten and a curl with a crow's foot is made, a stencil is used, and the workpiece is preheated.
- The second workpiece is being processed, but without a pattern goose foot.
- Both blanks are bent (according to the template) at a right, slightly rounded angle.
- The next stage is making a frame from profile pipes 20x30 and 20x20, as well as backrests made of 20x20 pipe and 10 mm rod.
- The base is being assembled and painted.
- An old cabinet door is used for the seat, and foam rubber 30 mm thick is used for the upholstery. and fabric, for the sides - fiberboard white.
- Fabric (with a margin) and foam rubber are measured and cut.
- The fabric is secured with a stapler and the seat is ready.
- Fiberboard sheets and fabric are glued together.
- The holes are closed with 20x20 plugs.
- The product is completely assembled.
DIY wrought iron corner sofa with decor from leaves and curls
- Rods large diameter they are heated, processed, textured on a machine and manually, and the workpieces are bent in accordance with the sketch.
- The parts are placed on a flat surface to test the geometry of the patterns and then assembled by welding.
- The blanks that will serve as legs for the sofa are being processed.
- The leaves for decorating the sofa are being prepared.
- The seat is made of wooden boards, with leather upholstery.
- Painting is carried out, the seat is attached to the metal frame.
Sections: Sofas
Previous article: DIY forged doors
Next article: DIY forged firewood boxes
The benefits of a DIY banquette
This popular piece of furniture is easy to make at home, even for a person who does not have extensive experience in carpentry. The accessory is based on a bench, which is subsequently complemented by a soft seat and decorated with curls, fittings and other details.
The main advantages of such an independent product will be:
- Saved family budget - by buying or selecting materials and doing the work yourself, you save a significant amount from what is available in the store for a similar product;
- You can be confident in the quality of the designed banquette;
- You can choose the color, size and design to your liking, making an item that is unlike factory goods;
- A bench or pouf will be exclusive products self made;
- To simplify and reduce the cost of the process, stools, coffee tables, and chairs that are no longer needed or have an attractive appearance are used, which will become the basis of your banquette.
And besides, the creator will be proud of his invention, receiving a dose of positive emotions every day.
What materials will you need?
You can make a pouf or bench from forged, wooden, or plastic. The wood is malleable and easy to work with, so this option is best suited for the amateur beginner. Use MDF, chipboard or plywood, if the legs are planned to be wooden - then you will also need timber. The seat base is usually made of foam rubber, upholstered synthetic fabrics, leather, eco-leather, velor or other textiles available.
So, the raw materials that you need to have in stock to start work:
- Wooden beams, 30x40 mm and 30x50 mm - in case the future product includes strapping and legs. The latter can be unscrewed from old bench, coffee table or buy ready-made ones, and not necessarily made of wood;
- Plywood or MDF based on the number of seats;
- Self-tapping screws, glue, corners for furniture;
- Consider the filling and covering material of the case. The filling can be classic foam rubber or padding polyester.
Please note that it is better to choose fabric that is not easily soiled, dense and resistant to mechanical damage so that during intensive use you do not have to constantly change it, wash it or patch holes.
Required Tools
To implement your idea you need to have:
- Hammer, building level, screwdrivers;
- Screwdriver and drill, as well as a jigsaw;
- For processing wooden surface you will need sandpaper;
- Stapler for mounting fabric elements;
- Sewing kit, decorative accessories.
Just in case, prepare a stain or paints and varnishes.

Preparation
On preparatory stage a drawing or sketch of the future product is created, where all optimal sizes. When planning the length and width, keep in mind that a seat for one person is calculated as 45x55 cm. And also:
- You need to think through the design in advance: a regular pouf, a bench with a back, the presence of legs, shelves, drawers/non-drawers, etc.;
- Based on how many seats the banquette is designed for, determine the dimensions of other elements, transfer ideas and measurements to a sheet of paper;
- If there are a lot of parts planned for the frame, and it consists of a back, a partition, a shelf, it makes sense to make a pattern and cut the plywood;
- A jigsaw is used to cut out parts.
Consider the availability of space for drawers or opening bedside doors, if these are included in the project.
Product assembly
The manufacturing process includes next steps:
- The seat is cut out first - it will serve as the starting point to which all other components are adjusted.
- If you are planning a model with legs, 4 slats should be secured to the bottom so that they extend 1-2 cm beyond the edge. The main fasteners in this case are screws and furniture corners. Using a cutter will give the legs a more extravagant and attractive appearance. Round, make smooth, cut off protrusions and much more with similar device becomes a simple task.
- The resulting workpiece is carefully processed sandpaper and apply a layer of varnish or other decorative covering.
- In the case where the product rests on solid sidewalls, all spare parts are cut out at once. The resulting shelves, seat, bottom and sides are sanded and attached to pins, which are placed in pre-drilled holes.
- Before assembling the structure, all components are coated with a layer of varnish.
- When the design is ready, you can begin to cut out a suitable piece of foam rubber, which is attached to the base of the bench with a stapler or glued with glue. Recommended before soft layer lay down burlap or similar rough material.
- Next is textile design. It is necessary to cut the fabric of a given size, but with an allowance so that it is possible to tuck it a little and secure it with staples.
Do-it-yourself furniture upholstery
The technology described above allows you to design an ottoman with a perfectly flat surface. And if a long and wide one will look strict and neat, then a small one will look bland and cheap. Think about a carriage screed - this is one of the easiest and most cost-effective options to decorate a “dull” surface.
To create such a covering, you will need all the same materials and tools as when constructing a bench, with the difference that it is better to take thin fabric so that it is convenient to form folds from it, and you will also need buttons covered with the same material.
- The soft part of the bench usually consists of foam rubber and a layer of synthetic padding laid on it, although the latter is often not used, then the surface remains a little harder.
- The locations of the buttons can be marked directly on the porous material, but for a beginner it is recommended to make a layout of the pattern on paper, on a scale of 1 to 1, where the locations of the buttons will be outlined in detail and the shape of the folds will be thought out. One of the simplest and easiest options to implement is rhombuses, but if desired, you can implement more complex circuits.
- Holes are drilled through the marks.
- Next, lay the padding polyester, first leaving openings for the buttons.
- Then a layer of material is placed on which the accessories are sewn, in the designated places, relative to the sketch or workpiece.
- At the end, the folds are straightened and treated with steam if they have become wrinkled during the work.
This product looks very original, and making it with your own hands is not difficult.
Decoration
The main thing in creating decor is that the end result is in harmony with the overall picture in the hallway, is not sticky, easily soiled and is made of practical material.
A model with a soft seat can always be updated, further decorated or remodeled, thereby making the bench almost new, with a “fresh” interesting look. appearance.
For example, frame a model without a wall or armrests with a chic cover with frills. They will make a piece of furniture delicate and unusual. Attach a burlap bow or a stylish decorative ribbon at the seams and joints.
Knit the cover with your own hands - then your furniture accessory will become completely original.

If the hallway is made in country or Provence style, age the legs and wooden ends, create the effect of peeling paint or scuffs using silver or bronze stains

There is a huge variety of options for how to decorate a banquette; everything is limited only by your imagination. However, if it is not there, use online resources. There you can always find interesting solutions.
What will be useful?
A craftsman who decides to make a sofa or other piece of furniture with a carriage screed will need the following:
- a sheet of plywood, MDF or chipboard corresponding to the size of the furniture, wall or door;
- buttons or nails for carriage ties;
- fabric, leather or leather substitute (it is best if the upholstery material has a voluminous texture);
- fishing line, wire or strong lace;
- foam rubber (its thickness should reach 5-7 centimeters) and padding polyester;
- cardboard;
- ruler;
- pencil and marker;
- drill;
- jigsaw;
- furniture stapler;
- furniture glue (you can also use any rubber-based glue).
Step by step instructions
In order for a do-it-yourself carriage screed to turn out beautiful, the craftsman will need step-by-step instruction, which describes all stages of the work. A person who decides to upholster furniture or a wall in this way must complete the following steps:
- Create a sketch. First of all, you need to think about what the chipped surface will look like by drawing various options design on a sheet of paper.
- Make a pattern. When the final version of the surface decor is approved, the master will need a pattern. To make it, you need to take a piece of cardboard that matches the size of the surface to be padded, and draw on it a grid of horizontal and vertical lines located at a distance of 10 centimeters from each other (the result should be squares measuring 10x10 centimeters). On the finished pattern (at the intersection of the lines), you need to mark the points where buttons or nails will be installed and connect them with lines. When shapes (diamonds, squares, etc.) appear on the cardboard, you need to make identical round holes at their tops (where nails or buttons will be attached).
- Assemble the base. You need to take chipboard or plywood and cut out a sheet that matches the shape and dimensions of a piece of furniture or other surface. On plywood base with help furniture glue you need to glue the foam rubber and wait for it to dry completely (you can take large leaf foam rubber, stick it on, and then trim off the excess edges).
- Make markings. You need to attach a pattern to the base and trace the contours of the holes made in the sheet of cardboard with a marker on the foam rubber. Using a drill, you need to cut holes in the foam rubber with a diameter of one to one and a half centimeters according to the marks. You should glue the padding polyester onto a sheet of foam rubber and make the same holes in it (this will not be difficult to do, since padding polyester is much thinner than foam rubber).
- Cover the surface. In order for the carriage volumetric screed to turn out neat, it is necessary to properly tighten the base. To soft front part The workpiece must be evenly applied with upholstery material (the piece of fabric or leather should be larger in size than the base by about 50 centimeters on each side) and secured to the back with a stapler. At this stage, warping and pulling of the material should not be allowed.
- Install buttons or studs. Through the stretched fabric, you need to carefully feel the holes and in these places make small holes for fastenings using the thinnest drill bit. Then you need to attach the buttons; to do this, attach strong cords to them, which are pulled out from the inside and secured with a stapler. Decorative nails are carefully driven into the prepared base. It is necessary to take into account that both nails and buttons must be recessed into the soft surface to the same depth.
- Mount the mount. When the stitching is completed, it is necessary to install brackets or hooks on the reverse side, with the help of which the surface will be attached to the furniture, door or wall.
Making a beautiful carriage screed will not take much time. To fully understand the intricacies and nuances of this work, a person can look at the detailed step-by-step master class, which tells you how to make upholstery smooth and neat. In the photo or video you can find instructions that describe the whole process, how to make a banquette, an ottoman with a carriage tie or other pieces of furniture.
A do-it-yourself carriage screed will look much more attractive and tidy if the master who decides to take up this technique listens to the following tips:
- Before upholstering your sofa, banquette or headboard with your own hands, experts advise beginners to practice by taking a small sheet of plywood (you should not immediately decorate the furniture without trying this technique on rough material);
- When choosing upholstery material, you must give preference durable fabrics, too thin a fabric will not withstand tension and may soon tear;
- to get a neat wall, a beautiful sofa, an armchair or a chair with a carriage tie, experts advise choosing plain fabrics of any suitable color without any print, they will look much more noble than materials with patterns;
- An interesting design solution would be the use of decorative nails with colored rhinestones attached to their heads;
- If you couldn’t match the buttons to the color of the upholstery material, you can always cover them yourself with small pieces of existing fabric.
Almost everyone has creative thoughts, especially during renovations. One such idea is to make a coffee table. When remodeling a living room, you want to make it original and unique, and furniture made on our own, will help achieve this. To make your dream come true, you should figure out how to make a coffee table with your own hands and get an exclusive piece of furniture that compares favorably with store-bought items.
Three ways to make an unusual table from natural wood:
- You need to find a log with a diameter of 40-50 cm, or just go to the sawmill and buy it. For residents of private houses, this problem can be solved easily, since the required diameter and texture can be selected from trees harvested for firewood. In order for this block to turn into a piece of furniture, you need to buy three furniture wheels and colorless varnish. Horizontal wood surfaces must be sanded. You decide for yourself whether to leave the bark or not, but with it the item will be much more interesting. Next, you need to apply several layers of varnish to the block, let them dry completely and then attach the rollers. At this point, the production of the table is completed, and you can roll it around the house without much effort.
- The construction of a coffee table using the following method involves the use of wood scraps. A strong branch will be used as a support, the design of which will allow it to be made into a reliable tripod. The role of the tabletop will be played by a cut of a trunk with a thickness of 6 cm and a circumference of 50 cm. All material must be freed from bark, thoroughly cleaned and sanded. Next, the tabletop is fixed to the legs using self-tapping screws. All that remains is to apply a few varnish coatings to the finished table.
- To make an interesting piece of furniture according to the third option, you will need to use trimmings from a birch trunk. In addition, it is worth stocking up on plywood sheets, liquid nails, white grout and legs on wheels. It is necessary to cut out the base for the table from plywood and make a smaller box that is attached to the middle of the tabletop. Next, we fix the legs on wheels to the bottom.
After completing these steps, you can begin decorating the resulting product: cut out several birch logs and fasten them to a plywood box with liquid nails, so that they are positioned vertically. In the installed position, the blocks should rise above the box by 50 mm. The free space on the table surface is filled with saw cuts, fixed with liquid nails. The remaining gaps must be sealed with white grout, spreading it using a spatula. The solution that has come out beyond the limits is removed with a dampened sponge, and the product is left to dry completely, after which it is also varnished.
Methods for making tables from scrap materials
If you have two identical bookshelves and a sheet of plywood, you can easily make an original piece of furniture. At the same time, the design of the shelves is not of fundamental importance: they can be either with or without glass doors. The first step is to prepare the base for the table by attaching the back walls of the bookshelves to each other with black metal plates that are attached to the bottom and top of the structure.
To make it easier to move the table around the room, two furniture wheels are fixed to its bottom. A sheet of plywood is required to make a tabletop, which is cut to the size of the shelves and screwed to their surface. All that remains is to decorate the surface by choosing painting, staining or decoration using the decoupage technique using three-layer napkins with a suitable pattern.
For the next idea, you will need legs from a computer chair that can rotate and a sheet of plywood or chipboard. You need to make a tabletop from a plywood sheet, choosing the shape and size at your discretion. After this, the tabletop is secured to the leg with self-tapping screws, treated with stain and covered with a layer of varnish. Once the product is completely dry, it can be safely used.
A very beautiful thing can be obtained by combining birch and glass. To do this, you need to go into the forest and cut a thick birch tripod (you can go to a sawmill) 70-80 cm high, or another size at your request. The cut of the tripod is cleaned and polished, after which the entire object is varnished. As a tabletop, you will need to cut a glass circle of the required diameter, which is fixed on the tripod using special suction cups or decorative glass nails.
Thus, with a little imagination and a minimum of effort, you can fill your home with a unique thing that will delight you every day.
A few more original ideas for homemade tables:
10 ideas: DIY coffee table
We bring to your attention 10 ideas on how to make a stylish coffee table with your own hands from unusual materials. We will use old doors, windows, tires, wooden pallets and other items that are not usually considered as raw material for the coffee table.
1. DIY coffee table made from pallets
Let's start with a fairly popular Lately directions - making furniture for the dacha and home from wooden pallets. The pallet itself is an almost finished coffee table. The pallet can be painted or left in natural form, install it on wheels or small legs, make the tabletop from glass or plywood - there are many options for how to make a coffee table with your own hands from a pallet.


2. DIY coffee table from a radiator
Who would have thought that from the old cast iron battery You can make a coffee table with your own hands! The radiator can be placed on large, reliable wheels for mobility, and the tabletop can be made of tempered glass or chipboard sheet. Read details on how to make a table from a battery here.
 3. DIY coffee table made from window and books
If you have replaced ordinary windows at home with metal-plastic ones, then you can make an interesting coffee table from one old window. The legs can be made from wooden blocks, or you can use old books that you wanted to recycle anyway. Read more about how to make such a coffee table with your own hands at the link.

4. DIY coffee table from the door
Well, if you replaced the input or interior doors, That old door use as material for a new table. The door is sawn into three parts - the tabletop and legs. The dimensions of the parts depend on the size of the door and the selected table height. The legs are attached to the tabletop using metal corners. For added stability, you can add a bottom shelf made of planks.

5. Tire coffee table
Even fashion designers use old ones car tires for creating poufs and tables. This can only inspire you to make your own coffee table from a tire. Cover the hole in the middle with a circle of plywood of suitable diameter. In this case, it is possible to provide that such a lid can be opened, and things can be stored in the table. Or braid the entire table with a rope, as shown here.
 6. Coffee table made of chipboard and logs
It seems as if this coffee table is made entirely of birch logs, but this is not the case. In fact, plywood box It is covered on the sides with logs, and on top with birch fires. For more details on how to make a coffee table from logs, read the link.

7. Coffee table made from a log or stump
You can make a unique coffee table with your own hands from a cut of a log or stump. The cut of the log needs to be cleaned and sanded; you can also varnish the surface of the log or even paint it. A sanded stump or log can be placed directly on the floor or wheels can be attached. As an option, place a narrow cut of the log on a round stool.

8. Coffee table made from a basket
A square wicker basket can form the basis of a coffee table with ample storage space. Make a lid for the basket from chipboard, maybe on door hinges. If it is not possible to attach door hinges, then put two strips or a fabric (leather) handle on the side on the tabletop lid, with the help of which it will be easy to open the storage space. Attach small furniture wheels to the basket.

9. DIY coffee table made from drawers
Wooden boxes from fruits, vegetables or other items - universal material to create furniture with your own hands. One drawer is already a bedside table or stool, two are small, and four are a large coffee table.
10. DIY coffee tables made from spools
Large spools of industrial cable are a rare but ideal stock for coffee tables. However, if you are lucky enough to find a cable reel, then you just need to clean it and put it on the floor. Your DIY round coffee table is ready! Of course, if you wish, you can paint or otherwise decorate the coil. See the link for options for tables made from reels.


handmadeidea.com.ua
Self-production
Speaking about the material for the countertop, we completely forgot about wooden eurolining. This is an excellent material at hand, equally suitable for creating a lid, sides and legs.

The lining tabletop can be of any shape. The lid, assembled from wooden planks, is cut with a jigsaw along a given contour.
To make a coffee table from clapboard we will need several tools:
- screwdriver;
- jigsaw;
- belt sander;
- hacksaw;
- roulette.
The dimensions of the finished product and the design of the docking units should be thought out in advance and included in the sketch drawing.
The finishing of the table is carried out in two stages. Before assembly begins, sand the surface of the lid, bottom and legs with sandpaper. After completion of the work, the wood is covered with tinting stain and colorless varnish.
It’s even easier to make a coffee table from chipboard. This material performs two functions at once: it forms a continuous surface and carries the load. We recommend using a veneered board, since the “bare” Chipboard paint and varnish cannot hide the texture of wood chips.
Having completed the assembly, you need to cover all the edges (table top, bottom and legs) with plastic furniture tape, warming it up construction hairdryer before gluing.
Stages of work
To perform the work efficiently and accurately, the installation of the arch is divided into stages:
- Measuring the opening, designing the future structure.
Surface unevenness is leveled with plaster or putty, the vertical is determined by the level, otherwise even designer finishing.
The arch reduces the height of the opening by about 15 cm. Therefore, it is not advisable to carry it out if the initial height of the opening is less than 2 m.
- Procurement of material.
Depending on the selected type of arched opening, necessary materials. More often this is a rack and guide profile, dowels/screws, sheets of drywall, a needle roller, an arched corner with perforation, putty.
- Drawing and cutting out the front part.
This is an important and difficult stage. It requires two identical canvases from which the “face” of the vault is made.
- Creating a frame.
The basis of the structure is performed using guides. Take into account the thickness of the drywall sheet and the putty layer. Therefore, they retreat 12 millimeters into the arch, otherwise the arch will not be level with the wall.
- Attaching the front part to the frame.
- Manufacturing, fastening of the lower part.
- Final work (finishing).
Needle roller
Types of arches
Types of arched openings: “Portal”, vaulted arch, semi-arch and modern.
It’s easier to make a U-shaped arch with your own hands. It will look simple. Installation of the “Portal” involves dismantling the platbands door frame. Next, this opening is finished with plasterboard.
An arch with a vault looks impressive. But the process is also capacious and complex. It is possible to create a vault based on a standard opening, but it will look like an unhewn entrance to a cave. A child will like this design, but you will hardly appreciate the splendor. Therefore, you will have to start expanding the opening.
Arch with plasterboard vault
This is done in two ways:
- Enlarge the opening;
- Demolish and re-create a plasterboard partition.
The second method is acceptable if the partitions between rooms are decorative. Under no circumstances should the integrity of the supporting structure be compromised.
The semi-arch is practical and easy to implement. Craftsmen recommend choosing this option if you want to make an arch with your own hands. With its help, the contrast of a certain area will be emphasized.
The arched doorway in the Art Nouveau style carries a deep meaning. It is advantageous to install it opposite a window; it will visually add volume to the room. This arch fits harmoniously with any designer decorations.
Original and functional arch
Photo gallery
A few ideas on how you can decorate your interior space using a gypsum plasterboard arch:
Interior arches from plasterboard in the interior
Asymmetrical arch
Arched structure between rooms
Design between the living room and the corridor
The hallway area can also be designed as an arch
Semi-arch in the living room
Pretentious arch system design
Arch between bedroom and balcony
Arch made of gypsum plasterboard
Find out more information on the topic - DIY plasterboard bar counter: step-by-step instructions
Arch system
Not symmetrical arch
Arch with niche
Arched design with shelves
Arch system with additional elements
The idea of an arched structure in doorway
Design with shelves
Arch expanding the guest area
Arched passage
Plasterboard construction with shelves
Arched design that smoothly extends to the ceiling
A classic design option for an interior passageway