The process of creating something new can not only captivate a child, but also develop his intellect and abilities. Therefore it is important from the very small age teach your child to make crafts with their own hands. The main thing is to choose inexpensive and safe material. For example, boards.
Any boy over 10 years of age can make this product. The process must be supervised by an adult. Making a hanger is quite simple, and it will not only decorate the hallway for a long time, but also be useful.
To create a fake you need to prepare:
- 3 boards 10*70 cm;
- 2 boards 15*40 cm;
- 2 metal corner;
- 3 hooks;
- screwdriver;
- self-tapping screws;
- paint or varnish.

 Drawing of a hanger made of boards
 The hanger execution algorithm is the following sequence of actions:
- Carefully paint or varnish the boards on all sides.
- Take 3 boards, lay them out on a flat surface so that there is a gap of 5 cm between them. Place one of the boards measuring 15*40 cm on top of them. Use a screwdriver and self-tapping screws to secure the structure.
- Screw metal corners onto the sides of the horizontal board. Attach a free board to them.
- Screw 3 hooks under the top of the hanger with a screwdriver.
Shoe organizer
Often accumulates in the hallway a large number of shoes standing on the floor. This situation really spoils the entire Internet. This problem can be solved if you make regular boards organizer
In order to make a shoe rack, you need to use the following materials and tools:
- 6 boards 15*90 cm;
- 4 boards 5*45 cm;
- 8 boards 15*50 cm;
- 8 metal corners:
- hammer;
- nails;
- paint or varnish.


After everything is prepared, you can start working.
The process is the following algorithm of actions:
- Take 8 identical boards and arrange them in pairs. Attach them perpendicular to each other, additionally interlocking them with metal corners.
- Set the corners vertically. Make a mark on each of them located in the middle.
- Connect together 3 boards 15*90 cm. To do this, you need to nail a 5*45 board on each edge. This design set at level of marks wooden corners.
- Nail 2 5*45 cm boards on the sides of the top of the future organizer. Secure the remaining boards to them.
- Spread plastic wrap and place a shoe rack on it. Cover the product with varnish or paint.
Rack
DIY crafts made from boards can bring real benefits. For example, most families are faced with the problem of a lack of storage space for various household items.
You can solve the problem and at the same time engage your child in a useful activity if you make a shelving unit yourself. At the same time, it can easily fit into any interior by first choosing the right paint color.
Before you start work, you should prepare the following tools and materials:
- 6 wooden blocks 5*5*160 cm;
- 4 boards 25*60 cm;
- 8 wooden blocks 3*3*25 cm;
- self-tapping screws;
- screwdriver;
- dye.
 Prepare the boards
  Cut the boards into racks
  Assemble the side supports
  The rack can be assembled in a vertical position
  The board rack is ready
 To make a rack, you need to follow the instructions:
- Make 4 marks on all long bars. The distance between them should be 40 cm.
- Take 3 bars. Place them on a flat surface, maintaining an interval of 5 cm between them. Connect the structure with small bars. Fixation should be carried out according to the marks.
- Repeat the previous step with the remaining wood blocks.
- Connect the 2 sides of the rack by placing boards on top of the small pieces. Securely secure the result using a screwdriver and self-tapping screws.
- Paint the product, paying attention Special attention small details and corners.
Table
A great idea for creating crafts from boards is coffee table. It will decorate any room and can be useful. For example, such furniture is convenient for gatherings with friends. The table can also play a role extra space storage As a result, the product itself looks very aesthetically pleasing, so it will easily fit into any interior.
 Drawing of a classic coffee table
  Fastening the frame with self-tapping screws
  Coffee table frame
  In order to complete it, you need to stock up on the following set of tools and materials:
- 4 wooden bars 5*5*60 cm;
- 1 wooden block 5*5*60 cm;
- 2 boards 10*100 cm;
- 2 boards 10*60 cm;
- 4 boards 15*100 cm;
- 4 wide metal corners;
- self-tapping screws;
- screwdriver;
The algorithm for creating a table consists of the following sequence of steps:
- Make a rectangular structure. To do this, you need to take boards with dimensions of 10*100 cm and 10*60 cm. Connect them using metal corners.
- Attach 4 wooden blocks vertically to the inside of the resulting rectangle. This should create a table base with legs.
- Using a screwdriver and self-tapping screws, install the remaining wooden block perpendicular to the 10*100 cm boards.
- Make the table top. To do this, you need to secure 15*100 cm boards on top of the base of the table. During work, you need to make sure that the material fits tightly together.
- Cover the table with varnish. If desired, you can replace the varnish with paint of a color that matches the interior.
Feeder
DIY board crafts can be simpler than the options described above. The product will bring no less benefits, teach children to take care of animals and provide an opportunity to acquire new skills.
A bird feeder will help keep your child engaged not only while creating a craft, but also for a long time, it will be possible to regularly bring food and water for the birds.
Before you begin, you should stock up on the following set of tools and materials:
- 4 boards 10*25 cm;
- 4 boards 3*20 cm;
- 4 boards 5*20 cm;
- 4 boards 5*25 cm;
- 4 wooden blocks 2*2*20 cm;
- 8 narrow metal corners;
- screwdriver;
- self-tapping screws


To make a bird feeder, you must follow the instructions:
- Fasten 2 10*25 cm boards together. To do this, you need to use self-tapping screws and two 3*20 boards. This will create the bottom of the product.
- Make the sides. Fix 2 boards 5*25 cm along the length of the bottom, and 5*20 cm along the width. Additionally, fasten them to each other using metal corners.
- Make a roof for the feeder. To do this, you need to repeat the 2 previous steps.
- Connect the bottom of the product to the roof with wooden blocks.
Stool
Another option for a wooden craft that is easy to do with your child. You can make several stools at once, add pillows to them, which you can also sew yourself, and get comfortable furniture.
Before work, you should prepare the following tools and materials:
- 2 boards 250*25 cm;
- Chipboard 25*30 cm;
- board 9*20 cm;
- edge for pasting;
- iron;
- screwdriver;
- 4 confirmations;
- hammer;
- 5 chopiks;
- glue.


The work process is represented by the following algorithm of actions:
- Edge all materials for the stool. To do this, you need to get the iron as hot as possible and run it across the surface. Later you need to press the edge a little with a rag. Cut off all excess, turn the board or chipboard over and glue again on the other side.
- Screw the first leg to the crossbar, which will be a 9*20cm board. To do this, you should use 2 confirmations and a screwdriver. Repeat the same steps on the other side.
- Make 5 secret holes in the chipboard and in the base of the stool. Add a drop of glue inside and connect the seat with the legs.
Swing
Crafts made from boards with your own hands can be very simple to make, but at the same time bring great benefits. One such option is a swing. IN in this case A simple model is proposed that is easy to make yourself. It can be attached to any tree or special supports. If there is Small child, then you should hang the hooks above the doorway.


Before you begin the work process, you need to stock up on the following materials and tools:
- 2 boards 15*30 cm;
- 2 boards 3*20 cm;
- electric jigsaw;
- screwdriver;
- 4 screws;
- 2 ropes.
The creation algorithm is the following sequence of actions:
- On each of the 15*30 cm boards, make 2 drinks. One is in the center of the short edge, the second is closer to the edge on the long side.
- Make the seat by joining the material from the previous step. Secure the result using 3*20 cm boards, screwing them with self-tapping screws.
- Pull the ropes through the grooves.
Book shelf
Very functional and practical use of boards. After all, every home needs a hanging shelf to store books.


Materials and tools needed during the work process:
- 2 boards 10*50 cm;
- 4 boards 15* 70 cm;
- dye;
- brush;
- 4 metal corners;
- screwdriver;
- self-tapping screws
The process of creating a book shelf is the following algorithm:
- Paint all the material and let dry.
- Place 10*50 cm boards parallel to each other. Connect them at the top and bottom with two 15*70 cm boards.
- Attach metal corners. Install shelves on them and connect them with self-tapping screws.
Original wood decor ideas
 DIY crafts from boards: an original shelf made of boards and jars for flowerpots and flowers
 Wood always looks good in the interior. Therefore, you can use boards to create crafts for your home. They will look interesting wall stands for vases with flowers.
In this case you will need minimum amount of materials:
- 4 boards 20*20 cm;
- 4 rings of any material that can hold the vase suspended;
- 4 jars;
- screwdriver;
- 8 self-tapping screws.
The process of creating crafts is the following algorithm of actions:
- Arrange the first board in a diamond shape.
- Using a screwdriver and self-tapping screws, attach the ring to the diamond. Thread the jar through the ring.
- Repeat the previous steps with the remaining boards.
Afterwards you can mount the crafts on the wall. It is better to arrange them also in the form of a diamond. You can put any flowers in such vases.
Another interesting idea for decoration is a special panel for photographs. This fake will help decorate any living space and will look very original. At the same time, creating a wooden panel will require a minimum amount of time. For the most stylish look, it is better to use black and white photographs.

Before you start work, you should prepare following materials and tools:
- 2 identical long boards of any width;
- 2 metal strings;
- 4 screws;
- screwdriver;
- wooden clothespins;
- photos.
Afterwards you need to do next steps:
- Carefully coat all sides of the board with varnish. Let them dry.
- Step back 3 cm from the edge of the boards and screw in the screws. They should not be completely immersed in the material.
- Pull the string onto the self-tapping screws. The remaining ends need not be hidden.
- Hang the photographs along the strings, attaching them with clothespins.
Another option for storing photos is an eco-style frame. All materials used to create crafts are harmoniously combined with each other. Several similar photo frames placed on any roughly finished surface would look interesting in the interior. wooden surface. The creation process is quite simple, so even a little girl can be involved in it.
In this case, it is necessary for an adult to take over some of the actions or control them. This is especially true when using hot glue and a screwdriver.
Before work you need to prepare the following set of tools:
- 2 boards 10*15 cm;
- 2 boards 2*20 cm;
- 4 screws;
- screwdriver;
- dye;
- brush;
- pin;
- sackcloth;
- twine;
- hot gun;
- scissors;
- lighter.
Algorithm for creating a photo frame from boards in eco-style:
- Connect 2 boards 10*15 cm, tightening them with the remaining boards. In this case, it is better to use small screws so that the fastening is not noticeable.
- Paint the photo frame. Let it dry.
- Cut a rectangle from burlap. Treat the edges of the material with a lighter so that they do not fray later.
- Roll the burlap into a bow. Tie the center with a string.
- Glue the bow and clothespin to the photo frame.


DIY crafts made from boards can be very extraordinary. For example, fashionable eco-style in the interior can be emphasized using wooden candlesticks. For such work, you should choose old boards.
On the one hand, they should not have an even cut, but be slightly broken. The older the material looks, the more interesting and original the candlesticks will be. For these purposes, you can deliberately make the board older by breaking it.
Before you begin, you need to prepare the following tools and materials:
- 3 boards of any size;
- 3 boards 10*10 cm;
- 6 metal corners;
- jigsaw;
- screwdriver;
- self-tapping screws;
- 3 candles.
- Saw off one end of long boards so that one of the edges has an even cut.
- Screw 2 metal corners onto each of the boards. Use them to attach the shelves.
- Arrange the candles.

Another extraordinary design solution are eco-style watches. They are very easy to complete, so any child under the supervision of an adult can cope with this task.
For work you will need the following tools and materials:
- 3 boards 15*5 cm;
- 2 bars 2*2*15 cm;
- clock mechanism with hands;
- battery;
- hot gun;
- stencil with numbers;
- pencil;
- burner;
- drill;
- screwdriver;
- self-tapping screws
The work process is represented by a sequence of actions:
- Press the boards evenly together to form a square. Secure the structure with bars. In this case, the screws should not be visible from the reverse side.
- Make a mark in the center of the square. Drill a hole for the arrows in this place.
- Using a stencil and pencil, draw the numbers 3, 6, 9 and 12. Treat them with a burner.
- Install the clock mechanism using a hot gun.


Wooden key holder can simultaneously be useful and be an element of home decor. Such a thing is indispensable in the house, because it is much more convenient when all the keys are stored in one place.
To create a craft, you should stock up on the following set of tools:
- board 10*25 cm;
- small wooden choppers;
- wood glue;
- hammer;
- drill;
- pencil;
- burner.
After preparation, you can proceed to the following actions:
- Place the board horizontally. Make marks for choppiks closer to the bottom edge. There should be as many of them as there are keys in the house.
- Drill blind holes. Add a drop of wood glue to each and drive in the choppers.
- Use a pencil to mark the future inscription. It can be in the form of the word “Home” or the phrase “Welcome”, in Lately family surname is often used.
- Use a burner to process the inscription.

Crafts made from boards, which you can do with your children with your own hands, can resemble real masterpieces. For example, you can make a wooden picture-panel. The work is creative.
Therefore, the child can be involved in the process either fully or partially. Making panels requires the presence of a stencil. Can be used different images. A bicycle or a running horse will look interesting.
To create a product you must use the following tools and materials:
- 4 boards 12*70 cm;
- 2 wooden blocks 3*3*40 cm;
- 4 multi-colored paints;
- White paint;
- brush;
- scotch;
- stencil;
- sandpaper;
- screwdriver;
- self-tapping screws
The work process involves the following algorithm of actions:
- Paint each board a different color. Dry. Afterwards it is necessary to carefully process the boards sandpaper. At the same time, you should not worry because the abrasions are not evenly distributed throughout the material.
- Lay the boards out on a flat surface so that there are no gaps between them. Connect them using wooden blocks. Self-tapping screws should not go through. The attachment point should not be visible from the front side.
- Secure the stencil with tape. Fill the image with white paint. Dry.
Kitchenware
There are a large number of crafts that can be made for the kitchen. The most functional of them is cutting board.
To create it you will need the following tools and materials:
- board;
- sandpaper;
- electric jigsaw;
- pencil;
- burner.

- Electric jigsaw give the board the required size. Carefully sand all edges with sandpaper.
- Use a pencil to mark the future drawing. If necessary, you can use a stencil.
- Use a burner to process the drawing.
A stand for various small items will look unusual in the kitchen interior. Such a product will add a touch of eco-style or emphasize it.
Before you start work, you need to prepare a set of tools and materials:
- many small boards that should be approximately the same size;
- bottle;
- hot gun;
- twine;
- lighter;
- big button.

The process of creating an eco-style stand is a sequence of actions:
- Place the bottle on a flat surface. Vertically press small boards against it, treating them together with glue using a hot gun. The result should be a glass made from boards. Dry.
- Wrap the stand with twine. For better adhesion, you can add a small amount of glue. Treat the ends of the rope with a lighter.
- Glue the button to the twine.
In any kitchen there are many tools that need to be hung. To solve this problem, you can make a special organizer.
To do this, you need to prepare the following set of materials and tools:
- board 5*25 cm;
- metal hooks;
- dye;
- pencil;
- brush;
- self-tapping screws;
- screwdriver

The work process can be represented as the following algorithm of actions:
- Paint the board. Dry.
- Make markings with a pencil.
- Screw on the metal hooks with self-tapping screws.
Boards of any size are universal ecological material. You can use them to make many useful things, from small organizers to furniture. Children should definitely be involved in the process so that from the very beginning they early age learned to make various fakes with our own hands.
Article format: Natalie Podolskaya
Video about making crafts from boards
DIY crafts from boards:
Wood crafts can be amazing. For example, what is a wooden mouse worth, with a full set of functions, like its well-known analogue. Only a wooden craft will always attract the attention of other people and cause admiration. This mouse was developed by Actbrise Electronics. The design of the wooden mouse resembles more Jupiter. Chinese white ash was used in production.
Or here's another option wooden crafts, which will cause delight and admiration among passersby - an MP3 player, which is made in the shape of a small camera. Made in Korea and by hand. Plays several music formats.

A wooden scooter is another designer craft that is made of wood. It has an extraordinary design and rounded lines.

For those who do not welcome the use of plastic in production, the young designer offers a computer made of wood. This computer, mouse and monitor are made of wood. The wooden keyboard is built into the tabletop.

Laptop cases made of wood are considered exquisite and status items. The covers are lined inside soft cloth to avoid scratching laptops.

DIY wood crafts
However, you should not think that wooden products will require any special skills or tools. At home, you can make exclusive things yourself that will arouse the admiration of your friends and relatives.

Wooden LED clock
This watch was originally made by Kouji Iwasaki. On the wooden panel we can see not only the time, but also the date. They have a built-in alarm clock. The four-digit version can be made independently at home.

Step-by-step instructions for producing wooden LED clocks.
- For the window you will need a thin piece of balsa. This is necessary so that the light from the clock can pass through this window unhindered.
- For the box itself you will need four plywood walls. For precise cutting, you can use a laser. In order to assemble all the walls without any problems, you can use superglue or hot glue. Remember to leave the back and front open. This is necessary in order to insert the watch there without any problems.
- Watch. After you have assembled the box, you can insert the clock into it. Using glue, fix it in the box. Make sure everything is securely fastened.
- If there is a button to turn off the alarm clock, you must make a small piece of wood for it. You need to insert this button into a specially made hole and glue it to the hour button.
- You can close the box with glue.

Your product is ready. All that remains is to connect them to the network and enjoy their work.

Magic amulet
In order to make a talisman that will protect you from evil spirits, you will need small bamboo skewers (you can use toothpicks if you want to make an amulet without big size). To do this, you must first tie the sticks together, and then carefully wind the threads around them. The color of the threads can be any, depending on your preferences and tastes.


Wooden furniture
A more complex production option is wooden furniture. Unfortunately, here you need to have professional tool, as well as knowledge of carpentry.

The easiest style that a beginner can handle is the rustic style. He will be able to emphasize the natural beauty of the rough material. Small knots and cracks are welcome here.

Wood crafts can also be made for schoolchildren. Together with your parents, you can learn how to make doll furniture from twigs and tree roots. To produce a fairy gazebo you will need a small a plastic cup, pebbles, twigs small size, cardboard, hot glue. Cut the cup approximately in half.

Cover it with pebbles and insert a cardboard circle on top to fit the hole. Next, you can glue small branches in a circle to create a fence. Longer branches will serve as supports for the roof, which must also be glued.

DIY wood crafts are a great opportunity to maintain your health. It is known that working with natural material helps strengthen psychological health masters Each master, when making his product, puts his soul and love into it.

IN modern world There is even a Woodcarving movement that works with wood. They manage to create real works of art. After looking at their work, you may be inspired to repeat several of their works yourself or with the help of a qualified master working with natural materials.
Country construction, repairs and decoration are processes that take up a lot of free time and finances, and when, after completing useful tasks, you notice a lot of remnants of various materials, it becomes a little disappointing for the money spent. But we won’t be upset, because all the leftovers can be put to good use and there is no need to throw them away..
Never rush to throw away construction waste and leftover building materials. Everything that was not included in the main work can still become useful for the dacha.
Crafts from plasterboard
Truly universal material It may also be useful to you in the form of scraps and broken pieces.

The following can be done from drywall:
- Small vases for dry bouquets, you just need to cut the gypsum board into even pieces and fold it into shape using a mounting profile;
- Various geometric figures for room decoration country house, gazebos and patios;
- There's enough interesting solutions and for miniature pieces of furniture in a children's treehouse. For example, the same shelves, racks, different decor.
If you can no longer use drywall, give it to the kids, because with any piece of damaged material you can simply draw on asphalt or slabs, using the material like chalk.
What can be made from pieces of tin
This material it is very practical, because, like pieces of stainless steel, it can be bent into any shape. This makes it possible to create the most unusual crafts for the garden.
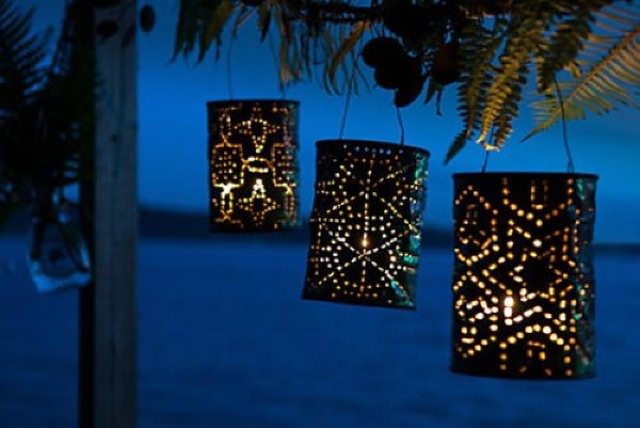
- First of all, this original lamps, which, with the help of metal scissors or a grinder, take on bizarre shapes;
- Also, from similar material, thin steel or scraps of tin, you can make small country bins and ashtrays;
- If the pieces are large, they can make good containers for flowers, even hanging ones;
- You can also use stainless steel and thin steel for more useful things, for example, putting patches on cracked linoleum, using strips of tin to connect the joints of flooring in country house, make clamps for bolts and nuts, cut washers, tighten with pieces of material wooden buildings and fences, install them as a lining when tying up large tree branches so that their bark is not damaged by the rope.
Useful uses of leftover and off-cut boards
Almost anything can be made from wood, within reasonable limits, of course. Naturally, we are talking about garbage residues, because we already create many useful things in the country from solid lumber.
- So, if there is a thin strip left, it can be used for boxes, just like, in principle, a small board with timber;
- Trimmings furniture panels, for example, from a press, will become excellent containers for vertical gardening;
- Larger boards can be sanded and cut into kitchen utensils– boards for chopping and chopping, coasters for hot dishes;
- Naturally, if there are materials good quality, they are always suitable for country furniture - shelves and racks, small stools and chairs, shoe stands, etc.;
- It is worth noting that sawdust also brings benefits in the country, but all our readers know this very well.
You can make a lot of interesting things out of wood, and therefore you shouldn’t throw away any of its remains.

If among the readers there are masters of wood carving, they will find another original application!
Useful scraps of OSB and plywood
Construction waste obtained from these materials will be a godsend for people with imagination.
But whatever you come up with, we have ideas too:
- A birdhouse and a house for a squirrel are the first things that come to mind!
- Next, feeders for birds and even animals, where the material will serve as the base of the roof;
- OSB and plywood scraps can be turned into quite good boxes for storing food and non-food products, a variety of bulk products;
- An interesting idea is the use of pieces of plywood and slabs to create formwork for the construction of small architectural forms;
- Such garbage can also participate in the production of country furniture, along with lumber, which was discussed above;
- If you have a jigsaw, you can always cut out original garden figures or fragments from leftover materials.

Using old polyethylene
Besides, old film you can cover anything... the same piles of sand for construction, stacks of bricks or decorative tiles for arranging a summer house, bulk materials, feed. One has only to fold it several times, and even old and shabby polyethylene film will be a good protection against moisture.

Excellent will find application It is also under major construction. The film can be used to cover foundations and only poured areas so that the concrete does not dry out and crack in the sun.
In the issue of film, we moved a little away from the main topic of crafts and leftover building materials, but now we are returning to it.
Foam insulation: using scraps in the country
Most often, such materials are applicable before New Year holidays, since you can easily cut snowflakes and stars of a wide variety of shapes from them. But they can often be used for standard room decoration.

One side of this material is foil-coated or coated with reflective material. That is, it shines. This makes it possible to create bright shapes that will transfer sunlight to the walls, floor and ceiling. Such crafts look especially interesting when suspended, on a fishing line or thread.
Most often, all thermal insulation work where such materials are used occurs with insulation that is foil-coated on one side. But if you need a double-sided object, you can cut out two mirrored shapes and glue them together reverse side. Then the star, snowflake or figurine will shine on both sides.
Savvy summer residents find many other uses for penofol, for example, they additionally insulate the sides of greenhouses, make small portable refrigerators with their own hands, simply by sewing the material inside onto the walls small box. But the most fun use is sewing children's costumes and their various elements from the material.
DIY garden crafts (video)
Remains of plastic, polycarbonate, acrylic
- First of all, various flashlights come to mind. We have studied with you many lighting options for the garden and dacha area, and therefore it will be easy for you to come up with lanterns and lamps made of plastic and polycarbonate, especially if the scraps of materials are colored;
- Colored plastic and polycarbonate with shades in the decor of the fence look very good. Once we already raised a similar topic and even showed you photos of similar fence decorations;
- From small scraps of acrylic you can make boxes and chests, which can perform both decorative and household functions;
- In addition, these materials can fully participate in the production of garden figures. By combining wood, steel, plastic and other materials, you can make garden gnomes, fairytale castles, and various animals with your own hands.

Remains and broken bricks
We use this type of construction waste perfectly as backfill and materials for leveling holes. But today we propose to think about more useful structures.
- These can be the same fairy-tale castles of a decorative nature, located in the garden, in which the brick will act as the base;
- In addition, small lamp columns can be built from brick;
- Application construction material It will also be found in the production of heavier and more permanent furniture, for example, as a base for benches or even under a table in a new gazebo.

What to make from PVC plastic panels
Wall and ceiling cladding, various buildings outside and inside with plastic - quite popular processes for renovating a dacha. But, due to the low cost of the material, or due to incorrect calculations, we often buy PVC panels with a reserve. Then, when the material remains, we think for a long time about where else it might be useful.
We have already mentioned certain options, but there are more interesting ideas:
- A miniature fence made of PVC panels will last for several years until the material deteriorates due to the influence of atmospheric phenomena;
- The material is also excellent for demarcating garden beds and flower beds. The result is a multi-colored and very colorful decor;
- If we return to country crafts, then plastic can become the roof of small garden buildings, be used as gutters for collecting rainwater, or even provide simple but quite attractive shutters for the windows of a country house, if you combine the panels with wooden beams.
Bulk mixtures and use of their residues
This can be either several scoops in a bag or a whole bag of material. Naturally, such material will not go to waste at the dacha - grease, seal cracks, repair garden paths And so on.

But mixtures can also be used in decorative purposes, for a wide variety of crafts.
- We have already talked about how to produce decorative blocks for walls using the simplest, even homemade forms;
- Also, they told you how to make a drinking bowl from cement, quickly and quite simply;
- But you can use your imagination, select special molds and pour out whole figures for the garden, which will easily last up to ten years even under the worst outdoor conditions. You just need to process the finished crafts protective paints, which will give a brighter look.
Remains of ceramic tiles and mosaics
They say that materials of this kind are irreplaceable at the dacha, but mainly in economic plan.
- The remains of the tiles can be used to decorate the base of the house to protect it from external influence;
- The same material can be used to cover a new blind area;
- If there are very few tiles, and they represent a battle, then, like the mosaic, it is worth moving it to the garden. Here you can decorate garden figures with pieces of multi-colored, glossy material with various patterns. For example, you are making a garden gnome... so now you don’t have to paint it, you can decorate it with pieces of tiles. A turtle from the remains of cement in the garden will receive an exclusive shell in the same way. Tiles or mosaics will serve as an unsurpassed finish and a small decorative pond in the country.

We have hundreds more tips in our arsenal, but we simply cannot fit them all into one article. We have mentioned almost all the popular materials used in the garden, and now you just have to focus on the fact that not everything should be immediately thrown into the trash, because any piece or scrap can be useful.
Crafts from building materials and beneficial use construction waste– topics are interesting and popular. Thousands of summer residents across the country every day come up with incredible decor from metal and wood, leftover foam and paint, scraps of polyethylene and dry mixtures. So why don't we try it? We are sure that with our experience the crafts will turn out just as good!
Things made with your own hands are distinguished by their beauty and decorativeness. They add a piece of warmth and comfort to the interior space. Wooden crafts for home and garden have an aesthetic appearance and allow you to reveal your inner potential. They help to decorate a residential interior and add a unique twist to your home. personal plot.
Both adults and children can make such products. Modern drawings wooden crafts will help you cope with the task. Good imagination and a little patience will allow you to get the desired result.

Original wood decor ideas
Since ancient times, natural solid wood has been widely used as finishing material. Beautiful texture and unusual coloring captivate the human imagination. Wood produces luxurious furniture and decorative items.
For creating unusual crafts. you can’t do without plywood, plywood, on the website https://faneramonolit.ru/katalog-fanery/fanera-1520-h-1520/ you can choose the size and place an order.

DIY wood crafts add a bit of warmth and simplicity to the environment. For example, beautiful photo a frame with carved patterns will be a wonderful decoration in the reception area for guests and loved ones. For this, you can use different types of tree crops. Special stains and impregnations will help add color and emphasize texture.

For a summer cottage, an original solution would be animal figures. To do this you will need flat wooden elements. For example, thin saw cuts are used to create an owl.


The design consists of five main parts: head, torso and eyes, wings and tail. The head and body are made from round saw cuts. For the wings you will need bark or vines, previously fixed together.

Crafts made from wood cuts will become a real decoration for your personal plot. Thin pieces of wood are used to make multi-tiered racks and shelves, on which they will later be located. flower arrangements. The surface of the array can be treated with sandpaper or left in its original form.

Wooden cuts are widely used as a base on which various decorative items are subsequently placed. For example, crafts in the form of a painting. There will be flat pebbles in the foreground. They will help imitate the torso and head of little people.

From gift paper, you can make beautiful clothes. We draw other small elements using a thin marker.


Natural landscapes are made using the same technique. Marble or granite chips. Fine amber can be used for these purposes. Helps you record your results paintwork. The photo of wooden crafts shows exclusive decoration options. They will add elegance to the environment.

Master class on creating a three-dimensional wooden applique
The wooden applique is striking in its beauty. Modern technologies allow you to create complex drawing made from thin wood. We bring to your attention a detailed master class on creating an applique from natural solid wood.

Before starting the work process, you need to prepare the following tools and materials:
- thin wood;
- a simple pencil;
- an image based on which we will create an application;
- paper;
- thin plywood;
- wood glue;
- impregnation. It will be needed to add color to the future craft.


The work process is divided into several stages:
- Draw a future sketch on a piece of paper. We sign and number the weight of the part.
- Next, we cut the entire drawing into separate parts;
- Carefully cut off sharp corners.
- We sand each part with sandpaper.
- After the surface is prepared, each element of the application begins to be tinted. To do this, you need a thin brush and a water-based stain.
- When all the parts have dried, you can begin making the wooden panel.
- We cover each element with glue.
- After this, we fix them on a sheet of plywood.
- When all the elements are in place, we leave our panel until completely dry.
- You can create a clear outline using a thin marker.

As you can see create beautiful thing simple enough. The main thing in this matter is to show a little imagination and perseverance.
Even more instructions on how to make crafts can be found on our friends’ website.


Photos of wood crafts


Every season, designers come up with new interior design options. Some suggest using ultra-modern materials, others insist on the good old classics, and still others use used wood as decorative elements. If you look closely, the third option looks quite impressive.
1. Floor design

A creative design covering consisting of many pieces of small wooden blocks with their unique patterns is a brilliant idea for decorating a floor in a hallway or a covered patio in a country area.
2. Parquet on the walls

Parquet has long ceased to be a material used exclusively for flooring. Walls decorated parquet boards, folded into an original ornament, look much more impressive, making the room amazing and completely different from others.
3. Cabinet

The simplest and practical way use unnecessary wood and make a small cabinet out of it. Ready product you can paint and decorate to your liking, each time getting a unique item made from a template.
4. Narrow shelves

Thick pieces of rough wood can be used to create original narrow shelves designed to accommodate dishes and decorative items.
5. Clock

An extraordinary clock in a rustic style that can be made from small pieces of wood.
6. Coffee table

From wooden blocks different sizes you can make a completely unique coffee table that no one you know will definitely have.
7. Stairs

Interesting, unusual staircase in a loft style, built from dark wooden planks, will become an amazing detail of a modern home.
8. Coffee table

Original coffee table, which you can make with your own hands from thin wooden planks and glass table top. The finished product will fit into any space, regardless of its purpose and design style.
9. Rack

A completely unique shelving unit that is not difficult to make from a piece of rough wood and several narrow glass shelves.
10. Organizer

Desk organizer made from thin wooden cut, with space for a phone and a few pens, will become small but meaningful and stylish detail desktop.
11. Frame

A massive frame made of rough boards will help transform an ordinary mirror. It’s not difficult to make such a frame yourself or buy a ready-made copy.
12. Tray

A decorative tray made from rough wood can become an eye-catching piece of home decor and a stylish base for various compositions.
13. Accent wall

Accent wall covered wooden planks, will help create coziness and bring notes of wildlife into the interior.