What could be more banal than an ordinary hanging shelf on the wall? But good imagination and skillful hands are able to work wonders with such a simple object, turning it into a beautiful element of the interior design of your home.
One of the techniques for decorating a room is the use of shelves.
All materials have their advantages and disadvantages. The following are suitable for wall shelves.
- Wood lumber is the most common and cheapest - it is easy to saw into blanks, processed and painted.
- Metal is not always suitable, it is more difficult to process at home, shelves made of it do not fit well into home interior, are subject to corrosion.
- Glass - looks great in the interior of any room, makes the shelves visually lighter and airier, but due to its fragility it requires special devices and cutting equipment complex holes and grinding.
- Plastic is the most lightweight material, which can replace all previous ones.

Shelves are hung on the wall, placed on the floor, some are hung from the ceiling or beams.
FOR YOUR INFORMATION! A person’s imagination in choosing material for shelves on the wall is inexhaustible - old suitcases, TV cases, water pipes and corners. Even... trouser belts can be used as fasteners.

Much more often they are functional.
Buy or make a shelf on the wall with your own hands
What is the advantage of homemade wall shelves over purchased ones? Furniture stores They offer options for all occasions - bookshelves, for dishes, for phones, for flowers. But in defense of homemade products, the following arguments can be given:
- The purchased shelf does not always correspond to your ideas of beauty - either the color is inappropriate, or the shape is awkward;
- the dimensions of the purchased product do not fit into the dimensions of your room;
- the height or width of the shelves does not correspond to the size of the things you want to place on them;
- after the repair there were pieces left good stuff and fasteners - it’s a pity to throw them away, but there’s no desire or space to store them.

But best of all, they are easy to make yourself, with your own hands.
ON A NOTE! Making shelves on the wall with your own hands is often cheaper than purchasing them from a well-known furniture company.

They are made of wood, plywood, laminated chipboard, fiberboard, and there are glass shelves.
The shelves are different
Before assembling the shelf, determine what type it will be. Furniture craftsmen have become adept at making wall shelves for all occasions:
- open – without side walls, front doors and back wall;
- closed - in essence, such shelves are hanging cabinets in miniature, differing from them in smaller mass, depth and height;
- corner – located at the junction of two walls, can be either for internal corner, and for external;
- asymmetrical - the layout of the shelves is devoid of an axis of symmetry, provided that functionality is maintained;
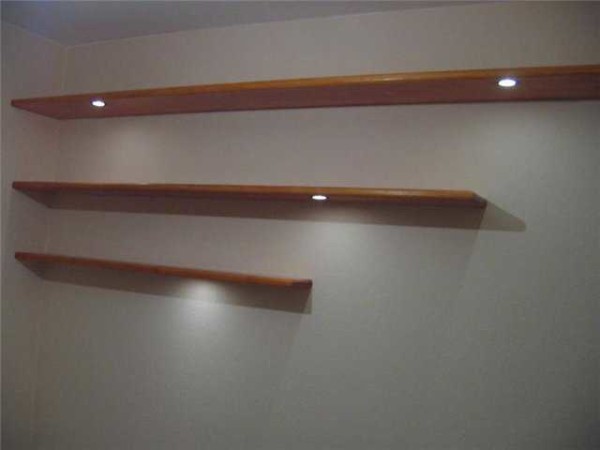
- suspended - harnesses, cables, dense fabric materials, belts are used as hangers for shelves, and the ceiling is used as a support;
- decorative - designed to beautifully arrange interesting things.

The same materials are used as stands, but they are also made from metal, plastic and other absolutely incredible things - for example, pipes or bottles.
Module – universal solution
The easiest way to assemble wall shelves consists of side, top and bottom walls, fastened together with screws or furniture fittings. Make these “modules” different lengths and heights required amount and fix them on the wall in in the right order. This option is well suited for making bookshelves.

IN living rooms It doesn’t really matter what material the shelf is made of. It is important that its design is in the same style as the interior.
You will need following materials and tools:
- board 16-20 mm thick and 150-180 mm wide - it can be pine, MDF, plywood or chipboard.
- self-tapping screws;
- screwdriver;
- building level;
- furniture hacksaw for wood.

Even functionality is not always important: some play a purely decorative role. If they have anything on them, it’s only one or two items.
Marking and sawing
The height and width of the shelf are selected arbitrarily. If the ends of the upper and lower walls rest against the edges of the side walls, then, when determining their height, it is necessary to make an allowance for the double thickness of the board.

Their role is to give the interior of the home special style and color.
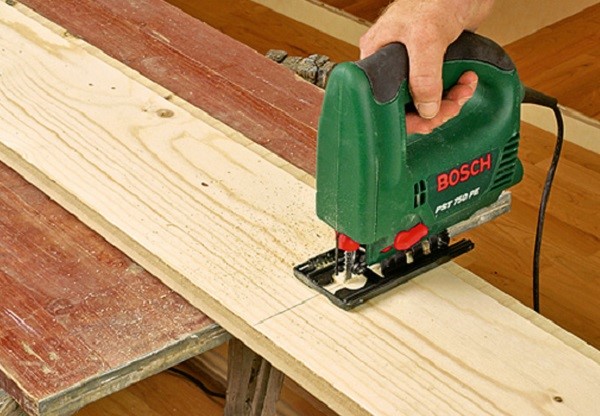
ATTENTION! To cut the board, use a hand saw circular saw or jigsaw. Their use allows you to make the cut surface smooth.

If we talk about shelves in technical rooms - the kitchen and bathroom, in particular, then in addition to aesthetic considerations, practicality requirements are almost universally added.
When marking parts for corner wall shelves, the upper and lower walls are made of two boards with oblique ends. Their connection must fit exactly into the angle for which they are intended. The surface of the ends is lubricated with wood glue, the boards are connected and tightened with clamps until completely dry. Additionally, you can fasten the corners with self-tapping screws.
Workpiece processing
Before installation wooden parts the shelves must be sanded and applied protective covering. You can treat the wood with stain and varnish. However, such a shelf does not always fit into the general color scheme interior Then it is better to apply a primer and paint it in the desired color.

To secure the place where the self-tapping screw is screwed into the lower part of the sidewall, you need to pre-drill thin drill holes.
Assembling the shelf
To fasten the walls with self-tapping screws, you need to mark the holes. From the end edge of the bottom wall, measure a distance equal to half the thickness of the side wall and draw a line parallel to the cut. Marks are made on it for the drill, stepping back five centimeters to the left and right. The opposite end is also marked. They make holes. Secure the side walls of the shelf with self-tapping screws. Mark and fasten the upper wall of the shelf in the same way.

So that the shelf is level, and subsequently it is not skewed, in the lower part, with reverse side, you can fix the location of the parts with flat window corners.
ON A NOTE! Other methods can be used to fasten the walls of the shelf - wooden dowels with wood glue, special fastening fittings - tie corners, eccentric tie.

Despite the fact that electronic devices are replacing printed publications from a person’s life, many people still carefully store books and magazines dear to their hearts, the storage location of which often leaves much to be desired.
Installing a shelf on the wall
It would seem that nothing is simpler. In fact, this is a crucial stage. You don’t want all your efforts to improve your home to collapse in one moment?
The easiest way is to use a hanging corner for shelves. The upper eye is attached to the wall using a dowel, the lower one is attached to the shelf with a self-tapping screw or bolt with a nut and washer.
IMPORTANT! When the load on the shelf is from 20 to 50 kg, use brackets. Mark the holes on the wall using a building level.

Hands must be clean, because untreated wood is very easily soiled.

The dimensions of the shelf will depend on the size of the books that will be stored on it.
Manufacturing of honeycomb shelves
A shelf of an original shape requires some imagination and a little more hard work, but your efforts will more than pay off - the original product will come to life internal view rooms.
- We saw the board into 15 sections 300 mm long with a cutting angle of 30°.
- We make the first “honeycomb”. To do this, we glue the hexagonal section and strengthen its corners with self-tapping screws.
- We make all other “honeycomb” shelves without one wall.
- We stack them on the floor in such a way that the missing edge is replaced by the wall of the adjacent section. We fasten them together with glue and self-tapping screws.
- If there are segments of sufficient length left, then you can make shelves inside the “honeycomb” itself.

Each part needs to be processed with a grinder, only then can it be fastened with other parts into a single structure.
IMPORTANT! To avoid the appearance of cracks and distortions when tightening screws, pre-drill holes with a diameter of 1.2 mm.

Of course, you can’t do without a tool. The minimum is a wood saw and a Phillips screwdriver.

There are strength requirements for bookshelves: they can hold significant weight.
Bookshelf with hidden fasteners
If your taste is offended by the view fastening fittings, then you can make a small open shelf with hidden fasteners.

The first thing you need to think about is the size of the shelf being made and decide on the place where it will be located, only then purchase boards.

It is often seen when people decorate their homes with artificial flowers, but still nothing can replace the freshness of a natural beautiful plant.
For this you need:
- wooden beam with a thickness of 25-30 mm with a well-polished surface;
- a board of the same thickness, made of the same material;
- dowels – cylindrical pins made of wood;
- wood glue;
- dowels and screws.

Thanks to modern universal tool a home craftsman can make almost any shelf, even in an apartment, not to mention working in his workshop.
Assembling such a shelf consists of the following steps.
- The timber and board are sawn into pieces of equal length.
- Using a template, matching holes are made in the side of the block and the future shelf, the diameter and total depth of which must match the length of the dowels.
- The beam is attached to the wall using dowels and self-tapping screws.
- Dowels lubricated with glue are carefully hammered into the holes of the timber.
- The surfaces of the beams and the shelves that will be connected with their help are also lubricated with glue.
- The shelf is “slipped” onto the dowels and pressed tightly. To be sure, you can gently tap along the entire length of the side of the shelf with a rubber mallet.

Of course, you immediately want to make something voluminous and beautiful, which is quite natural, but first you can try your hand at making a simple but neat shelf.
This shelf will look like a natural extension of the wall of your room. Just don't load it with too many items.

Moreover, these products may be the first self-made things. It's really simple.
Decor is everything
You have assembled and hung the shelves on the wall. But they look unpresentable - too empty or, on the contrary, littered with books and other small items. To make wall shelves in the interior of your room look aesthetically pleasing and eye-catching, follow these simple rules.
- The law of three colors - one dominant color for the shelf and two additional ones for the items on it. It is advisable that the color of the shelf contrasts with the objects standing on it - this way they will look more expressive.
- Control chaos with triads. Arrange objects with similar colors on different shelves so that they are at the vertices of imaginary triangles.
- Give more air– some things, especially large ones, require more free space on the shelf.
- Small things need a favorable background. For example, a figurine standing on a shelf next to a luxurious vase must be moved away from its spectacular neighbor and placed against the background of a small watercolor painting.
- Try to place objects that are similar in size and color relative to the imaginary vertical or horizontal axes of symmetry.
- The higher the shelf, the lighter the items should be. It is advisable to place all massive objects on the lower shelves, and light ones on the upper shelves.
- Don't forget about functionality - on a shelf located at your eye level, place the things you use most often.

A simple design is good: you can make any shelves with your own hands.
Don't be afraid to experiment. A wall shelf can be made from any material, but lumber works best. For installation, use hanging corners or brackets. And don’t be lazy to beautifully arrange books and vases on them.

Structurally, most shelves consist of the actual shelves and lintels.
VIDEO: DIY shelf (how to make a shelf out of wood)
Photo: upon request from Yandex and Google
Many people call wall shelves their favorite decorative element in an apartment or house. And for good reason: books with beautiful covers, original shapes, elegant dishes, trinkets and souvenirs from travel... All this instantly transforms the room. You can, of course, look into any furniture store and choose the option you like, or you can put a little human warmth and imagination into this thing: we suggest making a shelf with your own hands!
Unusual bookshelves: in the shape of a circle
The round shape is not just stylish. A round bookshelf will allow you to significantly save space by accommodating a lot of small items. It’s really easy to do it by hand: follow our photo instructions.

What material should I use? We recommend using fiberboard sheet. This material is inexpensive and quite durable. In addition, it bends perfectly. You will also need a board (its role is the central shelf in our circle shelf). You choose the length yourself depending on the size of the book shelf you need.
Let's get started: The success of the work lies in precise calculation. For convenience, we suggest you use the formula. d is the diameter of our circle, on which the size of the board in the center depends. Formula - l=3.14 x d/2.
Calculation example: if the board measures 150 by 700 mm, then the length of the semicircle will be 1100 millimeters (3.14x700/2).
Now we take a sheet of fiberboard and mark it (you can use a marker). Carefully form a circle. The edges of the strips need to be fixed: you can use high-quality glue in a gun. Bend the strips very carefully, as they may crack, even though the material is considered relatively durable. Before finally attaching the strips, check how the board shelf is installed in the center. If the calculations were accurate, then there will be no problems with this. The shelf is almost ready! We finish with painting: it can be just varnish, or paint of the color you need. We recommend hanging this unusual circle shelf with screws. The DIY shelf is ready - see photo below.


Wooden bookshelf: use rope rope
Wooden shelves like those in this master class are perfect for interiors in or. And its shape is very universal: suitable for the kitchen, living room, and bathroom.


What material should I use? This shelf must be made from natural wood. We will need two boards (possibly three, depending on how many shelves you need). The boards must be the same size.
Let's get started: On two (three) boards we mark the places where the holes will be. We make holes using a drill (as in the photo below). Keep in mind that the diameter of the drill bit should be slightly larger than the diameter of the ropes that will connect the shelf. It is advisable to paint the boards in any tone to your taste.
Advice! This shelf allows you to show your imagination. You can make it more original if, for example, you paint the boards only at the ends.
Our bookshelf is almost ready: all that remains is to assemble the structure. The rope rope needs to be folded in half, retreated approximately thirty centimeters, and knots should be tied (see photo). The ends are pulled through holes in the boards and secured with knots. Ready! For photos of DIY wall shelves, see the instructions below.


Wall mounted bookshelf with straps
We would call this shelf the simplest in our material. Moreover, the hanging shelf with straps looks quite impressive and fits into almost any interior. All you need is a well-sanded board and two fairly wide belts. If wood doesn’t seem very expressive to you, then feel free to paint the board in any tone. All accessories, including buckles, must be removed from the belts. We make small holes at the ends of the belts, as in the photo below. We fold the straps into a loop, fix them on the wall, thread the board through, and voila - the bookshelf with straps is ready!


Bookshelf with glass
The glass shelf is too neutral to belong to any style. It can be made quickly and easily from materials that a good owner will almost always have:
- hammer;
- two identical pieces of tempered glass rectangular shape;
- electric drill;
- building level;
- dowels;
- aluminum profile;
- pencil and ruler;
- some duct tape.
Cutting glass is a difficult and far from safe process, so we do not talk about it in detail, but simply suggest that you order this service in special workshops. The edges will be sanded and polished there.
Stage 1: we make markings. On the wall where our shelf will hang, draw a horizontal line with a pencil. In the places where it will be attached, we make holes with a drill.
Stage 2: install a profile or special holders for the shelf. We fasten the brackets with screws.
Stage 3: we attach the shelf. The rear edge of the shelf is covered with adhesive tape. We insert the shelf into the profile and secure it. We hope you are convinced that glass wall shelves are really easy to make!


Step-by-step photo instructions for making a DIY bookshelf
We invite you to familiarize yourself with the most different ideas how to make your own shelves from drywall, newspapers, plastic, pipes and other scrap materials... Get inspired!
Pipe shelf
A shelf made of pipes can simultaneously serve as a sconce. The ideal place is above the bed, sofa or chair: in general, the place where you like to read.


Wooden bathroom shelf
Simple and elegant. To make a wooden bathroom shelf last longer, cover it with a special varnish or film. We also recommend adding hooks to the bathroom shelf, which will be convenient for hanging hand towels, nail scissors, combs and other little things.


Wall shelves can harmoniously complement the design of a room. The range of their purposes is very wide. Depending on the location and application options, the material for their manufacture is chosen and the design is thought through. Let’s take a closer look at what features should be taken into account before you start creating a wall shelf with your own hands, and what are the main stages of the process.
Variety of wall designs
The main purpose of a wall shelf is to place many small items, while organically combining the functions of storage and interior decoration. Depending on this, the installation option for the furniture structure is determined. There may be several of them:
- The most common placement method is to make a wall-mounted form, when the product is attached to the wall, below which other pieces of furniture (sofa, bed or table) are often located.
- A do-it-yourself hanging shelf can be a unique highlight among wall structures. The key difference is the method of fastening: instead of traditional brackets and loops, ropes, chains and belts are used.
- Depending on the organization of the living space, it is periodically necessary to make corner shelf. Moreover, in addition to the common way of using internal space, sometimes they harmoniously use external corner rooms.


With a little imagination, you can make a wall shelf structure with your own hands in various variations. The following models are widely used:
- What makes it easy to make with your own hands is a console - a shelf attached perpendicular to the wall.
- If desired, the structure is supplemented with side walls and the back is covered.
- To create a unique rack with your own hands, it is enough to combine several single consoles together.
- Recently, combined specimens with an unusual arrangement of horizontal and vertical walls have gained wide popularity.
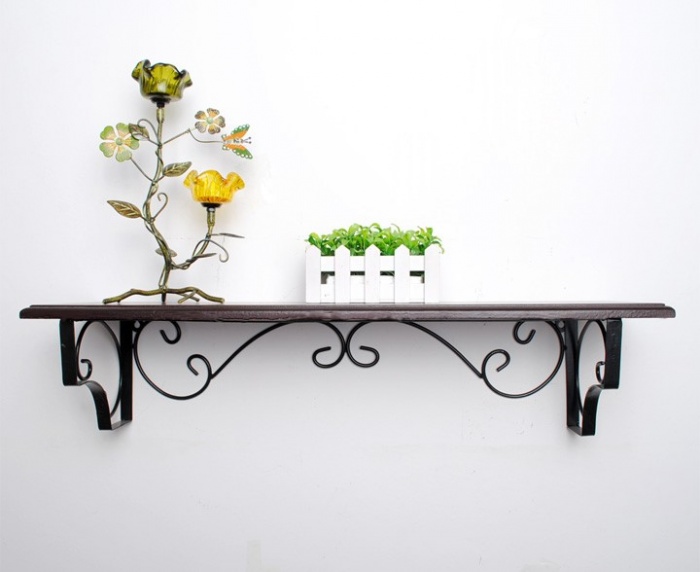
- Numerous are distinguished by originality decorative models wall shelves. Their main function is to create an exclusive design element in accordance with the chosen style.

Occasionally, the façade of a do-it-yourself structure is supplemented with glass. This is practical when storing items that do not have decorative function. A small part of the designs of wall shelves that you can design with your own hands is presented in the drawings below:


Nuances of choosing material when designing
No construction work is complete without a preliminary plan.
Note! Before you start designing a shelf with your own hands, you need to decide on the material for the base.
When choosing it, take into account the place where the furniture structure will be installed and its main functions. The scope of application of wall shelves is as follows:
- Book lovers and students will definitely find bookshelves based on wood and its derivatives useful.
- For storing jars of spices or decorative items(which are original plates or exclusive mugs), narrow shelves equipped with low sides are used. In this case, it is most appropriate to use wood for manufacturing, although depending on the chosen design, glass specimens can also look harmonious.
- The arrangement of a bathroom is not complete without installing glass shelves, complemented by chrome elements. This is due to the basic requirement for the material - it must have high level moisture resistance.
- Universal shelves allow you to be creative with the choice of material when making your own. They are intended for setting flowers or various souvenirs, and the base is selected taking into account the overall design of the room. It could be classic wood, durable metal, supplemented forged elements or glass, creating the effect of lightness.

Mounting options
Mounting type plays important role when designing wall structure shelves. By exploring the fixation options, it will be easier for you to determine the most suitable method.
Classic hinges
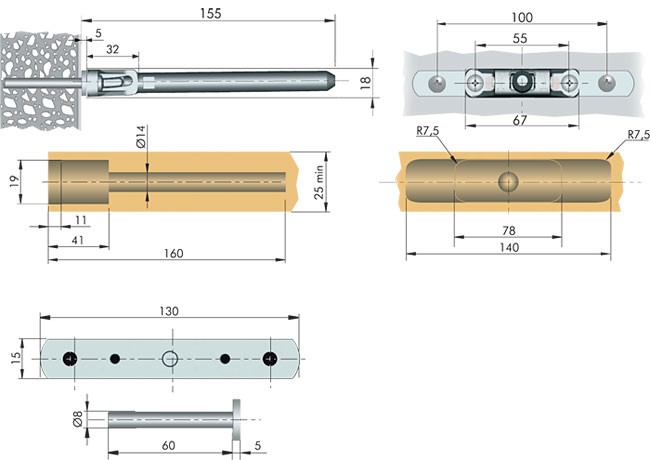
The traditional way to fasten wall shelves is to use hinges. They are optimally suited for products made of wood and its derivatives. Important condition– the material must be of sufficient thickness. The whole process takes place in several stages:
- The hinges are fixed to the side of the furniture structure with self-tapping screws.
- After measuring the distance between the holes, the required length is marked on the wall.
Attention ! Compliance horizontal line is important point when fixing a wall shelf.
- Holes are drilled at the designated point required diameter, intended for inserting a dowel.
- A self-tapping screw with a neat head is screwed into the hammered dowel, onto which the shelf is hung.

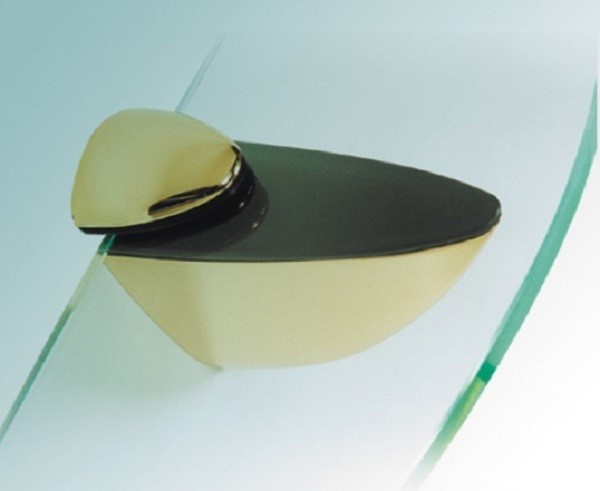
Fastening glass shelves
The use of loops is not suitable for all materials. Installation of wall glass shelves is carried out using special fasteners for fragile products. The fasteners are made of two parts and are often supplemented with elastic gaskets; the glass shelf is inserted between them. The lower part of the device for reliable fixation of the wall structure is equipped with a clamping screw.
A common mounting model for glass shelf is a specimen called pelican, capable of holding a wall structure with a thickness of 8 to 34 mm. In addition to glass, it can be used to fasten other materials with similar dimensions.
Concealed mounting and decorative brackets
The hidden installation of a wall shelf is distinguished by its simplicity and originality. In this case, the fasteners are completely disguised. The essence of this method is as follows:
- at the end wooden structure a recess is prepared for the pin and the body of the fastener;
- The mensolo holder is fixed to the wall, after which the shelf is put on it.

Create individual design rooms allow wall shelves with decorative brackets. They can be made in a production way or refer to exclusive copies. Photos of wall shelves decorated with do-it-yourself brackets are presented below:


Manufacturing process
Depending on the chosen design and material, the process self-made wall shelf has its own characteristics.
Tree
If you want to make an original wooden wall shelf with your own hands, you will need:
- Base material. In addition to natural wood, you can take MDF, chipboard or gypsum fiber board, this will greatly facilitate the surface treatment process.
- A jigsaw that can replace a hacksaw.
- Drill and Sander.
- Ruler with pencil.
- Building level.
- Wood glue or liquid nails.
- Varnish or stain.
- Brackets, dowels and screws.
The entire process of making a wall shelf with your own hands is simple. After drawing up a plan or taking as a basis finished project, the dimensions of the structure are transferred to the material. Saw wooden base It’s better to use a jigsaw, which provides a perfectly even cut.
All elements of the wooden shelf are thoroughly sanded; if there are significant defects, I use wood putty. On initial stage you will need sandpaper No. 40, get it perfect smooth surface will allow sanding paper under numbers 80 and 120.

Connect the parts of the wall structure liquid nails or wood glue.

Marks are made on the shelf and wall for fastening. The brackets are connected to the shelf, and a recess is made in the wall using a drill, after which the dowels are inserted.

On final stage Screws are screwed in and the wall shelf is hung.

Glass
Premises with small area It is better to equip it with glass wall shelves, which create an atmosphere of lightness and visually increase the space. If you don’t have enough experience working with glass, it is better to contact specialists who, while cutting the fragile material, will perform high-quality processing of the sections. The following steps for installing a wall shelf can be done by anyone capable of holding a tool in their hands, and are similar to the procedure for attaching a wooden structure:
- Using a level, mark the mounting points on the wall.
- The Pelican design requires two dowels.
- After removal decorative overlay, you will find holes where you need to screw in fasteners.
- The decorative trim is put in place and the glass is inserted.
- At the final stage, tighten the screw.
This completes the installation of the glass wall structure.


Conclusion
A competent combination of a wall shelf with other furnishings will create harmonious design rooms with individuality.
Modern interior designers in their projects try to free up living space as much as possible. Massive bookcases give way to racks and shelves, leaving quite a lot of unfilled space in the rooms. Many people install and hang standard store-bought shelves, which, unfortunately, are not particularly original. Modern bookshelf It’s quite possible to do it yourself; it can be made according to the style of the room, emphasizing and complementing it.
For work, they often purchase some kind of special exclusive material, but you can get by with improvised means.
Preparatory work
Before starting the main work, it is necessary to think through the main issues regarding the future product:
- What is the shelf intended for, will it be a simple decoration or should books be placed on it (different, large or small, for reading or for beauty - alas, this also happens).
- What shelf size is needed? Will it be one or two tiers, what should be its length, height, width?
- What is the total weight of the items you expect to place on the shelf? The choice of material from which it is better to make the product depends on the weight.
- Where and how are you going to mount the shelf - on the wall or ceiling?
- It is necessary to consider the design of the structure.
It is difficult to decide immediately on the materials that will be needed during the work, it depends on how you answered the above questions.

For example, if your shelf is wooden, then you will need, first of all, boards. Get also electric jigsaw or a saw, a screwdriver, glue, a sander or sandpaper, or a wood treatment product. It is also necessary to purchase a sufficient number of self-tapping screws, bolts, screws and nails.
DIY simple wooden shelves
Use an electric jigsaw or saw to cut out wooden parts the right size. Next, to process them you will need a grinding machine and a protective agent. wooden surfaces. When the elements have dried, assemble them, securing their connection with nails or screws. Then you decide for yourself: paint the product or leave it in its natural form.
Video master class on creating a wooden bookshelf:
Bookshelves made from outdated items
If you came up with the idea of making a shelf out of scrap items, you have a million options. You can use an old ladder, a box or box of an interesting format, a thick rope, a non-working TV, or even a guitar, or a water pipe - your imagination is not limited.

For nautical style a real boat will do - bookshelf, with built-in shelves. A musician can screw a guitar or cello case to the wall. But you just need to remove the filling from the TV - and the shelf is ready.
Romance novels will look good in old drawers lined with wallpaper. Making simple corner shelves.
You cut out or order wooden corners with sides of 20-25 centimeters. Use them to attach shelves to the walls. The shelves can be different in size, however, it is desirable that their length be no more than 80 centimeters, with a width of 20-25. Shelves larger than the specified sizes do not support the weight of books and sag.
If you have unnecessary interior door with the original relief, saw it lengthwise. Screw the resulting two parts into the walls, make shelves between them, paint - a fantastic door - a closet at your service!
Children's shelves
Video on how to make a beautiful bookshelf in the shape of a tree for a child’s room:
So that kids don’t forget about books and love them just like toys, you can make them special cabinet- showcase.
To do this, you will need narrow strips (6-10 cm) or water pipes cut in half. Mount them on the wall and you're done.
To make soft sling shelves you will need thick fabric, wooden sticks, fasteners with which to hold the shelf and a little imagination.
Here is an option for a fabric shelf.
The brackets are attached to the wall with screws. The fabric is processed along the edges sewing machine, holes are sewn into which sticks or pipes are inserted. The structure is attached to brackets.
For rope shelves it is necessary to have planed boards, wooden blocks, thick rope, hooks for fixing the shelf. Having a drill and wood treatment will make your job much easier.
No nails or screws are needed here. Drill holes in a couple of boards along the edges. A rope or rope is threaded through them and secured with knots. The shelf is ready to be mounted on the wall and it looks very creative.

If you want to make the same, but multi-tiered shelf, you will have to use bars. Holes are also drilled in them through which the rope will pass. Thus, bars will be strung between the shelves on the rope. For the evenness of the structure, it is desirable that the length of the bars be equal on both sides. The two upper ends of the rope are hung in the form of loops on hooks.
Shelves can be hanging - they are universal, as they can be placed in any room and even in a corner. If you hang such a corner structure, for example, behind a door, then you can place the necessary objects on it, which will be hidden from the first prying glance. By the way, the corner for shelves can be used not only concave, but also convex.

If ordinary shelves seem boring and ordinary to you, you can make, for example, invisible shelves.
They are completely invisible and it seems that the books are “stuck to the wall.” Buy required quantity self-tapping screws and screwdrivers, double-sided tape and L-shaped metal brackets - exactly according to the number of books you want to install (one bracket holds one book).

The screwed bracket must be placed perfectly level, otherwise the book will fall. A piece of double-sided tape is glued to the bottom. Attach the same tape to inside book cover. You press the book to the bracket - and now it is already hanging in the air!

Here's another option original shelf. You will need: a wooden reel on which the cable is wound, furniture wheels, bars with a round cross-section.

What is the procedure?
The coil is placed on one wheel. The distance between the wheels plus the thickness of one wheel is measured. The resulting figure is the size of the bars that need to be cut. One wheel is removable for ease of operation. Marks are made in the wheels for the holes for the bars, ideally exactly opposite each other. The holes are not needed through, but only half the thickness of the wheel. Next, use glue to lubricate these holes. Place the bars on the glue and put the removed wheel back in place. To better glue the joints, you can load something medium-heavy on top. You can paint the shelf only after it has completely dried. When the structure is ready, attach wheels to it and it will become mobile.

Shelf made from old ladders
If you like the idea of a ladder, attach it to the wall in a horizontal position using hooks or any other fasteners (for example, the same L-shaped brackets). It is better to use two ladders, or cut the existing one in half.

Initially, the material (stairs) is painted. Then the dried ladders are attached to the wall using corners. In order for books to stand confidently on such a shelf, it is necessary to move the ladder away from the wall a certain distance when attaching it.

How to create a drawing for a simple wooden shelf

Plywood blanks are cut for the shelves, base and back. The dimensions should be as follows:
- For shelves:
A - parts 25cm x 25cm – 16 pieces
B - parts 25cm x 157.5cm – 4 pieces
- For the backdrop:
C - one piece - 25cm x 91.25cm
- For the base:
D - parts 12.5cm x 25cm – 4 pieces
E - piece 12.5cm x 91.25cm – 1 piece
First, parts A glued together in pairs with wood glue will produce vertical racks. The base is also held together with glue from parts D.
Use sandpaper to clean all edges and surfaces.
For shelves (from parts B) select dark color paints, the remaining surfaces are varnished with colorless varnish.
The result is a shelf built on color contrast, which gives it sophistication.
The base is made by perpendicular connection of parts D and E. Glue is used for connection, and screws are used for fixation. Making the backdrop is done in exactly the same way.
To complete the assembly, the base must be placed on the floor, the upper part glued and a shelf placed on top, pressing down with a weight for better adhesion. Then, in the same order, the next section - and the same until the end of the work. You can use the bookshelf only after the glue has completely dried.

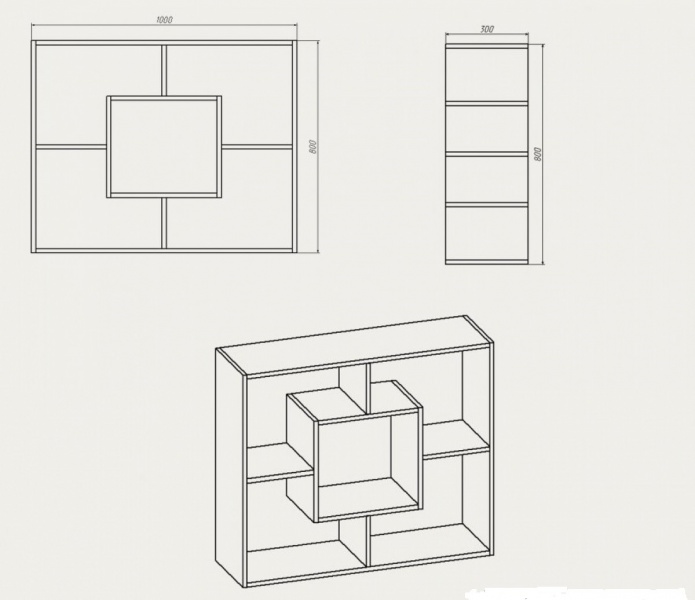
You need to prepare: chipboard board(laminated), a sufficient number of furniture screws - self-tapping screws, shelf holders, plugs.
Parts are cut out from chipboard according to the quantity indicated in the figure. Revealing can do you professional equipment specialist in the store. The parts will be fastened with self-tapping screws.
Holes for screws are made with a 4 mm drill; for grooves, the diameter of the drill should be 8 mm. Use caps to mask screw heads.
Internal shelves are also attached with screws or shelf holders.
If there is nowhere to put books, then you can approach the issue creatively and make a bookshelf with your own hands. An item created independently will always be highly valued and will fit original into the interior. Classic option For storing books, a shelf with glass is considered, as it protects the books stored inside from dust and fading in the sun.
Before you start making a bookshelf, you need to accurately determine its purpose, location and appearance, since it must fit the existing interior and hang on convenient location. Having chosen the place where the shelf will be located, calculate its size in order to know the quantity necessary materials for the manufacture of.
Selection of materials for manufacturing

For a multi-tiered book shelf, you need to use thin and light boards.
Wood is considered a classic material for making furniture by hand, as it is affordable and easy to process. If the shelf is single-tiered, then you can use thick and heavy boards, which look very solid in the interior. And if you plan a multi-tiered structure like a small hanging rack, it is better to choose a thinner and lighter tree so that the shelf does not fall under its own weight.
The bookshelf can be made of glass. Compared to wood and plastic, glass does not win in terms of strength or lightness, but it looks much more sophisticated. Working with glass is complex and requires a lot of time and care. Best way to glue glass epoxy resins, and to add strength to the bends, you can lay a thin aluminum profile. The biggest difficulty is drilling the glass to install the fasteners, so it is better for a beginner to do without this. Ordinary window glass not suitable for making a bookshelf, so you will have to purchase thick, impact-resistant glass.
How to make a bookshelf out of wood?
To create a simple wooden structure you will need:

To cut the boards when constructing shelves for books, you will need a jigsaw.
- boards or furniture board;
- varnish or stain, brush or roller, you can stock up acrylic paints for applying patterns and ornaments;
- hacksaw, electric jigsaw;
- pencil, measuring tape, building level;
- sandpaper or sander;
- a screwdriver and a set of short-length wood screws.
You will need to make 3 pairs of blanks from standard board 200x20 mm. The blanks should be 200x20x400, 190x20x260 and 195x20x1200 mm, 2 of each size. To cut the boards accurately and evenly, you need to use a measuring tape and a pencil for marking, and then cut exactly along the intended line. The cut will be clean, if the hacksaw and jigsaw are sharp, it is recommended to change the blade before work.
Grinding the workpieces is a mandatory stage of processing after sawing to size.
Number sandpaper selected depending on the condition of the blank boards. For very rough and splintered surfaces, you need a large sandpaper, which can then be replaced with a smaller one.
Assembling shelf parts

The longest pieces, which are the shelves, are attached to the vertical elements. The shortest boards are added between them, also placing them vertically between the 2 bases. These boards serve as partitions and additional supports, since long shelves under the weight of books can sag and deform the structure. Secure each cut with a pair of self-tapping screws, placing them at the ends of the workpieces. If the shelf will be used for very heavy things, you can fasten it with not 2, but 3 screws, and add corners for greater strength.
Finishing
After sanding, to make the product more attractive, you can slightly round the corners or even cut small patterns on the surface. If you have a burning machine, you can create interesting motifs outside and inside. And if you only have paints and a brush, the wood must first be primed by applying 2-3 layers of PVA glue or a special primer to the surface. After this, working with a brush will be easier. It is better to choose acrylic or tempera paints, but you can also paint with oil, having patience until it dries completely.
Wooden products need at least impregnation with varnish, stain or wax treatment to preserve them. Untreated wood cracks and dries out, becoming deformed. A good option are several layers of yacht varnish, which perfectly protects the wood. Since during work there will be a lot unpleasant odor, it is better to move this stage to the balcony or to the garage, in extreme cases to staircase. If a design is being varnished, sometimes it is important to choose a varnish that does not cause yellowing. Yacht varnish in this case it is not suitable, it is better to take automotive or acrylic, but the latter is not very resistant to various atmospheric influences.