We looked at what corner shelves are (in a stand-alone version).
Today we will look at how quickly and easily you can make a module of such parts.
Well, I don’t think it’s worth talking about how these very shelves are made. Their production is ordered along with cutting.
They are cut out, processed with a milling cutter, and “rolled” with plastic, 2 millimeters thick, using special equipment. In a word, it is better to make corner shelves not in artisanal conditions.
And since we are talking about how to make furniture in artisanal conditions, let’s take a better look at assembling a module with corner shelves.
So, the module itself consists of a side, a back piece and three corner shelves.
First, “by eye,” we make three holes in the end of the rear wall (just make sure that the middle one is not in the center, since there will be an axis for attaching the corner shelf).
Then, we apply it to the side of the module (in the place where there should be holes in it for connecting to it, we align their extreme ends, and with a pencil we make notches on the side part, opposite the holes made in the positioned part).


 Having retreated 8 millimeters (our chipboard is 16 millimeters thick), we make holes in the side part.

 As you can see, we do all the markings without a tape measure, “live.” Moreover, in this case, we obtain fairly good accuracy (hole alignment).
After that, we connect it to the back wall.
But here you need to be careful.
If you make two perpendicular holes close to each other (near the corner of the shelf), then when attaching the shelf (when confirmats are screwed into it), these confirmats may intersect. Therefore, by attaching the confirmation sheet opposite the hole made, we determine (visually) the position of the perpendicular hole.
 After this, again, we attach shelves to each of the joining faces (side and back wall), and mark the position of the holes.


 When the holes are made in the side part and in the back wall, we attach the shelf. When fixing the shelf, you need to press it towards the joining surface in order to remove possible gaps between them.


Shelves are often used not only to complement and decorate the overall interior of the room, but also for a clearer and more expedient organization of space. Thanks to their use, the apartment owner has the opportunity to conveniently arrange a huge number of small things that would simply get lost in closets.
Today there are a lot of products on the market various models which are made from different materials. They also differ in design.

You can choose not only products with classic design, but also ultra-modern designs.

But more and more often people prefer to make such interior details themselves. Wondering how to make a shelf with their own hands, they re-read a lot of literature and look through many catalogs.

However, this does not mean that self-production The shelves are complex and it is beyond the capabilities of a person who does not have special skills. No, that's not true at all.

Familiarization with literature in in this case necessary in order to create a product with beautiful design, which will fit into general interior. Let's take a closer look at what kind of shelves there are.
Types of shelves
Any specialist will tell you that before you start creating a product, you need to decide for yourself what kind of design you want to get and whether it will be combined with the interior. And only after that you can start creating the product.

After all, for a house decorated in a classically styled style, it is completely unacceptable to use trendy and modern shelves. They will look extremely ridiculous.


The most popular and widely known subtype of shelves is the classic shelf. This is due to the fact that it is quite easy to install, and appearance, thanks to its simplicity, it seems refined and sophisticated.
Both open and closed shelves are used successfully. Closed products are most often used for decoration and installation in rooms decorated in more modern styles. Glass and sometimes plastic are used to construct them.

Open structures can be used both in modernly decorated houses and in apartments with a classic design. Over the past few years, this particular type of shelf has gained enormous popularity and is therefore gradually replacing the classic options.

IN small spaces Quite often you can see corner shelves that have a special method of fastening. They are mounted on adjacent walls that are adjacent to each other. They are most often used in bathrooms, kitchens and utility rooms.

In addition to the above types of shelves that are mounted on the wall, there are suspended and floor-mounted structures. Hanging shelves are mounted in an unusual way.

They are installed using cables and vertical racks, and attached directly to the ceiling. This mount looks quite unusual and original.

Floor structures are most often used in hallways. After all, it is floor shelves for shoes, made by yourself, not only look beautiful, but also help you organize the space of a small hallway. At the same time, making them is quite simple.
How to make a simple shelf?
To create the claimed product, you should purchase or prepare some tools and materials in advance. As connecting elements, you can use whatever suits you best. But the most popular are ordinary screws, brackets and dowels.
Note!


For example, let's take a photo of the shelves with our own hands, which is presented below. It shows a product with the following parameters: width 250 mm, height 300 mm, length 1100 mm. For convenience, the manufacturing process will be divided into stages.
Stages of work
At the first stage, you need to complete the markup. To do this, you should lay the boards on a table or any other flat surface and transfer the measurements from the drawings. The side walls must be exactly 268 mm high.

This marking is optimal because the side walls will be located between the two parts.

The second stage requires cutting the boards. To get smooth and neat cuts, you need to use a jigsaw. After cutting, you will end up with 2 fairly long pieces and 2 shorter ones.

At the third stage, you can begin processing the resulting workpieces. The resulting segments should be coated with a special protective varnish or stain, having previously sanded them.

Note!

If you only plan to paint the shelf, you can get by with treating it with a regular antiseptic primer. This way you will not only increase the service life, but also achieve a more uniform distribution of paint.

At the fourth stage of making a wooden shelf with your own hands, you begin to directly assemble it. The bottom board should be laid on a flat surface. Step back 8 mm from the ends of the workpiece and draw two lines parallel to the cuts.
2 points should be marked on them with a distance of 5 cm from the edge. At the marked points it is necessary to drill holes for self-tapping screws. The same manipulations must be done with the second workpiece.

After this, you should install the side blanks on the lower section of the board and secure them. Once you are done with attaching the side panels, begin installation. top panel and its consolidation.

At the fifth stage, you should attach the brackets to the ends of the side panels, and make several holes in the wall for the dowels. After this, screw in the screws so that they protrude by 5 mm. And now your shelf is ready.

In the same way you can make acoustic shelves, but you need to take into account the size of the equipment itself. Measurements should be taken carefully, because if you make a mistake, the work will have to start again.
Note!


DIY photo of shelves


It's hard to imagine an apartment or house without shelves. This piece of furniture plays both a decorative and practical role. They complement the interior and look harmonious in the apartment. Shelves can be installed in any room, be it a kitchen, a room or a bathroom. They serve as stands for kitchen utensils, books, plants, small trinkets, cosmetics and much more. If you want to free up some space in your apartment and organize your things, shelves perfect option for this. But what if the area of your apartment is not so large? Corner shelves are perfect for you.
Based on the name, you can immediately understand that they are mounted in the corner of the room. Thanks to their design and placement, they can smooth out corners and save space in your home. It’s remarkable that anyone can do this. Such work will not take much time. Let's look at how to do it corner shelf for home.

Specialized stores today have a large assortment shelves that are made of various materials. Thanks to this, they can be matched to almost any interior. Moreover, various shapes, designs and dimensions allow you to choose a product that will be ideal for functionality. But you will have to pay a considerable amount for them. Therefore, most people want to make a shelf with their own hands.
The first step is to choose the material from which the product will be made:
- Tree. This is a classic, the simplicity and naturalness of the material has always attracted attention. Furniture and shelves made of wood will always be popular.
- Chipboard and MDF boards. The boards themselves are made from recycled wood with the addition of formaldehyde. They are often used to make cabinet furniture and accessories. The material is easy to use. Finished goods covered with veneer.
- Metal. To make shelves use metal profiles. They are used in the form of racks and transverse load-bearing elements. To avoid corrosion, the surface is covered with various polymer coatings.
- Glass. A material that is often used when installing in the bathroom, as it is not afraid of moisture and is combined with mirrors. To operate, you need impact-resistant glass, which is attached to a metal supporting structure.
- Drywall. Ecologically pure material and is not subject to combustion. Installation is very simple, and the drywall itself can be decorated with tiles, lining or panels.
- Plastic or window sill profile. The transverse materials, as well as the racks, are entirely made of polymers.
As you can see, there is more than enough material; the main thing is to choose one that will suit the interior, be practical and functional.

Once the material has been selected, you should preparatory work and decide on the design of the shelf. If the choice falls on wood, you need the following tools:
- hacksaw;
- electric jigsaw;
- marker;
- fine-tooth saw;
- a compass with a large radius or a pencil with a string;
- glue;
- building level;
- file;
- ruler and tape measure.
Then you need to think about what design and shape the shelf will have. Products can be either complex design, consisting of additional elements, jumpers and several shelves, as well as a simple design with only one jumper (shelf), which is attached in the corner.
Let's move on to the markup. To calculate the dimensions of the required sheet, it is enough to measure the depth from the corner along the wall. It needs to be multiplied by 2 and added 5 cm for trimming. For example, having measured the required depth, you got 15 cm. We apply the formula:
Based on the formula, we need a square sheet measuring 35 cm. Such a sheet can be ordered in a store or cut out yourself. Then, using a pencil and a rope, we apply the knowledge of geometry lessons at school. To outline perfect circle, using a ruler or tape measure, you need to calculate the center of the slab, marking it with a marker. Using a button, we fasten one end of the rope to the mark, and tie a pencil to the other. We pull the rope and draw a perfect circle. The length of the rope should be the required 15 cm. Using a ruler, the circle must be divided into 4 even sectors.
Marking must be done carefully so that the parts are perfectly even. From 1 slab you will get 4 identical blanks, from which you can make either 1 or several shelves.
Cutting the workpiece and mounting a simple structure

Based on the markings, we cut the workpiece. For this purpose you will need a jigsaw. First, cut out a circle from the slab, strictly adhering to the line.
There is no need to use a hacksaw for this job. When cutting, the ends will be uneven and with burrs.
Having cut out the circle, saw it into 4 parts. The resulting blanks will be used as shelves. Here the choice is yours. You can make some simple shelves in different angles rooms or houses. In this case, the blanks are polished and grooves are cut into them, thanks to which they will be attached to the wall.
Holes are cut into the edge of the slab on both sides. On the left side the groove should be longitudinal, like a narrow groove, and on the right side it should be a point groove made with a drill. To do this, we make 2 holes in the left edge and connect them by repeated drilling. On the right side, the holes should have the depth of a self-tapping screw protruding from the wall; the structure will be attached to it. This type of fastening is called invisible. To select the diameter of the drill, start from the size of the screw head.

After this, the shelf itself is attached. To do this, it needs to be mounted on self-tapping screws. To ensure that everything fits perfectly into place and is well secured, self-tapping screws are screwed into the wall in the place where the grooves are made in the product. The screws on the right side must completely coincide with the location of the hole in the edge. On the left side, they should be positioned so that they enter the groove from below and move upward, fitting the structure close to the wall. This mounting option is more complicated than usual, but the shelf will look impressive.

If the simple option does not suit you, the design can be complicated. Using the same 4 ready-made elements, you can make a shelf with several tiers. To do this, reduce each next shelf by a few centimeters. The first, still with the same size of 15 cm, is attached to the bottom of the corner. The next one will be set a few centimeters higher, depending on your goals. A distance of 10 cm is recommended. Then, using the same pencil and rope, reduce the remaining 3 blanks by an equal amount.
We cut the rope by 3 cm and draw a cut line on the second piece. We cut off the excess and fasten it at a distance of 10 cm or more from the first finished shelf. We reduce the remaining two in the same way, forming a structure in the form of a Christmas tree. Fastening can be either invisible or using jumpers or screwed brackets.
To make the finished shelf more attractive, the visible ends are covered with veneer or the corners are rounded using a sanding machine. You can decorate the transition from one lintel to another using veneer.
Another design option is a two-tier shelf, the side walls of which will serve not as a wall, but as wood. To do this, three equal parts of the circle are connected together. The base is positioned vertically, and the side walls are attached vertically from above. To obtain tight joints, the rear edges of the parts are trimmed. When the product has ideal geometry, you need to drill holes that pass through the wall of one sector into the end of the next. P
Using a screwdriver and self-tapping screws, we connect the three structures together. The remaining fourth part needs to be cut. This is done with the same pencil and a rope, 10 cm long. The excess is cut off, and the jumper is attached to the center of the finished shelf. Everything needs to be checked carefully building level and secure it in place in the corner of the room. There are a lot of options for designs, shapes and designs, the main thing is your ingenuity and a little effort.

Corner shelves in the kitchen serve for convenience and storage of necessary kitchen utensils, spices or other things needed in the kitchen. Therefore, no one really bothers with the design. They are often placed above work surface so that everything you need is always at hand. Such shelves are shaped like the letter “L” and occupy not only a corner, but also space along the wall. For kitchens with a small area, this is an ideal option if it is not possible to install bulky cabinets, but dishes, cutlery and other kitchen utensils need to be stored somewhere.
Such shelves can be made from any of the materials mentioned above, but wood products will look most organic. To make such shelves, you need boards, a hacksaw, screws and a drill. Having chosen the desired size of the board, they are cut and connected to each other, forming shelves. The entire structure is attached to the corner.
Corner shelves for the bathroom

It's no secret that bathrooms are usually not very large. Therefore, saving space in the bathroom is simply necessary. Thanks to the shelves, you can conveniently place all your bath accessories: cosmetics, shampoos, perfumes, shower gels. Don't forget about detergents for washing and cleaning. Shelves will help save space, and everything you need will be at your fingertips without clogging up the bathroom.
Wooden shelves would be inappropriate here, since this is a room with high humidity. Ideal choice- glass shelves. They fit any bathroom design and harmoniously combine with mirrors. Plastic shelves are also suitable for this purpose. For convenience, they can be equipped with hooks for washcloths and soap dishes. Metal shelves are also suitable; they are more durable and can withstand greater loads. The main thing is that they do not rust, and for this they use chrome and stainless steel.
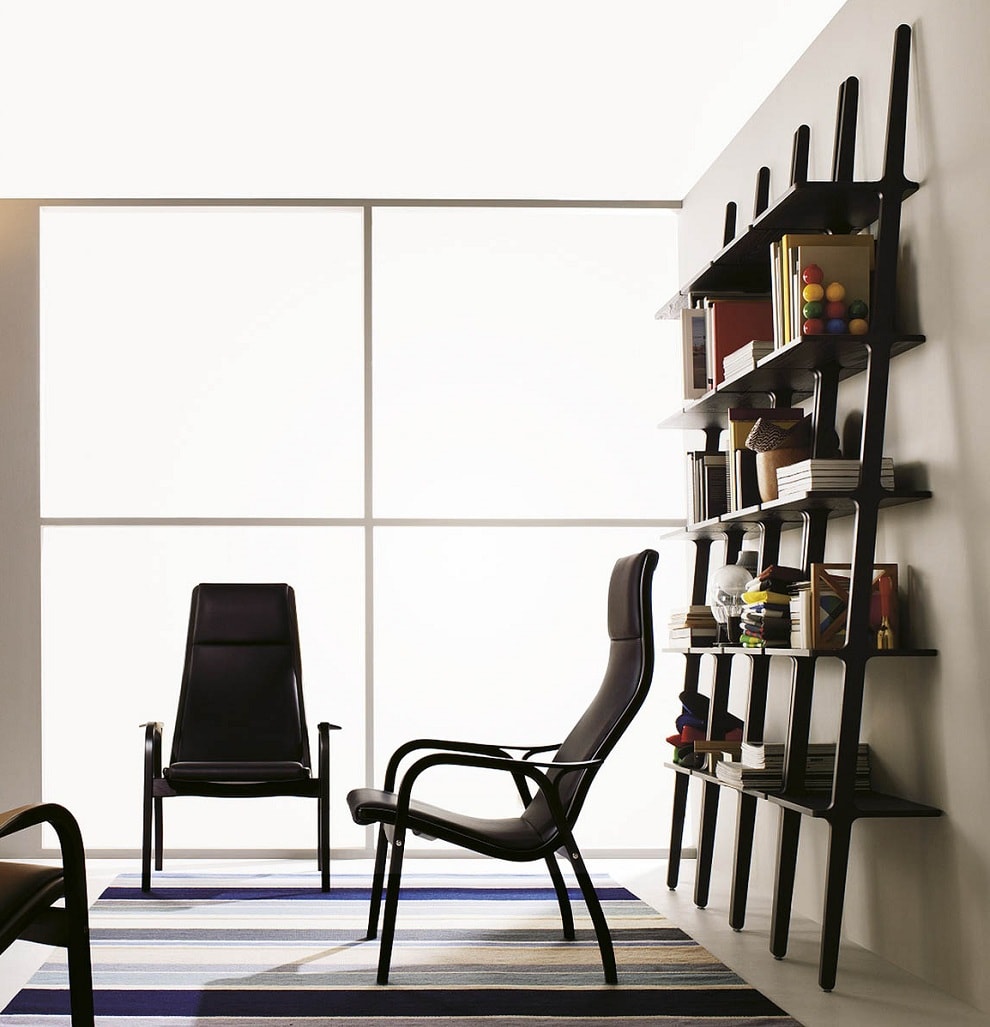
Corner shelves for books

You can often see corner shelves used to store books. It is not only convenient, but also beautiful. Such shelves complement the interior of the apartment and make it more aristocratic. The design itself can be varied; imagination will help make them original and practical.
A shelf made of wood looks impressive, parts of which are attached either on one side of the corner or on the other. It looks like a ladder. Such shelves are ideal for books, which, thanks to their shape, will fit perfectly into the right place.
Taking into account all the tips, making corner shelves yourself will not be difficult. This kind of work will only take a few hours. And the finished shelf will serve you for many years, delighting you with its beauty and practicality.
You might be interested in the following materials:
Video
From the provided video materials, you can learn about simple tips how to make a corner shelf with your own hands:
Photo
In the photographs provided, you can see various options for making a corner shelf with your own hands:


Scheme
These diagrams show calculations for the manufacture of corner shelves:


Sometimes, in order to make your interior design exceptional, it is not at all necessary to resort to the services of expensive specialists or buy exclusive and expensive furniture. After all, decorating the interior of a room is not a routine task, but the most creative process of transforming space. Therefore, sometimes, to give the room a certain individual style, the most ordinary and simple objects are enough, which with their presence will dilute the monotony of the interior, making it more dynamic and functional. Such elements are racks and wall shelves, when choosing which it is only important to take into account the harmony of their shapes and colors with the surrounding interior, without forgetting about their main functional purpose.
Types of shelves
The variety of types of shelves today is very large. If we take as a basis the material from which the shelf is made, then they can all be classified as follows:
- Glass and mirror;
- Wooden (chipboard, MDF, plywood);
- Polymer and plastic;
- From other materials that can be combined with each other.
If we take the design, appearance, structure and method of fastening as a basis, we can distinguish the following types:
Wall mounted
Wall shelves supported by other stable furniture or the floor. A positive feature of such shelves is that their special design allows them to withstand quite a large load, which makes them indispensable assistants in the house when you need a place to store something large and heavy.
Most often they are used for all kinds of equipment or storing shoes in. These shelves take up minimal space, which is also a positive feature, especially for.


Built-in “niche-shelves” in a plasterboard structure will look advantageous in any interior

Classic (rectangular)
Classic rectangular wall shelves attach directly to the wall. The advantage of this structure is that you can use both internal and external surfaces. The back wall may be missing, leaving the wall exposed.
You can put it on top various items interior: vases, clocks, photographs, lamps, books, night lights and figurines. It is precisely these shelves that, due to their functionality, add coziness to the apartment.


Simplicity and conciseness are the main strength of the interior in the style of minimalism
Multi-tiered
Multi-tiered shelves on the wall look very original and also combine many different functions. This type of shelves can combine a combination of various horizontal, vertical and inclined planes, which turns out to be very convenient in everyday life.
However, they often simply make identical horizontal planes, which, firstly, have an equally beautiful appearance, and secondly, are very functional. In this case, you should give free rein to your imagination to make something that is both comfortable and beautiful, matching both your preferences and the surrounding interior.


Corner
Corner shelves make it possible to use all the empty corners in the apartment. They are most often used in bathrooms, however this type shelves can be used anywhere. They are reliable and stable. They can even be made transparent, which will look very modern.


The use of shelves in the interior
Wall shelves have become so integrated into our lives that it is difficult to imagine life without them. There is no place in the house where they would not find their use. People put them on, hang them on, screw shelves to the wall, mount them in closets, build them into chests of drawers, install them in mezzanines and other hard-to-reach places. After all, shelves are not only an elegant interior decoration, they are also extra bed for storing things, which is always in short supply.
Besides beautiful shelves in the interior they will help to correctly place accents in the room, emphasizing its overall color. They will look even more attractive if they are equipped with additional lighting in the form LED strip emitting soft light.


There are no special rules about where shelves should and can be placed. They can be installed anywhere. However, it is still advisable to take into account functional purpose rooms:
- If this is a work office, then it is advisable to install them above the table, within reach of an outstretched hand, so that if necessary, you do not have to constantly get up from your chair.
- The same method of placing shelves is suitable for. Only in this case it is better to use open shelves, since every housewife loves for everything to be in plain sight.
- Designers recommend installing wall shelves near or above the bed. This way you can dilute the empty wall space.
As mentioned above, in addition to functional benefits, wall shelves also need to bring aesthetic pleasure. To do this, you can place your favorite books and magazines on them, place photographs of smiling relatives and people close to you who will give you Nice memories and warm feelings.


Shelves are a decorative element household items, whose main task is interior decoration. This item always attracts attention, so it is very important that the things placed on them are correctly and neatly arranged.
- If you want everything to look harmonious and tasteful, things need to be arranged in in a certain order. For example, large objects should not be located next to small ones; they are best placed separately and preferably higher, while small objects will look great on the lower tiers of the shelf.
- We must not forget about the right thing. Each element must strictly correspond to the overall style of the room. Bright colors should not spoil the interior, but rather complement it, correctly finishing color palette rooms to perfection.
- Shelf space must be used both in height and depth. Taller items should fade behind shorter ones, while functional items should be placed in the front. However, you should not clutter the space too much so as not to create a heavy feeling of overabundance of decor. Ideally, the ratio of free and occupied space should be 50 to 50%.


Also, do not forget about the option of symmetrically placing items on the shelf. This method allows you to achieve the desired effect of a certain completeness of the interior.
Types of home shelves.
Wooden shelves and racks
Fashionable and modern wooden shelves Huge and inconvenient racks and cabinets have long been replaced. These are fashionable and practical elements fit perfectly into the design of any room. They go perfectly with any interior style, are easy to use and maintain, and are also an excellent place to store things.
Wooden shelves will not only be a beautiful addition to your interior, but also an integral attribute of modern life.
Buy or make it yourself
Today it is not difficult to buy a ready-made hanging shelf either online or in any furniture store. The advantages of such a purchase are obvious:
- There is no need to waste time making your own wooden shelf;
- You can buy certified products High Quality, which will last a long time;
- You can choose a rack, wardrobe or bed in the same color and design, since in stores hanging shelves are usually separate element set of furniture.
- You can immediately select the required size and number of floors of the shelf, thereby gaining confidence that it will withstand the load you need.
However, not everyone will like a store shelf; many prefer to make it themselves in order to get an original and unique item.
Making a wooden shelf with your own hands is not difficult, especially since today there are a lot of ideas and master classes on the Internet.

Wood and metal are an excellent addition to the loft-style living room interior

Master class on making a wooden shelf
There are models of hanging shelves that you are unlikely to find on the Internet - these are wooden shelves made from scraps of boards or bars, fastened with a piece of rope. They look very stylish and unusual in the interior. Here are the two most popular ways to make them:
First option:
- Sawing the board the right size, we process it grinder, or paint.
- On the sides on both sides at the same distance with a drill we make one hole with a diameter equal to the diameter of the rope on which our shelf will hang.
- We thread the ends of the rope or rope through the holes and tie secure, tight knots to hold the board on them. We fix the shelf in the chosen place.
Second option (multi-tiered):
- As in the previous case, we prepare the boards, this time there will be at least two of them. We will also need small bars different sizes and thickness, they will become the side walls of the future model.
- We fix the main boards to the bars from above and below, using self-tapping screws and special wood glue. Then we give our workpiece some time to dry. The first tier of the structure is ready.
- In a similar way, using the same material, we make the remaining cells of the future shelf. We carefully ensure that internal corners were straight.
- After required amount elements for the shelf are assembled using a rope or metal chain, we connect them together. The final step is to install the wall mount. A carabiner or anchor bolt with a hook.
As you can see, there is nothing complicated here. Shelves can be painted to match the color of the furniture, covered with stain or decorated decorative elements to your taste.


How to choose the right shelf
Agree, hanging shelves in the interior always look impressive. If, of course, you select them correctly and place them in in the right places where they will look good. Now, fortunately, the choice of shelves is huge and their variety is simply amazing.
A shelf is not only useful and necessary furniture, but also a great design element that can bring beauty to your home.
In order to make a choice, let's remember what types of shelves exist:
- One of the most popular shelves is the wall shelf, which is attached directly to the wall;
- Also popular is a corner shelf that is placed between two walls. This allows you to save space in the room;
- Floor shelves that are placed on the floor are also very effective. And if they are also on wheels, then at the right time they can be moved, removed or rearranged;
- No less popular are hanging shelves, which are attached to the wall or ceiling using a variety of chains, cables, and belts.
- Folding shelves are also a great way to save space, as they can be folded down when needed.
- The shelf-table, the name speaks for itself, can take two forms: the table itself and the shelf. This great option for a small room.
- If the size of your room allows you to use more space, then shelving is perfect here.
Yes, as you can see, the variety of shelves is great, and there are quite a lot of them today. All you have to do is decide on the type of construction. The main thing is not to clutter the entire room with shelves. They should go well with general view the room in which you plan to hang them.


If you need shelving to store important things: books, documents, photographs, then try to make them stable and strong. Especially if they are intended for children.
In this case, the shelves should not be placed too low, since children are very active and mobile. Also, don't opt for glass shelves. And their corners should not be sharp.


As for the choice of shelves in . Here you can give free rein to your imagination. Tetris shelves and shelves will look good here unusual shapes, spiral shelves, frame shelves.
In the bedroom you can get by with regular classic shelves. They will look most impressive above the bed, where you can place family photos.

Wall-mounted bookshelves and wooden shelving are the latest in fashion.

White color is an excellent background for wall decor
It will be better if the material from which the shelf is made matches the material of the countertop. This will give the kitchen its own specific style and elegance.


If in the kitchen it is used as a material for shelves natural wood, its surface must be reliably protected by a product that is resistant to moisture and temperature changes
Video: beautiful shelves in the interior
As you can see, there are plenty of types of shelves and their shapes, so the main thing is not to overdo it, but to focus on quality and durability.


The main thing to remember is that shelves on the wall should look very good in the room for which they are intended. But no one forbids you to add something new and unusual to their design. After all, with a successful choice wall shelves and shelving, your room can sparkle with new colors.
There are many ways to make a corner shelf. All of them are quite simple and accessible to everyone. Of course, only a professional can make a complex product with many decorative carved elements and other decorations. However, an ordinary corner, in no way inferior to factory products, is very easy to create with your own hands.
You can use it at work following materials:
- Chipboard. Laminated sheets are used. The material is convenient because it does not require processing. It’s easy to make DIY shelves from it at home.
- Plywood. Plywood shelves are probably the simplest option you can imagine. At correct processing the furniture will turn out very beautiful.
- Boards. A properly made wooden corner will delight the eye for generations. Due to the simplicity of the product, you can safely give preference to this material.
- Drywall. It will create a built-in corner, that is, the product will be stationary structure. Advantages - no need for large quantities tools and ease of operation.
There are 2 main types of shelves: wall-mounted and floor-mounted. The difference between them is clear. Both types are easy to make yourself.
Basic principles of creating furniture from wood materials
Below are drawings of products that are easy to make with your own hands:
Regardless of which material is chosen, plywood, chipboard or natural wood, the following tool is required:
- jigsaw;
- screwdriver;
- furniture conductor.
The order of operation is also the same:
- Preparing parts. The corner shelf has walls and shelves themselves. It is necessary to cut all parts from the material used. Then holes are made through the furniture jig for subsequent fastening of the parts together.
- Product assembly.
- Final works.


Features of working with chipboard
If you decide to make a shelf with your own hands from chipboard, then you need to purchase furniture edge. This special material, which is attached to the ends of the products. Thanks to it, the product will be protected from moisture, it will not swell or crack after a couple of years of use.
The parts are fastened together using self-tapping screws, metal corners or confirmations. The choice remains with the employee. It is important to take all measurements correctly - if, when working with wood, an incorrect hole can be repaired, the chipboard will not “forgive” the mistake.
Wooden shelf
When creating a wooden shelf with your own hands, you need to consider several details:
- Correct selection wood - regardless of the type of wood, the wood must be carpentry, that is, have a moisture content of no more than 15%.
- The wood must be treated. After the parts are prepared (cut to size, equipped with all necessary holes etc.), they are processed with sandpaper or angle grinder, and opened with varnish. Before this, you can apply stain to give the product shades of valuable species. The varnish is applied in several layers. The first one is unpaved. For this, you can use either a highly diluted substance used or a special primer.
- You can fasten the parts in several ways: using dowels, making special grooves, or with self-tapping screws. Often, wall-mounted shelves have a design in which it is possible to connect opposite walls using the shelves themselves, without sacrificing the reliability of the product.
The drawings presented in the section on chipboard shelves also apply to natural wood. Here are some ideas on what kind of wooden shelves you can make with your own hands:

Plywood is a lightweight and reliable material
Many people prefer to make shelves from plywood, as from the most affordable and easy-to-use material. For example, the product shown below can be cut in 15 minutes if you have a jigsaw. All that remains is to cover the plywood shelves with paint and wait for it to dry.
It is very convenient to create hanging products from plywood - it is light and does not require serious fixation. And if you have the skills and patience from of this material you can even make a real work of art.

Such compositions are cut out with a knife. The work is very painstaking and requires a lot of attention. This plywood shelf is suitable for those who need not just functionality, but also original item interior Stencils for the patterns can be found online. Here are a few items that may come in handy:


Plasterboard shelf
You can make a stationary, non-movable shelf with your own hands from gypsum board. The principle of its creation is simple: a frame is made of metal or wooden slats, onto which prepared gypsum board parts are attached.
For work you will need:
- Stationery knife– they will use it to cut drywall.
- Hardware - gypsum-wood or gypsum-metal, depending on what material is chosen for the frame.
- Putty, spatula, dilution container.
- Metal corners, the side of which is equal to the thickness of the gypsum board used.
- Frame materials – wooden slats or metal corners.
- Level, tape measure, pencil.
How to make a corner shelf according to the instructions with your own hands:
- The installation locations of the slats are marked on the wall. All markings must be made as evenly and accurately as possible. Each one needs to be controlled by level.
- The frame is attached.
- Prefabricated plasterboard parts are installed.
- Attaches to the ends metal corner and sealed with putty.
- The finished corner is painted to taste.