The passage of a pipe through the ceiling in a bathhouse is a very narrow topic that requires a lot of specifics, and therefore excludes other important issues from consideration. But it doesn't matter. On our website you will find many other - overview or highly specialized - articles that talk about the construction of a bathhouse from to.
How to remove: fire standards
All features pass-through node in the bathhouse through the ceiling connected to fire safety. Furnace gases and solid particles formed during fuel combustion have a temperature of several hundred degrees ( up to 700). And this hot stream almost immediately (in the case of a metal stove, because a brick stove has labyrinths where the walls take heat from the stove gas) enters the chimney, heating it and making it dangerous for adjacent structures.
So, minimum For isolated pipes (thermal insulator with heat transfer resistance 0.3 m2∙°C/W) – 13 cm, for non-insulated– 25 cm.
There is also Appendix K, which everyone interprets in their own way, where it is said that, together with the thickness of the stove or pipe (the latter is not written explicitly), the amount of indentation is equal to 50 cm to combustible materials and 38 cm– up to finished with 2.5 cm thick plaster or metal sheet on top of 8 mm thick asbestos cardboard. It implicitly follows from this that we are talking about an air gap between the heated and combustible surfaces.
IN SP 7.13130.2009 there was one more addition: that the cutting size should be 7 cm greater than the thickness of the ceiling. In this case, a link is given to the application already mentioned above, which talks about 50 and 38 cm.
BUT! In some cases this is seen as an indication of the size of the opening in the ceiling.
Chimney: types of pipes
What can a modern chimney for a sauna stove be made of? There are not many options:
- brick (we will talk very little about it in this article, because this is a topic more for brick stoves),
- metal;
- ceramics;
- glass.
It is noteworthy that the best material there will be impact-resistant, heat-resistant glass, in second place is ceramics, and then come steel of various grades. Below is a video in which the author compiles a list of the highest quality steels, but for those who are too lazy to watch, we will present it in text form:
- austenitic AISI 310 and 310S;
- austenitic AISI 316 T L;
- austenitic AISI 321;
- austenitic AISI 304;
- with the addition of manganese AISI 201-202;
- ferritic AISI 409;
- ferritic AISI 430.
At this point the list is interrupted by description enameled chimneys, then from aluminum zinc, after which the author proceeds to black carbon steel, which can only be used if painted with heat-resistant enamel.
Here's the video itself:
We agree that ceramic chimneys are better than metal ones, but they are also more expensive. As for which brands have become better, we trust the author of the video.
Brick pipe passing through the ceiling
A special consideration is the case when a brick pipe is laid through the ceiling. In principle, this is also part of the work of a stove maker, but even so, the owner should understand what is being done and why.
A brick chimney heats up just like any other. Therefore, when passing through interfloor covering thermal protection of this ceiling from excess temperature is needed.
A brick pipe is insulated either with brick or concrete. In order for the brick PPU to be reliably connected to the pipe, “fluffing” is done - this is a gradual increase in the cross-section of the pipe due to additional bricks.
The fluff order is shown in the figure below.

An alternative would be to create formwork to the size of polyurethane foam and fill it with concrete.
The hole in the ceiling is cut to the size of the fluff.
But the author of the video considers such thickening of the pipe to be an ugliness, and suggests following the regulations, which do not insist that the insulation be made of brick. We agree that a more effective material can be found, but this is not mineral wool! Because it will turn to dust over time.
Pass-through unit: structure and dimensions of the box
There are several names for boxes, which is installed in the opening of a hole cut in the ceiling: this is a “pass-through unit”, and a “cutting box”, and a “ceiling cut-out”, and PPU (ceiling pass-through unit).
What is he? Quite simply, this is a box with heat-insulating material, which should stay in the hole you cut, and also keep the chimney pipe exactly in the center.

Box for the passage of the chimney through the ceiling for installing a stove in a steam room
In addition to this, there is also finishing of the hole itself, which is very desirable to be reinforced with material, withstands high temperatures, does not ignite and has low heat transfer. Below we will talk about specific materials, but the problems that should be solved by them are exactly the same.
The passage unit is made from metal In particular, this could be stainless steel. In any case, the part that is visible from the steam room is usually made of stainless steel. On sale you can find boxes made entirely of stainless steel, and entirely of galvanized steel, and their combinations.
Boxes vary sizes. And not only the box itself, but also the internal hole through which the chimney must pass. Diameter varies from 115 before 300 mm.
As for external dimensions, everyone interprets GOST in their own way. We already understand why this happens - some believe that a box with a side 1 meter complies with GOST, others, as 26 cm + pipe diameter – quite enough. And all this is based on technical standards.
IMPORTANT! If there is any discrepancy, one has to rely on common sense.
What is the main limitation when passing through the ceiling? Ceiling beams, if the ceiling is false. If the dimensions of the box are greater than the distance between the beams, you will have to cut the beam and insert the cross member in another place. This will affect bearing capacity of this beam. That is why they try to fit the box between existing beams without additional waste of time and effort.

The ceiling in the bathhouse and the chimney. Photo StroyDom
Of course, if the position of the furnace had been thought out even further design stage, then it would be possible to position the beams so that the foam would pass between them. Consequently, the size of the PPU would need to be thought out in advance.
On the other hand, there are now materials with low heat transfer that can withstand heating up to 1000-1100 degrees. If you use them, there is no need for cutting big piece ceiling. For example, look at the video that shows a test test of a slab made of calcium silicate. We then looked at the technical characteristics of this refractory - they are simply excellent! Find out for yourself (we do not advertise or sell).
For now, let’s summarize the data. We found that according to SNiP and other regulations, there are the following options:
- radius of ceramic pipe + insulation + 13 cm;
- ceramic pipe radius + 25 cm;
- pipe radius + 38 cm;
- pipe radius + 50 cm.
ATTENTION! There are no data for steel pipes in the first two cases.
As for the device, everything is simple: the metal box has the height of the ceiling, and is closed at the top and bottom with lids with holes for the diameter of the pipe. The lids are larger than the size of the box.
The box itself is lined with a heat insulator on all external surfaces - minerite or basalt cardboard. Inside the box is poured expanded clay or fits basalt wool. This standard option, this is done most often. But in the video you saw that you can get by with a slab of calcium silicate and use it to isolate the pipe in the bathhouse from the ceiling.
How to make a chimney: choosing insulation

Fireproof plate
We believe that special attention should be paid to the choice of insulation. We repeat: the majority will put expanded clay or mineral wool inside the box, and cover it with mineralite on the outside (its analogue is sheets Flamma) or basalt cardboard. This is a valid solution. Doubtful to use instead of mineralite asbestos.

asbestos cardboard (asbestos cardboard)
ADVICE! Do not make an internal backfill of sand, because it transfers heat perfectly, and when the chimney heats up to 400 degrees, even this is a guaranteed fire. Because wood lights up at 330 degrees, but if you heat it for a long time, it will light up at 150-170 degrees. Sand will do a very bad job.
However, in our time, other refractories have appeared - the same calcium silicate, known commercially as superizol or slabs Silca. But it is a slab material.
The chimney in the ceiling of the bathhouse in the area of the polyurethane foam can be lined with other materials that look like cotton wool or felt If we talk about stone derivatives, then this basaltine And Basfiber, which are technologically more advanced modifications of mineral wool.
But now you can buy not only them, but also ceramic fibers, in particular, these Supersilica, which is a silica fiber from which either cotton wool or mats are made. It has no binding substances at all, which in mineral wool burn out over time, causing it to crumble. The manufacturer's website directly states that this fiber is suitable for insulating the ceiling passage in a bathhouse.
Below is a video that shows a funny stress test of everything that can be stuffed into a PU foam assembly:
Is there some more mullite-silica wool, but this is already a real fireproof material, capable of withstanding temperatures twice as high as the maximum for a chimney.
Through the roof
The matter is not limited to one cutting box when you lead the pipe in the bathhouse through the ceiling and roof. But we decided to make the topic of this article quite narrow. Moreover, there is a more complete one on the site, which talks about wiring through attic space and the roof. We recommend that you familiarize yourself with it.
How to insulate a pipe from the ceiling
And here it is interest Ask. One of the videos says that the maximum temperature to which the chimney duct can, but should not, be heated is 700 degrees. And since most people make metal pipes, according to the rules, they first go monotube, then, closer to the ceiling, it turns into sandwich. That is, in the steam room we will have an unprotected monopipe - thin layer metal, separating from hot gases. And this is powerful and hard IR radiation.
We can consider the problem of insulating a pipe in a bathhouse from the ceiling in two ways - both down and up. Down Usually, it is not so much insulation that is made, but a device that takes away heat, which literally “flies into the chimney.”
There are two options - you can hang it on a pipe heat exchanger, which will heat the water. Can you hang it? grid with stones, which will absorb heat and retain it longer than metal.
If we consider devices such as isolation in particular, they will perform their function - their temperature will be significantly lower - the water heats up to 100 degrees, the stones can hold a higher temperature, but lower than that of the gases in the pipe.
As for the pipe above the ceiling, that is, passing through the under-roof space and the roof, then more care needs to be taken specifically about insulation.
ADVICE! Do not neglect fire-prevention impregnations for wood; they are quite appropriate in the attic of a bathhouse and can protect it from fire.
Insulate the pipe higher The ceiling can be made of a calcium silicate box with an air gap between the pipe and the box for better cooling of the former.
The second option is to use supersilica. It is a ceramic fiber that can be purchased in sheet or mat form. The pipe wrapped with it will become simply warm to the touch. In addition to the pipe, supersilica can be used to protect all flammable surfaces in the immediate vicinity of the chimney.
It even occurred to us that ceramic fiber is much better than ordinary sandwich stuffing, which loses its insulating properties when condensation forms inside, and over time settles and turns into dust (losing binders). And the most unpleasant thing is that the sandwich tends to burn out if it is fired incorrectly frequently, which makes such a pipe dangerous.
In other words, you can either try not to take a sandwich at all, but limit yourself to supersilica insulation, or replace the mineral wool inside the sandwich with this material.
How to install a chimney through the ceiling with your own hands
It is advisable to start at the design stage. The location of the furnace must be matched with the position ceiling beams And roof rafters. In this case, you won't have to redo anything at all. Then a decision is made on the size of the PPU. If you do it “according to GOST”, that is, 38 or 50 cm from the bare pipe, then it will most likely be impossible to fit between the ceiling beams without undercutting. If you use store-bought versions of polyurethane foam that are far from GOST, then you won’t need to cut anything even with a standard beam spacing of 60 cm.
However, we will still provide a picture showing how to trim correctly ceiling beam, which interferes with the passage of the PPU. 
Just in case, let’s clarify that similar The design is also used for cutting rafters, but in this case it is necessary to make the rafters adjacent to the trimmed ones double (for the entire length).
Those who for some reason do not want to make a hole exactly above the stove can make or L-shaped a chimney that will lead the pipe to another place in the ceiling, or bring it out at an angle in 45 degrees- the difference is determined by the magnitude of the displacement - if it is more than a meter, then an inclined version is made, if less - an L-shaped one. You only need to then provide reliable support to the chimney pipe so that it maintains its vertical position.
But this is a technical solution, but how good it is for a steam room is another question. To be honest, then not good at all. And the extra IR radiation from additional meters of the chimney will not improve the health of visitors, alas.
ADVICE! To avoid having to suffer so much, add a roof plan to the floor plan with the foundation for the stove - you will immediately see where the chimney will go. At this stage, you can adjust the plan itself.
So, preparation for penetration is desirable even before the final filing of the ceiling. If everything is calculated correctly, all you have to do is cut out a piece of lining with a vapor barrier, insulation and waterproofing. Well, if you put a rough and finishing floor on the second floor, then those too. But the beams will remain intact.
You can cut with what you have on hand, for example, jigsaw.
Next, you need to choose what exactly you will finish with mineralite or calcium silicate, or basalt cardboard - the outside of the box or the walls of the hole. Both are acceptable. After attaching the slab insulation, the box is inserted into the hole and secured from below with self-tapping screws.
IMPORTANT! The center of the hole in the ceiling should coincide with the center of the pipe. To do this, use a plumb line and align the centers.
A pipe is mounted below. If you choose a sandwich, then first put a monopipe on the stove pipe, not forgetting to fix all connections with high-temperature sealant. Closer to the ceiling, a start is put on the monopipe - this is an adapter for a sandwich. The sandwich is already threaded through the PU foam hole.


Check your verticals! The pipe must have fastenings to the wall that will fix it in a strictly vertical position.
After the sandwich is threaded through the polyurethane foam, the space between it and the walls of the box is filled with another insulation - mineral wool, expanded clay or ceramic wool. We like mineral wool least of all from this list. Expanded clay is perfect for a budget option.
BY THE WAY! The bottom of the box can be lined with the same calcium silicate and the inside of the lid can be finished with it.
We close the lid and fix it to the attic floor with self-tapping screws (it protrudes slightly beyond the hole). At this point, the passage of the chimney through the ceiling, done with your own hands, can be considered complete. Next is the exit through the roof.
Useful video
And this is an hour-long video that tells everything about installing chimneys, fortunately below there is an opportunity to select the piece that is most relevant to the viewer:
About errors - it's worth watching and listening:
And here is our favorite video about ceramic fiber:
A Russian bathhouse is usually heated with wood, which means that a good chimney is needed to remove combustion products. Work flawlessly sauna stove Only some types of chimneys can, so the choice of material must be approached responsibly. The issue of installing a chimney, which is allowed to be installed through the ceiling or wall, should be taken just as seriously.
Types of chimney for a bath
A chimney is a device that improves draft in the furnace firebox and releases gases into the atmosphere. This channel has a rectangular or round section and consists of vertical and sometimes horizontal elements.
The first chimney consists only of vertical parts, and the second has one horizontal element
Chimneys differ from each other in material and design.
What material is suitable for the chimney?
Most often, smoke ducts are constructed from bricks, ceramics and steel. The latter material can be black, galvanized or stainless.
Combined chimneys have become widespread. The most popular two options: a brick channel with steel pipe inside and a ceramic pipe in a steel case.
Combined chimneys combine metal and material with poor thermal conductivity
The advantages of brick, ceramics and steel are that they resist fire well and are non-toxic when heated. Asbestos-cement and aluminum pipes, therefore they cannot be used to construct a chimney for a sauna stove.
The most practical material metal is considered to be used for making a chimney
To make the choice between brick, ceramics or steel easier, I can give a simple, but useful advice: It is better to take the raw materials with which you have experience working. For example, to someone who once posted brick wall, it will not be difficult to assemble a brick chimney. True, such a product is gradually becoming a thing of the past, clearing the way metal devices. I, like many other bathhouse owners, boldly prefer a stainless steel sandwich pipe.
A chimney made from sandwich pipes is preferred by most bathhouse owners, since these structures are made with a thick layer of insulation inside and no longer require modifications during installation.
Sandwich pipes (double-walled) metal constructions) are in demand due to the following characteristics:
- easy and quick installation;
- material strength;
- low risk of fire - they do not heat up to the limit.
A chimney made from a sandwich pipe is assembled simply, like from a construction set, and does not require special construction skills
Bath chimney design
Depending on the design or installation method, the chimney can be of two types:

Subsequently, people usually regret installing an external chimney in their bathhouse. Such a chimney is safer, but it transfers heat not to the room, but to the street. Therefore, it is better to build an internal smoke channel in a bathhouse: it does not need to be insulated, and it is easier to clean during operation.
The inner pipe goes through the ceiling, and the outer pipe goes through the wall.
Calculation of pipe sizes in a bathhouse
When choosing a chimney, you should pay attention to the cross-section (diameter) of the pipe and determine the total height of the channel.
Chimney section
Section chimney Available in round, rectangular and square. And its size depends on the power of the sauna stove.
Usually, round-shaped pipes are used for the stove in the bathhouse. In them, the traction is as good as possible, because the air flows do not encounter serious obstacles on their way.
The diameter of the pipe for the furnace to the bathhouse is calculated as follows:
- First, it is calculated what volume of gases will be released during operation of the furnace: V gas = B * V fuel * (1 + T / 273) / 3600. Where V gas is the volume of gas passing through the pipe in 1 hour (m³/hour), B is the maximum mass of fuel burned within an hour in the combustion chamber (kg, depends on the power of the furnace and the density of the fuel), V fuel is the coefficient of the volume of gases formed during the combustion process (m³/kg), and T is the temperature of the gases at the outlet from the pipe (°C). The Vfuel value when using dry firewood is 10 m³/kg, which is indicated in a special table. If the chimney is carefully insulated, the T value is in the range from 110 to 160 °C.
- Substituting the necessary numbers into the formula: S smoke = V gas / W, determine required area pipe sections. S smoke is the cross-sectional area of the chimney (m²), V gas is the volume of gases per hour (m³/hour), and W is the speed of movement of combustion products inside the chimney, which is 2 m/s.
- By calculating the area of the circle, find the diameter of the pipe. To do this, use the formula D = √ 4 * S smoke / π, where D is inner diameter round pipes (m), and S smoke is the internal cross-sectional area of the chimney (m²). P is a mathematical constant (3.14).
Table: dependence of gas temperature in the chimney on fuel
| Fuel | Volume of combustion products at 0 o C and 760 mm pressure, m 3 /kg,V fuel | Temperature of gases in chimneys, oC | |||||
| Type of fuel | Qph kcal/kg | Density kg/m 3 | First T 1 | Intermediate T 2 | Last T pd | Pipe exit T uh |
|
| Firewood with humidity 25% | 3300 | 420 | 10 | 700 | 500 | 160 | 130 |
| Lump air-dried peat with a moisture content of 30% | 3000 | 400 | 10 | 550 | 350 | 150 | 130 |
| Briquette peat | 4000 | 250 | 11 | 600 | 400 | 160 | 130 |
| Coal near Moscow | 3000 | 700 | 12 | 500 | 320 | 140 | 120 |
| Brown coal | 4700 | 750 | 12 | 550 | 350 | 140 | 120 |
| Coal | 6500 | 900 | 17 | 480 | 300 | 120 | 110 |
| Anthracite | 7000 | 1000 | 17 | 500 | 320 | 120 | 110 |
So that calculating the pipe diameter does not seem too complicated, you can consider it using an example:
- It has been established that 8 kg of wood burns in an hour in a stove.
- For T we take the value 140 °C.
- When the furnace is operating, gas will be released in a volume of 0.033 m³/hour (V gas), since 8 * 10 * (1 + 140 / 273) / 3600 = 0.033.
- Using the second formula we get the figure 0.017. This cross-sectional area (in m²) is required for the chimney.
- It was found that the stove requires a chimney with a diameter of 0.147 m (since √ 4 * 0.017 / 3.14 = 0.147).
- We convert the diameter value from meters to millimeters and round it (i.e., it turns out to be 150 mm).
Chimney height
The height of the chimney is primarily affected by the type of roof.
The pipe must rise above the surface of a flat roof by at least 50 cm. If the smoke channel extends more than one and a half meters, then special braces are used to secure such a structure.
On flat roof it is better to build a chimney from brick, but usually a bathhouse is built under a pitched roof
Of particular importance when calculating the height of the pipe is the distance from the place of its installation to the ridge beam of the pitched roof. Namely:
- if the pipe is more than 3 meters away from the ridge, then its upper edge should be at the level of a line drawn down from the ridge at an angle of 10 degrees to the horizon;
- when the distance between the ridge and the chimney is in the range from 1.5 to 3 meters, the pipe is placed at the same height as the ridge;
- reducing this distance to 1.5 meters, the pipe is raised at least 50 cm from the level of the ridge.
The height of the chimney depends on the type of roof and the distance from the chimney to the roof ridge
Pipe outlet options
The pipe from the sauna stove is allowed to be routed outside either through the roof or through the wall.
Through the ceiling and roof
Installation of a chimney through the ceiling is conventionally divided into the following stages:
- Preparing the opening - a hole measuring 45x45 cm is cut out in the ceiling of the bathhouse. Another similar opening is made in the roof above it. Both windows are created so that the chimney goes exactly in the middle of the opening.
The hole for the pipe to pass through the ceiling is made square
- Welding of the passage unit - from steel sheet Using metal scissors, 5 square blanks are cut out: one measuring 50x50 cm, and the rest 5 cm smaller. A round hole is cut out in the middle of a large piece (the diameter is equal to the outer section of the chimney). Holes for fastening elements are drilled in the corners of the product. Welding machine a box is welded from four other (small) blanks. It is then connected to a large piece of metal with a hole. Or you can simply buy a chimney passage unit in a store.
The metal box will protect ceiling from overheating during operation of the sauna stove
- Installation of a pass-through unit to the ceiling - a prepared metal box is inserted into the ceiling hole with inside baths and fixed.
The pipe passes through the ceiling, located in a firmly fixed metal box
- Making a box for passage through the roof - another metal box is made using the same technology. But the hole is not cut in itround and oval. After all, the box will be mounted on a pitched roof, so it will turn out to be inclined in relation to the pipe. However, it is difficult to accurately determine the cross-section of the resulting ellipse, so it is better to purchase such a product in a store. This box is mounted to the roof from the attic side.
The passage of a pipe through the roof also requires the installation of a metal box to protect rafter system baths from overheating and fire
- Chimney assembly - an element with a damper (a valve for adjusting the draft force) is put on the stove pipe. It must be made from single-walled durable pipe, even if the entire channel is made of sandwich pipes: so that it does not catch fire internal insulation. The first section of the chimney is secured to the stove with metal fasteners. The second link is mounted on it. If it is thinner than the outlet of the first element, then an adapter is installed on the first one. Then the two parts of the smoke channel are welded and fastened with a clamp.
The link with the damper is attached directly to the stove and is the beginning of the chimney
- Pipe insulation inside the box - the box in the ceiling is completely filled with expanded clay, clay, asbestos or mineral stone wool. The top is covered with metal foil. Or you can put a metal sheet with a hole in the middle.
The space between the boards and the pipe is filled with insulating material
- Creating the necessary bend in the pipe - if the hole in the roof is not located directly above the stove, then an elbow is installed on the second fragment of the chimney. This is an adapter for changing the direction of the pipe. The next link is mounted on it, which is led outside the roof through the box.
The elbow allows you to change the direction of the pipe and place it exactly between the rafters
- Making a passage for a pipe on the roof - a box mounted in the roof is filled mineral wool. The area with the exiting pipe is closed roofing material. An elastic cap is placed on top of the chimney. It is glued to the roof surface with a moisture-resistant sealant and fixed with self-tapping screws. Sometimes, instead of an elastic roof, a metal one is installed.
A metal canopy is as effective as an elastic one
- The top of the pipe is supplemented with a fungus that protects against precipitation.
Installation of the chimney is completed by attaching the umbrella
Video: how to install a chimney through the ceiling and roof
Through the wall
When it is necessary to remove the stove chimney through the wall, sandwich pipes are used. The installation process is as follows:
- A hole is made in the wall opposite the stove pipe. If the bathhouse is brick, then use a hammer drill to knock out enough bricks from the masonry to form a square opening of 40x40 cm. As a result, there should be a gap of 20 cm between the chimney and the wall. If the bathhouse is wooden, then a square hole is cut out with an electric saw.
A metal box is placed in the sawn window through which the pipe is brought out
- The inner walls of the opening are lined with basalt cardboard. A factory-made or home-made metal box is inserted into the hole on the inside of the bathhouse, which is secured with self-tapping screws. From the street side, the box is densely filled with basalt mineral wool. Heat-resistant sealant is squeezed into the gaps between it and the wall. The outside of the passage block is sealed with a metal plate or decorative rosette, which is attached to the factory product.
- An adapter treated with a sealant that can withstand temperatures up to 1500 degrees is attached to the furnace pipe. The junction of the two elements is tightened with a metal clamp.
The metal clamp serves as a reliable connecting element for the parts of the chimney pipe
- Connects to the adapter horizontal section smoke channel. It should not be more than a meter in length. The horizontal pipe is passed through the finished hole in the wall, and a tee is put on its end.
The brackets will not allow the tall chimney to move from its place
- On the street side, a bracket is attached to the wall. It will stabilize the position of the vertical element of the chimney.
- A vertical section of the chimney is assembled - the upper element of the pipe is placed onto the lower one with a wider socket. The places where the tee and two sections of the chimney combine are coated with sealant and tightened with clamps.
- The others are connected one by one to the first vertical element of the pipe. At equal distances, brackets with clamps are fixed on the wall to help keep the chimney in a vertical position. To move the chimney away from the roof, a special tubular element is used - an outlet. An umbrella is mounted on the assembled structure.
Among the elements of a chimney installed through a wall, there must be an outlet
Video: how to install a chimney through a wall
Chimney insulation in a bathhouse
The part of the internal chimney located above the ceiling, and the entire external chimney extending beyond the bathhouse, need additional insulation. Typically used to insulate chimneys:
- basalt wool or glass wool are equally fire resistant, retain heat well, do not emit harmful substances and are not afraid of moisture, rodents or high temperatures;
Teploizol is often used due to its low cost.
In most cases, a single-wall chimney is insulated with cotton wool boards. Insulation technology:

Video: how to insulate a chimney
The chimney for a bathhouse must be built in such a way that there is no doubt about its safety. The builder needs to consider a lot: appearance, correct sizes smoke channel and the nuances of bringing the pipe out.
FORUMHOUSE users are well aware that high-quality installation metal chimney directly affects the safety of living in the cottage. We have already written about that. It's time to talk about the features of installing a steel chimney.
1. What is a sandwich chimney
Despite the large selection of materials for installing smoke exhaust systems, reliable steel sandwich chimneys are most widely used in private housing construction.
A sandwich type chimney consists of two pipes of different diameters inserted into each other, and all the free space between them is a place to be filled with non-combustible insulation - mineral wool.
Mineral wool simultaneously plays the role of insulation and insulator.
Sandwich chimneys have the following main advantages:
- High installation speed and low cost compared to brick chimneys;
- Low weight of the smoke removal system;
- Smooth internal walls of the chimney provide good draft and help reduce soot formation;
- The use of acid-resistant stainless steel grades guarantees a long service life of the chimney.
The temperature of the flue gases directly depends on the type heating boiler and the type of fuel used. The higher the temperature of the exhaust flue gases, the more the pipe and, accordingly, all the structural elements through which it passes, heat up. The following table will help you understand the dependence of the flue gas temperature on the type of boiler and the type of fuel used.

It should be remembered that unprotected wood begins to char at a temperature of 200 ° C. Well-dried wood can ignite from an open flame source at a temperature of 270-290 ° C. And if a wooden surface is subjected to constant heating for more than 24 hours in a row, then it can spontaneously ignite already at a temperature of 170° C. Therefore, when installing a sandwich chimney, it is important to observe all fire safety measures. And any mistake made at this stage can lead to dire consequences - fire and loss of property.

Urban:
– Two of my friends’ houses burned down due to an improperly installed sandwich chimney. Moreover, in both cases, the fire occurred in the place where the chimney exit was located through the wooden ceiling.

According to statistics, up to 80% of fires occur precisely because of improperly installed chimneys. Therefore, when choosing and installing a chimney, you must adhere to SNiP 41-01-2003 “Heating, ventilation and air conditioning”.

2. Chimney: distance to the floor slab and correct penetration
As practice shows, greatest number questions arise when calculating the distances from the chimney to the wooden floors.
VadimPro:
– I built a house with a distance between the rafters of 60 cm. And only then I found out that according to existing standards my chimney does not fit into this distance.


And again SNiPs come to our aid:
vova230:
– According to the standards, when passing through wooden floors it is necessary to maintain a distance of 38 cm from the inner pipe of the sandwich to the combustible structures. All this space must be filled with fireproof material. If the standard passage does not provide this distance, then the dimensions of the furnace passage must be further increased.

If the chimney is laid through protected wooden structures, then the distance can be reduced to 25 cm.
Protection of wooden structures - joists, ends of rafters, sheathing - is ensured by a galvanized sheet with an asbestos sheet of at least 5 mm thick laid between it and the wood.
Galvanization performs the following functions:
- Prevents the spread of fire in the ceiling;
- Provides uniform heat dissipation;
- Shields and reflects thermal radiation coming from the pipe.
In case of penetration interfloor ceilings single-pipe steel chimney The distance to unprotected wooden structures must be at least 50 cm!
Also, the parameters of the chimney should be calculated in such a way that the chimney pipe passes through the ceiling entirely - without joints with other elements. The chimney itself is installed through a passage pipe-cut, which is a metal box.


Specialist from the portal website Alexey Telegin from Moscow recommends:
– According to the standards, the thickness of the cutting (metal box) should exceed the thickness of the ceiling by 7 cm.
 Sealing the floors where metal pipes pass from the stove with basalt fiber cardboard
Installation of polyurethane foam chimney
The process of installing grooves in a wooden floor can be divided into a number of successive steps:
1. Cut a hole in the ceiling with a size of at least 700x700 mm.
2. If necessary, remove or strengthen the floor beams.
3. We sew up the perimeter of the cut opening with fireproof materials, super insulation, etc.
4. For tightness, we place a sheet of basalt cardboard under the superisol.
5. We make a supporting frame from a galvanized profile, which is used when installing gypsum boards.
6. The dimensions of the frame are calculated for the PPU (ceiling-passage unit) fastening units.
7. We close the opening with sheets of mineralite or superisol with a hole for the passage of the inner part of the polyurethane foam.
8. We fix the foam.
9. Install the sandwich pipe.
10. We insulate the lower part of the polyurethane foam and the space around it with non-flammable insulation, this will avoid freezing and the formation of frost and condensation.


It is better to install and calculate the smoke removal system at the stage of designing the house!
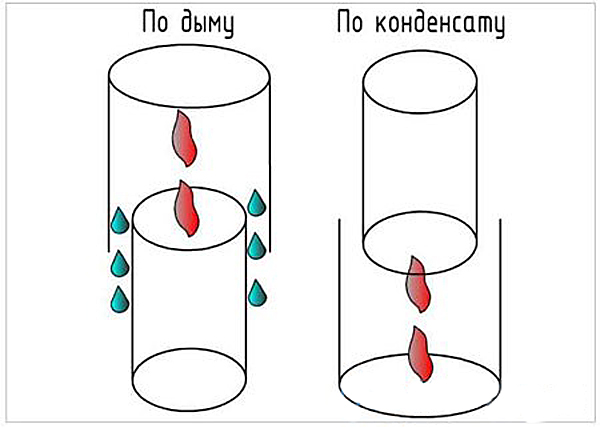
It is also important to pay attention to how the pipes are connected to each other. There are two methods - “by smoke” and “by condensate”.
- Docking “through smoke” - the pipe of the lower bend of the sandwich goes inside the pipe of the upper bend of the sandwich. In this case, flue gases move freely up the walls of the pipe;
- Docking “by condensate” – inner tube sandwich: the upper one is inserted into the lower one, the outer tube of the sandwich: the lower one is inserted into the upper one. With this installation, the pipe allows condensate to pass through, it flows down freely and does not flow out along the outside of the chimney, which can lead to a fire.

Kotlasky:
– The condensate pipe is usually installed on modern gas boilers, because they have a low temperature of the outgoing smoke.
U metal furnaces, cast iron potbelly stoves, the smoke temperature is about 300°C; the steam that is released when burning wood begins to condense at a temperature of less than 100°C. At the moment of kindling, steam, falling on the cold walls of the chimney, is deposited in the form of water droplets, which roll down the smooth walls of the chimney down into the condensate collector.


The condensate collector is installed outdoors. It is better to assemble a sandwich chimney “by condensate”.
3. Features of penetration through the roof
Penetration through the roof is done according to the same principles as penetration through ceilings. Let's find out if it is correct that when driving through rafters, the distance to protected wooden structures can be reduced to a size of 150 mm.
Alexey Telegin:
– It is assumed that the chimney cools down when passing through the roof, and the space around it is well ventilated, so you can reduce the gap to the protected rafters. In my opinion, this may be true for cold roof, and when insulated, you need to apply the same standards and distances as for interfloor ceilings.
The times when the stove in the bathhouse was heated black are long gone. A chimney now rises proudly above each steam room, like a spire. But this component of the design, however, is something to be proud of - thanks to the pipe, the room quickly warms up, and vacationers in it are protected from smoke, soot and suffocation. The ceiling trim for the chimney, which is the fire insurance of the building and the custodian of your property, requires special attention. Let's talk about her.
Purpose and functions of the chimney
Before we start learning how to build a passage through the ceiling for a chimney, it wouldn’t hurt to get to know the main “hero” for whom, in fact, this work is being carried out. So, you already understand that the chimney is important and necessary. Why? How does it function? Thanks to this miracle pipe, the furnace already gets fresh air, separated from gases.
Where do the harmful compounds that appear as a result of burning wood go? They go through the pipe into the sky. Moreover, without any motors, levers, current or intervention of human hands, but in a simple way - under the influence of traction of natural origin. Here is a magical device that seems extremely simple, but to achieve this natural simplicity, you will have to work hard. Ready?
A chimney in a bathhouse is like an engine in a car, one of the important components
Immutable rules
What are the requirements for the chimney and its passage through the ceiling of the bathhouse?
So, remember this important list:
- the most suitable pipe length is 5 meters;
- the prefabricated structure should not contain protrusions (the main guideline is the vertical position);
- the optimal height above the roof level is up to 1.5 meters (otherwise stretch marks will be required);
- the distance between the pipe and the ceilings must be at least 13 cm with cutting the passage and 30 cm without it;
- Smoke elements cannot be joined in roof or ceiling structures;
- contact of the pipe with communications (plumbing, ventilation, wiring, sewerage) is unacceptable.
This is important to know! To avoid unforeseen situations, inspect the chimney at least once a year. An excess of soot, accumulation of soot at seams and joints can damage the structure.

This is how the bathhouse heating system works
Work plan
Now that you are familiar with the design and the basic requirements for it, you can learn how to construct a chimney passage through the ceiling. Learn a step-by-step case study:
- Surface cutting and marking.
- Box installation.
- Sheet installation.
- Arrangement (insulation) of the opening.
This, as you understand, is a theory that needs to be put into practice, and that’s what we’ll do.

This is what it looks like installed chimney from the attic
Practical lessons
And now about each action in detail.
Some pioneers in bathhouse construction are wondering: how to determine the location of the pipe? To avoid further frustration, remember: this location is determined at the stage of drawing up the steam room design.
When marking, it is important to determine the vertical axis of the pipe. The beginning of the layout is the outlet pipe coming from the stove. The axis starting from this structural element, resting on the ceiling, is the center of the skylight that you have to make. If the steam room has an attic, then the axis extends all the way to the roof.
And don’t forget about the rule: the distance from the chimney to the ceiling is at least 13 cm.
Worth paying attention! Before installation, structural elements (pipes, adapters, bends, etc.) must be prepared. Remove the film, stickers, price tags (which many people forget to do) and degrease the surface of the parts.

Your photo tip for installing a pipe for a bathhouse
What dimensions should the ceiling trim for the chimney have? Many people think that these parameters depend on the materials from which the chimney is made. This is not so, the only important thing is that the structure does not touch the ceiling, but is not too far from it, since the hole will be difficult to repair, and besides, the heat that is so necessary in the steam room may subsequently evaporate through it.
You probably already remember about the gap of 13 cm, now understand one more indicator - the thickness of the insulating sandwich should not exceed 5 cm. Are you afraid that the insulation will slip out and fall down? Don't worry, the iron sheet that you attach below will serve as insurance against such situations.
This is important to know! When buying iron sheets, keep in mind that galvanized material is not very suitable for a bathhouse, because heated zinc is a source of harmful substances formed after the decomposition of the substance.

Like this finished design should look like from the inside
Many people confuse the purpose of the insulating layer, thinking that it is done for beauty, to make it cozy inside. Not only that, its main mission is to protect the steam room from fire and cold. The ideal materials are fiberglass, asbestos, mineral or basalt wool.
However, insulating the hole is not enough; you need to additionally create a heat-reflecting screen around the chimney, which we already briefly mentioned above. A piece of polished stainless steel, ideally with a mirror coating, will do an excellent job as a screen. Creating the greatest possible reflective effect for infrared waves is your goal when installing an iron surface.
To reduce the opening, a ceiling-passage assembly is constructed, providing a kind of air gap, which serves as additional insurance against heat leakage from the steam room.
Construction assembly details
You already know the wisdom of the process, let's assemble the device? So, the cutting of the bath consists of:
- iron sheet;
- boxes;
- clamp.

The box is a kind of shell that protects the tree from fire
A galvanized box with parameters 40x40 cm is installed from the attic side. And from the inside of the bathhouse, an iron sheet is attached to it, the dimensions reaching 50x50 cm. The pipe at the lining is covered with a clamp in order to avoid stress on the stove. And only after that, insulation is placed into the hollow part of the body - usually the surface is covered with insulation and covered with expanded clay. Then you can install the final fragment - part of the pipe going through the roof to the street.
Worth paying attention! In order for the chimney to serve for a long time, the joints of the clamps should be sealed, and parts of the structure susceptible to corrosion should be coated with heat-resistant paint.
Video instruction: how to make a pipe passage with your own hands
Ceiling cutting for the chimney is troublesome, but necessary stage bathhouse construction work.
A stove pipe for a bathhouse must not only remove smoke well, but also be designed in such a way that the likelihood of a fire is reduced to zero. In addition, a good chimney retains heat well - in this case, the high temperature in the steam room will be maintained for a long time, and you will be able to save on fuel.
The main types of chimneys for baths
| Characteristic | Kinds | Peculiarities |
|---|---|---|
| By material | Metal, brick, ceramic, asbestos-cement, polymer | Metal pipes are easy to install, and most people prefer this option. A brick chimney is more difficult to make, but it is more durable than a metal one and retains heat better. Ceramic pipe is more expensive, but it is easy to install, has good thermal insulation, heat resistance and durability. Asbestos-cement chimneys are very cheap, but cannot withstand temperatures above 300°C, like polymer ones |
| By design | External and internal | The external chimney exits through the wall and goes up outside the room, the internal chimney exits through the ceiling and roof |


To get a high-quality brick chimney, it is very important to build the masonry correctly. It's pretty labor-intensive process which takes a lot of time.
However, a brick pipe has important advantages:
- it is stronger and more durable than metal;
- brick accumulates heat well and has excellent thermal insulation properties;
- a bathhouse with a brick chimney will be better protected from fire.
Since a brick chimney has all these advantages, this option is still worth paying attention to. There is nothing truly complicated about building a brick pipe for a bathhouse.

But you need to keep in mind that brick chimneys There is also a serious drawback. Soot deposits settle on the inner surface of such a pipe, since it has roughness and corners. Due to the accumulation of this soot, the draft begins to decrease over time, and the bathhouse warms up worse. If the inner surface of the chimney is clogged too much, this can lead to smoke in the bathhouse, and soot inside the pipe can ignite.
However, solving this problem is quite simple - you just need to clean the pipe in a timely manner. The cleaning process does not take much time, and this procedure does not have to be carried out often.

Brick chimney - strengths and weaknesses
Features of a metal chimney

The best option for constructing a metal chimney is to use sandwich pipes. They are a three-layer structure:
- inner pipe;
- a layer of thermal insulation located on top of it;
- outer pipe.

The sandwich pipe has two very important advantages:
- it does not heat up too much from the outside, so it cannot damage wooden floors; in addition, its use will reduce the risk of fire to a minimum;
- thanks to the three-layer design with a heat insulator inside the chimney, condensation will not form in the cold season;
- Also, due to the presence of insulation, the high temperature in the room is maintained much better, however, such pipes are significantly inferior in this characteristic to brick chimneys.

Sandwich chimney installation diagram
In general, the main advantages of a metal chimney for a bath include:
- ease of installation - assembling such a structure will take much less time and effort than laying a brick pipe;
- smooth inner surface - soot and soot will settle on it in minimal quantities, smoke will flow outward in a directed flow, and draft will be good;
- low cost - especially if you do not use ready-made sandwich pipes, but make them yourself.
Condensation appears on the inner surface of a metal chimney in the event of a sudden temperature change. The use of sandwich pipes allows you to reduce this problem to a minimum. To further reduce it, you need to use pipes with as thick a layer of thermal insulation as possible.
Chimney prices

Note! It is best to make a metal chimney consisting of two main parts. In this option, a regular single-layer pipe should extend from the stove; it will heat inner space. Sandwich pipes are placed on top of it, and they are the ones that will go further out. An important advantage of this option is its low cost: the fact is that the pipe located near the stove heats up more, so it quickly becomes unusable. When this happens, it can be replaced without having to buy a new sandwich pipe.


External chimney
In this option, the chimney does not pass through the ceiling - it is vented outside through the wall and then goes up. This design has significant advantages, including:
- ease of installation;
- safety;
- moisture protection.

During its construction, there will be no need to install isolated passages in the attic and roof. In this case, the risk of water getting inside the room will be minimized, since there will be no gaps between the pipe and the roof covering.

However, moisture condenses quite quickly in such a chimney. To minimize the problem, the pipe must be very well insulated. Another disadvantage of an external chimney is that, being outside the room, it does not warm up the interior of the bathhouse. As a result, fuel consumption increases significantly.
Internal chimney
In this option, which we will consider in this article, the chimney rises from the stove to the ceiling and then goes outside. This design will be best for capital construction, which is designed for long-term operation. It's a little more difficult to make, but it's still worth doing if you want to get a really good result. If the chimney is constructed according to all the rules, it will last for many years without any problems.

The pipe retains heat well and warms the interior of the bathhouse and the attic; in addition, the stove cools longer, so you can save on fuel - this is an important advantage of the internal chimney. The only significant disadvantages of the design include the higher outer pipe for smoke removal, fire hazard. However, if everything is done correctly and all recommendations are followed, the likelihood of an emergency will be reduced to almost zero, and you won’t have to worry about a fire.
Sandwich chimney prices
sandwich chimney

Safety
When building a chimney in a bathhouse, you first need to think about safety issues. After all, if something is done incorrectly, wooden structures can catch fire very easily. The problem must be approached carefully, then the bathhouse will last a really long time, and there will be no risk to people’s lives.
All necessary requirements requirements that chimneys must meet are established by the relevant sanitary rules and regulations. They specify the distance that must be maintained between the pipe and flammable parts of the roof slabs. This value depends on the pipe parameters. If you are planning to make a chimney in a bathhouse, you should familiarize yourself with SNiP 41-01-2003, which approves the rules for the installation of ventilation, heating and air conditioning. Please note Special attention to paragraph 6.6.22, which contains all the necessary information.
To ensure that the chimney is completely safe, you need to use appropriate materials for thermal insulation:
- mineral wool;
- basalt cardboard;
- mineralite

Fire-resistant plasterboard and glass-magnesium sheet are also suitable for this purpose.

You need to pay attention to some other points. So, it is important to choose the right materials from which the chimney itself will be made - they must be resistant to high temperatures. For example, if you decide to use metal pipe for the construction of a chimney, it must be made of non-galvanized material. The fact is that when heated to high temperatures, zinc begins to evaporate, and its evaporation is extremely harmful to health.
Brick chimney installation
If you do not have extensive experience in creating brick chimneys, it is better not to take risks and choose a simple, standard, time-tested design option.
Prices for a chimney kit
chimney kit

Such a chimney consists of five main parts:
- top pipe with valve - that part of the chimney that goes directly from the stove;
- fluff - expansion of the chimney by 30-40 cm, which begins 5-6 rows to the ceiling;
- riser - part of the chimney that goes into the attic;
- otter - an expanded part that prevents precipitation from entering the cracks between the roof covering and the pipe itself;
- neck with cap - the upper part of the chimney.
You can install a cap or deflector on top of the neck, which will protect the pipe from rain, snow and debris. This design will also improve traction.

Fireproof or ordinary solid bricks are suitable for constructing the pipe. They can be placed on a composition made from a mixture of cement and sand or cement and lime. In the area where the temperature will be highest, refractory clay should be used. To prepare such a composition, you need to take fireclay powder and dilute it with water and sand in a large container; a 10-15-liter tank is perfect for this. The consistency of the ready-to-use solution should be such that it does not flow from the trowel and does not stick to it, but slowly slides off without leaving marks.
Brick pipe laying

Step 1. First of all, find or prepare it yourself detailed diagram masonry

Step 2. Then make it out of brick or reinforced concrete foundation for the stove, build the heater itself. The height of the foundation should be at least 30-40 cm, and the width should be 15-20 cm greater than the width of the chimney.
Step 3. After this, build the chimney itself, sequentially making all its parts - the top pipe, the fluff, the riser, the otter and the neck with the cap. In this case, you need to install a valve in the top pipe.


Step 4. In areas where the chimney passes through the ceiling and through the roof, cut and lay one of the insulation materials listed above.

Video - Laying fluff


Step 5. If the chimney is located near a wall, it should be fixed to increase the reliability and durability of the structure. Fasteners can be installed every 30 cm.
Step 6. It is better to finish the inner surface of the pipe with plaster. Thanks to this, it will become smooth, as a result, much less soot will settle on its walls. Also, after completing the main work, you can whitewash the outside of the chimney.
Step 7 Last upper section chimney, which rises above the roof level, must be insulated, and then installed finishing. For this you can use facing bricks.
To get a high-quality result, carefully monitor the thickness of the seams. They should be the same throughout the entire length of the pipe. The optimal thickness of such a seam when constructing a chimney in a bathhouse is 15 mm. Experienced stove makers can do the job quite quickly, but there is no need for you to rush - carefully ensure that the laying proceeds brick by brick according to the pattern you found or prepared in advance. Walls good chimney must be perfectly even, all corners must be perfectly straight. To get this result, you need to use a plumb line, level and other tools. If you take your work seriously and take your time, you will succeed, even if you have never done such work before.
Video - Laying a stove and chimney
Choosing a metal pipe for constructing a chimney in a bathhouse
To choose a suitable metal pipe for constructing a chimney in a bathhouse, you need to pay attention to two main points:
- diameter;
- wall thickness.
If the diameter is too small, the smoke will not be drawn out well, and some of it will begin to enter the room. If you choose a pipe that is too wide, smoke and warm air will go out too quickly, as a result the bath will cool down. To buy a pipe of the appropriate size, you need to take into account the required length of the chimney and the number of bends. If the pipe will have two turns or more, a diameter of 110 mm is suitable.
The wall thickness must be sufficient for the metal chimney to last long years. If the pipe is thin, it will soon become unusable, because when heated, the metal quickly corrodes. This happens primarily in those areas where the chimney gets hotter. Therefore, the pipe that will extend from the stove must have thicker walls than the sandwich pipes located above it.

Installation of a metal chimney for a bathhouse
Assembling a chimney from sandwich pipes takes place in 7 main stages.
Stage 1. The first step is to cut a hole in the ceiling, which should be 15-20 mm larger than the outer diameter of the chimney.
Stage 2. You also need to make a similar hole in the roof.
Stage 3. From sheet metal a square is cut out that will close the hole in the ceiling; in this square you also need to cut a hole for the chimney, and at the edges you need to drill holes for fastening with self-tapping screws.

Prices for coaxial chimney
coaxial chimney


Example of insulation with expanded clay and asbestos cardboard

Stage 4. The first single-layer pipe must be installed on the stove and a square of sheet metal must be placed on it, which will be fixed to the ceiling.
Stage 5. Then you need to insert the first sandwich pipe into the branch pipe of the single-layer pipe.
Stage 6. Thus, it is necessary to completely assemble the chimney, installing and securing one sandwich pipe after another.
Assembly of chimney elements “for smoke” and “for condensate”

Stage 7. A cap must be welded to the end of the last pipe, which will protect the structure from precipitation.


Video - Sandwich chimney installation
Heat protection gasket
To insulate the ceiling of a bathhouse near the pipe, any heat-resistant material will do. It can be:
- expanded clay;
- cellular concrete;
- clay.
Mineral wool should not be used - it absorbs water well, so for rooms with high humidity doesn't fit. If you leave the ceiling near the chimney without insulation, the room will quickly cool down, and the cost of warming it up will increase significantly, so you should not skip this step.
Making sandwich pipes with your own hands

If you don’t want to spend money on buying ready-made sandwich pipes to build a chimney in a bathhouse, you can make them yourself. Then they will most likely have a less presentable appearance, but these pipes are no worse for removing smoke and protecting against fire. In addition, no one is stopping you from making your own sandwich pipes, which will look just as good as store-bought ones - everything is in your hands.
To make them, you need:
- take two sheets of steel and roll them into pipes, the diameters should be different - one will be internal and the other external;
- the inner pipe must be wrapped with thermal insulation;
- then you need to put a larger diameter pipe on top and connect the entire structure together by rolling;
- the next step is to cut clamps from the same sheet metal - strips 20 cm wide, their length should be greater than the outer circumference of the chimney;
- These clamps connect the pipe from above and below;
- thus, it is necessary to produce the required number of sandwich pipes for the construction of the chimney;
- a square sheet of metal must be fixed to the ceiling using self-tapping screws, after which it is necessary to place thermal insulation on it;
- a strip needs to be welded around the circumference to the end of one of the pipes to form a pipe.

Another option is not to roll sheet metal pipes yourself, but to use ready-made ones. You can also purchase ready-made clamps in the store.
A simple way to install a chimney
There is a simpler way to install a metal chimney in a bathhouse, which will also cost much less. It involves the use of exclusively ordinary single-layer pipes that go up from the stove and exit through the roof to the outside.

The main features of this design:
- for fastening various elements you can use self-tapping screws;
- in the place where the pipe passes through the ceilings, it can be wrapped with any suitable insulation(For example, basalt wool) and asbestos cord.

However, such a chimney is neither durable nor fireproof, and if you want to get a high-quality result that will please you for many years, you should still use one of the options given above.
Brick and metal chimney maintenance
There are many in various ways chimney cleaning. Perhaps the most popular of them is cleaning the pipe in winter using snow, which must be thrown from above. However, the effectiveness of this method is low. It is better to use one of the methods that bring much more noticeable results.

Chimney cleaning - photo
| Way | Description |
|---|---|
| Cleaning with a brush is an old and proven method that has been used since time immemorial. It allows you to achieve an excellent effect, but for this you will have to work hard. In addition, be prepared for the fact that a lot of soot will get on you - this work is very dirty. |
| Cleaning a chimney with weights on a cable - another one mechanical method cleaning. Like cleaning a pipe with a pipe cleaner, it’s effective, but it means you’ll have to tinker with it and get pretty dirty with soot along the way. |
| You can also install a fan at the top of the pipe that will work for suction. It will pull soot out of the chimney, but you need to prepare for the fact that the space around the bathhouse will then be contaminated with it. |
| There is an easier way - you need to throw aspen firewood into the stove. As a result, a powerful draft will arise, and the soot will be knocked upward. In the dry and intense heat that aspen creates, the resinous substances that settle in the pipe quickly burn out if you heat the bathhouse with wood from coniferous species tree. |
| Cleaning with chemicals. There are different variants For example, you can throw special preparations into the sauna stove along with firewood that enhance cravings. A significant advantage of this method over cleaning with aspen firewood is that the compositions used contain special substances that additionally loosen the soot. As a result, it easily moves away from the inner surface of the chimney. |
Washing and heating the furnace | Another option is to pour several liters of water into the pipe, then heat the stove for a long time. |


To extend the service life of the chimney, it is necessary to periodically inspect all joints and check the general condition of the structure in order to notice problems that may appear in the early stages. As noted above, if you install a metal chimney in your bathhouse, its lower pipe will need to be changed periodically, since it heats up much more and therefore becomes unusable faster.
If you strictly follow the technology, chimney made of brick or metal, made with your own hands, will remove smoke well and retain heat well. In this case, the risk of fire is reduced to almost zero. Both metal and brick construction are very durable, so you will very soon feel the need to build or install a new chimney in your bathhouse.
Video - Typical mistakes when installing stoves and chimneys