Choose correct pots for seedlings - that is still a science. Especially now, when all sorts of variations of these simple, but important and necessary garden tools. Experienced summer resident knows perfectly well what is better to grow this or that variety of fruit crops, but what should a beginner in the world of gardening do? Of course, to study what pots for seedlings are, what are the pros and cons of each type.
These pots can be purchased at any store, even if it does not have a gardening focus. They are made of plastic and can be of two types - with a round and square section. Sizes range from very tiny (about 50 ml) to quite large (1 liter or more). There are also large plastic pots, but they are no longer intended for growing seedlings - rather, only for indoor flowers or landscape design.

The ease of use of the pot often depends on its shape. According to gardeners, it is more convenient to fill with soil round pots, but square ones can be placed on the window more compactly. The disadvantages of square products also include the fact that it is not very convenient to take out a plant together with a clod of earth from them: if a round pot can be “crumpled” with your fingers, and a clod of soil will come out immediately, then it is more difficult to squeeze a plastic one, especially if it is made of dense and high-quality plastic.
On a note! To make life easier for gardeners, they often began to make round inserts at the bottom of the pots that help push the earth along with the plant out of the pot.
Plastic pots for seedlings usually have drainage holes, although the cheaper the container, the more likely it is that you will have to make holes in the bottom yourself.
Very often, seedling pots are sold as a set, and they come with a pallet that will protect the window sills from moisture flowing from them.

So, here are the benefits of using this type of seedling container:
- plastic pots are optimal for growing absolutely any kind of crops;
- they well retain the necessary moisture in the right amount;
- can be used for several seasons in a row, as they are durable;
- perfectly protect the root system of plants from damage;
- they are very easy to store.
Flaws plastic pots:
- non-compact and take up a lot of space;
- it is not always possible to carefully remove a lump with roots during planting seedlings;
- are quite expensive and will cost a round sum if purchased in large quantities.

Below is a table that will allow you to choose the required pot size for a particular type of plant.
Table. Selection of plastic pots for seedlings.
By the way, the following recommendations will help determine the size of the pots.
- For growing seedlings of crops that definitely need a pick, use pots of the smallest volume - 50 ml.
- For small crops that grow without picking, pots of 100-200 ml are suitable
- Pots with a volume of 500 ml and more are suitable for tall and large crops that grow a long period time and grow powerful roots.

On a note! When choosing a pot, remember to consider diameter and height, not just volume. This is important for correct formation roots.
peat pots
Outwardly, the walls of these pots resemble thick cardboard, but they consist of more than 70% of natural natural peat. And the rest of the pot is, by the way, just paper.

Main advantage peat pots- this is the absence of the need to take out seedling bushes for planting in the ground directly from the pot. To do this, simply dig a hole of the required size in the garden and place the pots there without removing the seedlings from it. Gradually, the peat will rot, turning into a nutritious fertilizer, and the seedlings will grow into a beautiful and strong plant.
Peat pots are ideal for growing fussy crops - usually cucumbers, zucchini, peppers, and others. And using them is extremely simple: just fill it with soil, shed it, place the seeds, put it on a pallet and that's it. Further work on growing seedlings proceeds as usual.
Peat pots come in various sizes and, like plastic ones, come in two shapes - round and square in section. However, here the form does not play a special role, since it is no longer necessary to shake the seedlings with the ground out of the container. Unless you should take into account the free space on the sunny windowsill - square pots can be arranged more compactly.

Advantages of peat pots:
- convenient to use;
- allow once again not to injure the plants with picks and not to extract them during planting in the ground;
- are themselves nutritious fertilizers;
- are made from environmentally friendly materials.
Disadvantages of peat tanks:
- quickly become limp from water, so you need to water the plants in them moderately;
- if the pots are dried out, then the soil in them may become too dense for plants;
- when buying, there is a high risk of running into low-quality goods, which will contain only pressed cardboard;
- Excessive watering can lead not only to dehydration of containers, but also to moldy walls of pots and soil.
A peat tablet is a compacted peat washer, small in diameter and height. Before the production of this type of packaging, peat is enriched with microelements useful for seed germination and seedling development. Read more.
How to use peat pots? Everything is simple.
Step 1. Select the peat pots of the required size and process them. To do this, soak them briefly in a solution of mineral and organic fertilizers and then dry.

Step 2 Make drainage holes at the bottom, place expanded clay there.

Step 3 Fill the pots with potting soil, but not too tightly to create the cavities needed for successful root development. Spill the soil.

Step 4 Plant crop seeds, each in a separate cup.

Step 5 Cover the pots with plastic and place in a warm room. Then wait for the shoots and continue to care for the seedlings, watering it moderately.

Step 6 While the seedlings are growing, you will increase the distance between the pots standing on the pallet so that the branches and leaves of the plants do not interfere with each other.
Step 7 When the seedling grows, transplant it into the ground on garden plot as described above, without removing from the pots. Place containers 2-3 cm below soil level.

homemade pots
Many gardeners are unwilling to spend money and purchase ready-made pots for seedlings in the store. With perseverance and fanaticism, they collect various containers or look for new ways to make containers for growing crops. And often they are right - why spend money on something that you can do with your own hands?

There are a huge number of ways and master classes for creating containers for seedlings, and a variety of materials can be used.
Table. Materials for making pots for seedlings with your own hands.
| Material | Advantages and disadvantages |
|---|---|
| Pretty much the same as store-bought plastic pots, only free, since you still get yogurt, sour cream, etc. from the store. The product is eaten, and the jar is washed, drainage holes are made in it and it is removed before planting the seedlings. Neat, with smooth edges, safe and convenient, these containers can be used for many years. The disadvantage can only be a small size, and sometimes molding of the soil. |
| It turns out that many people make pots for seedlings from plastic bags. This material has a lot of advantages - it is easily accessible, cheap, and making pots from it is very simple. You can cut pieces of polyethylene and tie their lower part with a thread, make holes for drainage. You can take whole small bags - and the pots are ready. Disadvantages: the material does not hold its shape well (especially large sizes) and can provoke molding of the soil. |
| What plastic bottles, what plastic cups for drinks - practically free and easily accessible pots for seedlings. They are durable and can be used for more than one season. And if plastic bottles still have to be cut with scissors, then cups are almost ready-made containers. It is enough to make drainage holes and you can use it. And taking out a clod of earth with a plant is as easy as shelling pears - just slightly wrinkle the walls of the glass and the soil will come out by itself. There are practically no shortcomings by gardeners. The main thing is to take care of the accumulation or purchase of this material in time. By the way, plastic cups are much cheaper than special pots for seedlings. True, they are not very large. And one more minus - the edges plastic bottles where the scissors “walked” can be sharp. |
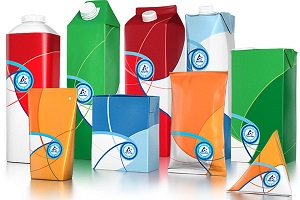
| Easily and simply turn into containers for seedlings - just cut off one of their parts (top or bottom) and make drainage holes. Tetrapacks do not leak, do not sag, soft enough to easily and simply remove the bush from them. You get them for free (you buy juices and fermented milk products, don't you?), you just have to wash the boxes and store them until spring. Minus - fragility. |
| An elementary and simple option for making pots for seedlings. It is enough to put such tubes on a pallet, fill it with soil - and you can plant seeds. But such containers are suitable only for plants that need picking, or those that do not grow too much, since the tubes are small. By the way, take seedlings out of the container before planting on suburban area optional - this can be done together with the tuba. Gradually she will rot. |


Video - Polyethylene seedling pots
The main advantage of such homemade pots– no costs, as containers can be safely accumulated within winter period by buying basic necessities. The most important thing is not to forget to make drainage holes in such containers.
Advice! Holes for water drainage are easier and more convenient to make with an ordinary thick nail. It must be well heated over a fire (for example, in a candle flame) and with a sharp end, melt holes in the bottom of the container. Be careful - hold the nail with pliers, as the metal heats up very quickly (you can burn yourself).

Unusual pots for seedlings
Pots for seedlings can be made from very unusual materials. Gardeners are creative people, and they can’t come up with anything to make their work easier and provide plants with proper care. Consider three types of unusual seedling pots - some are made from eggshells, the second are made from aluminum cans, the third - from newspapers.
Pots from aluminum cans
A good option for those who are fond of carbonated drinks in cans of 0.33 liters. This material is not afraid of rust, durable, strong enough. It is convenient to rewind such jars in several pieces with tape between each other - you get a kind of aluminum "cassettes".
Step 1. Use scissors or a knife to cut off the bottom of the jars.

Step 2 Cover the neck opening with the remaining tongue, but not tightly.
Step 3 Place a little eggshell or expanded clay on the bottom of the resulting container for drainage.

Step 4 Make gauze bags, place them in containers and fill with soil.

Step 5 Sow seeds and grow seedlings.

Step 6 Take out the grown seedlings from the containers with a gauze bag and plant them in the ground with it.
Egg shell pots
Highly interesting way. It is convenient because in the future the plants, together with the shell, are planted in the ground - you do not have to dive and take them out of the "tanks". A "pot" will serve as additional fertilizer

Step 1. Take egg shells and make a small hole in the bottom of each with a needle.

Step 2 Fill them halfway with soil.

Step 3 Plant the seeds and cover them with soil.

Step 4 Put the filled "pots" on the egg cell and grow the seedlings (as usual).

More than 10 years ago, on the shelves of hardware stores they began to sell multifunctional vessels for growing seedlings, which are called peat pots. The convenient shape and pleasant price of the tanks immediately interested people involved in the garden, thus ensuring a sharp demand for goods. Read about peat pots for seedlings and their use in this publication.
Peat pots for seedlings
So, in this article we will tell you about what peat cups for seedlings are. You can also learn how to use them. Since ancient times, humus, cellulose and peat have been included in the composition of products, which occupies 70% in high-quality containers. Sometimes lime or chalk is added to the composition to reduce acidity. Products are made using a press in forms with a radius of 10–20 cm. In appearance, they can resemble a circle, trapezoid or square. The density of the walls is about 1-1.5 millimeters, thus ensuring the unhindered growth of the roots.
The method of using the vessels is quite easy: the plant is moved into the ground along with the pot. Eventually root system not adversely affected and seedlings germinate well. To avoid rapid evaporation of moisture, it is necessary to completely put the pots in the ground, making holes in the vessel in advance. Some summer residents specially dip the containers into the water, then remove the seedlings and move them to the ground together with the earth.

How to use peat pots
And now the moment has come to tell you how to use peat cups. Within a month, the vessel rots and turns into fertilizer. Not very high-quality containers for sprouts split in the soil for a long time. This is due to the fact that some organizations use large volumes of thick cardboard, which was under pressure, in the manufacture of peat vessels. As a result, the young root is not able to germinate through the glass. To avoid this, it is necessary to make holes in the bottom of the glass.
Mode of application:
Planting in peat cups is not a difficult process. And now it is worth revealing the details of this work. The bottom of the pot is filled with a drainage layer of pre-crushed eggshells. Next, soil with nutrients is added, pre-washed with a solution of potassium permanganate. During the laying of the layer, the soil should not be over-compacted. In order for the root system to develop naturally, it must be airy. The soil is watered room temperature and plant seeds. For prevention, a peat container is treated with an anti-fungal agent. Banks with seedlings should be at some distance from each other so that the roots do not become intertwined.
Pros and cons of peat containers
There are no weed seeds and pathogenic microflora in peat. When transferring seedlings from the container to the ground, the roots of the plants are not exposed to negative impacts. The pots are splitting natural way saturating the soil with peat. Convenient jars for sowing seeds. Improvement of seedlings should be started in medium-sized square pots, and grown plants, together with containers, should be moved to larger round pots.
The only disadvantage of such pots is the rapid evaporation of water. It is for this reason that plants growing in them need to be watered more often than in plastic products. To avoid rapid evaporation of moisture, wrap with food foil or polyethylene. Use peat containers on acidic or neutral soils, as well as when growing plants with brittle roots. For example, cucumbers, eggplant and tomatoes. Do not use similar forms for garlic seedlings, Chinese cabbage, onion and lettuce. You can choose peat pots for growing plants with strong roots, such as pumpkins.

Summing up
After reading the article, you can tell what peat pots for seedlings are and how to use them. Seedlings should be grown using such glasses, because they have many advantages, one of them is a low price. However, many experts do not consider such pots useful, you can conduct the experiment yourself by planting part of the seedlings in peat cups and the other in ordinary plastic ones. At the end of the article, we want to wish you warm days and rich harvests in your beds.
The use of peat pots for seedlings has been practiced in our country for more than 20 years. This remedy has many advantages; its value is known not only to fans of gardening, but also ordinary people from the countryside.
Self-expanding pots extend the growing season of plants that make up the range of vegetation in gardens and orchards.

What is the meaning of the idea
In fact, the idea is extremely simple:
There, after a while, it decomposes into microparticles (one-time, without the possibility of reusing it);
- gardeners manage to grow young plants that do not need to be disturbed at the time of planting in the ground under the open sky or a covered outdoor greenhouse. After all, some flowers and fruit crops when transplanted, they often die. They don't like to be disturbed;
- while the sprouts are in the walls of the pot, the root system is generously supplied with oxygen, since the material is porous - it allows oxygen molecules to pass through. In this way, the young plant is additionally strengthened in the first weeks of its life.
IMPORTANT. Do not seek to "dig" the pots after the plant has taken root in the ground. You can damage the root system. There is no need to worry about peat residues - after a few rains they will completely dissolve in the soil.
Natural materials for seedlings in such a situation is a fundamental decision. It is obvious that the inventors solved the problem of protecting the soil from harmful chemistry. They succeeded. Moreover, the material itself is beneficial for the surrounding soils, additionally fertilizes them.
Pros and cons of using peat pots
When it comes to choice, the average person is always trying to weigh the pros and cons. The same is true for peat pots. The question is especially of interest to beginners who have recently begun to master the intricacies of gardening and horticulture.
Advantages
The advantages of peat containers include such properties as:
Flaws
Are there any disadvantages? Regardless, finding them is not easy. Here are a few things to think about:
- during the peak season, these products can no longer be found in stores, because all of them are sold out very quickly. In order not to be left without pots, purchase them in advance. Or order in online stores specializing in goods from the garden-garden category;
- the products are disposable and you have to buy them again every year. But is this a disadvantage? After all, the disappearing object becomes part of the soil on your site, enriching and nourishing it with organic matter;
- cases of dishonesty on the part of manufacturers have become more frequent. They add ordinary cardboard to peat. As a result, the material does not completely disintegrate, and next year when digging up the earth, “paper remains” are found;
IMPORTANT. Avoid buying goods on dubious "collapses". There are fakes on the market. Use only the services of shops and specialized outlets. Give preference to reputable brands.
- peat creates an acidic environment. If the plants do not tolerate it well, then you will have to add chalk, lime or special mineral additives to lower the acidity;
- there are low-quality products - the walls of the pots are destroyed during the growth of seedlings, mold appears on the sides of the containers;
IMPORTANT. Buy products with a wall thickness of 1 to 1.5 mm. She is optimal. Strong enough at the stage of cultivation, rather quickly decays when placed in the ground.
How to use
Please note that stores sell products that have two main features:
Select size
- 11x10 cm (volume 0.5 l) - ideal for seedlings of cucumbers, peppers, tomatoes, eggplants. From flowers it is recommended for fuchsias, gerberas, cyclamen;
- 9x9 cm (volume 0.350-0.4 l) - cucumbers, peppers, tomatoes are suitable. Of the flowers - all annuals, as well as gerberas, begonias, primrose, balsam;
- 8x8 cm (volume 0.250 l) - for zucchini, tomatoes, cucumbers, wild strawberries. From flower crops - cyclamen, coleus, primrose, hydrangea;
- 7x7 cm (volume 0.200 l) - for watermelon, melon, cabbage, garden strawberries and wild strawberries, for annual flowers;
- 6x6 cm (volume 0.100 l) - recommended for same-year flowers (such as levkoy, ageratum, aster, dahlia);
- 5x5 cm (volume 0.050 l) - for food greens (dill, lettuce, cilantro, parsley, basil, fennel.
IMPORTANT. The shape of the pots does not play a special role. There are products in the form of a truncated pyramid (ribbed sides), and there are in the form of a truncated cone (round smooth sides). The differences are nothing more than the difference in stamping molds in production.
Planting seeds
Basic Rules:
- fill the pot not to the very top, but leave a little space (7-15 mm from the edge to the level of seedlings). For what? When placing seedlings in protected ground, a certain amount of natural soil will need to be added to the base of the plant. This will speed up the adaptation of the sprout to local conditions;
- put 1-3 seeds in one pot. This measure applies to untested seeds - if you do not know if all the seeds will sprout. If each seed sprouts, the sprouts can be distributed to additional containers. Or select the strongest, and dispose of the weaker ones;
- lay the nutrient soil and all the fertilizer mixtures that you use on the bottom of the pot;
- planting seed should be in the ground at a depth of about 1 cm from top level earth in a pot;
- set all the pots tightly to each other in a tray. This will protect individual pots from falling if they are handled carelessly (small objects tend to fall, because they are light in weight and low in stability);

- it is advisable to lay a plastic film under the peat pots or pour some soil, gravel, sand. This will help to save and reuse the water that flows from below when watering the seedlings;
- the regularity of watering depends on the dryness of the room (water as the earth in pots dries up).
IMPORTANT. When the plants get stronger and increase in size, the pots should be moved apart from each other. This way you will improve aeration, give the green foliage more light.
Landing in the ground
As soon as the time comes for planting plants in the ground, your actions:
- prepare the garden;
- mark the furrows based on the number of plants in the garden, the density of their placement;
- dig grooves or holes;
IMPORTANT. The depth of the groove should not be less than the height of the peat pot. Ideally, if 1.5-2 cm deeper.
- moisten the landing sites with water;
- evenly install each peat pot in the place allotted to it, gently sprinkle with soil on all sides.
- for antibacterial purposes, sprinkle with a slightly pink solution of potassium permanganate, pour a little ash;
The instruction given in this article is only a generalized one. In each case, there will be nuances that you have to record, analyze and take into account. The use of peat pots is incomparably more beneficial than disadvantageous. Without risking anything, you have a chance to increase the results of your gardening work.
Pots for growing seedlings vary in size, color, density and the presence of pores that allow air to pass through. In order for the plant to be comfortable after planting in the ground, the walls of the pot must quickly dissolve under the influence of moisture. This allows the roots of the crop to easily penetrate the soil, supplying them with nutrients.
A peat pot for growing seedlings should have thin walls, the width of which is not more than one and a half centimeters.
- when planting plants, you do not need to take them out of the pots;
- the roots of the plant are not damaged, which is especially important for melons;
- pots are environmentally friendly, because they are made of natural materials;
- contain nutrients, which, when grown, pass into the soil and are used by plants;
- the dishes are light and at the same time durable, withstand watering and rearrangements;
- the walls of the pots are porous, so they allow air to pass to the roots;
- they are easy to dispose of.
- The root system freezes when grown in such pots. The soil is constantly wet. Moisture evaporates, while the temperature of the soil decreases.
- Some pots do not dissolve well in water after planting. It happens that the plant can not get rid of it. This is usually caused by the fact that the pots are of poor quality, their walls are too thick.
- With excessive watering, the soil in pots becomes covered with mold, with insufficient watering, it quickly dries up.
- Use pots only for growing seedlings, and remove them before planting plants.
- Place seedlings in the ground with a pot, but before that, soak and break the bottom of it. Seedling roots will easily sprout into the soil.
- Before planting, plastic dishes must be cut or pulled out without damaging the root system. It is not always possible to do this.
- Plastic cups do not allow air and moisture to pass through. The use of peat solves this problem, but the amount of water for irrigation must be selected correctly.
- Homemade paper cups quickly soak and tear. In this case, the roots of plants are damaged, or the integrity of the root ball is violated. It takes time to prepare them.
- Paper and plastic cups do not feed seedlings.
- 1. You need to take 7 parts of peat, 2 parts of humus, add a part of mullein and slaked lime.
- 2. Sift and grind peat and humus.
- 3. Remove or crush hard pieces and lumps.
- 4. Mullein is bred hot water and let it brew. The amount of water is determined by eye.
- 5. Thoroughly mix all the ingredients. If the composition is dry, add water and mix again. The prepared mass should be homogeneous, not very wet.
- 6. Trial cups are formed to check the quality of the material. Use two plastic cups or similar containers. The mixture is applied to one, the other is squeezed out so that the walls of the glass are obtained.
Show all
Description
Peat pots or cups have been used by gardeners for about 30 years. At that time they had the shape of a truncated cone. Now there are pots in the shape of a cube or a truncated pyramid. Whole blocks of several forms are on sale.
Can pick up right size 5 to 10 cm across. The thickness of the wall also matters. It can be 1 or 1.5 mm.
Peat pots for seedlings are made not only from peat. It is only 50 to 70 percent there. Humus is added to peat. And in order for them to keep their shape and not fall apart, cellulose is added. After mixing these ingredients, they are diluted with water and pressed on special equipment in appropriate forms.
Device for making peat pots
Usage
Peat dishes are used to sow seeds in them or dive seedlings. Turn the pot upside down and see if there is drainage hole and what size it is. If it is not enough, it will be inconvenient to use it. Therefore, expand it so as not to damage the walls.
At the bottom of the pot, crushed eggshells are poured. It will serve as drainage for the outflow of excess water, protect the plant from the black leg, and make the soil less acidic. Fill the pot with soil prepared specifically for each crop. Do not fill up to the edge of the pot by 1 cm. The earth is not compacted.
Make a hole in the soil, which corresponds to the size of the seeds, lay them and sprinkle with earth. O. Ganichkina recommends sowing 2 or 3 seeds in one glass, and then thinning out the seedlings. Watered, covered with glass or film. Pots are best placed in a special box or pallet. This will facilitate the transfer of seedlings, which will need to be done several times. It is good to grow such seedlings in a greenhouse where the air is quite humid.
Seedlings are dived into pots, the size of which corresponds to the size of the root system and to whom the earth is on them. Before planting seedlings, water the dishes. Do this in advance, an hour before planting. The soil should get wet to the depth where the roots are located. Carefully separate the seedling from the bulk of the plants, remove it from the ground and transfer it to a pot.
Sprinkle with prepared soil, compacting it. Watered, set in a cool place until the root system begins to supply the stem with moisture. This will take about a week. Then transfer the dishes to a sunny place.
Planting time for seedlings open ground depends on many conditions. When a plant forms right amount real leaves (cucumbers), buds will appear (in tomatoes) or the soil in the garden will reach desired temperature, plants are immersed in prepared wells. Its depth should be greater than the height of the pot. Sprinkle it completely so that the plants sink into the soil to the cotyledon leaves. Water, mulch and carry out all procedures as in the usual way planting.
Seedlings fall into the ground with intact roots. Under the influence of moisture, peat and humus in the composition of the pot should dissolve and go into the soil. The roots of the plant will receive a supply of nutrients that they will use for growth and development.

Advantages
Peat pots have undeniable advantages:

Flaws
But peat pots also have disadvantages:
But experienced gardeners learned how to get around these unpleasant features. So that the roots do not freeze, it is advised to wrap the pot in cellophane immediately after planting the pickled seedlings or sowing the seeds. Remove the film immediately before planting the plant in the ground.
You can solve the problem with poor solubility of pots in the following ways:
Pots in which mold has started must be rid of excess moisture. It usually accumulates at the bottom. Perhaps the size of the pot is too small. The walls are wiped with vinegar. If there is a lot of mold, such containers are discarded. Pay attention to the level of humidity in the room, ventilate it more often. Upper layer soils are carefully loosened so as not to damage the roots.
How to choose a pot?
You need to choose peat pots that have a percentage of peat no more than 70 percent. It's hard to tell by eye. Therefore, pay attention to indirect signs. good pot dark, porous. They are soft to the touch. The thickness of the walls should not be more than one and a half centimeters.
You need to buy only high-quality pots, trusting trusted manufacturers. Products must be packaged, have a quality certificate. The original shape of the container does not affect the growing conditions.
Quality pots for growing seedlings
They do not take light glasses, even though they are more beautiful than dark ones. Such containers contain a lot of cellulose, so they will soak for a long time.
You should not buy very small cups with a diameter of 5 cm. The amount of soil will fit in there is small, so the roots will dry out quickly. It is better to take a pot with a diameter of 8 to 10 cm.
Comparison with plastic and paper
In addition to peat, they use plastic and paper cups, which you can even cook yourself. Advantages of peat cups:
Making pots
Peat pots can be made independently using improvised means. This is especially easy to do in the countryside.
Walkthrough:
Dry the glasses in the shade at high temperature.
Reading: 6 minutes
You can provide yourself with healthy, strong and hardy seedlings by buying it at a spontaneous market or in a store, but it’s better to grow it yourself. Moreover, the market offers a lot special means for growing seedlings.
This is soil with a special composition that takes into account the needs of a particular plant, and cassettes, tablets, pots or cups for sowing or planting it. An indisputable advantage growing vegetables through seedlings is a small cost.
After all, buying already grown plants is much more expensive than buying seeds and sowing them. In addition, it is not always possible to find exactly the kind of crop that you want to grow, while seeds provide an unlimited choice.
Peat pots are very convenient for sowing seeds.
An excellent option for utensils for sowing seeds or diving them are peat cups. They are natural material, contributing to the proper air exchange of the root system of the plant, as well as a kind of additional fertilizer.
What is the point of using such pots?
To understand in more detail the advantages of using this particular type of utensil for sowing seeds, it is worth gathering a little information about them. They are made from peat, cellulose and water, sometimes from peat, sawdust, cardboard and chalk.
On the market you can find peat products in the form of cups, pots or whole cassettes, with a certain number of cells. They are a great alternative wooden boxes, paper cups and especially plastic, which were a favorite a few years ago.
Using peat cups for sowing or diving, there is no need for additional feeding of plants with fertilizers, because they themselves are an excellent organic fertilizer. In addition, there is no need to transplant or remove the plant before planting in open ground.
They are endowed with a remarkable property - to decompose in the soil under the influence of heat and moisture, while turning into soil fertilizer and nourishing the root system. Thus, the roots of plants become strong, hardy, and the plants are strong and healthy.
Pros and cons of peat cups
Dealing with everyone possible consequences From the use of peat-ware for growing seedlings, the following advantages can be distinguished:
- low cost or availability;
- a wide range of options (type, size);
- ease of use;
- the possibility of planting plants in the ground directly in the dishes;
- excellent ability to fertilize plants;
- plants take root in open ground much faster, as they do not get sick, as is usually the case with a standard transplant;
- good air exchange of the root system.

Picked young seedlings.
Speaking of negative moments use of peat products, we can distinguish only the following:
- rapid evaporation of moisture and, accordingly, drying of the top layer of soil;
- the possibility of deformation of the walls of the vessel due to waterlogging or improper handling;
- inability to apply on some types of plants.
Considering the foregoing, there are much more positive aspects in the use of this type of dishes, so it is definitely possible and even necessary to use them.
How to use for growing seedlings?
If a decision is made to grow vegetables or flower crops from seeds, peat cassettes, peat tablets or pots are best suited for this process. Any of them must be placed on a plastic tray or put in another container to prevent water from leaking onto the windowsill.
Peat tablets are a great option for initial stage seedling cultivation. They are placed in any container in which the seeds will subsequently grow and pour warm water. After a couple of seconds, they increase in size and become suitable for sowing. Seeds are placed in special holes and covered with 1-2 centimeters of peat mixture on top.
Thanks to this species practically does not delay the mixture excess moisture, fungal infections are not terrible for cultures. You can safely plant peppers, tomatoes, eggplants, cabbage and other vegetable crops in them. Flower crops such as petunia and other crops that are not very fond of transplanting will also quite like peat tablets.

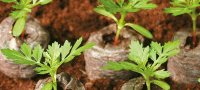
Photo of seedlings in peat cups.
Pots are more versatile, since there are an unthinkable number of their varieties. You can choose exactly the size that will fully satisfy the needs of a particular plant and withstand the growth of its root system.
How to choose the right container size?
If you plan to grow cucumbers or watermelons, it is preferable to choose small pots, as the seedling will grow in it in splendid isolation. In addition, their root system is poorly developed; almost any container of a minimum volume (0.05 liters or 0.07 liters) can satisfy the needs of these crops.
Reference! A few years ago, some gardeners grew seedlings of cucumbers in a whole eggshell. To do this, a hole was made in a raw egg, the contents were used as food, and the shell was allowed to dry. Then it was filled with soil and seeds were sown. It was believed that it is able to saturate plants with calcium.
For plants to be pickled, for example, tomatoes or peppers, it is better to purchase a larger pot (from 0.25 to 0.5 liters). Peppers and tomatoes favorable conditions for their cultivation, they get stronger very quickly and their root system is quite developed. Therefore, the pot must withstand the plants themselves and give free rein to the development of the root system.
How to plant: seed planting technique
Naturally, in order to grow high-quality seedlings, it is necessary to carefully select the seeds. They must be of high quality, proven, have friendly germination. You should also be picky about the choice of soil, now in stores you can find ready-made soil mixture designed to meet the needs of each individual plant. For unpretentious cultures, you can do universal primer.

Illumination of seedlings on the balcony.
The container is filled with soil, without adding 1.5-2 centimeters to the top, lightly tamping, this can be done by lightly tapping on the table. Then put 2-3 seeds each and sprinkle another 1 centimeter of soil. All filled or seeded pots are sent to a plastic container, or pallet, set in even rows. Then it is necessary to carefully spray the ground with a spray bottle and cover with a film or container lid until sprouts appear.
Advice! The sown container can be placed in a warm and dark place and leave it there for about a week. This is the minimum period for which the first shoots are able to grow.
Having found the first shoots (even if it will be the only one), it is worth immediately moving the pallet to the windowsill. Lack of light can be very harmful to plants, they will stretch out and be weak.
Seedling care involves regular watering and preventing hardening of the topsoil. Due to the fact that peat is porous, it is well ventilated, so you can only moisten the soil with a spray gun.
Planting seedlings in the ground
After waiting for the onset of warm nights in the region, you can safely begin the process of hardening plants. To do this, they are taken out into the air, first for 30 minutes, then for 1-1.5 hours, gradually increasing the intervals of their stay on the street. final stage hardening can be considered an opportunity to leave the seedlings to "spend the night" under open sky. If the plants survived the night, you can safely send them to grow in open ground.

Before landing in open ground.
Before planting a strong, well-formed, and most importantly hardened seedling, the cup must be lowered into warm water. When air bubbles stop appearing in the water, you can safely lower the pot into the prepared hole.
Peat with regular moisture decomposes quite quickly, usually in 20-25 days there will be no trace left.
Is it worth buying peat products?
Given the many advantages in the use of this type of product, its beneficial effect on plants, and the soil as a whole, the answer is unequivocal: “Of course, yes!”. It doesn’t matter at all what kind of peat container you choose for your seedlings, the main thing is that it will really help you grow a beautiful, strong and healthy culture without applying special efforts.
Useful video