The bedroom is the main room for relaxation, in which it should be comfortable and pleasant. Therefore, when renovating a bedroom, you should take into account some nuances, because you can really save a lot on some things, and invest well in others. How to make an inexpensive renovation in the bedroom with high quality and how to decorate the room in a strong and original way - read the article!
Inexpensive, but high-quality, cosmetic or semi-overhaul bedroom renovations can only be done with your own hands.
To get a good room without spending on it large sums, you must follow these recommendations:
- We do everything we can do with our own hands! Saving and laziness are two incompatible things. Therefore, you will have to putty the ceiling and walls, glue wallpaper, install the floor and baseboards yourself. The same cannot be said about, for example, wiring: here you will definitely need to hire a professional.
- We leave everything that can be left unchanged. If the ceiling is generally flat, but has deep cracks at the joints, you should not use tension or plasterboard sheets: rustications can be easily foamed and putty applied on top.
- We assess the condition of the heating system. If earlier redecorating required mandatory replacement cast iron radiators on aluminum heat exchangers, then modern loft interiors only welcome conventional batteries. If the system is sealed and copes with its task, feel free to leave it.
- Down with imitation. We leave imitation of expensive stone, marble and wooden floors in the past and give preference to high-quality and affordable materials, for example, carpeting (modern low-pile carpets around the entire perimeter of the room will be an excellent solution if the floor is flat), parquet (the most affordable is bamboo parquet). The most inexpensive option that will level the floor and look stylish is a concrete, self-leveling coating.
We smooth out minor wall defects with plaster. If the unevenness is significant, then you can correct them with the help of drywall: the sheets are not expensive (from 200 rubles), and their installation can be done with your own hands, even without experience in construction work.
Choose for repair work early to mid-autumn: work at this time at open windows It’s still comfortable, and prices for building materials are already starting to decline ahead of winter.
You should not save on windows to the bedroom, because the microclimate in the room and the health of the residents depend on this element: choose a three-chamber package that can guarantee the maximum level of heat and sound insulation.
Modern trends in interior design allow you to decorate your bedroom economically but stylishly. So, if you choose styles such as loft and minimalism for your bedroom design, you can achieve the maximum decorative effect while saving significant money.

Following following rules, you can get a stylish bedroom without spending all your savings on it:
- The main rule modern bedrooms– the bed should not be cheap: you can leave only a few basic elements of furniture in the room, but the bed should be spacious, strong, with an orthopedic mattress. Healthy sleep– this is something you should never skimp on!
- Furniture for modern bedrooms should be as simple as possible: no massive wardrobes, chests of drawers or bedside tables around the perimeter of the room. The most budget-friendly option that suits a loft style is wooden shelving. You can buy a rack (for example, in Ikea a simple Albert rack costs 749 rubles), or you can make it yourself. You can store clothes in such racks using organizing boxes, and small items and accessories can be organized in fabric, hanging racks: affordable, stylish and convenient!
- If your budget is really tight, then you can use pleated blinds or roller blinds as curtains.
- You can buy soft chairs at sales, and workplace you can search on bulletin boards or make it yourself (this way you can make a stylish set of shelving and a table).
Collages and pictures on the walls, lamps with colored sconces, and textiles can dilute a rather restrained design.
Saving sleeping space
For one-room apartments and small rooms, the issue of saving is especially acute. sleeping place.

- The bed is on the second tier. This option will be excellent for rooms with a ceiling height of 3 meters. The bed, however, can be of any size; it is placed on a special structure with steps, which you can easily assemble with your own hands. There is free space under the bed itself, which is often used for an office or recreation area.
- Murphy bed or lift bed- This practical solution for standard Khrushchev apartments: the bed, in this case, can be easily transformed from furniture (most often a tall cabinet). At the same time, the design imitates a facade behind which a retractable mechanism with a mattress is hidden.
- Bed on the podium. In this option, the bed is placed on a sufficiently high platform (about 80 cm), which, in addition to the frame for the mattress, also serves as a place for storing household items, clothes and shoes (you can organize the space under the bed using perforated or fabric boxes, plastic containers ).
The proposed designs for a sleeping place can be made with your own hands: for this you will need to find the corresponding drawings on the Internet and purchase a good mattress for the bed. In many ways, such options will be cheaper than quality ones folding sofas on orthopedic mattresses. In addition, such systems will look stylish and unusual!
Economy bedroom
Economy class bedroom furniture consists of frames made of laminated chipboard and, in part, MDF. Such furniture can be made to order or sold as a ready-made set.

Most often, bedroom sets in this price category include: a wardrobe (hinged or compartment), a bed (frame without mattress), a chest of drawers, one or two bedside tables or dressing table. Such sets can be made in any color, and the surfaces can be either glossy or matte. If necessary, some elements of the set can be equipped with mirrors (for example, a wardrobe or dressing table).
When choosing furniture in the economy segment, you should give preference to trusted companies that provide a guarantee for their products.
Economy: inexpensive do-it-yourself bedroom renovation (video)
High-quality, inexpensive bedroom renovations are a reality! Having mastered some types of repair work and using a little imagination, you can get a beautiful and modern room, saving a lot of money! Study photos of inexpensive bedroom renovations, get ideas, and create your own unique interior!
In the life of every person, sooner or later there comes a period that frightens and makes a lot of nervous - repairs. When carrying out renovations throughout the apartment, special attention should be paid to the room intended for relaxation, the comfort in which is prerequisite. We are talking about the bedroom. It is very important to arrange it in such a way that it is pleasant to be in the room, and the atmosphere is conducive to relaxation and a wonderful pastime. After reading this article, you will learn how to do beautiful renovation in the bedroom, spending a minimum of effort, nerves and financial resources on it.

photos
Development of a design project
Before starting the renovation of any room, it is necessary to draw up a competent design project, covering absolutely all aspects of the upcoming actions. Not everyone knows what a design project is, what stages it includes, and whether they are necessary.

A design project is a set of necessary documentation, design developments and a list of building materials.
To plan everything correctly, you must adhere to the following order:
- Stage 1 – discussion and determination of the budget. At this stage, all available financial resources are calculated that can be invested in renovating the bedroom. This stage helps to avoid unreasonable spending.
- Stage 2 – work with the designer. This stage involves developing the interior, drawing up plans and drawings, thinking through the smallest details regarding the furnishings. If finances do not allow it, it is not at all necessary to resort to the help of a specialist; you can draw up a plan yourself.
- Stage 3 – discussion of building materials. After discussing the concept of interior design, it is necessary to decide what construction and finishing materials will be used for repairs.
- Stage 4 – calculating upcoming expenses. The next step is to count required quantity materials, as well as upcoming costs, compiled based on real numbers. After calculation, the budget can either increase or decrease.
A design project should consist of these main stages.

Any small additions, equipping the room with accessories and decorative elements, which are not part of the finishing, are not prescribed in the design project.
DIY repair stages
There is an opinion that repairs are easy to start, but impossible to finish - they can only be suspended for a while. However, this opinion is a misconception, since with proper development of the project (as well as covering absolutely all the details), the repair can be considered completely completed.


Many people do not risk starting this process because they underestimate their own strengths and use the help of third parties, whose wages may be somewhat inflated.
One has only to study in more detail all the stages and complexities of this process, and it becomes clear that making repairs with your own hands is not so difficult.

You can slightly update the room by making minor cosmetic repairs that only affect external finishing walls, ceiling and floor. Light cosmetic repairs will be relevant in a room where there is no serious damage or parts that require immediate replacement.

When redecorating, there is not even a need to replace furniture, so the room remains almost the same as before replacing the decoration, it just takes on a slightly updated and more fresh look. For drastic changes, a major renovation is required - with a complete replacement of furniture.
To make a major European-quality renovation, it is necessary to cover many details. It is worth understanding what is included in the process of this type of repair, what important details must be taken into account.
Window replacement
In houses with old wooden frames that have become unusable, as well as with plastic windows that are out of order, window replacement may be necessary. Very often, this stage is skipped during the repair process because it seems excessively expensive, but its absence can lead to quite serious consequences. Old windows can allow drafts, moisture, and excessive freezing in winter.

Replacing windows yourself is not as expensive as doing it by someone from a construction company.

You just need to follow a certain sequence:
- It is necessary to take measurements from window openings and order the appropriate double-glazed windows from the company or purchase them in specialized stores.
- Next, the old ones are dismantled window frames. You should carefully separate them from the window openings, being careful not to damage the walls.
- Then you need to carefully prepare the window openings for installing new double-glazed windows. It is necessary to remove old materials used to install windows, as well as repair any damage that occurred during dismantling.
- After this, you need to install a new window, securing it with special metal pins, without which it simply will not hold up.
- After fixing the window in the opening, it is necessary to close all holes and cracks using polyurethane foam.
- The final stage will be puttying areas covered with foam, small cracks, as well as painting the slopes.


Replacement of windows is carried out first, since it may lead to damage to the covering of the walls, which is undesirable after decorating them. They may lose their original appearance, and the work will have to be done anew.

photos
Dismantling
The next stage will be the dismantling of all other components of the previous renovation, since new finishing materials cannot be applied to the old ones. You need to learn more about the process of dismantling old finishing materials and interior elements, as well as some life hacks that make this process easier.

At major renovation You will also have to get rid of the doors - you will need to replace them. Dismantling doorways is a very important component of the entire process. First you need to remove it from its hinges door leaf, carefully dismantle the platband and the door frame itself.
When replacing old doors, it is necessary to take into account the size of the doorway, since in some cases it may need to be expanded or built up.


The process of removing old wallpaper can seem complicated and tedious if you peel off dry wallpaper from an unprepared wall.
There are many life hacks that will help simplify the task.
- Here are the most effective ones: Wallpaper can be wet warm water or soap solution.
- For convenience, you can use a spray bottle or mop. The canvases should be wet enough so that after a while they can be easily removed from the wall. If the wallpaper is wet and this does not make the process easier, you can use a water steamer.

Hot steam in combination with already applied moisture will be a wonderful way, and the canvas will easily come off the wall. If there are tiles in the room, they will need to be removed.
This process is perhaps the most labor-intensive of all, since the tiles are attached to a special cement mortar, which is incredibly strong and reliable. First you will have to get rid of the grout - using wetting, a sharp hard object or a small grinder. Grout on cement based
can be quite strong, so it will take some effort. Since the withdrawal process old tiles


may be somewhat labor intensive, you will have to be patient. You can dismantle it using a strong iron spatula and a hammer, but this method can take quite a lot of time. Working with a hammer drill will be much faster and more efficient.


It is necessary to clean both the floor and the ceiling of old finishing materials. Depending on the coating used, the cleaning method will vary. For example, laminate, linoleum and parquet are quite easy to remove, as is a suspended ceiling sheet. But you will have to tinker with whitewash and paint, armed with a spatula and sandpaper.
If you want to make the bedroom more comfortable, you may need to separate communications. You can select existing options how best to do this, as well as communication options that can be routed to the bedroom.
First of all, it is electricity. Sometimes central lighting located in the central part of the ceiling may not be enough, so it’s worth thinking about additional points.
To save space, bedside floor lamps can be eliminated by using additional ceiling elements or wall sconces.

You can distribute electricity from the central lighting point, if it is quite powerful, from the electrical panel, if repairs are being carried out throughout the entire apartment, as well as from the nearest outlet. In the bedroom should be done hidden wiring, which will require wall gating.
In the same way, you can draw lines to create additional electrical access points - sockets.


If the bedroom is located next to a bathroom, toilet or kitchen, you can easily install pipes into the room, equipping it with an additional water supply point.
To do this you will need the following:
- first of all - a plumbing permit obtained from the BTI;
- well-designed plumbing pipe layout;
- pipes for hot and cold water, other plumbing elements.

You should not make pipes in the floor, because if leaks occur, they will be extremely difficult to fix without damaging the floor covering. It is best to use walls for this, securing pipes and covering this area with special cabinets.
The distribution of central heating is carried out in a similar way.
Rough finish
About to start the process finishing premises, it is better to take care of the draft. Not everyone knows what rough finishing is and what it is needed for. After all, not even every experienced specialist does it.


Rough finish necessary, because without it it is impossible to carry out the finishing work efficiently. Thanks to preparation, you can significantly extend the service life of finishing materials, since they will be more securely fixed to the walls of the apartment.
In addition, it is believed that rough finishing can even slightly enhance the sound insulation and thermoregulatory properties of the room. This is understandable, because during rough finishing, all small cracks and holes missed during construction will be sealed.
It is worth noting that rough finishing includes the installation of communications and the construction of plasterboard structures.
It is necessary to take a closer look at the main stages of rough finishing, the features of each of them, and also familiarize yourself with the list of necessary materials.


Ceiling
The most difficult thing to do is rough-finish the ceiling, since during construction the slabs may not be laid quite evenly, and it may be necessary to level the surface. This need disappears if a tension or suspended structure is used as a ceiling finish.


If repairs are to be made in a new apartment, the premises of which have not been subjected to the rough finishing process, problems may arise. the need to eliminate clefts between the ceiling slabs. These gaps can be quite large, so they simply need to be eliminated.


It is best to eliminate cracks using polyurethane foam. A level ruler, as well as a painting mesh and cement mortar, will help make the ceiling surface more even. All irregularities and differences must be smoothed out, creating a completely smooth ceiling surface.


Top layer The ceiling should be covered with plaster, which will become the basis for further actions.

Walls
Rough finishing of walls is done using primer, plaster and putty.
Primer serves for better adhesion of materials to the wall surface.

By using plaster The surface of the walls is corrected, as well as any seams are closed and unevenness is smoothed out.

Putty is the final detail of the rough finishing of the walls. It is necessary for further finishing of the walls.

However, this is not all. As already mentioned, part of the rough finishing of the walls can be construction of additional partitions and interior structures. When it comes to decorative partitions, it is enough to use thin materials, but for serious interior floors, more durable options are needed.
As for decorative partitions, in most cases, plasterboard sheets are used for their construction, mounted on special metal profiles and forming a hollow space. Such a partition does not provide sound insulation and does not retain heat in a separate part of the room.

To build full-fledged interior floors you will need concrete blocks or regular bricks. In addition, foam blocks and cinder blocks are quite popular, durable and practical. The blocks are fastened together using a cement mixture, and the finished structure is covered with a thick layer of plaster and putty.


Floor screed
Another stage of rough finishing is working with the floor, namely, screeding. The floor screed is called the intermediate layer flooring, which separates the foundation laid during construction and the elements of decorative finishing.

Floor screeding is necessary for several reasons:
- the base, as a rule, is not very level, it has many flaws, so screeding is done to level it;
- if pipes and heating are installed under the floor, a screed will also be necessary, since this wiring will need to be hidden;
- screed is also necessary for competent, safe distribution of thermal insulation properties;
- Screeding is also carried out if there is a need to create any slopes.

Laying the final floor covering without screeding will make the coating ineffective and reduce its thermal insulation and sound insulation properties several times.

The screed also has a slight soundproofing effect. This is especially true for renovations in a bedroom located in a new building, since the sound insulation properties of such houses, as a rule, are reduced to almost a minimum.
Rough finishing of walls and screeding of floors helps reduce noise levels.
There are several types of screeds, and each of them has some characteristic features.
Wet screeds are made by combining a dry mixture with an aqueous solution. Screeds of this type exist in two versions: tied and floating (which serves to provide the greatest degree of sound insulation, which is ensured by laying the mixture on special mats).


Dry screeds placed on the surface using expanded clay and special slabs. Surfaces are treated with plaster or cement mortar to hide the resulting seams.


Ceiling and wall primer
After leveling the surface and applying putty, it is necessary to prepare the walls and ceiling for final finishing. To do this, you need to apply a layer of high-quality primer. The primer is a special solution that serves as a kind of adhesive between the surface of the wall or ceiling and the finishing material.

The primer has protective properties, preventing loss of moisture from finishing materials. The thing is that concrete has the property of excessively strong absorption and sucking of moisture, which can lead to fairly rapid drying of the material, loss of all elasticity and premature failure.

Primers are divided into several types and are selected in accordance with the surface to be primed.
In addition, the choice is influenced by the humidity of the room and the purpose of the material.
One type of primer is created to serve as a layer between building and finishing materials, while others are needed only for treating the base of a wall or ceiling. And still others are completely distinguished by the properties of deep penetration, which is very important for walls made of fragile, bulk material.
The primer may have to be applied in several layers, depending on the type of mortar itself and the wall surface it is being applied to.
You can begin the final finishing only after all layers of primer have completely dried.
To determine whether the wall needs additional priming, after the first layer has dried, you need to run your hand over the surface. If dust remains on your palm from the material from which the wall is made, you should repeat the procedure.
Finishing After rough finishing and preparation of the walls and ceiling, you should begin finishing
. It includes decorating the walls, ceiling and floor with the necessary finishing materials.

Materials must be selected in advance, since the preparation of the walls must be carried out in accordance with the type of finish. Don't be too smart when choosing materials. By overestimating your strengths, you may simply not cope with the task and not complete the bedroom renovation as you would like (or not complete it at all). However, the choice of material will be discussed a little later; now the main stages will be considered final finishing
and their features.
Finishing includes work on the surfaces of walls, ceilings and floors.
Ceiling
The sequence of processing the parts of the room that need to be decorated may vary, depending on the chosen finishing material. The ceiling is finished first if plaster, paint, ceiling tiles


, attached using special glue. This stage should be the first, since these materials are quite easily soiled and can damage the decor of the ceiling and floor. Whitewash and paint

photos
must be applied to a primed surface, but to secure the tile decor, you will have to first plaster and putty the ceiling, since the glue does not always adhere well to the concrete surface. First of all, it is produced. Since such elements are made from sheets of plasterboard, the surface will also need to be plastered and puttied, after which it will be necessary to apply a primer and paint. In any case, the painting process may result in contamination of the surrounding area.


A installation of stretch ceiling carried out at the final stage of finishing. It will be very difficult to paste wallpaper under an already stretched canvas, and decorating walls with plaster will be completely impossible. A stretch ceiling does not in any way affect the cleanliness of walls and floors, since no liquid adhesive or painting materials are used for its installation.
For installation tension fabric special fastenings are constructed on the wall (a few centimeters from the ceiling) metal profiles. After this, the canvas is heated with special air guns and stretched around the perimeter of the entire bedroom. The edges of such a canvas are tucked into the profiles - and thereby fixed.


Walls
Everything is clear with the stages of finishing the ceiling, next step is wall decor.
Most selected suitable option- depending on the surface of the wall itself, room temperature, humidity level and individual preferences.
If the choice fell on ordinary wallpaper with pattern, everything is quite simple here - high-quality glue with the appropriate characteristics is selected, the wallpaper is cut into sheets of the required length, coated with glue and attached to the wall. If necessary, you can apply glue to the wall itself too.
If the choice fell on wallpaper with a pattern that needs to be matched and adjusted, you should cut the canvas in advance to cover the entire perimeter of the room - taking into account the creation of a complete picture.

photos
After pasting wallpaper for painting It is necessary to dry thoroughly - and only then paint.

photos
It is worth noting that you can paint both simply primed walls and surfaces decorated with finishing plaster, with which you can create an interesting textured surface.

Rules painting walls do not differ from the process of painting any other elements of the room in anything special. First, you need to apply paint with a brush to the edges in the area of the floor and ceiling, as well as to the corner openings, after which (armed with a roller with the appropriate surface) you will need to paint over the central part of the wall.
If the ceiling has been pre-painted, be careful when applying paint to the top of the wall. There is no need to touch the surface of the ceiling.

photos
Floor
Floor finishing is the most the last stage, completing the repair, since painting the floor surface is carried out very rarely, and in general, the process of decorating it in a special way does not affect the safety of the walls and ceiling.


What is really worth considering before the process of finishing the entire room is equipping the floor with heating mats (a heated floor system that will be very relevant for a sleeping area - especially if the room has a balcony).
Some types of heated floors require careful fixing. When laying mats on an already dried screed, they must be fixed with special glue or cement mortar. Some particularly powerful elements are even fixed before the surface is screeded.

photos
Special attention should be paid to parquet and parquet boards, since the final stage is the application of a special coating - parquet varnish.

Of course, an important aspect of any repair process is the choice of high-quality building materials. You need to understand what needs to be taken into account when choosing, what should be given Special attention, and also learn the features of the most popular materials.
It is necessary to analyze the supply market in order to identify the most favorable price variations of the same product. The process of renovating (even one bedroom) requires considerable investment, so a little saving definitely won’t hurt.

It is worth considering what qualities and characteristics need to be taken into account when choosing a particular material:
- Any material should not have any strong unpleasant odors. The slight odor left behind from factory products quickly disappears, but the pungent odor characteristic of low-quality cheap materials can persist for quite a long time, having a detrimental effect on human well-being.
- The material must have antistatic properties, preventing the accumulation of static electricity, which can disrupt comfortable living conditions.
- It is very good if the material contains antibacterial components, preventing the occurrence of fungi and the proliferation of harmful bacteria, which also may not have the best effect on health.
- Of course, the material must be beautiful and provide a wonderful rest, since the sleeping area is designed specifically for this.
- Any construction and finishing materials must be durable and wear-resistant, since annual renovation of the premises through renovation is expensive and unreasonable.
You can select the most suitable finishing materials for various parts rooms.
For the ceiling
For convenience, it is worth considering the advantages and disadvantages of various ceiling coverings using the comparison table as an example.
| Peculiarities | Advantages | Flaws | |
| Whitewashing the ceiling | This is done using a sprayer, roller or brush. | Simplicity of execution, neat appearance. | Preliminary leveling of the surface, high degree of soiling, fragility. |
| Painting the ceiling | This is done using water-based or water-dispersion paint. | Possible choice of budget materials, ease of execution. | It peels off quickly, needs to be renewed every couple of years, preliminary filling is necessary. |
| Drywall | Constructed from plasterboard sheets and metal profiles. | With special technology, you can build a structure of any shape. | Similar designs“eat up” the free space of the room. |
| Suspended ceiling structures: | |||
| Cassette | Consists of thin plates made of aluminum or galvanized materials. | Easy to install, easy to clean, hide surface imperfections. | Low degree of sound insulation and noise suppression. |
| Hemmed | Installation is carried out using plasterboard and decorative panels. | The ability to use different lighting, retains heat well and muffles noise. | Required decorative finishing, it is impossible to install ceiling electricity distribution. |
| Rack and pinion | Consist of narrow aluminum plates. | Various decorative finishes are possible and are suitable for rooms without heating. | Not suitable for residential premises. |
| Wallpaper for the ceiling | Dense ones are used ceiling wallpaper and appropriate glue. | Cleanliness in the process, easy to hide ceiling defects, durability. | Cheap wallpaper quickly loses its original appearance and cannot be removed from dirt. |
| Stretch ceiling | They are constructed using metal profiles and a special fabric that stretches when heated. | Suitable for rooms with high humidity, retains its original appearance for a long time, can be mounted with lamps, fireproof, does not require special care. | Intolerant to mechanical stress from sharp objects. |
| Ceiling tiles | The tiles are made of polystyrene foam, size 50x50 cm. | Big choice surfaces and shades, easy care. | Labor-intensive work, fragility of the tiles, fragility of the base pecks. |
For walls
Best option for decorating bedroom walls – non-woven and high-quality vinyl wallpapers . It is best to choose meter ones, since they are more convenient to glue, and the whole process will take much less time.
Wallpaper in neutral light shades is suitable, since in the bedroom bright colors not very appropriate.

For those who want to add color to the bedroom interior or create an atmosphere of something unusual, finishing decorative plasters or unusual photo wallpaper, pasted on one of the central walls.


For floor
There are quite a lot of flooring options, you can choose any one - in accordance with individual tastes and needs. For example, it is considered the easiest to install linoleum, which looks quite attractive. In addition, a newfangled development is environmentally friendly linoleum, with hypoallergenic components in its composition.


Considered similar in ease of installation carpet- carpeting distributed over the entire floor surface of the room. This material can be laid in the bedroom if you are interested in softness and warm floors. The disadvantages include the inconvenience associated with caring for such material. Carpet has many advantages.


Laminate is the most common floor covering. It is affordable, practical and will last quite a long time. There are quite a lot design solutions: You can lay white, brown, dark or colored laminate on the floor.
It is impossible not to mention parquet board . This coating It is better in quality than laminate, but it has one feature - it is necessary to cover the floor with a special parquet varnish.


As a special design move, you can use the construction of a structure two-level floor, decorated with different finishing materials. A two-level floor will be the highlight of the bedroom interior.
And have certain skills in this area. Before you begin this difficult, but truly aesthetically pleasing process, be sure to determine the functionality of the room so that it will be easier for you to draw up a project.
If you want to see examples quality repairs bedrooms, photos are shown in our gallery.


What to consider when drawing up a project?
Before you renovate your bedroom, draw up a project. This can be done using a special computer program, but if you don’t have the skills to work with it, just draw the layout of the room on a piece of paper.
You should start drafting with a definition. Decide in advance on the width and design of the bed. Remember that these parameters affect what other furniture attributes will be located in the bedroom.

The bedroom renovation design in the photo was made using a simple computer program
Be sure to plan your bedroom in such a way that the bed is easily accessible. If two people will live in the room, it is advisable to make convenient approaches to the sleeping area from both sides.

Photo of a bedroom renovation with a comfortable approach to the bed
The bedroom design should also include the location of other elements and large decorative details. You should also note the electrical wiring diagram on it if you are planning a major rather than cosmetic renovation of the bedroom with replacement of wiring.
Which style should you choose?
Bedroom renovations can be done in different styles. The choice is influenced by several factors, but the most important are the square footage of the room and the personal preferences of the apartment owners.
What style to use for a room with a small square footage
Where to start renovating a bedroom? Of course, from the ceiling decoration. Regardless of whether you plan to level it, plaster it, paint it, or stretch it, you should always start with it.

Bedroom renovation, design, real photo demonstrates installation of stretch ceiling

European-quality renovation of the bedroom, in the photo the room is completely ready for use
Tips and tricks for renovations in small and narrow spaces
Creating a beautiful and functional interior can be difficult if the bedroom area is small. More often small rooms arise as a result of redevelopment in an apartment or house, for example, after expanding the living room. They also differ in their small area. In these cases, carrying out repairs, as well as choosing a design, requires a special approach. If you want to see a beautiful and competent renovation in a small bedroom, photos are waiting for you in our gallery.


The most successful options for decorating small rooms in Khrushchev
Small rooms in Khrushchev (3 by 3 or 3 by 4 m) should be decorated in light colors and contain a minimum of furniture. It is better to paint the ceiling in such a room or make it suspended. Plasterboard construction can make the room lower and visually smaller, which means it’s best to avoid using it.

Bedroom renovation in Khrushchev, in the photo there is an example of an original stretch ceiling

Photos of renovation ideas for a narrow bedroom, the interior decoration is made in Japanese style
Don’t forget about the main rule for renovating narrow spaces. The main accents should be used on short walls, and try to make long ones less noticeable. By accents we mean brighter wallpaper or carpet, if its use is allowed by the style. A small wall can be covered with bright colors.

Wallpaper with a large pattern in a narrow room is the main accent of the room
Interesting idea: Narrow room for a boy or teenager can be decorated in a nautical style. The white and blue color scheme inherent in this style will help visually expand the space.Before you start repairs, you need to think through everything and prepare carefully, this will help to avoid unnecessary expenses. The created interior should be comfortable, calm and comfortable.
Interior style for the bedroom
Bedroom interior modern style this is coziness, comfort, minimalism and functionality. Let's study existing styles.
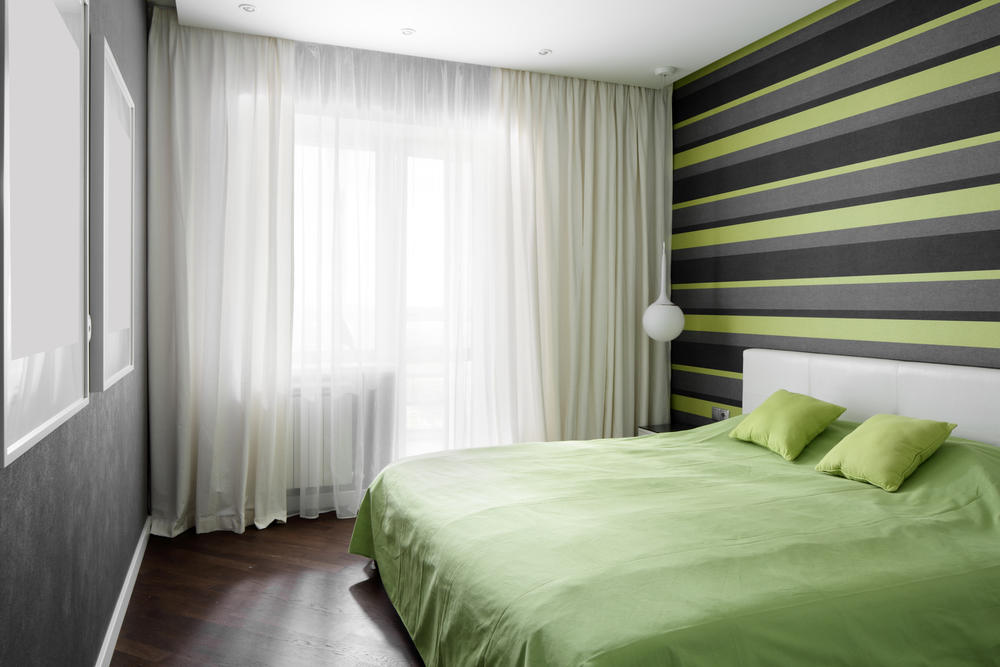
— Scandinavian- characterized by elegance and natural materials. Bedroom decor is suitable for people who value aesthetics, comfort and simplicity. Light and slightly cool shades of green, blue and gray are used as the main color. But the most common color is white. It goes well with these natural materials like wood, leather, fur, textiles. Scandi is suitable for the design of a bedroom in light colors in the attic, with a small area or non-standard rooms, both in an apartment and in country house or at the dacha.
— High tech- This sharp lines, simple shapes, bedroom architecture design in light colors. The sleeping place should be comfortable for sleeping, so choose not only beautiful beds to the bedroom, but comfortable and functional.

— Modern does not accept luxury, so it is characterized by functionality and minimalism. The materials used are exclusively of natural origin. The design of the walls in the bedroom should be monochromatic and not bright.

- For loft characteristic brickwork or rough plaster, wooden floor, leather or velor furniture with metal inserts, vintage bedside tables, rocking chair or bean bag. The design of a bedroom in the loft style makes it possible to experiment with finishing materials: stone facing tiles or laminate design will give an amazing effect. Color range You can use varied and contrasting ones.

— Bedroom decor in style pop Art bright and positive, challenging and creative, without clear boundaries. Therefore, anyone can create it, just use your imagination. Used for finishing artificial materials, plastic, synthetics. I'll like this design creative individuals leading an active lifestyle and loving modern Art, culture, music, cinema.

- for those who are tired of modern megacities and want comfort, reunification with nature and tranquility. Translated from French it means “village”. Interior design tends to be minimalist, environmentally friendly and natural. Wood is used to decorate the walls in the bedroom.

Bedroom interior in modern style known for its convenience and functionality. The decoration should be in calm and neutral colors. The ceiling is always white. The walls are decorated in any color: dark or white, beige or gray. Accent colors with low saturation in accessories or textiles are allowed. The flooring is most often laminate, parquet, carpet, an option with self-leveling floors is possible. Modern style bedroom furniture has straight lines, bright, but calm colors, great for a room with a laconic design.

High-quality design development
We are offering to you step by step plan, what to pay attention to:
Let's figure out the main areas: do you need a sofa or armchairs, a wardrobe, a table, a trellis, an ottoman. Let's start planning with furniture arrangement. 
We measure the main parameters of the room: length, width, height. We draw a plan to scale in several copies so that we can make different options. 
Distribute where you will have lights, chandeliers, sconces, switches, sockets. 
Feng Shui teaches that for friendly family relationships, you need to hang two identical lamps above the bed in the bedroom.
How to choose a color scheme
How to decorate a bedroom? An important rule for the ratio of colors in design: 60% - dominant color, 30% - additional, 10% - color accents.
The choice of color is a significant factor in life and well-being. There are warm colors: red, yellow, orange. And cold ones: green, blue, purple. Black, white and gray maintain color balance.
Red removes negative emotions, causes a feeling of warmth. But use it very little, for example in accessories, as it causes irritation and controversy.
Yellow lifts the mood. It is used with windows facing north.
Orange improves mood, but excess is stressful and quickly tires.
Green calms and helps cope with stress.
Blue helps to relax, but excess increases fatigue.
Blue calms, calms, relieves emotional stress.
Violet stimulates brain function and imagination. Goes well with yellow.
If the bedroom decoration has rich and rich colors, then the furniture should be dim. And vice versa, light walls combined with contrasting, eye-catching items.
What to hang above the bed in the bedroom, based on the style of the room.


Small bedroom interior
- Usually bedrooms in an apartment small size, but don’t be upset, because small ones are more comfortable than big ones.
- To visually expand the space, choose light and uniform colors for the floor.
- The carpet should completely cover the floor so as not to reduce it. Make the walls one color, light with an inconspicuous pattern.
- A glossy ceiling will add height. And light airy curtains will not block the penetration of light.
- A bedroom in light colors will appear wider. How brighter room, the more spacious it will seem, and for variety, use bright accessories.
- For lighting you will have to abandon a large chandelier. Spotlights and wall sconces will not clutter up the space.
- To save space, the bed can be placed on a podium, and drawers can be arranged in it for storing things.


Options for wall decoration in the bedroom
The most common and budget look finishing is wallpaper.
Paper- environmentally friendly, breathable, but on the sunny side they quickly fade. There are single-layer, multi-layer, waterproof.

Vinyl- durable, resistant to abrasion and fading, they can be washed, but do not allow air to pass through.

Non-woven- environmentally friendly, breathable, available in different densities, practically non-stretchy, so the surface of the walls must be perfectly flat.

Textile(fabric). A fabric of various textures that is pleasant to the touch is applied to a base made of paper or non-woven fabric. The coating is breathable, very beautiful, but quite expensive, does not like high humidity, attracts dust, and after installation, requires additional care.


Acrylic- textured wallpaper. Are made on paper based with acrylic spot spraying, which means they are environmentally friendly and breathable. They are waterproof, but not resistant to mechanical stress and ultraviolet radiation.

create a seamless surface and do not require a flat base. Sold as a plaster mixture.

Cork and bamboo— natural ones do not absorb odors, increase heat and sound insulation.

Photo wallpaper- the best place for a bedroom.

Glass wallpaper- breathable, they are used for painting. You can repaint up to 20 times! They are not afraid of moisture.

Dye washes well, easy to apply and use, an excellent background for paintings. Acrylic, water-based and water-dispersion paints are suitable. 
environmentally friendly, durable, masks cracks and smoothes the surface, exclusive and unique coating.
Durable, lightweight, odorless, practical, easy to clean. Suitable for Provence style.

Bedroom decoration wooden clapboard gives the impression of comfort and tranquility. She has excellent performance: durable, provided the room is dry. It is natural and environmentally friendly material, but will need to be processed special composition for protection against pests.
What can you hang above the bed in the bedroom? Laminate. And sometimes it is even mounted on the ceiling. Easy to install, the smallest class from 21 is used. You will not walk on it, which means it will last quite a long time.

MDF panels- durable, imitate wood, stone, easy to install and do not require complex maintenance. The only negative is the heavy weight.

Great soundproofing material, soft and pleasant to the touch, hide unevenness, but strongly attract dust and require regular care.


Bedroom lighting
Lighting affects well-being and visual comfort, so we recommend:
— make the lighting dim, diffused, subdued;
- the main source of light, a chandelier, should be located in the central part of the bedroom;

- if you like to read at night, then arrange an additional light source near the headboard, for example, sconces or lamps;
- You should also hang lamps near the mirror.
— lamps with adjustable lighting intensity adjust the brightness of the light.
Plan pass-through switches at the entrance and near the bed. You can turn on the light when you enter and turn it off without getting out of bed.
— It is better to place the bed with the head of the bed against the wall, and not at the door or window.

— To make it comfortable to get out of a double bed, you don’t need to move it to the side wall.

— Place the cabinet opposite the window or to the side of the window.


— Bedside tables next to the bed.
Decorating the room: secrets and life hacks
To make an inexpensive bedroom renovation, you can save at different stages:
- We design it ourselves.
- We save on hiring professionals where we can do it ourselves. For example, finishing - wallpapering, plastering the walls and ceiling, laying laminate, linoleum, mounting baseboards.
- We don't change what we can keep. If you are satisfied with the heating system, then we leave it unchanged, without replacing pipes and radiators. For a bedroom in an apartment, this will help you save a lot.
- If you will wallpaper or paint the walls and ceiling, then glue or paint the ceiling first, and then the walls. Next comes finishing the bedroom with linoleum or laminate.
- On the contrary, the parquet is laid very first, only after it comes the design of the ceiling and walls in the bedroom.
- The stretch ceiling is done after finishing the walls.
We offer a video that contains 18 decorating life hacks that will help transform your home.
Preliminary work - what is important not to forget about
To make renovations in the bedroom with your own hands, you first need to:
- Empty all drawers and cabinets, put all small items in boxes.

- Remove curtains and drapes.

- Take out all the furniture or cover it with film so as not to get dirty during repairs. But it is advisable to free up space so that nothing gets in the way.

- We remove the old finish.
- We remove the windows and door and install new ones instead.
- According to the project, we are making electrical wiring for the future installation of chandeliers, sconces, lamps, and sockets.

- We prime and level the ceiling, then screed the floor.
Bedroom renovation and design photos are presented below.


The bedroom is a room with two faces and even many faces. In the bedroom, functionality, aesthetics and psychophysiology are closely intertwined. When renovating a bedroom, technical and design techniques are used, respectively. Therefore, when starting a bedroom renovation with your own hands, you need to carefully consider all its stages, based on the type of bedroom, the degree and nature of its use, and even before starting work, imagine exactly what the updated room will look like.
We will try to help the reader with this. For the bedroom, the choice of finishing materials is of particular importance, so sufficient attention will be paid to it. But all other types and stages of repair will also be properly covered. We will also try to give recommendations on how to make inexpensive bedroom renovations of any kind.
Types of bedrooms
Bedrooms can be divided into the following categories based on a set of characteristics:
- Parental (matrimonial) bedroom;
- Children bedroom;
- Bachelor bedroom;
- Bedroom in one-room apartment(odnushka).
All types of bedrooms can be either simple in plan or with an alcove - a wall niche for a bed, with or without a balcony. Let's take it in order; We do not touch upon the bedrooms of couples or groups that adhere to the, so to speak, exotic nature of their relationships.
Marital
Parents in the bedroom, since they have children, not only sleep. Perhaps they don’t sleep so much, but this is a matter of temperament, and from the point of view of the spouses in the bedroom, you need to create the required mood at the right moment. Transforming houses that capture the thoughts of their inhabitants still exist only in fiction, but modern construction and design technologies provide the necessary set of tools to create the desired psychedelic effect, and this can be achieved with your own hands and inexpensively.

Children's
In families for whom renovation is a problem and a reason for thought, a children's bedroom and a children's room are one and the same. Many questions arise here, especially if the children have to share one room, so the nursery is the subject of a separate description.

Bachelor
As the unforgettable Lelik put it in “The Diamond Arm,” there is no married man who, at least for an hour, would not dream of being a bachelor. That is, in the life of bachelors there are romantic moments and ladies visit them. Hence the same requirements as for a married bedroom, and in addition, bachelors rarely live in spacious multi-room apartments, so a bachelor’s bedroom should “be able” to be transformed into a relaxation area or a study, again inexpensively and, if possible, with your own hands.

One-room bedroom
One-room apartments are occupied not only by bachelors. A family living in a one-room apartment is also not uncommon, so the “one-room” bedroom is the same in all guises: it is a married room, a children’s room, and a dining room. Oddly enough, to combine all this into 26-30 square meters. It’s still possible to do it yourself, and living with three people in such an apartment may turn out to be even more convenient than in a stupidly furnished three-room apartment.

Video: basic aspects of bedroom design
Types of repairs
In order of increasing complexity, the types of bedroom renovations can be listed as follows:
- cosmetic repairs, aka simple ones;
- decorative;
- capital;
- European-quality renovation;
- renovation with redevelopment.
Redecorating
Cosmetic repairs come down to cleaning the room, replacing a window or balcony block, etc. When preparing for it, the main thing is the choice of wallpaper and new furniture, which will be discussed below. Laying a new solid flexible floor covering over the existing one, without repairing the floor, replacing curtains, hanging a lambrequin, installing screens are also included in the cosmetic repairs.
Decorative renovation
Decorative renovation It’s already more complicated: in addition to the above, during this process a new ceiling is installed, the walls are refinished, and the floor is re-laid. Perhaps the balcony is insulated and produced. Decorative renovation of a bedroom is already quite complicated, but we can still do it ourselves. The construction of lightweight partitions made of PHB (tongue-and-groove blocks), GVL (plasterboard), plywood or lumber also applies to decorative repairs.
Major renovation
A major overhaul of a bedroom, like any other room, includes a complete cleaning of the room, drying it, a major overhaul of the ceiling and walls with their insulation, a major overhaul of the floor with replacement of the screed, its sealing, insulation and vapor barrier. The technology and methods of work are the same as for other rooms, and in terms of complexity and labor intensity, major repairs are accessible only to the most skilled home craftsmen.
“European-quality repair”

European-quality renovation is a fairly general concept and does not at all come down to continuous paneling and installation of PVC windows. European-quality renovation is, first of all, style, creating a unique look for the bedroom, expressing the individuality of its owner (owners). European-quality repairs are possible of any kind, including cosmetic ones, but require either developed artistic taste and knowledge of appropriate work techniques, or advice experienced designer. In any case, European-quality repairs will cost much more than usual.
Repair with redevelopment
Repair with redevelopment most often involves the installation of heavy capital partitions, which place a large concentrated load on the floors (brick, etc.), as well as installation in the bedroom. It requires the development of a project, special permission for work with complex documentation, professional technical supervision of the work, and its acceptance with confirmation by a certificate. To carry it out, you need the experience of a builder, with the ability to make technical calculations and knowledge of SNiP, so repairs with redevelopment are carried out independently in exceptional cases.
Note: Every bedroom should have a boudoir corner: a dressing table, an ottoman, a chest of drawers or a pencil case. In a bachelor's bedroom, a secretary with a mirror in its niche perfectly combines the functions of a boudoir and a work desk.
Light and air
An ideal bedroom renovation should not only make it cozy and change according to the intentions of the person(s) who entered. After all, the sick person also lies in the bedroom, and completely healthy people stay there for a long time while they sleep. Therefore, hygiene in the bedroom is no less important than in the bathroom or kitchen.
But they don’t use deodorants in the bedroom, and you can’t provide increased ventilation: it’s easy to catch a cold while sleeping, even with additional heating. Bedroom hygiene should be achieved through the most natural, relaxed means.
Light
 The main factor in disinfecting a bedroom is natural light. For comparison: such a dangerous microorganism as tryponema pallidum in a dark room on outdoors survives up to several hours, in diffused medium-intensity light - up to 20 minutes, and in direct sunlight from a window dies instantly. Therefore, the window in the bedroom should be larger, and in the bedroom facing shadow side– with continuous glazing, as in the picture.
Next, natural light needs to be distributed as evenly as possible throughout the volume of the room, and it should be possible to dim it if necessary. The first is achieved by making the walls and ceiling as light as possible and by large mirrors located in places of the most intense illumination by direct rays. Light vertical panels allow you to redirect light from a window without greatly reducing its overall intensity. rotating blinds, Japanese curtains, shiny plasterboard (see below) and suspended ceiling.
Air
Invisible, but quite effective air circulation in the bedroom is ensured by “breathing” walls, properly plastered and covered with correctly selected wallpaper, see below. Firstly, at night such walls absorb fumes and exhaust air from those sleeping, and during the day, when the bedroom is mostly empty, they gradually release natural ventilation deletes them.
Secondly, in a properly decorated bedroom, the well-known “open bottle effect” works in reverse: dust does not settle in the room, but is imperceptibly swept out of it. For this, in addition to proper wall finishing, you need a dust-free ceiling and properly selected floor covering. A heated floor has a huge effect on hygiene and comfort in the bedroom, but its installation is a complex, labor-intensive job that requires the complete removal of the old screed and the formation of a new one, which is equivalent to a major overhaul of the floor.
Note: The question arises - how to combine light and soft wall decoration with the requirements for increased wear resistance of their lower part? And the walls below must be dense, smooth, and not stained or stained?
- The simplest solution is to finish a height of approximately 80 cm with plasterboard on the frame and paint it acrylic enamel or gluing with self-adhesive film.
- More complicated and more expensive - wooden panels. All these materials also “breathe” and absorb little light. But covering with plastic should be avoided: it is “deaf” in the air.
Technological techniques
Technology and consistency complete renovation in the bedroom are no different from those for other rooms:
- Cleaning the ceiling and walls; drying the room.
- Removing the old floor covering.
- Repair of base surfaces of ceilings and walls.
- Floor repair and installation of heated floors.
- Electrical wiring.
- Plastering works.
- Suspended ceiling installation.
- Flooring.
- Wallpapering and decorating.
A simple bedroom renovation, of course, does not include all of these stages and not all operations at each stage. But to decide what needs to be done and what not, you need to have a complete understanding of the renovation.
Cleaning and drying
The room is cleaned after wetting with water. old plaster and holding for 24 hours with a metal spatula; the residues are removed with a drill and a cord brush. Surface cleaning before whitewashing and painting is done with an abrasive mesh on a flat block. Former flooring wooden floor removed with a pry bar or crowbar and carpenter's pliers with a nail puller. The tile cladding is knocked down with a hammer drill and a chisel; it is also used to remove the unusable screed during a major floor repair.
Before starting basic repairs, the damp room must be dried. The need for drying is determined with a 1 sq. piece of film. m, laid on the floor and pressed tightly along the edges: if condensation has not formed under it during the day, there is no need to dry it. Dry with a fan heater or an industrial hair dryer, with a slight excess of humidity. To speed up drying, you can spread silica gel in cloth bags in the room, but under no circumstances scatter it!
Basic surface repair
During basic repairs of the ceiling and walls, the rustic joints - the seams between the slabs - are foamed layer by layer. The thickness of one layer is 3-4 cm. Foam with a gun with a thin long spout until the channels between the plates are filled.
To determine the required degree of repair of the floor, it is first inspected. If there are intersecting or gaping cracks more than 2 mm wide located along the perimeter, it is necessary. Individual cracks are sawed through with a grinder to a depth of 50-70 mm, removed from dust, treated with a deep penetration primer for concrete and sealed with a thixotropic compound, having previously inserted marker pins. After the thixotrope has hardened, the markers are removed, the seam is sawed again with a grinder, a damper cord is placed in it and filled with silicone sealant. Small potholes are sealed cement-sand mortar; The tubercles are removed using a grinder with a bowl-shaped circle on the concrete.

The second option for partial repair of the base floor is dust removal, impregnation with a “deep” primer, sealing cracks with silicone and base to 10-20 mm. The filling composition is mixed immediately over the entire floor area using a hammer drill and mixer; Even experienced professionals avoid pouring the floor in parts. The poured composition is leveled with a mop and rolled with a special needle roller. You can pour another 7-10 mm of polymer liquid self-leveling floor on top. It simplifies flooring and gives additional insulation, but expensive.
Major floor repairs
Major repairs of the floor, in addition to its poor condition, are necessary when installing heated floors and hidden heating wiring. First, a hydro- and vapor barrier made of a special film (hydrostop, etc.) is applied to the dried surface of the ceiling with a 25-30 cm fold on the walls, without cuts. Then: in ordinary cases, expanded clay; under heated floors - special fiber mats with increased bearing capacity or foam concrete. In the first case, the layer is at least 20 mm; in the second - from 60-80 mm.
Next they lay plaster beacons in increments of 600-800 mm and make the screed with a very viscous, “dry” cement-sand mortar. Mix it in 10-30 liter portions with a hammer drill or drill with a mixer. Portions are sequentially dumped between the beacons and leveled broad rule by lighthouses. You can walk on the screed after 24 hours, but it must sit for at least 40 days before laying the floor.