The question of how to build a brick stove for a home with your own hands continues to be relevant today, since comfort and warmth have always remained important conditions for a person to have a good rest after a busy day at work. Therefore in Lately More and more city residents are moving from panel high-rise buildings to private houses, where they have the opportunity to create a comfortable environment at any time of the year.
Due to the demand for various models of furnaces, engineers continue to develop new options suitable for buildings with different areas. It should be noted that even in the case when all the “blessings of civilization” are present in the house, a small cozy stove will never be superfluous and will help out in different situations. For example, it can be heated on cold spring or autumn evenings, when it is humid or it's raining without starting the heating system. Such a structure will help create an optimal balance of temperature and humidity in the house, which will be comfortable for a person. In addition, the oven will be an excellent assistant in cooking or drying vegetables, herbs and fruits.
Since there is a large number of different models of heating structures, then for self-laying you should choose stoves with the most accessible, easy to read diagrams, especially if you have little or even no experience in this craft. Naturally, it is necessary to take into account other factors that directly affect the efficiency of the stove - its power, dimensional parameters, functionality, and aesthetics are also important. appearance. And in order to choose the right stove model, you need to consider the criteria that you need to focus on when determining the desired option.
How to choose the best oven option?
Choosing a furnace installation location
In order for the furnace to be fireproof, efficient, and its power to be used to the maximum extent possible, this structure must be installed correctly, taking into account some nuances.
- Firstly, it is decided how much area can be allocated for installing the stove.
- Then, you need to decide on a specific location:
— the stove is installed in the center of the room, dividing it into separate zones;
— built into the walls, between two or three rooms;
- erected near the wall, with a distance of 250÷300 mm from it, if you need to heat only one room. However, it must be taken into account that this option is the most losing, since most of the heat generated by the rear walls will not be fully used.
- Having chosen an approximate location, you need to immediately mark it, starting from the ceiling, using a plumb line, since the pipe must pass through the attic floor between the beams and rafters, and at a distance from them of at least 120÷150 mm.
- When allocating an area for the furnace, it is taken into account that for its foundation it is necessary to provide more space than its base, by 100–150 mm on each of its sides.
- To avoid any problems with regulatory organizations, when choosing an installation location, you need to take into account not only the recommendations presented above, but also the standards developed by specialists and specified in SNiP 41-01-2003.
Calculation of the required power and assessment of firewood consumption
A furnace will not be efficient and will not be able to heat your home if it is not powerful enough for a particular area. This also takes into account the winter temperatures of the region where the heated building is located, the number of windows and doors in it, the level of insulation of walls and floors, ceiling height and many other conditions.
For example, the higher the ceiling, the larger the volume of air will have to be heated, and the larger the glass area, the faster the heat will leave the house, which means you will have to choose a stove with increased power. Typically, for buildings with non-standard glazing and other parameters that do not fall under the average statistical level, calculations must be made by a specialist individually, based on the specific characteristics of the house.
But in general, you can rely on average values. Thus, for well-insulated houses with conventional glazing, with an area of 50 to 100 m², with a ceiling height of 2.5 to 2.7 m, the following thermal power standards per unit area (Wsp) are acceptable:
This value can be found out more accurately from your local construction organization. And for those who like to do their own calculations, we can recommend a more detailed and fairly accurate algorithm.
How to accurately calculate the required thermal power?
Each room is unique in its own way, and heating two seemingly equal rooms may require different amounts of thermal energy. The methodology for calculating the power of heating equipment is set out in a special publication on our portal dedicated to.
Having data for a specific region and the size of the heated area (S), the furnace power for it is calculated using the formula:
Wsum = S (m²) × Wsp (kW/m²)
For example, we can consider the power of a furnace for a brick house located in the central part of Russia and having an area 75 m².
Wsum = 75 × 0.14 = 10.5 kW
Typically, stove developers immediately indicate the thermal power of their designs. True, other units of measurement are often found - kilocalories per hour or megajoules. It’s not scary - they can be easily converted into watts and kilowatts:
In our case, for example, the calculated power in kilocalories will be equal to:
10500 × 0.86 = 9030 kcal/hour
Now you can calculate the efficiency of the future stove, which largely depends on the quality and type of wood used as fuel. At the same time, we must not forget that usually brick wood-burning stoves are not characterized by high efficiency. It is usually estimated at around 70%. If there is data for a specific oven model, then a specific value is substituted.
Each type of solid fuel has its own calorific value - the amount of thermal energy that is released when burning 1 kilogram. It is clear that only bulk fuels - coal or - are usually measured in kilograms and tons, and firewood is usually measured in storage cubic meters. This indicator therefore depends on specific gravity one type of wood or another. Indicators of the energy potential (based on mass and storage volume) of the main types of solid fuel are shown in the table.
| Wood type | Average calorific value of dry firewood by mass, Qm (kW/kg) | Average calorific value of dry firewood by storage volume, Qv (kW/m³) (for coal and briquettes – kW/t) | The same applies to damp wood (which has not undergone at least a one-year drying cycle) |
|---|---|---|---|
| Firewood: | |||
| Beech | 4.2 | 2200 | 1930 |
| Oak | 4.2 | 2100 | 1850 |
| Ash | 4.2 | 2100 | 1850 |
| Rowan | 4.2 | 2100 | 1850 |
| Birch | 4.3 | 1900 | 1670 |
| Elm | 4.1 | 1900 | 1670 |
| Maple | 4.1 | 1900 | 1670 |
| Aspen | 4.1 | 1750 | 1400 |
| Alder | 4.1 | 1500 | 1300 |
| Willow (willow) | 4.1 | 1400 | 1230 |
| Poplar | 4.1 | 1400 | 1230 |
| Pine | 4.4 | 1700 | 1500 |
| Larch | 4.4 | 1700 | 1500 |
| Fir | 4.4 | 1600 | 1400 |
| Spruce | 4.3 | 1400 | 1200 |
| Coal and briquettes: | |||
| Anthracite | 8.1 | 8100 | - |
| Charcoal | 8.6 | 8600 | - |
| Coal | 6.2 | 6200 | - |
| Brown coal | 4.2 | 4200 | - |
| Fuel briquettes | 5.6 | 5600 | - |
| Peat briquettes | 3.4 | 3400 | - |
The calorific value of undried firewood is shown for contrast - how much generated power is lost. Naturally, you should still rely on firewood that has gone through the necessary drying cycle.
In order for the stove to live up to its purpose and serve as long as possible, it should be “fed” with the right fuel. About their main characteristics, rules of preparation, drying and storage - in a special publication on our portal.
The average daily weight consumption of fuel to ensure the necessary heat transfer is determined by the formula:
V(kg)= (Wsum /Qm) × 24 hours
To calculate volume - everything is the same, but instead of calorific value by mass Qm value is substituted Qv.
Knowing the daily consumption, it is easy to determine the weekly, monthly and even for the entire expected heating period - in order to have an idea of the upcoming costs of purchasing or procuring the required amount of firewood.
For relax self-calculation, below is a convenient calculator, which already contains the necessary ratios. The calculation is carried out for dried wood.
Ecology of consumption. Estate: A small brick stove for a summer cottage can be made in a short time and with your own hands, without the help of a professional. We will talk about preparing the foundation, what materials are best to choose for laying a stove, and how to properly prepare brick and clay so that the stove will serve for a long time and heat your home well.
Very modest requirements are put forward for a do-it-yourself brick dacha stove. Long breaks between visits, a relatively small volume of the heated room, maximum efficiency and the use of local fuel - all these criteria indicate a choice in favor of wood stove. Contrary to popular belief, it can be done without the services of a master stove maker. Let's take a closer look at how to design and build a small brick oven for a summer cottage with your own hands.
Preparing for work
It is unlikely that you will be able to make a complex and highly efficient stone stove for a brick cottage with your own hands without construction experience. There are too many nuances and secrets hidden in the work of a professional stove maker. But small in size and simple in design, a vertical stone stove for a summer cottage can easily be built even by an untrained person. The main thing in this process is to do everything very carefully, carefully and in accordance with our recommendations.
Selection of building materials
Since the described small brick stove for a summer house is heated with wood, it is not intended for intense and prolonged heating - it can be made of ordinary, not refractory brick. Although, it is better to use heat-resistant material for the combustion chamber.
List and required quantity of materials:
- red ceramic solid brick - 700 pcs.;
- grate - 1 pc.;
- combustion door - 1 pc.;
- ash door - 1 pc.;
- soot removal channel doors - 2 pcs.;
- valve - 1 pc.
For a wood-burning stove for a summer cottage with your own hands, you need to choose a solid coreamic brick, which does not crumble from the average blow of a hammer, and at the same time produces not a ringing sound (this is a superheated brick), but a booming sound. It is desirable that the side edges of the bricks be smooth.
For the solution you will need clay. Stove makers prefer to choose “fat”, from which the solution turns out to be soft, like butter, and plastic, like soft plasticine. Such clay for building a stove for a summer cottage with your own hands can be found in construction stores or, after consulting with local residents, simply dug up in the area.
Tool
With a good oven tool country house builds quickly and easily. For work, you should prepare a level, plumb line, trowel, mason's hammer and cooking utensils. clay mortar. To cut bricks you need a grinder.
Preparing the foundation for a brick oven for a summer residence
No matter how small a brick stove you make for your own summer cottage, its weight is several hundred kilograms. Therefore, you cannot place it on the wooden floor of the room, but you will need a foundation.
To choose the right location for the foundation, you need to project the plan of the stove onto the ground so that its pipe fits between the floor beams and the roof joists. If there is a chimney in the wall of the house, then the stove for the country house should be located near it. When building a new house, a stove for a dacha can be built into the wall between the rooms. This option is very convenient: both rooms heat up equally quickly, but in one of the rooms, even at the most unfavorable conditions there will never be smoke.
The depth of the foundation must exceed the freezing depth of the soil. However, if the country house has its own deep foundation, then a combined foundation can be made for the country house stove. To do this, four lightweight concrete columns, such as those used for fences, are dug vertically into the ground. The posts should protrude from the ground just below floor level.
Between them, directly on the surface of the soil, half a brick is poured with a gravel or sand cushion. Then a layer of roofing felt or other sheet waterproofing is laid. A reinforcing metal mesh is laid on top, and a concrete foundation with reinforcement is poured on top of it. The top of the foundation must coincide with the floor level and be perfectly horizontal!
Let's start building the oven
You need to lay another layer of waterproofing on top of the foundation, and a metal sheet on top of it. The dimensions of the sheet should exceed the projection of the stove by 10-15 cm. Moreover, on the side of loading firewood it is better to make a larger outlet. Then random sparks from the blower will fall not on the wooden floor, but on the metal.
During operation, the garden stove heats up quite strongly. If the nearby wall is made of wood or other flammable materials, it must be protected with thermal insulation. The simplest defense a sheet of asbestos painted with heat-resistant paint or covered with a thin plaque can serve. Asbestos cannot be kept open, as its dust is considered very dangerous to inhale. Instead of asbestos, a do-it-yourself summer cottage stove can be insulated from wood with a slab of solid mineral wool. The material must be heat resistant. Facade construction wool is not suitable for this, since it has too low a temperature limit.
Preparing clay solution
The country stove is built on clay, not cement. The clay solution is prepared from good clay and clean river or sea sand. If the clay is not purchased, but was dug somewhere in the neighborhood, then it is worth checking its quality first. To do this, we make several test batches with different proportions of clay and sand. Roll the finished clay dough into small balls, rolls, flat cakes, and leave to dry for two weeks at room temperature.
Dried products need to be tested: throw them from a height of human height, try to crush them with a board under the weight of a weight, etc. The composition of the most durable clay sample is taken as a standard. In the figure shown, the best batch corresponds to samples “b”.
Preparing bricks and clay
The stove for the dacha is built with your own hands from pre-soaked bricks! To do this, it is kept in water for at least 8 hours. During this time, all the air will come out, and the clay will adhere well to the brick in the masonry. You need to prepare very little clay so that approximately 20-25 pieces are enough for laying. bricks. Without the necessary experience, you won’t be able to put in more at one time. The thickness of the clay mortar in the masonry should not exceed 5 mm.
Features of stove masonry
In order for a stove in the country, laid with your own hands, to serve for a long time, each row should be checked for right angles and horizontal surface. The laying sequence is visible in the order drawing.
The cast iron doors of the blower and combustion chamber are secured using steel wire, which is embedded in the masonry. The cuts are made with a grinder. As a last resort, you can do it the old fashioned way - with a mason's hammer, but in this case there may be a lot of waste for scrap. The area for the grate should be slightly larger than the size of the grate itself. Then, when heated, the metal will not move the brick.
The solution is applied to the wet brick. Experienced stove makers do this not with a trowel, but with their hands. Good solution spreads as easily as spreading soft butter on bread.
Important Note
If during laying the brick sank lower than necessary, it should be removed, the mortar cleaned and laid on a fresh one. Otherwise, the new stove at the dacha will smoke heavily and leak soot. Unlike cement mortar, bricks cannot be moved in clay mortar!
When building a stove for your dacha, try to make the inner walls as smooth as possible. Then soot will not linger on them, and it will be easier and less likely to need to be cleaned. The outside of the country stove should also be neat and beautiful. External seams should be carefully embroidered with a needle or finger. There should also be no gaps in the places where arches and horizontal partitions are formed. It is better to lay such rows slowly, one per day, so that the lower rows have time to set, and the upper rows do not creep.
Bottom line
Despite small size And simple design, for small houses, brick country stoves are very popular, as they show very good results. They heat up quickly and are warm enough to last all day. A small brick stove for a dacha is low cost and easy to make yourself, but if you live permanently in winter time You will have to heat it twice a day - in the morning and in the evening. published
There are many options for stoves for cottages and houses. Some of them involve financial expenses, others require direct hands. What should we do for those who have not succeeded either with money or with skill? A simple brick stove that even a “humanitarian” can put together will help out.
The article discusses two options. The first one is suitable for those who want more or less “decent” heating and cooking equipment. The second will be useful to readers who generally do not pretend to be either a penchant for handicraft or any kind of aesthetics of the result.
Figure 1. Simple brick oven
How to make a simple but effective stove?
This option can serve as an alternative to the simplest metal heating devices- for example, a potbelly stove. With the help of this stove you can heat the room, cook food, and even admire the flames.
The structure occupies just over half a square meter. Unlike full-fledged brick ovens, this one does not require a foundation. The weight of the structure is not so great as to make a strong base - it is enough to lay a strong board.
The oven can be made in just a day. One of the advantages of this option is that starting heating is possible in the evening. Certain skills are necessary, but they do not go beyond the skills of the average male.
On a note! No qualifications are required to build stoves. But it is necessary to maintain order - this will make the design as effective as possible in the context of its potential.
What will you need for the job?
This is not only a simple, but also a budget option. To build the structure you will need:
- brick:
- *fireclay – 37 pcs.;
- *red – 60 pcs.;
- ash door;
- firebox door;
- lattice;
- valve;
- hob made of cast iron.
Clay solution is used as a binder. In total you will need about 20-25 liters of the mixture.
Preparation
The first step is to decide on the location of the stove. Since the mass of the structure is small, there are no limitations inherent in traditional brick solutions. By securing strong boards or a suitable alternative material, the “foundation” is thermally and waterproofed.
The role of an insulator can be played by a non-flammable material - for example, basalt wool. Polyethylene or roofing felt is placed on top of the base. The size of the latter corresponds to the dimensions of the base plus a small allowance.
A layer of sand 1-2 cm thick is poured on top. The bedding is leveled. It is important to make the base level - the quality of the design and the convenience of subsequent work depend on this.
Masonry scheme
Figure 2. The order of the stove masonry The stove order is as follows:- The first row is laid on sand without using a solution. A dozen bricks are leveled strictly. The bricks are coated with a thin layer of the mixture, after which the blower door is mounted at the end. The door is pre-wrapped around the perimeter with an asbestos cord, which compensates for the thermal expansion of the metal.
- After fixing the door with wire, lay the second row according to the diagram. Form a ash pit.
- Fireclay is used (in the diagram it has a yellow tint). After laying, a grate is installed above the ash pit.
- Before this, bricks were laid flat. On this row it is placed on its edge. A smoke exhaust channel is formed, inside which a base for the partition is made. One of the bricks (seen in the illustration) is laid “dry” - it will later be removed. After this, the firebox door is installed, which is wrapped several times with asbestos strips before installation. But this must be done so that the door opens well to the top. The element is fixed with wire and a pair of bricks.
- The brick is laid flat again, duplicating the previous row.
- Again the “rib” row is the second and last row in which the brick is laid in this way. The exception is the next row, in which one of the walls is formed by laying on edge. The walls of the chimney channel should be wiped with a damp cloth.
- The brick is laid flat according to the diagram. The back wall is made using the edge-on format again.
- This row closes the firebox. A couple of bricks should hang over the firebox so that the flame moves to the middle hob– in case the stove will be used as a fireplace (without closing the firebox door).
- The bricks are moved slightly towards the back wall to support the firebox door. Strips of asbestos soaked in water are laid in front of the brickwork. Thanks to this, they ensure sealing of the gap between ceramics and cast iron. A cast iron panel cannot be placed directly on a clay solution, otherwise the difference in the thermal expansion parameters of the materials will lead to the appearance of cracks.
- At this stage, the formation of the smoke exhaust pipe begins. The latter, according to the plan, should gradually expand towards the back side. But only the chimney base is made of brick. The rest is made of light metal. Otherwise, the excess mass of the element may lead to a shift in the center of gravity of the stove.
- A valve sealed with asbestos strips is installed here. It is recommended to pre-coat the latter with clay mortar. This is the final row, which is used to complete the construction of a brick oven directly with your own hands. The remaining couple of rows are given to the chimney, which will then be connected to a lighter metal channel.
After this, those bricks that were laid “dry” on the 4th row are removed. At the same stage they clean construction waste smoke exhaust channel and stove surface.
Final works
The simplest stove does not require serious decorations. The only decoration is whitewashing. It is recommended to add a little blue and milk to the composition - this will protect the coating from the formation of a yellow coating and bleaching.
Important! Brick and metal should be protected before work. If this is not done (for example, using film), you will not be able to get rid of the stains.
It is necessary to coat the seams between the brick and the metal of the chimney very well, as well as the seams between the ceramics and cast iron.
It is imperative to close the joint between the stove brick and the floor. This will prevent oven sand from getting into the room. It is advisable to cover the joint with an L-shaped sheet. Then they make a plinth edging, which serves both as decoration and as an additional element that prevents the “foundation” bedding from spilling out.
Figure 3. Functioning oven
The stove is ready. The entire process took no more than one working day. Now you can try making low-power kindling. You cannot use logs - only wood chips or paper. Wood burning will create too much high temperature, and the structure will crack. For the mixture to fully set, you need to give it a week or two. After this, you can already heat it “like an adult.”
An even simpler version of the stove
If the previous option seemed complicated to someone (although it is not), we can offer an extremely simplified heating design. You can lay out this oven with your own hands in literally an hour, even if your hands are far from being called golden.
 Figure 4. The simplest version of a brick oven
 The operating principle of the structure is simple. It's burning down below solid fuel, which settles here under the influence of its own mass. Temperature changes create a draft that carries hot air currents upward. In this case, the firewood burns almost without a residue - the smoke is minimal.
For masonry you will need only two dozen whole bricks and two halves. The stove consists of five rows. The design is so simple that there is no point in describing the order. The procedure is clearly shown in the illustration.
Figure 5. Arrangement of the simplest brick structure If you lay the bricks correctly (and it is very difficult to do otherwise), the result will be similar to that shown in the photo. It is recommended to bind the bricks with clay mortar. But in field conditions, you can do without binding material - just put the components on top of each other according to the order. In this case, the stove is built in five minutes.
 Figure 6. Masonry process
  Figure 7. Finished mobile brick oven
 For those who want an intermediate option, we can recommend a slightly more complicated option.
 Figure 8. Diagram of a simple stove. According to this diagram, the output is an L-shaped three-section stove. The first compartment is designed for loading firewood. The second is a chamber in which the logs are burned. The third compartment is the chimney duct.
 Figure 9. L-shaped stove
 To create this structure you will also need 20-30 bricks. This option can be completed by yourself in a couple of hours, if the skills of a mason are completely absent. A specialist will complete the construction in a matter of minutes.
Advantages of the simplest furnace designs
Advantages of the designs:
- very high installation speed – from a day to several minutes;
- does not require a foundation; the stove can be folded anywhere; and if you do not use a binder mixture, the stove comes out collapsible and can be easily moved;
- as fuel - everything that burns: logs, branches, cones, corn stalks, leaves, chipboard, furniture remains, etc.;
- fuel consumption is several times less than, for example, in the case of a potbelly stove;
- the simplest option - without using clay - allows you to get greater heat transfer than from a fire; That's why similar designs– a godsend for those who don’t want to constantly keep a fire going while camping;
- almost complete absence of smoke - fuel burns with a minimum of waste;
- the temperature of the bricks reaches 1000 degrees - good heating and quick cooking food is provided.
Conclusion
 Figure 10. Another L-shaped option
 Even the most advanced version of this review does not require qualifications and a lot of time. The choice of design depends on the goals of the stove maker. In a stationary case, the first option is suitable. For mobile situations and completely inexperienced users, it is better to use even more simplified schemes.
znatoktepla.ru
How to build a brick stove for a home or cottage
Despite the development of new technologies, a conventional brick wood-burning stove continues to be one of the popular heat sources for private and country houses, as well as garages and other outbuildings. But building even the simplest stove requires significant financial costs, which is why many homeowners are interested in whether it is possible to build it themselves and how best to do it.
To help them save on construction, this material tells you how to correctly build a simple brick stove with your own hands, intended for heating a residential building or cottage.
Selection of furnace design
It's no secret that various projects There are countless wood-burning brick stoves, and stove makers are constantly coming up with new designs. That is why a person who decides to master the basics of baking will find it difficult to choose among them. Therefore, you should first give clear answers to the following questions:
- What tasks should a brick stove solve in your home? Will it be for heating purposes only, or will it be used to cook food and heat water?
- How much space are you willing to allocate for the construction of a stove when building a new house?
- If the cottage or house has already been built, then you need to think about the location of the heater and the passage of the ceilings with the chimney pipe. In this case, it is necessary to take into account the construction of a separate foundation.
- Decide on the design in advance; you may want to build a fireplace stove with panoramic glass.
Advice. At first, a beginner should not take on the task of laying a serious brick stove in the house, but to begin with, build something simple and small in the yard - a barbecue or grill, fortunately, quite a lot of such projects have been published. After practicing and becoming more experienced, you will understand the nuances of this work and begin building a home heater with more confidence.

 Scheme of an outdoor barbecue with cabinets
 Of course, an ignorant person is unlikely to be able to immediately build a beautiful stove with a built-in panoramic glass with his own hands. But you can always invite a stove-maker to carry out this work and provide consultation. As a rule, these people are friendly, since the construction of a home must always be approached with soul. As for choosing a project, you are offered 3 simple options:
- a regular 2-burner hob with a tank for heating water;
- duct heating stove - Dutch;
- heating and cooking stove of classical design.
Original construction technology rocket stove presented in our separate guide.
Cooker with water boiler
This stove has dimensions of 890 x 510 mm and is designed for cooking with simultaneous heating of water in a tank located in the path leaving the firebox flue gases. The total heat output of the stove is 1.2 kW when adding firewood twice a day. Below this furnace is presented in drawings with sections:

Such a small-sized brick oven, built with your own hands, is quite simple to make and will take up little space in the kitchen. Subsequently, a heating shield can be attached to it in order to extract more heat from the flue gases. The masonry diagram below shows the order of the furnace:

To assemble the hob yourself, you must purchase the following materials and stove accessories in advance:
- solid ceramic brick – 185 pcs.;
- cast iron stove with 2 burners measuring 530 x 180;
- firebox door 250 x 210, ash pan 130 x 140, inspection door 130 x 140;
- equal angle corner 30 x 4 – 3.6 m;
- oven 320 x 270 x 400;
- water tank 150 x 350 x 450.
Also, for lining under the stove you will need roofing steel and asbestos sheets measuring 115 x 64 cm, and for laying in front of the stove on the floor you need a sheet of metal 50 x 70 cm.
Dutch duct stove
This classic duct-type heating stove shown in the photo actually comes from Holland. Its advantages are its simplicity and undemanding quality of materials, and the body of the stove can be increased to any height and thus heat rooms on two floors. In addition, the Dutch oven can be safely considered a mini-oven, since it takes up very little space in the plan.

Making a simple 3-channel Dutch oven, shown in the drawing below, will not be very difficult for an experienced craftsman. A beginner will have to work hard to make high-quality masonry with plan dimensions of 1010 x 510 mm, extending to a height of more than 2 m plus the chimney. But first, it is suggested that you familiarize yourself with the laying diagram of this brick kiln and the order:


For construction you will need the following materials:
- solid ceramic brick – 390 pcs.;
- grates 250 x 250 (cast iron or steel grate);
- firebox door 250 x 210, ash pan 140 x 140, inspection door 140 x 140;
- metal valve 130 x 130;
- asbestos sheet 1000 x 500;
- the same sheet of roofing steel.
Heating and cooking stove
The design of this heat source is more complex, although outwardly the stove resembles the same Dutch oven. Its dimensions are 650 x 510 mm, and the developed thermal power– about 1.5 kW. By the name of the brick stove - heating and cooking - it is easy to understand that it is intended both for heating rooms in the house and for cooking. The construction diagram is shown in the figure:
 Combination stove diagram
 Important point. If you carefully study the diagram, you can understand that summer mode work is not provided for in this simple design.
This means that cooking on a stove in the summer will be hot if it is located in the house. You will have to cook in a different way or choose a more suitable heat source design. Homeowners who are not embarrassed by this fact are offered a list of materials and procedures to successfully build a brick stove:
- solid ceramic brick – 211 pcs.;
- cast iron stove for 1 burner, size 360 x 410;
- grate bars 250 x 250;
- firebox door 250 x 210, ash pan 130 x 140, inspection door 130 x 140, ventilation 130 x 75;
- equal angle corner 32 x 4 – 300 mm;
- valve 140 x 140;
- knitting wire with a diameter of 1.5 - 5 m.

What kind of brick should the stove be made of?
Main building material for the construction of the furnace is red ceramic brick grade 150, made from baked clay. Its dimensions are standard - 250 x 120 x 65 mm, although in past times other stones were also produced for stove making. But now all the dimensions are unified, so the fireclay (fireproof) brick, from which the firebox of the stove is often laid, is the same in size as a regular one.

Stone with a height of 88 mm is still used in construction, but it is not suitable for laying stoves because it has voids. Here, only solid material that does not have voids or cracks is required. For the latter, each unit must be carefully studied; the work requires a good quality brick. True, there is one exception - a Dutch oven; it can also be made from lower quality stones. But you shouldn’t go to the point of absurdity; a heat source made of cobblestones definitely won’t provide heat.
The fact is that a heating and cooking stove, built with your own hands from low-quality red brick, can crack even at the stage of drying of the masonry mortar. It should be noted that the clay mortar dries, and does not harden, like cement. Therefore, beginners are not recommended to experiment with bad or used bricks, otherwise the newly built stove will immediately require repairs.
 Fireclay stone for forming a firebox
 A separate recommendation concerns masonry mortar. At first, you should not go to the nearest ravine for clay, because it still needs to be brought to the correct condition. It is better to buy a ready-made building mixture for laying stoves, clay or fireclay.

How to build a stove correctly
In the vast majority of cases, construction begins with the construction of a foundation for a future heat source. An exception may be outdoor mini-ovens, which due to their low weight are sometimes placed directly on the concrete screed of the yard. All others, regardless of location, must be built on a solid foundation. Moreover, it is not allowed for the foundation of the stove to be connected to the base of the house or placed close to it; it is necessary to leave a gap of at least 5 cm, and preferably 10.
Important. Failure to comply with this requirement may lead to the fact that after a year or two the stove may crack and even deviate from the vertical.
If the house has a good foundation in the form of a cement screed, and the total weight of the stove does not exceed 750 kg, then a foundation is not required; masonry can begin directly from the screed, having previously laid sheets of asbestos and roofing steel. The structures given in the previous section weigh over 750 kg, and therefore it is necessary to arrange for them solid foundation. There are 2 types of foundations for the furnace: rubble and reinforced concrete.

Regardless of the type of base, you first need to dig a hole whose dimensions exceed the area of the stove by 10 cm in each direction. The depth depends on the thickness of the upper layer of chernozem or other subsidence soil, while the base of the foundation should rest on a denser layer. In the first case, the pit is laid with rubble stone and dressing, using a solution of the following components:
- sand – 6 parts;
- cement – 1 part;
- lime mixed with water - 1 part.
All voids between the stones are also filled with this solution, and the upper part, located at a depth of 80 mm from the floor, is also leveled with it. The reinforced concrete base is poured with formwork and reinforcement mesh, having previously poured a 10 cm thick cushion of crushed stone onto the bottom of the pit.

Important. After the mortar or concrete has hardened, a waterproofing barrier made of roofing felt in 2 layers must be laid on top of the foundation.

The furnace is laid according to the procedures, observing the thickness of the joints within 3-5 mm. After laying each row, it is necessary to control compliance with the vertical and horizontal using a plumb line and building level. The mortar can be applied to the brick with a trowel or by hand; light tapping of the stone after placing it in place is allowed.

The remaining mortar is removed from both sides of the wall, and the inside is wiped with a wet rag to create a smoother surface. This is necessary to ensure the least resistance to flue gases.
When installing fittings and water tanks, it is important to ensure that there are no gaps between the masonry and the metal surface; the joints must be carefully filled with a solution, otherwise the stove will begin to smoke. Upon completion of construction, it is necessary to wait 2 days until the solution dries completely, after which you can test fire the stove, starting with a small amount of firewood. How to build a small stove at home is described in detail in the video:
How can you paint a stove?

It is clear that a newly minted master will not be able to build a beautiful stove the first time due to lack of experience. But this is a fixable matter, because the outside of a brick wall can be lined with paint. Previously, they were plastered and covered with two layers of chalk or lime whitewash, but now there are simpler and more convenient means. In addition, lime is easily transferred to clothing by accidental touch and constantly needs to be renewed.
If we talk about how to paint a brick stove, here are the following options:
- organosilicon heat-resistant enamel of the KO brand, designed for high temperatures;
- silicate or acrylic paints;
- heat-resistant varnish (for example, PF-238) mixed with dye.
The most preferred option is transparent enamel KO-85, KO-174 and KO-813. It is suitable both for the stove itself and for painting metal parts, since it can withstand temperatures up to 600 °C. Silicate and acrylic paints will not last as long, but they are also cheaper. The oven can also be painted with transparent varnish PF-238 or mixed with gouache of the required color, as shown in the photo:

In any case, the coating is applied 2 times, the second layer is applied after the first has dried. The tools used are a brush and a roller. It is advisable to pre-treat the surface with a special primer intended specifically for such purposes.

Conclusion
Of course, it is impossible to deeply reveal all the nuances of the complex furnace business within the framework of one article; only the basics are given here. For a beginner home handyman Before getting down to business, it is advisable to study the relevant literature in order to successfully build your first stove. It is equally important to carry out preparatory stage, choose the right materials, tools and equipment.
otivent.com
How to build a stove with your own hands - brick laying technology, tips + Video
It’s not difficult to build a brick stove that is always ready to warm any home. You just need to learn some of the intricacies of building brick stoves and use the knowledge gained correctly.
What kind of brick oven can you install in your home and where is the best place to do it?
Based on functionality, all stoves are usually divided into several types. Cookers have a special cast iron panel on which you can heat water and cook food. Such stoves are most often installed in dachas and small private houses where people do not live in winter. In principle, a cooking stove is capable of heating a small area, but its main task is not this, but cooking.
Heating units are intended exclusively for heating the home. They do not cook on them, since they do not have a cooking panel, which is why they usually have very compact sizes. Cooking and heating stoves are a combination of the first two types of brick stoves, which makes it possible to heat a large area and cook any food. Often such devices are equipped not only with a cast-iron panel, but also with a separate niche where you can dry fruits and vegetables, and a built-in oven.

Cooking and heating furnace
Regardless of the type, any stove must be as fireproof as possible, not smoke during kindling and burning, and also create comfortable conditions stay in the house. To achieve this, you need to choose the right place in the home where you want to put the stove, guided by the following recommendations:
- You cannot build a heating device near external wall residential building due to the fact that it will begin to cool down very quickly due to exposure to cold air from outside.
- Place the stove in the middle of the room or next to the inner wall. It can also be built built into the wall. If the device is placed in the center of the room (this is done when the area of the home is large enough), it divides it into several functional parts - living room and kitchen, bedroom and dining room, and so on. For small buildings, a stove built into the wall or mounted directly under it is more suitable.
- To simplify the masonry, it is advisable to find a correctly drawn up ordering diagram for a specific type of stove.
- If the stove is built between two rooms, it must be separated from the wall surfaces with materials with a high heat resistance.
Note that large devices for heating (the number of bricks is more than 500) and with its own chimney should be installed in the house on a separate foundation. Moreover, it should not have a (mechanical) connection with the foundation of the building (this requirement must also be observed when the house and stove are being built together).
Making a foundation and choosing a brick to build a stove
If a relatively small stove is being built in an already operating house with a slab concrete foundation, it is allowed to mount it directly on the existing foundation. You only need to lay roofing felt on the concrete floor.
When the flooring of a building is made of wood or the house is standing on strip foundation, it will be necessary to prepare a separate base for the heating device.
You can do it yourself using this scheme:
- We mark a place on the floor for the future brick stove.
- We remove the marked part of the floor covering and dig a pit in the ground underneath it (its depth should be about half a meter).
- At the bottom of the pit we place a layer of sand (about 10 cm) and on top - crushed stone (the thickness is the same), compact the resulting “pillow”.
- We place plank formwork for the foundation along the perimeter of the pit (it is raised about 11 cm above the level of the main floor covering).
- We fill half of the hole under the stove foundation with a mixture of sand, crushed stone and cement, and wait for it to harden.
- We fill the second half of the pit with a solution (after the previous composition in the pit has firmly set), which it is advisable to make more “thin” (add a little more water to it).

Base for heating device
After this, it is necessary to carefully level the foundation using the rule and wait about a month until it hardens firmly. And at this time, you can choose and purchase bricks, remembering that the durability of the stove depends on its quality.
For masonry, fireproof, ceramic, fireclay and special oven bricks are used, as well as hand-molded products. All these materials should be selected according to their markings, which indicate their strength. A brick oven in a house should be constructed from special products of grades M150–M200, having:
- uniform color;
- straight edges with no chips or cracks;
- geometrically correct shape;
- dimensions 11.3x6.5 or 23x12.3 cm (it is advisable to buy bricks with these parameters, since most of the ordering patterns are developed for them).

Special kiln bricks
It is allowed to use fireclay bricks rather than stove bricks. But be prepared for the fact that a stove made of fireclay material will not only heat up quickly, but also cool down quickly. On the outside, fireclay products are faced with ceramic bricks. This is a must. This finish is also recommended for heating structures built from special stove bricks.
Masonry stove mortars - what should they be?
Before you build the stove with your own hands, you should understand the compositions that will ensure reliable fixation of the bricks and the entire structure. Typically, masonry mortars based on sand and clay are used (white kaolin or fireclay marl for ordinary bricks, gray Cambrian or ground refractory clay for ceramic).
The components of the composition for laying the stove must be selected very carefully. For example, if you feel that there is any smell (unpleasant or pleasant) coming from fireclay clay, do not take it. The aroma indicates the presence of organic matter in the raw material. This clay is not suitable for laying a stove. You can take any sand, the main thing is that there are no foreign impurities in it.

Clay with sand
The proportions in a solution of clay and sand are determined experimentally by conducting special tests according to the following scheme:
- pour 1 kg of clay with plain water and leave for 24 hours until the composition sours;
- knead the clay until it becomes plasticine (adding water to the sour mixture);
- divide the batch into 3–5 parts and add sand to different portions (from 10 to 100% by volume);
- knead the solutions (as thoroughly as possible) and dry them for about 3.5 hours.
Then the samples must be carefully rolled out into 30–40 cm long “sausages” with a cross section of about 1.5 cm and wrapped around some round blank larger diameter. After this, wait for the compositions to dry (about half an hour). All that remains is to analyze the quality of the solutions.

Checking the quality of masonry mortar
If microscopic cracks have formed on the “sausage” or there are none at all, feel free to mix clay and sand in the proportions used for this test. With cracks no more than 2 mm deep, the solution can be used for laying those sections of the heating structure that do not warm up above 280–300 °C. If the “sausages” are covered with tears and deep cracks, this means that there is too much sand in the prepared mixture. It is prohibited to use it to construct a furnace.
An even simpler option is to purchase it at a hardware store. ready mixture for furnace work. If you don’t want to bother with creating the “ideal” mortar yourself, just buy it and start building a brick oven.
It is important to strictly adhere to the ordering scheme you have chosen for a specific model of the stove structure, and also decide on the type of masonry. Common methods of installing bricks are masonry with empty joints and undercuts. In the latter case, there is no need to plaster the finished stove - the solution is present in all seams. But when performing work with empty seams, plastering the constructed stove is a mandatory operation.

Order diagram for the furnace structure
In order to avoid making fatal mistakes, beginners in the construction of home heating structures are recommended to pre-lay bricks without using a sand-clay mixture. It is done in order using 5 mm thick slats. They are placed between rows of bricks. In fact, the slats “replace” the mortar.
Once you have built the entire oven dry and are sure that everything was done correctly, begin to disassemble the structure. If possible, number all the bricks and stack them separately. Then the process of finishing masonry will go much faster for you.

Furnace finishing process
- vertical seams(all without exception) must be filled with mortar to avoid the possibility of delamination of the structure;
- each brick in the masonry must rest on at least two others;
- the smallest seam width is 2 mm;
- you need to bandage all rows vertically;
- the thickness of the mortar for masonry is taken to be about 5–7 mm; after pressing it with bricks, this value decreases by 2–3 mm (it is permissible to lightly tap the rows with a rubber hammer);
- when using ceramic bricks, they are dipped in ordinary water for a couple of seconds, due to which they stick to the mortar without any problems; there is no need to “bathe” fireclay products;
- Before laying, bricks should be cleaned from dust and crumbs with a hair brush (this operation is called mopping).
A few more important points. The bricks are placed in their designated place one at a time. If a stone falls “by”, it must be removed, the clay-sand mixture removed from it, and then placed again. The mortar that was removed from the bricks is not used in the future.
We carry out the laying of the furnace ourselves using clear and simple technology
The first row of the heating structure is laid out without the use of mortar. Then all the bricks included in it are carefully leveled and the locations of all the doors and other elements of the furnace are determined. After this, you need to establish the position of the corner stones and lay them on the solution.
We use a level to accurately align the horizontal position of the bricks, as well as a tape measure to check the diagonal and plan dimensions of the structure being built. Now you can lay the first row on the sand-clay mixture, starting work from the middle of the row.

Laying the first row on a sand-clay mixture
The verticality of the entire contour of a brick stove during its construction is controlled by means of a simple device - plumb lines stretched on a string from the ceiling to the stove corners. The lines made in this way will become an excellent guide for masonry. Having completed the first row, we lay the second row according to a similar pattern:
- put the stones in their place in the corners;
- We check the verticality of the corners with a plumb line from the ceiling;
- lay out the middle of the second row.
In the same way we lay the third and subsequent rows of brick. Do not forget to constantly check the stove construction plan (with the order). It is imperative to clean the outer and inner parts of the stones from excess mortar using a construction trowel.
Depending on the type of stove, choose the location of the firebox, blower, and ash pan. In a conventional heating device, the ash compartment is most often made after the third row of bricks, and the ash pan after the fifth.
When laying a stove, you should adhere to the important principle of tying the stones used, which involves covering the next row of each vertical seam with brick. It is desirable that the vertical connection is located clearly in the center of the brick of the next row. In practice, such an “idyll” is rarely achieved. In this case, try to ensure that the seam shift is a maximum of a quarter of the stone.
Do not forget to mount a special sheet between the floor and the first row of masonry (it is called the pre-furnace). It will hide the small gap that is always present in this place. As you can see, it is not so difficult to lay out a brick oven with your own hands.
remoskop.ru
How to properly build a brick oven
Stove heating is not going to become obsolete at all. Wood-burning stoves made of brick continue to be built not only by the owners of village houses, but also by the owners of large country cottages. Another question is how much does it cost to hire a master stove-maker to build and buy necessary materials. The only way to save money is to build a brick oven with your own hands, having studied the construction technology according to the schemes - procedures presented later in the article. Of course, a beginner cannot build a Russian or two-bell stove with a stove bench, but you can overcome a heat source of a simple design.
Projects of simple brick stoves
The first thing you should worry about is choosing a home heater design that can meet your heating needs. We offer 3 options for simple designs, proven by many years of practice:
- duct-type heating stove, the so-called Dutch oven;
- hob with oven and tank connected to water heating or hot water supply;
- Swedish - a combined heater with a niche for drying things.

Duct stove - Dutch
Folding the Dutchman shown in the picture yourself is quite simple. It is small in plan, but it can be placed indefinitely in height, while the internal vertical channels are lengthened. This allows you to heat a two- or three-story small house or cottage if you build a Dutch oven with a passage through the ceilings. A duct stove successfully burns wood of various qualities and satisfactorily heats rooms, although it cannot be called economical.
Reference. The Dutch oven warms up quickly, and after extinguishing it does not give off heat for long; the duration of combustion from one bookmark also leaves much to be desired. Her strong point– ease of construction and low fuel requirements.

The plate shown in the photo is - convenient option for a country house or a small dwelling in the village, including for use in the summer. A tank installed in the path of hot flue gases is capable of supplying hot water for the heating system or household needs.
Swedish brick stoves combine the advantages of the two previous heaters. In addition, they are economical, release accumulated heat for a long time and work equally well with wood and coal. But the masonry of a Swedish stove is much more complicated than a hob, plus it requires more bricks and purchased iron fittings.

Swedish oven built between the walls
Drawings and orders of stoves
 Dutch oven order
  Cross-sectional diagram of a Dutch woman
  The procedure for laying the hob
  Schematic structure of the plate
  Ordering a Swedish oven
 Any brick stove transfers heat into the room in two ways: using infrared radiation from hot walls and through heating the air circulating in the room (convection). Hence the conclusion: for efficient heating it is necessary that the heater, or at least part of it, be located in the heated room. Taking this requirement into account, we will give some tips on choosing a location for a building in a rural house or country house:
- If you need to heat one large room, then it is better to place the stove in the middle, with a slight offset towards the outer wall, from where it's getting cold.
- To heat 2-4 adjacent rooms, the structure must be placed in the center of the building, dismantling part interior partitions.
- Suppose there are 1-2 small rooms adjacent to the hall. There you can install water heating with radiators and circulation pump, connected to the furnace heat exchanger or tank.
- Do not plan to install the heater close to external walls. There is no point in warming them up; some of the heat will simply go outside.
- Hob and the oven should go into the kitchen, and the oven should go into the living room or bedroom.

Advice. When placing the heater in the center of a private house, make sure that the future chimney does not fall into the ridge of the roof. It is better to move the building by 20-40 cm and bring the pipe through one of the roof slopes.
Partitions and floors made of wood or other combustible building materials located closer than 500 mm from the body of the stove must subsequently be protected with sheets of metal. It is advisable to lay a layer of basalt cardboard under them. In a stone house, these precautions apply only to the wooden roof elements located next to the chimney.
Procurement of materials and components
The main building material from which a do-it-yourself stove is built is red ceramic brick. It must be of high quality and must be solid; stones with voids inside are not used in the stove business, except perhaps for the construction of outdoor grills and barbecues.
Advice. The Dutch one is so undemanding in terms of the quality of materials that it can be made from used red brick. Only upon completion of the masonry will it be necessary to refine it, for example, cover it with tiles or come up with a beautiful tiled decor.

To assemble a small-sized Dutch oven, you need to prepare the following materials and fittings:
- red burnt brick – minimum 390 pcs.;
- grate size 25 x 25 cm;
- loading door 25 x 21 cm;
- small cleaning and blower doors 14 x 14 cm;
- metal flap 13 x 13 cm.
Note. As mentioned in the first section, the Dutch oven can be laid out to any desired height. The specified number of bricks is enough for construction in a one-story private house.
List of components and building materials for the hob:
- solid ceramic brick – 190 pcs.;
- grate 25 x 5 cm;
- two-burner cast iron stove measuring 53 x 18 cm with discs;
- fuel chamber door 25 x 21 cm;
- metal tank - boiler with dimensions 35 x 45 x 15 cm;
- oven 32 x 27 x 40 cm;
- cleaning doors 13 x 14 cm – 2 pcs.;
- chimney valve;
- steel corner 30 x 30 x 4 mm – 4 m.
To save money, you can take on the manufacture of a tank for heating water yourself - simply weld it from metal 3, or better yet, 4 mm thick. There is another option: instead of a tank, place a coil inside the furnace, welded with your own hands from a steel pipe with a diameter of 25-32 mm. But we must remember that in such a water circuit it is necessary to organize constant circulation using a pump, otherwise the metal will quickly burn out.

To build a Swedish heating and cooking stove, you will need the same set of materials as for a stove. Just take a larger corner - 50 x 50 mm, buy a steel strip 40 x 4 mm and prepare fireproof (fireclay) bricks for laying the firebox. To install fittings, find soft steel wire with a diameter of up to 2 mm.
Advice on masonry mortar. Preparing natural clay, which experienced stove makers use to lay bricks, is a long and difficult process. Therefore, beginners are recommended to use ready-made clay-sand mixtures for constructing stoves, which are commercially available.
Laying the foundation
Before folding the stove, you need to prepare solid foundation. The structure is quite heavy, so placing it directly on floors, even flooded ones cement screed, unacceptable. The foundation of the stove is a separate structure, not in contact with the base of the building. If you are building a brick heater close to the walls or building a corner fireplace, you need to make a retreat of at least 150 mm so that there is a minimum clearance of 10 cm between the foundations.

If the floors in the house are covered with screed, then it is recommended to follow the following step-by-step instructions for installing a stove foundation:
- Dismantle the screed section and dig a pit protruding beyond the dimensions of the stove by 50 mm in each direction. The depth depends on the thickness of the upper layer of subsidence soil.
- Pour a sand cushion 100 mm high and compact it. Fill the hole to the top with rubble stone or broken brick, then fill with liquid cement mortar.
- After hardening, lay a waterproofing layer of roofing felt and install formwork protruding above the screed, as shown in the drawing.
- Prepare the concrete and pour the foundation slab. For strength, you can lay reinforcement mesh there.
After 3 weeks (the time for the concrete mixture to completely harden), place a sheet of roofing steel on the finished base, and on top - felt impregnated with clay mortar or basalt cardboard. After this, you can begin to lay the body of the furnace.

Scheme of the base structure for wooden floors
To properly lay the foundation of a stove under wooden floors, use the same algorithm, only instead of a concrete slab, lay out the walls of red brick (used) up to the level of the floor covering. Fill the void inside with rubble or crushed stone and concrete on top. Next is a sheet of metal, felt soaked in clay and a solid first row of stove masonry. You can get more information on the topic by watching the video
No one country house cannot do without a stove, as it will both feed and warm. Today, gas mains have been installed in many villages, and it would seem that it is possible to switch to a more convenient heating method. However, many homeowners are in no hurry to abandon brick stoves, which provide a completely different, special warmth. In addition, in regions rich in forests, where there are no problems with firewood, it is possible to save on gas by having a brick stove in the house.
To find out how to fold, you need to study in detail the layout and masonry technology. Before you begin to study a specific option, you should consider several models, since there are compact and massive structures. You need to choose a stove that will take up less space in the house, but will have all the functions that are in demand in the household.
There are a lot of models of brick stoves. Experienced stove makers can make their own changes to finished projects, since they already know by heart where and how the internal channels through which smoke is removed should go. Thanks to correct scheme their placement in the stove design, it will warm up evenly and release most of the heat into the room. It is better for novice craftsmen to strictly follow the already drawn up order schemes, without deviating a single step from them, since even one incorrectly placed brick can ruin all this rather labor-intensive work.
Types of brick kilns
Based on their functionality, stoves are divided into three main types - cooking, heating and. Choosing a suitable design, Firstly you need to decide what exactly will be required of her.

The hob has a cast iron panel for cooking food and heating water. Typically, such stoves are small in size and are popular for installation in small private homes and in the country. Of course, a cooking stove can, in addition to cooking food, also warm a small room.
 The heating and cooking stove is a multifunctional massive structure
 A heating and cooking stove can warm a house or country house with a large area, and its design sometimes includes a stove bench, and in addition to the stove, an oven, a tank for heating water and a niche for drying vegetables and fruits are built in.

Always compact. It does not include a hob and serves only to heat the premises. Such a structure can warm two rooms if it is placed between them, built into the wall.
Choosing the optimal location for the furnace
Having chosen the desired stove model, you need to look for it appropriate place. The structure can be installed against a wall, in the middle of a room, or built into a wall. The choice of location will depend on the size of the stove structure and the desires of the home owner.
- A stove placed in the middle of a large room can divide it into two different zones, for example, in the kitchen and dining room or living room. The hob will go into the kitchen, and flat wall with well-made masonry it will become a designer decoration for the living room. Perhaps, immediately or over time, there will be a desire to add a wall to the stove and completely separate the two rooms - in this case, the partition should be insulated from the stove with non-combustible material. You can use asbestos sheets for this or install brickwork.
- It is not advisable to build a stove near an external wall, since there it will quickly cool down.
- When installing a stove between two rooms, it must also be separated from the walls with heat-resistant materials.
- The proposed construction site must be carefully measured and be sure to take into account that the foundation should be 100 ÷ 120 mm larger than the base of the furnace. In addition to the base area, you need to calculate the height of the building so that it fits well into the room in all respects.
- To make it easier to work, you need to find an ordering diagram for the selected model.
Having decided on the model and installation location, you can purchase materials for construction and prepare tools.
Tools, building materials for laying a brick stove
Depending on the size of the furnace, it requires different quantities materials and additional cast iron and steel parts, but the tools required for masonry are the same.
Tools
Of the tools and equipment for the construction of any furnace you will need:
The “goat” is a scaffold that will make it easier to work at height when the stove is raised above human height. They are convenient because the stove master can not only climb onto them, but also place a container with a solution next to him and even put the tools and building materials necessary for this stage of work.
 “Goats” will be needed when laying the top rows
 Another version of the stand, more compact, is the “tragus”. You need to have two such devices, because if you place them at a certain distance from each other and lay thick boards on top, you will get the same platform. Can also be used separately, as stairs.
 You can get by with a couple of more compact trestles, making temporary plank flooring on them
 The following set of tools will need to be prepared:

1. A pick will be needed to separate and trim the brick.
2. A broom made from sponge, for removing dried sand and pieces of mortar from the finished laid rows of masonry and mopping inside the masonry.
3. Corner - will help bring the corners inside and outside the oven exactly 90 degrees.
4. A plumb line is needed to check the verticality of the walls.
5. A kiln hammer is also required to separate bricks into pieces and chip off small protrusions of hardened mortar.
6. Pliers will be needed for biting, bending and straightening the wire.
7. A rubber hammer is necessary for tapping bricks in masonry if it is difficult for them to fit.
8. A chisel will also be needed for splitting bricks, as well as dismantling old masonry.
9. Trowel (trowel) of different sizes - for applying mortar and removing excess.
10. The rule will be necessary to level the surface of the foundation.
11. A lead scriber is used for marking, especially in cases where it is planned to decorate the stove with tiles.
12. The knocker is a piece of pipe, which is also used for cutting tiles; instead of a hammer, it is used to hit a knife.
13. Wooden spatula - for mixing and grinding the solution.
14. Metal scriber rod for marking.
15. A level is needed to check the horizontality of the rows and the verticality of the walls.
16. A rasp is used to remove sagging and grind in lumps.
17. Jointing is necessary for neatness of the seams if the stove will not be plastered or finished with decorative tiles.
18. Container for mixing the solution.
19. A sieve that will help make the masonry mortar thin.
Construction materials
The amount of materials will depend on the stove chosen, and their list is almost always the same. For a purely heating type, you will not need a hob, oven cabinet, or water tank. But usually standard set cast iron and steel elements consists of the following items:

1. Blower door.
2. Door for fireboxes
3. Cleaning doors ovens.
4. Chimney damper.
5. A burner made of several rings.
6. Hob.
7. Grate.
Other metal elements you may need:
1. Oven.
2. Tank for water.
3. Metal corner 50 × 50 mm.
4. Metal strips 3 ÷ 4 mm thick.
5. Steel wire.
Directly for masonry you will need to purchase:
1. Red hardened brick.
2. Fireclay brick.
3. Ingredients for clay mortar or ready-made dry heat-resistant mixture for laying stoves.
4. For the foundation you will need cement, crushed stone, sand, formwork material and a sheet of roofing felt for waterproofing.
5. You will also need heat-resistant material for protective finishing of the walls of the house and a metal sheet or ceramic tile for the floor.
Prices for refractory bricks
Fire brick
Preparing a site for the construction of a stove
Usually the foundation for the furnace is poured simultaneously with the general foundation of the house, although it is not rigidly connected to it. However, it often happens that the furnace is erected in a finished building.
Further actions depend on what kind of floor is installed in the room.
- If the foundation is concrete and completely poured, according to the principle of a slab, and the structure of the stove is not designed to be too massive, then you can begin to lay the stove directly on the concrete floor, having first laid a sheet of roofing material under the masonry.
- If the foundation is strip or the floor is wooden, then you will have to build the foundation from scratch.
Foundation
The foundation must be deepened into the ground. To do this, a place for the stove is marked on the floor, and then the boards or thin concrete floor are removed.
- A pit is dug in the exposed soil, 400-500 mm deep.
- At the bottom of the pit, a “cushion” of 100 mm is made of sand, and then of the same thickness - from crushed stone, the layers are well compacted.
- Next, along the perimeter of the pit, formwork is installed for pouring concrete - it should rise above the main floor by 100 ÷ 120 mm
- The lower layer of the foundation, up to about half the height, may consist of crushed stone, sand and cement. It is poured, distributed in an even layer over the entire area, and left to harden.
- After the bottom layer has set well, you can pour upper layer, which will consist of a thinner solution. The space is filled with fully prepared concrete mortar and leveled using the rule, and the top formwork boards will serve as beacons for this. The foundation must dry well and gain the required strength. To do this, it must be moistened with water starting from the second day, which will improve the uniformity of ripening. cement mortar and will not allow cracks to form.

- Fully ready foundation(after 3 ÷ 4 weeks) it is covered with roofing felt to create a layer of waterproofing. Then markings are made on this surface - the shape of the stove base is drawn, along which the first row will be laid out.
Dry masonry
- Experienced craftsmen recommend that a novice stove maker take his time laying bricks on the mortar so as not to make mistakes. Especially if this work is being carried out for the first time, it is best to dry out the entire furnace structure.
- By carrying out this process carefully, with a constant eye on the existing diagram, you can understand internal structure chimney channels and the installation of a firebox and vent.
- For dry masonry, you need to prepare auxiliary slats with a thickness of 5 mm, which will determine the distance between the bricks - during the main masonry it will be filled with mortar, forming seams.
- After the entire stove model up to the chimney pipe has been laid out, it is disassembled again, while the bricks of each row can be stacked separately, if there is enough space in the room for this, and numbered, indicating the row and the specific part in it. This is especially important if, when laying dry, the bricks were adjusted to the required size.
- It should immediately be noted that during the final laying, it is also better to first lay out each row dry again, for control, and then immediately fix it with mortar.
- In addition, you need to know that when laying bricks on the mortar, it is applied with a thickness of about 7 mm, then the brick is pressed and, if necessary, tapped with a rubber hammer. Excess mortar is immediately picked up with a trowel.
- Having laid two or three rows until the solution has set, the seams are decorated with jointing. If suddenly the solution is not wet enough, you can sprinkle it with a little water from a spray bottle.
- We must not forget that during laying, constant monitoring of the vertical and horizontal rows is necessary.
Knowing these nuances, you can proceed directly to the masonry.
The presented video shows a diagram of the construction of a compact heating stove, which is suitable even for a very small room. True, others additional functions it does not include:
Video: heating stove for small spaces
Compact "Swedish"
 Convenient, versatile and fairly compact Swedish oven
 It can be called the neatest and most compact stove, suitable for small spaces. This stove can be called a heating and cooking stove, since it has a high body with smoke exhaust channels located inside, which means that when it is fired, the walls will warm up well, releasing heat into the room. At the same time, the design also includes a hob.
The first picture shows a “Swede”, which has a wider pediment than in the second photo, since it is supplemented with an oven, and instead of cleaning windows there is a drying niche above the stove. This version of the stove is twice as wide as the second model.
 This is also a “Swedish”, but of a slightly different design
 The ordering diagram shown below almost completely corresponds to the stove in the presented photo, with some exceptions: instead of two windows for cleaning, there is a niche above the hob, a slightly different location of the pipe - on the other side of the structure, and consistent roundness of the corners. When laid in this order, the stove will look something like this.
The structure is laid out based on the ordering diagram:
 Layout diagram for laying a compact heating and cooking "Swedish"
 Although this diagram shows that they begin to lay out the blower chamber from the first row, after all It’s worth laying it out in a continuous plane and only from the second row can you start working on the blower chamber. But, in order not to create confusion, the description will go exactly according to the diagram, and the first continuous row can be called “zero”.
- So, the formation of the blower chamber begins from the first row.
- A blower door is installed on the second row. The door is secured with wire and temporarily supported with bricks until it is lined with masonry on all sides.

- From the fourth row, two chambers for cleaning begin to be removed and doors are also installed on them.
- A grate is laid on the fifth row.

- The firebox door is also secured with wire to the sixth row, and is also temporarily supported by bricks mounted on the grate, and Also, if necessary, a support is placed with front side doors.

- On the seventh row, the beginning of the vertical smoke exhaust channels is laid.
- On the ninth row, the firebox door is covered with a brick, the wire of which is secured and tucked into the seams between the rows.
- On the eleventh row, a hob is placed on the left opening, and strips of asbestos are placed under its edges. The front lower edge of the cooking chamber is framed by a steel angle.
- From the twelfth to the sixteenth row the cooking chamber is displayed.
- On the seventeenth row, metal strips are laid, and its upper edge is formed with a corner.
- The next two rows are laid solid, leaving only three smoke exhaust channels.
- On the twentieth row, another door is installed, and cleaning chamber and a niche for drying.
- At 22- ohm row, the chamber door is covered with masonry.
- On the 23rd row, the chamber is completely blocked, and at its end a hole is left that will continue the smoke exhaust channel.
- On 24- ohm a row of metal strips cover the drying niche.
- At 25- ohm install the cleaning chamber door.
- At 27- ohm the door is covered with masonry.
- At 28- ohm The entire chamber is completely blocked.
- At 30- ohm In a row, two valves are installed on the smoke exhaust channels. First, the frame of this part is laid on the mortar, and then the valve is inserted into it.

- From 31st to 35th th a row is laid out a segment.
- From the 35th to the 38th, the construction of the pipe fluff begins.
- Next comes the laying of the pipe, which already has your own numbering. From the first to the 26th row, the shape of the pipe does not change, you just need to very carefully monitor the evenness and internal cleanliness (from solution residues) of the smoke exhaust channels. This part of the pipe is called the riser.
- On the third row, another door is placed on the cleaning chamber.
- At 27- ohm Another chimney valve is installed in a row.
- At 29- ohm they expand the pipe by one row, and by 30- ohm it is brought into its initial form.
- Starting from the 31st row, the narrowest part of the pipe is laid out, which is discharged through the roof.
When a chimney passes through the attic floor, it must be insulated from it with flammable materials - this could be asbestos, mineral wool or expanded clay, poured into a box located around the entire perimeter of the pipe.
The hole in the roof through which the pipe passes must be closed after construction. waterproofing material, which is applied both to the pipe and to the roof.
Installation of other oven elements
As mentioned above, there may be other elements built into the stove, so it is worth considering how some of them are installed.
Oven
If the design includes an oven, it is most often installed on the same level as the firebox or hob. This is important for its rapid and uniform heating.
- Metal corners are first installed in the place where it will be installed - they will become reliable supports for the cabinet.

- Next, the oven is wrapped with asbestos cord - this material is heat-resistant and will help the thin metal of the cabinet last longer.

Video: technology for laying an efficient stove with an oven
Prices for masonry mixtures and special-purpose adhesives
Masonry mixtures and special-purpose adhesives
Hot water tank
The water heating tank can be installed in different ways. Sometimes it is built into the design of the furnace, in other cases it is placed on top. The main thing is that it is located next to the smoke exhaust duct, from which the water will receive the necessary thermal energy. In this case, you need to provide a hole for filling the tank with water and a tap from which it can be taken. It is advisable to make the water tank from a stainless alloy, otherwise very soon yellow water will come out of it, unsuitable for water procedures.

Another option for installing this water heating element is to install it at the same level as the hob, above the firebox, when it will only heat up from below. In this case, it is best to place a cast iron or thick steel plate under the tank, otherwise its bottom will burn out very quickly. The container in this installation option is not embedded in the walls of the oven.
The disadvantage of this setup is that less space remains for the hob, or the firebox will have to be made deeper, which means the overall dimensions of the stove will increase, which is not always possible in tight spaces.
When choosing a stove model for your home, you need to think through everything in advance - what functions should be implemented in it, its size and design. Based on this, it is worth choosing a building design with an ordering scheme.
It should be noted that laying a stove is a real art, and not even every experienced craftsman always succeeds perfectly. Therefore, if you do not have any skills in this work, then it is better to invite a specialist who will help you do everything correctly.
TO cooking ovens include kitchen stoves of various designs. They come in various sizes and are used only for cooking. Kitchen stoves are connected to main or top pipes.
Brick kitchen slabs
Based on their design, kitchen stoves can be divided into simple, medium and complex.
A simple kitchen stove has a combustion and blower doors, a grate and a smoke damper. It is the simplest of all household stoves.
Kitchen stoves of average complexity have, in addition to the above-mentioned stove appliances, an oven, and complex ones also have a hot water box. Ovens are made of black steel with a thickness of at least 1 mm, and hot water boxes are made of galvanized steel. The casing of the water heating box is made of black steel with a thickness of at least 1 mm. The thicker the steel, the more durable the devices.
Stove with two-burner stove and oven
In a simple cookstove, hot flue gases from the firebox are directed under the cast iron stove and then discharged through an opening under the chimney into the chimney.
In other kitchen stoves, hot flue gases are directed under the cast-iron stove and then, descending, heat the walls of the oven or one wall of the water-heating box, and then are discharged into the pipe, while heating the bottom wall of the oven, the bottom and the other wall of the water-heating box.
The above-mentioned kitchen stoves do not have a cooking chamber, therefore, during cooking, steam and odor are released into the room, which negatively affects the microclimate of the room. This article provides drawings of sections and ordering of a kitchen stove of an improved design, which has a cooking chamber connected to a pipe using a ventilation duct closed by a ventilation valve.
Simple kitchen stove
A simple kitchen stove has dimensions, mm: 1160x510x630 (without foundation, i.e. without two rows brickwork on the floor).
To lay a kitchen stove, the following materials are required:
- red brick - 120 pcs.;
- red clay - 50 kg;
- sand - 40 kg;
- grate - 28×25 cm;
- fire door - 25×21 cm;
- blower door - 25×14 cm;
- cast iron stove for two burners - 70×40 cm;
- slab trim (angle 30x30x4 mm) -3.5 m;
- roofing steel sheet under the slab - 1160×510 mm;
- construction felt - 1 kg;
One stove maker can build a simple kitchen stove within 3 hours (not counting the laying of the chimney); in addition, it takes 1.5 hours to carry the material and prepare the clay-sand solution. To erect a chimney, additional time is required: depending on its height, you need to calculate the time from calculation of half an hour per 1 m of pipe laying (when laying a pipe in a quarter of a brick).
The heat output of a simple kitchen stove when cooking food twice a day is about 0.7-0.8 kW (660-700 kcal/h).
The figure below shows vertical and horizontal sections of a simple kitchen stove. Next, masonry drawings will be given in rows (orders). From the sections and drawings of the masonry along the rows it is clear that the masonry of a simple kitchen stove does not present any difficulties.

Sections of a simple kitchen stove: a - facade; b - section A-A (longitudinal vertical section of the furnace); c - section B-B (transverse vertical section). Designations: 1- firebox; 2 - ash chamber; 3 - grate; 4 - smoke valve; 5 - cast iron plate (flooring).
Before you start laying a simple kitchen stove, you should purchase the necessary stove equipment.
Having prepared the clay-sand mortar, proceed to laying a simple kitchen stove. If the slab is placed on a foundation, then level it upward. When laying a slab on a wooden floor, it is necessary to cut a sheet of roofing steel to fit the size of the slab. Place a layer of sheet asbestos on the floor, and if it is not available, two layers of construction felt, well soaked in a clay-sand solution, cover everything with a sheet of roofing steel and nail it to the floor. Then a platform is made from a whole brick in two rows of masonry on clay-sand mortar. After this, they begin laying the slabs from the first row strictly in order.
First row laid, observing the rules for bandaging seams from selected whole bricks, as indicated in the figure below. The completed masonry is checked for squareness.

First row of a simple kitchen stove
During laying second row arrange a ash pit, install a blow-off door, which is attached to the masonry using furnace wire. Temporarily, the blower door at the front can be supported by bricks, which are stacked on the floor in front of the blower door. The bottom of the ash chamber is 380×250 mm.

Second row of kitchen stove
Third row similar to the previous one, but the seams should be well bandaged.

Third row
Fourth row covers the ash door, leaving only a hole in the ash chamber measuring 250×250 mm, on which the grate is placed. If possible, it is advisable to lay the fourth row using refractory bricks, as shown in the figure below.

Laying the fourth row. The shaded bricks are fireproof. The arrows indicate the direction of movement of hot flue gases in the heating furnace.
Fifth row forms a firebox measuring 510×250 mm. The brick adjacent to the back of the grate is cut off to form an inclined plane along which the fuel will roll onto the grate (see section B-B along A-A). When laying this row, you need to install a firebox door, having previously attached roofing steel legs to it using rivets.

Laying the fifth row of the furnace
Sixth row laid in the same way as the previous one, but the seams should be bandaged.

Laying the sixth row of the furnace
Seventh row placed according to the figure below. This is where a chimney is left under the stove, connecting the firebox to the chimney.

Seventh row of the oven
Eighth row performed strictly horizontally, with this row blocking the combustion door. A cast iron slab is laid on the eighth row laid out using a thin layer of clay-sand mortar. Factory-made cast iron slabs with bottom side have protrusions, or stiffeners, that extend 15 mm from the edges of the slabs.

Eighth row of the oven
The internal dimensions of the eighth row of masonry must be such that the slab fits freely there with its ribs and has a gap on all sides of at least 5 mm, intended for the expansion of the metal when it is heated. If this is not observed, the cast iron stove, expanding, will destroy stove masonry. To ensure that the masonry is strong, a frame made of angle steel is laid on the eighth row. It is advisable to cover the frame with fireproof varnish, which protects the steel from rust.
After laying ninth row Using a thin layer of clay-sand mortar, install a smoke damper. This row is the final one, followed by the laying of the chimney.
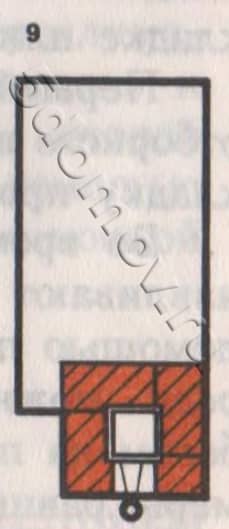
The final row of a simple kitchen stove
The kitchen stove works as follows. Flue gases from the firebox enter under the cast-iron stove, then through a hole under the pipe through a smoke valve they are discharged into the chimney.
The kitchen stove does not have a cleaning hole, since the chimney can be cleaned through the hole under the pipe, where it is easy to stick your hand through the burner cast iron stove.

An example of laying a hob
Firstly, in a kitchen stove the fire door is installed at the same level as the grate. In the stove, flue gases constantly maintain a high temperature in the chimney, as a result of which it is not necessary to place fuel on the grate large thickness. Secondly, with this installation of the fire door, the distance from the grate to the cast iron stove will be only 280 mm, which makes it possible to quickly cook food even with low fuel consumption.
After finishing laying the furnace, it must be dried by opening the furnace and blower doors and the valve in the pipe.
The longer the oven dries, the stronger the masonry will be. The kitchen stove can be dried using small test fires, but after the test fires, the valve in the pipe and the blower door must be left open.
After complete drying, the kitchen stove is plastered with clay-sand mortar, followed by whitewashing.
Exterior finishing is best done as follows: after laying the eighth row and installing the cast iron slab, as well as before installing the corner steel frame, the kitchen slab is walled up on all sides in a case made of roofing steel (galvanized steel can be used). Pre-cut the corresponding holes according to the size of the combustion and blower doors. The case is secured to the floor using a plinth, which is nailed around the slab. The outer surface of the case is cleaned and coated with oven varnish, which can withstand high temperatures well.
In front of the combustion door, the pre-furnace sheet is nailed to the floor with nails 50 mm apart from one another. If the plinth was nailed earlier, then the pre-furnace sheet must be folded onto the plinth.
Kitchen stove with oven
The kitchen stove with oven has dimensions, mm: 1290x640x560 (without foundation, i.e. without two rows of brickwork on the floor).
To lay a kitchen stove with oven, the following materials are required:
- red brick - 140 pcs.;
- red clay - 60 kg;
- sand - 50 kg;
- grate - 26×25 cm;
- fire door - 25×21 cm;
- blower door - 14×25 cm;
- cleaning doors 130×140 mm - 2 pcs.;
- cast iron stove of five composite slabs size 53x18 cm with two burners;
- smoke valve - 130×130 mm;
- oven - 45x31x28 cm;
- slab binding (angle 30x30x4 mm) - 4 m;
- roofing steel pre-furnace sheet - 500×700 mm;
- roofing steel sheet under the slab - 1290×640 mm;
- construction felt - 1.2 kg;
- metal box for collecting ash in the ash chamber - 350x230x100 mm.
One stove maker can put this stove together within 3-4 hours; in addition, it takes about 2 hours to carry the material and prepare the clay-sand solution. The heat transfer of the stove when cooking food twice a day is about 0.8 kW (770 kcal/h). The figure below shows a general view, longitudinal and cross sections of a kitchen stove with an oven. Below are the order drawings for each row. Laying a kitchen stove with an oven is also not difficult and is similar to laying a simple kitchen stove, but here you have to install an oven and cleaning doors.

Kitchen stove with oven: a - general view; b - sections A-A, B-B (vertical sections), B-C, D-G (horizontal sections). Designations: 1 - ash chamber; 2 - grate; 3 - firebox; 4 - cast iron plate; 5 - oven; 6 - smoke valve; 7 - combustion door; 8 - blower door; 9 - cleaning holes.
When laying slabs on an independent foundation, before starting work, level its top with a layer of clay-sand mortar.
When installing a slab on the floor, before starting to lay the first row, it is necessary to carry out the same work as when laying a simple kitchen stove.
Masonry first row made from selected whole bricks, strictly adhering to the rules of bandaging the seams. The length of the kitchen stove should correspond to the length of five bricks, the width - to the length of 2.5 bricks. Using a cord, check the equality of the diagonals.

Laying the first row of a kitchen stove with an oven
Second row laid out strictly following the order. Here an ash chamber measuring 380×250 mm is left, a blower door is installed and secured, and cleaning holes are left on the back wall (the width of the holes should be equal to the width of the brick, i.e. 12 cm). If possible, cleanout doors measuring 130×140 mm are installed. At the cleanout hole at the farthest from the ash chamber, a brick is laid on its edge, as shown in the masonry order. For better fastening ovens, in the middle of the place where it is installed, place half a brick on the edge.

Laying the second row of the slab
Third row similar to the previous one, only you must follow the rule of ligating the seams.

Laying the third row of the slab
Fourth row covers the blower and cleanout doors. After finishing the laying of the fourth row, an oven is installed on a thin layer of clay-sand mortar at a pre-marked place. After this, a grate is installed. The chimney into the chimney is blocked with the same brick installed on the edge.

Laying the fourth row of the stove with oven
During laying fifth row The combustion door is installed and fastened, the brick is cut off before installation behind the grate so that the fuel gradually rolls onto the grate during the combustion process.

Laying the fifth row of the slab
Sixth row looks like the fifth one.

Laying the sixth row of the slab
Seventh row laid out in order. The resulting chimney channel from the front side is laid with three bricks, as a result of which the internal size of the resulting channel under the chimney will be 130 × 130 mm. In the image of this row near the oven, a steam pipe with a diameter of 10 mm and a length of 160 mm is visible, which connects the oven to the ascending duct. This pipe is designed to remove steam and odor.

Laying the seventh row of the stove with oven. The arrows indicate the direction of movement of hot flue gases in the heating furnace.
Eighth row
perform strictly horizontally in level. This row covers the oven and the fire door. The upper wall of the oven is coated with a layer of clay mortar up to 10-
15 mm, which will protect the oven from rapid burning.

Laying the eighth row of a brick oven (before installing a cast iron stove)
In this case, it is necessary that the distance between the top of the clay coating and the cast iron plate is at least 70 mm. After this, a cast iron slab and lining made of angle steel are installed on a thin layer of clay-sand mortar.

Eighth row of brick oven (after installing the cast iron stove)
After laying ninth row All that remains is the laying of the vertical channel. The ninth row is placed according to the image below.

Ninth row of the oven
After laying tenth row install a smoke damper.

Tenth row of the oven
Masonry eleventh row start the chimney. Further laying of the pipe does not present any difficulties.

The final row of the furnace (the masonry of the chimney is not taken into account)
A kitchen stove and oven works like this. From the firebox, flue gases are directed under the cast-iron stove, from where they, heating the oven from behind on both sides, fall under the oven and are directed to the hole under the chimney. Rising through a vertical channel, they enter the chimney through a smoke valve and are released into the atmosphere.
Kitchen stove with oven and hot water box
To lay a kitchen stove with an oven and a hot water box measuring 1290x640 mm, the same materials are required as for the previous stove. Additionally, you should purchase a water heating box measuring 510x280x120 mm.
The figure below shows a general view, a horizontal section along A-A and a vertical section along B-B of the slab.

Kitchen stove with oven and hot water box: a - general view; b - cuts. Definitions: 1 - firebox; 2 - cast iron plate; 3 - oven; 4 - water heating box; 5 - smoke valve; 6 - ash chamber; 7 - angle steel harness
A kitchen stove with an oven and a hot water box is placed in the same order as a kitchen stove with an oven. The only difference is that after laying the third row, instead of a brick partition, a water-heating box in a case is installed on the edge between the oven and the vertical channel. The height of the hot water box should correspond to the height of four rows of flat brickwork. The rest of the masonry is completely similar to the masonry of a kitchen stove with an oven.
Kitchen stove with oven and hot water box of improved design
In kitchen stoves rural areas They prepare not only food for people, but also boil feed for livestock, and boil laundry when washing. During combustion, a lot of steam enters the room and foreign substances are released unpleasant odors. Because of this, the air humidity in the room increases, which negatively affects its microclimate. Therefore, to remove foreign odors and steam from kitchen stoves, it is advisable to provide a cooking chamber, which is connected to the chimney using a ventilation duct. A ventilation valve must be installed in the ventilation duct.
Installing a double door in the cooking chamber allows you to keep food hot in it for a long time and thus prevent it from souring.

Cooking chamber in a brick oven
The firebox and ash chamber (ash chamber) are closed from the outside with appropriate doors. The upper surface of the oven is protected from hot gases by a layer of clay mortar 10-12 cm thick. It is advisable to lay the stove from the fourth to the ninth row from refractory bricks (especially the firebox).

An example of covering an ash pit
It is advisable to make the kitchen slab up to the ninth row of masonry from sheet steel, and to enhance its strength, after installing the frame on a clay-sand mortar, install a frame made of angle steel. Since the mass of such a slab will be more than one ton, it is installed on an independent foundation.
If it is impossible to construct an independent foundation, the floor must be strengthened with additional beams, which are mounted on brick columns. Instead of brick pillars, you can use pillars made of hardwood logs, reinforced concrete pillars, iron pipes with a cross-section of at least 180-200 mm.
The kitchen stove has an improved design and is equipped with a “direct” valve. During prolonged heating of the stove, evaporation of water in the water heating box is possible. To stop this, you need to add a little cold water into it and open the “direct” valve. In this case, the flue gases from under the cast iron stove do not go down, but immediately go into the chimney. As a result, the water heating box stops warming up and the evaporation of water in it stops.

Example of a “direct” valve
To make it easier to clean the ash chamber from ash, a special roofing steel box measuring 350x230x100 mm is installed in it. This prevents contamination of the room when cleaning the ash chamber from ash.
A kitchen stove of this design has the following advantages compared to the previous kitchen stove with oven and hot water box:
- during cooking, steam and foreign odors do not enter the room, which are removed into the atmosphere through the ventilation hole;
- food cooked on the stove in the cooking chamber remains hot for a long time and does not sour during the day;
- With the help of a “direct” valve, it is possible to cook food without warming up the water heating box and thereby preventing further evaporation of the water in it.
The figure below shows a general view of the kitchen stove from the front; here are also drawings of sections of the stove in the most difficult places. Layout drawings along the rows will follow, and they give a comprehensive idea of internal structure slabs Using the orders and drawings for the rows, you can fold the slab yourself, without the help of a stove maker.

Kitchen stove with oven and hot water box of improved design: a - facade; b - sections A-A, B-B, c - sections B-C, D-G, D-D, E-E. Definitions: 1 - blower door; 2 - combustion door; 3 - oven; 4 - cooking chamber door; 5 - smoke valve; 6 - ventilation valve; 7 - “direct” valve; 8 - water heating box; 9 - cleaning holes; 10 - cast iron stove.
A kitchen stove with an oven and a hot water box of improved design has dimensions, mm: 1290x640x1330.
The following materials are required for masonry:
- red brick - 250 pcs.;
- fireproof brick - 80 pcs.;
- red clay - 180 kg;
- sand - 90 kg;
- combustion door - 250×210 mm;
- blower door - 250×140 mm;
- grate - 280×250 mm;
- oven measuring 250x280x450 mm;
- cast iron stove with two burners - 700×400 mm;
- water heating box - 250x140x510 mm;
- pre-furnace sheet - 500×700 mm;
- strip steel measuring 400x250x6 mm;
- door to the cooking chamber - 750x350x5 mm;
- corner steel for tying a slab measuring 30x30x3 mm - 4.1 m;
- strip steel for covering the cooking chamber measuring 450x45x4 mm - 4 pcs.
A stove can be assembled by one stove-maker in 18-20 hours; preparing the solution and carrying the material requires an additional 6 hours.
To fold the stove with the firebox on the left side, you need to look at the drawings using a mirror placed edge-on on the drawing.
The kitchen stove is laid out as follows. Masonry first row produced on a foundation built to floor level. The first row determines the main dimensions of the slab. The length of the slab is equal to the length of a laying of five bricks in clay-sand mortar, and the width is equal to the length of 2.5 bricks.

First row of improved cooker with oven and hot water box
During laying second row two cleaning doors and a blower door are installed in front. They are attached to the masonry using furnace wire.

Laying the second row of the furnace; 1 - blower door, 9 - cleaning holes.
Masonry third row produced according to the order, it is similar to the previous row. After laying the third row, a water heating box is installed.

Laying the third row of the furnace; eleven - steel sheet 3 mm thick.
Firebox fourth row they are laid from refractory brick; in its absence, sorted first-class red brick is used. The fourth row covers the cleaning holes and the blower door, forming the beginning of the hearth. After laying the fourth row, the grate and oven are installed.

Laying the fourth row of the furnace
Masonry fifth row presents no difficulties. The brick adjacent to the back of the grate is cut off halfway to form an inclined plane.

Laying the fifth row of the furnace; 3 - oven.
Before masonry sixth row prepare the combustion door, for which strip steel is attached to the top and bottom with rivets, which should be 10 cm longer than the combustion door on both sides. For greater strength, the ends of the strip steel are screwed with furnace wire, the ends of which are embedded in the masonry. The door is installed on a clay-sand mortar, having previously wrapped the frame of the combustion door with asbestos fiber.

Laying the sixth row
Masonry seventh row secure the base of the combustion door.

Laying the seventh row
Eighth row blocks the water heating box.

Eighth row masonry
Ninth row covers the fire door and oven. The top of the oven is protected from burning through a layer of clay mortar 10-12 mm thick. It is advisable to lay this row entirely of refractory bricks.

Ninth row masonry
After finishing the laying of the ninth row, a cast iron slab is installed above the firebox on a clay-sand mortar. The large burner of the stove is placed above the firebox. Next to the main plate, an additional one is placed, made of a steel sheet measuring 400x200x6 mm. After this, angle steel is laid, to which the lower frame of the cooking chamber door is welded. For strength, it is advisable to tie the angle steel through special holes in it with furnace wire, which is attached to the masonry.

Installation of a cast iron stove on the ninth row; 12 - steel sheet 6 mm thick; 13 - angular steel.
Tenth row They are made of ordinary red brick. A window is left on the right side for cleaning the “direct” channel. Some of the bricks that cover the slab are cut with a pick before laying so that if the slab breaks, it can be easily replaced.

Laying the tenth row
Masonry eleventh row does not present any difficulties, you just need to follow the rules for dressing the seams.

Eleventh oven row
Twelfth row blocks the cleaning window.

Twelfth row of the oven
After laying Tthirteenth row a “direct” valve is installed on the clay-sand solution.

Thirteenth row of the oven; 6 - ventilation valve.
Masonry fourteenth row must correspond to the level of the upper frame of the door to the cooking chamber. Angle steel measuring 45x45x800 mm is installed next to the upper frame of the door to the cooking chamber.

Fourteenth row of the oven
Fifteenth row blocks the door to the cooking chamber.

Fifteenth oven row
Sixteenth row blocks the “direct” channel.

Laying the sixteenth row of a kitchen stove
Masonry seventeenth row provides ventilation duct to remove odors and steam from the cooking chamber.

Laying the seventeenth row of the kitchen stove
After finishing the masonry eighteenth row Four pieces of strip steel measuring 4x45x500 mm are installed above the cooking chamber to cover the cooking chamber.

Laying the eighteenth row of a kitchen stove
Nineteenth row covers the cooking chamber. After finishing the laying of this row, a ventilation valve is installed.

Laying the nineteenth row of the kitchen stove; 6 - ventilation valve.
Masonry twentieth and twenty-first rows is not difficult, you just need to bandage the seams well.

Laying the twentieth row of a kitchen stove

Laying the twenty-first row
Masonry twentysecond row reduces the size of the chimney, it will be 130x130 mm.

Laying the twenty-second row
Twenty-three and twenty-four ranks put in order.

Twenty-third row of the oven

Twenty-fourth row
After laying twenty fifth row install a smoke damper, which is also a control valve.

Laying the twenty-fifth row of the furnace; 5 - smoke valve.
Masonry twenty-sixth row start the chimney. Laying a chimney is not difficult.

Laying the final row (not counting the chimney)
After finishing the laying of the stove, before coating it, clean the chimneys from fallen mortar and crushed stone residues through cleaning holes. Holes for cleaning are then filled with brick halves in clay-sand mortar.
When installing the cleaning doors, they are closed tightly, and leaks are covered with clay-sand mortar.
After this, the stove can be dried in two ways: by opening the combustion and blower doors and valves, or by using small test fires. After complete drying, the slab is plastered with clay-sand mortar, and after drying the plaster, whitewashing is performed twice. A pre-furnace sheet is nailed to the floor in front of the fire door.
Do-it-yourself brick oven: step-by-step masonry instructions + photos