Modern furniture has high cost, and for its manufacture can be used various materials, in addition, models differ in size, shape, appearance and content. An excellent solution for a living room, bedroom or other room would be a corner wardrobe that does not take up much space, is distinguished by its high capacity and interesting appearance. Creating a corner cabinet with your own hands is easy if you carefully understand this process.
Immediately before the process of creating a structure, you should decide on the dimensions, materials and tools that will be used, and also think about the purpose of the cabinet. Initially, a project is formed, for which drawings are created, according to which parts are prepared that are firmly connected to each other. A decision is made whether the corner cabinet will be triangular or L-shaped, trapezoidal or five-walled.
If you decide to assemble the furniture yourself, you should prepare for this process and purchase the necessary materials and tools:
- direct material for creating a cabinet, and the formation of a structure from plasterboard, which differs, is considered relevant affordable price, ease of use, environmental friendliness and durability;
- profiles from which the frame will be formed;
- pendants;
- screws and glue;
- mirrors, if you plan to decorate the closet with them;
- accessories that ensure ease of use of the structure;
- rollers and guides, if compartment doors are made;
- cabinet cladding material;
- drill, screwdriver, grinder, sharp knife for cutting drywall, level and other small tools.
Working with drywall is considered so simple that it usually does not require specific tools.

Tools

Drywall sheets
Preparing parts
A do-it-yourself plasterboard cabinet is made only after first creating a diagram. Initially, you should decide on the dimensions of the structure, for which the dimensions of the corner where you plan to install the furniture are taken into account.
You need to decide what parts the corner cabinet will consist of. Usually there is one large section for things that are placed on hangers. The other section is narrow and divided into several small compartments, which are separated by shelves. Often, an additional open pencil case is formed on one side. The standard dimensions of such elements are:
- the height of the cabinet itself can vary from 180 to 220 cm;
- the width of two different corner cabinet elements can be from 45 to 80 cm;
- It is advisable to leave a distance between shelves ranging from 30 to 35 cm;
- drawers and shelves usually have a width of 40 to 45 cm;
- It is advisable to make boxes with a depth of 25 to 30 cm.
It is considered optimal to have two large sections at the top, called mezzanines, which are used to store large and rarely used products and things, and at the bottom there is a narrow compartment for shoes.
After determining the dimensions and compartments of the structure, you need to perform the following steps yourself:
- determine the angle where the cabinet will be located;
- depending on its parameters, determine the exact dimensions of the cabinet;
- create a sketch that will allow you to calculate the base, cover and plinth;
- divide the entire interior space of the cabinet into separate sections, for which vertical and horizontal partitions are used;
- calculate the doors of the structure;
- calculate required quantity ends covered with end tape.
Based on the resulting diagram, you can prepare the main parts of the cabinet. To do this, the main elements of the frame are made in accordance with the sketches. Metal profiles are cut with a grinder, and the sections are cleaned. Next, based on pre-made drawings, parts of plasterboard are formed, and it is advisable to use thin and sharp knife. All elements must have the same thickness.

Materials
Selecting a location and marking
It is advisable to determine the installation location of the cabinet in advance, since the structure itself is made according to the existing parameters of a given angle. It is usually installed in the living room, but can be intended for a bedroom or children's room. The filling and dimensions depend on the number of things that will be stored in the furniture.
After determining the installation location, markings begin, which allows you to determine where the main elements of the cabinet will be located. Since the product will be created from plasterboard, all frame elements will have to be attached to the wall, so fastening areas are outlined. You will have to navigate by them during fastening and creating the frame.

Surface preparation and marking
Frame installation
How to make a corner cabinet with your own hands using drywall? To do this, you first need to start installing and fastening the frame. The whole process is divided into stages:
- if it is planned to have lamps in the cabinet, then the areas where they will be fixed are marked, after which electrical wiring is supplied to this place;
- shock-absorbing rubber insulation is glued to the guide profile, and it is important to place it on the part that will be laid further on the base of the furniture;
- All guides are fixed along the lines of previously applied markings, and dowels and nails are used to secure them;
- then direct hangers are fixed on the wall, and for this you need to constantly focus on the markings;
- fasteners for securing the hangers depend on what material was used to create the base, since if it is concrete or brick, then it is advisable to use dowels with nails, and if the base is wooden, aerated concrete or expanded clay concrete, then strong screws or even nails are suitable, and it is also allowed use special dowels equipped with spacer whiskers and notches;
- racks located vertically are inserted into the fixed guides, after which they are secured with suspensions, and for this it is advisable to use short self-tapping screws equipped with a press washer;
- between rack profiles strong and reliable stiffeners are installed, and the more of these elements are used, the more stable the structure will be obtained, and there should be especially many of them in areas where it is planned to store heavy objects.
It is allowed to use not only metal profiles to create a frame, but also wooden slats, but this solution is used extremely rarely, since wood can absorb moisture or dry out, so the dimensions of the cabinet will change, which will lead to distortions or increased fragility.

Pasting profiles with damper tape

Metallic profile easy to cut

Ready frame
Frame covering
Corner cupboard It is created quite simply from plasterboard, since after the formation of a high-quality, durable and stable frame, you can begin to cover it with plasterboard elements. To do this, follow the steps:
- blanks are made from plasterboard, for which parts are cut in accordance with the drawings, and it is recommended to use a hacksaw or an electric jigsaw for these purposes;
- It is advisable to choose a durable one to create a cabinet wall plasterboard, the thickness of which will be at least 1.25 cm;
- all edges are processed with an edge plane;
- finished plasterboard elements are inserted into the corresponding sections of the frame, after which they are screwed with special screws for metal;
- the sheets are finally fixed, for which it is important to calculate the number of screws so that there is a distance of 20 cm between them;
- all screw heads are recessed by 1 mm;
- in areas where shelves will be located, furniture corners are installed;
- rods and lamps are installed;
- Based on the available dimensions, the creation of doors begins, which can be ordered ready-made.
After the work is completed, you will receive a full-fledged cabinet, but in order for it to have an attractive appearance, care should be taken to use finishing materials.

Drywall marking

Drywall cut

Fastening drywall panels

Screwing in screws with a screwdriver

Finished wall
Finishing
Finishing involves the following steps:
- all surfaces outside and inside are covered with a high-quality primer;
- joints are filled with gypsum plaster;
- then the serpyanka is glued;
- Painting corners are mounted at the corners;
- putty is applied, which is sanded after hardening;
- It is advisable to make two layers of putty;
- then the primer is applied again;
- after that the final ones apply Decoration Materials, which can be represented decorative panels, tiles or other materials.
It is advisable to use a mirror during finishing to increase the comfort of using the structure.

Perforated angle for processing corners

Cabinet Finish
Drawings and diagrams
The most important thing when creating a corner cabinet is to create a correct and accurate diagram and drawings. If they contain any errors, then it will not be possible to build a complete, durable and stable structure.
Drawings and diagrams can be obtained in different ways:
- independent creation, and the process can be performed manually or using special computer programs;
- ordering from specialists, which will require significant financial investments;
- search for ready-made drawings, but you should only use them if you are sure that they are correct and accurate.
Corner cabinets are considered an excellent solution for different rooms. They can be created from different materials, but the most optimal is the use of plasterboard, which is used to cover a frame made of metal profiles. Such a cabinet will not require significant investment and is also easy to create. During independent work your own wishes and the existing dimensions of the selected angle are taken into account, so the design will be ideal for the installation location.
The sliding wardrobe, invented in the USA, has become widely used as the main type of storage for household items and clothing. In our country, this type of furniture appeared only in the middle of the last century. This is surprising because many of us have lived in small apartments, in which its advantages are obvious.
Domestic craftsmen were in no hurry to make a wardrobe with their own hands. The reason is that the case version, except sliding doors instead of doors, it no longer has any advantages over the usual wardrobe.
It is much easier to make a built-in wardrobe with your own hands. Its manufacture will require significantly less material, and even an inexperienced carpenter can make such a compartment on his own. With a smaller footprint, this storage option will have a larger volume than a cabinet storage option.
Sliding wardrobe design: distinctive features

The sliding doors of the first wardrobes produced by our industry did not have rollers for movement. At the bottom there was a longitudinal tenon along which the door moved, which had a groove along the lower end.
Such simplest design was quite reliable. Its disadvantage was that moving the doors required great effort, because the cabinet itself and the doors were made of heavy material, which was chipboard at that time.
You can make a sliding wardrobe with your own hands, built-in or in a regular mobile version. You can also make a corner cabinet yourself, either built-in or cabinet-mounted.
A corner wardrobe with your own hands must be made in relation to a specific place.
In plan, it can have the shape of a triangle, trapezoid, L or U-shape. Among other types, five-walled can be distinguished. This design has the shape of a pentagon with 3 right and 2 obtuse angles.
This diversity is the versatility of a corner wardrobe. If everything is clear with other forms, then the five-wall requires clarity. This version of the sliding wardrobe, occupying a slightly larger area, is much more spacious than, for example, a triangular analogue.
Stages of preparation for making a five-wall
When making a wardrobe with your own hands, do not try to saw it at home sheet material, from which the side walls and doors will be made. It is almost impossible to manually achieve the required dimensional accuracy, especially for a corner wardrobe. Having decided on the dimensions of its sides and doors, it is advisable to use the services of a workshop where it is possible to ensure the required cutting accuracy. It is also advisable to process the ends that will be visible from the outside. The elements located inside the cabinet can be made independently.

Before you do corner compartment do it yourself, check the installation location. This is especially important for the built-in option. Any unevenness in the floor or ceiling where the doors will move must be corrected. Otherwise, there will be problems with installing guides for moving doors.
Make sure not electrical outlets and other elements that may affect the installation of a wardrobe with your own hands. Consider the size of the baseboards and, if any, moldings on the walls under the ceiling.
It is not advisable to save on a sliding door system. More expensive Italian or German designs will pay for themselves due to reliability and long-term operation.
There is no point in showing the specific design of the carriages. There are quite a lot of them, and each of them has its own installation characteristics. First you need to figure out how to install: the dimensions of the cabinet elements will depend on this. A more reliable option is a door with an upper running carriage. At the bottom of the door there will be a roller moving along a guide.
Before you start making a sliding wardrobe with your own hands, you should have the appropriate tools. When making a built-in version, a hammer drill is required. You will need a power tool to screw in the screws. It is advisable to have a manual circular saw with a guide ruler. A hand saw will also work.
You will need an angle clamp, a tape measure, a stapler, a soft and hard hammer, a drill with a set of drills, and a hex key for screwing in confirmations. To drill confirmation holes to a given depth, you will need confirmation drills. For simple drills a limiter may be used.
It is necessary to purchase dowels, supports for shelves and screws.
Drilling holes in chipboard is the main operation when assembling furniture

To fasten panels made for furniture from chipboard, confirmats are used. Typically, confirmats with dimensions D×L = 6.4×50 mm are used for furniture. This mount has d=4.4 mm. The hole diameter for it should be in the range of 4.5-5 mm. With a larger diameter, the fastening will not be reliable; with a smaller diameter, the confirmat can destroy the fiberboard material.
To drill holes, special drills are used, which drill to a depth L and provide the appropriate dimensions in the upper part of the confirmat (H and h). Then the surface of the slab is countersunk to fit the cap. Screw in the confirmation without putting much effort, using a special hex key.
3 drilling options:
- drilling through the entire thickness;
- drilling in the end;
- drilling in 2 parts at the same time.
Another, most difficult option is drilling for dowels. General condition For all types of drilling, the position of the drill is perpendicular to the surface.
Let's consider the option of drilling in 2 parts. The parts are applied to each other and secured using corner clamps or other device. After this, marking and drilling are performed. This option is the fastest and most accurate. To determine the mark based on the thickness of the chipboard, it is advisable to make a template from wood or aluminum corner. If chipboard thickness is 16 mm, then the center of the hole in the template should be exactly in the middle.

If the parts are connected in such a way that the holes are drilled separately, then the strength of the fastening depends on the accuracy of the markings. This is how you have to drill when connecting parts to dowels. For example, to install a cabinet lid on dowels, holes are first made in it using a drill with a diameter of 8 mm with a limiter that does not allow drilling through it. Holes from the edge of the cover are drilled taking into account the indentation of the sidewalls, if provided. Using the same drill, holes are made in the sidewalls to a depth of 20 mm. The accuracy of the marking determines whether the dowels will fit into the holes. The ends of the dowels are placed on glue. When assembling, craftsmen do not recommend pouring glue into the holes on the lid; you may have to disassemble the cabinet.
It is especially easy to assemble a built-in wardrobe, which will have only 2 sides, fixed perpendicular to the wall. These parts are securely attached to the ceiling, floor and wall using corners. The corner is secured to the base using plastic dowels and self-tapping screws. The sidewall is secured to the corners with self-tapping screws. It is between these elements that the door movement system must be secured.
With proper preparation, there should be no problems with assembling the cabinet.
The problem of limited space and the desire to use every meter of living space pose the problem of what furniture to choose for the house and how to arrange it. Convenience and comfort of use will depend on how rationally the interior elements are thought out.
In addition, not every cabinet can be as functional as possible and act as a decorative element. Only a corner will cope with this task. After all, it occupies a place that usually remains unused - a corner of the room, without cluttering it at the same time. You can buy, or you can make a corner cabinet with your own hands.
Basic corner cabinet configurations:
- Triangular shape.
- Trapezoidal shape.
- Shape in the form of the letter "G".
- Five wall shape.
Triangular and trapezoidal shape are difficult to self-production. The fact is that there are diagonal elements that require individual schematic detailing and use special fittings. Preparation necessary materials It is recommended to carry out in the presence of a specialist measurer.
A five-wall corner cabinet is the most common configuration. Used in all kitchen models of corner cabinets. Two planes adjoin adjacent walls, forming an angle, while the facade consists of three planes, the middle of which is the door leaf.
The shape of the corner cabinet, in the shape of the letter “L”, is quite functional and compact. It consists of two double boxes placed in a corner. The advantage of this model is that it saves consumables compared to installing two separate products.
Doors in any configuration can be hinged or compartment. In the first case, the width of the door leaves should be minimal - up to 450 mm, in order to avoid excessive load on the hinges. In the case of compartment doors, their width cannot be narrower than 450 mm, with a total height of 2200 mm. It is necessary to maintain the ratio of the width of the doors to the height of the facade - 1:5, for normal operation of the cabinet.
 Corner cabinet with swing doors
 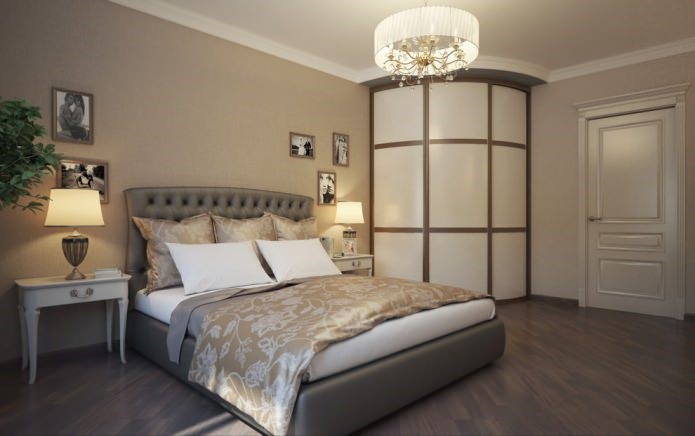 Corner wardrobe with sliding doors
How to make it yourself
Corner cabinets with hinged doors vary in the number of doors: two doors, three doors, or more. Open with handles or special mechanism, by pressing on the door leaf. The material used is wood or chipboard. The surface can be covered with plastic, enamel, paint. The product is decorated with gilding, carvings, mirror and glass inserts. For ease of use of the cabinet, on its internal or outside, lighting is built in.
Before you start work, you need to decide on the configuration of the product and draw up a drawing of the corner cabinet. It should display the shape of the cabinet and its dimensions, and include internal elements. The dimensions of the corner cabinet and its configuration directly depend on the size of the room where it will be located.
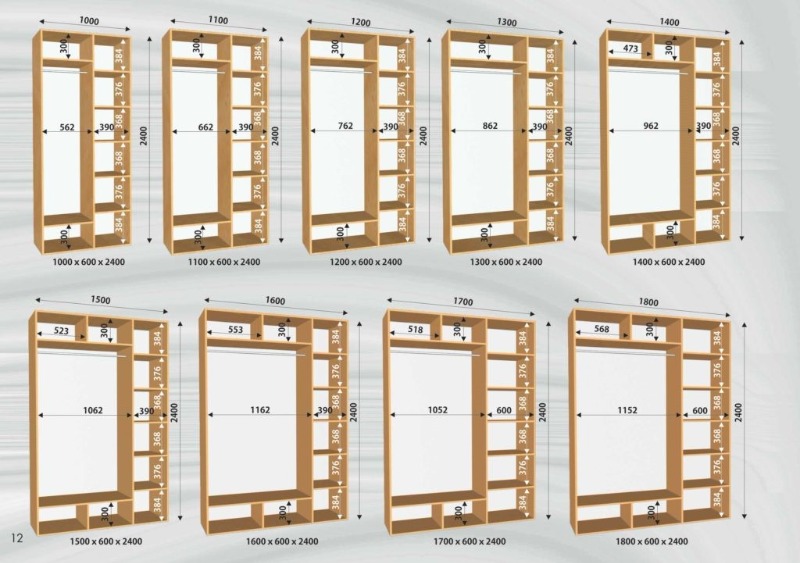 Examples of cabinet sizes
 Required Tools and material:
- Chipboard, boards or MDF;
- screws, dowels;
- accessories;
- profile;
- drill and hammer drill;
- screwdriver;
- roulette;
- building level;
- electric jigsaw or hacksaw;
- hammer
- glue;
- mirror.
There are several things to consider important features, before starting to manufacture the cabinet:
- Boards Chipboard is better take ready-made ones, according to size, or resort to the help of a professional to cut them. It is very important that the parts fit together as much as possible during assembly. They must be even and exactly in size.
- Don't skimp on accessories. It must be of high quality and be a complete set. This is especially true for elements for sliding doors, the doors of which must open smoothly and not jam.
- It is worth paying close attention to the surface of the ceiling and floor. It should be smooth. For example, for a built-in wardrobe this is of primary importance, because if this rule is not followed, the structure will not fit into the opening.
The classic five-wall wardrobe, with a square base and a cut corner, consists of two double parts. Two planes built into the corner are located at an angle of 90° to each other and form the back wall. On either side of them are two vertical panels forming the sidewalls. The upper and lower plane are the tray and the cover of the structure. Inside the corner cabinet there are different sizes shelves and rods for clothes. Hinged doors complete the look of the product.
Such a separate cabinet, in most cases, looks bulky. Therefore, if possible, it is better to install the built-in corner system. The advantage is that less material is required for installation due to the absence of upper, lower and rear modules. In addition, the utility of free space is higher than that of a free-standing structure.
Preparation
In order for the work on making a corner cabinet to proceed correctly and without errors, you need to follow the step-by-step instructions:
- first, you need to decide on the place and room in the house where the product will be placed;
- take measurements of the space and put them on the diagram;
- determine the configuration of the product and put it on the drawing;
- indicate the dimensions of the corner cabinet on the drawing and compare it with the dimensions of the prepared space;
- determine the required amount of material and tools and prepare them.
The dimensions and internal contents will depend on what you would like to fit in the closet and on the layout of the room. It is better to choose the configuration based on your skills in manufacturing furniture structures and cost consumables. The height of the shelves and the level of the bar must be placed at such a level that it is convenient for use not only by yourself, but also by all family members.
To make design easier, you can use computer program PRO100. She will help considering required sizes, and calculate materials and accessories.

The diagram of the corner cabinet is drawn by hand, starting with the side panels, which will be load-bearing. They must be made from solid boards. Then, the height of the cabinet is determined - from 2200 mm if space is left above it, and higher if the cabinet is ceiling-height. In the first case, you need to install a solid top sheet and a bottom sheet of the same type.
After this, the horizontal parts of the cabinet and shelves with rods are determined. Large shelves are best placed on upper level closet, and a clothes rail in the corner section. Next, the diagram shows the cabinet opening mechanism (). Upon completion, details are applied to the drawing (mirrors, handles, painting).
Assembly
The assembly process corresponds to the sequence of drawing all elements in the project. All wood parts must be selected in the store and then cut to size. It is recommended to buy high-quality fittings - German or Turkish. Depending on the type of cabinet filling and door opening system, the following are purchased: handles, hinges or sliding system, confirmations, closers, legs, dowels and coat hooks.
A corner cabinet actually consists of 2 or more boxes. When preparing these boxes, it is very important to maintain the proportions of height, length and depth. Otherwise, it will turn out skewed and the door mechanism will not close. The modules are fastened with ties. This steel fastener, made of a screw and a nut, prevents the product from loosening and firmly secures the structure, forming a single ensemble.
When installing a hinged cabinet opening mechanism, the doors are secured with canopies and can open in any convenient direction. In case of sliding mechanism, along the top and bottom of the opening, guides are attached along which they will move door leaves.
Brief assembly instructions
The corner cabinet, depending on its configuration: built-in or free-standing model, is installed in different ways. But there is universal instructions How to make a corner cabinet with your own hands, which you need to follow:
- According to the drawing, you need to cut the material and check the availability of components.
- Place the legs on the bottom of the structure.
- Attach the side panels to the installed bottom using confirmations.
- At the upper ends of the side walls you need to drill grooves for dowels. Moreover, they should be located at the same distance from each other as the holes on the lid.
- Treat the dowels with PVA glue and secure them in the lid.
- Place the cover on the side walls.
- When installing the cabinet in the ceiling, the legs must be installed so that the lid rests maximum on the ceiling.
- After assembling the “skeleton” of the cabinet, you need to install hinges for the doors swing type, or guides for sliding doors. Hang the doors.
- Install shelf fasteners.
- Install shelves and other fittings.
- Decorate the confirmation hats.
Thus, you can make a corner cabinet yourself, following the instructions for preparing materials and assembling the product. After choosing the cabinet configuration, it is important to correctly draw up the drawing and manufacture the product according to the indicated dimensions.
Owners small apartments facing the problem of lack of space. Although almost all corners in the rooms, kitchen and hallway remain empty.
But if you make a closet in the corner, you can “kill two birds with one stone” - decorate the interior and solve the problem of unnecessary things. Let's take a closer look at how to mount it.
DIY corner cabinet
Corner cabinets can be of several configurations:
- triangular;
- in the form of the letter “G”;
- in the form of a trapezoid;
- 5 wall.
Classic – 5 walls, fits perfectly between furniture. Now let's move on to the manufacturing process.
We start work with preparation:
- We draw up a diagram;
- We define required amount material;
- We prepare the material and tools.
Required material:
- Chipboard, MDF or boards;
- dowels;
- glue;
- self-tapping screws;
- mirror;
- furniture fittings;
- rollers - you need to choose high-quality ones, otherwise they will quickly fail;
- profile – preferably steel.
Installation Tool:
- perforator, drill;
- roulette;
- building level;
- hammer;
- hacksaw or electric jigsaw.
It is better to cut out the parts to order in a workshop or store, but if you are not afraid of difficulties, you can do it yourself.
Video: Corner wardrobe.
Choosing sizes
The size directly depends on the area of the room where it will be located. In this case, there are several recommendations that it is advisable to follow:
- the section for outerwear should not be less than 80 cm;
- minimum height for outerwear 1.4 m;
- the crossbar should be located at such a height that it can be easily reached; for this, the height of all family members must be taken into account.
Assembly
It is attached to the ceiling, walls and floor, in those places where the walls should be located. metal corner. To ensure that the doors do not warp, we check everything with a level. We assemble the frame from the blanks; if you take a responsible approach to cutting, the assembly will go without any problems. Rollers are attached to the door.
The guides are mounted and the door is installed. After this, you can attach the fittings and arrange inner space cabinet:
- partitions are installed;
- hangers, shelves, mirrors are fixed;
- screw the door handles.
That's all the corner cabinet is - comfortable and functional, ready to serve you faithfully.
Corner cabinet for the kitchen
The issue of lack of space in the kitchen comes first. To get a closet High Quality, it is advisable to perform assembly according to the following recommendations:
- It is better to order the cutting of parts from specialists, this will help to maintain the geometry;
- Before ordering, you need to make a drawing;
- It is necessary to take measurements after leveling the floor, ceiling and walls;
- use only high-quality fittings, it will cost more, but it's worth it.
IN design There can be two types of connections for a corner cabinet:
- at an angle of 90 degrees, you can install a regular tabletop under it;
- at an angle of 45 degrees, you can install a corner sink.
How does the design with a connection at an angle of 90 degrees differ from the standard one? A model with such a connection has the following design features How:
- additional inserts that pull the drawers together and act as a façade;
- ledge at the top and bottom.
Corner cabinet connected at an angle of 45 degrees. This design also has two features:
- Dimensions - if the bottom one is 60 cm wide, then the hinged one is 90 by 90 cm.
- Location of parts. IN standard design the side parts are located between the top and bottom, but here, on the contrary, the top and bottom are between the sides. And it will not be possible to install the façade any other way. Under such a corner cabinet, the countertop should be of the same shape.
From plasterboard
Installation of a corner cabinet made of plasterboard begins with a drawing:
- first you need to determine the place where it will be installed;
- then we make a diagram on which we plot the dimensions and dimensions of the parts, even the smallest ones;
- we determine the number of drawers, hanging baskets, doors and mark where they will be installed;
- We indicate the thickness of the drywall, without this it is not possible to make an accurate calculation.
Frame structure
We mark the future cabinet on the floor, walls and ceiling. If you plan to install lamps, we apply markings for their fastening. We attach rubber insulation to the guide profile on the side that will lie on the base. We fasten the guides along the marking lines using dowel nails.
We also attach the hangers according to the marked markings. Depending on the base, fasteners are selected. For example, to brick or concrete wall, secured with dowel nails, for wooden wall Nails or screws will do. The strength of the entire structure depends on the choice of fasteners.
Then vertical posts are inserted into the guides and secured with hangers using self-tapping screws with a press washer. Now you can mount the stiffeners between vertical posts. It is worth noting that the more such ribs there are, the more stable the structure will be.
The most reinforced areas should be the places where drawers and shelves are installed.
The metal profile for the frame can be replaced with wooden slats, the main thing is that the wood is dry, raw wood will shrink and deformation will occur.
Sheathing the frame
You can cut plasterboard blanks with an electric jigsaw or hacksaw. Finish the edges with a special edge plane.
We arrange the elements in the places designated for them and secure them with self-tapping screws. Now you can finally secure the sheets, screw the screws every 20 cm. We recess the screw caps 1 mm into the sheet.
In places where there will be shelves, we attach furniture corners and lay shelves, which can be made from two sheets of plasterboard glued together. After this, we mount the rods and install the lamps.
And only after this you can take accurate measurements and order the doors. If the door is ordered earlier, the actual dimensions may not coincide with the original ones.
Finishing
After the structure is installed, it must be refined. To do this you need:
- seal all joints with putty;
- prime external and internal surfaces;
- stick sickle tape;
- install paint corners on the corners;
- putty, when the putty dries, sand, then putty again;
- prime again, and after the primer has dried, apply the finishing touch.
The final finishing is done to your taste, it can be painting, finishing with mirrors, in the bathroom it can be tiled.
Watch the video: How to assemble a wardrobe with your own hands. Installation video instructions.
The design of the living space plays a very important role important role in life modern man, so much attention is paid to its creation. In the interior of the rooms, every detail is thought through, starting from flooring, wall decoration and ending with furniture. At the same time, furniture should be multifunctional, ergonomic, reliable, durable and beautiful. IN Lately Many people prefer corner cabinets, as they fit perfectly with the overall interior of the room and do not take up much space. You can make corner cabinets with your own hands: this way you can free the room from the traditional bulky wardrobe.


Advantages of a corner cabinet
When decorating a room, special attention should be paid to the choice of furniture so that it is convenient, comfortable and does not take up much space. Recently, corner cabinets have become in great demand. They are an excellent alternative conventional models, as they have the following advantages:
- Versatility. You can independently make a cabinet of any size, any shape. In addition, it is possible to select with maximum accuracy desired color. The structure made in this way will harmonize well with the rest of the furniture in the apartment.

- Multifunctionality. The corner cabinet model can be supplemented with mezzanines, hangers, drawers and shelves. Therefore, the furniture will look compact on the outside, but inside you can easily place a lot of things and objects. Homemade corner cabinets will accommodate not only clothes, shoes, Appliances, toys, but even various means for cleaning. Before you begin assembling the structure, you need to carefully consider the placement of future drawers and shelves, so you can rationally use the space of the room.
- Ease of use. Modern door mechanisms make closing and opening of the cabinet silent.
There are many positive qualities, but the main advantage of corner cabinets is considered to be space saving. Thanks to its convenient design shapes, it can be easily installed even in the smallest room. Such models look original in the bedroom, living room and hallway.


DIY development stages
When planning to begin work on making a cabinet, you should carefully consider all the details of the future furniture, its appearance, and dimensions. In addition, you need to know how to make a drawing, a diagram of the cabinet, according to which the walls will be cut, and the assembly itself will be carried out. As a rule, the diagram contains all the necessary dimensions and distances that are needed to attach the parts. The drawing is drawn by hand or made to order. Before making a cabinet, you need to take into account various nuances.

How to make a drawing?
When creating schemes, first specify external dimensions products: dimensions of the cabinet box, its height and width. The drawings must also show the thickness of all parts. First, the design box itself is drawn, then its contents. All diagrams should consist of two main views: side and front. The sketches must include the width of the sections, the distance between the shelves, the height of the base and the dimensions from the beginning of the part to the attachment point.


How not to make a mistake with sizes?
When drawing drawings, you must use the most simple formulas geometry that everyone knows from school. At the same time, when drawing diagrams, it is worth knowing the exact dimensions of the cabinet. How to calculate dimensions - this question worries all novice craftsmen. However, there is nothing complicated about this: you should calculate the size of the diagonal yourself (for the design standard sizes is 80x80 cm), the thickness of the material and the size of the gaps, and you also need to design the angle of the facade.
To ensure that the facades open freely during operation and do not interfere with each other, it is worth providing for small gaps on each side.


What should the facade be like?
When assembling a corner cabinet with your own hands, you also need to know what the facade should be like. To do this, you initially need to design a model of the structure, then, according to the drawings, you need to manufacture and assemble parts, correctly measuring the dimensions of the opening. Many people purchase a ready-made facade (to order). However, if there is a desire, then it is quite possible to make it yourself. To do this, you need to use a geometric formula, not forgetting the thickness of the side walls.


How to arrange it inside?
When all the sketches are ready, all that remains is to decide what the inside of the cabinet will be like. It is worth noting that the “filling” of the design directly depends on personal preferences. The most economical option The use of stationary laminated shelves and clothes rails is considered.
If financial capabilities allow, then the cabinet can be additionally equipped with pull-out shelves, baskets, various products on retractable wheels.


Selection of materials
An important issue when making a cabinet yourself is the choice of material. It is immediately worth noting that natural wood in this case, it is used quite rarely, because its price is high, and it is quite difficult to assemble a wooden cabinet that would meet all the requirements during operation. In addition, caring for such furniture is labor-intensive; natural raw materials are “capricious” to use and require additional coating protective varnishes and paints. Therefore, many craftsmen prefer to use plasterboard, chipboard and MDF to make corner cabinets.


Chipboard consists of slabs of wood shavings which are produced by hot pressing. Chipboard may differ in cladding options, thickness, number of layers and formaldehyde content. As a rule, slabs with a thickness of 16, 18 and 25 mm are chosen for the body of the structure. Their performance will not differ, the only thing is that the thicker the chipboard, the more solid the cabinet will be. Often the slabs are covered with a special film - to look like natural wood or plastic.
MDF– this is a finely dispersed fraction, which is essentially the same sawdust, only processed by dry pressing. Such raw materials are considered environmentally friendly. MDF boards decorated different ways, they are reliable and have an aesthetic appearance. In some cases, sheets of plasterboard are used to assemble furniture, which is available in a wide range.
When choosing raw materials for a cabinet, you need to consider not only its appearance, but also its practicality.

Accessories
When all the main parts of the case are ready, it’s time to start choosing components for the cabinet. Today, purchasing suitable accessories is not difficult. The components may vary depending on the shape of the structure and its contents.
For a corner cabinet of standard sizes you will need the following elements:
- shelf holder;
- self-tapping screws (for attaching adjustable supports and facade hinges);
- pole or crossbar;
- adjustable support;
- furniture hinges;
- pens;
- screws;
- washers for screws;
- nails;
- legs.
It is worth noting that the number and dimensions of components directly depend on the dimensions of the cabinet, the thickness of its walls and internal contents.


How to remake the old one?
Quite often, furniture becomes old-fashioned during use and loses its original attractiveness, but at the same time it is quite reliable and strong. In this case the right decision will be its modernization. In addition, it is quite possible to make a corner cabinet from an ordinary one or remake the structure from an old wardrobe. To create a new cabinet model, you will need to calculate the dimensions of the corner structure, prepare all the parts and process the old surface.
Sequencing:
- Delete old paint or varnish, sand all external parts of the furniture.
- Paint it. This can be either a plain layer or an original one with streaks. Looks good smooth transition(paints of different shades).
- Cover with varnish. In case if old wardrobe made from natural wood, then it has a natural texture that only needs to be supplemented protective coating. This restored product will fit well into the design of rooms decorated in eco and country styles.
- Decorate with appliqués from photographs or cover with film. Film with images of stone, wood, and metal looks unusual.


Then you will need to select the front fittings. This will change the appearance of the corner cabinet, and decorative overlays will accurately indicate the style of the room. We must not forget about replacing handles. If you choose models made of porcelain, painted with flowers, you will get a cabinet in the Provence style, but brackets made from palm root will indicate ethno.
A new wardrobe must also be equipped with modern functionality, this will make it comfortable and spacious. At the same time, it is better to remove the standard shelves from the old cabinet and replace them with multifunctional retractable systems. So instead of an outdated wardrobe you will get modern model corner closet with rails for all types of clothes, laundry baskets, shoe racks and hangers for belts and ties.
The presence of internal lighting in a corner design will not hurt.
You will learn more about how to make and how to restore a cabinet with your own hands from the following video.
How to put it correctly?
Furniture is important for every apartment. Wherein special attention deserves a corner cabinet, its placement directly depends on the room in which such furniture is installed. Often similar designs can be found in the kitchen. Thanks to its universal shapes, the cabinet will not only fit beautifully into general interior premises, but will also help save space. In addition, corner cabinets in the kitchen (thanks to many drawers and shelves) allow housewives to store various things.
No hallway would be complete without such an important piece of furniture as a wardrobe. It is a mandatory part of such a room. A corner cabinet can be easily placed in any corner of the hallway. In this case, the design will become decorative element in the interior, it will save space well.


Designers advise using corner cabinets in the nursery. It is in this room that children have to spend most of their time, so it should be comfortable for activities and games. Corner model counts ideal solution for a child's room, it is very well suited for storing things, toys and does not clutter up the space.