A wall bar for children can be wooden or plastic; you can buy it in a store or make it yourself.
A do-it-yourself wall bars will be useful not only for children, but also for adults - as a rule, it can withstand up to 100 kg.
In addition, such a home sports attribute will also appeal to the child’s mother, because the wall can be used to dry children’s things.
If you want your baby to grow healthy, fit and strong, which is especially important for a boy, then be sure to equip your children's room with such a device.
What is important to consider when building a wall bars

If the apartment is cramped, you need to make it clear to you even at the stage of preparing materials what width you can afford.
It is best to make a wall bars in the most suitable place for this - in the corner.
The height is also important, especially if the wall fastenings will be on the floor and ceiling.
In this case it will be necessary to carry out accurate calculations, however, if you are not confident in your capabilities, it is better to attach the wall bars to the wall, in which case any height will suit you.
DIY materials for wall bars

You will need:
- two beams with a thickness of approximately 40 mm and a length that corresponds to the height of your ceilings (or less if you plan to mount the wall to the wall);
- 10 cuttings (more is possible, again, it all depends on the length of the wall). Their diameter should be about 28 mm;
- screws about 60 mm (special for wood);
- drill;
- saw for cutting parts for wall bars;
- hammer;
- screwdrivers;
- drill (specially for wood);
- broom for cleaning;
- Grinder or plane;
- tape measure for easy measurement.
It is worth immediately clarifying what cuttings mean in our understanding.
Cuttings for the wall bars are the handles of shovels, which are the easiest to take for the wall bars, because processing it is too much labor-intensive process, if you are not a professional in this matter.

A do-it-yourself wall bars for children should mainly be reliable, so you should check the cuttings yourself - stand on them, try to resemble them.
How to make a wall bars for children
To make a wall bars with your own hands from the materials we have prepared, you need to perform a few simple steps.
So, we start by cutting off the “excess”. If the beam has a height of 2.7 meters (as a rule, these are sold in stores), it will have to be cut to the height of the ceiling.
It is important to process the beam so that there is not the slightest reason to scratch or drive a piece of wood under the skin.

This will not only become an unpleasant and dangerous moment, but will also discourage the child from using the wall bars.
Shovel cuttings should also be trimmed. They most often have a non-uniform structure, and they usually work with shovels with gloves, which means there is no confidence that the wood is well processed.
If the baby is not forced to study, he will perceive the wall as decorative design, and also as an element for the game, which will create an incentive for him to practice.

The wall bars can be beautifully decorated by applying paint to it. different colors, cover with stickers, which will complement any, even the most unusual and unique interior children's room.
Children are our everything. For them we are ready to create best conditions residence. Special attention addresses the comprehensive development of the child. After all, parents want their children to receive everything they need at every stage of their lives. Quite a lot important role Physical education also plays a role, which is the key to a child. That is why most children are sent to sports clubs, dances and other clubs. However, it is possible not to send children to such institutions. It is enough to make a children's sports corner in your room or home. This is a kind of sports section that will be located at home. You will always know how and what your child is doing.
Still, the question arises: how to do sports section for the child at home? This is exactly what we will look at in our article. To make things easier, corresponding photos and drawings will be shown. If you have children, this information will be very relevant.
A gym for a child at home - is it necessary or not?
Children's sports corners for the home are quite popular and have been used for many years. They are comfortable and practical. The child will be glad that he will have his own corner in the apartment or house where he can play sports. And it doesn’t matter what the weather is like outside, because the house will always be warm and cozy. Just give children space, and their imagination will develop as it pleases. On average, a sports corner at home for children will occupy 2 m2 or more.

Let's look at the factors that speak in favor of making it in your home or apartment:
- A child can actively develop any time he wants. This could be morning, lunch or evening.
- The child will spend time not only fun, but also beneficial for his health. In addition, when receiving guests, the children will not disturb the adults, having their own corner.
- Children will be able to develop coordination of movements and develop their vestibular apparatus. The cardiovascular system improves.
As you can see, the presence of this corner in the room will only benefit both children and parents. The only negative is that the corner takes up space and can be dangerous for children. But, this is how to submit it. After all, the room still has a corner for children’s games. As for falls from the structure, it is enough to simply place mats on the floor to protect those playing.

I would like to note that parents can buy a ready-made corner and install it in a suitable place, or they can make a children’s sports corner with their own hands. It will be cheaper, but you will need to have manufacturing instructions, drawings, materials, tools and free time. And some skills in working with wood are also welcome. However, before moving on to the instructions, you should consider the requirements for a children's sports corner.
Features of the corner and requirements for it
Everything that concerns children should be safe and not harm their health. And here there are several points that are taken into account when creating a children's corner. Let's start with the fact that all structural elements must be reliable, strong and durable. All parts are connected to each other securely so that when playing sports the child does not fall and injure himself. In addition, the wall or other elements must be secured to the floor or wall.

The second point concerns the finishing of products. All paints and varnishes or other compounds that will be used in the future for processing wood or metal should not emit toxic substances. Children will constantly be in contact with the elements, so their safety must be appropriate. Well, as we mentioned above, it is important to take care of mats and soft surfaces.
If we conclude, it is not difficult to make such a sports corner. It is only important to choose appropriate place and follow the instructions. Let’s say right away that to accommodate all the elements of the corner you will need at least 2 m2 and an additional 1 m2 of free space around for games and unhindered movement.

But it arises next question: What is included in the package of the sports corner? To create a functional corner in the apartment, you cannot do without:
- Swedish wall;
- small horizontal bar/bars;
- gymnastic rings;
- swing or rope ladder;
- soft sports mat on the floor.
Below is shown what a full-fledged complex for children should look like.
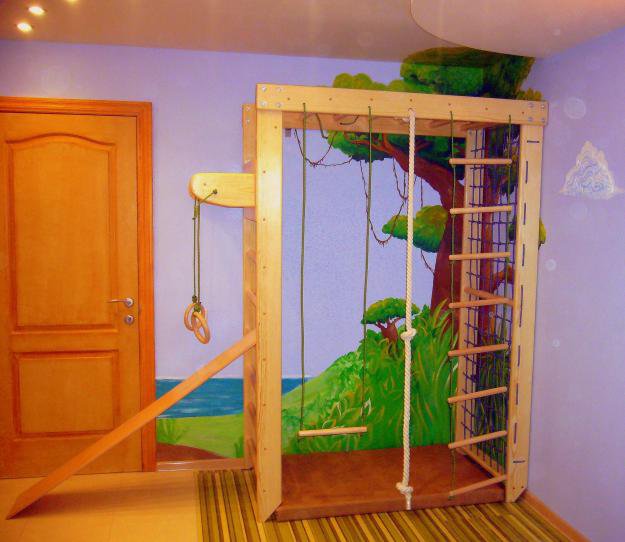
Thanks to this set of sports elements, you can make a complete structure so that your child develops and leads an active lifestyle. Now let's look at how to create a corner with your own hands.
Creation of a Swedish wall
It is the main element, without which not a single sports corner in the apartment can do. The Swedish wall takes up little space, is functional and easy to create with your own hands.
Tools and materials
Here's what you'll need to create a wall bars:

With this set you can create a Swedish wall. But, you also need a product layout. DIY children's sports corner drawings.

Manufacturing technology step by step
Now let's start with the DIY manufacturing process:


That's all, the staircase is ready. To complete it, all that remains is to create a horizontal bar for it.
Making a horizontal bar for the wall
While the varnish is drying on the ladder, you can create a horizontal bar. You can buy it and install it on the wall, or create it yourself. We will make the horizontal bar a stationary part of the stairs.

Here's what you'll need for the job:
- two wooden boards, the size of which is 600x250x50 mm. This is not a standard, so the size can be customized. These will be the side bars to which the horizontal bar itself is attached;
- crossbar - 2 pcs., length 60 cm, diameter 4 cm (so that the child can hold on comfortably). Again, the length is selected depending on the size of the wall. For example, if its width is 50 cm, you need to add another 10 cm (5 cm width of the sides);
- the same wood glue;
- 12 bolts, nuts and washers;
- wrench;
- sandpaper;
- drill screwdriver.

Creating a horizontal bar step by step


The Swedish wall is ready. We will install it later.
Note! Making the rings is a little more difficult. It is much easier to buy them and install them in the right place. However, below is a video on how to make them yourself.
Making a Rope Ladder
The last thing we will do for the home sports corner is a rope ladder. This is a useful detail, as it helps develop the child’s coordination and strengthens his spine and shoulder girdle. That's why we recommend doing it.

Tools and materials
Now let's consider necessary tools and materials:
- round slats made of wood (you can use mop handles);
- strong rope, at least 6 m, it depends on the desired height;
- drill-driver;
- sandpaper;
- hacksaw or jigsaw;
- rings made of brass or duralumin to secure the product at the end of the slats.

Basically, you need wooden sticks and strong rope. They can be used to make a wonderful staircase.
Step-by-step creation of a staircase

Installing a ready-made sports corner
Now that you have made a sports corner with your own hands, you can install it. As stated at the beginning of the article, it will be installed on spacers. To bring this to life, these same spacers are screwed into the upper and lower parts of the wall bars, and the structure is installed in in the right place and the spacers are screwed in to the limit. This way the sports corner will be absolutely motionless.
Note! Spacer quality better time Check from time to time by tightening the nuts. This also applies to the bolts in the sidewalls that hold the horizontal bar to the wall.
If you need to perform installation in a different way, you can do this:
- If the wall is made of brick, then the sports corner is secured with dowels.
- If the wall is made of concrete, then the sports corner is secured with anchors.
- At plasterboard walls Only spacers are used.
That's all, all that remains is to buy the mats and install them in their places. Then you can minimize all injuries to the child. Children's sports corner for apartment photo.

Conclusion
A children's room with a sports corner is every child's dream. We looked at the benefits of having a sports corner. And if you work with your head, hands and brains, you will get a durable, reliable and functional product for children to play with. When working, you only need to remember that this is a sports corner for children. Therefore, its creation is a responsible matter. But as a result, you will receive a lot of joy and appreciation from your child.
This is the most necessary set for a complete workout at home. This complex will also be useful for those who have small children, because... Climbing stairs helps prevent the development of flat feet. It can also be equipped with a cotton rope for climbing, a hanging ladder, rings for children, parallel bars and other sports equipment.
To make a wall bars with your own hands, you need to have a minimum number of tools (grinder, tape measure, welding machine etc.) and detailed drawings. Anyone who has a garage with tools can easily make a wall bars with their own hands.
I made this package collapsible so that in case of moving or shipping, the packaging would take up a minimum amount of space. The largest element has a length of no more than 1.6 m. The weight of the entire complex turned out to be 42 kg; if you use wooden crossbars, the weight can be significantly reduced.

The Swedish wall is fastened in two ways: to the wall with dowels through the plate and by expansion into the ceiling. This equipment is designed for a ceiling height of 2.5 m. You can adjust the height according to your ceiling height.
Reinforced horizontal bar with wide grip. The horizontal bar is designed for a load of 120 kg.
Swedish wall. Visualization


3D model of wall bars
Drawings and 3D model of the Swedish wall
Detail drawings, made in simple design, everyone can figure them out, even without an engineering education, and you can easily make a wall bars with your own hands. The 3D model is made to scale and you can easily insert it into your design project; it will look stylish in your interior. So, I give away the detailed drawings and 3D model for a purely symbolic price. You will receive a folder with all materials.
The comprehensive development of a child at every stage of his life is the main task for each parent. And physical education in this case is not in last place. Sports clubs and dance lessons become an integral part of the life of almost every child. But what should those parents do who do not have enough free time and the necessary “arsenal” of grandparents, aunts and nannies. There is an exit. You can equip a small sports section directly in the apartment!
Home gym: pros and cons
A simple design in a minimal area will greatly help in the development of the child
By offering your child his own sports corner in the apartment, you provide him with the opportunity to actively move, regardless of weather conditions outside the window. Rest assured: it’s worth giving the fidget room for movement, something, and his imagination will be enough for fun and useful games. Think for yourself, you only take up 2-3 sq.m. the baby’s room, and the benefits from this will last for the rest of his life.
Significant factors in favor of creating a sports corner in the house are:
- Possibility of active movement of the child at any time convenient for him (during breaks between preparing lessons, in the morning instead of exercises).
- A great option for having fun and working on physical fitness with friends or relatives.
- Excellent preparation of the body for future stress at school during physical education (for a preschooler) or additional classes for a schoolchild.
- Confident coordination of movements and well-developed vestibular apparatus and cardiovascular system.
Perhaps the only argument against installing such a house structure is possible injury due to a fall. But this problem can be solved by equipping the site with a high-quality mat. Plus dad's support during classes with a very young athlete.
Please note that today you can buy children's sports ground for home already in finished form and in any configuration. But if you have the material at hand and the desire to tinker with the tool, then it’s time to save family funds and please your child with a homemade wall bars.
Design requirements
In almost all models, the basic elements are unchanged
Equipping a gym with your own hands at home is not at all difficult. The main thing is to choose the right place in the child’s room for its location. Please note that you will need at least 2 sq. m for the structure itself and at least 1 sq. m around the sports ground. This is necessary for the child’s free movement.
The main elements included in the sports corner set are:
- Swedish wall;
- Small horizontal bar/bars;
- Gymnastic rings;
- Rope ladder or swing (optional);
- Soft sports flooring.
This is exactly the set sports equipment will allow your baby to fully realize the potential of his physical activity at any time convenient for him.
Swedish wall
One of the main elements of the home gym
To make a wall bars (or simply a sports ladder) you will need:
- Side bars made of wood. The height of the material can be arbitrary (depending on the height of the ceilings in the children's room), but, as a rule, the height of the finished staircase is 2.5 m. In our case, the finished structure will be installed on spacers, and therefore accurately measure the distance between the floor and the ceiling minus 10 cm. This indicator will be optimal for your stairs. The width of the beams should be from 10 to 15 cm, and their thickness should be 2 cm or more.
When choosing wooden blocks, you should not save money - buy the highest quality wood
- Wooden round slats (diameter - 2.5 cm; length - 40 cm; the quantity is calculated based on the height of the sidewalls divided by 30. In this case, the number 30 is the step length of the stairs).
- Sandpaper.
- Wood glue.
- Drill/driver for drilling holes in the sides.
- Construction or simple pencil.
- Self-tapping screws (optional for securing the steps of the stairs in the sidewalls).
- Roulette.
- Varnish for treating wooden surfaces.
Stages of staircase manufacturing
- After the wooden blanks have been carefully processed, using a tape measure and a pencil, we mark on the sides the places for drilling holes for the crossbars.
- Using a drill-driver using a special attachment, we form the joints of the crossbars with the sidewalls.
Drilling holes for steps using a special nozzle
- We coat the finished round slats-steps well with wood glue and drive them into the resulting grooves.
Fastening steps with glue
- Thus, we assemble the entire structure and leave it until completely dry.
- If desired, you can additionally secure the steps in the stairs with self-tapping screws outside sidewalls
- After two or three days we cover the entire staircase thin layer varnish This will add color and additional smoothness to the structure.
We varnish the finished structure
Horizontal bar
While the finished staircase is drying, it’s time to start preparing the horizontal bar. It will be part of our wall bars.
We will need:
- Wooden boards measuring 60x25x5 cm (if desired, the parameters can be changed in a direction convenient for you) - 2 pcs. They will play the role of side bars for attaching the horizontal bar.
- The crossbar itself, the length of which should be 60 cm, and the diameter 3-4 cm (for children's hands - the most convenient option). We calculate the length of the crossbar in this way: the width of the finished staircase = 50 cm + 10 cm (which falls on the two side crossbars of the horizontal bar).
- Wood glue.
- Bolts, nuts and washers - 12 pcs.
- Drill-driver.
- Wrench for fixing bolts and nuts.
Stages of work on the manufacture of a horizontal bar
- We carefully sand the wooden sides of the horizontal bar. If desired, on the sawmill you can give the parts a rounded shape on one side.
- We apply markings to the inside of the sidewalls and use a drill to form holes for the horizontal bar.
- We coat the crossbar on both sides with wood glue and firmly drive it into the formed grooves.
- Now you need to apply markings to the sides of the stairs and the sides of the horizontal bar in such a way as to form symmetrical holes for fasteners. Try to place six bolts on each side and at the same time evenly distribute the load of the horizontal bar sidewalls on the staircase structure by rational arrangement hardware. Let's say there are three of them along each edge of the side of the stairs. Total - six bolts on each side of the ladder for reliable fixation of the walls of the horizontal bar.
- Using a drill, we make holes for the bolts and securely connect the ladder to the horizontal bar at the top of the wall bars.
- After drying finished design Cover the horizontal bar with varnish and leave it aside for now.
Ideally, we should end up with something like this:
After finishing the work, the horizontal bar should look like this
Rings
In order for the child's wall bars to be as complete and functional as possible, all that remains is to equip it with rings and a rope ladder. Step by step creating a sports complex for the baby, for now let's move on to making rings.
For this we need:
- Plywood sheet 75x75 cm - 2 pcs.
- Construction compass.
- Wood glue.
- Press or bolts.
- Jigsaw.
- Milling machine.
- Rafters.
- Drill-driver.
Step-by-step production
- We draw each sheet of plywood into six equal squares and cut it with a jigsaw.
Production of plywood blanks
- We glue each of the six squares together with wood glue, laying them one on top like a sandwich. You should get two such plywood “sandwiches”.
Gluing plywood blanks
- We send both structures under the press or securely tighten them in the corners and center with bolts, leaving them for a couple of days until completely dry.
For maximum tightening of the workpieces when gluing, it is best to use bolts or self-tapping screws
- As soon as the wood dries, we draw rings on the plywood, inner diameter which will be equal to 18 cm, and along the outer edge - 20.5 cm.
- Cut out the rings with a jigsaw.
Cutting rings with a jigsaw
- By the way, in the same place (if there is no milling machine) you can ask your friends to give the rings a circular cross-section along the entire perimeter of the workpiece.
- All that remains is to sand the rings and coat them with varnish.
- Now in one of the sides of the horizontal bar we make holes with a drill at a distance of 40 cm from each other.
- We pass the rafters through them and hang the rings at the desired height. By the way, it is better to purchase good rafters at a sports store. After all, they play an important role in ring training, taking on the entire load. If you can’t afford it, then limit yourself to any rope that is convenient for you. It's inexpensive for you, and it's fun for your baby to be a monkey.
Video: how to make wooden gymnastic rings
Rope-ladder
The last step is a rope ladder and wooden beams. This exercise perfectly develops coordination and strengthens the spine and shoulder girdle. So you can’t do without it.
You will need:
- Wood slats round section. Mop handles are great.
- Rope - at least 6 m (or depending on the height of your ladder).
- Drill-driver.
- Brass or duralumin rings (optional) for fixing at the ends of the slats.
In fact, to create a rope ladder you only need wooden sticks and strong rope
Stages of work
- We cut the sticks into pieces, the length of which will correspond to the future steps.
Cutting steps from wooden sticks
- So, every wooden blank carefully grind and use a drill to form holes along the edges of the steps. The diameter of the holes should correspond to the diameter of the rope, but not exceed it.
Two bars stuffed onto the plank will help make all the steps the same
- In this way we put all the slats on the rope, securing them from below with strong rope knots.
- We also fix the last step with a knot. At the end of the ladder there must be at least 30 cm of rope left for reliable installation of the rope apparatus to the general structure of the wall bars.
- If desired, the edges of the steps can be trimmed with duralumin or brass rings.
- Using a drill in the second side of the horizontal bar, we form two holes at a distance identical to the width of your stairs. And with the help of a rope we securely attach the projectile to the general sports facility.
This is what the finished staircase should look like
Installation and installation of a finished wall bars
So, the whole structure is ready. All that remains is to install it on the spacers. To do this, we screw spacers into the upper and lower parts of the sidewalls of the wall bars, install the structure in the desired location and then unscrew the spacers to the limit, ensuring the absolute immobility of the structure.
It is important to remember that it is advisable to periodically check the spacers and, if necessary, tighten the nuts.
And for those who still want to install a ready-made corner by attaching it to the wall, we inform you:
- It is better to install the structure to a brick wall using dowels;
- TO concrete wall- on anchors;
- Plasterboard walls are just spacers.
And be sure to equip the children's sports corner with soft mats. You don't have to worry about possible injuries to your baby and his friends.
Born in 1977 in Donetsk, Ukraine. Graduated from the Donetsk Polytechnic Institute (now Donetsk State Technical University) with a degree in Automated systems management. Worked at the Donetsk Metallurgical Plant. In 1997 he moved to Moscow, where for 8 years he worked in several construction teams.
Wall bars, horizontal bars, parallel bars are indispensable things for sports for both adults and children. Despite big choice finished products, many people prefer to make, for example, a wall bars for a child with their own hands. Reason - high prices for industrial designs, the desire to test one’s strength as a craftsman and create a sports complex “tailored” for oneself. In this article we will talk about inexpensive options Swedish walls, horizontal bars and parallel bars that any home craftsman can make.
- How to make an inexpensive wall bars from metal or wood.
- How to attach a horizontal bar, gymnastic rings and a rope ladder to a wall bars.
- How to make adjustable bars and a horizontal bar for a wall bars.
Homemade metal wall bars
al_com FORUMHOUSE Member
I have a five year old son. My wife and I wanted to buy him a wall bars, but after looking at the prices in stores, we abandoned this idea. Expensive. We were thinking about purchasing a used wall bars. The price tag is already acceptable, but fastening it to the ceiling is also not suitable for me. Therefore, I decided to make a homemade wall bars by welding it from metal.
The user divided the work into a number of sequential steps:
1. I made a drawing of a Swedish staircase.
 Drawing of a Swedish staircase.
The height of the Swedish ladder depends on the height of the ceiling in the house or apartment. Important: how younger age child, the more difficult it will be for him to climb the Swedish stairs if the distance between the steps exceeds 300 mm.

The optimal distance between the steps of a Swedish staircase (along the central axis of the steps) is from 250 to 300 mm, and for very young children 4-5 years old - 200 mm.
2. Having made a drawing, al_com I cut a half-inch diameter pipe into pieces 50 cm long (for steps) and 20 cm long (for fastenings).
The pipes were cut with an allowance for further processing on a lathe.
4. I bought a profile pipe 2.5x2.5 cm for vertical racks Swedish wall, 2000 mm high, and two horizontal lintels 1000 mm long.
5. I welded the wall bars into a single structure.

al_com
I tried hanging on a wall bars without attaching it to the wall. Tests have shown that the angle needs to be strengthened. So I made it out of profile pipe 2x2 cm jib. Then I bought primer, paint, two cans of varnish and painted the structure properly.
The next stage is the production of gymnastic rings, a rope ladder and a climbing rope. First, the user started looking for a rope and decided to buy a rope cord in a store that sells fire and security alarm. It turned out that the production is engaged in the manufacture of rope ladders, however, 5 m long for 1300 rubles. The user was lucky and managed to buy an exhibition sample of a 2 m long rope ladder for only 500 rubles.

The rings are homemade - made from a metal rod wrapped in electrical tape and an oxygen hose stretched on top.
 The ends of the gymnastic rings rod are welded.

al_com
As a result, I made a budget and convenient Swedish ladder. All that remains is to install the rope.
Wooden wall bars
If there is no metal and access to welding equipment, then the most rational and affordable option Swedish staircase - make it out of wood.
 Wooden wall bars.

Semik User FORUMHOUSE
I made a Swedish staircase out of wood a long time ago for my daughters. This required - "fifty" boards, shovel handles and an electric drill with feather drills. More time was spent processing the workpieces. I sanded the boards well and burned them. blowtorch and coated with varnish. It took 10 minutes to assemble the structure.
The burnt board acquires a beautiful texture. Its service life increases, and also, during firing, the pile burns out, and there is no need to sand the workpiece with fine-grained skin.

When making a children's sports complex from wood, it is necessary to carefully process the workpieces, sand the wood, remove chamfers, etc., so that the baby does not get hurt or get splinters.
An interesting version of the Swedish wall from Yuri Nosov (nickname on the portal Uvik).

Uvik
Children love outdoor games, climbing, and playing pranks. The Swedish ladder will direct this energy in the right direction. To make it, I needed a board with a section of 10x2 cm, about 4000 mm long. Broom handles 4 pcs., length 1200 mm. Saw, drill, Sander. “Liquid nails” for wood and 2 hours of free time on the weekend.
- First, the user cut the board into two parts.
- Then I marked the holes for the crossbars.
The holes were drilled with a feather drill.
Life hack from Yuri Nosov - if you combine two boards with clamps, you will only have to mark the blanks once, and the holes will be exactly opposite each other.
In order for the edges of the hole to be smooth, it is necessary to place a piece of board under the drilling site.
The result was two boards with holes for the crossbars.
Ready-made cuttings from shovels or rakes are most often used in the manufacture of Swedish ladders.
- The boards were polished with a sander, and the corners were chamfered.
- Then chopped required quantity crossbars and, with the help liquid nails, secured them in the holes of the vertical posts.
The user also made a horizontal bar for the wall bars, taking four pieces of board 250 mm long and drilling holes in two of them for the crossbar. The joints of the boards were coated with glue. At the end of the work, the Swedish ladder was varnished and secured to the corners on the wall.

The budget for the homemade Swedish ladder was 1000 rubles.
Having gained experience, the user made different variants Swedish stairs.

And children's sports corners.

In the footsteps Uvik went Edmon74 and made a Swedish wall in the apartment for a four-year-old child.

Parameters of the Swedish ladder:
- height of supports – 2 m + inserts;
- board section – 140x25 mm;
- The center distance between steps is 200 mm.

It is planned to equip the wall bars with gymnastic rings and a horizontal bar.

Adjustable bars and horizontal bar for Swedish stairs
You can significantly expand the functionality of the Swedish ladder if you make a removable horizontal bar and bars for it. Moreover, depending on the design, on such sports complex Both adults and children can practice.

Uvik
The design of the removable horizontal bar for the Swedish stairs is clearly visible in the photo below. I made it for a child weighing 30 kg, but the horizontal bar can easily support a weight of 60 kg.