Joining techniques, that is, methods for creating strong connections between individual wooden parts when making furniture, are essential to the successful design of built-ins. Wall manufacturers use dozens of joining methods, but to make furniture designs you'll only need a few of the simple joints shown here.
The choice of connection method depends on how the built-in furniture structure will be used and how it should look. For example, built-in furniture designs for displaying items such as decorative glassware can be made with simple connections end-to-end, and for heavy objects (for example, a multi-volume encyclopedia) - with strong groove joints, reinforced with screws. If important appearance furniture, choose a hidden connection method. For example, a built-in design with tongue-and-groove joints is more similar to a factory design than a design with butt-and-batten joints.
Lap joint
When making many built-in furniture designs, you will need to glue and tighten several joints at the same time. For this job you need a range of different clamps. Use wood glue to reinforce all joints. Connections made with nails and screws alone will weaken over time.
Types of furniture connections
Method of gluing furniture


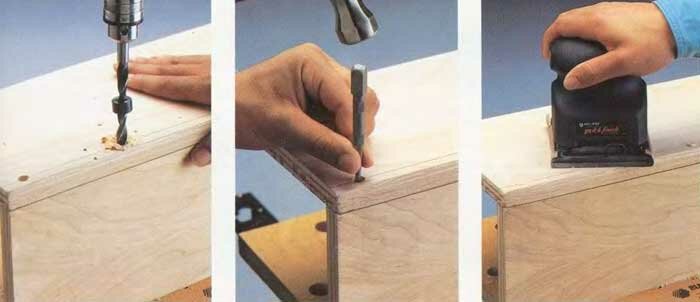
Pull the pieces together to hold them securely at the joints. After measuring the diagonals, make sure that the corners are right. Their straightness is evidenced by the equal length of the diagonals. If the lengths are different, adjust the position of the parts. |
Secure the connections by drilling pilot holes in them. Drive in screws or finishing nails. For the screws, drill out the base holes so that the screw heads are countersunk. Deepen the nails using a punch. |
Cover the counterbored holes with hardwood plugs coated with glue, and seal the nail holes with wood putty. When the glue or putty has dried, sand the surface smoothly and then varnish. |
How to make a dovetail joint

1 Measure the profile to the desired length, then set the miter saw blade at a 45° angle.
2 Clamp the profile in the miter saw, then cut to size. Apply a thin, even layer of wood glue to the beveled edges of the profile.
3 Place the profile sections on wooden structure so that their beveled ends are pressed tightly against each other. Drill through base holes in the profile and in the product and attach the profile with finishing nails.
How to make a butt joint

1 Use a frame square to outline the joint locations on the piece of wood. If desired, attach strips along the bottom edge of each joint for reinforcement.
2 Apply wood glue to the surfaces to be joined. When doing this, use a cardboard stick or strip, which ensures even application of the glue.
3 Connect the two pieces to reinforce each joint by drilling pilot holes and driving a finishing nail or screw into the joints. (The guide line on the piece will help align the nails.)
How to make a groove connection

1 Hold the pieces together and “mark the groove.” Insert a straight cutter into the cutter and set it to the desired depth. Typically the groove depth is half the thickness of the wood piece. For example, with a thickness of 3/4 inch, the depth of the grooves should be 1 cm.
2 Clamp a rectangular ruler on each side where the grooves will be, so that the edges of the rulers are against the marked lines. Install unnecessary wooden part the same thickness as the workpiece, between rulers to measure the gap.
3 Cut the groove with two passes of the router bit. On the first pass, press the base of the cutter firmly against one of the straight racks, then make a second pass in the opposite direction, pressing the base of the cutter against the second rack.

4 Apply wood glue to the surfaces to be joined and tighten the parts together. Drill pilot holes and drive in screws or finishing nails 7.5-10cm apart. For screws, countersink the base holes.
How to make a blind joint on tenons using a template

1 Arrange the parts as you want them to look when connected. Label them A and B as shown above. Turn the pieces over as shown below. In this case, the surfaces are connected and look at you. Using a template and an additional clamp, tighten the pieces together so that the ends are in line.
2 Insert the brush bit into the drill. If you are tenoning a 3/4" thick board, use a 3/8" drill bit.
To ensure you drill the holes to the correct depth, install a stopper.
3 Drill tenon holes in both pieces through the template hole. For a 3/4" thick piece, the holes in piece A should be 1.3cm deep and the holes in piece B should be 3cm deep. Move the template and drill new holes 7.5-10cm apart.

4 Check for proper connection by inserting 1 1/2-inch long knurled tenons into piece A, then tapping wooden hammer for part B, install it in its place. If the parts do not fit tightly, deepen the tenon holes in part B.
5 Separate the parts and remove the tenons, apply glue to the tenons and insert them into the holes of part B. Apply glue to the surfaces to be joined. Attention. When joining melamine-coated particle boards, apply glue only to the tenons.
6 Assemble the parts by tapping them with a wooden hammer until the joint “sits” tightly. Use a damp cloth to remove excess glue.
How to Make Blind Face Joints Using a Tenon Center Marker

1 Mark on front side workpiece connection line. Using a template, make holes for the tenons on the edge of the other part, then insert a tenon center marker into each hole.
2 Place the pieces edge-on on a flat surface, then press them together so that the tips of the markers leave marks on the wood.
3 Drill holes at the marked points using a brush drill. For 3/4" thick wood, the holes should be 1/2" deep. Use a square drill guide with a drill stopper. Assemble the part with the spikes.
How to make through tenon joints
1 Pull and glue the parts together, draw an auxiliary line. Using a brush drill bit with a stopper at a depth of 4.3 cm, drill tenon holes in one piece that extend into the adjacent piece. Place the holes at a distance of 7.5-10 cm from each other.
2 Apply wood glue to 1 1/2-inch grooved tenons then insert the tenons into the holes. Using a punch, drive the spikes in until they stop.
3 Cover the tenon holes with hardwood plugs coated with glue. Let the glue dry, then sand the surface with an emery block.
Furniture panels are produced by gluing or splicing lamellas of given sizes. Thin, highly polished boards are made from ash, beech, maple, oak, pine or larch.
They are used in the manufacture of wooden structures, steps, stair railings, furniture, internal lining walls Their surface is resistant to moisture, installation in rooms with high humidity levels is possible, and they also use innovative technologies, which protect the wood from cracking and deformation.
When it is necessary to assemble furniture panels together, special fastening systems will be required.
Mounting methods
Choosing a fixation method construction products, it is worth thinking about two nuances: reliability and aesthetics. Especially when it comes to the production of furniture, stairs or interior decoration walls Modern fittings for connecting furniture panels remains almost invisible.

Photo 1. Oak furniture panel
There are several ways to connect furniture panels to each other. Check out four classic views fasteners that have been used by craftsmen for decades.
- Confirmations- fastening for furniture panels in the form of a screw with a blunt end and a fairly wide thread. The thread is cut when screwed in, the outer cap is closed decorative plug. Allows disassembly working structure without loss of fastening characteristics.
- Dowels- proven fastening of furniture panels to each other with high level reliability. Made of wood, cylindrical in shape. The corrugated side edges with chamfers are tightly inserted into pre-made holes. To form the strongest connection, use construction types glue.
- Screed- allows you to connect furniture panels at right angles. During the reassembly process, downforce is maintained. Completely invisible after installation. The use of eccentrics is desirable with the help of construction equipment.
- Self-tapping screws- allow you to quickly, simply and reliably connect two furniture panels. It is advisable to pre-drill holes to avoid cracks and breaks after screwing.
Methods for attaching lumber to the wall
Initially, you need to prepare the material by cutting it to required sizes. You can use a regular hacksaw or jigsaw. An imperfect edge can be processed with a milling cutter or masked with a corner. How to attach a furniture panel to a wall? Pre-plant the lumber cut to the required parameters on liquid nails. When they set, make additional installation dowel-nails. Aesthetics are guaranteed, because you can easily close the caps with matching caps, and install a decorative plinth around the perimeter.
Before we talk about furniture joints, let us clarify what is meant by a furniture product. Highlight the following types products: parts, assembly units, complexes and kits.
A part is a product made from a material of one name without the use of prefabricated operations (for example, a table leg made of wood, etc.). Parts also include products made using gluing, stitching or welding (for example, a bent-glued part made from several layers of veneer, etc.).
An assembly unit is a product consisting of at least two parts. Assembly units have varying degrees of complexity in their composition. These include products of certain functional purpose(table, chair, cabinet) and components of products for a specific functional purpose (table drawer, side of a chair).
A complex is understood as two or more products that are interconnected not by assembly operations, but by common operational functions. Complexes are sets and furniture sets.
A set is two or more products, not connected by assembly operations, intended to perform auxiliary functions.
They combine elements into a furniture product in various ways. When choosing this or that connection, we must remember that it must ensure the reliability and durability of the product, its aesthetics.
All used in furniture production connections can be divided into two main types: detachable and permanent.
Detachable connections allow the structure to be assembled and disassembled, while permanent connections do not allow disassembly of the structure. Permanent connections are made using glue, nails, staples and screwless fittings.
Detachable connections are divided into stationary and movable. Stationary ones ensure constant relative position of the connected parts. These include connections on ties, screws and dowels without glue. Detachable movable joints ensure the movement of product elements relative to each other in a given direction. Movable joints are joints on hinges, rollers, and also on guides.
Permanent connections
The most common group of permanent connections are connections using glue. Adhesive joints have a number of positive qualities: they are technologically advanced, have high strength, increase the dimensional stability of the product, and reduce the likelihood of cracking of parts.
Let's look at tenon joints. The main elements of tenon joints: tenon, socket, eye, tongue, tongue. A tenon is a protrusion at the end of a part that has a certain form and sizes. The tenon fits into a socket, eye, or tongue. A socket is a hole or depression in a part. An eye is a hole at the end of a part, open on two or three sides. The shape and dimensions of the spike must correspond to the shape and dimensions of the socket or eye.
A tongue (groove) is a recess in a part. A ridge is a protruding part of a part that matches the shape and size of a tongue. Elements of tenon joints are shown in the figure.
Rice. 53. Elements of tenon joints: 1 – groove, 2 – ridge, 3 – round tenon, 4 – flat tenons, 5 – eye, 6 – flat tenon socket, 7 – round tenon socket
The shape of the spikes is flat, round, trapezoidal ( dovetail) and jagged. Spikes can be solid (made at the end of a part) or inserted (being independent parts). The planes of the lateral edges of the spines are called cheeks.
Inserted round tenons are called dowels.
The ledges that form the transition from the bar to the body of the tenon are called shoulders. The length of the tenon is the distance from the end face of the tenon to the shoulders. The thickness of the tenon is the distance between the cheeks of the tenon, the width is the transverse size of the cheek.
Typically, tenons are used to form joints: corner end joints, corner middle joints, corner box joints, along the length and along the edges.
Tenon joints are: through (the end of the tenon extends with its end face onto the visible surface); open (after connection, the surface of the upper edge of the tenon becomes visible); with darkness (after connection, all side edges of the tenon become invisible); with semi-darkness (after connection, part of the upper edge of the tenon is visible); on a straight tenon (the edges of the tenon joint elements are mutually perpendicular); miterwise (the end faces of the joined bars are cut at an acute angle, most often 45°).
The strength of tenon joints depends on the area of gluing and the density of contact of the elements.
Corner end, middle and box connections are used to create volumetric structures (frames, boxes, drawers). Straight open single, double or triple tenon connections differ from each other in strength, so the choice of connection is determined, as a rule, by the magnitude of the loads during operation.


Rice. 54. Types of tenon joints: 1-5 – connections along the length; 6-11 – edge connections; 12-22 – corner end connections, 27-31 – corner box connections
Tenon joints with darkness and semi-darkness (through or non-through) are inferior in strength to open tenon joints, but they protect the bars from turning out during assembly.
It must be borne in mind that in all non-through connections between the end of the busbar and the wall of the socket, a gap is provided (at least 2 mm). This is done in order to avoid structural destruction during inevitable deformation caused by the hygroscopicity of wood.
Dowel connections are the most common in furniture products. These connections have the following positive qualities: in comparison with other finger joints, the labor intensity of manufacturing the connection elements (holes and dowels) is minimal; the use of dowel connections allows saving up to 10% of the material of the parts being connected; The main structural material for furniture products is particle boards, and the manufacture of tenons and lugs on them is impossible due to the structure of the board. At the same time, dowel connections of chipboard parts provide the necessary strength.
Miter joints are used in cases where it is necessary to hide the ends of the parts being connected. In terms of strength and manufacturability, miter joints are inferior to right corner joints.
The most technologically advanced mustache connections with inserted tenons (flat or dowels).
Of all the box tenon joints, the dovetail tenon joint is the most durable. In the furniture industry, due to low manufacturability, it is rarely used; when making furniture at home, this is a disadvantage special significance does not have.
The most technologically advanced is the dowel connection, which also provides sufficient strength. The number of dowels depends on the size of the box and the expected loads. Increasing the number of dowels complicates assembly, so it is not recommended to use more than six dowels in one connection.
What the lengthwise connections serve is clear. They make it possible to produce full-fledged parts from small-sized waste. The most common type for this purpose is a toothed glued joint. It provides high tensile and bending strength.
Toothed adhesive joints, depending on the exit of the tenon elements to the face and edge, can be vertical (the surface of the tenon elements extends to the face of the part), horizontal (the surface of the tenon elements extends to the edge of the part) and diagonal (the surface of the tenon elements extends to the face and edge).
The strength of a toothed tenon joint depends on the length of the tenon and the slope of the faces. The slope must be a ratio of at least 1:8, only then are the optimal conditions assemblies.
Longitudinal and wedge-shaped joints have high strength, but are labor-intensive.
Connections along the length of the tenons into the end groove and half the tree provide for the contact of the end surfaces, which weakens the strength. Such connections can be recommended in structures where they work in compression.
Edge connections are used to increase the width of parts. These connections, as well as longitudinal connections, help reduce the material consumption of structures. On the other hand, they help out if there is no board of the required width. Of this group of joints, the smoothest joint is the most technologically advanced, since it is not labor-intensive. Since the mating profile is smooth surface, in connection it is possible to provide high density contact of the parts to be glued, which creates a condition for high strength of the connection.
Connecting along the edges on dowels is advisable for mating narrow parts (increasing the number of dowels increases the complexity of assembling the connection). The connection along the edges to the plug-in strip is durable and technologically advanced. The lath can be made of laminated plywood or wood with transverse grain.
Connections using the folding method (from the English folding - folding). It is used to create cabinet and box structures. The essence of the method is to obtain a box from a flat panel, in which wedge-shaped grooves are cut in the transverse direction. WITH outside The film is glued under the grooves of the shield. Glue is applied to the grooves, then the box is folded. The film provides sufficient ductility and strength of the folding surface at the time of folding.

Rice. 55. Folding connection
There is another version of this connection. The groove completely separates one part of the shield from the other. In this case, the adhesive composition previously applied to the groove extraction area acts as a hinge element, which is subsequently removed. This method is used for cladding natural veneer or laminated plastic. Assembly using the folding method is more accurate than with the traditional method; the elements are glued together more firmly due to the high precision of the operation and uniform compression of the elements. This method can be used on flat elements that have gone through the finishing stage.
Cladding is also a way of joining parts. Veneering is the bonding of workpiece surfaces. thin material. Cladding allows you to reduce the consumption of valuable materials and create surfaces with high aesthetic, functional, hygienic and strength characteristics. When cladding, the cladding is glued to the base.
The cladding is made of natural or synthetic veneer, polymer or thermosetting films, decorative laminated paper, edging material, artificial leather, porous-monolithic films, fabrics.
As a rule, the base is low-value wood, fibreboard, particleboard and wood boards, and plywood.
Single- and double-sided cladding is used. If the part has the shape of a shield or its width is 2 times the thickness, the cladding must be double-sided, otherwise unbalanced internal stresses will appear, which will cause warping of the part.
When cladding on both sides, in order to avoid warping, it is advisable to cover both sides of the board with a material that is the same in type, thickness and direction of the fibers. Usually, to save sliced veneer, the internal surfaces of elements (for example, the side wall of a cabinet) are lined with cheaper material. In this case, it is necessary to take into account the correspondence of the thicknesses of the linings and their elastic moduli. It is necessary that the product of the elastic modulus by the thickness of one cladding is equal to the product of the thickness by the elastic modulus of the other cladding.
One or two layers of cladding are used. Two-layer cladding gives the surface High Quality, but is rarely used, since it increases the material consumption of the product.
When cladding, you need to take into account the direction of the fibers of the cladding and the base (they should not coincide). They are usually placed at an angle of 45-90° to each other. Cladding with parallel direction of the fibers of the cladding and the base is permissible only if the ratio of the width and thickness of the base is no more than 3:1.
Let's also consider connections using nails and fastening brackets. It should be noted that the use of one or another type of connection, in addition to general, objective reasons, is associated with traditional methods manufacturing of furniture products. In our furniture production, nail joints have always been used extremely rarely. Now they are used for fastening parts made of thin sheet materials, array, individual species accessories, as well as in the manufacture of small furniture elements.
Nails come in different sizes in length and thickness. The cross-sectional shape of nails can be round, rectangular, notched, with a screw or ring thread. Nails are also distinguished depending on the material (steel, copper, aluminum, etc.). To extend their service life, the nails are coated with nylon, zinc, and cemented.
It is customary to characterize the strength of a nail joint by such an indicator as pull-out resistance. This indicator depends on the size of the nail and the cross-section, the material of the parts being connected. The larger the nail size and more complex form section, the higher its pull-out resistance. The material of the parts being connected affects the strength of the connection as follows: the greater the density of the material of the parts being connected, the stronger the connection.
The strength of the connection also depends on the relative position of the axis of the nail and the fibers of the part into which it is hammered. The weakest strength is found in a nail driven into the end of the wood.
The resistance to pulling out of a particle board is slightly higher than the resistance to pulling out of pine wood. But nails are difficult to drive into layered and glued materials.
The connection between the nail and the edge of the particle board is very weak.
The strength of the joint is greatly influenced by the moisture content of the wood. So, with increasing humidity, strength decreases. This must be taken into account when designing furniture for a country house.
To prevent cracking of the material, it is important to correctly position the nail relative to the end surface and edge of the slab. The nail should be placed at a distance of no closer than 15 diameters from the end and 10 diameters from the edge of the part. The nail must penetrate at least 2/3 of its length into the part to be attached.
When fastening parts made of thin sheet materials, fabrics, some polymer parts, springs are connected with brackets. Staples are made from flat or round wire. The connection with staples is not very strong. The size of the bracket is selected depending on the connection. To fasten sheet materials, the height of the bracket must be at least 3 times higher than the thickness of the part.
Plug-in connections
In furniture joints, screw joints are quite common, although they are considered labor intensive. Connections with screws are used for fastening fittings and other elements.
Screws are differentiated depending on the length of the thread and the shape of the head. The head shape can be semicircular, flat (countersunk), semi-countersunk and hexagonal. On the surface of the head there is a slot in the form of a groove or two intersecting grooves for tightening the screw.
The strength of a screw connection is higher than a nail connection. The resistance to pulling out of a screw depends on its size, the length of the thread and the material of the parts being connected. The higher the density of the material, the stronger the connection. The strength of the connection with screws screwed in along the fibers is almost 2 times lower than the strength of the connection with screws whose axis is perpendicular to the direction of the fibers. The face and edge of the chipboard hold the screw differently (resistance to pulling out from the edge of the chipboard is very insignificant).
The size of the screw is selected depending on the expected loads and the thickness of the attached part. The screw should enter the part to which the fastening is made by ?-2/3 of the entire length. With each increase in screw diameter by 0.5 mm, the pull-out resistance increases to 0.5 MPa, and with every 5 mm increase in screw-in depth, the pull-out resistance increases to 3 MPa. The length of the thread must be equal to the screw-in depth, therefore, to fasten thin parts, you need to use screws that have threads along the entire length.
When connecting parts with screws, holes must be selected in the parts. The diameter of the hole in the attached part is equal to the diameter of the screw in the unthreaded part. The diameter of the hole in the part to which the fastening is made is equal to internal diameter screw threads.
Screws are used to install many types of hinges, latches, latches, guides, etc., for fastening structural elements small thickness (walls and bottom of the box).
Although screws are classified as dismountable connections, repeatedly assembling and disassembling them is not recommended, since the strength of the connection decreases by 10% each time.
Connections using ties. Ties are a special fastening device that provides the necessary density and strength of the connection of elements located relative to each other in a certain position. Most often, screeds connect elements at an angle of 90?.

Rice. 56. Tie connections: a–d – screw (1 – screw; 2 – nut; 3 – angle; 4 – washer; 5 – plug); d – eccentric (1 – nut, 2.3 – screw or rod; 4 – eccentric, 5 – plug)
Ties should ensure quick and reliable assembly of the product, not interfere with its operation and not degrade its appearance. The design of the ties must exclude the possibility of spontaneous separation of the elements during normal operation. The following main types of ties are distinguished: screw, eccentric and hook.
Screw ties are used in several types. They differ in elaboration individual elements, but the main parts of all screw ties are the screw and the nut. The strength of fastening the screed elements is ensured by a threaded connection.
On the image ( a–c) shows a screw coupler, which consists of a screw, nut, washer and plug. This type of screed can be used for corner end and middle connections of cabinet furniture walls. These connections are quite strong. The fastening elements of the screed are located in holes closed with a plug, so it is possible to install the screed on open areas products. The screed does not impair the aesthetic and functional qualities of the products. The disadvantages of this type of screed include the high complexity of installation. When making furniture at home, labor productivity is not of fundamental importance, so this design is quite applicable.
The tie under the letter “b” also contains a screw, a nut and a plug. It provides greater strength than tie “a”, but its disadvantage is that the screw head protrudes onto the front surface of the product, which worsens the appearance of the furniture and eliminates the possibility of blocking the product into the “wall”.
Both types of screw ties require additional fixation of the walls with dowels when assembling the housings.
The tie shown in the figure under the index “g” consists of nuts, an angle, and a screw. It firmly connects the walls of the product body; additional fixation of the walls with dowels is not required. But the release of fasteners to the outside of the product worsens the appearance and reduces the functional and aesthetic qualities. These shortcomings are unacceptable in high-quality furniture products.
There are several types of eccentric couplers. The main elements of this type of tie are a nut, a screw or rod, an eccentric and a plug. The eccentric axis is shifted relative to its rotation axis. By turning the eccentric, it is jammed, which ensures the connection. This connection is inferior in strength to the connection with screw ties, but is less labor-intensive. Both types of screeds provide similar aesthetic and functional qualities of the product.
Hook ties are structurally very simple. These are metal plates with cutouts and hooks through which they are connected to each other. The plates are secured with screws. Hook ties can be used in cases where connections are subject to loads in one direction.
Hinged connections are perhaps the most common. Used in furniture products following types loops: card, heel, rod, card, four-hinged and two-hinged. Hinges are used for hanging doors and fastening hinged table tops.
Card hinges consist of two plates hingedly connected. Hinges can be detachable or non-detachable, right-handed or left-handed. Detachable hinges are more technologically advanced, since their installation requires less labor. Fasten the card hinges with screws to the edge or face of the door and the vertical wall of the case. Due to the insufficient strength of fastening with screws in the edge of the particle board, card loops are made curved or the edges of the boards are strengthened.

Rice. 57. Hinges for hanging panel doors: a – single-hinged card cards; b – single-joint pivot; c – single-hinged rod, d – double-hinged card loop; d – four-joint combined; e – double-hinged combined; 1, 3 – cards; 2 – axis; 4, 5 – plates; 6 – rod, 7 – earring; 8 – bowl; 9 – body; 10 – screw, 11 – strip
A variation of card loops is the piano loop. It is attached along the entire length of the door. Big number The screws used for its installation make this type of hinge low-tech, which limits its use.
Pentular hinges consist of plates that rotate in a horizontal plane. The plates are attached to the edges of the doors, in which recesses are selected for the thickness of the plate, and to the horizontal walls of the body. The appearance of the elements of this loop on the front surfaces worsens the appearance of the product. In addition, the door edges are made of particle boards When installing these hinges, it is necessary to strengthen them, which reduces the manufacturability of the design. These disadvantages limit the use of the heel loop.
For hanging glass swing doors they use heel hinges in the form of a metal bracket with an axis. Gaskets are installed in the bracket, and between them there is a glass door panel, which is fixed with screws. The axle is inserted into the hole of a metal plate attached to the horizontal walls of the housing with screws. The loop provides a strong and secure connection.

Rice. 58. Hinges for hanging glass doors
Rod hinges are installed into the edge of the door. These hinges consist of two rods (smooth or threaded) and a fixing screw. The strength of the connection with rod loops depends on the elastic properties of the material into which the rods are inserted.
Omber loops provide 180° rotation around an axis. They consist of two plates attached with screws, an axle and an earring. Card loops are used to install folding half-covers of tables.
Four-hinge hinges are the more common type of detachable connection. They consist of a body, a strip and a set screw. The body and the strip are attached respectively to the door and the wall with screws, and connected with a set screw, with which you can adjust the door hinge - the gap between the door and the amount of protrusion of the side wall.
Four-hinged hinges are available without fixing and fixing, ensuring a tight fit of the door to the body of the product. Fixation is carried out due to special springs in the hinge body.
These hinges provide a reliable and high-tech connection.
To install folding doors, double-hinged (secretary) hinges are used. They consist of plates and a body, which are hinged to each other. The plate is attached to the horizontal wall of the product, and the body is attached to the door.
For installing drawers, shelves, sliding doors guides are used. They come in roller and telescopic forms, in the form of slats and runners. The guides are attached to the walls of the products with screws, nails, staples or inserted into the grooves of the walls. Planks and runners are made of wood, metal, plywood, polymer materials. Structurally, guides are divided into single and double, mortise and overhead.

Rice. 59. Guides: a – telescopic; b – roller
Telescopic guides ensure smooth extension of the drawer with a load of up to 250 N to its entire depth. The telescopic mechanism consists of upper and lower guides and a carriage. The upper and lower guides each have four holes for screws. The carriage is equipped with four rotating rollers, with the help of which it moves in the guides. A fixed stop is installed on the upper guide - a carriage travel limiter. A freely rotating roller is installed on the lower guide, limiting the travel of the guide and facilitating easy movement of the carriage.
Guides and carriages are made of sheet metal(steel or Aluminium alloy), and the rollers are made of low-density polyethylene or polyamide. Rubber stops.
Non-telescopic roller guides are structurally simpler. They consist of lower and upper bars and rollers.
Screwless fittings. The main element when attaching screwless fittings is the dowel element, cast integrally with its body. The dowel has a shape with pointed annular or semi-circular projections. The height of the bushings, depending on the type of fittings, is 10, 12 mm, diameter – 8.7; 11.5; 35.8 mm. Screwless fittings are installed on special equipment by pressing dowels into pre-drilled holes.

Rice. 60. Screwless fittings: a – tie, b – hinge bar, c – magnetic latch, d – installation diagram
It is not always possible to cast fastening dowels at the same time as the fittings, so sometimes they are fastened using threaded connections.
AGREEMENT OFFER
Individual entrepreneur Klimov Alexander Nikolaevich, acting on the basis of a Certificate of state registration individual as individual entrepreneur, hereinafter referred to as the Seller, publishes this Public Offer about Digital Goods presented on the Seller’s website
1. GENERAL PROVISIONS. SUBJECT OF THE AGREEMENT
1.1. In accordance with Article 437 of the Civil Code Russian Federation(Civil Code of the Russian Federation) this document is a public offer, and if the conditions set out below are accepted individual, which accepts this offer, makes payment for the Goods and/or Services in accordance with the terms of this Agreement. In accordance with paragraph 3 of Article 438 of the Civil Code of the Russian Federation, payment for the Goods by the Buyer is an acceptance of the offer, which is considered tantamount to concluding an Agreement on the terms set out in this offer.
1.2. Based on the above, carefully read the text of the public offer, and if you do not agree with any point of this offer, you are asked to refuse to purchase the Products and/or Services provided by the Seller.
1.3. In this offer, unless the context otherwise requires, the following terms have the following meanings:
Acceptance – full acceptance by the Buyer of the terms of the Agreement;
Offer is a public offer of the Seller addressed to any individual (citizen) to conclude a purchase and sale agreement with him (hereinafter referred to as the “Agreement”) on the existing conditions contained in the Agreement.
Buyer - Site visitor - an individual who has entered into an Agreement with the Seller on the terms contained in the Agreement and is purchasing Digital Goods (s) and/or services.
Parties - Seller and Buyer are referred to together.
Website – a platform located on the Internet with the domain name “site”, which is an online store containing the Seller’s range of goods and services.
Digital product is a virtual product that is the subject of this agreement and has the following types:
a) finished digital goods – digital goods laid out for sale, having a completed appearance and ready for use.
b) courses – training programs using a distance learning system.
Delivery – delivery by the Seller of digital goods presented on the Site via electronic communication channels to the electronic mailbox whose address is specified by the Buyer in the Order;
Account is a virtual “office” of the Buyer, in which the registered user sees his personal data.
Registration is the process of the Buyer entering personal data into a special form on the Site when placing an Order (last name, first name, email address).
Order – individual items from the assortment list of Digital Goods specified by the Buyer when filling out an application to receive a Digital Good.
2. SUBJECT OF THE AGREEMENT
2.1. The Seller sells Digital Goods in accordance with the current price list published in the Seller’s online store on the website, and the Buyer makes payment and accepts the Goods in accordance with the terms of this Agreement.
2.2. The Seller delivers Digital Goods in exclusively virtual form, through Email and does not mail printed products.
2.3. This Agreement is an official document of the Seller.
3. ORDERING
3.1. The Order of the Goods is carried out by the Buyer by sending a properly completed form during the payment process. All fields of the payment form must be completed. In case of absence necessary information which allows the Buyer to be identified and the Goods sent to him, the Order will not be accepted by the Seller.
3.2. When placing an Order, the Buyer undertakes to provide the following information about himself:
last name and first name,
E-mail address.
3.3. The Buyer gives his consent to the Seller’s processing of the Buyer’s personal data with or without the use of automation tools. This consent of the Buyer applies to his last name, first name and other information related to his personality and specified when placing the Order. Consent is provided to carry out any actions regarding personal data that are necessary for the proper execution of this Agreement, including without limitation: collection, systematization, accumulation, storage, clarification, use, distribution, blocking and destruction, as well as carrying out any other actions with personal data in accordance with the current legislation of the Russian Federation.
3.4. Payment by the Buyer for an Order placed on the website means the Buyer’s agreement with the terms of this Agreement. The day of payment for the Order is the date of conclusion of the Agreement purchase and sale between the Seller and the Buyer.
3.5. If the Buyer has any questions regarding the Product, before placing an Order, he must seek advice from the Seller by email at help@site, or through the feedback form posted on the site.
4. CONDITIONS AND DELIVERY TIMES OF DIGITAL GOODS
4.1. Delivery of the paid goods to the Buyer is carried out by sending an email with a link to receive the Digital Goods to the email address that the Buyer specified during the Registration process. The deadline for sending the letter is 8 hours from the receipt of payment.
4.2. The Seller delivers the Goods based on the Order placed by the Buyer.
4.4. The Goods are considered received by the Buyer, and the Seller’s obligation to deliver the Goods is fulfilled from the moment the operation of sending the Goods is recorded via electronic communication channels to the Buyer’s electronic mailbox in the Seller’s automated electronic system.
4.5. In case of failure to receive the Goods by the Buyer within the period specified in clauses 4.1 and 4.2. of this Agreement, or due to technical problems with the mail server of the Buyer's provider or for other reasons, the Buyer must contact the Seller and report non-receipt of the Goods. In this case, the Seller will resupply the Goods free of charge within 2 (two) business days from the date of receipt of the corresponding message from the Buyer.
5. PRICES AND PAYMENT PROCEDURES
5.1. The range and price of Digital Goods are freely available on the Seller’s Website.
5.2. The cost of the Product indicated on the website may be changed by the Seller unilaterally at any time.
5.3. Payment for Digital Goods occurs non-cash using the payment system installed on the seller’s website.
5.4. The Buyer's obligation to pay for the Goods is considered fulfilled from the moment funds are received into the Seller's bank account
6. TECHNICAL SPECIFICATIONS OF DIGITAL GOODS
6.1. Digital products are supplied in the following formats: PDF format, JPG format, mp4 format, XLS format.
7. RIGHTS AND OBLIGATIONS OF THE PARTIES
7.1. Rights and obligations of the Buyer:
7.1.1. The Buyer has the right to be provided with a Digital Good in accordance with the technical characteristics specified in this Agreement (clause 6)
7.1.2. The Buyer is obliged to pay for the Digital Goods in full before receiving the Digital Goods.
7.1.3. Products purchased from the Seller are intended for the personal use of the Buyer. The Buyer agrees not to distribute copies of the Digital Product in any form or manner.
7.2. Rights and obligations of the Seller:
7.2.1. The Seller has the right not to deliver Digital Goods for which it has not received cash in full.
7.2.2. The Seller is obliged to deliver the Digital Goods in proper quality in accordance with the technical characteristics indicated in this Agreement (clause 4).
8. RESPONSIBILITY OF THE PARTIES
8.1. For failure to comply or improper execution obligations under this agreement, the Parties bear responsibility in accordance with the current legislation of the Russian Federation.
8.2. The Seller is responsible for the conformity of the delivered Digital Goods technical specifications indicated in clause 4, as well as for compliance of the content of the Digital Product with all legal norms.
8.3. The Buyer is responsible for the proper use of the Digital Product in accordance with clause 7.1.3
8.4. The Seller is not responsible for the content and accuracy of the information provided by the Buyer when placing the Order.
8.5. The Buyer is responsible for the accuracy of the information provided when placing an Order.
SELLER'S DETAILS
IP Klimov Alexander Nikolaevich
OGRNIP 311222511700014
Website Privacy Policy
This site is an information and educational Internet project of Klimov Alexander Nikolaevich (IP Klimov Alexander Nikolaevich. OGRNIP 311222511700014).
This site strictly adheres to the following privacy policy principles:
1. Subscription to the newsletter is carried out at the own discretion of anyone through the form on this website. To do this, your email address is requested. You must also confirm your consent to receive information materials from the site in the letter that arrives after filling out the form.
2. The personal data of each subscriber is used only to send him periodic newsletters, news and project promotions: and will never be transferred to third parties in any form.
3. To get an idea of the content of the newsletter releases, you can familiarize yourself with the contents of the “blog” section of the site:
4. Each subscriber can unsubscribe from receiving newsletters at any time by clicking on the link present at the end of each letter.
Blue electrical tape, as popular wisdom says, - the best remedy for connecting any fixed parts. Even if this is true, the appearance of such products leaves much to be desired. Various types of fittings are almost as reliable, but at the same time remain invisible. They will be discussed in this article.
How to attach furniture panels to each other?
The need for this constantly arises when assembling any furniture. The number of methods and devices is so great that a book could be written about them, but we will limit ourselves brief description the most accessible, proven and practical.
Confirmats (europrops)
This type of screw has a blunt end and wide threads. The thread in the wood is cut when screwed in, and the cap remaining on the surface is hidden using various plugs. If necessary, the structure can be disassembled, but with each assembly the strength will decrease due to repeated threading.
To screw in confirmations, you must first drilled holes. It is best to use one special drill, but several ordinary ones of different diameters will do. Euroscrews demonstrate the greatest efficiency in combination with dowels inserted without glue.
Dowels
 Simple wooden fastenings cylindrical – traditional way joining parts made of solid wood, furniture panels and other materials. They are small cylinders with a grooved side surface and chamfers that are inserted into pre-drilled holes. When adding glue, they form very strong permanent connections; without gluing, they are used as an auxiliary element.
Eccentric coupler
 This type of tie is used to fasten perpendicular parts. Among its advantages are high strength, the possibility of repeated assembly and disassembly while maintaining downforce, complete invisibility with outside. Installation is complex, requires high precision, the use of professional equipment is desirable, therefore eccentrics are more often used in the manufacture of factory furniture than in amateur work.
Self-tapping screws
The simplicity and cheapness of self-tapping screws are deceptive. In fact it is reliable and convenient fastening, the only serious drawback of which is that upon reassembly, reliability will noticeably decrease. If you do not plan to disassemble the furniture (for example, when moving), this is one of the best options.
It is better to screw ordinary self-tapping screws that are not equipped with a drill into pre-drilled holes of a smaller diameter. This will prevent cracks from appearing and make tightening easier.
How to attach a furniture panel to a wall?
Most often, the need for this arises when covering kitchen wall, adjacent to work surface. Resistance to moisture, absolute environmental friendliness and the very appearance of the furniture board make it good decision for finishing the kitchen. The price also plays a significant role, which can be found here. There you will find useful information, photographs and other examples of the use of this material.
If the slab is too large, you can cut it using a hacksaw or jigsaw. The cut edge will be uneven, so it must be closed with a special corner or processed with a router.
To get a neat cut, use cutting tool with fine teeth. Drive it as evenly as possible, avoiding sudden jerks and stops.
Attach the prepared shield to the wall using liquid nails, having previously marked the location of the upper corners. Once the glue has hardened, drill holes for dowel nails in the top of the slab and install. It is best to hide the hats under the kitchen cabinets, but you can also hide them with the help of matching caps. The gap remaining between the countertop and the wall cladding will spoil the appearance and collect moisture and dirt. Cover it with a special baseboard - and the kitchen will become practical and cozy.
Natural, durable and moisture-resistant furniture board from the DOSCITUT company will last for many years. You yourself come to change the environment much earlier than the need arises. Call us and we will deliver the materials directly to your home!