If you pay attention to the multilayer structure that has to be created indoors or on the facade of buildings to retain heat in them, there is always a desire to simplify it. There must be modern materials, which will help make the work of plasterers and finishers easier, while simultaneously increasing the speed of work. The main thing is that their quality does not suffer.
What can replace, for example, the now common wall insulation with polystyrene boards? A solution was found - insulating plaster. The process, it must be said right away, is more labor-intensive, but the effect from it is significantly higher. The use of dry construction mixtures for exterior work has again shown a wide range of applications, and purchasing them today in stores and construction markets is not difficult.

What can you offer?
In order to replace 2 standard insulating layers, consisting of a fixing mesh and insulation, with insulating plaster, there are the following methods:
- Take dry mortar, which is based on cement, but it should use perlite sand instead of regular sand. In addition, the composition should contain powder made from pumice, expanded vermiculite, expanded clay chips, sawdust or polystyrene foam balls. These components give the plaster good insulating properties. Sand is gradually being replaced by foam glass in granules.
- Use special insulating plaster boards. They are usually not used often in construction due to mistrust. Many cannot decide whether it can really become an alternative to conventional insulation or dry mixture. Although manufacturers insistently advise this method insulation, hoping that over time builders will believe in it.

Advice: if you want to significantly reduce labor costs when insulating walls, then use plaster insulation boards.
- Make your own insulating plaster.
In principle, it is not so difficult to make; the technology consists of dry mixing the following components:
- clay;
- paper pulp;
- sawdust;
- cement,
in the ratio: 1:2:3:1/5 parts.
If you do not use cement, which is also possible, the plaster will be too loose and soft, but quite suitable for decorative work.
- Sawdust, where the basis is sawdust. You can make this mixture yourself. Such mixtures should be used exclusively indoors, and during the drying period of the walls, ventilate them well for about 14 days.
- In polystyrene foam, the leading role is occupied by polymer granules.
Tip: apply insulating plaster to the surface in the same way as regular plaster, using long trays and spatulas. Make movements slowly from bottom to top.
Where is it used?
Insulating plasters will be useful wherever it is necessary to insulate internal and external walls buildings, although the price for this material is not the cheapest.
It should be highlighted:
- thermal insulation and is not produced so often;
- sound insulation when applied externally or internally;
- door and window slopes, which allows not only to insulate them, but also to give them a beautiful appearance;
- protection of sewer and water supply risers from cold temperatures;
- thermal insulation of ceilings and floors.
Advice: do any construction works a tool you trust.
Advantages and disadvantages
There are no ideal building materials; each of them has its pros and cons. In the case of insulating plaster, you should understand that it is simply inappropriate to compare it with regular plaster. Other methods of insulation are more suitable for it. The advantages of the material include the speed of work.
Generally accepted scheme:
- On working wall install the fixing mesh.
- Then attach the insulation.
- Then carry out plastering work.
- You complete the process with finishing plaster.
With insulating plaster:
- Cover the working wall with insulating plaster.
- Apply finishing plaster on top.
The fact is obvious.
More simple circuit is obtained due to the fact that:
- the master does not care about the final appearance of the surface, due to which he can prepare almost 180 m2 of surface in a working day;
- reinforcement mesh is not installed. Use only on corners and in difficult places;
- there is no need to level the wall before applying insulating plaster;
- the material has excellent adhesion, thanks to which it can stick to any wall, which especially attracts novice builders for whom “adhesion” is the main stumbling block.
In addition, heat-saving plaster has good vapor permeability. Thus, the material is superior to foam in this indicator. It also does not have any “cold bridges” that are typical when attaching foam, when you have to use metal dowels.
So it turns out that the technology used today, which has been “brought to perfection” over many years, is a multilayer structure. At the same time, this material includes two layers in one layer - plaster and insulation.
Minuses
- Weight. The mass of the layer has to be paid for the speed of work, and it exceeds similar standard layers by 10 times, which requires the installation of a more durable foundation. The thickness of the layer will also be quite large - it is almost twice as thick as, for example, mineral wool.
- Requires finishing. This type of plaster is not a finishing plaster, which is applied on top after priming, or decorative plaster is used on top of it.
- Cost of work. Unfortunately, this building mixture is quite large.
Tip: use vermiculite insulating plaster when insulating hard to reach places And wooden floors, as well as where mold or mildew may appear, rodents and insects may appear.
Technology
Below is suggested detailed instructions process:
- Prepare the surface by removing any remaining solution and removing dust. Possible in special cases apply penetrating impregnation or mesh to the wall to strengthen the structure.
- Wet the surface to be treated generously.
- Prepare the mixture according to the instructions on the package. According to the recommendation, it will need to be worked out in 2 hours.
- Apply plaster in layers up to 20 mm thick. Each subsequent one – no earlier than 4 hours later.
- The final result of the work will be visible after 2-3 weeks.
Tip: use for insulation plastic windows insulating plaster, which in this case will be able to reveal its potential.
Errors during operation
- The mixture was prepared poorly.
- It is past its expiration date, no more than 2 hours.
- Laying is carried out in a layer of more than 20 mm, due to which the mixture slides off the surface.
- The previous layer was not dried before applying the next one. It should be understood that in conditions of high air humidity, in particular in autumn, the drying time increases.


In construction, two main methods of insulating the external walls of buildings are used - erecting false walls with further filling of the resulting space with insulation or pasting outer surface foam sheets. Thanks to simplicity installation work and low cost, such insulation methods attract attention. When for some reason it is impossible to use such thermal insulation options, use warm plaster for outdoor work. This material appeared on the construction market relatively recently, but due to its high cost it has not yet become widespread.
Types of warm plaster and its composition

The finishing material is made on the basis of cement, and as a filler Most often, foam granules, expanded clay chips, crushed pumice or perlite sand are used.
Most universal look is a plaster with filler and from expanded vermiculite, obtained during heat treatment of the rock of the same name. Warm plaster is a good option for exterior work; masonry can be done with your own hands. Material with mineral filler can be used for interior and exterior finishing work, in addition, it has a pronounced antiseptic effect.
Sawdust plaster consists of clay, sawdust, paper fragments and cement. Thanks to this composition, the material is suitable for finishing external surfaces. If sawdust plaster used for interior work and applied to concrete or wooden walls, then during the drying of the plastered surfaces it is necessary to carry out timely ventilation - this will help to avoid the formation of fungi and mold. It should be noted that the period of complete drying of the walls can last up to 2 weeks. 
For interior decoration, the most suitable and reliable type of building material is considered to be plaster, which includes polystyrene foam, lime, cement and other components. This is the most common version of the finishing material, so it is worthwhile to dwell in more detail on the description of its characteristics. However, it is worth remembering that doing warm plaster for exterior work with your own hands requires a clear command of the technology.
Using warm plaster
This material is used not only for exterior finishing, but also for thermal insulation:
gender and interfloor ceilings;
window and door slopes;
building basement;
cold and hot water;
for clogging the joints of ceilings and walls;
giving internal walls soundproofing;
to increase the thermal insulation of walls built using today's popular well masonry technology.
Comparison of the material with traditional insulation
First of all, you should pay attention to the effectiveness of applying a layer of material to the facade of the building. For clarity, we will make a comparison with a surface insulated with sheets of foam plastic or mineral wool, followed by applying a layer of plaster on top of them. The comparison will be carried out in three directions: density, degree of moisture absorption and flammability.
During the analysis it was found that warm plaster is 10 times heavier others thermal insulation materials, this means that due to the weighting of the walls, you will have to take care of laying a more reliable foundation. 
To obtain heat saving indicators similar to those provided by polystyrene foam or mineral insulation, a layer warm plaster you will have to apply it 1.5-2 times more densely. Based on the calculations made, it was established that the layer thickness should be 100-200 mm, with a recommended maximum of 50 mm. It is not difficult to guess that you will have to apply plaster to the external and internal surfaces of the walls. In the future, the walls will need to be treated primer and decorative putty. This warm plaster for outdoor use with your own hands has a number of distinctive properties.
Following are the main advantages of warm plaster:
option for application on uneven surfaces;
high speed of plastering walls;
possibility of application without the use of reinforcing mesh;
good adhesion (compared to other finishing materials);
absence of metal components that can become “cold bridges”;
impossibility of damage to the surface by rodents after finishing.
Material application method

The technology for performing finishing work using warm plaster is not very different from the method of applying conventional plaster.
First of all, you need clean the surface walls from debris and dust, treat it with deeply penetrating impregnations. In addition, experts recommend using a special plaster mesh. The wall surface should be well moistened before applying a layer of warm plaster.
Usually the entire package of dry mixture is used for preparation, but it is important to note that ready solution should be used within 2 hours. You can apply the composition mechanized way
or manually. If, when turning over, the composition scooped up with a trowel holds well, then the warm plaster for exterior work has a good consistency and is ready for use.
Since the composition is applied in layers, you will need the most simple tools:
putty knife;
Master OK;
grater.
The thickness of each layer should not exceed 20 mm. It is important to apply the next layer after the previous one has completely dried, that is, after approximately 4-5 hours. Duration drying period depends on air humidity and temperature environment, so it may take a little longer. The mixture is applied to the wall with a spatula, using smooth movements from bottom to top. If you apply too much plaster to the surface, it will begin to slide. 
Time will help ensure the quality of the work. After a few weeks, you need to inspect the surface of the walls and, if mistakes were made, they will appear in the form of swellings, cracks and geometry changes premises, which are checked using building level or plumb line. At the same time, by 1 linear meter Horizontal and vertical deviation is permissible no more than 3 mm.
Due to the fact that the thickness of the layer of warm plaster does not exceed 50 mm, and the surface does not have fiber, the statement about soundproofing properties material. Moreover, the finishing material does not have elasticity, which will be sufficient to dampen pops, sharp sounds and knocks.
Many today are wondering what warm plaster is, for what purposes this material is suitable and how to work with it. Let's start with the fact that these products have not been on the domestic market of construction and finishing materials for long.
So, warm plaster is a mixture made on the basis of the simplest cement. But, unlike ordinary cement mortar, sand is not added to the composition. Instead of him other ingredients are used:
- Expanded clay chips;
- Perlite sand;
- Expanded polystyrene granules;
- Powder made from pumice, etc.
What types of warm plaster are there?
If you are interested in what warm plaster is, you should keep in mind that it can be different. There are many types, now we will talk about most popular of them.
- Among all the varieties of warm plaster, one can note the composition, which contains expanded vermiculite. Expanded vermiculite is a mineral lightweight aggregate that is obtained through heat treatment to which vermiculite rock is subjected. If you need warm plaster for exterior work, it’s time to pay attention to just such products. And if you don’t want to look for others decent options, other uses of the material are also possible. For example, this warm plaster is also suitable for interior work. Quite decent, versatile construction material. Among the advantages of vermiculite are excellent antiseptic properties.
- If we consider popular types warm plaster, one cannot ignore the “sawdust mixture”. This substance contains sawdust, as well as particles of clay, cement, and even paper. That is why it is not recommended to use warm sawdust plaster for exterior work. On the contrary, the mixture is most often purchased specifically as a warm plaster for interior work - any specialist will confirm this.

Sawdust plaster – ideal remedy for covering brick (concrete), as well as wooden surfaces. It is recommended that the room be regularly ventilated while the sawdust plaster is drying. It takes approximately two weeks for the composition to dry. If the doors and windows are closed in the room, mold and mildew may appear on the surface - be sure to take this into account.
- People who want to buy warm plaster always pay attention to a type of material that contains expanded polystyrene foam granules. This plaster contains not only polystyrene foam - here you will also find cement, various fillers and additives, and lime. You need warm plaster for the facade - this option is well suited, however, it is also often used for indoor work.
Since it is the last version of plaster (with polystyrene foam granules in the composition) that is the most common (which cannot be said about other types), we will consider it in detail within the framework of this material. All comparisons with other materials will also be made specifically for this type.
Warm plaster and its areas of application

Let's look at the industries where this material is used today. Anyway, manufacturers recommend following:
- Finishing of facades and their thermal insulation;
- Soundproofing of internal and external walls on existing buildings, as well as additional insulation;
- Insulation of walls if well masonry is used;
- Insulation of slopes of door and window blocks in those places where they are adjacent to the walls;
- Insulation of cold and hot water supply risers, sewer risers;
- For internal finishing works(as a sound insulator and insulation);
- It is recommended to use warm plaster for insulation ceilings and floors.
External finishing of the facade with warm plaster
Let's talk in more detail about How effective is the material? when performing external finishing of house facades.

- Warm plaster for the facade will be heavier than all others possible types– up to ten times or more. Consequently, such a wall most likely requires a more solid foundation;
- If it is assumed that the facade insulation structure will have a plaster layer over the insulation, the thickness of the insulation usually varies from 50 to 100 mm (depending on the thickness load-bearing wall, desired indoor temperature and climate zone). If you pay attention to what the thermal conductivity coefficient is, then everything is clear - in order to achieve similar indicators, the layer of warm plaster should be one and a half to two times thicker.
In other words, a layer of warm plaster will have to be made 100-200 mm thick, but the maximum allowed application is only 50 mm - otherwise there will be dumps. Therefore, warm plaster for the facade should be applied on both sides of the wall at once.
Now, based on all of the above, let's consider everything advantages and disadvantages of the material:
pros
- It is applied very quickly (even one plasterer can apply 110-170 sq.m. in a day);
- Can be applied without using reinforcing mesh(in places where there are no cracks and corners);
- There is no need to level the walls if you are going to apply warm plaster;
- The material has excellent stickiness (adhesion) to all other wall materials;
- When installing this insulation, there are no metal connections, so you don’t have to worry about cold bridges;
- Rodents will never settle in a wall that is insulated with warm plaster;
For more information about the advantages of warm plaster (including for insulating facades), watch the video material. Perhaps you will get answers to everything exciting questions after watching.
Disadvantages of warm plaster

- The composition is not finishing coat– on the surface of warm plaster, not only a primer should be applied, but also decorative layer plasters;
- The required layer of insulation is thicker than when insulating with polystyrene foam or cotton wool (approximately one and a half to two times).
Based on all of the above, let’s talk about where it’s really worth using “warm” plaster.
- When sealing different joints, cracks in the walls, ceilings of the house;
- As additional insulation, but this is for internal work - that is, you will need warm internal plaster (in a situation where work cannot be done from the outside - when, for example, there is already an expensive cladding that will definitely deteriorate during disassembly);
- Warm plaster is often used to insulate the base;
- When finishing window slopes, the material is also often used.
Applying warm plaster - technology
Before work, prepare the wall surface in the same way as before applying simple plaster to cement based. That is, all dust is removed, as well as the remains of other solutions. If necessary, the surface is treated with special deep-penetrating impregnations, or simply strengthened with a plaster mesh.
It is important that the surface of the wall, which will be insulated with warm plaster, is thoroughly moistened with water before starting all work.
- When the composition is prepared for use, the entire package is poured into a container (its volume must be at least 50 liters);
- Next, add water in the amount indicated on the packaging of warm plaster;
- Everything is thoroughly mixed using a mixer;
- The resulting mixture must be used within 120 minutes from the moment of preparation.

How to check whether the required consistency has been obtained or not? It's simple here:
- Scoop up the solution using a trowel and turn it over;
- If the mortar holds well on the trowel and does not fall off, it means that the plaster is completely ready for use;
- The finished plaster can be applied as by machine, and manual.

To avoid any difficulties when applying warm plaster, pay attention to the video: applying warm plaster. The lesson will be useful for both specialists and novice renovators.
What they look like subsequent work:
- The plaster mixture is applied using ordinary plastering tools (trowel, spatula, float, etc.) in several layers;
- The thickness of one layer should not be more than 2 cm;
- Each subsequent layer should be applied no earlier than 4 hours after the previous one was applied;
- If on the street high level humidity, and the air temperature is lower (especially in the autumn season), the drying time of the layer increases;
- It is customary to apply the solution only to the surface that has been leveled and primed;
- Apply warm plaster with a wide spatula, this is done strictly from the bottom up;
- It is impossible to apply a thick layer of plaster at a time - this may simply cause the mortar to slip;
- Check and acceptance plastering works usually carried out about three to four weeks after all the work has been done.
Common mistakes when applying warm plaster

It is not difficult to guess that during such work certain mistakes are often made - especially when the work is performed by novice specialists or simply amateurs. Consider this moment in more detail:
- If peeling is observed, it means you made some mistake during work;
- If the applied composition begins to crack;
- If the geometry of the room changes due to the fact that the layer of warm plaster is too thick.
How to check the “geometric” quality of the plastering work that you have completed? This work requires a plumb line, as well as a two-meter rule, and a bubble level. Everything is checked simply: a two-meter rule is applied to the surface (as a rule, an aluminum strip is used as such a tool). If gaps are detected, it means that there are irregularities in the geometry.
It is important that deviations from the horizontal (or vertical) of the plastered surface are not more than 3 mm per meter.
About material consumption
What can we say about material consumption? Everybody is here quite understandable:
- For each square meter the surface takes from 10 to 14 kg, if the desired layer thickness is 25 mm;
- If the desired layer thickness is 50 mm, then the consumption is 18-25 kg per square meter;
- 1 square meter of wall insulation with warm plaster will cost you $40 (the information will be useful for those who want to buy such plaster) - with a layer thickness of 25 mm;
- If you turn to specialists to do the work, you will have to pay up to $15 or more for each square meter.
- To produce insulation " airborne noise“With the help of warm plaster (this could be noise from the TV, conversations, the sound of a car engine), the material should have a fibrous structure. In addition, it must be ventilated. The effective thickness here starts from 0.5 cm;
- To perform isolation " impact noise“- knocking, falling objects, sounds of footsteps, the material must have elasticity (like rubber).
Warm plaster does not meet either the first or the second requirement, so all data on excellent sound insulation performance is most likely slightly overestimated.

For some work, warm plaster (facade, interior decoration) is indeed used often and this is quite justified. But its use is not always advisable - in many cases you can limit yourself to completely different materials or insulation and get either the same or a more impressive result.
Be sure to take this into account when performing finishing or repairs - in order to protect yourself from unpleasant surprises in the future.
Warm plaster is offered for sale as insulation. But construction specialists do not consider this material as a possible alternative to insulation materials for thermal insulation of buildings. And only in some cases is it recommended for use. Why? Is it necessary to insulate using a heat-insulating plaster layer? How to apply it correctly?
What is the difference between warm plaster?
The answer to why warm plaster cannot compete with insulation in conventional technologies insulation lies on the surface. Its thermal conductivity coefficient is 0.065 - 0.12 W/mK, while conventional insulation is 0.033 -0.04 W/mK. Those. almost 2 times.
To achieve the effect that is obtained from the use of conventional insulation, the layer of warm plaster must be 2 times thicker. If the usual appropriate layer of insulation for a façade is 10 cm of polystyrene foam, then it can only be replaced by 20 cm of plaster.
But such a layer is impossible - it is too heavy and threatens to collapse and be dangerous. With insulating plaster, it is simply very problematic to even achieve the heat transfer resistance values prescribed in SNiP. This does not allow this material to be reliably registered in those. documentation.
Not profitable
In addition, the cost of warm plaster is 2-3 times higher than that of insulation of the same volume. As a result, we get a loss on money investments compared to “conventional methods” for heat saving $/W by 4 (!) times. There is no economic feasibility of making direct thermal insulation with the material in question.
It should also be taken into account that heat-saving plaster is not a finishing material. Its surface, as well as the insulation, must also be covered with a final layer of finishing.
Varieties
To decide on the choice of warm plaster, you need to take a closer look at its composition and characteristics.
The plaster becomes heat-saving due to the presence of granules and insulation particles in the composition. Most often the same foam is used in the composition sand-cement mixture with plasticizers and fastening additives.

Another common base for warm plaster is expanded vermiculite and/or perlite.
Plasters based on these materials have similar thermal conductivity properties, but vermiculite plasters have high water absorption, therefore they require protection from water ingress and are not used in basements or on foundations...
There are also mixtures based on sawdust and cellulose. They have a lower cost, but their thermal conductivity is much higher, and specific gravity more.
To choose warm plaster, you must first determine the places where it can be used. Let's take a closer look.
Let's consider in order the advertising statements of manufacturers about the purpose of warm plaster.
The wall remains single-layer
Insulation of facades, walls, ceilings. First of all, walls made of large-format blocks - aerated concrete or porous ceramics. An increase in the thickness of the masonry of these materials entails a significant increase in cost, and not only the walls, the requirements for the foundation increase. Heat-saving plaster will help bring the heat transfer resistance of a wall made of warm blocks to the requirements of the standards.
The most important thing is that the wall will remain single-layer - only a load-bearing layer of blocks. A single-layer wall has very significant advantages over multi-layer walls with a layer of insulation, primarily in terms of durability.

Leveling surfaces and thermal insulation of pipelines..
In fact, it’s the same thing - both pipelines and walls need to be insulated to the maximum. Typically, pipelines are insulated with the best effect using a shell made of extruded polystyrene foam. But sometimes it is necessary to insulate already laid pipes, and this is usually easier to do only with warm plaster.
Warm plaster can be applied in a layer of considerable thickness, and therefore it can be used to level very uneven surfaces.
A significant layer can be placed where it is difficult to insulate - in hard-to-reach places, closed cavities...
Characteristics
Typical characteristics for warm polystyrene based plaster:
Thermal conductivity coefficient is 0.7 W/mK.
Flammability group - G1.
Specific gravity - 200 - 350 kg/m3.
Water absorption - 70%.
Cost - from $30/sq.m.

What can you use insulating plaster for?
Warm plaster must be applied in accordance with the manufacturer's recommendations. But that doesn't mean it will work out The best decision from the point of view of insulation.
Decide on wall insulation ( additional insulation) warm plaster should be applied by a specialist, or such a solution should be in the design documentation.
Also, warm plaster can be suitable for sealing any cracks, hard-to-reach places, joints of structures, where “adjusting” the insulation is most problematic and a tight fit is not possible. 
On the wall on both sides - significant additional insulation
The possibility of applying warm plaster on both sides - from the outside and from the inside - may also be considered. In this case, you can get a very significant insulating effect, for example, on a wall made of porous ceramics. On the inside, it is recommended to use plaster without expanded polystyrene, the environmental friendliness of which is questionable.
For a material such as warm plaster, with its significant cost, there are also places of application where it will be optimal and appropriate. First of all, this is an increase in the heat transfer resistance of enclosing structures made of heavy and light materials, while maintaining a single layer.
Also, insulation with warm plaster will save heat where it would seem that heat loss is inevitable...
Video - application process
How to apply warm plaster can be seen in the film
There are many ways to insulate a home. The choice of one or another insulation option depends on various factors, such as the climatic features of the area and the material preferences of the owners. The use of warm plaster can significantly reduce heat losses without changing the thickness of the wall. We will consider further the features of performing insulation work with plaster.
Insulating a house with plaster: advantages and features
Carrying out thermal insulation work on a building has a number of advantages. Among them we note:
- increasing the service life of the building;
- reducing home heating costs;
- improving the comfort of staying indoors.

In addition, thermal insulation materials protect the building from moisture, dampness, mold, and excessive wind. However, these advantages are relevant only if the materials for insulation have been selected in relation to individual characteristics premises, and all work was carried out taking into account all recommendations and technologies for their implementation.
If the house has not previously been insulated, then it is under the influence of constant heat losses. Heat leaves the building not only through windows and doors, but also through the surface of the walls, if they were not previously insulated. Therefore, first of all, the facade of the building must be in mandatory insulated.
Before you start insulating a building, you should perform the following steps:
1. Determine the most vulnerable places in the house in relation to heat loss. That is, you should find cold bridges through which heat passes very quickly.
2. After this, determines the optimal method of insulation. Insulation can be both internal and external. The second option is most often used, since internal insulation significantly reduces usable area Houses. Although the internal insulation of a house differs more simple execution, rather than external.
Among the advantages of performing external insulation, we note:
- reliable protection of walls from external irritants, such as high humidity, temperature changes, wind, etc.;
- absence of condensation, which destroys the building and leads to the formation of mold and mildew;
- improvement soundproofing characteristics building.

External or external insulation is distinguished by many technologies for its implementation. We suggest focusing on insulating the facade with “warm plaster”. IN in this case, the insulation is applied to the wall from inside the building, performing not only the function of preventing heat loss, but also decorative function improvements appearance Houses.
After choosing the insulation method, you should determine its installation scheme. These parameters depend on the operating conditions of the building, seasonal and daily fluctuations temperature regime, wind, precipitation and other climatic features of the region. In the process of determining the insulation method, these factors are taken into account without fail. Otherwise, problems with the insulation and its premature wear may occur.
Insulating a house under plaster has the following advantages:
- reducing the cost of air conditioning and heating the premises, as well as improving a healthy microclimate inside the building;
- increasing the soundproofing characteristics of the house;
- plaster does not load the building with additional weight, thereby reducing the cost of its construction according to the estimate;

- increase in the internal area of the building by 2-4%;
- insulating a building using this technique increases its service life by several decades;
- technologically correct insulation using plaster allows you to minimize temperature deformation fluctuations outside the building;
- the technology is used for almost any type of building, regardless of its material;
- plaster not only protects the building from heat loss, but also improves its attractiveness;
- if there are any on the building interpanel seams, then they are also sealed using plaster mortar.

In addition, when comparing warm plaster with other types of insulation, the following advantages should be noted:
- non-flammability;
- environmental Safety;
- ease of installation and repair, if necessary;
- manufacturability of application.
Insulation of facades under plaster: types of technologies
There are two main ways to perform insulation under plaster. The first one involves using thermal insulation material, which is subsequently plastered. The second is the use of special warm plaster, without additional insulation.
Among the materials used as an additional heat insulator we note:
1. Mineral wool - among its advantages, we note a high level of vapor permeability, resistance to combustion, good protection from heat loss, not susceptible to rodents, mold and mildew. In addition, this material has a long service life and is resistant to chemical and biological influences. This material has a slab design.

2. Polystyrene foam - more cheap option insulation rather than mineral wool. Petroleum waste is used for its production. However, this material is highly flammable and unstable to high levels of moisture and mechanical factors.
3. Slabs based on basalt rocks - for their production they use materials in the form of ultra-thin basalt fiber and bentonite-based clays. This material has high thermal insulation characteristics, it also perfectly protects the room from extraneous sounds. Basalt-based slabs are absolutely environmentally friendly and harmless to the environment.
4. Material based on foam glass is a universal heat insulator, which is primarily characterized by high resistance to mechanical stress factors, long term use, low density, complete absence of shrinkage and ease of installation work. This material does not lose its properties throughout its entire service life. Besides, this insulation It resists moisture very well, so it is often used in the process of insulating foundations.

Types of plaster for facade insulation
There is a certain type of plaster called thermal plaster. This version of plaster contains a filler and a cement-type base that holds it together. Plaster for insulation differs from ordinary plaster in that it contains a filler that has low thermal conductivity.
Most often, materials in the form of sawdust, perlite or vermiculite-based granules, as well as polystyrene foam balls are used as filler. In addition, a certain version of the filler contains foamed silicon or foam glass. The quality and functions depend on the physical qualities of the filler thermal insulation plaster. When determining the type of plaster used to insulate a house, you should pay attention to the following characteristics:
- thermal conductivity;
- susceptibility to combustion;
- resistance to moisture;
- environmentally friendly;
- resistance to biological pests;
- resistance to chemicals;
- breathability.

Thermal insulating plasters come in several types. We invite you to familiarize yourself with them:
1. Warm plaster for which sawdust is used as a filler. When considering this option of plaster, you should immediately note its disadvantages, which are determined by the severity of their weight and the lowest energy efficiency. This insulation option is used exclusively indoors, since sawdust is unstable in front of high humidity. Premises that are insulated using this method should be periodically ventilated, since excessive humidity in the room will lead to moisture absorption by the plaster and its falling off. Also, damp walls suggest the formation of fungus and mold, so this insulation option is the least popular.
2. Warm plaster with polystyrene foam filler. This version of plaster has good adhesion to any kind of surface and good thermal insulation characteristics. However, such plaster requires additional waterproofing and finishing. Also, when burned, polystyrene foam releases substances that are deadly to human life.
3. Warm plaster based on expanded perlite and vermiculite. These substances are mineral; for their production, special substances are swelled by acting on them high temperature. During the firing process, these granules increase in size and become unusually light. In addition, they change the structure, which subsequently becomes porous. The thermal conductivity of this material is low, so they are used for insulation. Among the advantages of this type of plaster we note:
- resistance to fire;
- environmental Safety;
- resistance to biological factors.
However, this version of plaster has certain disadvantages, which manifest themselves in too high moisture absorption. Therefore, before starting installation work, you should ensure reliable waterproofing. After installing the plaster, it is carried out finishing, which should also protect it well from moisture.
4. Materials based on foam glass or foamed silicon have unique characteristics. In the process of processing these materials, balls are obtained that have a finely porous structure. This version of plaster is resistant to moisture, but it also does not allow air to pass through. After hardening, the plaster is durable, waterproof, and resistant to burning. In addition, finishing is not needed after applying the plaster. It has an attractive rough surface white, which, if necessary, can be painted with facade paint.
Therefore, plaster based on sawdust, although it has the lowest cost, has a number of disadvantages, among which, first of all, it is unstable to moisture. Exterior plaster walls insulated using this version of plaster is impossible, since the scope of its application is limited to internal thermal insulation works. Although polystyrene foam plaster has excellent adhesion, it requires additional waterproofing and finishing. Plaster, which is based on the use of mineral rocks, perfectly resists biological factors, fire and is characterized by absolute environmental safety. However, they absorb moisture very well, so they need additional waterproofing.
There are no disadvantages in foam glass or silicon plaster, since it forms durable coating, which does not require additional waterproofing or finishing. When insulating facades decorative plaster This type is the best option.

Insulation of the facade with mineral wool under plaster: technology of work
In the process of insulating mineral wool under plaster, you will need the following:
- mineral wool in slab form;
- dowels made of plastic with a wide head;
- special composition on an adhesive basis;
- hammer;
- electric drill;
- plasters for facade decoration;
- reinforcing mesh.
The work of insulating walls with mineral wool under plaster is divided into several stages. We invite you to familiarize yourself with them:
1. First of all, you should prepare the walls for the installation of mineral wool. They must be free of dirt, dust, grease or oil. The walls must be leveled if there are any unevenness on them. After this, proceed to the next step.
2. Before installing mineral wool, guides should be mounted on the wall, with the help of which the material is fixed in two directions. For these purposes, it is permitted to use wooden beam or steel profile. The horizontal guide is fixed at a distance of about 60 cm from the ground. To fix them, use self-tapping screws, and in order to fix the mineral wool slabs, use mechanisms in the form of special dowels. Additional fixation of mineral wool is carried out using a special adhesive-based solution distributed throughout the material.

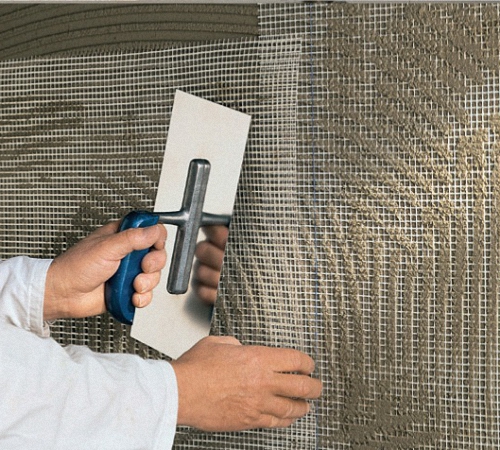
3. In order for the slab to stay as firmly as possible on the wall, it is secured with dowels installed in the corners and in the center of the slab. Use a regular hammer to drive in the dowels. After mineral wool is installed on all walls, a reinforcing mesh should be installed. For these purposes, mineral wool is covered with adhesive solution, and after that, the mesh is installed on the surface. When choosing a mesh, give preference to the fine-grained version, which is resistant to alkalis and moisture.
4. After the mesh is installed and the glue has already dried, the walls are finished using a plaster solution. For these purposes, the most various options decorative piece of the Turks. If it is necessary to level the surface, an additional layer is applied, after which it dries, plaster is applied to decorate the surface.
Insulation of walls with foam plastic plaster is carried out using the same technology as with mineral wool.
Insulation of external walls under plaster video: