Purchasing a new boat requires large financial expenses. For those who don't want to invest a large sum money to purchase this unit, there is another option - to make the boat yourself. A hand-made swimming device will complement the fishing process well.
Types of boats
The following types of swimming equipment exist:
- rubber;
- plastic;
- steel;
- wooden;
- from plywood.
Inflatable boat. In order to make such a boat you need rubber or polymer. The disadvantage of these devices is that they:
- They do not balance on the water surface.
- Not frost-resistant.
- They are easily damaged, so cracks will have to be constantly patched.
Advantages:
- convenient carrying;
- compactness;
- convenient storage.
Plastic boats. At correct operation This type of swimming equipment will last more than ten years. There are boats different colors, with an attractive appearance.
 Wooden boats. These boats are less durable when compared with plastic devices. For wooden material you need:
- constantly monitor;
- coat with moisture-repellent solutions.
Many anglers soak the boat in water before using it for better balance.
 Plywood boats. This type belongs to wooden boats and is currently the most popular among the population.
Advantages:
- Plywood repels moisture well.
- Can withstand heavy loads.
- Very strong material made.
The disadvantage of plywood is that it is difficult to bend.
Metal boats. In order to make this boat you need to use duralumin. This material is very durable and resistant to mechanical damage. Using of stainless steel the boat will be very heavy and transporting it will become almost impossible.
Making a wooden boat
By using wooden materials and knowledge of the nuances of making a swimming device can be obtained good result. Let's consider the entire production process of such a device in order.
Required tools and materials
To make a boat with your own hands, you need to purchase:
- boards;
- polyurethane glue;
- nails;
- latex-based paints;
- silicone sealant;
- syringe for sealing seams;
- sandpaper;
- jigsaw;
- paracord;
- clamp;
- screwdriver;
- roulette;
- drill;
- brushes for applying paint.
After all the tools have been purchased, you should prepare some materials. The board is divided into parts, as a result of which the following are suitable for the future bottom and base of the hull:
How to catch more fish?
I have been active fishing for quite some time and have found many ways to improve the bite. And here are the most effective:
- Bite activator. Attracts fish in cold and warm water with the help of pheromones included in the composition and stimulates her appetite. It’s a pity that Rosprirodnadzor wants to impose a ban on its sale.
- More sensitive gear. Reviews and instructions for other types of gear can be found on the pages of my website.
- Lures using pheromones.
You can get the rest of the secrets of successful fishing for free by reading our other articles on the site.
- One section measuring 460x610 mm;
- The second section is 310x610 mm;
- The third section is 610x1680 mm.
The side parts are made from parts 310x2440 mm. For supports, you should take small bars of 25x50x2400 mm, a total of three supports will be required. To create the bow, it is recommended to use timber, the size of which is 25x76x2400 mm.
To make a boat hull you need to take two bars measuring 25x50x2400 mm. You can fasten them using paracord, after cutting them into several sections.
Manufacturing of parts
 In order to make parts, you must adhere to certain rules:
- Use a disk saw to cut the boards into pieces.
- If the wood is less than 1 cm thick, you can cut it with a stationery knife.
- If the thickness of the board is from 2-6 cm, then the most correct solution would be to use a jigsaw.
- To avoid the appearance of cracks in the material, it must be cut crosswise and weakening strips must be applied to top layer veneer
fasten wooden parts you can use:
- wires;
- self-tapping screws
If the board is fixed with self-tapping screws, you must not drive them into the material, as this may result in damage to the structure.
First you need to make a hole using a drill. the right size and then install the screw. When gluing parts, pay attention to the description of the use of the adhesive base, what the drying time is and the operating rules:
- stripping;
- degreasing;
- surface treatment.
It is worth not forgetting about the location of the fibers on the two parts of the tree. If they are placed in parallel, the strength of the product will increase several times. Damaged parts should not be used; they are defective and will not be suitable for building the boat.
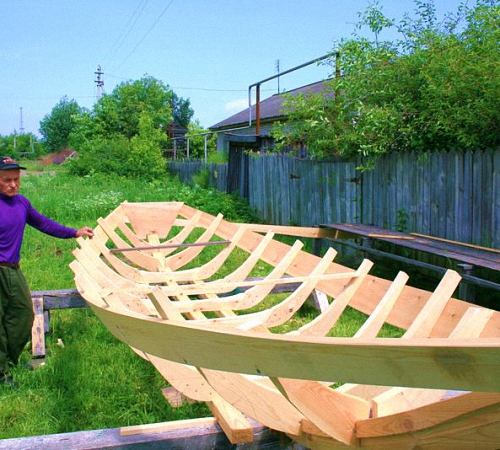
Boat assembly
 After preparing the required parts, you can begin assembling the wooden boat with your own hands. For this action you will need:
- nails;
- pins.
To assemble a wooden boat yourself you need:
- Install the bottom and secure the left side.
- Fix the stern on the left side to the bottom.
- Set the right side to the bottom and stern.
- Secure the nasal area.
To fix the boat with nails, you need to assemble it using an adhesive base. Once you are satisfied with the appearance, you should secure the joints with nails.
After the frame of the boat is made, it should be painted and polished. The finished product should be polished from smaller roughnesses and uneven areas. For this process you need:
- sandpaper;
- Sander.
With help silicone sealant All cracks that appeared during assembly should be sealed. In order to ensure that the boat dries evenly and completely, you should leave it on outdoors. After 24 hours you need to start coloring the product:
- The first layer must be applied externally.
- The second is inside.
After the paint has dried, you should paint again inner side boats.
Boat check
Before sailing a boat over a long distance, you need to check the quality of its assembly. To do this, you need to test the boat at shallow depths for minor defects. If they are identified, it is recommended to immediately work on the errors so as not to be afraid of further possible damage.
Making a wooden boat is a simple process. A home-made device will be no less attractive and will cost much less than a purchased one.
Buying a boat is quite an expensive business. That is why many people are wondering how to make their own small and reliable boat. The process of creating a boat is not as complicated as it might seem at first glance. However, it is quite painstaking and requires a lot of attention to detail.
The first and most important step is to determine what the vessel will be made of. There are not many options, let's look at them:
- Rubber based fabric. The end result is an inflatable boat.
- Plastic.
- Steel.
- Tree.
- Plywood.
Each option has its own advantages and disadvantages that are immediately noticeable. But now we will talk about a boat made of wood.
Having decided on the material, you can move on to the next stages of planning and preparation.
Manufacturing Features
There are really a lot of features, so let's look at them in detail:
- Working with wood. First and main feature– ability to work with wooden structures and with wood in particular. You need to understand which boards are best to choose, how to bend them correctly, what loads a particular material can withstand. Before starting work, it is best to prepare and read books on woodworking. They are very easy to find and are freely available on the Internet.
- Selection of materials for assembly. In addition to wood, you must immediately decide on other materials that will help hold the boat together and protect it from leaks. They must be suitable for the material that has been chosen and interact well with it.
- Assembly location. Manufacturing will definitely require a lot of space and time. For professionals, manufacturing and assembly can take from 4 to 10 days, depending on the complexity. A beginner will need several times more time. This is why it is important to choose a dry and comfortable place.
- Tools. To facilitate and speed up the process, you will need a number of tools (which we will look at later). In addition, it is advisable to have an extra pair of hands during some stages of assembly.
These are the main features you need to know, but as you progress, you will likely encounter others.
 Drawing of a boat from boards for self-production
Deciding on the sizes
One of the most important stages at the planning stage. The size determines the capacity, load capacity and weight. It is very important to maintain the correct dimensions so that the boat is stable on the water.
They can be changed at your discretion, but within reason:
- Length of the entire structure. The length can vary from two to four meters. If the vessel is designed for one, then the length should be 1.8 - 2.5 meters. Two people – approximately 3 meters. Three people – 3.5 – 4 meters. A boat 3-4 meters long can easily support up to 5-6 people; the issue here is more about comfort.
- Width. Also one of the main criteria. Average widths are 1 – 1.5 meters. The greater the width, the more stable it is wonderful. On the other hand, the greater the width, the less maneuverability. It is necessary to find a middle ground. It is different for everyone depending on the person’s body, the load that will be transported, as well as the length of the entire structure.
- Board height. The average and recommended side height is 50 centimeters. Again, you can make it either higher or lower, depending on your desire.
It is based on these dimensions that it will be necessary to make all the details in the future. It is difficult to determine these dimensions by eye, so it is best to make a drawing for clarity.
Moving on to the drawings, we must immediately say that it is not necessary to have a talent for drawing. At the moment, a drawing can be made without having such skills online on the Internet. You can make a three-dimensional model that will meet all the requirements and desires.
In the drawing, in addition to the main dimensions, you must immediately determine the dimensions of other, smaller, but no less important details. It is best to make drawings for them separately, so that you do not have to adjust them in the future.
 Basic planes necessary for constructing a theoretical drawing of a boat hull
 Required materials and tools
Having dealt with all the theoretical issues, we move on to practice. Collecting all the tools and materials and preparing them for work is the final part of the preparation, so this process must be treated with special care.
Consider the list of tools and instruments that will be needed during assembly:

This is the main list of what will be useful during assembly. In addition, other tools may be useful in the process. For example, a hacksaw, a hammer, clamps, etc.
 Selection of boards for lining the bottom of a punt boat
 Manufacturing process
Let's move on to the most interesting part, the manufacturing process. Let's present it in the form of step-by-step instructions.
There is no room for haste or shortcomings, so we do everything extremely carefully and clearly:

Boat testing
After creating and assembling the vessel, we move on to testing it.
You can test the boat in different ways, but the best number of stages is:
- The first waterproof test can be done in the yard. To do this, we turn the boat over and place it on some kind of support (chairs, benches, table). Next we pour it on it a large number of water. To do this, it is best to use a hose and “water” for 5-10 minutes. After this, the boat can be turned over and checked to see if water has gotten inside.
- Now, knowing that the schooner does not allow water to pass through, you can proceed to access to deep water. More precisely, try it in action. It is strongly recommended not to swim to great depths for the first half hour, because if something is done wrong and the boat begins to quickly take on water, it is much easier to get it out of the shallows.
 It is strongly recommended not to swim to great depths for the first half hour.
 Let's look at a few tips that may be useful to a beginner in the difficult task of designing and assembling:
- When assembling, do not spare materials. For example, when fastening the sides to the bottom of a boat, it is worth spending extra time, but carefully going over all the joints with glue or resin. It will be very difficult to correct such errors in the future.
- Do it with reserve. Excess parts of everything can be removed, for example, by sawing off a block in the bow of the boat. This also applies to all other details.
- Before using large nails or screws, it is advisable to make holes for them using a drill. This will prevent cracks from appearing.
- Don't skimp on materials. How better quality wood, the longer and better it will serve in the future.
Active fishing from the water for predators or peaceful fish, hunting for waterfowl, family holiday on a pond - all this is united by one obligatory element - a boat. Modern options for vessels of various displacements made of rubber, polyvinyl chloride, plastic and metal trading enterprises have a great variety to offer. And many worthy products often have one significant drawback - high price. Coupled with the need to purchase a motor for a boat, the overall price of pleasure becomes unaffordable for many. At the same time, there is quite a budget option The solution to the problem is to make a ship with your own hands. In order to better understand the intricacies of making a wooden boat, carefully study our instructions.

For a long time in construction and furniture production this type has been widely used wood material like plywood. High strength with low thickness, durability and even resistance to moisture when additional processing- all this encouraged craftsmen to use it for the independent manufacture of fishing boats equipped with a motor.
Drawings of a future wooden boat
If the dimensional characteristics of the vessel we offer do not satisfy you, it will not be difficult to find a program that calculates the parameters of all parts of the boat depending on the desired dimensions and displacement. 3D modeling capabilities will allow you to view the product from all angles.
The proposed boat has the following dimensions of the main parts:
bow and stern,

reinforcing ribs depending on location:


(Click on the picture to enlarge)
Getting started self-production watercraft, you should study a number of additional literature and become familiar with the name and purpose of the main parts of the vessel. Limitations on the length of this article do not allow us to provide users with this information.
Boat assembly
The material for making the boat, as noted above, is plywood. In this case, it is advisable to purchase moisture-resistant sheets. In this case, your product is guaranteed to be used for many years without the need frequent repairs. It is better to make the bottom from 12 mm material, and for the sides you can purchase 10 or even 8 mm.
From purchased sheets, having previously made patterns, for example, on sheets of wallpaper, you should use a jigsaw to cut out the details of the boat. Unfortunately, the industry does not produce sheets 5 meters long, so it becomes necessary to glue the bottom and sides from two parts. For this, it is best to use EDP glue, since it has maximum moisture resistance, unlike water-soluble PVA. You can glue using overlays on one or both sides in the form of strips of plywood with a thickness of at least 10 centimeters.

In addition, it is necessary to glue together internal stiffeners from strong birch bars located at the required angles according to the drawings shown above. Some options involve the installation of solid saddle cans, glued together from two side parts and a flat bench. This significantly reduces inner space vessel, but increases its buoyancy even when upside down, since air is retained in hermetically sealed cans.
Many novice shipbuilders are faced with the problem of joining plywood parts located at different angles. There is a method called “sew and glue”. It involves connecting parts with steel wire or a strong thread, for example, nylon, through pre-drilled holes in the fastening edges of the parts, 2-3 millimeters in diameter, spaced no more than 5 millimeters from the edge. After “stitching” the body, all joints are additionally glued with fiberglass impregnated with EDP glue or epoxy resin. It is better to glue both inside and outside the boat. This will ensure the strongest possible connection.
It is better to start assembling the hull from the side parts - the sides, bow and stern. Drill holes according to the above parameters with equal spacing and tighten the body with thread or wire. Check the relative position of the elements, secure the sides to the stiffeners using self-tapping screws with glue, and glue all the seams with fiberglass, carefully removing them from under it air bubbles. Leave the case until the glue dries completely.

Using the same technology, attach the bottom to the side parts of the body.

Along the sides along their upper edge, glue the so-called mooring beam, designed to protect the hull of your wooden boat from damage when moored to piers or the sides of other ships.

A mandatory element of a boat that ensures safe turning, especially when moving with a motor, as well as lateral stability of the vessel is the keel. It is attached to the bottom and should be located along its midline.

It is better to make the central keel in typesetting, glued together from several thin slats.

Additional glues in the bow will help give a wooden boat greater strength.

and aft parts.

In addition, it is better to further strengthen the transom - the part of the stern on which the outboard motor is attached.
After all the basics and additional details the boats will be secured in their designated places, you can begin testing the product. Transport the boat to the nearest body of water, launch it and check for leaks and load capacity. The noted deficiencies are marked and eliminated.

Final appearance We paint the product with oil paints in several layers.
Dear readers, comment on the article, ask questions, subscribe to new publications - we are interested in your opinion :)
Before you start building a wooden boat, you need to prepare the main part of such a structure - the sides. To do this, you need to take the smoothest, longest, enough wide boards which are made of spruce or pine.
Look at the photos of homemade boats and you will see that there are no boards on its sides that have knots - this is very important. The boards for this part of the boat must remain in a dry place under slight pressure for at least one year.

Choosing boards for work
Before production begins, it is necessary to once again ensure that the boards are absolutely suitable for the job. Next, for each board you need to measure the required length and carefully cut them at an angle of 45 degrees. These boards will go to the bow of the boat.

After this, you need to plan them and check that the boards connected to each other do not have gaps. Then treat the ends with an antiseptic.


The next step is to prepare the bow of the boat, using a triangular block. It should be one and a half times longer than the width of the sides. The timber is also planed and covered with a layer of antiseptic.

Further instructions for making a boat with your own hands is to select suitable board for the stern of the boat. Do not neglect the supply, because it is better to cut off the excess later than to search and start all over again.

Boat assembly
When the elements of the wooden boat are assembled, you need to begin assembling the product. You should start from the bow. Both sides and the triangular block must be connected to each other using self-tapping screws. It is advisable to immediately cut off the protrusions at the top and bottom so that they do not interfere in the future.

The next step is very important and responsible, since it is necessary to give the future boat its shape. You need to decide on the width of the boat and place a spacer in the middle. Choose a board for the spacer that is the same size as the height of the boat, so the sides will not burst.

Once the brace is properly installed, you can begin to shape the boat, call a few people to help or stock up on ropes to hold the structure in place.

Use the drawings and adjust the dimensions of the stern to make the boat so that when connecting the back wall and sides there are no gaps or cracks.

When the backdrop is installed, cut off the excess part from below, and on top you can make an element in the form of a triangle. Next we work on the spacers, which will constantly maintain the shape of the boat, as well as the seats, which are installed on top of the spacers. You can determine the number, as well as the location of these elements yourself, so it can be one, two or more places.


We align everything on the bottom in one plane and process protective layer the entire surface. When the glue dries, start making the bottom of the boat.

The best option for the bottom would be a galvanized sheet of metal. Try to find a sheet that matches the size of the boat.


How to make the bottom of a boat with your own hands
Place the future boat on a sheet of metal and trace its boundaries with a marker, do not forget to take a few centimeters of extra space just in case, you can always trim off the excess.

The next step is to cover the connection of the boat with its bottom with a special silicone sealant along the entire length in one line. On top of the sealant, until it has dried, a cord is laid in several rows - all this is necessary to ensure that the bottom of the boat is airtight and does not let water inside.

When this process is completed, we move on to connecting the bottom to the frame. Carefully place the bottom of the boat over the bottom of the boat. Use nails or screws to connect.


Start connecting from the middle and move towards the edges of the boat. Do the work as slowly and carefully as possible, as this part is very important.

We cut off the excess metal that sticks out more than 5 mm from the edge of the boat, and bend the rest with a hammer. It is also important to protect the bow of the boat from external factors using the same metal. Cut a rectangle of tin to the size of the boat.

Wherever wood and metal are connected, it is necessary to go through with sealant and lace. By this time, before you start “wrapping” the bow with metal, you need to treat the entire boat with an antiseptic.


Be sure to make a fastening on the bow for the chain. This will help if someone wants to steal a brand new boat, since it will attract attention on a body of water. Special attention due to its novelty.

Before you build a boat, think through and look at all the ideas that you can use to make a boat. Perhaps you will choose a special material for yourself that will be more convenient for you to work with, or maybe you need special protection or massiveness.

Don't forget to cover the bottom with reverse side special paint, since galvanized metal is destroyed over time when in contact with water. The wooden parts of the boat must be coated with several layers of special impregnation and the boat must be left to dry in the shade.


For convenience, inside the boat on its bottom you can lay out wood flooring. This way the bottom will not rattle when you move along it.

At this point the boat will be ready. Read more articles on how to make the best homemade boats with a description in order to find out some other nuances that may be useful to you in future buildings.

DIY boat photo


Buying a wooden boat is a rather expensive process that requires considerable investment. But its manufacture opens up to the creator a variety of options, shapes and style solutions in which the boat will be made; in addition, he will be able to save a little. A wooden boat made by yourself will be an excellent addition to fishing, hunting and just relaxing on the water. Let's look at how to build a wooden boat below.
Main types of boats
There are several types of materials suitable for building a boat. Among them:
- rubber-based fabric;
- plastic components;

- steel;
- tree;
- plywood.
Inflatable boats are also called fabric boats. They are made from rubber or polymer compositions. They are unstable and do not float well on water. They crack easily and are not resistant to cold and frost. They require constant patching and are very dangerous because they get damaged at the most inopportune moment. The advantages of this type of boat are ease of transportation, compactness and ease of storage.
Plastic boats are primarily distinguished by their attractive appearance; they are produced in a wide variety of color scheme. In addition, if used correctly plastic boats they will serve their owner for decades.
Wooden boats made from planks are less durable than plastic ones. In addition, they require constant care in the form of applying moisture-repellent solutions. Some owners of wooden boats soak the device in water before using it to keep it in shape.
Wooden boats photo:

Boats based on plywood are the most best option among wooden boats. Plywood is moisture resistant, resistant to heavy loads, strong and durable. The only drawback of plywood is the difficulty in bending it, so such boats do not have smooth lines, but are characterized by the presence of sharp corners.
For the manufacture of metal boats, duralumin is used, which has the properties of strength and resistance to wear. It is possible to use stainless steel to make a boat, but in this case, its transportation becomes impossible due to the enormous weight.
Homemade wooden boats: manufacturing features
There are special ones for drawing drawings of wooden boats. online programs, helping to calculate the dimensions of an individual part. With the help of a 3D designer, every detail of the boat is visible from all angles.
We suggest that you familiarize yourself with the equipment options for the boat of the following sizes:
- the lower length of the bow and stern is 200 and 850 cm, the upper length is 500 and 1120 mm, the height is 150, 185 mm;
- dimensions of reinforcing ribs: 1st - bottom height, top and length - 830 mm, 510 mm, 295 mm;
- the bead must be cut at an angle; to calculate it, it is better to use a calculator.
Advice: Before you start making a boat, study additional literature related to the number of main parts of the boat and their names.
This boat is made of plywood, when purchasing which be sure to pay attention to moisture resistance. Such plywood will last several times longer and will not require additional costs for its repair and maintenance.
To make the bottom, use plywood with a thickness of 1.2 cm, and for the sides and other parts - 0.8 or 1 cm.
After purchasing the plywood, start making boat parts. To do this, you need to prepare special patterns. They are made on large sheets paper, for example, on wallpaper. The shape of the pattern exactly matches the shape of the part.
To cut out parts, use electric jigsaw. Since the dimensions of the plywood do not allow constructing the entire bottom of the boat, it is necessary to resort to gluing it together from several parts. To do this, use EDP glue or any other glue solution, which is resistant to moisture. The gluing procedure is carried out using overlays in the form of plywood strips, 10 cm long.
Birch beams are used to glue the internal stiffeners together. They are located inside the boat and have a certain angle of inclination. In some versions of the construction of a wooden boat, solid saddle beams are used, for gluing which two side parts are connected to a flat bench. This design allows to significantly reduce internal filling boats, and also increases the buoyancy property, even if the boat capsizes.

For those new to boat building main problem the connection of several parts with each other appears, especially if it occurs at different angular inclinations. The most in a simple way is the so-called “stitching and gluing” method. In this case, the parts are connected to each other using wire made of steel or strong nylon thread. Before this, special holes are drilled in the edges of the parts; their diameter should not exceed four millimeters, and their location from the edge of the boat should not be more than five millimeters. When the body is connected using threads, it is the turn of conduction next process, which includes gluing all joints using fiberglass. It is fixed to the surface by impregnation with moisture-resistant glue or epoxy resin. It is recommended to carry out gluing both inside the boat and on its outer part.
Start assembling the boat hull from the side sections, which include the side, bow and stern. First, drill holes in relation to the indicated values, making sure that the drilling step is even. Tie these parts together using thread or wire. Follow relative position details and evenness of all corner connections. Self-tapping screws will help secure the stiffeners, and fiberglass provides additional fastening. Make sure that no air bubbles form under the fiberglass; if there are any, take care to remove them.
The bottom is attached to the body in the same way. It is necessary to glue mooring beams along the top of the sides. Its main function is to protect the boat from mechanical damage during its mooring at the pier or shore.
As mandatory element The boat's keel protrudes. He is responsible for the safe entry of the vessel into turns and for the stability of its side parts. Its fixation occurs along the central part of the bottom, and is installed along its central line.
To make a central keel, use not one, but a set of several slats. By additionally gluing parts into the bow or rear of the boat, its strength and stability increases.
We recommend that you take care of strengthening the transom - the rear part of the stern. After securing the main parts of the boat, it is recommended to open it with special impregnations. After they dry, proceed to testing the vessel. Transport the boat to a river or reservoir and lower it into the water; if there are no leaks, it is ready for use. It is also recommended to check the amount of cargo that it can transport. When all problems have been corrected, paint the boat using oil paints. Painting must be done in several layers.

DIY wooden boat: manufacturing instructions
Using ordinary plywood and skillful hands it will be possible to build good boat. The average cost of such a boat is about $20-30, which is significantly lower than purchasing alternative boats made of rubber or wood.
To make a boat of this type you will need:
- several sheets of plywood;
- polyurethane glue;
- nails;
- latex-based paints;
- silicone sealant;
- a syringe to help seal seams;
- sandpaper;
- jigsaw;
- paracord;
- clamp;
- screwdriver;
- roulette;
- drills;
- brushes for applying paint.
After preparing everyone necessary tools The process of preparing individual parts follows. To do this, the plywood sheet must be divided into three sections, which will act as the bottom and main parts. The first section is 460x610 mm, the second is 310x610 mm, the third is 610x1680 mm.
Two side panels are made in the size of 310x2440 mm. Use small blocks of 25x50x2400 mm as supports. Required amount supports - 3 pcs. To make the bow, it is recommended to use a block measuring 25x76x2400 mm. To build the body, the use of two bars 25x50x2400 mm is required. They are cut into several parts and fastened with paracord.

When all the parts are cut, proceed to self-assembly wooden boat. To carry out this process, the presence of nails and pins is necessary. Instructions for assembling a wooden boat with your own hands:
- installing the bottom and attaching the left side to it;
- fixing the stern on the left side and connecting to the bottom;
- attaching the right side to the bottom and stern;
- fixation of the nasal area.
Before fixing the boat with nails, first assemble it with glue. When the appearance of the boat satisfies its manufacturer, secure the joints with nails.
Next comes the painting and polishing stage. finished product. After assembling the boat, begin polishing it to remove small roughness and irregularities. To do this you will need sandpaper or some grinder. Using silicone sealant, it is necessary to seal all the cracks formed during the assembly process. Leave the boat in an open area until it is completely dry. After a day, start painting the boat. Apply the first layer to outer surface, and the second on the inside. After the paint has dried, you need to apply another layer inside the boat.
Now you should check the device during the swim. If there are minor defects, they need to be eliminated.

Wooden punt boat: main stages of manufacturing
Before studying the instructions for making wooden punt boats, let’s get acquainted with their advantages:
- minimal construction costs;
- light weight, which greatly simplifies its transportation;
- compactness - it will easily fit in the garage for the winter, and even in the trunk of a car during transportation;
- does not require special finishing or maintenance;
- easy to make with your own hands.
When choosing the length of the boat, you should take into account the number of people and cargo that will be placed on it; the interval between the optimal values for the length of a punt is from 1.8 to 3.8 m. At the same time, the width of such a boat varies from 1 to 1.5 m. The average value the height of the sides is half a meter. The weight of the boat depends on its size and is about 70 kg. The boat comfortably accommodates from one to four people.
Possible option additional installation motor or sails that can simplify boat control. Let's look at how to make a wooden boat further.

1. The first stage of working on a boat is the selection of material for its construction.
To build a punt, you need two types of plywood:
- plywood with increased moisture resistance characteristics, the thickness of such material reaches two centimeters, this type of plywood is based on the use of an adhesive base, please note that it contains harmful substances, therefore it is not recommended to use it in residential premises, as an alternative we recommend purchasing multi-layer plywood laminated type, it is safer for health;
- five-layer aviation plywood - light in weight but highly durable; seats and transom are made from it.
Exists certain rules working with the material that underlies the construction of the punt, namely:
- to cut the material into parts, use a disk plate;
- if the thickness of the plywood does not exceed one centimeter, a stationery knife is enough to cut it;

- with a thickness of two to six centimeters, the best option is to use a jigsaw;
- It is not recommended to cut plywood across the grain, as there is a risk of cracks; if necessary, in this type of cutting, place weakening strips on the top layer of veneer;
- when arranging popular types of wooden boats, the parts are connected to each other using wire, self-tapping screws or epoxy resin; when fixing using self-tapping screws, you cannot drive them into the surface of the plywood, as this will damage it; it is recommended to first drill a hole of the appropriate diameter, and then install a self-tapping screw;
- if necessary, equip the boat with the presence curved shapes, you need to wet the plywood, bend it into the desired position and fix it until it dries completely, the duration of the procedure is about 15 hours;
- In the process of gluing parts, pay attention to the glue packaging, it indicates general recommendations on its drying and working rules, which include cleaning, degreasing and treating the surface with glue;
- pay attention to the arrangement of fibers on the surface of two plywood parts; when they are parallel, the reliability of fastening increases several times;
- when plywood delaminates during the work, it is recommended to glue it; for this, place between the delaminated layers paper sheet, impregnated with glue, such plywood is not suitable for building a boat, since it is defective.
2. Next stage involves choosing the optimal tool for the work. It will help to cut the material electric saw or jigsaw. With the help of an electric planer you can do it required angle hooks. Allowed to use any electrical or mechanical tools for grinding. Using a screwdriver, install self-tapping screws and make holes for them.
3. The most optimal place to work is above the boat, since large parts will not fit on the table. Place the plywood sheet on the floor surface and transfer the pieces onto the surface using a square.
Tip: To significantly save material, you should make a preliminary sketch of the boat on paper. Experts recommend, if possible, to build exact copy boats made of cardboard to have an idea of its original appearance.
There will be two options for making the boat. The first involves installing vertical sides that have straight lines. Second - classic version- this is the installation of sides, a little narrowed in nature. To make them, you will need to do some embedding. To do this, it is recommended to use electric plane. Walk it over the surface of the parts once. Next, repeat the procedure using any grinding tool. If there are rods or other jumpers in the fender that increase rigidity, they are cut out at this stage.
Tip: To make assembly easier, use plastic cable ties. They become almost invisible after the boat is finished with epoxy resin.
When the frame is assembled, proceed to connecting the bottom. Its fixation is carried out with clamps or the same metal wire. Please note that the bottom must be properly sealed; for this it is filled with resin. If you use fiberglass lining, leaks cannot be avoided.
When all joints are dry, proceed to the next treatment. It includes sanding the seams. Next, the joints are covered with fiberglass coated with epoxy resin. The outer part is glued twice, and the inner part once.

4. Installation of additional components.
If it is necessary to install a sail, the vessel must be additionally strengthened, thereby increasing its stability. It is better to do this with the help of a centerboard. to make it you will need plywood 0.6 cm thick. In addition, the steering wheel is cut from this plywood. The number of centerboards depends on the size of the boat. The best option is to install two centerboards at the outermost parts of the vessel. The rudder is attached to the boat with several hinges, preferably of a non-removable nature.