Day after day, owners of personal plots rack their brains over the question “how to improve their piece of land and make it more attractive.” Fortunately, there are already a lot of ways to decorate. But sometimes you want something exclusive, something that is rarely found and with which you can pleasantly surprise your dacha neighbors or guests.
You can build a dacha with an exclusive design on the territory, but such a pleasure costs a lot of money. Can be organized, which includes rare plants, but you can’t walk on it, and it requires constant care.
When thoughts and ideas are running out, and nothing worthwhile has come to mind, pay attention to this interesting symbiosis of two decorative elements: wooden bridge through a dry stream.
A talented designer is able to create a real masterpiece, which will organically combine with the overall landscape and at the same time stand out against its background.
If you organize everything correctly and tastefully, you can get a very attractive composition, which will delight the eye day after day. Implementing a dry bridge over a stream is quite simple, and you will see it very soon. Well, first, let's look at each element of the composition - first a dry stream, then a wooden bridge separately, and after that we will merge the two parts into one common object, which will become an object of admiration and pride.
Advantages of a dry stream over a water one
Beautiful stream on personal plot It is implemented in several ways, which are divided into two main groups: using water and dry.
Each type has advantages and disadvantages, is beautiful and original in its own way.
By organizing a real pond, you create a separate world with its inhabitants (fish, aquatic plants). It is pleasant to spend time near such a pond; it has a beneficial relaxing effect. As for the dry reservoir, it is not deprived of its advantages.
The main advantages of a dry pond:
Ease of organization. A dry stream can be constructed on our own without any problems or financial costs.
Speed of construction. In just two or three days, you can complete the entire construction process: determine the location, mark the channel and fill it with stones, sand and other integral elements.
Easy to care for. The only thing a dry stream requires is to remove the growing weeds in time. Whereas a water stream requires special treatment equipment and constant monitoring of water.
Decor. A dry pond can be decorated with any plants and decorative elements. Its aquatic counterpart is more demanding and requires special algae, and the surrounding area can only be planted with moisture-loving plants.
Safety. A dry stream does not pose any danger to small children. In addition, in the territory of the dry stream there will be no annoying mosquitoes that so love to visit water bodies.
Bed. The bed of a dry stream does not require expensive compressors, various systems water supply and treatment, which is necessary elements every natural body of water.
Making a dry stream with your own hands
When there is no doubt and the decision is made in favor of a dry reservoir, you can begin to implement it. To do this, you need to choose a place and decide on necessary materials.
First of all, it is necessary to outline the contour of the future stream and dig a hole equal to 15-25 cm along its perimeter. To prevent the growth of weeds, it is better to cover the bottom of the future reservoir with any covering material. Suitable for this dark colors geotextile or non-woven material, well permeable to moisture. This simple measure will protect you from annoying weeds that can significantly spoil the appearance of your masterpiece.
Next, you can fill the reservoir with the necessary materials: sand and various types stones. For laying, several types of stone are taken at once, as a rule, these are pebbles, pebbles and rubble. Rubble is used to strengthen the edges of the stream, pebbles mixed with sand fill the stream bed, and cracks are filled with bare stone.
In order to harmoniously fit the future stream into the overall design of the site, they use the same stones and materials that were used to decorate the site or buildings.
The main thing to remember is that the dry stream came to us from Japan. And this is a country in which it is valued brevity and moderation. After constructing the stream, it needs to be decorated. The right thing will help with this. Here it is better to take those species that are associated with water, but can grow on ordinary soil. When decorating, as well as when organizing the stream itself, you need to know when to stop: do not allow your pond to turn into an ordinary flower garden. Plants should only emphasize beauty, but not become its main element.
Avoid using tall plants, but bluish-gray or blue colors work best (bells, blue fescue, creeping grass, mosquito grass and others).
Decorative bridges on a personal plot
The second element of our idea is decorative bridge. There are many options for implementing this construction: bridges can be different shapes, sizes, styles and made from different materials. Main stylistic directions for organizing bridges: country, avant-garde, bridge to nowhere, wild forest and Japanese bridges.
Each style has its own characteristics, based on the concept of the style itself. Country music is characterized by straight shapes with wide railings, made of wooden baluster. Stylizing the bridge as an avant-garde, asymmetrical forms born from your imagination are used. The so-called bridges “to nowhere” are becoming increasingly popular - the structure simply breaks off in the middle of the path. If the main idea of the garden is a wild forest, then the design of the bridge should be appropriate, i.e. an ordinary bridge made of boards or two logs thrown across or along a stream. It looks simple and tasteful.
If the stream has the wrong curved shape, then it is better to locate the crossing in the place where the channel is narrowest.
In addition to its decorative function, the bridge can also serve its intended purpose. For example, you can use it to go to the gazebo or organized place recreation. Often such bridges are built to cross small ravines on the site. The main condition for organizing a bridge is that it must correspond as closely as possible to the concept of the entire garden and become integral, and not be a separate structure that is located in an unknown place and for no clear reason.
Greetings to our guests and subscribers! There are now a lot of different small architectural forms on sale (we’ll talk about the bridge) for every taste and budget. But I want to draw your attention to wooden bridge. I believe that wood is a more accessible material for summer residents. Besides, wooden bridge will fit into almost any garden landscape.
Many materials are used in the manufacture of summer cottage bridges: metal, bamboo, stone, concrete. As for the shape and design, here, too, not everything is as definite as it might seem at first glance: after all, bridges can be straight, humpbacked, stepped, zigzag, step-by-step, and hanging...

Wooden bridges Excellent for a suburban area with already installed buildings and wooden decor - a bathhouse, gazebos, tables, benches, a well. To make the wood last longer, choose one of the most valuable species - larch, cedar or oak. Special antiseptics, impregnations and varnishes increase the service life and give the wood desired shade. A traditional (straight) garden bridge 2.5 m long consists of supports, spans, decking and fencing (railings and balusters). For supports take thick timber or tarred logs, which are laid on support platforms in the form of ledges on coastal slopes. Or you can simply do without a fence.

How to make a wooden bridge with your own hands?
If the length of the bridge is more than 2.5 m, then intermediate supports, for example, concrete or wooden piles, should be installed at the bottom of the reservoir. Special attention you need to pay attention to the size of the reservoir. If it is wider than 6 m, then before constructing the bridge you will have to build a solid foundation, for which you should use reinforced concrete blocks and intermediate supports.
The bridge design is:
Supports - they can be logs or thick beams, laid on support platforms (banks)
Span - determined by the shape of the bridge, located between the supports (bend of the bridge).
Fencing or railings can be one-sided or two-sided;
Flooring - it is laid across the supports, it must be strong and reliable.
SUPPORT
Once you have chosen a location for the garden bridge, you can begin to clear the area of weeds and debris. At the first stage it is necessary to build support platform and strengthen banks or slopes. Crushed stones and stones can help in solving this problem. different sizes. If the bridge is not very long, then a beam can serve as a support. Most garden bridges are installed without a foundation, but a foundation for stone and metal products is required, since such bridges are very heavy.

SPAN
The span (arch) of the bridge will be two slightly curved beams, with a cross-section of 20x35 cm, they are made from straight blanks, removing excess wood with a jigsaw and chisel, and a deck of boards will be attached to them. Depending on the shape of the structure, the span can be flat or convex.


FLOORING
After this, they begin laying the wooden flooring, and then install the pressure bars. The main requirement for it is that the coating should not sag. And when laying boards with slots, water does not linger on the surface of the flooring.
To fix the flooring in one place, it is screwed or driven in with nails. This should be done so that, if possible, they are equal to the level of the wood surface. Check the level to ensure the base is level. The boards are cut to size and attached with stainless steel screws. Between them leave gaps of 1-1.5 centimeters, through which it will go excess moisture. Before installation, all parts must be thoroughly dried and treated with special impregnations.
FENCE AND RAILING
Creation completes DIY wooden bridge construction of a fence. It is attached on both sides of the bridge to the bridge span. The railings are installed at a height of about 70-100 cm. At the stage of finishing the bridge, you need to protect wooden elements from moisture by covering them with paint or a protective agent. The design of the railing can be different, the easiest way is to fix it on several balusters curved arcs. Then they can be decorated with carvings, hemp rope or bamboo inserts. If the bridge is flat, you can do without a fence.


The finished product is painted or coated with stain, paint or varnish.
These are such similar and completely different wooden bridges!
While I was writing the article, collecting material and selecting photos, a desire arose to make a wooden bridge on our site.
By the way, leaving a review or comment is now easier - just enter the name! Ignore the email!
Regards, Tatiana!
Did you find the article useful? Share with your friends, because someone is looking for this information right now!
Original landscape compositions using a small bridge as a figure connecting space are not uncommon today. These ideas were doomed to popularity from the moment they appeared on the green lawns of our dachas and country houses.
Natural bodies of water, a pond or a stream are very rare on private property, so bridges serve more as decoration for the landscape; functionality is not the main thing.
The aesthetics of the landscape, the creation of conditions for peaceful contemplative relaxation, the possibility of meditation and reflection in the present life are as necessary as proper nutrition and giving up bad habits.
Add to this creative self-realization and the desire to create a certain composition in the country with your own hands, and it becomes clear why bridges are so popular.
Harmony of solitude
 Where is the best place to place landscape composition so that the bridge looks harmonious? Solitude requires distance; it is better to choose a remote area of the estate, somewhere among the trees, in a corner of the garden.
The first association with the word “bridge” is overcoming any obstacle, water, mountain, one that is in no way associated with home. Therefore, distance from home will enhance the effect; in addition, walking requires some distance.
It is also important to tie the composition with a seating area, a gazebo. There are several good options placements:
- along the way;
- aside;
- in the distance, each of which is interesting and original in its own way.
Advice: The most correct choice of composition location is the one that prompts the heart.
You can enhance the emotionality of the composition by creating a man-made barrier, or by installing it on the water. It could be a pond, a picturesque small ravine, originally decorated with dwarf shrubs and plants.
Decoration as a safety method
An artificially created element of the landscape is an obstacle that you can stumble upon and slide off. It is necessary to take safety measures, but those that would be a decorative technique:
- Handrails. You can make handrails from wooden branches intertwined with each other, carve balusters, use wicker fabric, you can order and install forged handrails, it is important to comply with the style.
- Lighting. Can be installed Street lights, which illuminate the space in dark time days. No less interesting and functional garden lamps that illuminate paths and bushes. Lighting can be dependent on electricity or independent, powered by solar powered. The lighting aesthetics complement the picture emotionally and aesthetically.
- Flooring quality. It is clear that a smooth, non-slip surface is the key to safety. Rubber inserts and artificial surface roughness will not be superfluous.
Take note: use for illumination solar energy. Yes, such lamps are not cheap, but they eliminate the cost of electricity consumption, which is steadily becoming more expensive.
Neglect of safety leads to negative consequences, injuries or bad mood, which is not included in the estate improvement project.
What to make from
 It is better to use the material that is familiar. It is more convenient for those skilled in carpentry to work with wood, for masons with stone, and for those for whom these activities are unfamiliar, it is better to turn to professionals or buy a finished product.
The materials for the main element of the landscape composition can be:
- tree;
- stone;
- metal;
- plastic.
Each of the listed materials has its own advantages and disadvantages. When choosing what to make a structure from, everyone takes into account material capabilities, creative guidelines, and the ability to work with a particular material.
 As a rule, the choice falls on wood; the material is cozy and compositionally appropriate. suburban areas, environmentally friendly, durable if processed in a timely manner, lightweight and very pleasant to work with. Wood is stylistically suitable for any style, because you can build a bridge from logs, boards, beams.
A bridge made of concrete and stone looks fundamental and is distinguished by its unpretentiousness and durability. To decorate the railings, you can use mosaics, decorative rock, clear glass. It must be borne in mind that such a composition must be connected by tracks and other style elements.
It is difficult to make metal structures with your own hands without the appropriate skills, tools and equipment. You will have to seek the help of specialists.
No less interesting are combined compositions, wood with metal, metal with concrete, etc. A matter of taste and imagination. The important thing is that any of the materials, even plastic, will fit perfectly into the composition and create a certain style and flavor. The photo will tell about this more eloquently.
We build from wood
 We build a wooden bridge, armed with the following tools:
- screwdriver;
- electric drill;
- hacksaw;
- hammer;
- plane;
- files;
- wood treatment agent, varnish and primer;
- fastener
We will also need stationery for drawing. You need to make drawings first. A product without a drawing has a lot of shortcomings and is not durable.
 After the drawing is ready, we get to work, installing a bridge across a small ditch, man-made or natural:
- At a distance that covers the bridge, we lay two logs or beams parallel to each other, this is the base. In the places where the base lies, we lay waterproofing and treat the wood with an antiseptic to protect it from rotting.
- We secure the base (logs or bars) with metal brackets so that it is rigidly fixed, and the brackets themselves protrude above its surface.
- We install the bridge spans and secure them with brackets. The span can be straight, or it can have the shape of a semicircle.
- Next we lay the flooring, for which we use boards, this is the simplest option; half logs, their installation requires skills; logs that need to be fastened together with staples inside bridge.
- The final stage is the railing.
Find out how you can boost your cellular signal at your dacha:
It is important to know: Make sure that the flooring is level and has sufficient roughness that it is not slippery to walk on. It is especially important to test the bridge for strength, especially if it is laid through a real or artificially created barrier.
After creating the structure of the bridge, we begin to decorate it. Clay toys look good in summer cottages, but best decoration original vegetation.
About natural and artificial barriers
 To make the bridge look natural and fit harmoniously into the landscape composition, it is worth considering the construction of artificial barriers, a ravine or a small reservoir.
This could be a pond; a dry stream that goes around garden or other trees would be perfect. The second option is more economical and easier to implement.
It is necessary to outline the bed of the stream, make small indentations, use stones that are at hand to mark the banks, lay out the bottom with pebbles and sand to create the impression that the water has gone away or has dried up. It’s not difficult to imagine how wonderful a bridge connecting the banks would look.
A bridge and a real pond, and even with a waterfall and various decorative additives - the best thing you can come up with. The costs and efforts will be more than repaid by the opportunity to sit by the pond and cross the bridge to it. With a little effort, the mini-pond will delight you with its beauty.
Good to know: do not stop halfway - what is made by your hands is the most beautiful and precious for you and your loved ones.
How to make a beautiful decorative bridge at the dacha with your own hands, see the instructions in the following video:
One of the most attractive and unusual small architectural forms for a summer cottage is a bridge. It can only be found on those suburban plots whose owners have creativity, rich imagination and, in rare cases, just luck if a narrow pond flows through their plot. Building a bridge with your own hands is not a huge task, and its decorative function will definitely attract the attention of guests, so read the information provided below and, having gained inspiration, make this miracle construction at your dacha!
- Article
- Video
The purpose of the garden bridge
Even in ancient times, in the countries of the East, the bridge carried not only functional purpose, as a crossing, but also a decorative and even spiritual function. The Japanese are confident that the garden bridge is an intermediary between our world and space, and that all the problems that arise in humans life path, it is necessary to decide and think about it while standing on the bridge.
If you have on your summer cottage a small pond, natural reservoir or stream, which is located in the middle garden plot, then the construction of a bridge will be the only solution so that you can cross to another part of the shore, this is the functional part of the garden bridge.
Today, experts in the field landscape design began to actively use the bridge as an unusual decorative element of the garden plot. Moreover, so that the presence of a bridge at the dacha does not raise questions, designers specially create narrow, extended water obstacles in the form artificial reservoirs, through which garden bridges are built.
In addition to bodies of water, garden bridges can also cross more decorative elements, such as a dry stream or a small ravine.
Material for creating a garden bridge
The most common, aesthetically attractive and inexpensive building material for constructing a garden bridge with your own hands is wood. In addition to the above advantages, wood has the following advantages:
- Environmentally friendly material
- Relatively long lasting if treated early protective equipment
- Ease of installation/disassembly
- Lightweight structure (for a bridge this plays an important role)
- Wood fits into almost any garden style, especially in landscape and
It is precisely because of such a number of advantages and practically not a single disadvantage that in our instructions we will also talk about how to make a wooden garden bridge with your own hands!

In addition to wood, garden bridges are often made of metal, natural stone and concrete. These building materials better than wood just because they have more long term services.
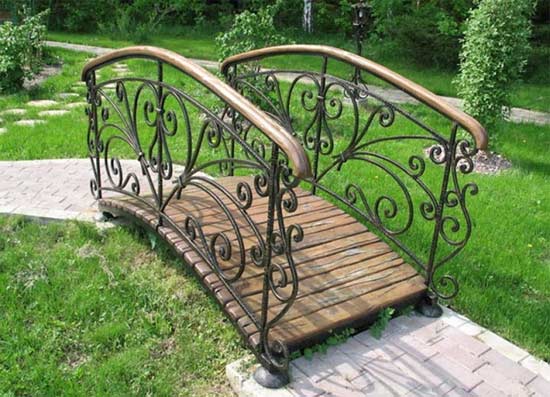
A metal garden bridge, made using figured forging, will perfectly decorate the garden area and make appearance bridge more luxurious.
If you use concrete and natural stone to make a garden bridge, you will not only lose significant amount material resources, but also miss the chance to make this architectural form with your own hands, because you will need the help of specialists. A significant disadvantage of such a bridge is its weight, because of which you will have to take the issue of strengthening the soil on which the bridge will rest very seriously, otherwise it will begin to creep and the structure may collapse.

The advantage of a bridge made of concrete and natural stone is its ancient, rich appearance, which can perfectly complement an antique garden style.
Experienced gardeners and craftsmen recommend implementing a combination of styles that will “kill two birds with one stone.” For example, if you make the base of the bridge from reinforced concrete, the bridge will be strong and stable, and the railings are made of wood, then the appearance of the building will become more attractive. The more popular metal-wood combination is used with the same success.
Where to place a garden bridge?
Since the garden bridge is unusual architectural form, which can complement the garden, it is recommended to place it in the same unusual place. If he performs exclusively decorative function, install it in your backyard, making a little surprise for garden visitors.
You can also place a garden bridge in the foreground if you use the decor of the garden area in the form of a dry stream, complemented by a stone garden and a mixborder.

A functional garden bridge must be placed in the place where it will be most in demand, relegating the decorative function a little to the background.
Very a good decision will install a garden bridge next to the garden so that after a walk completed by the bridge, you can relax with a cup of tea in the barbecue area.
It is not recommended to connect the banks of a round pond with a bridge; it will look ridiculous and will only worsen the overall composition of the garden. Remember, the best location for a bridge is to connect the banks of a narrow pond or reservoir.
If you are creating artificial pond, make a small island in the middle of the pond, onto which the garden bridge will cross.
It would look very awkward to place a large garden bridge under a small tree, and vice versa.
The most attractive look will be a slightly curved garden bridge, near which are neatly planted low-growing perennials And .
What should you consider when creating a bridge with your own hands?
When creating a garden bridge with your own hands, you must first take care of safety measures.
Since the height of the bridge will exceed the soil level, be sure to build a railing at a height that is comfortable for a person of average height. The railings must be secured firmly so that they are stable.

Another requirement is good lighting of the bridge, because... Walking will take place mostly in the evening. It is recommended to install the backlight in wood flooring bridge or install lanterns along the contour garden path and the bridge itself. A good option for a dacha would be to install a lantern on a pole or decorative one above the bridge.
Well, the last of the most important safety measures that need to be taken into account when creating a bridge with your own hands is that the bridge deck must be made of non-slip materials, because When it rains, you can be seriously injured by crossing this structure. In order to make the flooring less slippery, it is recommended to install rubber inserts into it or make notches manually, in the form of protrusions.
How to make a wooden bridge with your own hands?
Creating a garden bridge with your own hands is not difficult, and the process itself takes no more than 1 day, we will confirm this with this video tutorial:
The first step is to prepare a place for the garden bridge. For this purpose, the banks are strengthened using compacted crushed stone or cobblestones. It is necessary to lay two strong wooden blocks in parallel on the prepared slopes; the distance between the bars will determine the future width of the bridge. At those points where wooden blocks will be adjacent to the soil, it is necessary to carry out waterproofing. Minimal waterproofing - treating wood with antiseptic protective agents, wrapping it with roofing material or coating it with molten bitumen.
After the bars have been processed and laid, we proceed to securing them. To do this, metal pegs are driven into the notch of the bars and span bars are secured on top of the supports (their length is equal to the length of the bridge). The span bars must also be secured using metal brackets.

Next we move on to creating the flooring. To do this, boards with a thickness of at least 3 cm are nailed across the longitudinal bars. Pressure bars are attached to the top of the boards. We do not forget about safety measures and immediately when creating the flooring we take care of its slipperiness.
After the flooring has been created, all that remains is to make the railings and light the bridge. The simplest option for railings is to fix the bars (1 meter long) vertically, at a distance of about 30-40 cm from each other along the long sides of the bridge. Attach another bar to these bars on top, only this time horizontally - these will be the railings. Remember that the railings must be strong and stable, so do not skimp on self-tapping screws to secure them.
After the bridge structure is made, all that remains is to decorate it to your taste and decorate it with garden lanterns.
As you can see, creating a garden bridge with your own hands does not present any special difficulties or construction skills. All you need is determination, a little time and imagination!
Video example of creating a wooden garden bridge with your own hands