Working on the ground can really be easy and enjoyable if you use the right tools, and we will tell you how to make such devices for the garden with your own hands! Look at the inventions and tool improvements made FORUMHOUSE users, may they serve you faithfully too.
Flat cutter "Mower"
User www.site Antol13 invented and designed the “Mower” flat cutter (from the word “braid”). Previously, a forum member used a Fokin flat cutter to process potato rows, but then he decided to make his work easier: “it seems good, but it’s not that, and the quality of the metal, its thickness leaves much to be desired, and the prices are too high.”
For a new device that would penetrate more deeply into the soil, the forum member decided to use a scythe that was lying around unnecessarily and a cutting purchased in a store for 30 rubles. He spent 40 minutes making the flat cutter. The work does not require serious technical skills:
- Use a grinder to cut off the stiffening collar so that during operation the flat cutter does not experience resistance and does not cling to the ground. Optimal length flat cutter blades – 17 cm.
- Increase the angle of attack by bending it in a vice using a gas wrench. The angle of attack of the blade is 30-40 degrees.
- For better fixation in your hands on the handle of the flat cutter, make grooves on both sides with an electric planer.
- A stainless steel clamp at the top of the tenon will strengthen the fastener and prevent loosening.
The flat cutter performed excellently in its work. It also performs the functions of a scythe: it can be used to mow old burdocks, tartar, and other “grass vermin.”

Antol13
The manufactured flat cutter exceeded all expectations; I have never experienced such pleasure in work. Two working edges allow you to do the job quickly and with good quality without bending.
Beet seeder

viktor50 I planted beets by hand. The soil was slightly moist, and few beets sprouted, there were even gaps of 1-2 meters, although at the state farm where the seeds were taken, the sprouts were good. “Then it dawned on me that there was a seeder there, it was sowing seeds and rolling them down. Without rolling, seeds seem to hang in the soil, have poor contact with moisture, and if the soil is slightly dry, you may not be able to wait for germination.” On next year in just half a day, a forum member made a semblance of an industrial seeder in just half a day. The seeds germinated close to 100%.
By design, the handle is located in front of the seeder (the seeder is pulled by one person). At the state farm yard, gears with a diameter of approximately 200 mm and a width of 20-30 mm were collected. They were welded together to create a roller with a diameter like gears, a width of 15 cm and a weight of 5-7 kg. A piece of pipe with a diameter of approximately 3/4 at the bottom is slightly bent along the direction of the seeder, cut along the rear wall by 5 cm and the pipe is turned out (it turns out like a hollow nose of a cultivator). This pipe is attached to the handle first, then there is a device that rakes the furrow. Behind this hiller there is a welded gear wheel; it compacts the planting. A two-liter plastic bottle with a cut bottom is inserted into the upper part of the pipe: the person who follows the seeder throws beet seeds into it.

viktor50
That's the whole device, as simple as three kopecks. There are no turned parts, everything is done on the knee. If there is welding, then there are no problems with assembly at all. We have been using this seeder for about 20 seasons.
zayka2 makes things like this manual seeders, copied from “Vinnichanka” with a brush sowing device. He slightly improved the design: he installed removable drive sprockets and modernized the marker - he installed a control handle so as not to bend over to throw it to the other side. With such seeders you can sow almost any seeds: carrots, nigella onions, beets, beans, peas, corn.

Universal garden wheelbarrow
Forum member unkas This year I had to start filling up holes on my site. There were two-wheeled carts available, the track of which turned out to be too wide in some places. The neighbors didn't like the garden wheelbarrows unkasу for different reasons.
The forum member bought a polyurethane wheel that does not need to be inflated (a similar wheel, but not made of polyurethane, but made of rubber, is cheaper), 2 corners, an axle made of a bolt with a nut and a block of 40 * 40 * 3 m. He had plywood and the rest.

unkas
Wheelbarrow building is an exact science. If you do everything by eye, it turns out a little crooked.

Home water tower
Jacomo Venciano builds water tower for watering the garden.
It looks like this: a small round foundation with three concrete rings of two meters in diameter on it, placed on a mortar. On top there is a concrete cover with a hatch. The expert calculated the strength of the tower rings (the weight of the rings plus the water pressure). It turned out that there is a threefold reserve even for the weakest concrete, but provided that the concrete is not saturated with water. That is, waterproofing is important both inside and outside (from rain). For external waterproofing, the forum member decided to make a conical roof with an overhang.
Stairs are installed inside and outside the tower. The seams between the rings are carefully puttied, the transportation holes are sealed. Everything outside is painted green, inside there is waterproofing on the walls and foundation and a layer of plastic like acrylic.
At the bottom there is a drain and watering fitting. At the top there is a filling fitting. A transparent hose-level gauge is hung from the drain fitting through a tee along the outer wall.

Jacomo Venciano
I will connect the float valve from the toilet cistern with pre-flow to the filling fitting inside. coarse filter. I will pour from summer water supply pressure 1 atm. hut
In winter, the tower will be empty, and in summer, the water in it will warm up to the average daily temperature, up to 15 degrees. It will be possible to dilute fertilizers in the tower to feed the garden, mixing them with a drainage pump.
The forum member will not bury the container: the only advantage of a buried container is that the water in it does not freeze in winter. But why do we need irrigation water in winter?
Apple picking tool

Acordic I made a simple but functional garden device that can be used to pick apples and plums. Before that, she tried several options for fruit pickers from the store at her dacha, but then they all turned out to be abandoned and gathering dust without use. It turned out that it is better to use a three-meter aluminum pole and plastic bottle there is nothing. The forum member often uses this device because of its lightness and convenience.

Acordic
And we can’t live without him anymore. It's convenient and doesn't require a ladder.
Screw planting of seeds
Denforever came up with a device for planting seeds that allows you to avoid making holes and subsequently thinning out the seedlings. The device is made in several versions: length 3 cm, 5 cm and 2 cm. In the future, a handle will be adapted to the device. In the photo we see that the screws are not screwed in - this is for convenient transportation to the dacha. Then they will need to be screwed in.

Miracle shovel
Serdsvetlana absolutely delighted with the “miracle shovel”, which is easy to make yourself. The ease with which the garden is dug up, the soil is loosened and the potatoes are dug up is surprising.
The peculiarity of tilling the soil with a miracle shovel: the garden is dug not across, but along. We take the miracle shovel by the edges top bar With both outstretched arms, we step on the platform (footboard) and it easily enters the ground. With a slight movement (can be combined with light shaking), taking two steps back, we move the shovel from a vertical position to an almost horizontal one. After this, we take a step forward, pull the shovel back 30 cm, give it a vertical position, drive it into the ground and repeat the cycles until the row ends. Then we proceed to process the next row.
Materials: half-inch pipe, round timber (or hexagon) with a diameter of 15 mm.
For ease of transportation, a collapsible design can be made.

Read on FORUMHOUSE about other homemade tools - a wood splitter, a concrete mixer, and about what tools should be in your arsenal. And watch our video reviewing new products for gardening.
As they say, there is never too much space in the garage. Men who spend a lot of time in the garage will agree that in some cases every minute and every square centimeter of free space counts. This is why a garage handyman needs competent organization workspace. Various people help out and help here in every possible way. devices for storing building materials and work equipment, machine parts and other things necessary for work. To ensure that your electronic, garden and garage gadgets are always in their place, use the following devices:
- stands;
- shelves;
- retractable panels;
- racks;
- organizers for tools.
Also, for clarity, we offer do-it-yourself homemade products for the garage and home craftsman - the YouTube video will reveal all the nuances of organizing the workspace and suggest fresh ideas.
DIY crafts at home with your own hands
Man has been making homemade crafts since prehistoric times. Actually, all industrial processes are improved once artisanal or home-made developments craftsmen. Sometimes we don’t even think about the fact that we pay for things that we can do with our own hands. DIY homemade schemes are easy to find online, and the materials can be purchased at a hardware store or found at home.
For example, from cardboard box and a piece of fabric You can make a convenient portable organizer for towels and other textiles.
The topic of storing all sorts of little things is inexhaustible, fortunately, as is the number of ideas. Good ideas for decor You can also draw from ordinary things - let them be buttons or empty tin cans.  Cool shelves are made from ordinary drawers. How do you like this idea?
As you managed to understand, if there is detailed instructions It’s not that difficult to make homemade products with your own hands at home. The video will help you understand all the nuances of this enjoyable activity. Useful tips, interesting ideas- Everyone should watch it.
DIY crafts for the garden and garden with your own hands
At the dacha there is usually some free time for creativity and arrangement of the surrounding space. That's why It's worth having a few on hand fresh ideas
to implement them on your own summer cottage. Country homemade products at home, with your own hands, they can be ingeniously simple. From scrap materials you can make unexpected and extremely useful things for home use. 
Ordinary pebbles turn into fairy-tale animals.From an old teapot It makes a wonderful flower pot.
Used tires- this has already become a classic in the world of garden figures.  Stylish lamps for country interiors – do it yourself from an ordinary jar and candles (don’t forget about safety precautions).
- a great idea for a small cottage.  Do-it-yourself homemade products for a summer house and vegetable garden are often obtained by themselves, without unnecessary time and financial costs. Perhaps you had no idea how useful it is for household will turn out to be plastic bottles. Plastic bottles that have gone out of use can serve as the basis for an incredible decorative flower bed.
  Cool “blooming” pillars will significantly decorate your garden space.
Do-it-yourself garden furniture, successful homemade products: photos and drawings
In the previous sections, we told you about homemade products that will become indispensable for the household and home life. However, we should not forget about rest, before which, nevertheless, you will have to work a little. Cozy armchairs, various tables and benches, swings and hammocks- all this country and garden bliss can settle on your site. We invite you to familiarize yourself with photo instructions and drawings for making garden furniture. We have selected the best options for you.
With the beginning of the spring season, the owners garden plots there are a lot of worries. The time has come to prepare the place for. Then, to obtain rich harvests, it is necessary to properly plant seedlings or seeds, and then carefully care for the plants during the summer.
For all these processes, certain tools are used, which can be purchased in specialized stores or made independently. Some of them are very unusual and are the fruits of a creative approach experienced gardeners to difficult work on the ground. This publication will discuss how you can make non-standard, convenient and effective garden tools with your own hands to greatly facilitate the cultivation of the land.
Where to begin?
As you know, almost all gardening tools are made of metal, so the work will require a number of tools and, of course, the ability to use them. If there are no problems with this issue, all that remains is to prepare them for work. For those who are just starting their journey in self-production metal products, it makes sense to present a list of the minimum required:

- Usually, every business owner of a private house has this device, since there is always a lot of work on the site for which it is needed.
- Before starting welding of metal parts, it is necessary to clean their edges, and after the work, remove slag residues. For these processes, hard steel brushes are used, which can be hand-held or in the form of attachments to a drill or grinder.
- A slag hammer will be needed to remove slag deposits from the seam.
- Chisels, stamps and a hammer are used for branding seams and cutting out defective areas, as well as removing frozen metal splashes.
- Templates, ruler, square, scriber, tape measure, as well as other measuring instruments are used in assembly operations, when preparing parts of a future structure for welding.
- A grinder with metal wheels will be needed for cutting parts. It is also needed for final finishing - cleaning seams, sharpening cutting planes.
- Personal protection kit. This is a welding mask, gloves and a welder's suit, instead of which clothing made of dense natural fabric can be used.
- Metal table or trestles for welding work.
Welding operations require some experience
Purchasing a machine does not make its owner a welder. You have to get good at it, starting with the very simple seams. And you have to be prepared for the fact that things won’t work out right away; it requires patience, diligence, and perseverance. – read in a special publication on our portal.
If these tools are available and experience in welding work Enough, it’s time to choose a product to manufacture. You can find or develop a drawing of a future device yourself, to the best of your abilities.
Some useful ideas This is exactly what will be suggested below. You can take them as a basis and, if desired, improve them according to your own understanding.
Non-standard garden tools available for self-production
Today, manufacturers of gardening tools, taking into account the hard work of cultivating the soil, have developed and offer consumers a considerable number of different devices that not only dig up, but also loosen the soil, while simultaneously removing weeds. Such tools can significantly reduce the time for preparing beds and protect your back from excessive stress.
Some of these “small mechanization” tools can be made independently, saving a decent amount.
Miracle shovel
This tool appeared in commercials manufacturers of garden tools relatively recently. And at the same time, many craftsmen have been using such a device for many years, having made it themselves. And, I must say, only praising its effectiveness and convenience.
They call this invention a “miracle pitchfork” and a ripper-cultivator. But no matter what name is assigned to it, the main thing is that it greatly facilitates the gardener’s work.
There are several varieties of “miracle shovels”, differing from each other in their design. But they all work on the same principle. Therefore, you can choose the option that seems simpler to implement and convenient to use.
The first version of the “miracle shovel”
This is the most popular version of this tool. Him in finished form can be found in specialty stores or at gardening fairs. Before you start making such a model yourself, you should carefully consider its design and understand how it works.

The shovel consists of the following parts:
- Working forks.
- Front stop.
- Back stop.
- Front support forks.
- Tuleyka for installation and fastening of the handle.
- Cutting.
- Lever mechanism.
The “Operation Manual” of this tool can be represented as follows:

- The ripper shovel is taken by the handle and placed on the soil on the front stop.
- Next, the working forks are stuck into the soil so that the back stop touches the ground.

- Then the handle of the shovel lowers down with a little force applied to itself. Thanks to this, the working forks will begin to move upward, lifting layers of soil.

- The forks located on the front stop, passing between the teeth of the working forks, will loosen the ground. In this case, the soil layer will not have to be turned over, so the fertile layer will not be disturbed.
- After this, the shovel is moved to the next area, and the operations are repeated.
This version of the shovel is designed for digging up soil to the maximum depth, equal to the length working pitchforks Accordingly, the width of the processed strip will be equal to the width of the working forks. In the example shown, the length of the working fork teeth is 250 mm and their width is 430 mm.

This figure shows the “miracle shovel” in disassembled form, and the arrows also show the process of its assembly. This visual instructions will help you assemble any version of the “miracle shovel” design.

In order to make such a tool, you need to prepare next material:

- To make working forks you will need:
— a piece of steel angle 20×20×4 mm or profile pipe 20×20 mm, length 460 mm;
- line segment round pipe½ inch, length 220÷250 mm - for making a tulika;
— two metal plates measuring 100×40×4 mm - for securing the torso to the frame of the front stop;
- six pieces of round steel (Ø 8 mm) or, which would be better, a square rod with a cross-section of 8 × 8 mm, length 240 mm.

- To make a stop frame with front forks, you will need to prepare the following parts:
— for support so-called skis, you will need two pieces of round pipe with an outer diameter of 10 mm and a length of 710 mm;
— the crossbar on which the working forks will be attached will require a piece of profile pipe with a length of 460 mm and a cross-sectional size of 20×20 mm;
— the second cross member, on which the teeth of the front forks will be welded, is made of a pipe with a diameter of 12 mm;
— a pipe 170 mm long and 12 mm in diameter to connect the frame with the supporting heel of the structure;
- for the supporting part you will need a corner with dimensions of 15 × 15 × 4 × 330 mm;
- six pieces of round rod 200 mm long, similar to those used for working forks.
- reliable wooden handle.
Work on the manufacture of a miracle shovel is carried out in the following order:
| Illustration | |
|---|---|
 | The first step is to mark and cut the parts for the shovel design using a grinder. It is best to prepare the working fork elements first, and then support frame. Next, all parts will be prepared according to the drawing during installation work. |
 | First of all, the support frame and front forks are manufactured. In order to make forks, pipes are marked for holes, which should be located in increments of 65 mm. Blind holes with a diameter of 8 mm are drilled along the intended centers. Then pieces of reinforcement are installed in them, which will become the teeth of the front forks. |
 | Next, the “skis”, that is, the side parts of the support frame, are prepared for welding. One edge of these runners should have a slight bend for better sliding on the ground. In order for the pipe to maintain its given shape when using the tool, an incision is made on it, 100 mm away from one of the edges, thanks to which the pipe is given the necessary curvature. Then the cut is boiled, which will give rigidity to the parts. You can do without a cut by shaping the “skis” on a pipe bender. |
 | The next step is to make marks on the profile pipe for welding the “ears” - these are two metal plates measuring 300x20x4 mm. Holes are drilled in them for the hinge connection of the support frame with the working forks. Instead of plates, which are quite difficult to weld, you can use steel angles with holes of the required size. |
 | The distance between the “ears” should be 100 mm. |
 | The next step is to weld a back stop, consisting of a round pipe with a cross member made of a metal corner, to the profile pipe, on its other side, exactly in the middle at an angle of 120 degrees. |
 | Now that all the parts of the support frame are ready, they are assembled into a common structure by welding. It is very important to set the cross members of the frame at right angles to it, otherwise the shovel will not function well enough. |
 | Next, a tulle for the working forks is made; it must be welded exactly in the middle of the corner on which the teeth will be attached. The pipe can be narrowed on one side, giving it oval shape as I did in in this case master, or leave the diameter the same along the entire length. Stepping back 50 mm from the top edge of the torso, places are marked for fixing metal plates, in which holes are pre-drilled to create a hinge connection with the “ears” welded on the support frame. The teeth are welded to the angle later, after the fastening has been adjusted. |
 | When the vest is ready, it is tried on the supporting part of the shovel, temporarily screwed onto the bolts. In order for the lever mechanism to function without jamming, it is necessary to select bolts that are threaded only at the end. |
 | If everything works as it should, all that remains is to try on and weld the teeth to the corner of the working forks. They are placed in such a way that they are located between the teeth of the front forks and do not come into contact with them during work. The distance between the teeth of the working part of the shovel should also be 65 mm. |
 | But before welding the teeth onto the angle, they need to be prepared, since they must have a slight bend and pointed ends. You can sharpen the ends of square rods in two ways - by forging or by carefully trimming and stripping. For forging, the metal will have to be heated red-hot, and then the ends must be formed on an anvil. the required form using a hammer. This is quite a skillful job; besides, not everyone has a special furnace for heating metal. Therefore, all that remains is to sharpen the ends of the teeth mechanically, that is, carefully cut off part of the metal on one side of the square, and then clean the cut points. You can contact a turner who will perform the work on a lathe. |
 | You can make a smooth bend at the ends of the teeth using a pipe bender, using one template. If this device is not available, then this work will have to be done using a vice and a hammer. However, it must be remembered that the bend on all teeth must be the same, so it may be better to carry out this process after welding the teeth onto the angle. The forks can also be bent with a hammer, placing their teeth on the template. |
 | As a result of the operations performed, a convenient, relatively light design is obtained. Moreover, the “miracle shovel” will only need to be brought to the place of work and taken away to the place of work upon completion. The rest of the time you won’t have to lift it, since it will move along the soil with the help of “skis” runners. |
The manufacturer of this “miracle shovel” honestly admits that, having made it in the fall, he tried to dig up wet soil, and nothing worked. It turned out that the earth got stuck between the teeth, and the runners moved heavily along the wet ground.

Therefore, given its errors, you should not experiment with the tool immediately after the snow melts. This tool digs up dry soil perfectly, even if it is already “indecently” overgrown with grass. The working forks pick up and pull out the weeds, and the front forks free them from the soil. But in order to remove the grass from the dug up bed, you still have to bend down.
Prices for miracle shovels
Miracle shovel
Second option
In addition to this model, there are other models of “miracle shovels”. For example, for older people who like to tinker in the garden, there is an option developed by the Altai craftsman V. Popenko.

This design has a comfortable high U-shaped handle, which allows you to work without bending over. And if necessary, you can lean on such a handle by sticking the teeth into the ground.

The disadvantage of this version of the “miracle shovel” is the lack of good loosening of the soil. Therefore, you additionally have to break up the clods and grind them using a rake.
Third option
Another design that can rather be called an improved fork for digging up soil. But it will also make the work easier - due to the special support pedal installed on the handle. When the forks are driven into the soil, the pedal helps to apply the correct force of the leg. And after the pedal rests on the ground, it becomes a fulcrum for applying force through a lever-handle pivotally connected to it. This makes it much easier to lift the soil being dug up.

A similar version of the tool can be purchased ready-made. But it’s easy to do otherwise - purchase high-quality forks, and then improve them by adding a support pedal, pivotally connected to a clamp attached to the handle.

The illustration above not only clearly shows the design of the pedal, but also gives the dimensions of all the parts needed to make the instrument.
Cultivator "Tornado"
The Tornado cultivator has become very popular among gardeners. It is actively advertised in television and online stores. Indeed, the device is quite convenient and relatively compact. But not every Russian summer resident can afford to purchase this instrument. That’s why it’s worth trying your hand at making it.
The “Tornado” design is simpler than the “miracle shovel” and works on the principle of a corkscrew mounted on a convenient stand with a horizontal handle-bar.

If you decide to make a cultivator yourself, in order to simplify the task, you can use manufactured ones as a basis. industrial conditions pitchforks that have a very affordable price. The main thing is to choose a high-quality version when purchasing this tool. Today there are many products on the market, the metal of which will not withstand alteration manipulations - steel does not stand up to any criticism.

“Tornado” can be made immediately to suit your height, or you can make the handle adjustable. There can be many options here. For example, Collet clamp with a threaded coupling (but this is quite difficult to do on your own). Or a series of holes in the retractable part of the rack - this option is shown in the illustration below.

The “crab”, that is, the working part of the factory tool, is made by forging, so the teeth are resistant to bending. And if it is possible to manufacture this part of the cultivator using the same technology, then it is better to choose this option. To do this, you will need to heat the workpieces and use a hammer to give them the desired shape and direction. It must be said right away that not every master can do this process.

As you can see in the drawings and photos, the “crab” teeth have arched bends, are attached to the base in one direction, and in finished product they form inner space oval or round shape.

The teeth are welded so that they form a kind of square around the stand. That is, each of them is fixed not pointwise, but along the entire fold line of the part, which forms one side of the square. To begin with, you can weld a square steel plate 5÷6 mm thick to the lower end of the post pipe, and then weld the teeth to the sides of this square - it seems easier this way. Thanks to the continuous penetration of the teeth, the “crab” can withstand high loads during tool operation.

The “crab” teeth are narrowed, making them easy to drive into the soil and not deformed. But there is no special need to sharpen them - they will cope with the task anyway. The height of the “crab” can be from 180 to 200 mm. Accordingly, loosening of the soil occurs to the same depth.
“Tornado” is often called a root remover, because when digging and loosening the soil, weeds are simultaneously removed from it along with their root system.

The principle of operation of the cultivator is to install the “crab” perpendicularly to the soil surface, then rotate the tool 60 degrees while simultaneously pressing down. Therefore, an important point is the shape and length of the handle, since it should work as a convenient and effective lever.
Prices for the Tornado cultivator
Other tools for tillage Tornado
Models available with in different forms handles, so even when making your own, you can choose best option. So, the handle is made straight with a slight bend toward itself, 750 mm long. Or, as already mentioned and shown above in the drawing, you can use the handlebar from an old bicycle as a handle.
In a word, skilled craftsman I am quite capable of making this tool as convenient as possible for myself.
Fokina flat cutter
Another device that solves several problems is a flat cutter, invented by V.V. Fokin.

This simple tool can do the following:
- Effective removal of weeds from beds. Thanks to its compact size and ergonomic shape, this tool can easily fit between cultivated plants without causing damage to them.
- Loosening the beds can be done to different depths, since not only the side, but also the front part of the tool is working.
- Hilling up plants is also possible with this small tool.
- Forming beds and maintaining their shape throughout the season, and much more.
Find out about available options arrangement, from our new article on our portal.

To make a flat cutter, you will need a metal strip 3 mm thick, and all other required dimensional parameters are presented in the drawing. The edges of the plate must be well processed, cleared of irregularities and burrs. And in the upper part, drill two or three holes to secure the attachment to the handle. Then, the plate will need to be bent properly. In order for the metal to bend better, it must be heated, for example, using a blowtorch.
To give the metal strip the required shape, several successive bends are made. The order in which they are performed is shown in the illustration below.

After the metal has cooled, the edges of the working area of the flat cutter must be properly sharpened on both sides.

After this, the flat cutter can be mounted on a wooden handle, the material for which can be purchased quite inexpensively at a hardware store. The block must be well planed, chamfered, cleared of burrs, and sanded sandpaper. After this, holes are drilled to secure the tool itself, if the connection was planned to be screw-type. Many owners limit themselves to fixing the flat cutter to the handle with self-tapping screws.

The tool is very light in weight, so it is perfect for gardening for people of any age.
Prices for Fokina flat cutter
Fokina flat cutter
Using a flat cutter is also easy. To do this, the sharpened side of the plate is inserted into the ground to a depth of 40 mm and installed parallel to the surface. Then, with little effort, they begin to loosen or trim the root system of weeds.
At correct production and operation, the plate of the flat cutter, sharpened on both sides, is capable of self-sharpening. If the tool does become dull, you can periodically sharpen it with a grinder or file.
Devices for planting potatoes
To facilitate planting of the most popular root crop, craftsmen invented special devices, so-called planters and markers. In addition to them, mechanized landing devices are also manufactured, but they are more suitable for large areas. Manual planters are suitable for any size garden and will greatly simplify and speed up the planting process.
The simplest marker device for quickly planting potatoes

Markers are intended for creating depressions in dug up soil for throwing potatoes into them. They can be single, double or triple.

The presence of two or three conical heads for creating holes not only speeds up the work, but also allows you to maintain the evenness of the planting rows. So, to plant a sufficiently large area of the garden, the joint actions of only two people will be required. One forms holes with a marker, and the second throws potato tubers into them and covers them with soil on top. The depressions themselves turn out to be small and neat, so you can fill them up by simply pushing the soil with your foot. Thus, there is no need to work with a shovel, digging and then filling wide furrows. As a result, the landing process is not accompanied by fatigue or even local back injury.

The device itself has a very simple design, which can easily be made at home. To do this, you will need a frame with a comfortable handle onto which conical markers are welded.
As a handle, you can use parts of the back of an old metal bed or a pipe with a diameter of 15 mm, placing plastic hand pads on it.

For the lower horizontal crossbar, to which the cones will be attached by welding, it is suitable profile pipe, for example, 10x20 mm with a wall thickness of 2 mm.

The cones are welded onto the crossbar at a distance of 450 mm from each other. On the protruding edge of the crossbar with the same distance from the nearest marker, you can simply weld a reinforcement rod - it acts only as a guide in maintaining the evenness of the row relative to the intended line or already planted rows.
A more complex version of the planter
Another, more difficult to manufacture version of the planter involves simultaneously digging a hole and planting a tuber.

How to make this design will be discussed further in the instruction table:
| Illustration | Brief description of the operations performed |
|---|---|
 | To make this model of planter, you will need a piece of pipe with a diameter of 100 mm and a length of 150÷200 mm. It is necessary to immediately mark the holes on both sides of the pipe. Their centers should be located exactly opposite each other. Two holes will be drilled along them. |
 | To make drilling a pipe easier, it is laid on convenient stand. In this case, a piece of rail is used as it. It perfectly serves as not only a stand, but also an anvil. Before you start drilling, the holes are marked using a core, which will also make drilling in a semicircular surface easier. The holes are made at a distance of 10÷12 mm from the edge of the pipe and should have a diameter of 8÷10 mm, for bolts of the same size. |
 | To make the conical split part of the planter, you will need a small sheet of metal 1.5 mm thick. On the sheet, markings are made of two triangles with a cut off top. The size of one part is 190÷200 mm in height, the base of the triangle is 160 mm and the width of the upper cut is 30 mm. The second part has the same height, but its base should be 180 mm long and its cut should be 20 mm. The outlined parts must be carefully cut out using a grinder. |
 | The result is two triangles with a cut off top, from which it will be necessary to make a split cone. One side of this assembly will be stationary, and the other will be able to move in a hinged mount. To make the stationary part, a smaller part is used. |
 | To give the parts a semicircular shape, they must be bent. The work is best done on an anvil, but if there is none, a piece of rail again comes to the rescue. Giving the required shape is carried out with an ordinary hammer, which is used to knock out one or the other side of the part. |
 | While giving the parts the required bend, they are periodically fitted to the pipe. |
 | The part must be installed on the edge of the pipe and at the same time, its edges must be located at right angles to the cut of the pipe - this will result in a cone half converging towards the center. In order to achieve this installation of the part, you will have to trim the edges at the bottom of it. To do this, holding the part in the required position, areas for trimming are outlined. |
 | The part is cut along the marking lines using a grinder. |
 | This is the position the stationary part of the planter cone should be in, since the second, movable half should close with it as tightly as possible. |
 | Just like the first part of the cone, the second, movable half of it is made from the prepared plate. Then it is tried on and adjusted. |
 | However, more precise adjustments can be made only after the fixed part of the cone is attached to the pipe. Therefore, it is welded to the base - the pipe. |
 | The illustration clearly shows that the angles of the moving side of the cone fit onto the pipe. It is these that need to be gotten rid of, otherwise they will interfere with the opening of the planter. |
 | Before removing them, it is necessary to mark and then cut off the excess parts using a grinder. If the fixed side of the product is installed and welded onto the pipe wall, then the moving part should go around it, slightly facing it from the outside, since it will open. |
 | As a result of the work done, it should turn out approximately as shown in this illustration. |
 | The next step is to install the hinge assembly, with the help of which the moving part of the planter will open and close. To do this, you will need to prepare two plates - “ears”, made of metal 2.5 ÷ 3 mm thick. In these parts, a hole of the same diameter is drilled as in the holes made earlier in the walls of the pipe. |
 | To screw the “ears” to the pipe, bolts 8÷10 mm in diameter and 10÷15 mm in length are used. It is better to sharpen their heads immediately so that they protrude as little as possible from the surface of the pipe. The bolts are inserted from the inside of the pipe, pass through it and a hole drilled in the “eye,” and are tightened on top of it with washers and nuts. |
 | The “ears” will have to be bent a little, giving the mm shape of the walls of the opening part of the cone, since they will be welded exactly on them. |
 | Now the upper side of the “ears” can be secured with welding points to the walls of the movable part of the cone. When securing them, you may have to adjust the closure of the two halves. |
 | Next comes the manufacturing and welding of the planter handles. This will require a ½ inch diameter pipe and the length should be comfortable to work with. One edge of the pipe is cut at an angle, since it will be attached to the planter body. You can also choose the tilt yourself, but in this case the position of the handle relative to the body is at an angle of approximately 20 degrees. |
 | The second handle is welded in the middle of the opening side of the cone in its upper part. When you press this handle, it will be attracted to the pipe and open the cone. Therefore, it is placed at an angle of 35–40 degrees. |
 | If, when testing the planter, the handle welded to the pipe turns out to be not quite comfortable, its position can be adjusted. |
 | To do this, a cut is made on its inner side, along which the pipe is bent at an angle to its welded part and pulled closer to the planter body. Then the handle is boiled along the fold. |
 | The product is now being tested again. In this case, the technician discovered that the planter opened too wide, so it was necessary to include a limit bolt in the design. It will limit the opening width of the cone, so that the planted tuber or cup of seeds will be covered with soil on its own when the planter is pulled out of the ground. |
 | To do this, a nut is welded to the handle fixed on the movable side of the cone, into which the limiting bolt is screwed. |
 | Thus, when the handles are brought together, the bolt in the desired position will rest against the body pipe, preventing the planter cone from opening completely. By screwing this limiter in and out, you can adjust the width of the hole at the planting depth. |
 | A plate is welded to the back side of the pipe - a pedal, which is necessary to deepen the planter into the ground by transmitting the force of the leg. Since the pedal will bear a fairly high load, the plate must be strengthened by welding a jib to it from below - a piece of reinforcement, the second end of which is welded to the planter body. |
This planter design is suitable not only for planting potatoes, but also for other plants that are planted in the form of bushes, seeds or bulbs. There are other options for similar devices, but they all work on the same principle.
Devices for manual harvesting of root crops
There are not only devices for planting potatoes, but also “mechanisms” for convenient and quick harvesting. Thus, using a manual digger, labor productivity can be almost doubled. This is due to the fact that, unlike a conventional shovel, the device grabs the soil not from one, but from both sides at once, easily bringing the tubers to the surface.

Digger has not too complex design, which you can easily assemble yourself. In order to make such a tool, you will need to purchase a pair of ordinary forks. In addition to them, to form the handles you will need two pieces of pipe with a diameter of 27 mm, a wall thickness of 2 mm and a length of 720÷950 mm. And also - a metal plate 5 mm thick, 50 mm wide and 330 mm long for making the crossbar.

- Fork teeth.
- Crossbar.
- “Ears” welded to the forks.
- Bolt M10.
- Potato digger handles.
The production of the tool is carried out in the following order:
- Wooden cuttings are extracted from the pitchforks.
- Under the crowns, in the middle part of the forks, two “ears” with a diameter of 11÷12 mm are welded at a distance of 55 mm. So that the crossbar fits freely between them.
- WITH bottom side crossbars, tubes with a diameter of 10.5 mm are welded along its short edges. A hinge bolt with a diameter of 10 mm and a length of 70 mm will pass through them and the “ears” attached to the forks.
- Next, the tool handles are made. The ends of the pipes intended for them must be bent so that they are comfortable to hold in your hands. And then it is recommended to put pieces of hose on the bent ends. This will prevent your hands from slipping while working.
- And finally, the prepared handles, after adjusting their configuration, are welded into the fork crowns.
That's it, the design is ready for work. Digging forks are set in open position and installed over a potato bush. Next, stepping on the crossbar, drive the forks into the ground. After this, the handles are moved apart, that is, the forks are brought closer to each other, lifting the captured soil with all its contents upward. In this case, the teeth engage root system and bush tubers. The digger, along with the captured crop, is raised to the surface, loose soil crumbles, leaving the potatoes clean. In the process of digging up potatoes with such a homemade digger, the tubers are minimally damaged, and the soil does not shift.
It is not recommended to dig up potatoes using a digger (as well as a regular shovel) if the soil is very moist. The cleaning process in such conditions will be significantly complicated by the excessive weight and inconvenience of the tool due to sticking soil.
* * * * * * *
As can be seen from what has been said, if the owner wishes and the tools are available convenient equipment for processing the garden, planting and harvesting, it is quite possible to make it in a home workshop. This saves quite a lot of money. And especially if the master’s “stash” contains many of the materials necessary for the work.
Examples shown of diversity homemade remedies"small mechanization" gardening work is certainly not limited. If desired, you can find other useful devices, and maybe even come up with some kind of improvement yourself. We will be glad if anyone can share their experience on the pages of our portal.
In conclusion, an interesting video about another useful tool- cultivator. The fire will become a great assistant during the period of regular weeding of beds from weeds.
Video: Homemade manual cultivator for quick and effective weeding
7 country miracle helpers!
Unusual hand gardening tools (photos, videos, drawings)
The flat cutter is a great achievement of the agricultural mind. This is the first truly universal garden tools. Not just for cultivating the soil, but a tool for comprehensive cohabitation with the cultural plant community and soil.
Fokina flat cutter "Swift"
2. Ripper Miracle shovel "Plowman"
Ripper Miracle shovel "Plowman" drawings:
A shovel that can be classified as a ripper-cultivator - “Plowman”. The mechanism of the Plowman ripper is simple and quite effective. Raising the earth is carried out by the operation of a simple lever. The main load falls on the legs, which press the working forks into the ground. The lifting of the soil comes from the force of the hands, which relieves the back and is therefore attractive to the elderly and gardeners suffering from lower back pain. Two opposing forks, passing one through the other, loosen the soil without turning it around, providing a loosening depth of 15-20 cm.
Advantages of the design of a shovel or soil ripper or potato digger
1.Deep tillage without soil turnover.
2.High labor productivity.
3. Significant physical effort is not required when processing the formation.
4.Available in production.
Mode of application:
A special feature of cultivating the soil with a miracle shovel is that the garden is dug lengthwise rather than across. With both outstretched hands, we take the miracle shovel by the edges of the top bar, step on the platform (footboard) and it easily goes into the ground. With a slight movement (can be combined with light shaking), taking two steps back, we move the shovel from a vertical position to an almost horizontal one. After this, we take a step forward, pull the shovel back 30 cm, give the shovel a vertical position, drive it into the ground and repeat the cycles until the row ends. Then we proceed to processing the next row.
Materials: half-inch labor, round timber (or hexagon) with a diameter of 15 mm.
For ease of transportation, a collapsible design can be made.
Miracle shovel Prokopenko drawings:
Miracle forks allow you to dig up the ground without putting any strain on your back due to the unique rotary working method. Miracle Forks do not require bending or squatting. Efforts are applied only to the “steering wheel”. At the same time, digging productivity increases 3-4 times.
Miracle forks are adjustable in height over a wide range, which allows you to ideally adjust the tool to your height.
Miracle forks rotating photo:
Miracle shovel of the monk - Father Gennady photo and drawings:
The Miracle Cleaver is a tool for easily and safely chopping wood. You will be able to chop three times more firewood, spending the same time and the same effort as when working with a regular splitter. At the same time, even women and children will be able to chop wood, because the main work consists only of raising and lowering a weight weighing 3.3 kg.
One Miracle Cleaver replaces four tools: a cleaver, an axe, a hammer and a chisel. If you follow the instructions for use, the tool is absolutely safe.
The miracle cleaver allows you to chop even very thick logs. However, it does not require any special skills and is very easy to use.
Miracle cleaver photo:
6. Miracle potato hiller
The miracle hiller is designed for loosening the soil on potato beds and hilling up the sprouted potatoes.
Thanks to its optimally calculated design, the new invention contributes to high-quality processing soil (loosening and hilling) and correct formation potato comb
Dacha territory - this one separate world, which often pushes us to invention. And it’s understandable, because there is a huge amount of work that needs to be done quickly, efficiently, and without much investment. Therefore, today we are studying a cunning garden tool created with our own hands.
Our sheds are full of special country tools - shovels and pruning shears, scissors and hedge trimmers, hoes and axes, and pitchforks, and what about the Fokina flat cutter... but there are also more abstruse and modern tools - an angle grinder, a drill, a chainsaw. But all this is definitely not enough to do everything necessary work. No, everything is real, but who wants to spend a lot of time clearing the garden of young growth, removing weeds from the spring garden, or doing other, even more mundane work, if it is possible to quickly cope with the task? Today we will give you food for thought, because a reasonable and modernized garden tools do it yourself – it’s not difficult, but very useful. So, let's go in order and look at all the new products and older inventions, which, by the way, half of us have never heard of!
Convenient DIY gardening tools
This list was partly presented to us by summer residents we know, partly by you, the readers of the site, and a small part is our personal. Therefore, the site recommends taking a few minutes useful article, because it will really help save time and effort in the future.
Removing root growth
This can be done with a modernized shovel, which you see in the picture below. You can make a tool from scratch if you have a workbench, a vice, a grinder and sheet metal, but it is better to remake a ready-made shovel. Having received such a product - narrow and well sharpened at an angle, you just need to choose a strong handle, and you can safely go into the garden. The device easily cuts young growth even at a depth of several centimeters.

Cleaning and digging the garden
Most often, such equipment is needed if you are clearing out an old garden and planning to make a garden bed in its place. The same thing can happen in place of a forest belt on the edge of a vegetable garden, which was removed to expand the fertile territory.
But in a garden or forest belt, trees are not completely removed, and many roots remain in the ground. Searching for them is very long and difficult, especially when it comes time to cultivate the land. At this time, you can use a toothed shovel, which you can also make yourself. Below you see what it is - an ordinary shovel, which is cut so that its working part has several sharp teeth, the roots of which are cut very easily.
Working in the garden with a new hoe
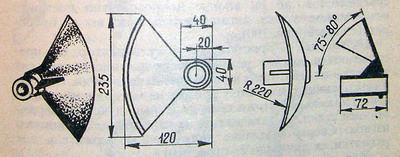
Do you want to get a new hoe that will now make it very easy not only to remove weeds and make furrows in the soil for planting seeds, but also to loosen the soil? Then notice how easy it is to make something like this with just a piece of sheet metal, a piece of pipe, a grinder, a hammer and welding. Of course, this is the lot of real men who are capable of creating something like this, but women also have every right to take a look, because in the future they will definitely try to work with such a tool.
The blade, slightly curved inward, spherical and also slightly curved along the radius, is capable of overcoming many difficulties in the garden, and believe me, this is a much better helper than a standard chopper.
Homemade hoe for loosening the soil
When planting seeds in a flowerbed or in a garden, when working in a garden with young crops, or simply when loosening the soil around adult plants, we need a high-quality and convenient tool. It must meet many requirements, but immediately be easy to use and small enough not to damage the roots or aboveground part grown crops. That's why experienced summer residents and a little thing was invented that many people have today.
This is a compact hoe made from improvised means, which is created from a small piece of board and a few nails. You only need to cut out a conveniently shaped handle from wood, and also drive 5-7 nails 6-10 cm long through it. Not perfect, but still an interesting piece of equipment that will be convenient in small flower beds.

Repairing a broken pruner
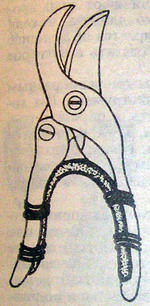
Intensive work in the garden sometimes leads to breakdowns of your favorite tool. And we are trying to do everything, just not to throw away the equipment we are used to and have long loved. Today our pruning shears broke while we were pruning trees, and therefore we are urgently repairing it, since we have neither the time nor the desire to go to the store for a new one.
We sharpen the pruning shears on a stone or machine, if available, and in place of a broken or simply torn spring, which represents the most frequent breakdowns pruning shears, install a piece of thick rubber. You can take thinner rubber, but fold it enough times to create a spring effect. We tape the rubber to the handles with wire, but always with the knots facing inward, so as not to get hurt or cause calluses. You can also use duct tape to prevent injury.
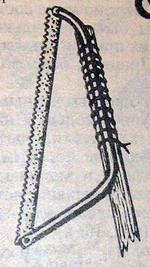
Device for cutting branches at high heights
This activity is not considered a problem for people with high stepladders or special professional pruners. But if there are none, let’s come to our senses and again invent a cunning garden tool that will make work easier and faster!
In front of you is an ordinary hacksaw, which is used to work with your hands. But today we will attach a long handle to it so that we can move the hacksaw as far away from ourselves as possible. You shouldn’t take a very long cutting, as it will be too hard to work, keeping the weight at a great distance, but a cutting of 1-1.5 m is just right. Believe me, this is quite enough to reach those branches that you cannot reach for cutting.
As shown in the picture, tie or wrap the hacksaw to the handle, more firmly, and start working. Do not rush, otherwise you may break the instrument.
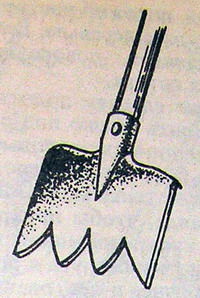
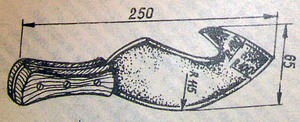
Garden knife for removing tendrils and stems
How long do we have to suffer with tendrils and young stems, which are very difficult to cope with? The secateurs chew them up, and it is generally unrealistic to work with a large knife in conditions of dense growth. In general, you need a special tool that will help in beds and flower beds. And this can be a homemade knife for removing tendrils and stems.
Again, we invite you to pay attention to the graphics below, where we show you a similar knife. This is an ordinary piece of steel, which is installed in a wooden handle. The shape of the blade is oval and slightly pointed, and a hook-shaped cavity is carved on one side. It is here, inside, that all surfaces are sharpened. You just need to take a tendril, root or young stem of a plant with your left hand, and run a knife along it with your right. And even if there is no immediate effect, then once in an acute cavity, any waste material will be cut off.
Ring cutter for gardening
It’s difficult to call the next device a tool, because it’s just a ring with a small blade for working in the garden. But, although the ring is very small, it brings enough benefits. As you can see, this is a metal ring with a small sharp solder on it, bent inward. It is the inner part that is sharpened for cutting thin wire or rope.
Tying up plants in the garden, tending to seedlings or vertical gardening, it is necessary to often cut off small pieces of rope or wire, but picking up a knife every time is not particularly convenient, and in the presence of numerous branches and leaves nearby, it is also dangerous. Then you can just take the rope to left hand, make a loop and throw it over the curved tip of the ring, and right hand make a movement to the side. Everything is quick and simple, and in your hands you already have a piece of rope of the required length.

Each of the tools we present or simply modernized items is an excellent device for working in a summer cottage. You can use such equipment in almost any conditions, and you can make it yourself.
Convenient tool for the garden (video)