Everyone wants their home to be not only comfortable, but also attractive from the outside. That is why facade finishing is given Special attention, and diversity architectural styles and gives directions ample opportunities for selection. The country style that came from the West is becoming very popular among domestic homeowners. There is no pomp and pretentiousness in it, which is so abundant in most modern buildings; on the contrary, country harmoniously combines comfort and simplicity.

From English “country” is translated as area, country, village. In architecture, this designates several ethnic movements united rustic style- uncomplicated and maximally functional. It is characterized by a lack of luxury, the use natural materials(mainly stone and wood), practicality of every detail and a small amount of decor.

Country style can be determined by the following criteria:
- low but wide windows with frequent partitions in the frames;
- solid wooden doors;
- lack of stairs or porch at the entrance;
- the walls are painted matte white or muted pastel colors;
- wooden lattice railings around the terrace and balcony;
- shutters, trim and window sills made of wood;
- ethnic motifs in wall decor.

The building itself can be large, two-story, with a complex roof configuration, or it can be very modest in size and simple. gable roof. The walls are made of stone or brick, and very often a solid wood paneling is mounted on top.

The architectural form and color of the facade largely depend on the direction, of which the country style has several:

Sometimes 2-3 directions and even different styles, but such experiments are not always successful. If you are planning to independently decorate the facade with a country style, choose a direction that best matches the architecture of your home.
Finishing elements
Since the most characteristic of country music are wooden elements, let's look at them in more detail - what they are, where they are located, in what quantities. The material from which these elements are made is no less important.
| finishing element | Description |
|---|---|
| The facades of most country-style houses are covered with wood. The cladding can be solid or lattice, often finished with wood only top floor. For cladding, lining, planken, block house and other edged board, which is usually attached with an overlap. The wood used is only hard deciduous and coniferous species, weather resistant. Materials must be processed protective compounds, whereby wood trim serves for years. With the help of cladding, you can style almost any house as a country house, the main thing is to choose the right finish in color and complement the exterior with other elements of the chosen style |
| It’s even easier to style your home like German country - half-timbered. To do this, false beams are attached to the facade, which form a certain geometric pattern. Very often, beams are replaced with natural boards: the wood is impregnated with antiseptics and painted dark color. If we compare wood paneling and decorating with beams, the second method is much more profitable, since less material is required. The beams are attached to the facade in increments of 40-100 cm, depending on the pattern, and can also only be located on the second floor. For such stylization, houses of regular shape with plastered walls are best suited. light walls, although red brick buildings in some cases look good |
| These products are the most decorative elements in the design of the facade. The country style is most characterized by wooden shutters with horizontally arranged slats like blinds. Although in the Russian direction preference is given to solid structures rather than lattice ones. Such shutters, if they are made of solid wood and not knocked down like a shield, are usually decorated with carvings made in various techniques. The appearance of the platbands also largely depends on the style direction. For example, in Canadian and American country these are roughly processed boards of a predominantly dark color; in English and French, the platbands are very neat and painted in White color, in Russian – carved |
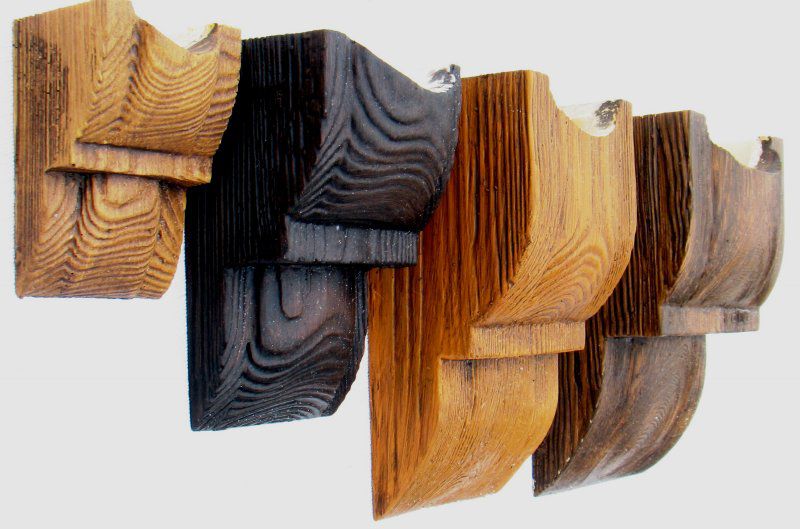
| These small elements serve to support horizontal beams, cornices, roof slopes and at the same time decorate the under-roof space. As a rule, they are a piece of board in the form of a right triangle with a figured cut at the end edge. Thin consoles are usually decorated openwork carving, consoles of greater thickness are simply painted and varnished. You can make them yourself, but this requires the appropriate tools and woodworking skills, so it is much easier to buy them. But attaching the consoles to the facade does not require any special skill and is very simple. Consoles are located at the corners of the house, on pillars, under all protruding elements of the facade - balconies, terrace roofs, second floor ceilings. They are fastened in increments of 60-100 cm, depending on the weight of the structures being held and the thickness of the consoles themselves. |


Additionally, for country styling, a variety of wooden cornices, support posts, lattice railings, decorative ethnic crafts. The more complex the architecture of the building, the more elements will need to be selected. The most successful in this regard are houses with open terraces, as well as a balcony or a protruding second floor. Here it is enough to install simple wooden columns as supports and mount horizontal railings from boards.

Block house prices
Block house
DIY country style decoration
To decorate the facade of the house in the chosen style, you can invite a professional designer, which will cost a tidy sum, or do the work yourself. Most country style elements are easy to make and install yourself. All that is required for this is availability good tool, quality wood and maximum effort.
Wood paneling
Façade cladding with wood is the most labor-intensive process, but this is precisely the most effective way to style your home as a country house. An unedged board is best suited for this, which, unlike the newfangled planken or block house, gives the facade a very rustic, cozy look. The covering is also suitable for brick houses, and for buildings made of aerated blocks, shell rock, adobe and other materials.

First of all, you need to decide what kind of wood to use so that the sheathing does not have to be changed after a couple of years. Larch is the most practical, its dense wood is resistant to mold fungi and putrefactive microorganisms, is almost not deformed by temperature changes, has beautiful drawing on the cut. The only negative is high price. As an alternative, pine and spruce are suitable, cheaper, although not as resistant to harmful effects.

To extend the service life of this wood, protective impregnations must be used.

Materials for work:
- unedged board with a thickness of 220-300 mm;
- timber with a section of 50x50 mm;
- antiseptic impregnation of deep penetration;
- coating waterproofing;
- polyurethane sealant;
- dowel-screws and nails.
Step 1. The façade walls are carefully prepared for covering: they are removed decorative elements, platbands, lighting and anything that might interfere with your work.

Clean from dirt and inspect for cracks and other damage. All detected defects are eliminated using cement mortar.
Step 2. The timber is cut to the height of the walls, then, together with the boards, they are impregnated with a protective compound and laid out in a well-ventilated place to dry.

Prices for popular model circular saws
A circular saw
Step 3. Coating waterproofing is applied to the walls in 2-3 layers, observing the time intervals specified in the instructions. Each layer must be completely dry, only then the quality of waterproofing will be high. The composition is applied with a wide brush from top to bottom, masonry joints are treated especially carefully. There should be no untreated areas, gaps, or sagging on the surface.

Step 4. Mount vertical sheathing. The corner posts are installed first, controlling their location with a level. First in brickwork drill holes for dowels in increments of 30-40 cm vertically and at a distance of 20-25 mm from the corner line. Next, the beams are screwed on, and a fishing line or strong thread is pulled between them, which will serve as a guide when installing the remaining racks. This will help secure all the sheathing elements in one plane. Be sure to fill pieces of timber around the perimeter of windows and doors, for additional fastening of the trim around the openings.

Step 5. Begin attaching the sheathing from bottom to top. To give the bottom board the required slope, spacers made from scraps of wood are attached at the very bottom of the wall. All trims should be of the same thickness and spaced every 20-30 cm. Long slats can be used instead of spacers suitable thickness, the fastening step is increased to 50-60 cm. A board is laid on top, leveled horizontally, and nailed to the sheathing beams. Nails are driven in at a distance of 20-30 mm from the top edge of the board. Each subsequent board is overlapped by 30-40 mm and nailed in the same way.

Step 6. Upon completion of the sheathing, it is necessary to close the corners. The easiest way is to fill the top with boards 250-300 mm wide. The boards are placed vertically, along the edges of adjacent walls, and are very tightly joined to each other.


After this, all joints are filled with polyurethane sealant, the excess of which must be immediately removed from the surface of the skin. The final stage is the application of a finishing coating, which is wood varnish or paint.


Imitation of half-timbering

To decorate a facade in German country style, first of all you need to choose the right boards. They should be good quality, identical section, made of hard wood. Thin bars and slats will not give the desired effect; the boards should look massive, so take lumber at least 150 mm wide and 30-40 mm thick.
All Finishing work are carried out on the finished facade, that is, the surface must already be plastered and painted. If finishing is planned on new brickwork, all defects are eliminated, and the joints must be grouted.
Step 1. A sketch of the future layout of the boards on the wall is drawn on a sheet of paper in order to choose the best option.


Step 2. According to the measurements, they cut the boards, cut off the ends of those that will be located at an angle, and be sure to number each segment. The blanks are treated 2-3 times with a tinting antiseptic until the wood acquires desired color, dry well.

Step 3. The fastening of the elements is done in accordance with the sketch. Take one element, apply it to the wall, mark the drilling locations for fasteners. Having drilled through the wall, insert the dowels, reattach the board and secure it with screws.


In order for such a finish to look aesthetically pleasing, the boards must be attached very carefully, especially at the joints, eliminating the slightest gaps. The presence of gaps between the elements will spoil the appearance of the facade; in addition, water will flow into them and snow will become clogged, which will lead to rapid deterioration of the wood.

Prices for various types of construction boards
Construction boards
Manufacturing and installation of shutters
Since country style is primarily associated with Western countries, let us consider, as an example, the manufacture and installation of horizontal wooden shutters, so popular in Europe and America. Anyone with basic carpentry skills can make them.

You will need:
- bars for a frame with a section of 60x24 mm;
- wooden planks 40x12 mm;
- wooden dowels 40 mm long;
- wood glue;
- milling tool;
- hinges for fastening shutters.
Step 1. Take measurements of the window opening with outside, after which the timber for the frame is cut. You should get 8 segments - 4 for each shutter.
Step 2. The blanks are laid out in the form of a frame on a flat surface, and each segment is numbered. Then, at the ends of the horizontal crossbars, two holes are drilled for dowels on each side, and the same holes are made in the vertical bars with inside around the edges.
Step 3. Take the side sections and, on the inside, mark with a pencil the location of the inclined grooves into which the strips will be inserted. The dimensions of the grooves must correspond to the cross-section of the planks, the angle of inclination is 35 degrees. The distance between the grooves is 1.5-2 cm. Using a milling tool, grooves are made according to the markings.
Step 4. The sash is assembled: the dowels are coated with glue and inserted into the sides of the frame, then glue is applied to the edges of the planks and inserted into the grooves. The last to attach are the upper and lower crossbars, carefully join all the parts and press firmly. For reliability, you can clamp the frame with clamps for several hours to allow the glue to set.


Step 5. When both sashes are ready, you need to attach hinges to them. To do this, lay the shutters flat on a flat surface, try on the hinges on the top and bottom rails, and mark the attachment points with a pencil. Next, drill holes for the screws and screw in the hinges.

Step 6. Place the sash against the window opening, align it vertically, and mark the location of the fasteners on the window frame. Having screwed the fittings, hang the sash and check the ease of movement. The second half is hung in the same way.
To emphasize the chosen style, it is advisable to paint the shutters in a dark color so that they contrast with the cladding. The trim should be the same color as the shutters, but the window frame can be left light.


Prices for popular models of screwdrivers
Screwdrivers
Manufacturing and installation of platbands

Making platbands is also not very difficult, although some skill is required here. In order for these elements to become a decoration for the facade, it is advisable to use a template for cutting out patterns, which you can purchase in a store or make yourself if you have the ability to draw.

| Manufacturing stages | Process description |
|---|---|
| Accurately measure the width and height of the window opening. Take dry, smooth boards of good quality with a thickness of 10-30 mm. Mark cutting lines on the boards and cut the material according to measurements |
| The blanks are laid on a flat surface, a template is placed on top and the drawing is carefully traced with a pencil. |
| Using a jigsaw, cut out all unnecessary parts according to the drawing. The edges of the workpieces and internal cuts are sanded with sandpaper. |
| The finished platbands are impregnated with a protective composition, dried, and, if desired, painted or varnished |


To install the platbands you will need galvanized nails up to 75 mm long. Take the platband and place it tightly against the front part. window box, aligned vertically. If the windows open outward, the platband is moved from the opening 5-20 mm to the side. After this, it is nailed directly to window frame along the entire length every 40-50 cm. The heads of the nails must be well sunk into the wood.

The described methods of wooden finishing will help you independently change the style of the facade and give your home a fashionable and aesthetic look. The most important thing is not to overdo it with the decor, because country style does not tolerate excess. And a lot also depends on the quality of workmanship, and even roughly processed parts must be attached as carefully as possible.

Video - Country style wood trim
Video - Covering walls with overlapping boards
To decorate the facade of a house, you can choose a variety of finishing material, and even the most ordinary and simple decoration, with the right and competent approach, can perfectly decorate the facade of any building. One of the simplest and most inexpensive materials is an ordinary unedged board, which is characterized by unsawed edges, giving the facade of the building simply magnificent properties, creating a truly original and aesthetic design. However, today wooden façade decoration is very popular, with any types of boards, not just unedged ones.
What is an unedged board?

The edges of such boards are untreated, which allows you to give general finishing amazing style. Unedged board can easily be used to finish the facade of any building with proper cleaning and processing, but it is mainly used as a material for facade finishing cottages and country houses. When such boards are carefully adjusted to each other, it creates the impression that the house is entirely built of wood.
You can also leave the edges of the unedged boards without being cleared of bark, as this finish looks surprisingly stylish. The main thing to consider when using unedged boards is the application protective impregnations and antiseptics. Alternatively, you can use stain and then varnish the boards. Unedged boards were previously used exclusively for non-residential buildings, as well as for sheathing roofs, that is, where an aesthetic appearance is not required.

However, in last years There was a tendency to use such material for cladding houses. Of course, such a board requires before this correct processing and beautiful location, which allows it to compete in aesthetics with any other façade finishing option
Unedged board is characterized high level strength and resistance to mechanical damage, and also resists changes in humidity and temperature changes quite well. The not very high density of unedged boards makes it quite easy to process in various ways, reducing the time for finishing the facade of a building with such material.
Carrying out work on finishing the facade with unedged boards

At exterior finishing buildings use timber, which must be nailed on top of unedged boards in increments of approximately 1.5 meters. Also, beams are used at the corners of the house. The fit of the boards to each other does not have to be perfect, since the remaining cracks can subsequently be sealed with mastic or sealant.
Dimensions of unedged boards
Unedged boards usually have a thickness of 16, 19, 22 and 25 mm, however, thicker ones can be found - 32-75 mm. Modern market building materials offers a varied selection of boards, since finishing houses with wood is quite common these days.
The façade of a house made from unedged boards creates a unique play of light and shadow, which is achieved through horizontal cladding with boards, which looks very stylish and impressive. For facade finishing, as a rule, an unedged board is used, the width of which is 30 cm. Best choice for this purpose, northern tree species with beautiful texture And high density. Usually these are trees like Siberian larch or selected butt wood, which is free from any defects.

Choosing an installation method
During the installation process, unedged boards are installed using the “overlapping” method or placed close to each other, not inferior in quality to siding. The second option is the most complex, but at the same time more beautiful.

Overlapping sheathing - structural diagram
However, in addition to aesthetic qualities, the practicality of all cladding methods should also be taken into account. The “overlap” method is more suitable for finishing facades from a practical point of view. This finishing option is more resistant to moisture, but it should be remembered that the installation of unedged boards in this case must be carried out on top of the waterproofing, and the joining of their ends is joined with a miter cut, after which the joint is treated with sealant.
If necessary, the boards can be coated with a primer and then installed on top of the waterproofing layer. They're nailing it front side using one nail at the bottom, but above the previous board. In case of fluctuations in humidity levels, this method will preserve the integrity of the entire structure.
Detailed technology for cladding the facade with unedged “overlapping” boards

Example of installation of an overlapping unedged board
This technology is the most acceptable, since an unedged board has uneven edges, which complicates the process of joining parts.
1. Cover the boards with a primer or protective coating. Suitable for this work deep penetration compounds, used for the preparation of mineral or wooden coverings before carrying out plastering and painting works. The primer penetrates deeply into the board and acts as a connecting link. Advantages: the wear resistance of the coating increases, the impact on the plank surface is reduced environment, adhesion of adhesives and paints increases. The walls are also coated with primer.

Knotting
2. Installation of waterproofing on the walls. Coating-type waterproofing is suitable for these works. This could be TechnoNIKOL Mastic MGTRN. It is important not only to protect the walls, but also to waterproof the blind area of the house. The mastic is applied to the walls using a brush. If there are gaps left, pour the solution there and remove the excess with a spatula.

Example of coating waterproofing for wood
After this, the waterproofing layer should dry well so that the surface is not sticky when touched. It is best to apply three layers of waterproofing, this way you will avoid moisture entering the room and the formation of mold and mildew in the house. And if you still encounter such a problem, buy special building materials to combat mold.
3. Installation of insulation. One of the most popular materials for facade insulation is mineral wool, since it is non-flammable, does not absorb moisture, and is not afraid of the cold. Keep in mind, this is only one option.

Foam insulation
4. Fastening the boards on top of the waterproofing, nailing them. To do this, vertical boards are laid vertically along the wall, after which horizontal ones are laid on them, in the direction from bottom to top. The next layer should be applied to the previous one by approximately 20 mm, this is an overlap.
5. Applying sealant to the joints of the boards. The best façade sealants for filling joints are polyurethane sealants. By technical specifications and their parameters compare favorably with acrylic, silicone and other sealants. Polyurethane sealants have high elasticity and resist stretching and deformation, which is very important when cladding the facade with unedged boards.

Example of sealing a seam with polyurethane sealant
6. Applying the finishing coat. Often used varnish coatings. We select products and apply varnish with a brush. This completes the finishing of the facade with unedged boards.
The façade of a building is usually decorated with standard materials. However, if you want to get a unique design, you will have to use not the most familiar solutions. One of them could be finishing the facade of a house or other buildings with unedged boards. The appearance is very peculiar and certainly atypical. At the same time, the cost of such design will be low due to the low cost of the material used.
Features of such boards
Unedged boards differ from standard ones in that their edges are not aligned on machines. There may be bark left on them, and there may also be already processed parts. In fact, their name means that the edges of such boards are not cut in any way. This is precisely where the attractiveness lies - when the right approach structures lined with such materials look very beautiful. However, it will take a lot of work to make everything look attractive.
What you need to do to use it
In order to decorate the outside of the house with unedged boards to look as attractive as possible, you will have to put a lot of work into the design. And you should start with the most important thing - making the material resistant to water, fire and protecting it from pests. After such treatment, you will no longer have to worry that the façade cladding will not last long due to rotting or destruction by pests.
You should also decide what type of finish you like - with or without the bark left. In the first case, you just need to select dies from which the bark does not crumble or peel off. In the second, there is still a lot of work to be done - all the bark remaining on the slats will have to be removed and the resulting cut cleaned.
When all previous operations are completed, you can begin applying stain, if you need to give the surface specific color. It is necessary to take into account that after applying all the compositions, the final color may differ from the intended one due to the mixing of all components. Therefore, it is better to try in advance to apply all the compounds one by one on a scrap of material and only then use it to decorate the facade.
How to mount everything
Usually, finishing the facade of a house with unedged boards begins with applying it to the walls. waterproofing compounds. This will protect the walls from moisture and you won’t have to think about the condition of the base surface after decoration. Next comes the insulation operations - if necessary, it is at this stage that an additional layer of insulation can be installed on the outside of the buildings. Only after all this work does the actual finishing begin. It is performed in the following sequence:
- Slats or bars are attached to the walls, which will serve as lathing for outer covering. You can place them horizontally or vertically, depending on the orientation of the decorative covering strips.
- Insulation is installed if necessary and covered with protective membranes.
- The wall is sheathed with planks from bottom to top in the chosen method. The choice of cladding option will be influenced by two factors: ease of installation and preference for appearance. If you cover the wall with overlapping strips, you will need a little more planks, but everything will be easier to do. Installation with a herringbone pattern will require more effort, but the appearance of the coating will be more attractive. However, this is a matter of personal preference.
- The joints of the boards are sealed with sealant and the final design of the wall is carried out.

There will be two cladding methods - overlapping, checkerboard or herringbone. The first option involves placing the boards in such a way that the upper one covers the edges of the lower ones on both sides. The second option is similar to a plane made of siding - the bottom edge top bar superimposed on the top of the bottom. In both cases, the overlap must be at least two centimeters to ensure maximum aesthetics of the structure and eliminate the formation large gaps between the dies.

Examples
Previously, such finishing methods were used only for outbuildings. Nowadays there is a tendency to use as much as possible environmentally friendly materials and giving residential buildings unusual looking. Therefore, finishing the facade of a house with unedged boards has become a very popular technique, and several photo examples of such finishing are presented below. Using them, you can form your own opinion about such repair options and see different ways sheathing.

To decorate the facade of a building, as a rule, standard materials are used. But if a person wants to decorate his home in a unique way, then he can use unedged boards. The building gets a very unique appearance. A huge advantage is the low cost of materials.
What is an unedged board
Unedged board is special type lumber that has different widths and thickness. Main feature products is that their end is not cut off. Due to different shapes and sizes, finishing the facade of a building with unedged boards can have an attractive and original appearance.
What types of wood are suitable for cladding?
For cladding, you can use different types of materials.
- If we consider the characteristics of various types of wood, then the most the best option considered larch. Wood is not scary high humidity, it has a lower degree of warping than all other rocks. It is easy to work with and holds nails well.
- Finishing the facade with unedged spruce boards is considered not a very popular option. Wood has its own impregnation. Thanks to the availability large quantity knots, the boards have an attractive decorative look. After some time, noticeable cracks appear on them, so unedged spruce boards are used extremely rarely.
- The pine will quickly warp and soon become unusable. It is never used for exterior cladding.
- Hardwood will look very nice. In addition, it has a long service life. It is worth remembering that hard rocks are difficult to process, and nails can cause them to split if the work is not done carefully. Also considered a disadvantage is the high price of the material.
Exterior cladding of a house: materials and technologies
In order to make the house attractive from the outside, you will need a beam with a section of 20x20 or 30x30 mm. It will be used for the frame of the building. The average width of an unedged board is 30 cm. The thickness of the elements can be selected depending on preference.
You need to purchase sealant and mineral wool in advance, antiseptic impregnation and protective. Barriers for the insulation used and means for finishing– varnish or paint.
- All products must first be coated with a primer or a special substance for protection. This will increase the wear resistance of the elements several times and increase their service life.
- Next, waterproofing is installed on the walls where the boards will be finished. In this case, coating waterproofing would be the ideal option. It is necessary not only to take care of protecting the walls, but also to secure the blind areas of the building. The mastic is applied to the surface of the walls using a small brush. If there are gaps, the mixture is poured into them, and all excess is removed with a spatula.
- You need to wait until the waterproofing layer is completely dry. To prevent mold and mildew from appearing in the building, it is advisable to apply at least three layers of the mixture.
- Then you need to install insulation. Mineral wool would be an ideal option for external insulation. It does not ignite, it is not afraid of frost, high humidity, or precipitation.
Calculation of materials and components

The last method is considered the most expensive, because you will have to use much more elements for the cladding.
After the most suitable cladding option has been selected, the total area of the building walls that will be treated is calculated. From the resulting amount, you must subtract the area that will fall on the doors and windows.

Option "Herringbone"
If you know at least approximately the size of the board that will be used for the facade, then you can practically calculate exact amount elements used for operation. The material is purchased with a small reserve so that there will certainly be enough.
What tool will you need?
In order to finish a house with unedged boards, you need to use a minimum set of the simplest tools. 
- For marking you will need a pencil and a long tape measure.
- Be sure to use a building level.
- You can't do without nails, a hammer and a square.
- Since the boards will have to be cut, a hacksaw is used.
- To apply the finishing touch, use a small roller or a special brush.
In what cases is a frame needed?
It is unlikely that you can do without a frame if you plan to cover the facade with unedged or some other board.
He plays very important role and helps to level the base of the building and hide all existing defects that could arise as a result of long-term operation of the structure.
The frame allows you to securely hold the insulation used. With its help, it is possible to create a special ventilation gap through which condensate will subsequently be removed.
Frame installation
If you plan to decorate the house with unedged overlapping boards, then you need to pay special attention to the correct construction of the frame.

Wood frame
The work is carried out according to the following principle.
- At a distance of 15-20 cm from the corner of the building, you need to mark the place where the very first element of the future structure will be fixed.
- Similar actions are performed in relation to the second corner.
- The area of the building that remains is divided into as even parts as possible, the width of which will be the same as that of the insulation sheets.
- At the places marked in advance, you need to fix the parts used with dowels.
Sheathing a house with overlapping boards
This design for the exterior of a house is quite airtight due to the fact that the upper elements will overlap the edges of the lower boards. Additional work will need to be carried out exclusively at the corners of the structure.
The boards are mounted using ordinary nails on top of a layer of waterproofing and insulation.
The boards are packed vertically, then you can begin to secure the horizontal elements. It's worth moving from bottom to top. Each subsequent layer will be installed on the previous one with an overlap of approximately 2 cm.
Final finishing
After the boards for finishing the facade are securely fastened, sealant can be applied to the joints. Experts recommend using polyurethane sealants, which are more elastic and can withstand fairly strong stretching. They are not so afraid of mechanical damage.

A combination of beauty and economy
IN last resort applied finishing coat. Most often, varnish is used, which must be carefully applied to each board with a small brush.
An unedged board for finishing a facade is an excellent and economical option that will look very beautiful and original. Installation does not take much time and does not require any special knowledge.
Mankind has been using board wall decoration for more than one century, so it can rightfully be considered a kind of eternal value. Today the use of wood for decoration interior walls is a way to create an aesthetically attractive, yet environmentally friendly and safe interior design for those present.
Finishing specialists distinguish at least five types finishing board for walls. Despite the fact that they have much in common, there are also differences, which in some cases play a decisive role. Before covering the walls with boards, you should understand each of the options.
Lining
In the interior of modern homes, among other types of boards, lining is most often found. This is the least expensive wooden finishing material, which, however, does not deprive it of most of the main advantages of wood finishing. The lining is strong and durable; it is often made with special grooves, which turn the installation procedure into a formality. The material weighs very little, which means it can be used in any conditions. If desired finished surface can be painted or coated with colored varnish. Often such a decision is justified because decorative properties linings, especially inexpensive ones, are not too high.
 Lining is the most popular material for finishing interior walls and ceilings with wood.
 The installation is carried out on top of the sheathing, which somewhat complicates the whole procedure, but allows you to hide communications, insulation or additional sound insulation in the resulting void. In general, the characteristics of the lining strongly depend on what type of wood was used for its manufacture.
This material is very similar to lining, both in appearance and in its main characteristics. performance qualities and installation features. At the same time, imitation timber is relatively rare in the interior, since it is much more often used for exterior wall decoration. The visual difference from the lining lies only in the larger width, which inside the room would create an unnecessary effect of reducing the area. However, no one is stopping the consumer from using a board that imitates timber indoors.
 Imitation timber is an analogue of lining, which is more often used for facade cladding, but interior decoration with this material creates the feeling of being in a real timber house
 Some manufacturers initially process imitation timber with all necessary compounds, protecting the product from harsh conditions streets. If the material is purchased for interior decoration, it may be worth taking a less secure option, because additional protection increases the price of the product, and snow and rain are unlikely to fall on the wall inside the building.
Block house
If you are really looking for a board for, then a block house is perhaps the best you can find. Visually the interior will look natural wooden frame, with the difference that there is no talk of using full-fledged logs. In essence, a block house is a log trunk from which the square core has been removed, leaving only a thin convex layer of wood on the outside, which was formed by cutting the log on four sides.

The block house is made from various types of wood and always has the most natural look. Preference is given to pine or spruce. Installation of the finish in this case will be a little more difficult, so it is advisable to seek the help of specialists. In general, the material is divided into two categories, and for use in the interior, that is, indoors, it is advisable to give preference to category “A”, since it has more smooth surface. The buyer has the opportunity to choose the diameter of the original trunks from which the block house is made.
Planken
Planken is an alternative to the materials described above, the only difference is the absence of a tongue-and-groove connection. It is used both for cladding facades and interior decoration Houses. Individual fragments of material have an oblong shape and are usually used to highlight a wall or some element in the interior. At the edges, it is most often equipped with sharp or rounded chamfers.

Basically, planken is made from pine or larch, which is naturally very resinous, thanks to which it can withstand an almost unlimited amount of moisture.
When installing planken, remember that this material expands easily when high temperatures and humidity, therefore gaps should be provided between individual boards.
Parquet board
Parquet perfectly withstands the high loads constantly placed on the floor, and at the same time looks very aesthetically pleasing - so why not use it for wall decoration? Look at the photo below. Is not it original solution?
 Parquet boards on the walls are stylish, original and practical
Few people still do this, but that’s the trick – unusual finish It also allows you to stand out from the homogeneous crowd.
As with any other elongated material rectangular shape, the specific placement of individual fragments allows you to change the perception of the room. If parquet board placed vertically, this visually makes the ceiling higher. Diagonal spatial orientation creates a complex geometric impression. For a greater variety of results, you can cover only one wall, or cover only up to a certain height level. You can also combine boards of different shades.
An interesting result is obtained if the parquet on the floor and walls is “directed” in general direction– then the room seems more elongated and purposefully oriented.
The most natural effect will be obtained if unedged boards are used when creating an interior design. This solution is most often used for exterior finishing, since inside it looks rough and even brutal, but on the other hand, this allows you to create a unique design, which in certain situations will also be appropriate. Initially, the material was intended as a lathing for everything that was described above, but today the edged board has firmly entered the arsenal of progressive design ideas.
For finishing, unedged boards are often used in gazebos or buildings for household needs, that is, where some wildness in design seems quite appropriate. They do not refuse this material when decorating the interior to give the home a primitive style. With a lot of effort, unedged boards can be installed without gaps, and then the structure will look as if it was built entirely from untreated wood. The most “wild” option does not even involve removing the bark.

Like any other wood for finishing, unedged boards mandatory must be impregnated with protective compounds that protect it from moisture and pests.
What interior styles involve finishing the walls with boards?
Wood fits well into most interior variations and goes well with all popular styles. However, there are styles in which wood paneling walls will look as harmonious as possible:
