An integral component of the steam room is water. But so that it does not stagnate, it is important to know how to drain the bathhouse. In this case, certain nuances must be taken into account. For buildings that are on stilts, a thoughtful approach will be required to ensure that communications do not freeze. Depending on the load on the room, different decisions will be made.
Even before construction
It’s worth thinking about even before laying the foundation. In this case it will be much easier to draw a conclusion. The following points should be analyzed:
- What is the size of the planned building?
- What is the frequency of its use?
- How many people will be inside at the same time?
- Will it ?
- Will the washing room be a separate room or combined with a steam room?
- What is the depth of soil freezing?
- What is the composition of the soil?
- Is there a central sewerage system?
- How much free space is there around the bathhouse?
This questionnaire will greatly simplify the creation of a gasket drawing, and will also make it possible to determine which of the options, which will be described below, is best suited to a particular situation.
Briefly about floors

A big role in how effectively all moisture will be removed from a steam room or washing room is played by the right approach for the manufacture of flooring, as well as drain hole. The flooring can be wood or concrete. The first, in turn, is divided into:
- leaky;
- leak-proof.
The essence of the leak is that a space is left between the boards through which the water can simply drain under the building. This solution is suitable for southern regions. In the second option, the boards are laid in two layers with tight joints. In this case, the slope is maintained towards the groove or drain hole.

Concrete floors must be insulated. If you don't do this, your feet will be very cold. When pouring, just as in the case of a non-leaking wooden floor, a slope is maintained towards the drain hole or in the middle where the gutter will pass. Additionally, wooden gratings are placed on top to make those staying in the room more comfortable.

The ladder for different designs will also be different. If this is a bathhouse that is constantly heated, or it is known that the room does not freeze, then you can install a product with a water damper. Usually it is located in the corner or in the middle, where all the liquid collects. IN wooden floor installing such a structure will not be difficult:
- The work is carried out before the finished floor is installed.
- The location of the drain hole is selected according to the slope of the surface.
- Markings are being made for the ladder.
- A hole is drilled so that a jigsaw file can be inserted. An opening is cut for the product.
- The entire floor surface is covered with thick polyethylene film.
- A slot is made in the place where the drain hole will be located.
- The plastic drain is mounted in place.
- The junction areas of the film are coated with silicone sealant.
- The finished floor is being laid.
Note! With this solution, even if water seeps under the floor somewhere, it will flow down the oilcloth to the drainage point.
But most often, bathhouses are used less often, and if you make a similar structure there, then this can lead to the fact that the water inside will freeze and the product will simply tear into pieces. To prevent this from happening, you can make a drain with a barrier without liquid. One of the solutions is easy to implement in wooden bath, the other is in a bathhouse with a concrete floor.
For wooden:
- You will need a small sheet of galvanized metal measuring 62x38 cm.
- It must be marked as follows: put 2 points from each edge at a distance of 10 cm. The points on the two sides must coincide so that the corner is a square with a side of 10 cm.
- In the resulting squares, a diagonal is drawn from the corner to the point.
- All points are connected by a line to form a rectangle inside. These marks will serve as a guide for us to bend.
- At a distance of 17 cm from the edge of the smaller side in the middle of the sheet we make a notch. This will be the center of the hole for the pipe if it is 50 mm in diameter.
- Now, along the drawn lines, you need to bend this sheet to make a small trough.
- The sharp edges sticking out on the sides are bent towards the larger side.
- Plastic or wooden plank. In size it should be 39 × 17 × 0.5 cm.
- The capacity of this container is about 6 liters. When the water begins to drain, it lifts the bar and freely enters the hole. After the level drops, the board falls into place and closes the hole. This is done so that there is no smell.
- Even if it happens that the board freezes to the trough, when hot liquid gets in, it quickly thaws.
Note! Such a drain mechanism will be very relevant for bathhouses that stand on piles or columnar foundation when the temperature under the floor is sub-zero.

For concrete:
- In order to implement the project, you will need a plastic or durable rubber ball.
- When the floor is poured, it will need to be placed above the drain hole and recessed there a little. You can press it with something on top so that it does not move.
- An additional slope is created around the ball.
- The ball remains in this position until the screed has completely hardened. Afterwards it is very easily separated from the frozen mixture.
- It is he who will serve as the shutter. When the water begins to drain, it will lift the ball. After this, it will fall into place and close the hole, preventing the penetration of unpleasant odors. This shouldn’t freeze, and if it does, it will thaw fairly quickly.
Simple water collection systems

The most simple solution drainage will be a solution for leaking floors.
- A hole is dug under the steam room (or washing room, if they are not combined). Its dimensions will coincide with the area from which the water will flow.
- It needs to be deepened slightly below the freezing point of the soil. Sand is placed in a 10 cm layer on the bottom and compacted well.
- The rest of the space is filled with crushed stone or expanded clay so that there is another 10 cm left to the top. Everything is carefully compacted.
- The remainder of the space is filled with the soil that was dug.
You don't need to do anything else. The liquid will fall into this hole, filter and go further into the soil.
Note! This design will be relevant if the bathhouse is used no more than once a week and there are 3-4 people in it at the same time. If the soil under the bathhouse is clayey, then it will be necessary to make a transition pipe to the pit, which can be located a few meters from the bathhouse.

To implement the following idea, you will need a plastic or metal barrel with a volume of 200 liters.
- A place is chosen near the bathhouse.
- A hole is dug to a depth below freezing of the soil. Its diameter should be 30 cm larger than the diameter of the barrel. This is necessary for ease of installation.
- A 10 cm layer of sand is placed on the bottom and compacted well.
- A layer of fine crushed stone is laid another 10 cm and is also compacted well.
- A hole is cut in the side wall for a pipe through which water will flow.
- In the bottom using a drill and feather drill a hole is drilled at 26 mm. It is necessary for the ventilation hose.
- A nut is screwed onto the ¾" pipe and a sealing gasket is put on. It is pushed through the hole. Another gasket is put on and the entire structure is fixed with the help of a second nut. An adapter is screwed onto the upper thread to the HDPE pipe, which will act as a ventilation pipe.
- The barrel is placed upside down in the hole.
- The drain pipe is connected. It is desirable that it extends 15–20 cm inside. Thus, if the soil shifts, it will not be pulled out.
- Approximately up to the middle, the hole is filled with crushed stone and compacted, but so as not to damage the barrel. The remaining space is filled with soil.
This disposal method is also suitable for non- clay soils. The capacity is quite enough for 5 people to take a bath at the same time once a week.
Systems under intensive use

In cases where the bathhouse will be used in a more intensive mode or there will be a toilet in it, it is necessary to provide solutions that will allow the system to cope with a large volume of liquid. If the building is located near a private house and VOCs are provided for it, then you can draw a conclusion directly to it. The quickest way to prepare a single-chamber septic tank or cesspool is to do this:
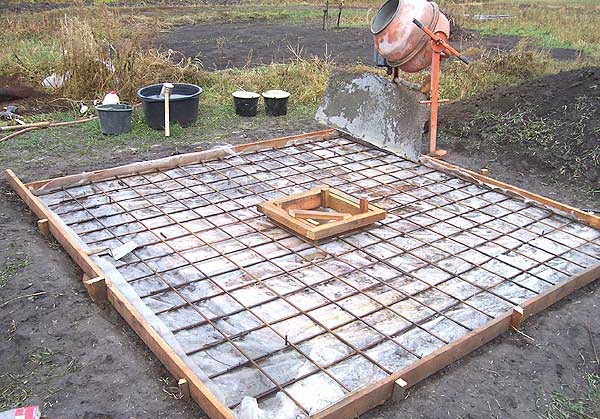
- Dig a pit. Its depth should be just over 3 meters so that 3 concrete rings can easily fit, and they do not reach the surface by 30 cm.
- If the bottom is planned to be filtered, then a 20 cm layer of sand is made, and a 30 cm layer of crushed stone is placed on top. Everything is compacted well. If not, then a 20 cm layer of concrete is poured and the rings are immersed in it.
- The walls can be strengthened in another way, for example, by laying them out of brick. In this case, it is necessary to do the masonry with holes for water drainage.
- A suitable hole is made to enter the sewer pipe.
- The pit is closed from above using a reinforced concrete slab.
- Installed in the lid fan pipe for ventilation.

This septic tank is cleaned using a vacuum cleaner. It must be located so that there is an entrance to it. The distance to the building must be at least 2 m. It is possible further, but then communications will have to be laid to a greater depth.
In order to increase the interval between cleanings, you can make several chambers. In this case, the water will be purified more effectively, and it will also be possible to increase the volume of average daily wastewater. The essence of the device is to make the first two containers sealed according to the described method, and to make the last one with a filter bottom. At the same time, they are connected to each other using pipes. In the first and second compartments, heavy particles settle. There they decompose with the help of bacteria. The third section receives partially purified water, which then goes into the ground.

Alternatively, you can use plastic containers or buy
A comfortable bathhouse on your own site is a dream that you can always turn into reality on your own. One of the key aspects of its construction is the solution to the problem of wastewater disposal.
Let’s take a closer look at how to install a sewer system for a bathhouse with your own hands and what points to consider when designing and installing the system.
The installation of a well-designed waste water disposal system is prompted not only by aesthetic standards, but by current requirements aimed at maintaining environmental safety.
According to standards 30-02-97, the collection and disposal of wastewater from baths and showers must be carried out using treatment and filtering facilities that provide sand and gravel backfill
Constructive solutions autonomous sewers There can be many built during the construction of a bathhouse.
By type of action independent systems are divided into two types:
- Gravity system- involves the movement of wastewater through it by gravity. This effect is achieved due to the correctly maintained angle of inclination of the pipeline.
- Pressure system– provides for forced transportation of wastewater using pumping equipment.
A sewer system for a bathhouse building is constructed regardless of whether or not a water supply is connected to it. In any case, the very nature of the site implies a copious use of water, which must be disposed of.
When installing a gravity system, it is determined by the diameter of the pipes.
Photo guide for installing a sewerage station
If a station is selected to treat wastewater before disposal deep cleaning In addition to connecting to the sewer system, you will also need an electrical wiring device.
Otherwise, the stages of work on the arrangement of all types of treatment points of autonomous sewer systems are carried out in a similar order.
Image gallery
But it can only be installed on soils characterized by high level moisture permeability. These include sandy, fine-clastic and coarse-clastic soils.

Having decided on the location drainage pit, mark the site and select the route for laying the sewer line to it
Construction treatment plant performed in the following sequence:
- In the marked area, a pit is dug, the depth of which is 1-1.5 meters higher than the freezing mark of the soil.
- The bottom of the pit is laid out with a 10-centimeter layer of clay.
- Expanded clay or crushed stone-sand filling is laid on top, forming a layer 40-50 cm high. This will serve as drainage.
- To prevent the earthen walls of the pit from collapsing, they are lined with bricks, laying out rows in a checkerboard pattern, or with ready-made concrete rings.
If desired, the walls of the drainage well can be lined with tires. To do this, dig a pit, the diameter of which allows you to accommodate 4-5 used tires laid out on top of each other.
During the construction of a bathhouse Special attention should be given competent organization water drainage systems. If everything is done correctly, fungus will never appear in the sauna and there will be no unpleasant odors. And the building itself will last much longer.
Floors in the bathhouse - selecting a suitable base
Russian bathhouse or sauna on your own suburban area- the dream of many people. Bringing it to life is not that difficult. It is enough to understand all the features of the construction and arrangement of the steam room, in particular, the rules for organizing drainage in it. This issue needs to be given increased attention. If you do not organize effective drainage of waste water from the sauna, within a couple of years after the start of operation, its foundation, floor base and lower parts of the walls will become unusable. Naturally, very soon all these problems will cause the destruction of the building.
It is possible to do the drainage in the bathhouse with your own hands, but first we will need to understand all the existing drainage options, choose optimal system, and only after that start arranging the drain. The first issue to be resolved is related to the type of flooring in the steam room. They can be done:
- concrete;
- wooden.
A concrete floor is ideal for a capital sauna, in which water treatments accepted throughout the year. Such a base consists of several successive layers. The first is compacted gravel, then concrete mortar, vapor barrier, heat insulator (it is best to use polystyrene foam boards). The insulation is covered with polyethylene, which acts as a water protector. Another layer of concrete is laid on it. The entire structure is secured with cement reinforced screed. At the very end, the concrete base is covered with tiles (ceramics) or other finishing material.
A wooden floor is much faster and easier to build. It is installed in bathhouses used exclusively in the warm season. The costs for wooden foundations are significantly less than for concrete ones. But there is one problem. Even with careful processing of wood special. compositions, after some time it will begin to deteriorate under the influence of moisture and high temperature. After 5–6 years of operation, such a floor will have to be completely re-laid. This should be kept in mind when choosing the type of base for your bath.
Wooden floors are structurally divided into non-leaking and leaking. The first of these are always laid on a pre-made concrete screed (it must have a certain slope). Non-leaking structures are prone to rotting, since after using the steam room they take quite a long time to dry. From this point of view, leaky floors are more convenient to use. They are simply laid on the joists without rigid attachment to the latter. The boards are laid with small (about 5 mm) gaps. It is through them that water is removed from the surface of the flooring. At any time, such a floor can be removed, taken outside under the hot sun and dried.
If you plan to build a leaky foundation, you should make a pit (preferably sealed) under the sauna and connect a pipe to it, through which the drainage will be carried out.
Wastewater disposal systems - pros and cons during operation
Having figured out the type of flooring, we move on to selecting a suitable drainage system. There are several options for arranging a drain:
- soil filtration technique;
- installation of a drainage well;
- pit.
The choice of a particular system depends on the geometric parameters and frequency of use of the bathhouse, the presence or absence of a centralized sewerage system on the site, the depth to which the soil freezes, and directly the type of soil available. If in own sauna a person plans to go with two or three friends a couple of times a week; there is no particular need to organize complex drainage (for example, ground filtration). In such situations, you can get by at low cost by building a simple pit or well for waste water. If the bathhouse becomes a permanent gathering place large quantity lovers of hot steam will have to take care of arranging a more sophisticated and efficient system.
On clay-type soils, it is best to make a drainage hole. Used water will flow into it from the bathhouse through pipes and then be pumped out. For sandy and similar soils, systems in the form of drainage wells are more suitable. We also take into account the most important requirement - the pipes through which water will be drained must be laid below the freezing level of the soil. If you mount them above the specified mark, in very coldy they will freeze, and we will not be able to fully use the private bathhouse.
Let's talk about the pros and cons different systems plum. And then we’ll find out exactly how each of them is mounted. Let's start with the simplest system - a pit. It is essentially a hole that is dug under the floor base of the steam room. A layer of filter material is placed at the bottom of the pit. Water passes through it, is purified, and then gradually seeps into the soil. The pit does not require pipes or any other communications to operate. Its arrangement takes a minimum of time. These are definitely advantages. But this solution also has disadvantages. Firstly, a pit cannot be made on soils that do not absorb water well. Secondly, it cannot be installed in saunas with a foundation in the form monolithic slab. Thirdly, even a deep pit is characterized by an objectively low throughput potential.
It won't be much more expensive to install a drainage well. This is understood as a sealed tank for collecting wastewater, buried in the ground. When it is full, the owner of the bathhouse calls a sewer truck. She pumps out the water. Any summer resident will make a drainage system, spending a minimum of effort on the work. Here you just need to choose the right place to install the tank. It should be installed on the lowest plot of land. No special maintenance is required for the drain well. The disadvantages of the system are the need to regularly call special equipment to pump out water and to arrange fairly wide access routes to the tank. The sewer truck will not pass along the narrow path.

A drainage well is a deep and wide hole that is filled with a layer of filter element. This can include furnace slag, small pieces of bricks, crushed stone, and construction sand. Digging a hole is easy. Cover it with filtrate too. But here's to serving drainage system It’s not easy at all. The wastewater is not pumped out of it. They go into the ground. In this case, at least once every 5-6 months you need to completely change the filter layer and clean the well. Such an operation requires considerable labor costs, which negates all the advantages of the system.
We will consider the advantages and disadvantages of the ground filtration method below. And we’ll immediately describe how exactly such a system is made professional builders. She is considered the most effective option drainage of wastewater from private saunas.
Soil filtration - how effective and durable?
The method of soil wastewater treatment requires the installation of a complete sewer system. It includes pipes for collecting and draining water and a special septic tank. The latter plays the role of a distribution well and at the same time a settling tank. Some craftsmen assemble a septic tank on our own, but more often it is bought ready-made in specialized stores. The advantages of the system are high-quality purification of heavily polluted water, completely autonomous operation, and no need to call in equipment to pump out the well. Disadvantages - a huge amount of land (very labor-intensive) work, considerable cost of used Supplies and equipment, the need to allocate a large area for the installation of a septic tank.
A step-by-step guide to setting up a ground filtration system is provided below. First, we decide on the location of the septic tank. We bury it 150–250 cm into the soil. Then we connect the sewer pipe to the installed container. We remind you! It should be laid below the freezing mark of the ground. After this, we prepare perforated drainage pipes (the so-called drains). We select their cross-section and length taking into account the volume of wastewater. In most cases, plastic products with a cross-section of 110 cm are used as drains. You can also use other pipes by drilling a number of holes in them.
It is not advisable to take the length of one drainage pipe more than 25 m. The pipes are laid in trenches about 1 m wide (minimum 50 cm). The distance between individual drains must be maintained at least 150 cm. The system installation process itself looks like this:
- 1. We draw up a diagram for laying drains. We dig a trench with a slope of about 1.5°, checking its accuracy with a building level.
- 2. If the soil is sandy, we make a cushion of gravel and sand at the bottom of the trench (the thickness of each layer is 10 cm), and then lay geotextiles on top. For clay soils the procedure is similar. But in this case there is no need to use geotextile material. It is allowed not to make a pillow on loams. In this case, the pipes must be wrapped in geotextiles. In this way we will reduce the risk of siltation of the system.
- 3. Lay the prepared drains. At their end we install a half-meter (slightly more) pipe for ventilation.
- 4. Fill the drains with 10 cm of gravel. Fill the trench to the top with a layer of soil.
- 5. Cover the ventilation outlet. pipes with a protective cap. It will prevent leaves and debris from entering the ventilation duct.
The soil drainage filtration system is ready! If properly installed, it will serve trouble-free for at least 15 years. But after a specified period of time, you will have to change the cushion under the drains, since it will gradually silt up during the operation of the sewer.
Making a pit - a simple and quick operation
As noted, drainage from small, rarely used baths can be organized using a pit. The diagram of its device is as follows:
- 1. We dig a hole under the future floor base of the steam room.
- 2. We fill our mini-pit with a layer of crushed stone, expanded clay or broken brick.
- 3. Pour sand on top.
- 4. Install wooden joists on top of a pit with a filter pad made.
- 5. We lay the plank flooring on the mounted supporting elements. As you remember, we install lumber not closely, but with gaps.
Boards can be nailed to the joists. But it’s better not to do this in order to be able to periodically remove the flooring and dry it outside.

Some craftsmen make an improved pit. It serves as a collector for wastewater, which, after reaching a given level, goes into the sewer. This pit option is also quite simple to construct. We dig a cubic hole under the floor. We take the length of the ribs of such a pit to be at least 50 cm. We protect the walls and bottom of the pit from moisture. The easiest and most reliable way is to fill them concrete mixture. Although you can use any roll waterproofing material, for example, roofing felt.
Further, at a height of approximately 10 cm from floor base we bring the pipe to the pit. We take it outside the building on a slope (otherwise the drains will not be able to leave the pit by gravity). We install a water seal. It is a device that prevents unpleasant sewer odors from entering the steam room. The simplest water seal is a metal plate installed at a slight angle. Its lower end should be about 5 centimeters away from the bottom of the pit. The shutter can also be made from an ordinary rubber ball. It should be secured above the pit (directly above the drain). When the tank is empty, the ball covers the pipe, and when the tank is filled, it floats up and the water flows freely through the pipe.
Building a drain well - a practical option
A drainage pit is rightfully considered the most rational way to organize drainage from a bathhouse. We need to dig a hole and install a metal or plastic tank in it. This option does not require serious expenditure of effort. But the durability of the drain structure is not very great. Therefore, home craftsmen prefer other methods of arranging such a system. They make pits out of iron concrete rings or they line the walls of the well with bricks. In this case, the structure becomes more reliable, due to which its service life is significantly increased.
Working with reinforced concrete products is difficult. And here brickwork It’s quite possible for any self-taught master to do it. Let us describe the last option for organizing the drain step by step:
- 1. We choose a place for a well, remembering that it is always located at the lowest point of the land plot. In addition, we need to immediately take care of arranging the access to the drainage pit for the machine pumping out the wastewater.
- 2. We dig a hole of the planned size. It is recommended to make it rectangular or square. Then the volume of excavation work will be less. We make sure that the walls of the pit are smooth and dense (we do not allow soil to fall off them).
- 3. We make the bottom of the pit with a slope, directing it towards the hatch.
- 4. Pour a 15-centimeter layer of sand into the hole and tamp it down. Pour concrete mortar on top. Can be installed on the bottom finished slab(reinforced concrete). Due to this, it is possible to reduce the time required for the work, since you do not have to wait several weeks for the concrete solution to completely harden.
Now we begin laying the walls of our drain structure. We carry out the operation using new or used red brick. We make the masonry 25–30 cm thick. We install the bricks with an offset of half a stone. We fix the products with a composition made up of sand, clay and water. We install a pipe in one of the walls for the wastewater entering the well.
Brick is a permeable material. Therefore, the masonry needs to be additionally sealed. We use any bitumen mastic for moisture protection. We apply it strictly according to the manufacturer's recommendations. After waterproofing the walls, we install a ceiling on the well. It should be 25–30 cm larger than the pit (on each side). It is advisable to make the ceiling from reinforced concrete. This design has a considerable weight, but is distinguished by its durability and unique strength.
The process of installing the ceiling is as follows: we assemble the formwork, fill it with concrete (layer - about 7 cm), install metal reinforcement, and add another concrete layer on top. We are waiting for the ceiling to harden. After the concrete has crystallized, we install a hatch in the center of the slab. Let's take it plastic film. We cover the flooded floor with it and fill it with soil. Only the hatch remains on the surface of the earth. Through it, wastewater will be pumped out from the brick tank after the tank is filled to a critical level.
Drainage structure - how to do it?
A drainage well is made exclusively in areas where groundwater flows very deeply. If they are located high, the structure we are interested in will not be able to perform its function. It will begin to fill up groundwater, and the drains from the bathhouse will simply have nowhere to collect. The drainage well should be dug 2–2.5 m from the walls of the building. If, the risk of subsidence or wetting of the foundation will increase. With a smaller distance between the wall of the building and the pit, we will not be able to organize the required slopes to ensure gravity flow of water.
Having chosen a suitable place, we dig a cylindrical hole in the ground. Theoretically, the well can have any other shape. But practice shows that cylindrical pits are much less likely to need repair work. In addition, they mark a uniform distribution of loads on the walls. We can choose any depth and size of the well. For large and actively visited baths, the parameters of the well, of course, should be more impressive than for saunas that their owners use only from time to time.

- Laying walls with brick or wild stone. Important! We lay the products with small gaps. They are needed to naturally remove moisture.
- Installing containers made of metal or plastic. Before installing it in a hole in the tank, you need to make holes on the sides and cut off the bottom.
- Laying several old car tires on top of each other.
- Installation of slate sheets. This option is suitable for wells in the shape of a rectangle or square.
We fill the reinforced pit with crushed stone, broken brick or expanded clay, making a cushion 10–15 cm high. Then we cover it with sand (the thickness is similar). We dig a trench to the well from the sauna (don’t forget about the slope, optimally if it is 1 cm for every meter). We put a drain pipe into it. We put the last one into the drainage hole. After this, you need to install a cover on the well. It is better to make it metal and always removable. After all, we will have to regularly maintain the drainage pit, changing the filter layer in it and cleaning it. All that remains is to cover the lid with polyethylene and fill the structure with soil.
Choose suitable option sewerage for the bathhouse and do all the work ourselves. Guided by the given instructions, we will arrange a truly effective system drainage.
Probably the vast majority of owners summer cottages and country private houses cannot imagine their life without their own, since such a structure is an integral part of ancient Russian traditions. A bathhouse is not only a place for washing, but also a kind of home “dispensary” that works to restore the strength and health of the owners, and provide the necessary periodic relaxation. But in order for it to bring only pleasant sensations, its arrangement, and in particular all the necessary communications, must be carried out according to all the rules.
One of the traditionally problematic components of the bath system is the disposal of used water, so it is very important to properly organize its drainage and collection site. Disposing of contaminated, untreated wastewater onto the ground or into natural bodies of water is strictly prohibited, and such an approach will inevitably lead to penalties from supervisory environmental authorities. Therefore, in the absence of a centralized sewerage system (as is most often the case), a special storage or drainage pit is usually created for these purposes. And in order for the drainage pit for a bathhouse to function effectively, it is necessary to study its design before starting construction, and during the period of arrangement work, follow the recommendations of experienced craftsmen.
Main types of drain pits
Arranging any drainage pit is quite labor-intensive process, since the pit will most likely have to be dug manually. At the same time, such a hydraulic structure is not very complex in design, so any owner of the site can build and equip it independently, without even involving assistants, of course, if there is enough strength for excavation work.
Drainage pits can be divided into three main types - a sealed container, a pit with drainage capacity, and one consisting of several chambers.
First, let’s figure out what each of the varieties is, in principle.
- A sealed drainage pit is most often installed on construction sites with shallow groundwater aquifers. It is more often called a cesspool, that is, requiring periodic emptying of the accumulated volumes dirty water.
To build it, a pit is dug into which a container with a sufficiently large volume is installed. This is where they will gather wastewater. As the container is filled to a certain critical level, the waste is pumped out by a sewage disposal machine.
This option is environmentally friendly, since no contaminants or chemical cleaning solutions, which can negatively affect the condition, get into the soil and groundwater. fertile soil on the site, and also have a negative impact on high-lying ground aquifers. However, this option is not convenient and economical, since you will have to constantly monitor the filling level of the container and often call specialized vehicles, and such services are not cheap.
Prices for septic tanks
- There is no hermetically sealed bottom created in the drainage drainage pit. It is used as a bulk layer of filtering building material - most often crushed stone or gravel is chosen for this purpose.

In addition, holes are often made in the walls of the drainage pit at a certain height through which water will be absorbed into the soil. This option is perfect for a bathhouse and is perhaps the easiest to build, however, if the soil characteristics on the site allow it.
- A septic tank is a whole system consisting of two or more chambers that have different purposes.
In any of the options, the first chamber most often has a sealed design and is used for collecting, primary filtration and purification of waste - solid components settle to the bottom, and liquid ones are clarified and undergo a cycle biological treatment due to the action of aerobic microorganisms. This container is connected to the second chamber with a special overflow pipe - clarified liquid waste flows into the next compartment, which is already organized according to the principle of a drainage well. Water passes through the drainage, is further purified and absorbed into the soil.

If a septic tank of three containers is planned, then the third chamber is made into a drainage chamber. The second serves for the final sedimentation of suspensions, deeper purification of water due to the action of anaerobic microorganisms. And from here the purified liquid is poured into the drainage well.
A septic tank is most often installed when a considerable volume is expected to be collected into it. liquid waste both from a residential building and from a bathhouse.
What is important to know about the design and rules of septic tank equipment?
A septic tank is already a rather complex engineering structure, the creation of which must obey certain rules. Often, home owners prefer to install a ready-made factory-produced system. What are the rules for setting up such a treatment plant, and what to pay special attention to - read in the special publication of our portal.
Materials for arranging a drainage pit for a bathhouse
Various materials can be used to construct bath drainage pits. Their choice directly depends on the expected volume of wastewater, the financial capabilities of the site owners and the convenience of construction.
Barrel drainage pit
To create this water drainage system, metal or plastic barrels of different sizes are used. However, such a drain can be arranged in different ways:
- First option. At the bottom of the excavated pit, covered with drainage material 300–400 mm thick - crushed stone or coarse gravel, after compaction, a barrel with perforated walls and a cut bottom is installed. In this case, it is taken into account that between the walls of the barrel and the pit there should be a space of at least 100 mm, which is also filled with drainage backfill.

In a barrel under required angle A pipe is installed along the slope through which used water from the bathhouse will flow into the container. These drains gradually, through holes in the walls and through bottom part will seep into the drainage layer, cleanse, and then be absorbed into the surrounding soil. In some cases, drainage material fills not only the free space of the pit, but even the barrel itself, that is, water will flow directly into the drainage layers and then into the ground. This way the barrel will never fill up.
It must be correctly understood that such a scheme is not suitable for collecting other types of wastewater from a residential building. For a bathhouse that is used for its intended purpose once or twice a week, such a pit becomes one of the most optimal options.
- Second option. In this method of arranging a pit, two barrels are used, installed at different levels - one above the other by about 200 mm. They are connected to each other at the top by an overflow pipe. Water from the bathhouse enters the first upper container, soap sediment and solid suspensions settle in it, and when it is filled, the water is poured into the second barrel, to which one or two long drainage pipes with perforated walls are connected.

Outlet pipes from the second tank are laid in drainage trenches filled with gravel or crushed stone, through which water purified from chemical precipitation will be distributed, moistening the soil. The trenches are filled from above with a layer of fertile soil, approximately 500 mm deep, and can be planted ornamental shrubs that will receive constant watering. Thus, two problems are solved at once - draining water from the bathhouse and irrigating plants on the site.
This option for arranging a drainage pit will be discussed in detail below.
Brick drain pit
The walls of the drainage pit can be arranged using bricks, which are laid out with gaps - through them, water is drained into the drainage backfill and further into the ground. The difference between this pit and the first version, made from a barrel, differs only in the material, but the operating principle remains the same. A drainage layer is poured into the gap between the soil and brick walls, which will purify the water and distribute it throughout the pit, discharging it into the ground.

A pit made of brick is more durable and is designed to hold a larger volume of water. Moreover, if you dig a pit deep enough, and the bottom and lower part of the walls are sealed, then this structure can also be used to drain other waste, but in this case the pit will have to be cleaned periodically.
To build this version of a drainage pit, it is not at all necessary to use new brick - used material is also quite suitable.
Prices for metal barrels
metal barrels
Drainage pit made of concrete rings
If there are financial and technical capabilities, then the drainage pit can be built from perforated concrete rings, which are installed in the prepared pit. After installing the rings, a drainage backfill is arranged at the bottom of such a well.

In this option, the entire space between the walls, as in previous cases, is also filled with drainage material, so the hole, provided it is used only for bathing needs, will never be filled with water. In the same case, when the pit is deep enough and the bottom of the well is cemented, then such a pit is suitable not only for a bathhouse, but also for a general one. True, this will require additional calculations, assessment of the absorbent properties of adjacent soils and the location of aquifers.
Pit made from old car tires
A drainage pit made from waste car tires can only be used for liquid waste, so it is impossible would be better suited for collecting periodically incoming water from the bath.

Tires are installed in different ways: in some cases, holes are cut out in their side walls, in others, a small gap is provided between the slopes, in others, the outer walls are almost completely cut off, but the principle of operation of the drainage pit remains the same.
This option for draining water from a bathhouse can be called the most popular, since it is simple to install, affordable (tires are easy to find for free) and practical to use.

The numbers on the diagram indicate:
1 – Crushed stone or coarse gravel – drainage backfill, in a layer 250÷300 mm thick.
2 – Old car tires.
3 – Drain pipe from the bathhouse (there may be two of them)
4 – Crossbars for laying the lid.
5 – Cover or hatch.
Around the stack of wheels laid out, and sometimes inside the resulting well, a drainage cushion is backfilled, which allows you to retain and purify the water coming from the bathhouse. With good drainage capacity of the soil and periodic use of the bathhouse, the pit never overflows.
It should be noted that other materials that can withstand the effects of high humidity are also suitable for the construction of a drainage bath pit.
How to independently equip a drainage pit for a bathhouse
Inspection of the soil at the site of the planned drainage pit
In order for the bathhouse drainage system to be effective, it is necessary to determine the type of soil in the area at the approximate depth of the planned pit. To do this, a trench or test hole is dug. So that the bathhouse can be used in winter time, the depth should be below the soil freezing level. Information about soil freezing in a specific area can easily be found on the Internet, or you can consult with the owners of neighboring plots who have been using similar drainage systems for a long time.
Prices for concrete rings
concrete rings

Sandy soils and sandy loams, including those with rocky inclusions, have good drainage abilities.
But dense clay layers can cause problems. At high humidity They are well saturated with water, swell and become practically waterproof, and when dry they shrink. In addition, they are highly susceptible to frost swelling. These qualities of such soils are unfavorable both for laying and laying pipes in trenches, as they can lead to deformation and damage to themselves and other elements of the system.
Constructing a drainage hole in such soil, if it extends to great depths, is an almost pointless exercise. Well, if you have to lay a pipe through such layers to a drainage pit that reaches the depth of soil with high absorbency, then the bottom of the trench must be lined with a sand cushion 100–120 mm thick, which will prevent the harsh impact of ground vibrations on the elements of the drainage system.
The level of groundwater (GWL) is also important, since the degree of absorption of water entering the drainage pit will also directly depend on this. So, between the bottom of the pit and the location of the stable aquifer there should be a distance of about 1000 mm. If the groundwater is located close to the surface, then the contaminated water will not flow well into the drainage, and such a well will soon turn into a fetid pit, as it will be constantly filled. In this case, as with clay soils, the option of a drainage pit is not suitable. You will have to either install a sealed container that requires periodic emptying, or organize water drainage to special surface filtration fields.
Having chosen the material for constructing the pit, you need to decide on a few more important points its arrangement, on which the efficiency of the system depends, environmental Safety, both the site itself and its inhabitants.
First of all, you will need to decide on the location where the hole will be located.

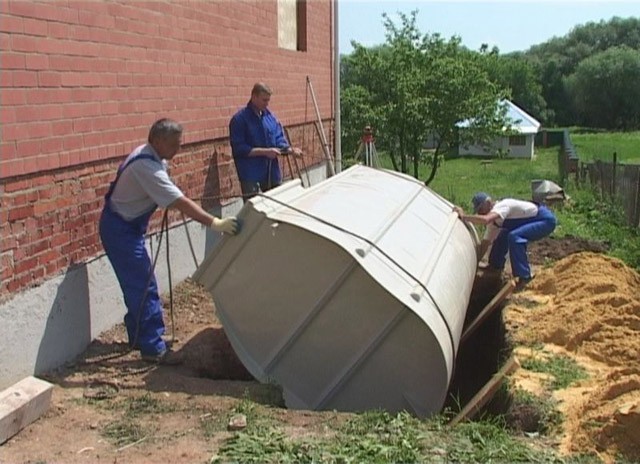
- Quite often, owners place a drainage hole directly under the building, but this becomes possible only if:
- the pit is equipped before the construction itself;
- the structure rises above the ground on a columnar or pile foundation, which will need to be well waterproofed;
- under the bathhouse building there must be provision good ventilation;
- the sewer pipe connecting the bathhouse drain and the pit will require effective thermal insulation.
- If the pit is located separately, away from the bathhouse, then it is necessary to ensure that it is located at the required distance from the sources drinking water, natural reservoirs, residential and commercial buildings, trees, the border of the site and the road passing near it. The required standards are shown in the diagram below:

- The pit should be located below the level of the drain hole in the bathhouse floor by at least 150÷200 mm, and the recommended distance from the bathhouse building is 3÷5 meters.

- If the drainage pit has to be located fairly close to the bathhouse structure, then:
- the bottom of the pit should have a slope of 20÷25 degrees, draining water from the walls of the building;
- perforation in the walls of the barrel, concrete rings or tires must be done on the side that will be located further from the walls of the bathhouse;
- It is very important to maintain the correct slope of the sewer pipe so that dirty water does not stagnate inside the channel, but immediately goes into the drainage hole, and there is no risk of freezing when using the bathhouse in winter. It is especially necessary to remember this in cases where it is decided to place the pit quite far from the bathhouse. The amount of required slope depends on the selected pipe diameter - this is clearly shown in the diagram below:

It should be noted that in order to organize the removal of water from small bathhouse without a toilet, a pipe with a diameter of 50 mm is usually sufficient. In order to maintain the required slope, when digging a connecting trench, as well as when adding a sand “cushion” to it, you should control the difference in its depth using a building level.
Arrangement of a drainage pit - step by step
In this section of the publication, two options for drainage pits will be considered, which can be arranged independently.
Regular drainage hole
This version of the drainage pit has a design that can be made of various materials, which were discussed above.
| Illustration | |
|---|---|
 | After determining the location of the drainage hole, you can proceed to digging a pit. For a bath drainage well, a pit depth of 2500÷3000 mm will be sufficient. It may have a round or square shape in cross section - it will depend on the selected material for the walls. For example, if the pit is made of brick, then it is more convenient to lay a square or rectangular shape from it, but in some cases a round well can also be built from it. The diameter of the pit should be 150÷200 mm larger than the prepared container. |
 | When the pit is prepared, a trench is dug from it to the bathhouse building at the required angle for laying the drainage pipe. The width of the trench can be 300÷500 mm, and the depth will depend on the level of soil freezing in the area where the bathhouse is built, but not less than 500 mm at the entrance to the well. |
 | The bottom of the finished pit is filled with medium-fraction stone - gravel, crushed stone, crushed brick or even broken slate. The drainage layer must be at least 300 mm, as it is designed to retain dirty water and purify it, that is, moisture must reach the soil by capillary action, which will allow it to be quickly absorbed. |
 | Further, they act differently. You can lay a sewer pipe right away, and then work on the brick walls of the water intake well, or you can first install or build a container, and as it is being built, a drainage pipe is inserted into one of the specially made holes. Most often, the pipe is laid at a time when the walls are brought out to the level of the depth of the trench, otherwise it will simply interfere with the work. |
 | So the walls drain well can be built of brick. The laying is carried out maintaining a clearance between adjacent bricks in a row of 40÷50 mm. The wall can have a thickness of half a brick or one brick - this parameter is chosen by the builder, and largely depends on the amount of prepared material. Having raised the walls of the well by another 200÷300 mm, the space between the soil and brick walls is filled with drainage backfill. |
 | If concrete perforated rings are used to form the walls, then specialized equipment will have to be used to install them, since each of them has an impressive mass, and distortions must not be allowed during installation. After their installation, the distance between the soil and concrete also needs to be filled with drainage backfill. It should be noted here that if concrete rings are used for the pit, then you should not rush to install them in the hole of the sewer pipe wall, since under their weight they can sink somewhat into the ground - sometimes by 100-150 mm. Therefore ready concrete well It is recommended to leave it alone for a while for shrinkage, otherwise the plastic pipe may crack or break due to the resulting pressure and tension. |
 | When used for pit metal barrels, the bottom and lid are cut off from them, and the side walls can simply be cut using a grinder. The cuts are made at a distance from each other of 200÷250 mm horizontally and in increments of 100÷120 mm in height. If two barrels are used, they are placed one on top of the other. After installing the lower one, the free space around its walls is filled with drainage. After this, in the second of them, in the top, a hole is marked and cut through which a drainage pipe will be installed into the barrel. The hole according to the markings can be cut with a grinder, but the opening made electric jigsaw. To do this, a hole is drilled at one of the points on the marked circle into which the tool file should fit freely. |
 | If plastic barrels are prepared for the drainage pit, then they are mounted in approximately the same way as metal ones, but quite often the drain pipe is connected through the top lid of the container. The bottom of a plastic barrel can also be cut off or several round holes with a diameter of 100÷120 mm can be cut into it. |
 | Holes with a diameter of 10 mm are drilled in the side walls along the entire perimeter of the polymer container with a frequency of 100÷150 mm horizontally and vertically. Crushed stone or gravel is poured around the barrel and under it, into which, just as in previous cases, water will flow from the holes of the barrel, be cleaned and go into the ground. |
 | The most commonly used material for arranging a bathhouse drainage well is car tires, which are stacked one on top of the other. WITH inside At the edges of the tires, in three or four places, holes with a diameter of 10 mm are drilled, through which they are fastened together using, for example, plastic clamps. The sewer pipe can be connected between two tires. In this case, for support, bricks are installed along the edges of the plastic pipe and in three or four more places between the tires at the place where it passes, which will relieve the load on the plastic from the upper slopes. |
 | Another option for drilling the pipe is to install it in a hole cut in the side wall of the tire. When choosing this method, it is necessary to provide for possible shrinkage of the structure by cutting a hole larger than the diameter of the pipe by 70÷80 mm. |
 | Quite often, the drainage bath pit is not filled with drainage material around the barrels or tires, but is filled with it two-thirds - this allows the water to slowly flow to the soil walls and slowly be absorbed into them. |
 | It is recommended to strengthen the top of the pit with brick walls by arranging concrete pad with a hole for the hatch. To do this, formwork is built around the well, into which a reinforcing grid is laid, and then it is poured concrete mortar, layer 70÷80 mm thick. |
 | After the concrete has hardened, a homemade cover made of a steel sheet and a corner is installed on the hole. Factory-made hatches, metal or plastic, are also quite applicable. |
 | Special plastic sewer hatches can have various shapes and linear parameters. So, when planning to install this particular option, the hatch is purchased in advance, and the top cover of the drainage pit is built according to its dimensions. |
 | A well made of concrete rings is usually covered with a special lid made of the same material with a ready-made hole for a plastic or cast iron hatch. |
 | Well walls built from tires or barrels have less rigidity than brick or concrete, so it is best to strengthen them cement mortar, mixed with crushed stone. If the drainage was filled between the walls of the well and the soil, then its top layer, 120÷150 mm high, is recommended to be made from the solution mentioned above. Further, the top of the pit can be left in this state by simply installing a hatch on the hole, or a concrete platform can be built over the structure and then backfilled with soil. |
A pit based on the principle of a two-chamber septic tank with access to a filtration field
The second option is more complex in design, but its functionality is significantly higher. This system is perfect for installation in areas with groundwater located close to the surface, since it does not require a deep pit. Besides, similar design can be a solution for the organization drainage outlet water from the foundation, from a storm well, filled from linear rainwater inlets on the site or their gutters on the eaves of the roof of the house.
To figure out how to cope with the arrangement of such a hydraulic structure, you should consider this process in detail.
| Illustration | Brief description of the operations performed |
|---|---|
 | This system uses two plastic barrels that are easy to prepare for installation work and connect to sewer pipes made of the same material. Usually, for the drainage pit of a small bathhouse, two or three containers with a volume of 200÷250 liters are enough. |
 | The pit for installing barrels is also dug 100÷150 mm larger than their diameter, and due to the fact that containers of equal size will be installed at different levels, the pit for them should have a stepped configuration. The depth of the pit in this system should be 450÷500 mm greater than the height of the barrel. This distance will be needed to create a drainage cushion under the barrel and a recess for the pipe entering it. The difference in the installation level of the containers should be 150÷200 mm, and the distance between them varies between 200 and 300 mm. The barrels are installed in one line. The bottom of the pit is compacted and filled with medium-fraction crushed stone, a layer 80÷100 mm thick, which also needs to be compacted. |
 | Next, you can move on to working on preparing the containers. The barrel installed above will serve as the primary chamber, that is, a sump for dirty water. A neat hole is cut in its top cover into which the drain pipe will be installed. In the side wall, on the opposite side from the hole in the lid, holes are cut for a pipe that will connect the first barrel with the second, installed slightly lower. To insert plastic pipes into the lid or into the walls of the barrel, you can find special flanges at a plumbing store, such as the one shown in the illustration. |
 | If not, then you will have to cut the hole with maximum precision, and then to seal it, use high-quality silicone sealant. |
 | Additionally, it is recommended to cut a hole for installation ventilation pipe with a diameter of 40÷50 mm, or install a tee, as shown in the illustration, where one outlet will be intended for connecting the sewer drain pipe from the bathhouse, and the other, vertical, for the ventilation pipe. |
 | The second barrel is equipped with three holes, one of which is drilled in the top lid, and two in the side wall, 100÷120 mm below the top edge. The axes of these side windows should be radially rotated from the axis of the central hole by 45 degrees. |
 | Nozzles with 45-degree bends installed on them are cut into the side holes and sealed. As a result, the connection pipes drainage pipes will become parallel to each other - as shown in the illustration. |
 | Additionally, in the lower part of the walls of the installed second barrel, on the opposite side from the entrance, small holes with a diameter of 5 mm are drilled, at a distance of 150÷170 mm from each other. This is an additional outlet of water into the drainage fill around the barrel. However, if powerful filter fields will certainly cope with their task, and even more so if such a septic tank has to be installed in the immediate vicinity of a bathhouse, then this operation is not necessary. |
 | The result should be a design similar to that shown in the illustration. Having installed a system of barrels and pipes, you can proceed to creating a filtration drainage field. |
 | For the drainage area, which is located at a slope from the installed barrels, a trench is dug, having a width of 1200÷1500 mm and the same depth to which the first barrel standing above is buried. If desired, the drainage filter field can be extended over the entire area, since it will not interfere with the arrangement of garden beds above it. annual crops or for planting shrubs. A geotextile fabric is laid at the bottom of the resulting channel, on top of which drainage will be laid. Filling the trench with crushed stone is done in layers, each of which should be carefully compacted and distributed at a slope along pre-set pegs. The slope of the trench should be approximately 25 mm per linear meter. Pegs installed in advance with the required height difference will become a kind of beacons for the correct filling of the drainage layer. |
 | As drainage material is poured around the lower barrel, water is poured into it, otherwise external soil pressure may deform it. It is recommended to fill the space between the walls of the barrels with gravel or coarse sand, which should be compacted by pouring water. Next, pipes with perforated walls are connected to the nozzles, through which water will be distributed throughout the drainage area. Holes are drilled in increments of 150÷180 mm along the bottom and sides of the pipes. After drilling, the pipes are dressed in a filtering “casing” made of geotextile - so that the inside of the pipes is not subject to silting. |
 | The next step is to fill the pipes and the entire trench space with medium-fraction crushed stone mixed with sand. Such a layer should reach the lid of the barrel installed below, that is, completely cover the pipes from above with a layer of at least 100–120 mm. It is best to backfill several different layers of soil on top of the crushed stone. So, the crushed stone is first covered with geotextiles, on which a layer of moistened sand 70÷80 mm thick is laid, and the rest of the space can be filled with fertile soil. On this site it is quite possible to arrange a flower bed, plant annual vegetable crops or even small shrubs with shallow fibrous root systems. |
At the end of the publication, it should be noted that there are other materials that can sometimes be found in the yard among old stocks or even seemingly unnecessary trash, which in fact may well be suitable for building a drainage pit for a bathhouse. For example, you can find a use for old sheets of corrugated or smooth slate, or even scraps of corrugated sheets remaining after roofing work.
Some resourceful owners country houses line the walls of the drainage well with glass or plastic bottles, which are filled with sand, find others very interesting solutions. Therefore, if you want to save money, and at the same time free up part of the yard or barn room from old materials, then you need to use your imagination “to the fullest” - and act! We will be glad if any creative master will share their innovations on the pages of our portal.
Another example of a simple drain for a bathhouse is shown in the video below.
Video: How to make a bath drain yourself at minimal cost
Today, bathhouses are built not only in villages, but also in dachas and cottage communities. However, before starting construction, it is necessary to determine how to drain the water from the bathhouse. Since time immemorial, drainage has been carried out directly under the building, where it goes into the ground. But then there was no such density of population and special unsanitary standards, which today it is not only stupid to ignore, but also unsafe.
In order to avoid unnecessary difficulties with waterlogging of your site or disputes with sanitary and epidemiological inspection, we will consider how water will be drained from it, with the lowest cost and maximum comfort for others.
Water drainage methods

So how can you organize a device for draining water from a bathhouse?
The following options can be considered the most popular and widely used:
- draining water directly under the bath;
- discharge to the general sewer;
- arrangement on ;
- uniform distribution of water throughout the area using drainage pipes.
Advice. You need to ask yourself how to drain water in a bathhouse even at the planning stage, and if you decide to drain moisture outside the building (into a septic tank, into a sewer), then you need to take this into account when laying the foundation.
IN strip base sleeves are laid through which the outlet pipes will pass.
Foundation drain
The method with a drain pit is used if you do not visit the steam room very often and in the amount of no more than 1-3 people. In this case, directly under the floor of the used water.
For better absorption, the walls are not lined with solid masonry, but in a checkerboard pattern, which will allow moisture to escape not only through the bottom of the pit, but also to the sides. Unfortunately, this method has a significant drawback: in winter, water can freeze and damage the foundation.
Using central sewerage

If there is an opportunity on or near the site to cut a pipe into a centralized sewer system, this option is the most preferable. You only need to connect or connect to the sewer pipe, and the question of how to organize water drainage will never bother you again.
But if there is no sewer pipe near your site, you will have to solve this problem yourself, fortunately, it is not difficult to do it yourself, even alone.
Septic tank and filtration
This system for draining water in a bathhouse and cleaning it is deservedly considered the most expensive, but at the same time it allows not only to efficiently organize the drainage of water in a bathhouse, but also to use this water for agricultural purposes.
To do this, you need to install septic tanks in which the water is purified and then flows through a pipe into the collector, from where it is used for irrigation. But the disadvantage of such a system is its price, which includes regular replacement of filters and the introduction of microorganisms that take over the purification process.
Drain pit

This is the most used method for draining not only used water, but also sewage from a private home. It’s not at all difficult to make and next instruction, will tell you how to do it correctly.
Choosing a location and arrangement of a pit
According to the rules and regulations of the location cesspool it should be no closer than 12 meters from the living space. This rule should be taken as a basis when organizing the removal of moisture from the washing room. When choosing the type of pit, you must consider whether you will clean it regularly or allow for the absorption of moisture into the soil. The second option is preferable due to the fact that it requires less costs not only during construction, but also during operation.
However, you must take into account that a pit without a bottom can only be built if there is no surface groundwater and if no more than 1 cubic meter of water is drained per day.
Otherwise, the bottom and walls of the cesspool must be completely isolated from the ground. This is achieved by laying the walls with bricks and concreting the bottom of the pit.
Since the concepts of bathhouse and water drainage are inseparable, it is necessary to calculate the volume of the future waste receptacle.
The most optimal sizes are:
- length not less than 1.5 m and not more than 3 m;
- width from 2m to 3m;
- depth from 1.5m to 3m.
Such dimensions will provide you with sufficient volume of the structure for the trouble-free functioning of your bathhouse, even with frequent visits.
Operating procedure

- You need to start by digging a pit. This can be done manually, but if it is possible to use an excavator, be sure to use it.
Advice: Excavation the most difficult type of work, and you will soon begin to understand this when you decide to take up a shovel yourself.
With the help of an excavator, for a small fee, within half an hour you will have a pit of the required volume on your site.
- The walls and bottom of the pit need to be leveled. This can be done manually by trimming bayonet shovel. This type of work will not require high costs energy and time.
- Fill the bottom of the hole with gravel mixed with sand, this will slightly improve moisture absorption and prevent clay and earth from penetrating into the hole.
- Now you can start laying out the walls with bricks. The masonry is done in a checkerboard pattern, from the bottom to the very top.

- The last step is to make a concrete floor with a hole 30-50 cm in diameter for cleaning and the intake hose.
- Now all you have to do is let me down sewer pipes, through which water will flow out of the bathhouse.
Only clay and well-fired bricks are suitable for lining a pit; it is not recommended to use silicate or pressed briquettes of unknown composition.
Conclusion
The choice of technology that will ensure the drainage of water in the bathhouse depends not only on your financial capabilities, but also on how often and how many people will use the washroom at the same time. The video in this article will also help you.