Summary: Paper bird crafts. DIY bird craft. How to make a paper bird. Spring crafts for children. Children's spring crafts from natural materials.
Spring's most faithful friends are birds. In spring, nature awakens from hibernation, the trees are filled with life-giving sap - life is everywhere! And the birds are the first to remind us of this. The hubbub of birds greets the revival of nature with victorious force. For this reason, we could not help but include in our section “Do-it-yourself spring crafts with children” a selection article “Crafts of birds from paper and fabric”. We will teach you how to make paper birds. Taking advantage of our ready-made templates And detailed instructions, you can make an original one spring craft- mobile “Spring Birds”, which will decorate the interior of your home. You will also learn how to sew beautiful birds from fabric.
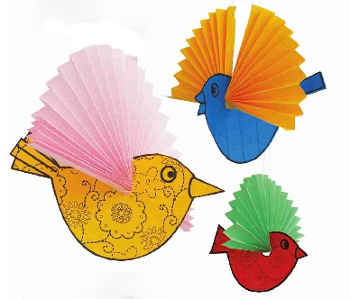
1. Bird crafts. Paper birds
A very simple spring craft for kids. To make these cute paper birds you will need scrapbooking paper, colored paper clips, glue and a hole punch.
Download the bird template from the link >>>> Print and cut out. To make one bird you will need two mirror pieces. Before gluing them together, take two paper clips and straighten them to create “bird legs”. Place them between the two sides of the bird and glue the sides together. Make the eye using a hole punch. Children's spring craft is ready!
2. Crafts bird. How to make a bird out of paper
We present to you another simple spring paper craft. You can make it in literally 10 minutes.

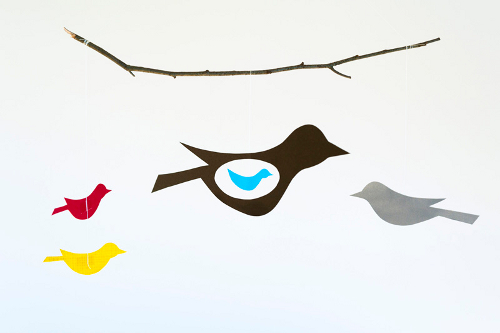
And one more spring craft - a mobile from the well-known blog madebyjoel.com. On this site you will also find video instructions. The template can be printed using the link.
4. Children's crafts spring. DIY bird crafts
If you don't know how to make a paper bird, be sure to visit the Bulgarian website Krokotak.com. There you will find two great spring crafts for children: a white stork and a swallow.
White stork made of paper. How to make a paper stork

The white stork is an extremely positive symbol among most peoples of Europe, Asia, America and Australia, an emblem of the sun, peace and goodness. The stork, arriving from warm regions at the end of March or at the beginning of April, is quite naturally associated with spring and the beginning of a new life. Since the large, proud bird is not at all afraid of humans and builds nests on the roofs of houses or on the tops of nearby trees, returning annually to its old, habitable place, people are accustomed to viewing it as a guardian angel of the hearth, as a peaceful symbol of constancy and well-being.
The storks in the photo below are made from disposable cardboard plates and disposable plastic spoons. The birds' feet are made from small coffee spoons. To make this DIY spring craft you will need glue gun.

A swallow made of paper. How to make a swallow out of paper

The grass is turning green
The sun is shining;
Swallow with spring
It flies towards us in the canopy.
(Alexey Pleshcheev)
The swallow is probably second only to white stork. The attitude of the people towards her is especially warm and kind. And of course, she is a symbol of spring, the return of the sun. The Hermitage houses a Greek vessel - a pelica with a wonderful design: an adult man, a young man and a boy joyfully greet the swallow that has returned with spring.
Note: the swallow's eyes are glued on purchased ones (so-called "doll eyes"). You can buy such eyes, for example, in the online store Read.ru. See link >>>>
5. Crafts on the theme of spring. Bird crafts
From the usual paper plate can be done original craft on the theme of spring - a bird in a nest. It is appropriate to use decorative feathers for decoration.

Of course, it’s not good to keep live birds in a cage; it’s better to let them fly free. You and I will make a spring craft, a bird in a cage out of paper and plastic cover. Detailed wizard class see link.

Look at what cute birdhouses you can make together with the residents from the so-called. waste material. This spring craft would be appropriate to decorate a wall in a child’s room. The birdhouses themselves are made from cardboard milk or juice cartons. The outside was painted with acrylic paints. The birds were made from plastic containers from Kinder surprises.

These bright spring birds on wires can be easily and simply drawn using fingerprints.


This spring bird applique is made using paper cupcake liners. Even a small child can make such a spring craft. The molds need to be folded (or cut) in half, glued to paper, and then finished drawing the birds’ legs, beaks and eyes.

6. How to make a bird from fabric. How to sew a bird from fabric
Birds can be made not only from paper, but also from fabric. Felt is best suited for these purposes. You can decorate a bouquet of spring twigs with ready-made fabric birds.
For decorating a children's room, or garden, for serving festive table use homemade products. Birds made from plastic bottles or wood are used as decoration. Another way of making it is from rubber bands. It is worth considering each option and choosing the most optimal one for yourself.
Birds from bottles
Lawns are often decorated homemade products. As you can see in the photo, the birds with their own hands complement the style composition and favorably emphasize the advantages of the place.

Manufacturing does not take much time, all family members can do it. Turn this process into a celebration, during collective creativity. This way you can spend time with your family and have fun with your children.

In order to make a peacock with a painted tail, you will need five-liter eggplants and a lot of 1.5-2 liter plastic bottles. Prepare garbage bags, tape, and foil. The tools you will need are scissors and a stapler. For decoration decorative item take a brush and acrylic paints. Varnish is used as a fixative.


After preparing all the materials and equipment, you can begin the main work. First of all, you should process plastic container. It should be clean from the inside, without glue trace, or liquid. Worst case scenario, you'll get dirty and slow down your work.

One of the most complex components is the bird's tail. The middle part of the bottle is cut into three long tongues. The bottom and neck of the bottle should be cut off first.

Round one end until it turns into a feather, and make very small cuts along the edges. A blue oval is attached to the rounded ends; for this you will need plastic bags, circle made of foil. Using a stapler, you need to fasten these elements of the product.

Note! In order for the bird’s tail to be voluminous and fluffy, you should prepare many of these homemade preparations.

The last step is to paint the bird and seal it with varnish.

Bird for the garden
In order to learn how to make a bird with your own hands, you should use the following recommendations.

Prepare a five-liter eggplant. The neck should be cut off; the bottom is also not required. Next, cut a semicircle from the middle part. Feathers will then be attached to it using a stapler.

Then they begin to manufacture the base - the body of the product. Cut off the neck of 5 l and 2 l, fasten these two elements with wide tape.

The bird's head is made as follows:
- cut the neck, twist to create a beak;
- connect it with the cut off large neck. To do this, use tape;
- fasten the part to the base.

The advantage of such products is their long service life. Plastic material, as well as polyethylene, do not deteriorate due to bad weather, in particular, this applies to snow and rain.

Cut strips from garbage bags, then attach them in rows to the body of the bird. Gradually move from the top to the bottom of the bird's body.

You can fasten the base and tail of the peacock using a rope. Before doing this, you should make a hole in the place where the fastening will go.

To fix it directly on the lawn or in the garden, attach a stick to the bottom. By using acrylic paints draw eyes, beak, and other elements as desired. Then secure the result of decorating with paints.

Note! For additional decoration, use a crown made of foil. You should pour a little sand inside so that it is heavy and does not blow off the bird’s head.
Bird for children
Product for kindergarten easier to do than big bird. If you have such an opportunity, you can complicate the process using a frame made of metal mesh. This will be the base along with the foam that will make the bird.


Using acrylic paints, the product is painted and varnished. Car tires are often used to make the product.

Manufacturing techniques
There are many manufacturing techniques and materials available. The French weaving technique is often used. To do this, you need to choose the right fittings. Real creations are made from wires.

The kanzashi technique is considered to be quite common among needlewomen. In addition to hairpins and flowers made using this technique, you can make other crafts.

To make a bird, they use a wire frame, then wrap it with threads. A semicircle cut out of cardboard serves as the basis for the tail.

Another manufacturing method is from threads. You can make a pink chicken, for example. Manufacturing will not take you much time.

Make paired blanks from cardboard. Wind the threads until the hole is completely filled. Cut from the outer edge, thread the thread, tie a knot. Thus, fluffy balls are made to decorate other products.


conclusions
Birds are popular among DIY enthusiasts. The material used is different materials and manufacturing techniques. It can be plastic bottles, colored paper, threads, other improvised means. Manufacturing techniques vary in complexity, you can choose the one that suits you.

With the help of such art you can have a good time with your children and have fun. At the same time, the decoration will please the eye for a long time.

DIY bird photo


Paper crafts are a wonderful way to have fun with friends and children, make original gift and just improve fine motor skills hands Origami birds are most often created because their patterns are most understandable for beginners, and the resulting product is quite original and presentable.
The most actively used origami techniques are cranes, swans or doves. Owls, seagulls and other representatives of the fauna are less popular, and more often precisely because of the difficulty of working with them. There are, of course, a lot of schemes for each of the birds: they differ both in the required level of training and in general appearance figurines.
All of them imply the presence of colored or plain paper, which will not tear from too frequent manipulation at a specific point, but will also be easily deformed. In addition, it is often necessary to resort to help a simple pencil, ruler, protractor and scissors. However, in some algorithms these devices may not be needed.
The easiest way to make a paper swan is. You can often notice such a bird as an element of table setting, when large napkins are folded in a similar way, placing them on an empty dish.
Required for production large leaf paper in the shape of a square, on which a central line is drawn, and the side corners are turned to it. The figure resembles an elongated rhombus. The triangles that made up its long part are bent internal corners, and the figure along the middle vertical is folded in half again.
The most acute angle (lying at the base) is bent diagonally so that this part forms a perpendicular to the base, and its tip is directed with a new fold outward to the side. The swan's head and neck are ready. It is enough to bend the tail twice along parallel diagonals with an accordion, and the work with this origami bird is completed.
Making a pigeon: master class with diagrams

The dove is a symbol of peace and the easiest origami bird to make. There are, of course, a lot of schemes for it, and beginners are encouraged to use the one that includes only 7 steps. You will need to stock up on colored paper, cutting out a 20 by 20 or slightly larger square from it, so that there are no special difficulties when folding. On initial stage You will need to place it in front of you like a diamond, and then bend all the edges inward, aligning the vertices in the center. You should end up with a square envelope.
Now bottom corners the figure is tucked towards the center line and bent, turning the square into a pentagon. After which it is folded along the same middle vertical and the paper is turned. Its widest side looks up, its acute angle looks to the left, the diagonal goes down. At this step, the sharp corner is bent, which will become the beak of the pigeon: it is advisable to adhere to a diagonal of 45 degrees. However, it should be understood that it does not go back or forward, but folds inward, between the halves of the paper. And the top line will now bend in the opposite direction.
Next you will need scissors: at an angle of 45 degrees at the bottom right angle a diagonal cut is made. If it is difficult to determine its length by eye, you can find the middle on the right side of the figure, draw a line along it along the base, and the point of intersection of this line with the diagonal from the right angle will become the point where the cut ends. The part to the left of it bends outward, forming a dove’s wing: this must be done on both sides.
The right one remains lowered: this is the tail of the bird, with which it is necessary to perform 1 more manipulation. From an acute angle to the upper base, start a diagonal, measuring an angle of 20 degrees, then bend the edges of the figure inward along this line. This completes the creation of an origami paper dove.

You can use another diagram of the same bird, which already includes 11 steps, but to some it may seem simpler in execution than the previous one. A sheet of paper is selected with the same parameters, and is also located in the projection of the rhombus, after which it is folded in half along a vertical line and straightened back. Then the side parts must be tucked towards the same middle, aligning their edges, and the top bent back.
The next step is to mark the lines: the side corners of the resulting triangle are folded towards the middle and straightened, then each of them bends outward, but only along front side so that the top remains untouched. At the final stage it will become the head of a dove.
The lower ends of the side folds need to be moved inward; the angle at which this is done is taken to be minimal - 7-10 degrees. After this, along the middle vertical, the figure is folded with a movement away from itself: i.e. those sides that were in your field of vision should remain visible, being external. Then the product is turned so that the midline along which it was bent looks diagonally upward: this is the back of the bird.
All that remains is to bend the head inward - the upper corner, and fold the tail. The latter is reproduced as follows: first, the part is folded and straightened along a line close to the base, then along the line that is 0.5-1 cm (depending on the original dimensions of the paper) to the right of it. Now, thanks to the outlined lines, it is easy to bend the latter with a finger movement so that it disappears inside the bird. A simple origami dove is ready.
Origami: DIY bird of happiness
Legends and songs were written about the bird of happiness, and many people were probably at least once interested in what it looked like. However, its appearance in the imagination of each nation differs: in particular, in Japan the crane is called the bird of happiness. In this East Asian country, there is a belief that 1000 of these origami birds are able to fulfill even the most unrealistic but secret desire. Of course, this is only beautiful fairy tale, but maybe by the time the 1000th crane flies out from under your hands, your old dream will really come true?
To create such a bird you will need paper, preferably colored on both sides. Sheet sizes are preferable to 18 by 18 or 24 by 24, since with smaller parameters it becomes more difficult to work out every detail unless you have significant experience in origami. And the last nuance that is important to consider when choosing paper is the degree of its softness and strength. Often you have to bend and straighten one line several times, after which some materials begin to tear in this place, which reduces the result to “no”.

- According to classic scheme origami birds of happiness, the square is placed so that it resembles a rhombus, after which it is folded in half twice and folded back, each time forming a rectangle. This move made it possible to outline auxiliary lines. Now you need to turn the paper over and start bending again, but along the diagonals of the rhombus, each time getting triangles. This created the last auxiliary lines.
- The sheet is turned over again, and then you need to press on its center with your finger, lifting all the corners up and combining them: i.e. the paper “hugs” the finger, which is immediately removed. The paper standing on the surface with its base in a plane is still the same square, but in the projection of a rhombus. It should be turned over so that the “blind” corner, which is the base on which the pressure was pressed, is at the top, and the diverging ones look down.
- A new stage - the sides of the diamond need to be bent inward, aligning the edges along the center line. After which they bend back. The same must be done for the upper “blind” corner: lower it down and straighten it again. The basting lines are ready. The most interesting and important point: the lower edge of the top layer should be pulled, lifting it, as a result of which folds should be created along the previously drawn lines, and a hollow, not completely closed rhombus should be formed. The same actions are performed for the opposite (back) side.

- Now, in appearance, the figure resembles 2 elongated rhombuses, combined with a single base. Continuing to hold it in this position, you should again fold the sides inward, towards the middle line: for each rhombus this is done separately, they are under no circumstances combined at this stage. Then it is important to bend each of the lower parts upward and move them apart no more than 45 degrees, and then straighten them again.
- According to the resulting lines, the ends of the rhombus will again need to be bent, but inward, and on either side the very tip is also bent by 45 degrees - this will be the bird’s head. The final step is lowering the “wings”, i.e. the upper ends of the rhombus, as well as flattening of the central “hump”. The Japanese bird of happiness is ready to fly after its dreams!
Crane that brings happiness: video tutorial
Read also:
- DIY paper boomerang
- DIY paper flowers
- How to make a swan from a tire?
- How to make a dove out of paper?
- Paper crane of happiness
- How to make a frog out of paper?
- Paper claws or nails
- How to make a paper dinosaur with your own hands using the origami technique?
When you have fully mastered these patterns, you can move on to more complex versions of the firebird, the original owl, etc. The number of algorithms for creating origami birds has exceeded 100, so you will definitely find an idea to your liking.
The origami crane is one of the most basic origami crafts you can make, it is not only a simple paper craft, it also has a long and beautiful history. Of all the different works of art that are made with paper, it seems that the simple crane is still very popular and very close to people's hearts. The first time I saw an origami crane was when I was in first grade, and my teacher taught the whole class how to make them . But I never managed to assemble it, I was so upset that I couldn’t make a crane that I decided that I hated origami and would never devote time to this, in my opinion, meaningless activity. But everything changed a few years ago when I went to Japan. I got off the plane and went to get something to eat, but suddenly I noticed that at the airport there was a museum dedicated to the art of origami. Of course I decided to go there. When I entered the museum, I simply fell in love! Everything was so beautiful! I was so impressed that I stayed in the museum for hours just looking at all the different origami crafts. I visited the museum three more times before I left Japan and even learned how to make an origami heart. On my last visit to the museum, I bought a book and origami paper to take home as I was very interested in the art and really wanted to collect various new creations. Now, after some time, I learned to do different models fish, birds and animals, and of course the origami crane - traditional and magical! There is even ancient legend in Japan, which says that if you collect 1000 origami cranes, a crane will fly to you and make your wish come true. There is one sad story related to the origami crane about a girl who was only two years old when she was thrown atomic bomb, she was only a mile from the epicenter of the explosion. Over the years, she began to feel unwell due to an illness that was caused by a bomb explosion. She spent a lot of time in the hospital, but then she remembered old legend about a crane and decided to try to make 1000 cranes, but died before she could achieve her goal. For this reason, I always think of her every time I make an origami crane, and I always pray for peace on Earth.

On this page you can find out how to make an origami bird- a bird made of paper. It's pretty simple circuit origami it consists of ten stages.
Ready paper bird shown on the left or in the last picture of the origami diagram for children. In order to make an origami bird You can use patterned paper napkins or colored paper. The picture at the bottom of the page shows a decoration idea using paper birds.
How to make an origami bird - a paper bird
In order to make a bird out of paper, you will need a square sheet of paper. The figure below shows a diagram, how to fold origami birds out of paper.

Fold a sheet of paper in half twice as shown in the first origami drawing, so that the sheet of paper has folds indicated by dotted lines.
Bend a sheet of paper as shown in figure number two. The corners of the left and right halves of the origami should meet in the center.
As shown in the following pictures, bend the left and right corners. The picture below shows a decoration idea using blue paper birds.

Origami diagram “Crane”

Perhaps the “Crane” is the most classic form of origami. Using the diagram below, you can easily fold this beautiful bird. Origami diagram “Crane”:

Procedure: 1. We begin to fold the crane from the basic shape of a Square. 2. We move the layers of paper apart on the sides and make three folds: we bend and unbend the right and left edges, after which we bend and unbend the top of the figure. Turn over and repeat the same with the other side; 3. Carefully lift upper layer rhombus and bend it up. We do this by pressing on the sides. 4. Turn the figure over and repeat the same with the other side; 5. Spread the layers of paper apart on the sides and fold the sides of the front layer of the figure towards the center; 6. Turn the figure over to the other side and do the same as in the previous point; 7. Now we spread the layers of paper along the sides of the figure and wrap the sharp lower ends up. Press on the sides, align the figure and bend to the sides, you guessed it, the nose and tail of the crane; 8. Bend the crane’s nose, spread its wings and voila.
Here are the other entries!
Tags: CraneOrigami animalsOrigami patterns

All the January holidays have passed. And in February we are waiting for almost our own holiday - Valentine's Day, or Valentine's Day, which is celebrated on February 14. In Russia it has been celebrated not so long ago, but we can safely say that everyone, young and old, knows the history of this holiday and its significance.
I think that best gift just for Valentine's Day - made with your own hands. A gift made with your own hands allows you and your partner to understand and feel the value and individuality of your relationship.
A huge number of DIY gift ideas for Valentine's Day can already be found on the Internet. However, an indispensable attribute of Valentine's Day is “Valentines”, or simply, cards in the shape of hearts. Large, small, paper, fabric and even edible - they are visible everywhere.
I suggest you learn how to make your own paper valentines.
How to make a valentine with your own hands
Do-it-yourself crafts can give adults and children an invigorating spring mood. A current topic for master classes is the image of birds returning from wintering from warm regions. Creating birds, symbols of happiness, from scrap materials turns into a fascinating process in a lesson at school, in the garden or just at home. There are many ways to make a beautiful bird with your own hands, some of which we will now consider.
Paper bird
Let's try to make a bird out of paper using origami, quilling and mobile techniques. To do this, let's stock up on patience and beautiful paper.

Origami
This principle of paper folding originated in Japan and is now popular throughout the world. In order to get an elegant, neat bird, you should strictly follow step by step instructions on the picture.

Try to make the most precise and neat folds by running the handle of scissors or your fingernail along them, and also carefully follow the instructions on how to make a bird.

It is possible to create different birds using the origami technique, three-dimensional and flat, flying and calmly sitting.

Quilling
This type of needlework has been known in Europe since the fourteenth century. Nowadays people love to do quilling of different ages, this activity is calming and captivating, and the result is beautiful panels made from simply curled pieces of paper.

A firebird made using this technique will look especially bright and unusual. To get started, it is recommended to draw up a sketch, think over a color palette and combinations of elements.


The most impressive fiery beauty will be located on a dark blue or black background, as if flying in the night sky.

Mobile
The easiest way to make spring birds. To do this, you will need to cut out beautiful silhouettes of birds from colored cardboard, attach cardboard wings, which can also be supplemented with feathers different colors. Then we pierce a hole in the back with a hole punch and hang the birds by a string on a stick, which is easy to find on a walk in the park or in the forest.

You can also combine this method with the BEEP technique by folding a sheet of variegated paper into an accordion shape, thereby turning it into three-dimensional wings and a tail that are inserted into slits on the silhouette of the body. Such a craft will become original decoration nursery or any other room in the house.

Bird made of threads
You can make a bird very easily from strands of yarn. To select shades of threads, you should carefully study the representatives of selected bird species and select the appropriate colors and choose the thickness of the threads. Then connect several shades (for example, brown and gray) and make 37 turns, winding the threads around the wide part of the palm.


By cutting the ring of threads, we get a long piece. Using magazine wads of paper or cotton wool, select the size of the bird and wind it around the thread.

It is important to lay the threads like strands of hair, imitating feathers. A knot of yarn will serve as a head, and the remaining panicles of thread will envelop a ball of cotton wool or paper, creating a body. The beads will turn into curious eyes, and the legs will grow from chenille wire.

Bird made from natural materials
Birdies collected from twigs, cones, feathers, acorns, shells, etc. look very cute and natural. Plasticine and paper are used as fastenings and detailing of the craft.

It's fun to collect materials for handicrafts in nature, finding a variety of fruits and leaves, unusual plants, fir cones, chestnuts, shells, nuts, moss - you need to stock up properly so that there is plenty to choose from.

Before you start making a bird, find an image of it and draw a sketch to provide an approximate design. Then you can recreate your favorite design in volume using convex elements, or on a plane using variegated leaves.


Mother Nature gifts us with such diverse and colorful materials for creativity and, as if she herself is giving us a master class on how to make a bird.

Salt dough bird
First, let's choose a fairly strong and inflexible base background. It could be old record or a ceramic plate, pre-painted in the desired color.

When making poultry from salt dough, we will need batches of several colors and without dye. To get the dough, mix 1 part salt and 2 parts flour, then combine the pieces with paint of the required colors diluted in water.

From white We sculpt the body and wings of the bird, glue it to the base with PVA glue. Then we color the bird according to the desired look.

To the base around the bird we glue natural background elements made from colored dough, for example, tree branches, leaves and berries. Using a stack we outline the veins and plumage.


Plastic bird
A good way to recycle plastic waste and turn it into adorable crafts is by making birds from PET bottles. This is an easy way to decorate your home, garden, cottage or favorite yard. A body is made from a five-liter bottle, a hose is inserted into its neck, and a wire is inserted into it, which will create a natural curve of the swan's neck.

Feathers are cut from a white bottle of fermented milk products, the edges are processed with a lighter and attached to the frame from top to bottom in a spiral, previously secured with wire.


It is recommended to fasten the entire frame with wire, and make the beak from parts of bottles cut out and painted red. A photo of a homemade bird demonstrates how easy and fun it is to turn waste into materials for crafts.


We have revealed only a few secrets, but there are a great many options out of what else you can make birds at home and everything is limited only by your imagination.

Spend more time on manual labor with growing craftsmen, discovering amazing world inventions. By communicating with the world in the language of creativity, your child will learn to understand and control it, and you will gain a strong connection with your child.

Photos of homemade birds


DIY paper birds - a craft for all occasions. It is suitable for creative activities with children and as decoration for any holiday. Birth of a baby, wedding, New Year, Birthday - cute paper birds will fly in on their wings to congratulate you. Today we will tell you how to make paper birds and provide you with templates.
Once upon a time, in our childhood, beautiful interior decorations for holidays were made only from paper. That's why paper will forever remain on the list ideal materials for everyone who loves to create.
If you pick up paper, scissors and glue, and have some free time, the preparation process, which usually causes so much anxiety and worry, will become a very pleasant pastime.
Making voluminous paper decorations is actually an interesting and fun activity, because the result is immediately visible. If you go beyond the usual ideas, worn out by years of use, you can make many interesting discoveries.
For example, what do you think of the idea of paper birds? In the photo you see the work of needlewoman Leah Griffith.
Lia Griffith - being a master of graphic design, implements her projects in the most different types creativity and shares his ideas with everyone who is interested in them. Leah knows how to dream and make dreams come true, doing it with amazing taste and skill. “Craft is your life” is the motto that she invariably follows.
In this amazing woman's blog you will find many interesting design ideas for home, holiday decor for a wide variety of calendar dates and family events.
And these snow-white ones paper birds- a gift from the master to everyone who loves to work with this beneficial material. You can combine such birds into a kind of “flock” and hang them from the ceiling. The bird can also be used as packaging for a small gift or serve as a planting card for a holiday table.
Use laminated paper with glitter to imitate the sparkle of snow underneath. sun rays, or maybe you want to turn white bird into a bullfinch, titmouse or waxwing... Any idea will be good if you let your imagination run free.
Print bird details, here are these (by clicking you can go to the page with the PDF file, where the image size will be 1: 1):
Now you need to carefully cut out all the parts along the contour, pick up glue, or best of all, a glue gun, and you can start assembling. To make the process more clear, use the lesson Leah Griffith posted on her video channel:
A few more lessons from other needlewomen will help you bring the idea of paper birds to life:
How to make paper birds. Video master classes
1. How to make paper birds, master class:
2. DIY paper birds, master class:
3. Paper birds, master class:
Create with pleasure, delight yourself and your loved ones with new unusual ideas!