Wall decoration decorative plaster– these are works that are carried out on internal or external surfaces. They are aimed at giving walls or ceilings a certain texture and color. Depending on the chosen composition, different techniques for applying this material are used. Only preparatory work.
To decorate the walls with plaster yourself, you will need the following:
- spatulas of different sizes;
- graters and graters;
- trowel;
- containers;
- brushes, rollers and sponges;
- drill with mixer attachment;
- stepladder or scaffolding;
- plastic film, masking tape;
- plaster mixture, wax, paint.

For preparatory stage The following tools and materials are needed:
- sandpaper, sanding machine;
- rule;
- level and plumb;
- spatulas;
- reinforcing mesh;
- deep penetration primer;
- starting plaster, putty.
Preparatory stage
Plaster finishing requires a perfectly prepared surface. To do this, you need to carry out the following manipulations:

- Completely remove the old coating or clean it of traces of paint, wallpaper, and so on.
- Level the walls using starting plaster and reinforcing mesh or plasterboard sheets.
- Fill possible surface defects, such as potholes and cracks, with putty.
- Remove protruding parts.
- Check the evenness of the walls with a level or plumb line.
- Apply a coat of primer twice to enhance adhesion.
Wall finishing with structural plaster
Using this material, they carry out Finishing work on external and internal surfaces. Do-it-yourself decorative plaster finishing does not require extensive experience or qualifications - House master can handle it easily. Difficulties can only arise with applying the mixture to the ceiling.

Preparation of the solution
The modern construction market offers ready-made mixtures in plastic containers of various sizes or dry powders in bags that need to be diluted with water. If we are talking about saving your budget, then it is better to buy powdered material and prepare decorative plaster yourself. For this purpose, you will need an electric drill with a mixer attachment, water and a mixing container.
Important! Majority structural plasters They dry out very quickly, and you cannot add water to them after cooking, so it is not recommended to make large batches so as not to lose the material.
Material consumption directly depends on the filler fraction:
- Coarse-grained material - 2 kg per square meter.
- Medium grain – 1.7 kg.
- Fine-grained – 0.7 kg.
The first step is to wash the dilution container and pour into it the amount of water indicated by the manufacturer on the packaging. The temperature of the liquid should be approximately 20 degrees. Then you should gradually add the solution to the water, stirring it with a mixer.

After this, you need to wait about 15 minutes and stir the plaster again. If the material is made on the basis acrylic resins, then color is added to it, otherwise it is subject to subsequent painting.
Application Features
The prepared composition is scooped onto a spatula and applied to the wall, after which the plaster is stretched over the surface. Excess material is also removed with a spatula. During application, it is important to maintain the thickness of the plaster layer, which must correspond to the fraction of the material, so it is not recommended to make it more than 3 mm. At the same time, a layer that is too thin will not be able to completely cover the walls, and after drying the primer will appear on them.
As mentioned above, this material dries instantly, so there is limited time for work. To ensure an even layer of plaster, it should be applied at a time. If the surface to be treated is too large, you will have to divide it into sections with masking tape. Then apply the plaster with an overlap, remove the tape before the material hardens, and treat the rest of the area in the same way.
 The applied layer of plaster should not be thicker than the filler grain included in the composition
 Rubbing plaster
This stage is considered the most responsible. The appearance of the resulting surface and its performance characteristics depend on its correct implementation. Work must begin immediately after the material has set. This usually takes 30 minutes. It’s easy to check if the wall is ready: just put your palm against it, if it doesn’t stick, you can start.
The procedure is carried out using a plastic trowel. To achieve different effects, different rubbing techniques are used (see photo):

You should know! If for some reason it is not possible to treat the entire wall at one time, then you do not need to rub exactly to the boundaries of the treated area. You need to leave the plaster untouched at the edges, and after applying the entire layer, thoroughly rub the joints.
VIDEO: applying decorative plaster “Lamb” (master class)
Coloring
A day after the main work has been carried out, you can begin painting the wall. The first step is to treat the entire surface sandpaper to smooth out minor defects. Then the wall is painted dark color and wait until it dries. The next layer of paint should be 1-2 shades lighter. The work is carried out with a regular paint roller, and the joints of the wall with the floor and ceiling are treated with a brush. After the second layer has dried, it is recommended to apply a gloss varnish.

Wall decoration with textured plaster
First, prepare the solution taking into account the manufacturer’s recommendations, after which it is applied to the surface using spatulas. It takes longer to dry than structural paint, so you can safely treat the entire wall. Excess material is also removed with a spatula. After processing the entire area of the wall, you can begin to create the texture.

How to make a textured layer
This coating can be obtained using the following tools:
- roller;
- stencil stamp;
- trowel and spatula.
Using a roller is the easiest and most quick way. Using this tool you can create a surface resembling velor. To do this, you need to forcefully pass it over the entire surface of the wall, while the movements should be directed in one direction. Then wait for the material to dry and remove the protruding fragments with a spatula blade.

If the process seems too complicated, then you can purchase special stencil stamps with relief patterns in construction stores. These products are simply pressed onto fresh plaster, after which a relief remains on it. The main inconvenience is the need to constantly wash the stencil with water to remove any remaining material from its surface.

On a note! While shopping for everything you need, you need to purchase several small stencils for the corners.
Using spatulas and trowels, they create designs that resemble texture natural stone, suede or concrete. You need to work with them according to the same principle as with all the above tools. A brush, spatula or trowel is pressed to the surface and passed over its entire area. If you don’t have a construction tool at hand, you can use a regular sponge or even in a plastic bag. In general, anything that can be left on the surface by the relief will do.
VIDEO: decorating walls with textured plaster
How to dye
Such decorative plaster for interior works does not require mandatory coloring, but to emphasize the texture it is better to do it. First, the surface is cleaned with fine-grained sandpaper, then the resulting dust is brushed off. The first coat of paint is applied with a long-haired roller, and the second with a short-haired roller. The paint tones should be slightly different. They need to be applied at intervals of 24 hours, and the plaster should dry for about 48 hours after giving the texture.

If you don’t have a roller at hand, the process of painting decorative plaster is as follows:
- Open a can of paint and pour it into a special container. The brush is completely dipped into it, for the entire length of the bristles. Then press it against the embossed edge of the container to remove excess paint. If there is no special container, you can squeeze the bristles of the brush onto a piece of multi-layer cardboard.
- Now you can start applying paint. There is no need to paint every detail; you should apply the layer with sweeping movements, barely touching the surface. Thus, the paint will not rub into the texture, but will only touch the protruding fragments.
- Wait until the first layer dries and apply a second, lighter one. The same technique is used as for the first layer.
- The last step will be applying varnish. This material is first diluted with water in a 1:1 ratio, after which it is applied with a wide, clean brush. After some time (each varnish takes a certain time to dry), you can apply a second layer. After about 1-2 days you can touch the plastered wall.

Some artists use the wash method. It involves applying only one layer of paint, which is subsequently rubbed with a damp cloth. As a result, the texture remains saturated in color, and the protruding parts are lighter.
Drawings and panels
Before working with decorative plaster, you need to immediately decide on the presence of additional design elements on the walls, for example, various drawings or panels. They can decorate and elevate even the most ordinary interior, especially if they are combined with the right lighting.
What drawings can be used and where to place them
A win-win option is separate wall, which is pre-finished with stone or stucco around the perimeter. It is also appropriate to place these elements between windows, near interior doors or along the edges of an arched passage.

If we are talking about a children's room, then here you can fantasize as much as you like. The drawings can be based on the theme of a child’s favorite fairy tale or cartoon. For a children's room, it is permissible to apply drawings over the entire area of the walls.
As for bedrooms or living rooms, everything is much more complicated here. The first rule is that the drawing should not bring disharmony to the interior. Drawings on the walls are permissible only for classical design, baroque, empire, etc. It goes without saying that in modern or high-tech, drawings and panels will look superfluous.
 The bas-relief on the wall is perfect solution to create a stylish and unique interior
 The tone of the painted panel should either contrast with the tone of the adjacent wall, or differ from it by 2 tones. The combination of motley and dark tones is unacceptable.
Application techniques
There are three main methods of surface decoration that require artistic taste. Therefore, it is better to trust the professionals or get a master class on decorative plasters.
Working with a stencil
This creation option is the simplest. You can use fragments of plywood or drywall as a stencil, having previously cut out patterns on them.

The application process is as follows:

Creating a bas-relief using construction tools
The relief graphics method is also considered one of the most popular. It involves the use of plastic fine-grained plasters based on synthetic binders, acrylic paints and clear varnish. To carry out such operations you will also need brushes. different forms and sizes, spatulas from various materials, pointed wooden pegs.

The process goes like this:
- After applying the final layer of plaster, the master, using the selected tool, applies a relief pattern to the surface. The simplest example is waves drawn with a paint brush.
- The composition is completed with a decorated relief frame, which is created using a sponge or foam roller.
- After the drawing has completely dried, it is painted. There are also no clear recommendations here - it all depends on imagination and talent.
Hand sculpting
The last method is considered the most difficult and without specialized education sculpture, most likely, nothing will work out. The purpose of this operation is to create a relief on the wall being processed by hand sculpting. Such panels can occupy only part of the wall, or the entire area. After drying, the surfaces are also treated with paint and varnish.
Do-it-yourself decorative plaster is applied quite simply, if you do not take into account the artistic aspects of the issue. The main thing is to adhere to the above tips and recommendations from manufacturers.
 Decorative plastering was and remains a popular type of decoration both indoors and on façade walls due to its practicality and the variety of surfaces created. In this article we will look at all the popular methods and techniques for applying decorative plaster, the features of which will be clearly shown in video lessons.
Materials and tools
The trowel application technology includes the following work methods:
- A portion of the solution is applied to the tool and distributed over the wall in short strokes. The layers of plaster are laid overlapping each other. Their direction can be either in one direction or in different directions. If the trowel moves not in a straight line, but in an arc, the relief will be completely different, more bizarre.
- Another popular option to put decorative trim is trowel trimming. The plaster solution is also taken onto the trowel, then the entire surface is easily pressed against the wall and removed. The movements are made quickly “touch-free”, turning the tool in different directions. The result is an effect small "fur coat". You can also first apply the plaster in an even layer of 2-3 mm, and then trim it over the entire area. It turns out as in the photo.
Roller
To decorate walls during repairs, ordinary fur (paint rollers) and special rubber ones with a certain pattern are used. You can also make a structural roller for decorative plaster with your own hands by wrapping its rotating part, for example, with a rag, bag or rope.
The technique of applying a pattern with a structural roller is very simple:
- the wall is plastered in one layer 2-4 mm thick;
- roller is passed over the plaster in one direction, leaving a pattern.
To give the walls a “fur coat” effect, use a fur roller. There are two ways to do it:
- the roller is dipped into the plaster solution and rolled along the wall;
- a section of the wall is completely plastered with a trowel or spatula, then the texture is formed with a roller.
After the mortar has set, you can walk along the wall with a wet trowel and smooth out the protrusions and rub it in.
Important: if the mixture lies unevenly, remove the excess with a spatula. It is not recommended to take long breaks when working with a roller, as the material will dry out and joints will be visible on it.
Brush
Create using a brush finishing coating, as a rule, using ready-made plasters for decoration. This method has several advantages:
- Economical. The brush distributes the material in a thin layer.
- Rapidity. When applying the mixture to the wall, a texture is immediately created.
- Simplicity. No special skills or techniques are required; decorative plaster is simply applied and distributed with strokes in different directions.
Often such mixtures contain mineral fillers, for example, sand, marble chips. They give roughness to the plaster and complement the texture created by the brush. More details about the application technique will be discussed in the video tutorial below.
Sponge
To create a textured coating, improvised means are also used, for example, foam rubber or sea sponges, plastic bags, rags.
First, lay down an even base layer and use a trowel. Then use a sponge to scoop out a small amount plaster mortar and applied with strokes to the wall. You can’t cover the entire surface, but only make islands of plaster. After it begins to set (after 15-20 minutes), the tops are smoothed with a trowel or spatula.
In this way, they imitate the texture of stone and create arbitrary patterns.
Decorative plaster has been one of the popular materials for DIY wall decoration for many years. The style, method of application, materials have changed, but the technology has remained the same. The surface is treated with plaster, which not only protects the walls, but also serves as a decorative layer. Thanks to in various ways applying decorative plaster, the room can be treated beyond recognition. The interior of the house can be kept in one style, or you can make it varied. The peculiarity of plaster is that it will not be possible to make two identical designs, so each room will be original and unique. Among other things, the material can be painted in any color you like, there are no restrictions for you. And when you get tired of the base color, you can easily change it. One of the advantages of finishing walls with plaster is the ease of work. Even if you are not a professional, our tips will help you do everything yourself.
So, this article is devoted to decorating walls with decorative plaster with your own hands. Detailed information will be made for you step-by-step instruction, additional videos and photos.
A little about decorative plaster
If this is your first time encountering this material, then I would immediately like to reassure you - there is nothing complicated or supernatural in it. Usually it is sold in the form of a dry mixture, which needs to be prepared during the process, and there is ready-made plaster. The composition of the material is quite simple: binder material, additives and filler. Depending on the type of plaster, the components may be different. The binder can be gypsum, lime, polyurethane, acrylic and epoxy resins. They provide the plasticity of the plaster, which is very important. If we talk about filler, it can be colored clinker or white portland cement, and various colored or pigmented fillers. Additives are plasticizers and other materials that increase the properties of plaster to repel moisture. Special solid elements are added to structural mixtures to form furrows (bark beetles). These are wood fibers quartz sand, synthetic granules or marble chips. They can be either large or small fractions.

note! Plaster happens different types. It is used for decoration interior walls, and external. It can be structural, textured, mineral, Venetian and stone.
Material advantages
Before plastering the surface, you need to understand why plaster is better than other materials. Here are the main advantages:
- No professional skills are required for the job. To do everything yourself, just read the instructions from the manufacturer, take our advice into account, stock up on tools and materials (there are not many of them) and start completing the task.
- The ability to hide any surface irregularities and imperfections. Due to its texture and variety of ornaments, designs and patterns, even the most curved surfaces will look beautiful, as if it was originally intended. For example, when working with wallpaper, the prepared wall must be perfectly flat. But for plaster, small unevenness, cracks and defects are not a problem. The material will fill all cavities.
- When the wall is pre-treated with a primer, the plaster plays the role of a heat-insulating layer (if it is of the required class).
- Appearance and variety of techniques. The processed surface looks rich, beautiful, original, skillful and attractive. The wall can be made to suit any taste, according to your desire.
- Ecological cleanliness. These days it's very important factor. Using decorative plaster, you don’t have to worry about the health of those living in the house. The material does not emit harmful substances and is odorless.
- Durability. Good plaster will serve you for many years. It is resistant to small mechanical damage, to temperature changes and aggressive substances.
- Easy to care for. Some types can be washed.

As you can see, decorating walls with decorative plaster is a profitable business. All the advantages speak in favor of this material. Now we will look at what is needed to do the job yourself. But first, look at the photo. Here you can see different kinds decorative plaster.**
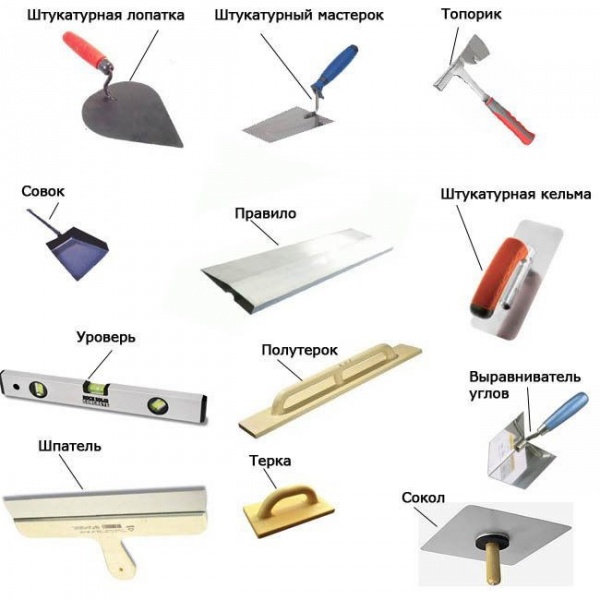
Tools required for work
We have already mentioned that expensive and specialized tools are not needed here. They are quite simple, affordable and easy to use. What should you have in your arsenal? It all depends on the material being applied and the desired texture. But, standard set next:
- container for the finished mixture (bucket, basin);
- drill with mixer attachment;
- a set of spatulas of different sizes;
- trowel, grater, grater;
- falcon;
- roller with bath;
- soft and hard brushes for painting or drawing;
- metal brush for cleaning walls.
The photo shows what each of them looks like.
As materials for forming a pattern, you can use a sponge, cellophane, various structural rollers, stencils even rubber glove. In this matter, you can use your imagination to the fullest, because you can create any patterns with anything. When the arsenal is complete, you can begin decorating the walls with decorative plaster with your own hands.
Step 1 - surface preparation
There is no point in achieving a perfectly flat area. It is important to complete the basic steps so that the surface is ready for processing. The procedure is as follows:
Step 2 - preparing the composition
Once the primer is dry, everything is ready to go. On next stage you need to prepare a plaster mixture. Usually the packaging contains instructions from the manufacturer, which indicate the method of preparation and proportions. It is as follows:
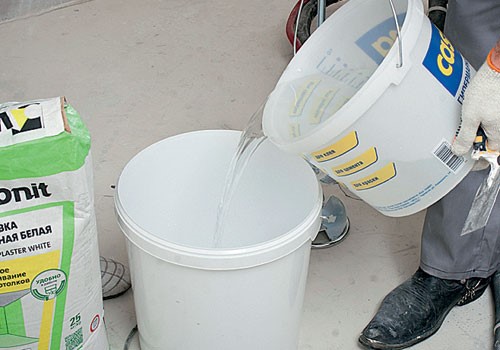
This way you can quickly and easily prepare the solution with your own hands in a few minutes.
Advice ! Do not knead too much material. Over time, it will dry out, losing its plasticity. If you are a beginner, then 1 portion should not be large so that you can apply the solution before it dries.
Step 3 – applying decorative plaster
Now everything is ready for surface treatment. Your task is to apply the solution to the wall and form one or another pattern. The technology is as follows:

Since the techniques and subtleties of the work differ depending on the material and method of application, we invite you to familiarize yourself with a series of videos that will describe in detail how you can make various types of decorative plaster with your own hands.
Application of bark beetle:
Application of Venetian plaster:
Application of Desan Versagel plaster:
Application with a textured roller:
Possible difficulties
If you are working with mineral plaster, then you should know that it tends to burn out under ultraviolet rays or from exposure to precipitation. To avoid this, finished surface must be covered with several layers of high-quality paint, for example, silicate paint.
When you have applied a thin layer of material, be prepared for the base to show through. It will be difficult to fix everything with coarse-grained plasters. The wall is simply covered with a colored primer, matching the plaster.
The wall will not always turn out the way you wanted. The reason may be incorrect application of the composition, choice of tool, or consistency of the solution. To prevent this from happening, study everything down to the smallest detail: the product, the method of applying it and the tools for this.
At the end we invite you to look at the photo different finishes walls with decorative plaster.
The times of total shortages generated by the Soviet era are long gone. After all, back then decorating the walls in a room was understandable and simple. Today, a wide variety of finishing materials have appeared:
- liquid wallpaper;
- facing panels;
- modern paints.
But decorative plaster is a real breakthrough in construction and repair technologies. This is absolutely not the plaster that is put under wallpaper, but a completely new independent material.
The excellent qualities of decorative plaster do not require additional recommendations. Two rooms, even decorated by the same person, using the same materials and techniques, will never be the same. Each one is exclusive, because the pattern of plaster on the wall cannot be repeated. With its help you can create the most interesting effects, you just need to master the necessary technique. This coating is very durable various kinds harmful effects. It is difficult to get dirty, but if this happens somehow, it is easy to wash.
The plaster is environmentally friendly and does not emit harmful chemical compounds.
In addition, it improves the soundproofing of walls. In stores, such material is sold in dry form; it is made on the basis of binding materials. Crumbs, sand, stones or fibers with the addition of antiseptics, dyes, and thickeners can be used as fillers. In this article we will tell you how to make decorative plaster on walls with your own hands, what methods and materials exist for this, and also demonstrate photo and video instructions.
Conventionally, plaster is divided into:
- interior
Facade plaster is much more resistant to aggressive influences environment and is used for external works. The interior, in turn, is divided into:
- mineral;
- silicate;
- latex.
There is also a classification according to the type of surface that results. For example, under “roller”, “fur coat”, “rust”, etc.

In general, each type of plaster has its own characteristics in application. For example, expensive “Venetian” plaster is applied in several layers, in a special way that requires thorough professional skills; it can be coated on top with wax. This is beyond the power of a beginner, so it is better to turn to a professional.
If you still want to do the repairs yourself, it is better to choose “bark beetle” type plaster. To apply it you only need an ordinary spatula.
Even a beginner will be able to work with ordinary decorative plaster, because it is extremely difficult to spoil such a coating. And there is no need to prepare the walls too carefully - it will smooth out all the defects itself. Such decorative plaster of the walls will also give flight to your design ideas.
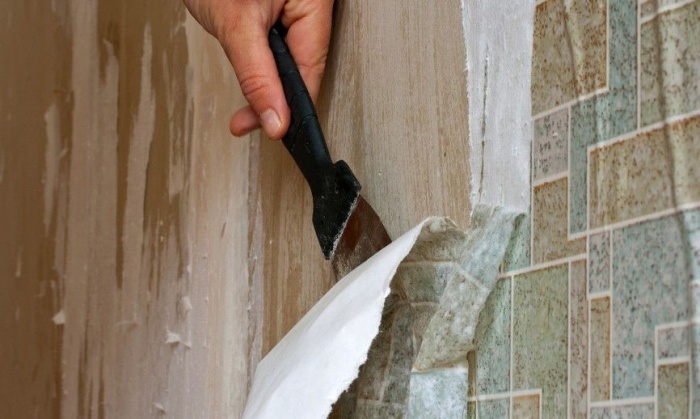
Preparing walls for finishing

It is necessary to thoroughly clean the wall from the remnants of the previous coating (paint, wallpaper, etc.). The peeled areas are removed and the cracks are sealed. This will be enough for “bark beetle” type plaster, but “Venetian” and some other varieties require a perfectly flat surface.
After priming and drying the surface, it is necessary to decide whether the entire wall area will be plastered, or whether part of it will go under another coating.
Zones different claddings can be separated using masking tape or window seal.
Minimum set of tools:
- Spatulas of different sizes.
- Grater (wooden or plastic).
- Metal smoother.
- Containers for solution and water.
- Roller for textured plaster.

The solution should be prepared based on the recommendations on the package, then you will get the required consistency. Moreover, you need to prepare such a portion that you can take it out at once, because otherwise the solution will “set” right in the container. This is a job that does not tolerate long smoking breaks.
The plaster must be applied with a spatula. When it thickens a little, you can go over it with a grater without excessive pressure, creating the desired pattern. It is better to practice in a small area first.
To create a unique relief, all you need is a spatula, a grater and your own hands. You can use any available means.
Most often, beginners create rain in different directions, circles, waves, crossed lines on the walls. The easiest to implement is horizontal relief. You can also use a special figured roller, then applying the pattern is much easier.
All this must be done at maximum speed, because the layer of plaster dries very quickly. It is necessary to pay special attention to the joints of the sections to avoid sagging.
If your wall has been prepared for different types coatings, then the adhesive tape in the places where the zones are separated must be removed before the plaster is completely dry; later this will be more difficult to do, and minor defects may remain.
After complete drying (usually about 24 hours), the plaster needs to be treated with fine sandpaper, which will remove all excess.

At this point, finishing the wall with decorative plaster can be considered complete. But there are people who are not happy with this and want to paint the wall. In this case, you should use only high-quality paint that is resistant to moisture, sun rays and mechanical influences.
When carrying out work, you must first paint the textured areas of the surfaces, and only then the smooth ones.
After the first layer has dried, a second coat of paint should be applied.

Decorative bark beetle plaster is increasingly used for façade finishing. Even an apprentice can apply it, the main thing is to familiarize yourself with the technology and adhere to it as accurately as possible.
As a rule, bark beetle is used for facade works, but due to its attractive texture, this type of decorative plaster has recently been used in interior design, for example, in eco style.
Bark beetle is used for finishing vertical surfaces, but if you have experience in this matter, you can even apply it to the ceiling.
Wall preparation and priming

Before applying the bark beetle, you need to putty the surface of the walls if we are talking about plastered walls. It is very practical to apply the bark beetle directly to the foam plastic previously glued to the facade of the house. Leveling will be reduced to grouting the joints.
To avoid the formation of cracks at the foam joints, you should use a reinforcing mesh when applying putty.
To achieve proper adhesion of the plaster to the wall, you should use a primer that contains quartz sand, which ensures excellent adhesion of the plaster to the base of the wall.
The products of the manufacturing company Ceresit are most in demand on the market. If you decide to purchase such a primer, then you should use ST 16 grade for decorative plaster.
The walls are coated with a primer shortly before applying the bark beetle. At a temperature of +20ºС the primed surface will dry within 30 minutes. Composition consumption – 150 g/m2.

The primer is slightly visible from under the plaster, so its color should be as close as possible to the color of the bark beetle. To do this, it should simply be tinted in a shade corresponding to the color of the bark beetle.
If the bark beetle is applied to cement-sand plaster, then there is no need to prime the surface. Simply wet the wall an hour before applying the bark beetle. To achieve maximum adhesion, wet the base with plenty of water.

On the market you can buy ready mixture, this could be Ceresit CT 63 or a dry mixture that you will need to prepare yourself. If we talk about price, then from an economic point of view it is better to purchase a dry mixture, since it is cheaper.
To prepare decorative plaster from a dry mixture, you will need a drill with a mixing attachment, water and a mixing container.
The bark beetle dries quickly and should not be mixed with water. Therefore, do a small batch, especially if you have no experience working with decorative plaster.
Considering the magnitude marble chips, the amount of bark beetle is calculated. For the small fraction XS, the consumption is 700 g/m2, for XL – 1700 g/m2, and for XXL – 2000 g/m2. To ensure that the joints are invisible, the bark beetle must be applied to the wall in one go.
So, to prepare the mixture, pour the amount of water indicated on the package into the container. In this case, the water temperature should not exceed 15–20ºС. Add the dry mixture into the water gradually, while stirring the mixture with a drill with a mixer attachment. Leave ready-made plaster for 10 minutes, and then stir again.
Only acrylic-based bark beetles can be tinted; all other types of plaster are best painted on top.

The main thing when applying bark beetle is to distribute the composition evenly over the surface. This can be done with a metal grater 30 cm long. You can remove excess bark beetle from it with a 10 cm long spatula.
The bark beetle layer should correspond to the size of the marble chips, that is, within 2–3 mm. This important condition, because if the layer is too thin, the primer will be strongly visible, as a result of which protective properties finishes will be degraded. Well, if the layer of plaster is too thick, then the texture of the bark beetle will not be visible and the appearance of the facade/interior decoration will suffer.
Since, as mentioned above, the bark beetle dries quickly, you will have to work just as quickly. To ensure that the surface of the walls is as uniform as possible, it is better to apply the plaster at a time. But if this is unrealistic in view large area walls, then separate the strip masking tape and apply the composition slightly over the tape. Then peel off the tape without waiting for the plaster to dry. Continue applying plaster in the same manner until the entire wall is covered.
Trituration

The most important stage of work is rubbing the bark beetle. It depends on what the final drawing on the wall will be. This work should begin immediately after the plaster begins to dry (after about 20 minutes). If your palm does not stick to the wall, then you can start rubbing, which is done using a plastic trowel.

When marble chips are rubbed, chaotic depressions are formed.
Thus, you can get the desired effect:
- “Lamb” - the pattern is formed thanks to short circular movements. Thus, chaotic grooves remain on the wall, which are visually similar to lamb’s wool.
- “Rain” is the most common rubbing technique. It is created by up and down movements. So, you get vertical rain. If you rub from the upper left corner to the lower right corner, the rain will be diagonal. To keep the rubbing angle unchanged, you can mark the wall with masking tape.
- “Carpet” – rubbing should be done with alternating movements up and down and left and right.
If you cannot apply the plaster in one go, then do not rub it to the very edge. It’s better to finish the next part of the wall, and then carefully rub the joints. This way you can make a seamless transition.

You can paint the walls the next day after applying the bark beetle. Painting has some advantages over tinting plaster. After the bark beetle has dried without color, you can finally level the layer with sandpaper. Plaster with colors cannot be leveled in this way, as worn-out pieces will be noticeable.
Painting provides more opportunities for design work. This aspect is especially relevant when using bark beetle in interior design.
The grooves emphasized with a dark shade look very impressive. To achieve this, you first need to paint the wall. dark color. After the paint coat has dried, apply a second, lighter coat of paint. In this case, the second layer must be applied with a semi-dry roller. In this case, the paint will not penetrate into the grooves and they will remain dark. The consumption of the coloring composition is 300 g/m2.
To improve the performance characteristics of the walls (this is especially appropriate for interior wall decoration), you can coat them with varnish - glossy or with glitter.

Preparation for applying homemade decorative plaster made from putty begins with determining the room in which it will be applied to the walls. The choice of texture, collection of tools, and even the method of mixing the composition depend on this.

So, to successfully decorate walls with putty you will need:
- Putty.
- Kneading container.
- Spatula and trowel.
- Metal grater.
- Construction mixer.
- Plastic film for the pattern or bag.

Take measurements of the walls, which will allow you to roughly calculate the amount of raw material for finishing. The approximate consumption of putty indicated on the packaging will help you with this. To save money, you can purchase putty in powder form. To make the solution in this case you will need:
- 6 kg of dry putty;
- 200 g PVA glue;
- 2 liters of water.
Dilute the putty with water in some suitable container. This can be done using a mixer. You should get a homogeneous mass. Then add PVA to the mixture and bring it again until smooth.
For finishing walls in rooms with low level humidity, you can use gypsum or cement plaster. And for rooms with high level humidity it is better to use cement.

If the walls are damaged, then all crumbling parts must be cleaned. All recesses should be covered with cement. This way you can level the walls. If the surface is unreliable, then stick on it plaster mesh, which you will subsequently putty.
After the putty layer has dried, rub it in so that the surface is even. Then the walls should be primed. Use a deep penetration composition for these purposes.
Applying homemade plaster

You can apply decorative plaster, made yourself from putty, in several ways:
- Scales. Apply the putty with a layer thickness of 3–5 mm, and then make vertical strokes with a spatula 10 cm wide. After the composition has dried, it can be painted in the desired color.
- Rock. Start applying a thin layer of putty from the top corner of the wall. The layer should be approximately 3 mm. Then take a metal float and place it so that one side remains in the air and does not actually touch the wall. Without lifting your hands, draw straight lines along the putty.
- Cave. Apply putty to the wall and level it. Then, with a piece of polyethylene compressed into a ball, make a pattern, pressing it against the wall. This can be done in another way by applying a covering film to the wall. It will need to be torn off from the putty in a day.
- Venetian made of putty. Place a little putty on a spatula and make uneven strokes with it. After 24 hours, sand the walls with fine-grain sandpaper. If you only need to erase sharp corners, then do it with a grid. Prime the surface and let it dry. Paint the wall with a base color, followed by a surface color. Immediately after application, it must be lightly wiped off the convex parts of the plaster using a damp rag. Ultimately, the walls should be covered with wax/acrylic varnish/gold plate.
- For creating original pattern You can also use other stamps from scrap materials. For example, pieces of foam rubber, branches, polystyrene foam, flowers, pieces of fabric, a roller wrapped in fabric, stencils, etc.
After your homemade decorative plaster has dried, paint it or open it with colored wax.
In general, this science is simple and even an inexperienced “plasterer” can do it. If you did everything correctly, the interior of your home will delight you with originality and originality for many years.
Photo


Video
We bring to your attention a series of videos about various decorative plasters and methods of applying them:
If you want to order wall decoration with decorative plaster, we recommend turning to professionals, since the price for these products is very high. You can find out the cost of decorative plaster on the websites of companies producing decorative coatings. Also note Venetian plaster, it is great for covering walls.
Decorative plaster is a special thick composition used for durable wall covering. It is characterized by high flexibility and plasticity, with its help you can create the necessary background in the interior and emphasize the design idea. Applying decorative plaster is the final stage of repairing a room (room) or facade. It is worth noting that most of the work can be done with your own hands, without the help of specialists.
Finishing with decorative plaster
The easiest way to have a beautiful front lawn
Of course you saw perfect lawn in the cinema, on the alley, and perhaps on the neighbor’s lawn. Those who have ever tried to grow a green area on their site will no doubt say that it is a huge amount of work. The lawn requires careful planting, care, fertilization, and watering. However, only inexperienced gardeners think this way; professionals have long known about the innovative product - liquid lawn AquaGrazz.

Types of plaster mixtures
Depending on the composition, the following types of plasters are distinguished:

The procedure for decorating walls with bark beetle plaster
The popular “bark beetle” style can be made with your own hands. To do this, you will need the selected plaster mixture and tools: a trowel, a steel spatula, a plastic float for sanding.
Procedure:
- Surface preparation: puttying and sanding, applying primer;
- Application with a spatula decorative covering after the soil has completely dried (this takes about 24 hours);
- Lightly sand the uncured surface with a plastic float;
- Repeated sanding (after 10-15 minutes) - to mark the pattern. The duration of grinding affects the severity of the relief.
Methods for staining bark beetle
For coloring you can use:

Tools needed to create a unique terrain
The texture of the plaster depends on the type of filler. However, it is possible to obtain a textured relief from a homogeneous mixture - this requires special tools.
For texturing use:
- Rollers :
- rubber (embossed);
- velor;
- fur;
- foam rubber.
- Stencils (plates with different relief):
- rubber;
- plastic.
- Brushes;
- Trowels.
Bathroom decoration
Due to the nature of the bathroom, everything in the room is exposed to moisture. At first glance, it may seem that decorative plaster in the bathroom is simply impossible, but this is not so. The correct selection of consumables will allow you to apply high-quality and durable coating plaster. 
Covering the walls with moisture-resistant decorative plaster will help create a beautiful relief and provide the correct microclimate (due to its vapor permeability). Perfect option for the bathroom - plain smooth or Venetian plaster coating with a glossy surface.
The advantages of such a coating in the bathroom:
- When covering the bathroom walls, you should carefully monitor the drying of each layer (if you are renovating the bathroom yourself). Priming surfaces in the bathroom is a mandatory process that ensures not only proper adhesion of the layers, but also additional waterproofing.
- simplicity and ease of care;
- vapor permeability;
- withstands changes in humidity and temperature;
- antistatic effect;
- microclimate regulation;
- unique interior.
The glossy layer, which is formed due to the application of a wax composition, will protect the bathroom walls from harmful moisture and sudden temperature changes. To give a beautiful glossy shine to walls, a composition based on natural beeswax. If you want to make the surface of the walls matte, use synthetic wax.
Decorating the loggia and balcony
A balcony or loggia is an integral part of an apartment or country house, therefore the aesthetics of its decoration are important aspect, which should be given special attention. The process of using a loggia and balcony differs significantly from other rooms - due to constant exposure to atmospheric phenomena, the structure wears out much faster, so you should not buy too much expensive materials(for example, Venetian plaster).

Decorative finishing of the balcony
Since the loggia is a built-in structure, it can be insulated and redesigned, making it part of the room; in this case, it should be compatible in style with the overall design of the living area. When finishing the walls of the loggia, in addition to the texture and color range, heat and soundproofing properties the material used. Preference should be given to fillers that are most resistant to ultraviolet radiation and can be used for outdoor use.
High quality decorative interior decoration loggias, correct selection furniture and accessories will give the room a cozy and stylish look.
A glazed balcony, unlike a loggia, is an auxiliary room, so when choosing decorative materials Coarse-grained compositions with high thermal/sound insulation and vapor permeability are preferred.
Finishing a balcony with a fine-grained mixture is a more labor-intensive task; it requires careful leveling of the surface of the walls and it will not be easy to do it yourself.

Balcony finishing
Decorative plaster will create a beautiful and practical balcony covering.
Decorating the walls of a loggia or balcony allows you to increase thermal insulation performance and create an exquisite design inside and outside the house.
Balcony preparation includes:
- mandatory insulation;
- cleaning the surface from dust, old paint and finishing materials;
- sealing cracks with a solution of cement or gypsum;
- elimination of bumps and pits;
- applying a primer (to increase adhesion and reduce the risk of material peeling);
- applying the finishing layer (plaster);
- after complete drying, remove unnecessary excess from the surface with a spatula;
- coloring (if colorless material was applied);
- It is recommended to wax or treat finished walls wax composition– this will improve water repellency and add additional shine to the balcony coating.
Liquid wallpaper in interior design

Liquid wallpaper is a modern type of decorative plaster, which consists of a mixture of fibers (silk or cellulose) and binder. The mixture is easy to apply (after adding the recommended amount of water), hardens quickly, and has no odor. This decoration option is suitable even for beginners who are renovating their apartment with their own hands. Liquid wallpaper is intended exclusively for internal covering, they are not suitable for outdoor work.
The main advantages of liquid wallpaper:
- flexibility;
- affordable price;
- environmental friendliness;
- beautiful appearance;
- creating unusual effects or original designs.
Decor of building facades
External finishing of the facade is carried out in order to improve operational characteristics and appearance building. The textured finish of the façade is resistant to stains and makes small chips on the surface completely invisible. There are several types plaster mixtures, which are used for exterior work and improving the facade of the house, but the most popular are acrylic, marble and mineral mixtures. They exhibit high resistance to environmental influences - precipitation, temperature changes, ultraviolet radiation.

Most economical option for the facade - a mineral mixture with natural stone chips, which is characterized by special strength, resistance to moisture and sudden temperature changes. The disadvantage is in this case can be considered a very limited choice of colors.
Acrylic plaster, in addition to resistance to precipitation, has such useful property, as elasticity, which is especially important for the exterior decorative finishing of new buildings. This means that even when the building shrinks, the finishing material does not deform and its service life will be at least 15 years.
It should be remembered that decorating facades requires certain skills, strict adherence to the technology of preparation, mixing, applying strokes and the sequence of layers.
Base finishing
The base of a house is a protective barrier that protects the foundation and lower part of the building from exposure unfavorable factors. Improving the appearance of the base has not only aesthetic, but also protective functions. The material used to improve the base must have the following properties:
- strength;
- durability;
- resistance to temperature changes;
- high density;
- waterproofing (to protect the base from groundwater).
In addition, the façade of the plinth must correspond architectural style private house.  There are many finishing options, including plaster, covering the base with natural or artificial stone, siding. Plastering the base is the easiest and most time-tested way to treat this important part of the house, so finishing the base with your own hands is the most a budget option. Covering the façade and plinth with decorative plaster gives the building a finished look.
It is worth noting that everything modern views mixtures for outdoor use contain special polymer additives that not only improve the quality of the coating, but also provide additional strength, moisture resistance, frost resistance, and durability. In addition, the increased adhesive properties of the applied surface make it possible to create a particularly durable plaster layer. The main types of external work can be done with your own hands; it is not necessary to invite an experienced craftsman, this will significantly save money.
To improve the appearance and strength of the base, the following is usually used:
- mineral;
- silicate;
- silicone plaster.
As you already understand, it is quite possible to do most of the work, both external and internal, with your own hands - then the interior of your home will be truly unique.