Country "moidodyr" can be very diverse. For it, you can additionally buy a nice mirror, get a special hanging shelf for toiletries, a towel holder, a stand for dishes, a sink made of stainless steel or other material. It can be without heating or with it.
Construction of a simple washbasin for a summer cottage using scrap materials
The drainage pipes in such a washbasin can be “disguised” by placing them in a special device. It is best to take an aluminum or stainless steel sink. At the same time, it is best to refuse earthenware due to the heaviness and fragility of this material at the same time.
Before building a washbasin without heating, it is best to first make a sketch. Consider what the washbasin will be like, what parts will be present, and what the tank, water tap and main frame will be made of.
It will also be necessary to think about it. To do this you will need a corrugated pipe, rubber compressor to connect it to a stainless steel sink, and, in fact, the container itself, where the spent water will flow.
 Outdoor washbasin from a barrel with a sewage system
 As the latter, you can use the most ordinary bucket or make a pipe outlet into the toilet drain pit.
It will also be necessary to consider the volume of the water tank for the unheated washstand. If you plan to travel out of town only on weekends, then in this case a small container can become a tank. If we are talking about carrying out construction work
in a cottage, it would be more prudent to stock up on a tank with a capacity of more than 10 liters.
The simplest washstand
You can make a hand washing device from a regular plastic bottle. The whole process will take you a minimum amount of time.
 Let's look at how this can be done. Let's take a water bottle, cut off the bottom of it and, turning it over, secure it with wire to the nearest tree or. Now you can pour water into such a simulated washbasin.
 In order to rinse your hands, you just need to unscrew the cap, which will be a tap, and then screw it back on. That's all the simple wisdom - your dacha "moidodyr" is ready!
More complex washbasin design
If desired, you can make a washstand without heating and a more advanced look with a larger water capacity. For this purpose, you may find all kinds of water accessories that you will find on your country plot useful.
For example, a plastic canister or small keg may work well.
Once you have placed a water hole of the required diameter in your chosen tank, all you have to do is cut or drill it. After this, you will need to connect the water squeegee to it, putting rubber gaskets on both sides and tightening it with nuts. Then, in fact, the tap itself is installed on the drain to supply water to the “Moidodyr”.
Read also
Metal garden furniture– drawings with dimensions and 75 photos interesting options for garden decoration
 An example of a complex washbasin design made from a can and a tap
 A self-made dacha moidodyr is, as a rule, a very inexpensive, but quite practical device for providing you with clean water.
It should be noted that it would be advisable to first consider the water drainage system. To do this, you can adapt an additional reservoir, from which water will flow through a pipe into the garden. You can arrange a washstand so that water simply pours out onto the ground through the tap and sink and goes into the soil. The main thing is to cover the surface of the earth with plenty of gravel so that the soil under your feet does not wash away.
An improved look for a garden washbasin
If your plans include building a more durable “moidodyr”, in this case you will need:
- buy an industrial water tank;
- buy a sink, faucet or mixer;
- think over a system for connecting water and its further drainage to the sewer system;
- buy materials for arranging the frame.
The easiest way to start building a washbasin is to install the main frame. It can be made of wood or metal. When building the frame, it is necessary to take into account the dimensions of the sink and water tank.
It is important to make a “moydodyr” in such a way that it fits harmoniously into the design of a summer cottage or your home interior, in case you decide to place a washbasin in your kitchen.
On next stage you can install a sink and arrange a drain by connecting it to the water drainage system.
 An example of an outdoor washbasin that is practically no different from a home sink in the kitchen
 After this, you can install the washbasin tank, but it will need to be secured more firmly.
At your discretion, a tap can be built into the tank or equipped with the usual one for us. kitchen faucet. At the final stage, all that remains is to connect the water to the sink.
Materials from which a washbasin can be made
A washbasin made of wood looks very beautiful, but it will definitely need to be treated before use with special means to increase its service life, since wood itself, due to its high humidity and atmospheric precipitation is subject to natural deterioration.
It’s very convenient when you can wash it after working in the garden. dirty hands in the yard without going into the house. For these purposes, many people buy a washbasin or a stationary outdoor washbasin. This is cost-effective in a private home. If you have a summer house to which you come at most once a week, then it is more convenient to make a washbasin from a plastic bottle with your own hands and install it on a vertical base. The article describes in detail the manufacturing methods and various options fulfillment of plans. This is not difficult and even an inexperienced master can do it.
Simple and temporary option
Such a simple device can be installed even outdoors during a family vacation. You can hang this device on any tree branch away from the tent or bedding so that flowing water does not form dirty puddles near vacationing tourists. It’s easy to make a washbasin from a plastic bottle with your own hands. You need to have a 1.5- or 2-liter container, a rope, a sharp knife and find appropriate place to accommodate.
First you need to rinse the bottle so that it is clean. Then cut off the bottom sharp knife. The picture shows the bottom completely cut off, but you can cut it off halfway, leaving a narrow strip. Then you can cover the hole like a lid. In this case, leaves, dirt, and insects will not fall into the container from the tree. The water will remain clean and you can use it to wash dishes from the sink.
From a plastic bottle with your own hands you need to cut two round holes at the top, not far from the cut. Pull the rope through them and tie knots on both sides. Using this thread, we hang the bottle upside down on a suitable horizontal branch. Then water is poured.
To wash your hands, you will need to slightly unscrew the cap of the bottle, but so that the water flows in a thin stream. After the hand washing process is completed, screw the lid back tightly.
Placement on the fence
You can make such a convenient washbasin from a plastic bottle with your own hands at the dacha by hanging it on screws. wooden fence. To prevent the cut edge of the bottle from being sharp, you can rub it several times on the surface of a hot iron. The sharp part will melt and will not be able to injure. Even a child can be trusted to fill the container.

To prevent the screw from rusting from constant contact with water, it must be screwed on top. The photo shows that the master used a cap from another bottle for better grip. To ensure that the container is in an upright position and water does not pour onto the fence, you need to nail a small wooden block just below the top. You can make a soap dish from the bottom and place it next to it.
Multi-jet fixture
We bring to your attention another option for making a washbasin from a plastic bottle with your own hands. The peculiarity of this device is that water flows from it in several streams. This washbasin can be used in a summer yard shower.
To make it, you need to take a 5-liter bottle and cut out a large round hole. Through it, water will subsequently be drawn into the container. As in the previous version, holes are made on the top of the bottle, and then you need to hang it on a rope.

Several holes are drilled in the lid like a shower. The only disadvantage of this option is that water cannot be stored in such a container. It must be used immediately. When pouring water, you need to hold the lid with your hand so that the liquid does not spill from it. And hang it on a hook in the roof of the shower stall and immediately start washing.
A real washstand
The one shown below is very convenient option making a washbasin from a plastic bottle with your own hands. In the photo below you can see that this is a real washbasin, from which no water flows out at all. It can be used in the same way as the purchased version, by pressing on the stick at the bottom. Similar devices are now installed on almost all trains.
The container can be used either small or large, 6 liters. But you still have to cut a hole in the bottom so that air can enter the bottle. Otherwise, there will be no necessary pressure, and the water will not flow.

The only difficulty in this design of the washbasin will be preparing the lid. In the photo there is a purchased plastic pin inserted into it, intended for washstands. It's easy to find in the household goods department. The product is sold already with a lid. If you are unable to find this device, do not despair. A simple medical syringe can perform its role.
To do this, you need to cut off the part where the needle is inserted. The result is a cylinder-piston. A hole is cut in the lid into which the syringe will fit tightly. The retractable piston should hang down. When pressing on the valve, water will flow. Naturally, you need to use a rubber gasket so that the cylinder holds tightly and water does not leak out of the cracks.
DIY washbasin made from a plastic bottle
Step-by-step instructions for installing a device equipped with a tap:
1. Take five liter bottle and cut a small round hole for pouring water.
2. A small hole is drilled in the bottom the size of the squeegee.
3. Rubber gaskets are put on both sides of it, and with the help of nuts and washers it is firmly fixed.
4. After this, you need to install a faucet or stretch a plumbing hose to the place where it is more convenient to wash.
5. Using the handle or brackets, attach the bottle to the location: tree, fence or pole.
6. All that remains is to pour water into the container - and the washbasin is ready.

Big tank
Before you do it, you need to think about where you will place it. In addition, it is important to know the expected volume of water. If there is a need only to wash your hands, for example, after working in the garden, then you can use the bottle options presented above. Their volume is quite enough for your needs.
If there is a need for constant use of water at the dacha: washing hands, dishes, for cooking, then it would be reasonable to install a large plastic tank with a faucet in the house itself. There is no need to pour water into this container often. Plus, the tap makes it very easy to use. And there is no need to constantly run into the yard to wash some fruit or plate.
But for such a large tank, you need to hang holders on the wall that can support the weight of 25 liters of water. A sink with drainage into a cesspool or large bucket must also be installed.
When preparatory work completed, you can mount the tap on the bottle cap. For this type of washbasin made from a plastic bottle with your own hands, instructions for installing the faucet can be found in the previous block. She is practically no different. The only one additional advice: When installing the faucet, add linen rope for better insulation details. Then the device will hold tightly in the container. There are special covers with ready-made taps that will save you the hassle of installation.

When choosing a location, remember that the water detergents should not leak onto the roots of plants or trees. This will ruin them. In the place where the water will flow, you can place a bucket for dirty water or dig small hole for drain.
Before you begin, remember that the cut bottle has sharp edges that can cause serious injury. Therefore, be careful, especially if there are little helpers nearby.
As they say, if little things determine the consciousness of everyday life, then the washstand determines... I don’t know what. But it definitely makes life more convenient with him. I don’t have a stationary washbasin on my site, but the construction guys took theirs. So somehow I got ready and went shopping in search. I didn’t really like everything I saw on sale, which is why this article appeared here.
Method number 1: nail in cork
The simplest and most obvious, of course. We make a hole in the center of a plastic bottle cap, insert a nail with the head inward, and screw the cap on.
Problems: water leaks, the nail rusts. And besides, there is a problem common to all washbasins with a rod: while you press from below, water flows, but your hands are busy and you can’t wash them, and when you let go, your hands are freed and you can wash them, but the water no longer flows :).
Method number 2: hole in the cork
We make it in a bottle cap triangle side cutout. Then, by turning the lid, the water will flow out; by turning it back, the tap closes. Original and simple.
Problems? Read a funny story from one forum:
“I built a washstand from a 5-liter bottle according to the recipe described: you turn the lid slightly and a thin stream flows. The unit hung on the corner of the gazebo, dug a shallow hole below and poured a bucket and a half of ASG into it. Everything worked perfectly while I was busy putting the dacha in order. And then relatives began to arrive...
The mother was the first to come across: she wanted it to flow better and she turned it off more - the lid flies off, all the water goes down at once! I explain that you need to unscrew less. An hour later, the mother-in-law comes up to the washstand... Well, you understand. He explained the same thing, although not so calmly. And then the wife goes to wash her hands... and not once, but twice within an hour! Considering that the day is just beginning, and the water is imported and there is almost no water, my educational speech begins to resemble a motorcycle without a muffler.
And then the washbasin attracts the children's attention. Usually you can’t force them to wash their hands, but this is under a normal tap. Well, I make a special step for them from a large block of wood. Voila! Children unscrew the lid in the same way two times in a row! I can’t bring myself to scold children... The next day I go to the store and buy an ordinary 3-liter plastic washbasin. I hung it in the same place..."
Method number 3: tap in the neck of the bottle
Almost similar to the first two. We take the faucet from washing machine, for example, a couple of turns of electrical tape, and you're done.
Method No. 4: faucet in a plastic container
Instead of a bottle, we simply take a five-liter plastic container, drill and cut a hole at the bottom, and insert a purchased faucet. Voila. All that's left is to come up with a drain :)


Method number 5: tap into a regular bucket
Whoever likes it. On the plus side, it’s easier to decorate a bucket (see video below).

Method No. 6: pin + cork + bottle
We make several holes in the cap of a large plastic bottle plus 1 in the center. Insert the pin into the center. We attach a handle to the bottom. Inside we insert a rubber plug attached to the pin. Kind of like a drain plug in a bathroom or a faucet from a chemist's heating pad.

Method number 7: “for advanced”
Take a 5 liter bottle. Cut a 10x8 cm hole in its bottom.
We take a steel rod 18 cm long and 5 mm in diameter. Using a hacksaw, we cut the upper end of the rod along the axis. We separate the ends of the rod with a screwdriver. At the opposite end we cut an M5 thread. On the rod we make two transverse cuts 1 mm deep at a distance of 65 mm from the end. We attach a washer and a fixing bracket made of wire with a diameter of 3 mm to the rod. We insert a pressure spring with a diameter of 10 mm into the bracket. Its height is 15 mm greater than the height of the bracket. We put a rubber gasket with a diameter of 10 mm on the rod up to the support washer. Place a rubber washer on the bottom. Drill a hole in the center of the lid. We assemble everything: we attach the bracket with the equipment to the roof with two self-tapping screws, and screw the cap from a tube of toothpaste onto the lower end of the rod. We cover the metal parts with enamel to prevent them from rusting, and place them in a tank to dry. All…

Method No. 8: washbasin from a kettle
What could be simpler? We hung the kettle, put a basin underneath - that’s all.

Video on making washbasins with your own hands
Method No. 9: designer washbasin made from buckets
A master class on creating a washbasin from a galvanized bucket and faucet, as well as a washbasin from a larger bucket, a colander and a siphon. The buckets are beautifully covered with film, so they called it a “designer washbasin for the dacha” :)
Civilized elements of everyday life are not always present at the dacha. But you can adapt to everything. And when the question arises of how to make a washbasin at the dacha with your own hands, you can always find original solutions.
A washbasin can be made using materials such as wood, metal and improvised materials such as plastic bottles and canisters.
Selection of capacity
If you come up with the idea of building a washbasin with a cabinet yourself for your dacha, this does not mean that literally all the parts need to be made from scrap materials. You can, for example, find plastic bottle 5 or 10 liters and use it to make a water container. But there is little hope that it will be reliable and look beautiful. It is better to purchase a washbasin with a tap specially made for such cases, as it is cheap and looks aesthetically pleasing. In this case, the capacity of the water container should be selected up to 20 liters. Relying on less water is not a practical approach.
The material from which the container is made is of considerable importance. Today, it is most important to make a sink for a summer residence from stainless metal or plastic. You can choose any one, but even here you need to look from a practical point of view.
When choosing between plastic and stainless steel, you need to take into account that the latter option is more practical, as it is more reliable. Many things have the ability to fall. If a plastic plumbing fixture filled with water is accidentally dropped, there is a high probability that it will break and fall apart. A small crack is enough for the washbasin to become unusable. A stainless steel washstand is preferable in this regard. It is more resistant to falls and impacts.

You also need to pay attention to the shape of the washbasin. At first glance there is no significant difference, but if you look at it practical point view, then the opinion will change. The fact is that washbasins with various shapes there will be a different flow pressure from the tap. If the container is large in width and small in height, then water will flow out of the faucet under low pressure. If the container is high, the water will flow out faster and you can wash yourself faster. And one more factor - the bottom of the container should not be flat, but slightly curved towards the tap.
Nowadays, washbasins are often made in which a valve tap is attached to the front wall of the container, and it is not located at the very bottom. It is not surprising that the water flows too slowly from such a faucet, if you take for comparison a small-capacity washbasin with a pressure tap. In the first option, the pressure is lost through the narrowed opening of the valve and the high installation location of the drain part - the valve is installed not at the lowest point, but on the front wall. Therefore, in order for it to flow required amount water for washing, you should give preference to models in which the tap is located, if possible, at the bottom of the container. Otherwise, you will have to come to terms with the fact that there is still water in the washbasin, but nothing is flowing from the tap - you will have to add water, since there will be dead space in the container.
Water heating

Retail outlets offer a washbasin with a water heater quite inexpensively. It pays for itself, since the heating device has a built-in temperature regulator. Thanks to it, water can be heated up to 30 and 70ºС.
It should be taken into account that the heating element gives maximum efficiency if it is installed at the bottom of the tank - up to 50 mm to the bottom surface. By attaching a heating element to the top of the container, heating water loses its meaning.
If you install a heating element in a container, some difficulty arises. You will have to make holes in the lower part of the washbasin body so that the heating element can be inserted. After installing the device through the insert, it will be very difficult to seal the cracks back. Therefore there is another way out. The heating coil can be inserted into the washbasin through the lid. This will avoid making lower side holes through which water would seep in if the seal is poor.

If you make a washbasin for your dacha on our own, then its design will require a cabinet. Before making it, you need to build a frame, which then needs to be sewn up. Under such cabinets the best way An old sink, which was produced decades ago and was installed in the kitchen, is suitable. The owners often made cabinets under it, in which they hid a trash can. AND in this case this design fits better, because a cabinet with a door can fit well under such a sink. To such a structure with a sink, all that remains is to attach a board to which a container of water will be attached.
If the required sink with cabinet is not available, then the latter will need to be made on your own. First, a frame is made for it from wooden planks with a section size of 5x5 cm or from a corner of 2.5x2.5 cm.
- Most optimal height sides of the washbasin, at which it is convenient to use the plumbing fixture - no more than 1 m.
- 4 legs 1 m long are cut from bars or corners.
- The sink or sink that will fit on the cabinet is measured from all sides. Dimensions must be taken in those places that will come into contact with top harness frame.
- After this, 8 fragments are cut according to the measurements taken. As a rule, 0.5 m is enough.
- The frame elements are then connected using appropriate tools into a single structure.
Since the working support of the device will be the inner edges structural elements, markings need to be made along them so that the washbasin easily fits into the frame. If it is metal, the surface of the elements must be painted so that they do not rust over time.
Making cabinets and tabletops

There are many materials that can be used to cover the design of a cabinet. The main thing is that the chosen material is practical and durable. For example, if the washbasin is located outside, plywood cladding is not suitable, since during rain it will get wet and deteriorate. If you leave this material, you will have to make a hanging washbasin for the dacha. All sides except the front are sutured. The door is placed on hinges at the front. It is better to make the floor in the middle of the cabinet from boards, the gap between which should be approximately 1 cm. In this case, it is possible that spilled water can penetrate into the ground through the cracks.
In addition to the cabinet, you can build a tabletop on which you can place and dry dishes after washing.
- A tabletop is attached to the sides of the cabinet, which would also serve as a drying rack.
- To do this you need to prepare wooden planks cross-sectional size 2.5×1.5 cm.
- They need to be knocked together so that slots with a distance of up to 2 cm are formed in the structure.
- At a height of 40 cm above the ground, you can make a second tier if the number of dishes to be washed is planned to be large.

The sink for a country washbasin can be made from different materials, and with different service life. The main thing is that it is in marketable condition. Water drainage from the device can be carried out in different ways:
- Place a bucket at the bottom of the cabinet and drain the waste from time to time;
- organize a civilized challenge waste water into a ditch or sewer network;
- drain water directly to the ground. In order to avoid making a swamp, you need to make a small embankment of crushed stone at the drainage site.
Most practical option drain is the use of a bucket. In this case, there is no need to be afraid of clogging the outlet with various fragments after washing, for example, vegetables and fruits. After filling the bucket, the contents can be poured into compost pit. The photo shows options for washbasins made for a summer residence.
Photo


Video
We invite you to see what country washbasins can be like.
If you don’t want to spend a long time fiddling with the washbasin, you can make it from a plastic bottle.
Every owner of a summer cottage tries to create comfortable conditions on his estate. This is especially true for residents of large cities, who are accustomed to the benefits of civilization at their fingertips. In addition, at the dacha you need not only to relax, but also to work, and if you do not have running water, then you will encounter certain difficulties. We will tell you how to make a washbasin in your country house with your own hands.
Choosing the right place for the washbasin
If you plan not only to come to your dacha in the evenings, but also to live on it for several days in a row, then you need a constant supply of water. Waking up in the morning, it’s so nice to wash your face cold water, drive away sleep and cheer up so that you can get to work with renewed vigor.
Most often we are faced with a lack of running water and sewerage in summer cottages. Of course, you can drill a well yourself and provide your estate with an almost complete water supply, but this is a labor-intensive and expensive task, and, moreover, far from paying off, especially given the fact that you will only use it in the warm season. In winter, without control, pipes can freeze, burst, or even simply fall into the hands of unreliable people. social elements.
Therefore, we will opt for a simple, light and familiar washbasin design - moidodyr. The first thing you need to decide is where this washbasin will be installed - in the yard or inside the house?
Find comfortable spot in the yard for a washbasin
It would be best to make or purchase a structure that can be left in the yard or garden in the summer, during hot weather, and brought indoors when cold weather sets in.
This way you don’t have to set up sewerage and water supply. The only thing left for you to decide is where exactly to put the moydodyr. The washbasin should be in an accessible place so that you can use it at any time. if you love warm water
, install the structure on the sunny side so that the water-containing container warms up well. However, many people believe that it is better to place the washbasin in the shade, especially if the container is made of plastic.
- Well, one more important question: which washbasin to choose? It all depends on your personal preferences and capabilities. Washbasins are:
- liquid;
- hanging;
- counter-mounted washbasins with cabinet;
heated washbasins.
Each of these washbasins can be used as a portable one, or can be firmly fixed in a certain place. If you don’t want to bother, then any type can be purchased at the store. But making it yourself, especially using improvised materials, is not only much cheaper, but also more fun.
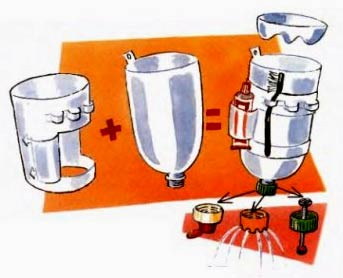
We use improvised means Even if you only have plans to create a moydodyr at your dacha, you will still have to wash your hands and face. In this case, the simplest, camping option will come to our aid - volume from 1.5 liters. Cut off the bottom, turn it over and attach it to a wire to a tree branch, fence, etc. Water is poured in from above and warms up quite well. You can make a full-fledged washbasin by attaching holders for soap, toothpaste and brushes.
Scheme of a washbasin made from a plastic bottle
So that the water from such a bottle does not flow constantly, but when it is needed, you can use several devices.
- The easiest way is to nail the cork. Make a hole in the center of the bottle cap and insert a nail into it so that the cap remains inside. Screw the plug tightly. The disadvantages are that water leaks, and this causes the nail to rust, and besides, it is not very convenient to wash your hands with such an inconsistent water supply.
- The second method is easier to use. A hole is made on the side of the lid. When the lid is unscrewed, water begins to flow as much as you need. Screw the lid and the water will stop. The disadvantage of this method is that it is not very easy to control the sufficient level of unscrewing so that the lid is not completely torn off.
- The third method is also simple: you can attach a faucet, for example, from a washing machine, to the neck of a bottle with electrical tape. The water will flow as you need, and you can be sure that the faucet will not fall off if it is fixed well.
- The same faucet (or a purchased one from a hardware store) can be attached to a plastic container with a volume of 5 liters or more. To do this, just drill a hole required diameter and fix the faucet in it. A tin or enamel bucket as a container is also perfect.
Such homemade washstands can be decorated with various designs using improvised materials. Children will be very happy to have the opportunity to contribute their imagination and effort to a common cause.
What can you make a washbasin from in your country house?
More complex washbasin design
Such a washbasin will be heavier, which means it needs to be installed on permanent place. This also means a place for drainage, which, however, can be replaced with a bucket or basin. The accumulated used water can be used for watering small flower beds or beds.
So, you will need:
- large capacity (bucket, canister, can with a volume of 10 liters or more);
- drive;
- tap gaskets;
- clamp nuts;
- faucet for water supply.
Mark a hole on the container. It should not exceed the diameter of the drive. Depending on the material of the container, knock out, drill or cut a hole and place the squeegee in it.
Place rubber gaskets on both sides of the bend and secure with nuts on both sides. Now install the faucet and your garden washbasin is complete. When placing it on the site, pay attention to the soil at the installation site. If you do not plan to do drainage to cesspool or in the garden, be sure to pour several buckets of gravel under the sink. This will protect you from dirty puddles.
Use a large plastic barrel for the sink
If you are not constrained by time and money, you can make a more practical and thorough one using the same scheme. country washbasin.
- For it you will need:
- tank and plumbing fittings; sink the right size
- from suitable material;
- materials for the frame or connecting the tank with the sink into one structure;
materials for water supply and drainage. Build a frame of metal and wood, taking into account the dimensions of the tank, sink and hoses. Install in finished frame
all elements, connect them to the water supply and sewerage system. If you were planning a pour-over sink, then connecting to the water supply may not be required.
Choosing a reliable water container
If your plans are to make a washbasin with a cabinet, then you should not make a water container yourself from improvised means - you will only waste time, and such a design will not look aesthetically pleasing. A ready-made tank with a built-in tap is inexpensive and looks much more beautiful. The optimal container volume for a washbasin is 10-20 liters. It makes no sense to take a smaller one, but a larger one is suitable for country shower
. As a tank for a sink, it will be too bulky, and the water in it may stagnate.
Pay attention to the material from which the container is made. Give preference to a stainless steel washbasin; it is durable and resistant to damage. Plastic is lighter and cheaper, but it can crack from impact, especially if it is filled. The shape of the washbasin is also very important. The pressure of water flowing out of the faucet directly depends on it. If the container is not high and is in a horizontal position, then water will flow out in a thin stream. As we remember from the school physics course, the higher the column of the container, the greater the pressure. Therefore, it is better to choose a tank with an elongated shape. The best option
– a washbasin with a non-flat bottom sloping towards the faucet.
There is no need to remind you that the tap should be located as close to the bottom of the tank as possible. Nowadays, washbasins in which the valve tap is located on the front wall are becoming increasingly popular. The pressure from it will be lower than from a washbasin with a volume of up to 5 liters with a pressure tap. In such a tank, water pressure is lost due to the location of the tap. Due to loss of pressure, water will have to be added to the container frequently. Therefore, choose a model with the lowest possible location of the tap.
Making a cabinet for a moist hole yourself
Perhaps you still have a Soviet-style sink from old times. It fits perfectly under a standard tank and sink. In this case, you will only need to clean it, paint it, and maybe add a couple more elements to the structure. Well, if there is no such sink, then you can easily make the frame yourself. For it you will need wooden blocks with a section of 50X50 - 80X80 mm or steel corners 25X25-40X40 mm.
The optimal height of the cabinet on which the sink will be located is no more than 1 m. Take a corner or beam and cut 4 sections of 85 cm each. The size of the cabinet frame should be such that the sink fits easily on its edges, so carefully measure the structural elements.
Modern models of moidodyrs
Cut 8 pieces of timber (angle) to fit the size of the sink. As a rule, this is 50 cm. Assemble the frame and fix it: knock it down if you used timber, and weld it if you used a metal corner.
Please note: use the inner edges of the frame as a guide since the sink will be placed on them. After manufacturing, the steel frame must be primed and painted to avoid rust.
The frame of the cabinet can be sheathed with the following materials:
- plywood board;
- wooden plank;
- polycarbonate;
- steel sheets;
- plastic panels.
To prevent plywood and wood from becoming unusable after getting wet on the street, coat the structure with varnish. Cover the back wall and sides of the cabinet completely, firmly fixing the material to the frame. At the front, hang a door made of the same material as the frame on its hinges.
Make the floor in the cabinet from boards, leaving gaps of about 1 cm between them so that spilled water goes into the ground and air circulation is ensured.
Additional washbasin elements
You don’t have to limit yourself to the frame of the sink cabinet. To make it convenient to use the washbasin, attach a countertop to it, which can serve as a drying rack for dishes.
- The dryer can be attached on either one or both sides. To do this, take wooden boards with a cross section of 25 X 15 mm and knock them down so that you get a dryer in the form of a lattice. The distance between the boards should be 1.5-2 cm.
- You can make a two-level dryer. To do this, make another frame at a height of 35 cm above the ground and put boards on it.
- Be sure to varnish the dryer so that it does not delaminate over time and does not deteriorate from moisture.
- For the countertop, take plastic or wood board and place it on a frame made to fit the size of this slab.
You can make the frame for the washbasin yourself
We talked above about how to organize drainage of water from the sink. You can use a regular bucket for this purpose. This is especially good if you wash not only your hands, but also vegetables and fruits, as well as dishes with leftover food. Thus, there will be organic residues of products in the water, and such slops can be sent to compost heap for humus.
If cleaning products and food debris will not be dumped into the sink, you can connect to drain hole corrugated pipe and lead it to the drain.
Video about installing a washbasin in a summer cottage
Now yours garden plot equipped with a convenient and functional washbasin. We hope that our tips will help you make it quickly and easily. Tell us about your experience in making country washbasins. Have a warm summer and easy work!