Plants in pots look beautiful and unusual. They are easier to care for and create a variety of compositions. At the same time, it is not necessary to buy such a vessel in a store, because many ideas can be implemented independently.
An original flowerpot will decorate the area and attract the attention of neighbors. Now you can create it yourself beautiful products for the new season and plan future planting. Making flowerpots is an enjoyable process that will allow you to realize your creative potential. You can use a variety of items: from old buckets and cups to faded T-shirts and unwanted building materials. Our selection contains the most current ideas, which will transform your site and allow you to realize any fantasies!
But first, let’s figure out what a flower pot is, what its features are, and what types of products can be made for different purposes.

A flower pot is a decorative container without a drainage hole. It serves as a shell for an ordinary pot. In a broader sense, a pot can be understood as any product in which or on which a potted plant can be placed. In this case, the flowerpot can be changed without replanting the flower. It is enough to move the pot with the plant into a new pot. This is very convenient if you like to update the design of your site or if the old pot has lost its decorative appearance.
Sometimes such a vessel is also used as a stand for draining water, although there are also flowerpots with a tray that have a hole in them. But such products, in principle, have more in common with ordinary pots. You can also plant plants entirely in pots, but in this case it is important to take care good drainage to avoid moisture stagnation.
You can make the following types of flowerpots:
floor planters – for placement near country house, in the center of a flower bed, along paths or a fence, etc.; hanging pots (hanging) - for gazebos, balconies, porches, external and internal parts of windows.
According to their intended purpose, flowerpots are distinguished for outdoors (garden) and indoors (indoor). The latter are more compact. Flower pots are very diverse in shape and volume, and they must be selected taking into account the size of the plants that will be placed in them, as well as the future location. Large flowerpots are best placed in a recreation area or at the entrance to the house. Medium ones are along the paths, and small flowerpots are on the fence or in the gazebo.
Plants in pots can be an alternative to a flower bed if you don't have time to create one.
Among the ready-made models that can be found in summer cottages, flowerpots on a leg and luminous flowerpots stand out. The former look very elegant, and the latter provide additional lighting in dark time days. Also popular is a three-dimensional pot-ball, in which you can grow both flowers and ornamental shrubs.

But if you are not attracted to designer flowerpots or don’t want to spend money on them, you can easily make beautiful and practical products yourself.
Outdoor flower pots made from scrap and building materials
Unusual containers for plants can be made from almost anything you have on hand. If you have crushed stone, use it to create a planter. big size. Any capacious container is suitable as a form for a flowerpot. You can combine several of these containers to create, for example, an elegant vase. Place the crushed stone on cement mixture: Dilute 1 part cement and 3 parts sand with water to the consistency of sour cream, coat the pots with the resulting mixture and cover tightly with stones.


If you want something more unusual, try making a flowerpot from cement and fabric (burlap, etc.). Wrap a bucket or basin in a dry cloth and dip it in cement mortar. Then cover with a wet cloth and leave for at least 12 hours, preferably a day. When the cement hardens, remove the base - the flowerpot is ready! All that remains is to paint it and place the plant inside.


A similar principle can be used to create flower pots from concrete. For the base, you can take an old pan or bucket, but the easiest way is to remove finished goods from plastic containers. Bring to life one of the ideas you like!


By analogy, you can make a beautiful clay pot or plaster pot.
A wooden flower pot will look attractive at your dacha. This environmentally friendly and easy-to-work material allows you to create durable and no less sophisticated products than those made from concrete or clay. Wooden planters made from leftover boards will look better as a composition. If desired, they can be painted in any color. To ensure your products can withstand bad weather, cover them protective varnish. It's easiest to make a rectangular or square planter, but you can experiment with the shape.


From tin cans It's easy to make metal planters. It is enough to cover them with paint or decorate them using the technique decoupage by gluing a beautiful napkin or picture to the surface.


Or you can make a large flowerpot from ordinary branches!


Unusual street planters made from unnecessary things
Stylish flowerpots that will amaze with their appearance can be made from old or out-of-fashion items. Giving objects a second life is now fashionable. Here are a few garden planters that are definitely worth your attention.
It’s as easy as pie to make a planter for a summer house from an old chandelier; just place pots of flowers on it. But it is important to take into account their size so that the composition does not lose balance.


A flowerpot-bicycle will look original on the site. Painting it a single color will make it decorative. And you can place pots with plants not only on the trunk or frame, but also near the wheels.


A hanging planter made from an old T-shirt is very practical and elegant. It is unlikely that anyone will guess what it is made of. Just don’t take clothes that are too old to prevent the fabric from tearing. You can cut a T-shirt into ribbons different ways. Some can be found on the Internet, and your imagination will probably tell you some!


Do you feel bad about throwing away an old leaky bucket? Turn it into a Provence style flower pot! To do this, you can apply a thematic design to the bucket, tie it with ribbons, burlap, or place lavender inside.


Do not throw away mugs with chipped or chipped handles. It’s better to make a pot-cup, decorating it with any available materials.
A flower pot woven from newspaper tubes will look impressive. Just don't put it under open air, otherwise the design will quickly lose its attractive appearance.


Decorative flowerpots for balconies
Balcony pots can come in different sizes, depending on the type of plants you grow. Small flowerpots mounted on the railings or hanging flowerpots with hanging flowers will look nice. But it’s better to avoid bulky flowerpots; they will “eat up” most of the space.
An excellent option is neat concrete pots in which succulents are planted. Making such a product is quite simple; choose as a base plastic container to make it easier to remove later. If you wish, you can also make simple figured flowerpots from clay or plaster.

Rope pots are often made using the macrame technique - weaving with knots.
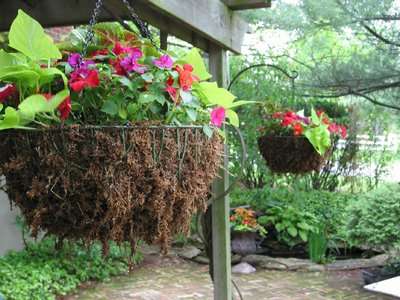
A more exotic option is a coconut pot. To create it, you first need to make a frame of the desired shape from metal rods, and then line it with coconut fiber. If you want to make such a flowerpot, read our master class!
Plants in garden pots need special care. The fact is that water in containers evaporates faster than in open ground, so watering should be regular and abundant enough so that the entire lump of earth is saturated with water. If you wish, you can purchase a flowerpot with automatic watering, but if this is not possible, mulch the soil and do not place the plants in the sun.
Feeding will also have to be increased, because... in a limited amount of soil, plants quickly absorb the nutrients they need. nutrients. If placed in a pot houseplants, then it is important to regularly inspect them for the presence of pests and spray them with Epin, Zircon or other drugs that increase immunity.
How to keep plants in pots in winter
For the winter, it is better to move heat-loving plants that do not have a dormant period (ficus, ivies, dracaenas, palm trees) into a warm room along with a pot, and leave the pots outside. If the plant is planted in a pot and there is no way to move it, it is important to provide the roots with protection from freezing. To do this, you can transplant the plant into open ground, but only on condition that it is frost-resistant. If this is difficult to do, then after the first frost, cover the perennial with spunbond or spruce branches, place the flowerpot in a large container and fill the gaps with soil. It is better to wrap tall flower pots with foil insulation.
Now you know how to make and decorate flowerpots to give your garden area some personality. If you don’t want to buy a standard store product, make it yourself - and you will not only get a unique thing, but also lift your spirits!
Do you like hanging flowers? This composition becomes a real decoration of the landscape area. In addition, hanging flowers help to relieve space and significantly diversify the interior when it comes to the room. But in order for the flowers to look harmonious against the background of other plants, it is necessary to do DIY garden pots from scrap materials. How to create an original product from ordinary things? Let's figure it out.
 DIY garden pots made from scrap materials
 Do-it-yourself planters for the garden - there is no limit to your imagination
Flowerpots – The best decision for those who do not have much space for growing lush, voluminous flower beds. Located in a suspended state, it will not interfere with walking and doing everyday activities in the summer cottage. Since it is quite rare that the upper part of the terrace is used, why not use it for a small flower garden? Also, flowerpots can be hung in a gazebo, veranda, on a fence and even trees - wherever there are suitable conditions for plant life.

Today, the cost of a flowerpot is high, so not every summer resident can buy it. But don't despair! We invite you to make a flowerpot for your garden with your own hands! It is not only simple, but also very interesting. You will be able to make your any, even your wildest fantasies come true. After creating such a flowerpot, rest assured that you will hear many laudatory speeches and positive feedback. It has been noticed that people who decided to make flower pots for themselves soon made this activity their life’s work. Maybe this will happen to you too?
Where does the creation of a flowerpot begin? First, try to find suitable materials - containers that you no longer need on the farm. You may also need some tools, paints and rope. We suggest considering several options for making flowerpots:
Wood is the most beautiful, natural and aesthetic raw material. It fits perfectly into landscape design, does not require special care and will be an excellent material for creating flowerpots. What will the design be like? Of course, it all depends solely on your preferences and desires. Let's find out how to make the simplest, most uncomplicated flowerpot that looks like a box or bucket.

What will you need? Boards, branches, bars and other wooden products that were left after repair work or just lying around on a summer cottage. Also prepare some rope, glue, hammer, nails and scissors.
Before creating a flowerpot, you need to decide on the size of the product. What will it be like? Large or medium? The amount of material used depends on this. So, first you need to cut the bars or branches same size. Now a standard knot is knitted on one branch, the next one is applied to it, on which another knot is knitted, etc. Knit until you are satisfied with the size of the design. The result should be an original, highly flexible canvas that will wrap around the flower pot. But how to make the bottom? To do this, you need to place several sticks on the cross ropes, which will become the basis.

- Pots made from plastic bottles
Plastic bottles are the most easily available material that can be purchased in any store. To make a flowerpot from a bottle, you only need the bottle itself, a knife, rope and paints. For greater aesthetics, you can cut out flowerpots in the shape of animal heads, for example, a bear with two ears, a lion with a large mane, etc. Then the product is painted and acquires a different, original appearance. The only thing that needs to be taken into account is that such a pot will be small in size, so it will not be possible to plant large flowers there.

- Pots made from gramophone records
Finally, a use has been found for the old gramophone records that almost every summer resident has. Make them into flowerpots and other simple things. To do this, you will need a plate, a plate, mittens, twine and any object for shaping the product. First, make a hole in the plate and pass the string through it. Now, holding it in a glove, gradually heat it over the oven. After some time, you will notice how it begins to change its shape, soften and sag.


We looked at three options for pots, but in fact there are a lot of them. It is made from burlap, wire, ceramics, plaster, clay, etc. The main thing is not to be afraid to experiment and try something new. DIY garden pots from scrap materials Anyone can do it, even an inexperienced master.

Indoor plants have long been used to revitalize and decorate the interiors of apartments and houses. At the same time, gardeners are not limited only to the type of plant itself, but select additional decor.
DIY flower pots are a great way to get something that is functional, stylish and original decoration. You can also use improvised materials.
Stylish ideas for the home
Whatever the interior of the room, its design and color scheme, you can always find several universal solutions. These include the use of black and white, jeans and various types of weaving. Plus self-made flowerpot for a pot is that you will receive an exclusive item that is ideal in all respects.
Leather plant pots
Light and openwork flowerpot made of leather looks incredibly elegant and stylish. It will easily fit into any room decor. With its help, you can focus attention on a green corner, or simply decorate all the pots in uniform style. Do hanging planter for flowers you can, having at your disposal following materials and tools:
- A piece of thick leather, the size of which should be 7 - 10 cm larger than the upper diameter of the pot.
- Punching tool - leather hole punch and hammer.
- Cutting mat, sharp stationery knife.
- Ruler, compass, pencil.
- A thick, long cord, preferably made of leather.
- Foam sponge and warm water.
The advantage of this method of making pots is that even waste material damaged by stains or scratches will do.
On the wrong side of the material, using a compass, draw a pattern according to the diagram. You can use a printed template and copy paper, or you can draw a labyrinth yourself. Circular arcs are drawn, the distance between their open edges is 1−1.5 cm. The distance between the circles is 1.5−2 cm, they are located in descending order, one inside the other.
After the drawing is ready, you need to make holes along the edges of each arc with a hole punch. This will fix the material and prevent it from tearing in the future. With a sharp knife make slits along all arcs. On the outermost ring, make several holes at the same distance from each other, so that later you can thread the cord and hang the structure.
Cut two pieces of cord of the required length and thread them in pairs into the existing holes. Tie the ends of the cord into a strong, neat knot. Moisten the skin warm water, place the pot in the center and lift the material by the cords, holding the pot. It is better to hang the pots immediately to form memory of the shape. Ready!
Product made of fabric and thread
Flower pots for indoor flowers You can make it yourself from fabric or thread. If woven material is used, it must match the rest of the textiles in the interior. Burlap and denim are considered neutral options.
Cute and stylish flowerpot for the pot you can make from scratch, for this you will need:
- Sackcloth.
- Cotton fabric of any color.
- A piece of decorative tape.
- A bucket of ice cream or mayonnaise.
- Sewing machine, threads, scissors, etc.
- Glue gun and sticks.
First of all, you need to measure how much material you will need. To do this, you need to wrap an ice cream bucket with burlap and cloth. This is the cutting length. The width of the burlap and the fabric will be different, since the “wrapper” for the pot is two-layer. The height of each piece of material must be determined arbitrarily, but leave seam allowances of 1 cm. In addition, 2-3 cm must be left at the bottom and top for turning the edges.
Cut the fabric and burlap, fold with right sides facing each other and stitch together. Turn right side out and sew decorative tape to the seam. Wrap the bucket, press the edges together and glue with hot glue. Carefully fold the lower part of the burlap to the bottom and glue it. Place the top part of the material inside the bucket.
Cut a strip of fabric 10-15 cm long and 3-5 cm wide. Fold it in half along the length, gather it with a thread. Roll into a spiral to make a flower and secure with a few stitches. Make two more smaller flowers in the same way. Cut out several leaves from burlap. Glue the decor at the junction of the burlap and fabric using hot glue. DIY flowerpot is ready!
Bamboo and jute option
To make a flower pot in eco-style, you will need:
- Bamboo napkin.
- Glue gun or Moment glue, pencil, scissors and stationery knife.
- A small piece of burlap, lace ribbon.
- White acrylic paint, craquelure varnish and brush.
- A small piece of twine.
- Wooden beads.
- The basis for the cache-pot is a mayonnaise bucket or a large tin can.
Wrap the base with a bamboo napkin and mark the resulting shape with a pencil. Cut off excess. Cover the sticks with craquelure and let dry. After this, cover with white acrylic paint and dry.
Cover the base with a colored napkin, carefully joining the edges. First wrap the pots with a strip of burlap and secure with glue. Place a narrower strip of lace on top. String wooden beads onto the twine and glue them on top of the lace. The stylish eco-pot is ready!
In a similar way, you can make an original flowerpot by covering the base with jute twine. You need to fix at least one turn at a time so that they are tight and the base does not show through. You can decorate such a thing with fabric flowers or natural materials.
Decorate flower pots In a teenager’s room you can use old jeans, and such a design will definitely not cause a protest in the child. Required:
- Pieces of jeans.
- Glue Moment “Crystal”.
- Threads, buttons, decorative spikes, rhinestones and half beads.
- Pencil, ruler, measuring tape, scissors, chalk.
- The basis of the flowerpot.
Measure the base for decoration with a measuring tape, cut a piece of denim with the indicated dimensions. Using a ruler and chalk, draw a line on which the decor will be located. If the pot is intended to decorate a boy's room, it is best to sew on buttons or spikes. An alternative for girls is rhinestones, half beads and lace.
Sew or glue the parts, wrap the material around the base and glue it with glue. The fabric joint can be decorated with a zipper.
Flower pots made from scrap materials
Hanging option decorative design quite popular because it looks aesthetically pleasing and at the same time saves space on window sills. A bright and laconic version of this design can be made quite quickly. Required:
- Neon threads.
- Straws for cocktails in bright colors.
- Scissors.
Measure 8 pieces of thread of the same length. This value depends on how high you want to hang the pot from the ceiling. The length varies from 80 to 110 cm. Fold all the threads into one bundle and tie one end into a single knot. Spread two threads on four sides.
Cut pieces 2-2.5 cm long from the straws. Thread each thread into the straw. Tie in pairs with a knot. Place the threads after the knot in different directions. Thread a piece of straw 5-6 cm long through each, in pairs and knot threads from adjacent sections. Repeat this action one or two more times. The flowerpot is ready, you can insert the pot and hang it from the ceiling.
Hammock made from an old T-shirt
If you have an old T-shirt lying around in your closet, and you urgently need to figure out at least some kind of flowerpot for a pot, it’s a small matter. Understand the intricacies of strip weaving old fabric. In addition to a T-shirt, you will need scissors and a little patience.
Cut the T-shirt into 8 identical knitted strips and pull them into strands. Tie all the ends into one knot, and after the knot, tie the strands in pairs at different distances. After this, connect the outer strips of adjacent pairs with knots. And so weave the cells to the desired height of your pot. The bundles are secured with a common knot at such a height that the container with the plant can be inserted.
Plastic bottle container
Perhaps more ordinary and available material than a plastic bottle, you won't find it. For a spectacular plant stand you will need:
- Plastic bottle.
- Old DVD disc.
- Super glue.
- Aerosol paint, newspapers.
- Stationery knife, marker.
First you need to use a marker to outline the cut line of the bottle. One container can make two plant stands. Use a sharp knife to cut the plastic. Turn the upper part of the container with the neck and stopper upside down and glue it to the center of the CD with superglue.
Place the entire structure on an unfolded sheet of newspaper and evenly cover it with aerosol paint. If necessary, apply a second coat. Also paint the remaining half of the bottle if necessary. Job finished!
An old deflated ball can be used as a hanging pot container. A basketball or soccer ball will look most impressive. You need to cut it in half and make holes in the edges for the cord. It is very important to choose the shape of the pot so that it follows the natural shape of the ball. Perfect for hanging plants.
Outdoor flowerpots
 Any, the most beautiful cultivated plants and flowers need decent decoration. This is the correct arrangement in terms of color and growth, according to varieties and types, as well as a harmonious and suitable frame that zones the plants.
Many owners summer cottages and private houses they prefer to make flowerpots and flowerpots for the garden with their own hands. This often saves significant money, although it requires some effort.
Concrete and fabric
A popular option for making such a flowerpot does not require too many materials. You need to find a container for the blank that matches the size of the tub or flower pot, prepare a concrete solution and find an unnecessary rag or towel.
The consistency of the solution should resemble thin sour cream. You need to put a cloth in it and let it soak for a few minutes. After this, remove the fabric and lay it on a blank turned upside down until the concrete hardens completely. The finished flowerpot can be painted or left in its original form.
Plastic pipes and bottles
This pot container can be different sizes and diameters. This can be a vertically placed pipe, or cut along its length. Plastic can be decorated with aerosol paints and stencils, assembled into a multi-tiered structure and decorated with carvings.
With some effort, large five-liter eggplants can turn into funny pigs or swans. To make a pig out of a five-liter bottle, just paint the plastic pink color and finish drawing the patch and eyes.
Natural materials
Various flowerpots look very harmonious and neat, decorated with stone, shells, cuttings from a tree trunk, dry sticks, cones, acorns, etc.
Uprooted stumps can be turned into containers for plants. To do this, you need to cut off the protruding roots and branches, clean the stump from the bark and sand it. In the middle, use a chisel and other tools to hollow out a recess of a suitable size. Coat the wood with shiplap varnish and let dry. After this, the pots can be used for their intended purpose.
The coconut, which is exotic in our area, can be successfully turned into a hanging container for a flower. To do this, you need to saw it in half and cut out all the flesh with a knife. Use a drill to make several holes for the cord and the flowerpot is ready!
Large shells are also used to decorate containers with house flowers, both in hanging and static positions. This option is used, as a rule, for annual flowering plants.

As practice shows, there are a lot of options for making decorative containers for pots. There is absolutely no need to buy expensive designer items, which sometimes seem a little strange to the average person. You can do everything yourself, the main thing is to approach the matter with imagination!
Today, almost all owners of private houses and city apartments are engaged in floriculture. Some housewives even create mini-greenhouses. Flowers are a decoration and improve your mood. Available in stores wide choose different flowerpots for plants for indoors and outdoors. But it is much more interesting and profitable to create this item with your own hands at home than to buy it.
By creating pots with your own hands for indoors and outdoors, there is a chance to give to the elderly, unnecessary things second life.
To make a flowerpot, anything that can serve as a container for soil is suitable. Thanks to rich imagination and skill, abandoned washbasins and chairs become original designs with plants. The basis for creating homemade compositions can be watering cans, mayonnaise buckets, boots, metal boxes, portable barrels, tires, dishes, containers, boots, old dolls, funny figures, rags, etc. There are many master classes on the Internet on making unusual products that you can make yourself step by step.
Clay pot options
 DIY clay flower pots for the garden will become good decoration and an addition to any interior. For work you will need: water, clay, rag. They take a piece of clay and begin to knead it like dough. If the lump is hard, add a little water. The mixture should be free of bubbles, homogeneous, and not stick to your hands.
First you should try to blind simple figures: balls, animals. Once you get the hang of it, you can start creating a flower pot. To do this, roll out the clay into a pancake and cut out a circle that will serve as the bottom of the flowerpot. Then they make walls and attach them to the bottom using several strands or twines 0.5 centimeters in diameter. Easy to create from clay different shapes flowerpots.
When the work is finished, the pot is wrapped in newspaper, paper or a rag. After the product has completely dried, it is fired twice. The first firing removes all excess moisture, the second – gives strength to the product. Heat should be evenly at a temperature of about +300 degrees for three hours.
Pots made of cement, concrete
Turns out to be original outdoor pots made of concrete, cement. For their production they are used classic recipe: sand, cement, water and aggregate are mixed in a ratio of 2:1:0.5:4. If you plan to create large flowerpots, it is recommended to use a reinforcing frame. To make the front surface perfectly smooth, use sanding and a felt wheel.
For filling concrete pot use forms from different materials. The main thing is that the product does not get wet and keeps its shape for five hours. Thick cardboard, a bucket, a glass, a tray, a plastic bottle, and a frame made of boards will do. You will also need a rag. 
Algorithm for making a flowerpot from cement:
- Take a container and wrap it with film.
- Soak a rag with cement. It is important that there is not a single dry piece. To do this, the material is left in the solution for 10 minutes.
- Place the rag on the container and straighten it carefully. You can make wavy edges or creases.
- Leave for 72 hours until completely dry.
It is better to watch the entire process of making a pot via video on the Internet.
Plaster plant pots
 A plaster flower pot for a summer residence is made by analogy with a cement product. To work, you will need two plastic containers of different sizes, water, and plaster. A 5 liter container should be lubricated inside with oil. Place a smaller form in it. Make a solution of gypsum and water in a 2:1 ratio. Pour plaster into the free space between the pots. Let cool for a couple of hours and then remove from the pan.
Decorate using a knife, cutting out interesting patterns. For example, a flower, curved lines. You need to wait a week for the pot to completely dry and harden. After which the vase is allowed to be painted.
It is better to make flower pots from plaster. After all, such material absorbs all excess moisture. If you make a main pot out of it, over time the product will begin to rot. You can read about how to make a flowerpot with your own hands.
Wooden flower pots
Wooden flowerpots made from boards are less common than clay and concrete ones. But they look original and have a number of advantages. For example, they are easy to process, durable, and easy to repair. Wood allows you to realize any design ideas. To work you will need a hammer, jigsaw, saw, floor chipboard, log or stump.
A piece about 40 centimeters long is cut off from the log. Using a drill, several holes are drilled at the same distance from the walls. Make nests in the center to destroy the core. Remove excess wood with a chisel and form a pot. The walls must be strong and thick. The edges must be carefully aligned.
If you have a plastic pot of suitable diameter, it is better to place it in a wooden flowerpot. Otherwise, the inside of the container will have to be impregnated with moisture-proof compounds and lined with polyethylene. After all, wood is hygroscopic, and upon contact with moist soil, it begins to rot and deform over time.
Pots from scrap materials
 It’s easy to make a plant pot from plastic bottles with your own hands. To work you will need plastic bottles, acrylic paint, a knife, a music disc, a glue gun, and scissors. First, the bottle is cut into two halves. An uneven edge will look more beautiful: in the form of a wave or a pattern. A disc is glued to the outside of the container (from the neck side). After drying, the structure should be painted in any color.
Let's consider another interesting way of making a flowerpot from plastic bottle. It is implemented by analogy with the previous option. But the flowers are supposed to grow from the bottom. Pots from plastic containers easy to hang from the ceiling. Therefore, such products are ideal for families who have children or pets that can harm flowers.
Decorating flower pots
 There are many pots and flowerpots on sale. But most of them are not beautiful enough and make the interior more boring and simple. Of course, you can buy a designer model, but it will not be cheap. It is much more profitable to decorate the flowerpot with your own hands.
Seashells, stones, fragments of broken tiles and dishes, buttons, and coins are suitable for decorating the container. Before gluing these elements onto the pot, they need to be washed and degreased. It is advisable to apply glue to containers and decorative items. Then press the shells onto the surface and wait a few seconds.
When all the parts are glued, start painting the empty spaces. For this, it is allowed to use a mixture of PVA, cement and acrylic paints. The composition is applied with a brush.
You can emphasize the marine style by decorating with river or sea sand. To do this, apply glue to the voids and sprinkle sand on them at an angle. The final step will be to coat the pot with varnish. This will add shine and strength to the product.
A popular and affordable means of decoration is eggshell. It must first be cleared of film, washed and dried well. The area of the pot on which the element will be attached is covered with glue. Next, the shell fragments are attached with the convex side outward. If you need to correct the position of an element, you need to use a toothpick. When the work is finished, the entire decorated surface is covered with PVA glue.
 An interesting method is decoupage, in which napkins, paper pictures, eggshells, and macrame threads serve as decorative elements. Provence style technique is suitable for plastic, clay and corrugated pots.
When performing decoupage with your own hands, you should go through a number of steps:
- Cleaning, degreasing, priming the flowerpot.
- Coating the surface with paint.
- Cutting shapes from corrugated paper.
- Gluing paper elements to the surface of a flowerpot or flowerpot.
- Decoration with additional materials.
- Varnish coating for fixing.
Lace is often used to decorate a pot. To do this, glue is applied to the inner surface of the material and applied to the container. They also decorate themselves with fragments of burlap. To transform a flowerpot, beads are used.
Unusual Uses
Ideas for use flower pots so many. By choosing the most suitable method, you can make the garden unusual. There is on the Internet different variants creation original flower beds and flowerpots. Pots are also used to make bird feeders and drinkers, candlesticks, and heaters. Toys made from clay containers for flowers and plants are interesting.
Fountain made from flower pots
 A fountain is a good decoration for a garden. But to build it, you need a large plot or platform, which not every summer resident has. There is only one way out of the situation - to create a miniature fountain without a pump from flower pots.
First you need to buy:
- A large flowerpot, with a diameter of at least 30 centimeters. This will be the base of the fountain.
- A float that will show the water level.
- Pump.
- Rubber-based mesh.
You need to place the pump in the pot so that its spout is flush with the edges of the pot. Then cut off part of the mesh and cover the container with it. inside to the very edge. Place a layer of pebbles on the mesh. Fill the flowerpot with water. Using a pump, create the required stream of water.
Flower pot people
It’s easy to make a creative and fun decoration for your backyard from just one flowerpot with your own hands.
Clay and plastic pots are suitable for crafts. Such a little man can be hung in a gazebo.
A master class on making a man from a flower pot is given below:

- Select flowerpots for the body and head.
- Turn them upside down towards each other.
- Connect the body and head with wire.
- Place foam on the edge of the wire to keep the pots securely in place.
- Take a piece of wire and string small containers onto it. This will be the hand of a man. Make the second arm and legs in the same way.
- Attach them to the body with wire.
- Draw eyes, nose and mouth on the face acrylic paints. Dried flowers must be secured to the drainage holes using wire. This will be the hair.
DIY tandoor from pots
It's easy to make a tandoor with your own hands. To do this you will need a clay pot and a stationary metal barrel. The containers must be placed inside each other. The pot, located inside a ceramic barrel, should be surrounded with glass wool or rock salt. If the outer body of the barrel is made of steel, then holes need to be drilled in the bottom of the container through which the ash will come out. Attach wheels to the bottom of the body to make the stove convenient and easy to transport. The design is ready, it will be a pleasure to use it.
Lighthouse made from pots
The lighthouse is decorative element landscape design. It's easy to make from clay pots. You will also need small stands for flowerpots, permanent glue, paint brushes, a battery-powered candle, glass candle holder proportional to the pot, acrylic paint.
The work algorithm is as follows:

Chandelier made from flower pots
 An old chandelier can be given a new look original look using flower pots. To do this you will need nuts, a cartridge, a cord, a plastic flowerpot, and screwdrivers. Decorate the pot as desired. Clean the wire and connect it to the socket. Use a hot screwdriver to make holes in the pot and stand. Place a washer on the free end of the wire. Insert the wire from the cartridges into the pot so that the washer remains inside. Secure the cord from the outside with a nut. Thread the wire into the stand, which will be attached to the ceiling. Adjust the height of the lampshade. Hang a chandelier. It is advisable to take an energy-saving light bulb so that it does not heat up the flowerpot.
 Heater made from flower pots
To create the shape of a small heater you will need 4 ceramic flower pots: 2 large and 2 small. You will also need nuts, washers, a spark plug and long bolts. Holes should be drilled in the stand and pot. Thread the chains through the bolts and secure them with nuts. Insert a bolt through the hole in the pot, put a washer on the bottom and secure with a nut. Place a smaller diameter pot on the bolt. Secure in the same way. Next, put on the stand and candle and secure it. Do the same steps with another flowerpot. Hang ceramic pots on the holder. Place several candles on the stand. This heater can be used not only in winter time in the apartment, but also outdoors in the evening.
Flower slide of flowers
If there is not enough space on the veranda or in the garden, you can decorate the area with a slide and cascades of flowerpots. To do this, you need to take a large flower pot, pour a drainage layer on the bottom and place a wooden rod in the center. Cover with soil. Place a container of smaller diameter on the rod. Place all other pots in the same way. It is important to do in the bottoms additional holes to drain excess water. It is better to plant hanging plants in such a structure. This will create a beautiful cascade of flowers.
Making pallets and stands with your own hands
![]() and a stand in the shape of an alpine staircase will be a good decoration for a window sill in a small apartment. To make such a design you will need 5 pots of different sizes. The color of the containers may be the same or different. You need to insert a metal tube or rod into the lowest pot. Secure at the bottom with a self-tapping screw or polyurethane foam. Pour small stones and soil into a container and plant a flower. Attach all other pots to metal rod from largest to smallest in such a way that each flowerpot rests at the opposite angle on the previous container. It is better to turn the pots in different directions. This way the stand on the windowsill will look more harmonious. More detailed manufacturing process and instructions can be seen in the photo.
and a stand in the shape of an alpine staircase will be a good decoration for a window sill in a small apartment. To make such a design you will need 5 pots of different sizes. The color of the containers may be the same or different. You need to insert a metal tube or rod into the lowest pot. Secure at the bottom with a self-tapping screw or polyurethane foam. Pour small stones and soil into a container and plant a flower. Attach all other pots to metal rod from largest to smallest in such a way that each flowerpot rests at the opposite angle on the previous container. It is better to turn the pots in different directions. This way the stand on the windowsill will look more harmonious. More detailed manufacturing process and instructions can be seen in the photo.
Thus, creating flower pots with your own hands is not difficult. The result is original, beautiful containers and boxes for plants. In addition, flowerpots can be used to create interesting designs. The main thing is to show your imagination and spend a little time.
The charm of the most beautiful and well-groomed plants will not be complete if they are planted in assorted pots that differ in shape, size, and the material from which they are made. Perfect solution problems – flower pots. Purchased in a store or made with your own hands, they will complete the look of the collection and help decorate your suburban area.
Selection of ready-made pots for indoor and garden plants
 The range of ready-made flowerpots in stores is incredibly large. In order not to get confused when choosing, experts advise paying attention to several aspects. Among them:
- the price of the sample you like;
- destination of the pot;
- the size of the pot to be decorated;
- compliance with the style of interior or landscape design;
- practicality of the product.
Most often, flower growers prefer flower pots made of polymer materials, fired ceramics or clay, and glass.
Flower pots made of plastic
 The most affordable samples are made of plastic. They are easy to wash and can be used indoors and outdoors. Thanks to the availability drainage holes and the ability to easily make new ones, plants in pots are protected from rotting of the root system. Another useful quality is lightness, which is important if a gardener needs a hanging pot for hanging plants or a spectacular garland of their flower pots. Despite the thin walls, a container exposed to the sun does not heat up to critical temperatures and does not cause overheating of the soil and root system.
If desired, plastic flower pots can be easily decorated with fragments of wood, textiles, beads, or simply painted using safe and bright acrylic paints.
A store-bought plastic planter can be easily transformed with a roll of string and glue. Processed by him lateral surface tightly wrapped with twine or cord.
 However, with a lot of advantages, plastic flowerpots have a couple of disadvantages. They are not very durable when used outside the home, and the products cannot be called original.
Ceramic flowerpots
 Ceramics different types has long been used to make flower pots and flowerpots. Clay is incredibly malleable. It can take a variety of forms; the natural material retains the warmth of the master’s hands, transferring it to the interior or summer cottage.
When choosing a ceramic pot, you should pay attention to the presence of a drainage hole, as well as the outer covering.
Unglazed clay retains porosity, which improves the microclimate inside the pot, but reduces the durability of flower pots. When watering tap water Untidy stains may appear on the walls. Outside the home, containers are in danger of destruction:
- increased air humidity;
- sudden changes in temperature, especially freezing and thawing.
Painted or glazed ceramics look very impressive and are much stronger, but they warm up slowly and do not remove excess moisture well.
 Due to the large weight of ceramic products, especially when making hanging flower pots with your own hands, you need reliable fastening. It's easy to make using strong twine and macrame techniques.
Glass flower pot
 Transparent or colored glass is a fragile but effective material that will help decorate the interior and make the house unique.
At the same time, if you show your imagination, it’s not at all difficult to make such a pot with your own hands for indoor flowers.
As a basis you can take glass jars suitable size, glasses, vases or even a small round aquarium. By connecting the vessels with a rope and securing them to a wooden stand, you can build a garland for flowers or make a flowerpot for several pots at once.
How and from what to make a flower pot with your own hands
 The decoration of the window sill and garden will be flowerpots that were not found in the store, but were made by the gardener himself. Such samples are usually:
- many times cheaper than analogues from the store;
- created taking into account the tastes and preferences of the master;
- unique.
But, relying on his imagination, the gardener needs to remember about the reliability of the future flowerpot, safety and practicality. It is especially important to take into account weather variability and the impact external factors, if you have to assemble a flowerpot for the garden with your own hands.
 The most popular materials suitable for this work:
- wood, including planks, bamboo, dry branches collected from the garden;
- cement mixtures that turn into durable, moisture-resistant structures after hardening;
- durable types of twine and rope from which wicker flowerpots are made;
- textiles treated with wear-resistant paint.
You don’t have to go to the store to buy an original flowerpot or materials for making it.
One has only to look around to notice things that have fallen out of use, but can turn into a unique interior or landscape object.
DIY hanging flower pot

Handmade flowerpots for the home are a great opportunity to show your imagination and demonstrate your ability to create practical and absolutely unique things.
The simplest option is a hanging planter using the macrame technique. Woven to fit the size of the pot, it:
- fits perfectly into the interior;
- decorates any container in which an indoor flower grows;
- can be used for ordinary and hanging plants;
- in combination with others, it forms a multi-tiered garland, saving space on the windowsill and giving the window a unique look.
In addition, the pot allows you to significantly improve the lighting of plants and simplifies care when large quantities flowers in the house.
 When choosing a rope for weaving, it is better to give preference to samples made of wear-resistant fiber that does not stretch under load, does not fade in the sun and is not susceptible to moisture. The same requirements apply to wicker flower pots for outdoor use.
Floor and table flower pots
 Large plants, e.g. indoor lemon, monstera, ficus or lush fern are a magnificent home decoration. To make them look even more impressive, the pot can be placed in an original flowerpot.
It is not always possible to choose a suitable design and size, but anyone can make a tall floor planter for flowers on their own.
One option is a cement pot. As a base, a quickly hardening mixture is taken, which is poured into a prepared mold and after some time a strong casting-pot is obtained. Another way to use the material is to drink it through a textile scrap and give it suitable look, wait for the composition to dry. This pot can be used in the home and garden. For more decorative effect the casting is painted and even covered with mosaics.
 A wonderful flowerpot for big flower A box of a suitable shape will serve. It is first sanded, treated with moisture-proof varnish or painted. To protect the floor and other surfaces, for example, a table under a wooden flower pot, a tray is installed at the bottom to collect excess moisture. The free space between the pot and the flowerpot can be filled with coconut fiber.
A pot with a built-in watering system will help simplify the care of a large green pet and protect the plant from moisture deficiency and drying out. You can buy it or make it yourself from scrap materials.
 In addition to the container for the pot, there is a cavity for water and a tube for filling it, as well as a system of holes that supply moisture to the roots and remove excess moisture. Similar design for flowers of any size can be assembled at home. It will be useful both on the windowsill and in the garden, especially when the plants are deprived of the daily attention of the gardener.
 The simplest flowerpot with automatic watering can be made from an ordinary one. plastic pot. The main thing is that it is of a suitable size, and its bottom has many large drainage holes. A shipping container in which flowers arrive at the store is ideal. Under drainage, laid at the bottom mosquito net made of plastic. It will prevent the soil from being washed away. Several nylon cords are threaded through the holes so that their ends remain hanging freely.
By placing such pots with home or garden flowers on gravel in a tray filled with water, you can be sure that the plant will not suffer from drying out. The liquid will rise along the rope to the ground, but will not cause root rot.
Making a hanging flowerpot with your own hands - video