Wooden coffered ceilings Lately are increasingly popular in modern architecture. Now coffered ceilings They perform more of a decorative function, so the design and decoration of the ceiling are of significant importance.
The carpentry workshop "Amurles", based on many years of experience, is ready to make any custom-made wooden ceilings for you. The total cost of manufacturing and installing a wooden ceiling will depend on the type of wood chosen. Without a doubt, buying coffered wooden ceilings in Moscow will be the right decision, which you will never regret.
Coffered ceilings are considered the most efficient and ergonomic solution using a unique architectural design. The main element of the ceilings are square or polygonal recesses - caissons, which form the overall style and design of the ceiling. Caissons may occur various forms and sizes with appropriate design decorative elements- molded rosettes, ornamented beams, decorative painting.
You can buy custom-made wooden coffered ceilings from any material: MDF, solid oak, pine, ash, walnut, beech, larch and other valuable types of wood of your choice.
Wood ceiling trim

Our workshop uses modern technologies to decorate the ceiling with wood. We can make any wooden ceilings using modern building finishing materials, unique design and design style.
The decoration of wooden ceilings can be supplemented with glass, decorative inserts, carved elements (gypsum, polyurethane stucco), silvering, gilding, additional elements decor (sockets, borders, platbands, cornices, etc.)
Among the obvious advantages of coffered ceilings, it is important to note the quality, environmental friendliness of the materials used, resistance to deformation, the ability to disguise unevenness or other visible imperfections on the ceiling surface, as well as a unique expressive appearance that emphasizes the status of the owner of the house.
Wooden coffered ceilings should not be installed in rooms with poor lighting or with a lot of dark and massive furniture. It is recommended to install coffered ceilings with a shade that is as close as possible to the color scheme of the furniture.
The cost of manufacturing coffered ceilings includes the following stages of work:

Formation of the project, taking measurements of the premises;
Formation of a sketch (at the request of the customer);
The process of manufacturing components for a coffered ceiling and decorative elements;
Preparing the ceiling surface before installation;
The process of installing coffered ceiling components.
We can also produce coffered wooden ceilings for you, using both standard and individual design solutions:
- Coffered ceiling made of clear edges: the main idea is to highlight the main element in the ceiling decor (end or horizontal plane);
- The compositional center, the main element of which is a circle from which rectangular caissons will diverge;
- Solid wood coffered ceilings in chalet style, used mainly in furnishings country houses, the main element of which is the use of roughly processed wooden beams in the form of intersecting structures;
- Solid wood coffered ceiling modern style: the main element of this style is the use of simple and concise wooden profile;
- Coffered ceiling in diagonal design;
- Honeycomb-shaped coffered ceiling;
- Coffered ceiling using lining made of valuable wood.
It is possible to design a coffered ceiling using contrasting colors, but before choosing a paint, it is important to consider the lighting in the room.
The following decorative elements can be used in ceiling decoration:

- molded rosettes;
- cornice elements;
- curbs;
- transitions to walls made of profiles;
- ceiling painting.
Manufacturing of coffered ceilings
The design of wooden coffered ceilings includes the following elements:

- frame;
- transverse, longitudinal bars;
- diagonal elements (installation is carried out if essential);
- finishing guides;
- fasteners;
- decorative elements (rosettes, borders, cornices, etc.)
The manufacturing process of wooden coffered ceilings includes several stages:
- Formation of the initial project. It is very important at this stage to draw up detailed drawing premises, indicating all required dimensions; take into account its functional purpose;
- Sketch design: decoration must be thought out internal space ceiling recesses using textured stucco fragments;
- Preparing the ceiling surface before the main installation work. It is important at this stage to correct all significant irregularities and pre-treat the surface (putty, primer);
- The process of installing coffered ceiling components using individual wooden modules.
Our company is ready to complete the project, manufacture and install coffered ceilings in Moscow, components, and other necessary decorative elements from any type of wood.
Maybe decorative design coffered ceilings using elements hand carving according to our samples or according to your sketch plans.
What material is used in the manufacture of coffered ceilings?
| Oak | Ash | Maple |
 |  |
|
| Alder | Beech | Larch |
 | ||
| Pine | Red tree | MDF |
 |
Coffered ceilings have become very popular in modern design interior
However, few people know that they appeared back in Ancient Greece, when architects invented a new, more reliable type of flooring.
In this regard, there was a need to hide load-bearing beams, making them become part of the interior.
Over time, coffered ceilings have not lost their popularity, but, on the contrary, have acquired a more sophisticated and complex technique.
They are a specific configuration where the beams form rectangular, square or polygonal sections, which are decorated with various patterns inside.
These sections are called caissons (translated from French “caisson” - “box”).
Today, coffered ceilings mainly serve only a decorative function.
The main feature of the design is its appearance.
Such a ceiling always looks more respectable and can become a highlight for any room.
Relatively recently, coffered ceilings have moved from being a decorative element public buildings, such as theaters, libraries, palaces of culture and so on, into the interior of residential premises, the owners of which want to give their home an element of luxury and demonstrate their impeccable taste.

However, when choosing a coffered ceiling as a decorative element, you need to take into account the height of the original ceilings.
It must be higher than the standard one, otherwise the design may look ridiculous, and the ceiling structures will “press.”
A coffered ceiling is one of the types of suspended ceilings, that is, it allows you to hide unevenness and external defects in the ceilings.
The cost of the work of craftsmen varies somewhere from 4,000 to 15,000 thousand rubles per square meter coating depending on the material used.
That is, the pleasure, of course, is not exactly cheap, but the result is worth it, especially if you want to turn your home into a palace.
The coffered ceiling consists of beams and various decorative elements.
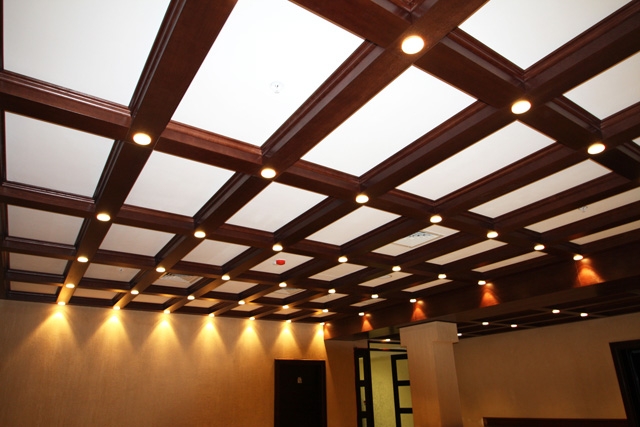
A variety of lamps can be built into the design of the caissons, which, in addition to performing their immediate function, can also become very successful element decor.
Varieties
Exists big choice materials for the manufacture of such a ceiling.
This includes wood, MDF, plasterboard, polyurethane and cardboard.
To make a wooden coffered ceiling, mahogany, oak, ash, and walnut are used, which makes it possible to choose the most suitable shade for the interior of the room: from light to deep dark.
It must be taken into account that dark wood will visually make the ceiling lower.
Wood is the most expensive in price, but at the same time the most best material for the manufacture of coffered ceiling structures, as it is hypoallergenic, environmentally friendly, does not emit harmful substances and has a beneficial effect on human health.

Even when choosing a material, wood is indicated by its undoubted durability and the fact that it is unlikely to lose its relevance over time.
Among the disadvantages of this material, we can only mention that a wooden coffered ceiling is for professionals and if you install it yourself, you may not get the desired result.
If installed correctly, MDF is a good alternative to wood.
This material is much cheaper than wood and at correct installation it looks very good.
However, MDF has a number of disadvantages, such as fear of moisture, high sensitivity to mechanical stress (easily deformed), and low fire-fighting characteristics.
Plasterboard structures are the most budget-friendly and high-quality option.
They are an alternative to conventional suspended ceilings made of plasterboard, which, to put it mildly, will not surprise anyone.
Such a ceiling is assembled according to the principle of a puzzle, as a result of which it turns out to be solid and neat.
Ceiling structures made of plasterboard look best in rooms that have a large area (offices, classrooms, conference rooms, and so on).

A fairly common material for the manufacture of coffered ceilings is polyurethane.
Caissons made of polyurethane are produced certain sizes and have a low weight, which, with proper selection of the size, allows you to easily assemble such a structure yourself.
The undoubted advantage of this material is the immense possibilities for decoration and the fact that polyurethane can be painted.
It is worth mentioning that polyurethane is not at all afraid of moisture and does not support the combustion process well, that is, this material increases fire safety.
And finally, the simplest and cheap way to build a caisson means to make beams in the form of boxes from construction cardboard.
These boxes can be painted desired color or cover it with wallpaper that matches the main texture of the surface.
Cardboard caissons are glued using wood glue.
To decorate them, they usually also use wallpaper or self-adhesive film, which has a certain texture, for example, wood.
Installation of a coffered ceiling
Preparatory stage
Before buying materials, you need to draw a sketch to more clearly imagine what it will look like. finished ceiling.

Then you need to think about which material is best to choose depending on the material capabilities and characteristics of the room.
You also need to pay attention to the condition of the ceiling.
As already mentioned, a perfectly flat surface is not required to install the caisson; however, its surface should be relatively flat and solid, without serious defects.
If such defects exist, it is necessary to apply putty and let it dry well.
Then the base must be primed, preferably twice.
This will ensure reliable fixation of the material.
When the primer has dried, you can begin gluing the wallpaper, which will serve as the basis for the coffered ceiling.
When the wallpaper is hung, you need to make markings on it in accordance with the sketch.
Materials and tools
Scroll necessary materials depends on what kind of caissons you want to install.
Below is an average list of required materials:
- false beams and slabs or finished cells;
- nails, hammer, saw, square, tape measure;
- glue (installation and for wood);
- roulette;
- wallpaper, plaster, primer, roller;
- materials for decoration (stucco and others);
- decorative slats (if the structure is made from ready-made slabs).
Install ceiling cornice with your own hands? Easily! Step-by-step instruction located
Do you prefer practicality in everything, but with a creative approach? Then a false ceiling is exactly what you need! Read all the details.
Frame made of support beams
The most important (load-bearing) element of a coffered ceiling is the support beams (box beams).
They are nailed to the surface in a certain order.
To create a box beam, you need to cut a strip, the length of which should correspond to the length of the ceiling.
Small planks are nailed to the sides of this plank at equal distances from each other.
This beam is then nailed to the base.
In this case, you need to carefully check the sketch.
After this, parallel beams are installed using a similar principle.
The transverse beams are installed when all the longitudinal beams are already installed.
Gluing finished boards
When working with ready-made slabs, the first slab must be attached in the center of the ceiling so that the pattern is uniform.
Glue the finished caissons using mounting adhesive, it is very important not to stain the wallpaper.
If there is an irregular angle in the room, then it is better to fasten the finished modules with brackets, while retreating a few centimeters.
Decorative slats are inserted into the gaps between the slabs.
Video installation instructions:
Conclusion
Coffered ceilings are a versatile decorative element that will add special elegance to any room from the bedroom to the office.

In order to achieve the most positive effect, it is necessary to take into account the characteristics of the room in which such a device will be installed. ceiling structure and with special attention consider the choice of texture and color range caissons.
Caissons provide the opportunity to realize your most ingenious ideas regarding interior design.
And one more big plus: almost everyone can afford such a luxurious ceiling, because, firstly, there is a large selection of materials from which it can be made, from the cheapest to the most expensive.
Secondly, the entire structure can be installed with your own hands without the help of craftsmen.
In contact with
IN modern world artificial ones predominate for the most part Construction Materials, which would seem to have great advantages over natural ones in terms of ease of installation, accessibility and versatility. However, connoisseurs still prefer to see wood products in their homes, genuine leather, stone, textiles and more.
The same applies to caissons - three-dimensional figures that decorate the offices and bedrooms of real aristocrats. Today we will talk in detail about these products, talk about their advantages, mention the disadvantages, and also see how they are assembled and installed ready-made solution from the manufacturer.
Caisson as it is

The word “caisson” itself came to us from French, and translated means “box”. And indeed, the shape of the element is very reminiscent of this object.
- Externally, caissons can be different, but more often we are talking about a surface divided into equal sections by beams and lintels between them.
- Such designs look great in rooms with high ceilings, bringing elegance, classics and the spirit of aristocracy to them.
- When caissons are made of wood, and not materials like MDF or plasterboard, they look very rich. Such a ceiling will last a very long time, but the price for its purchase and installation will be appropriate.
Advantages and disadvantages

The first coffered ceilings appeared in France back in the 17th century, but at that time they served a load-bearing function. Today this element is purely decorative.
However, coffered ceilings owe their popularity not only to their beauty:
- Wood is a good sound insulator;
- Like anyone suspended ceiling, caissons can hide laid communications - wires, ventilation, pipes;
- Wood can “breathe” and naturally remove excess moisture from the room;
- Before installation, minimal preparation is carried out - the rough surface does not need a good finish;
- The acoustics in the room become very comfortable;
- Such ceilings can be made very original, complementing it with all kinds of rosettes, flutes, planks and more.
The disadvantages include the following:
- First of all, very high price, which forces many to pay attention to more affordable options like MDF. Installing a ceiling is also expensive, since the process requires good tool and high precision in fitting parts.
- You should not buy such a ceiling if the height in your room is less than 3 meters. In this case, they will hang heavy from above, which not everyone will like.
Advice! Alternatively, in such a situation, you can choose white coffered ceilings, which will not have such an effect.
- Installation of the structure requires experience, as it is very complicated.
Installation of a coffered wooden ceiling
We have already seen the beauty of such a solution, now let’s see what you need to know and be able to do when installing it.
How to prepare
If you want to try to assemble such a ceiling on your own, then we will try to help you with this with our instructions. We will mention the highlights and subtleties, so don't miss anything.

- There can be no talk of any work if you don’t have a high-quality preliminary design in your hands. Here, of course, you can try yourself, but it is better to invite a specialist who will take into account many nuances that you will not even suspect. He will determine the optimal number of beams and the distance between them so that it all looks neat and does not deviate from the overall concept of the interior.
Advice! Many designers advise reducing the distance between beams in spacious rooms so as not to create the effect of an unfinished ceiling. And vice versa, in small rooms place them less often, so as not to create visual overload of the space.
- If you want to do everything yourself, then consider the following points.
- The distance between the beams usually varies between 60-120 centimeters, but depending on the requirements of the interior and the dimensions of the room, you are free to change these values for yourself - there is no rigid attachment.
Advice! The last point does not matter if you purchase a ready-made ceiling that only needs installation.
- Following classic rule states that when drawing up a sketch, the caisson lattice is oriented strictly in the center of the room so that the additional elements on the sides have the same dimensions.
- If for some reason it is not possible to obtain a uniform division, or you simply do not want to see the cut elements on the ceiling, we advise you to install plasterboard box, making its dimensions such that all the caissons are located inside
- After creating the mesh, be sure to mark the locations of all lighting fixtures, wiring lines and other communications, as well as the locations of their terminals. All this will be very useful during the installation stage.
Now we will give some advice regarding the shape and color of the ceiling, because all this is also taken into account at the design stage.
- We have already written that very important role The height of the room plays a role. Look what it is like for you. If it's small, you can do the following. Frame the door and window openings with similar beams in the same color as the ceiling; make the beams themselves not very high - sometimes people simply install planks, simulating a full-fledged caisson; choose light shades for the ceiling, which will visually raise it above your head; Place built-in lighting around the perimeter of the ceiling, the light from which will fall on the walls - you will get visual effect, similar to the previous one.
- Also, don’t skimp on the light in the room. The darker the room is, the more depressing and pressing on the psyche it will be.
- Please note that on white coffered ceilings it is necessary to perfectly fit the details, otherwise shadows will form in the cracks, which will create the illusion of a falling ceiling and will negate previous visual effects.
- It is better not to illuminate such ceilings, but rather to direct the light from them into the space and onto surrounding furniture and walls.
- We use dark ceilings only in spacious and high rooms. They will add neatness, warmth and comfort.
We think it will not be a revelation to anyone that the caissons should be correctly combined with the rest of the interior. For example, if your walls, floor and furniture are chosen in a high-tech style, then such wooden elements will look ridiculous in it.
Although, as an option, you can use mirror surfaces as panels, install some newfangled spotlights in the beams, track systems or built-in lamps, and paint the wood in an unnatural color, for example, gray, and make the beams themselves strictly rectangular in shape.

Tools, material for frame and caissons
Now let's see what we need to have available. So that installation can begin.
|
|
Any suspension system contacts capital ceiling and walls. If the ceiling is concrete, then for work you cannot do without a hammer drill, which effectively drills holes in it. |
|
|
We will use it to connect caissons and frame elements. It is advisable to have two pieces - one for the bit, the other for the drill for convenient and quick work. |
|
|
When assembling the structure, you have to cut the material at an angle of 45 degrees. It is quite difficult to do this quickly and accurately by hand, but such a saw will help out a lot. |
|
|
For rough and longitudinal cuts you will also need a jigsaw with high-quality files. |
|
|
We will make a frame for the ceiling from a metal profile. To trim it, metal scissors are required. |
|
|
You will also need a tape measure, a carpenter's square, a pencil and, optionally, a stationery knife. |
|
|
Good laser level will help us quickly and accurately determine the plane of the ceiling. If the tool is not available to you, you can use a water level. |
|
|
The dyeing thread will help to draw the actual walls and ceiling, according to the project. |


We buy the following materials for the frame:
|
|
The frame will be very similar to what we usually make for drywall, and for it we need guides, which are PPN profiles. |
|
|
The basis of the frame will be PP profiles. |
|
|
We connect the frame to the ceiling using direct hangers. Buy hard products, 0.6 mm thick. The same applies to profiles. |
|
"Crab" - single-level connector |
We will use this intricately shaped thing for the cross connection of PP profiles. |
|
|
We will use them to connect the frame parts together. You can also use LN type self-tapping screws, popularly called “bugs”. |


We will assemble the ceiling from the Start company.
It includes the following set:

- Long guide rails;
- Short guide rails;
- Curb cornices;
- Caisson units;
- Additional elements.

The installation of such a ceiling occurs in several stages, the sequence of which is very important to follow.

- First of all, we mark the ceiling, dividing it into sections. As we have already said, you need to start marking strictly from the center of the room so that the distance for additional elements on opposite sides is the same.

- Don't forget that maximum length additional element should not exceed 40 centimeters.
- The distance between the center lines (cell size) should be 66 centimeters.

- Next, using the level you have, we determine the height of our frame. It is very important to remember that the design distance from the ceiling must be set back from its lowest point.
- You can find it using a tape measure, which measures the distances from the level line to the base. Lowest value and will be the desired point. Step back here as much as the project requires, and from the resulting point draw horizontal line along the entire perimeter of the room.

Interesting to know! For this ceiling, the distance from the base is 120 mm. This is required in order to install caissons into the structure without any problems.
- To do this, you can use the level again, or adjust the values according to the first marking using a tape measure.
- We draw lines on the walls with a tapping cord.

- Next, using the received markings, we attach the PPN profile. For fixation, we use wood screws on a suitable base, or anchor wedges in the case of a concrete or brick surface.
- The fastener installation step is 40-50 centimeters. If the reliability of the profile is in doubt, then the fixation points can be increased.

- We attach straight hangers along the main longitudinal marking lines, as shown in the photo. We use the same fasteners as for the guide profile. The installation step is 60 centimeters.

- Next, using 4.2*16 self-tapping screws, we attach the PP profile to the hangers. Here it is worth paying attention that the profile is not installed in the same way as when installing drywall, but upside down.

- The profile is attached to the suspension at a distance of 10-15 mm from its upper part. In this case, the distance from the ceiling to the top of the profiles must be at least 120 mm.
- When it is necessary to lower the ceiling lower, the suspensions can be increased or corners made from PPN profiles can be used.

- The crossbars are connected to the main belts of the frame at one level, but due to the fact that the profile is inverted, the “crabs” need to be “fixed” a little.
- We also turn it upside down, and bend its mounting ears in reverse side. The connection is made using self-tapping screws with a press washer.

- Trimming the cross profile requires an oblique cut at an angle of 5-10 degrees. If this is not done, then when installing the longitudinal guides in the corresponding profiles, there will be nowhere for it to bend, and the part may not sit in its place.

- Next, work begins with wooden elements. The transverse guides are installed first. They are shaped in such a way that they simply snap into place. metallic profile. Everything is simple and intuitive.

- Next, we bring coffered units into the resulting cells and lay them horizontally, on top of the transverse guide rails.

- We install longitudinal guide rails. They are attached in exactly the same way as the transverse ones.

- The niches at the edges of the room that remain uncovered by coffered units are filled with additional elements. They require additional cutting after the fact - we do this using an electric jigsaw.

- The installation of a decorative border completes the work. It is attached with self-tapping screws to the PPN profile, in the center of the recess in its body.
- To hide the screws, a decorative fillet is glued on top using “liquid nails” glue. These elements in the corners of the room are cut at an angle of 45 degrees.
This is where the installation actually ends. Someone will say, what’s so complicated about it, but don’t forget that we were talking about finished products. The most elegant and beautiful ceilings of this type are completely assembled by craftsmen on site, turning and milling every detail, and this is not only very difficult, but also takes a long time.
Make an aristocratic castle out of your home, create an atmosphere of medieval comfort in it, or convert your home into such style direction, like the Renaissance, allow coffered ceilings made of wood.
French barons and aristocrats decorated their homes with them, but now every person has such an opportunity.
In contact with
Classmates
Varieties

There are also designs with not rectangular, but oval or round cells.
The main feature of such products is that they are assembled from two groups of different elements:
- structural - guides, beams, bars and joists that create the frame of the future ceiling;
- decorative - borders, rosettes, extensions, cornices, which add splendor and majesty to the room.
Coffered ceilings visually reduce the height of rooms, making them more compact and cozy.
The presented designs fit perfectly into any type of premises, but they are more widespread in the rooms of private houses. They also look impressive in offices. large companies, being a sign of their successful activities.
Advantages of coffered coverings

Among other features, carpenters-installers highlight the following:
- environmental friendliness - materials do not emit toxins when heated, saturate the premises with useful resins and fragrances;
- versatility - products transform the appearance of a home, help hide imperfections in relation to the floor and walls;
- durability - the service life of products is not limited by anything, only high-quality maintenance is necessary;
- simplicity - the elements are connected to each other through grooves and protrusions, speeding up the installation process.
The slabs produced at the factory are identical in size to each other, thanks to which they look organic and filigree accurately
Another feature can be called originality.
Note: depending on the wishes of the customer, the cells of the coffered ceiling are made different forms and sizes, types of wood. Their decoration can be carried out according to sketches chosen or drawn up by the client, which provides great opportunities for bringing your own style to life.
Place of structures in the interior

The combination of different breeds can achieve varied results:
- when trying to reduce the height of the vaults, it is necessary to choose darker types of wood - bog oak, walnut;
- The use of materials allows you to visually increase the internal space light shades- maple, birch, aspen, linden;
- divert attention from the arch and focus on interior decoration You can use white.
Please note: achievement complete picture is possible only with a combination of the color of the ceiling, the shade of the furniture and the floor. The ideal result is achieved using either laminate.
You can effectively complement the room with leather furniture and a fireplace.
The choice of this hanging structure imposes some restrictions on the use of furniture. To achieve absolute harmony, you can use classical decorative elements together with coffered vaults. Items from polymer materials will be noticeable.
Drafting

When drawing up a design project, several rules are followed:
- the lower the vault, the thinner the slabs, panels and frame beams, and their shade is lighter;
- the larger the area of the room, the greater the number of beams should be used in the structure;
- V small spaces the beams should be located next to the doors - this will “spread” the room;
- the parameters of the beams must correspond to the dimensions of the room.
In the old days, the family coat of arms was placed in the center of the coffered ceiling.
During design, you need to remember about some installation nuances. Thus, designers do not recommend installing coffered structures in rooms with poor lighting or with a large number of dark furniture- this will create a gloomy, depressing atmosphere.
Take note: The coffered ceilings are effectively complemented by stucco molding, ornaments, stencil painting, and appliqué.
Think about the composition too. Designers recommend highlighting the center of the ceiling in any way. This can be done using an oval for a third of the vault, a large aristocratic chandelier, stucco molding and carved slabs with a unique ornament, a specific plot.
Installation features

But there is another option - self-assembly designs.
Despite the fact that the coffered suspended structures hide the flaws of the ceiling, it still needs treatment. Therefore, the first stage is priming the surface, and depending on the installation method - with ornaments or plain ones.
The optimal width and height of the beams is 12-15 cm.
The frame of the future decoration is assembled on the floor and then attached to the vault using nails. When the ceilings are made of concrete, you will need dowels and screws. After fixing the frame, strips are installed to cover the sides.
Expert advice: cut out the coffered ceiling strips only after securing the frame, so that you can accurately fit the elements and close the gaps.
Transverse and longitudinal beams. Sockets are glued to the places where they intersect - this allows you to hide the cracks and joints. After all the activities, the structure is coated with varnish or stain.
If you are using ready-made slabs, then gluing them to the ceiling should begin from the center to make it easier to navigate in the future. To securely fasten honeycombs together, slats are used, and they are also used to close gaps near walls.
Cost of coffered ceilings

The price of the products depends on the type of wood chosen. The most expensive structures are made of moraine oak, mahogany, acacia, and walnut. Materials made from linden, pine, and coniferous trees have a more reasonable cost.
In offices, it is more appropriate to install coffered ceilings without wood carvings.
The second factor influencing the final price is the number and type of decorative elements and the shape of the cells. It's simple: the more cornices, extensions, rosettes and borders, the more money you will have to spend. The complexity of the production of elements, as well as their shape, depends on the sophistication of decorative patterns.
Coffered wooden ceilings allow you to create a completely unique image for the room. But their final price, installation and maintenance features can become a serious obstacle to achieving their goal. Anyone whose income is above average can buy and decorate their home with coffered ceilings.
Watch the video in which a specialist explains how to assemble a special frame and shows the installation of a coffered ceiling.
In contact with
See inaccuracies, incomplete or incorrect information? Do you know how to make an article better?
Would you like to suggest photos on the topic for publication?
Please help us make the site better! Leave a message and your contacts in the comments - we will contact you and together we will make the publication better!