Home is the place where you want to feel as comfortable as possible. Eat various ways make it even more cozy. But it’s especially nice when the decorative elements are made by yourself. Decorative panels in the interior always attract admiring glances, and making them from scrap materials is not difficult if you follow the technology correctly and follow the instructions step by step.
What it is
The panel is a decorative element and its purpose is to decorate the interior and fill empty space on the walls or ceiling. Sounds a lot like the description of a painting, doesn't it? How does it differ from a painting, if both decorative options are designed to decorate the room? The answer is simple: a painting is a subject of painting art, and a panel can consist of anything. Dough, plastic, plaster, beads, fabric, wood - there is no limit to imagination when it comes to making panels and the material for decoration can be anything. If you want to make your interior unique, then the panel will do it perfectly!
Determining the scope of work
The first stage in creating a wall panel is to decide on the design of the future product. If you already know where it will be located, then this complicates the task. Need to weigh color scheme, dimensions, what it will have, whether the material from which it is planned to be made fits into the overall picture of the interior.
So, we decide: size, color scheme and what materials will be used. This is the first step. If this is possible, then it is worth drawing a sketch of the planned product. This will help take into account all the nuances in completing the task.
If a piece of cardboard, canvas or any other hard surface is taken as a basis, then markings are made on it: where and how the decorative elements will be located. If the base is fabric, then it is stretched onto the base (for example, onto a piece of plywood, board or plastic), and the rest of the fabric is secured on the back side. After the craft is completed, it is placed in a frame and hung on the wall.
There is another option for making panels on tissue based. You will need to take a solid base, for example, plasterboard sheet the desired size and glue foam rubber to it. The fabric is stretched onto the resulting soft base. In this case, you can do without a frame.
After all the preparations, you can begin the main part of production: decorating.
Types of panels with your own hands
Let's look at the main types used in decoration:
| Fabric | These are all variants of embroidery, applique and tapestry techniques that are made on fabric. The technique can be anything: from hand embroidery to machine embroidery, made in mass production. |
| Stone | Often made using mosaic technique. Are used natural stones which are considered noble: basalt, marble and others. Less often, such products also contain artificial stone. |
| Made of ceramics | They are made using ceramic tiles and are usually placed in the bathroom or kitchen. |
| Sculptural | A volumetric version of the product, which is made of special plaster, plaster or metal. |
| Graphic | Anything done using various types of printing. These can be reproductions of paintings, photo printing. |
| Other types | Products are presented here self made, which are made using any available materials. Salt dough, wood, dried flowers and plants, shells, clay, beads - there is no limit to your imagination for decoration. |
Here are examples of manufacturing different types of panels:
From prints of fruits and vegetables
A child can also participate in the creation of this panel, as it is very simple to make. The bright, colorful design of this creation is ideal for the kitchen.
For production you will need:
- Solid vegetables or fruits (this could be apples, any citrus fruits, pears, cabbage, etc.);
- Paint (gouache, oil, acrylic);
- The basis on which the decoration will be made. It can be cardboard, board, fabric stretched over a sheet of drywall.
The surface of the base is pre-degreased and painted desired shade. Cut fruits and vegetables into halves and dip them in paint. It is best to pour the dye thinly into a plate. We apply the cut side of the colored fruit to the base and get a stamp.
Stamps can be made anywhere on the base, but images that are positioned symmetrically look best.
From paper
There are many options for making paper creations. Let's look at the main ones:
Made from round paper designs
This product can be made with your own hands in an hour and is an excellent way to decorate the interior, as well as get a lot of positive emotions.
Let's prepare materials:
- Colored paper;
- Paper clips;
- Scotch;
- Pins;
- Stapler.
Procedure:
- A sheet of paper is folded like an accordion, like a fan.
- We bend the accordion in half.
- Using a stapler, we secure the edges at the fold so that the accordion does not fall apart and you get a small fan. We connect three such fans and get a circle.
- Accordions different colors can be combined into one circle, then the panel will turn out even brighter.
- Connect many circles together, attaching them to the wall with safety pins. The size of the circles and the composition itself can be as large as you like and take any shape.
From photographs
Essentially, this is a collage of photographs or artistic pictures, which can either have a specific theme or be completely abstract. Photos are combined into one composition and mounted on a wall or other base. Design option: combine multiple images of sea and sky.
From colored paper
There are a lot of options for making crafts from colored paper. Today we offer the “Flowers from Hearts” option, which is suitable even for children's master class. It is very simple to implement and is an excellent tool for development. fine motor skills baby, but it looks amazing!
We will need:
- Office colored paper;
- Basis for panels;
- Pencil;
- Scissors;
- Cardboard;
- Paints;
- Tassels;
- Frame.
Let's get started:
- Cut out a heart-shaped template. To make one flower, we need eight such hearts. All hearts in a flower must be the same size.
- Fold the heart in half and get a petal.
- Glue a flower from these petals onto the base. This could be cardboard or a wall.
- To make flower leaves, you need smaller green hearts.
- We lay out the flowers in any order, depending on the overall shape of the desired panel. It can be a heart shape, or you can arrange flowers in the shape of a tree. Let's show your imagination and bring it to life!
From newspaper tubes
Newspapers can be great for making your own panels.
Necessary materials:
- Newspapers;
- Knitting needle;
- Glue;
- Wire;
- Brush;
- Knife;
- Acrylic paint.
Procedure:
- We cut the newspaper sheet into two parts with a knife.
- Apply to these parts thin layer glue.
- We wind sheets of newspapers diagonally onto a knitting needle. You should get thin tubes.
- Let's take it acrylic paint and paint the newspaper tubes in the desired color.
- We coat the resulting flagella with glue again and wrap the ends of each newspaper tube so that we get a spiral. Both ends need to be twisted in opposite directions if you want to get the shape of a seahorse. You can make a circle: to do this you just need to roll the entire tube in a spiral.
- We secure the spirals with rubber bands and leave them to dry for 24 hours.
- We remove the rubber bands and make up the desired pattern from the resulting elements. The elements can be immediately mounted on the wall, or a panel can be created on a pre-prepared base.
Circles made from newspaper tubes can be painted in different colors, combining several shades in one circle. Circles with a gradient look interesting: a transition from one color to another.
From wallpaper
This interesting solution, which will enliven your interior and give it even more comfort.
There are several ways to make a wallpaper panel yourself:
- Shred technique
Cut out fragments from existing wallpaper. The pieces can be of any shape, but must fit together. Consider general form the entire future composition. For example, you can cut out squares with flowers from three different types wallpaper and combine them together in several rows in a certain sequence. In this case, paired elements do not have to be arranged symmetrically.
- Whole wallpaper technique
We take wallpaper with the desired image (for example, a sakura branch), carefully cut it out and insert it into a frame, or glue it to the wall and decorate it with moldings or panels.
- Combination of styles
Here the design is limited only by your imagination! Combine whole pieces wallpaper with small cut out fragments. It's modern and inexpensive way decorate your home.
Important! If you can’t decide on the style of the future composition, then you should take a closer look at the images of flowers and plants in soft shades. It is always appropriate and looks beautiful.
From salt dough
This type of panel is one of the most budget-friendly, since its production requires a minimum of material and usually everything you need is always at home.
We offer a version of a molded panel where your child’s arms and legs will be imprinted. This creation will allow you to decorate your baby's bedroom in an original way and preserve the memory of his childhood for a long time.
We will need:
- Flour;
- Salt;
- Colored gouache (optional).
Procedure:
- We take flour and salt in proportions of two to one. Two glasses of flour are mixed with a glass of salt, then water is added. The approximate volume of water for this amount of flour and salt will be 125 ml.
- Knead the stiff dough. If it sticks to your hands, then add more flour. The dough should be elastic and not stick to your hands.
- If you want to make the panel colored, then it’s time to add gouache, decorating the dough with it.
- Roll out the dough. Its approximate thickness should be about 2 centimeters. The shape of a piece of dough can be any.
- We bring the dough to the baby and gently press his palm and foot into the mass. The pressure should be light, but sufficient to leave a mark.
- Let's do two in the test through holes- this is for the future ribbon, on which the panel will then hang.
- Place everything on a baking sheet and cover with baking paper.
- Preheat the oven to 90 degrees and put the dough there to dry. This will take approximately two to two and a half hours. It is necessary to carefully turn the dough once, halfway through drying.
- We paint the resulting panel with colored or white gouache, thread the tape through the holes - voila! Very touching and cute decoration ready for your home!
From fabric
Decorating panels with fabric came into fashion not so long ago: only in last years handmade lovers paid close attention to the fabric. This product is ideal for a Provence style interior. Let's look at the main types of fabric panels that you can make with your own hands:
Patchwork
Various techniques are used to make such panels, but they all have one thing in common: the use of scraps of fabric in the work. There are many patterns for such products on the Internet. Panels can be either on a fabric basis or on rigid structures. You will need any fabric for making: from pieces of tulle to scraps of old bed linen.
Felt for creativity
Felt panels are one of the most popular among needlewomen. All you need are pieces of felt of different colors, a pattern for future parts of the picture, thread and a needle or glue and a base on which you plan to attach all the details of the panel. Felt is a very beneficial material for creativity: it will help bring all your fantasies to life. A felt panel will be an excellent decoration for a living room or hallway.
Burlap looks like an extremely inconspicuous material, but it begins to play with completely different colors when craftswomen use it in their work. Burlap can be used to cover a frame for a panel; it can be used as a basis for other materials: beads, lace and others. This rough material perfectly emphasizes the delicacy and sophistication of other fabrics.
A panel made of wool is the most a simple product using the wet felting technique. This is an interesting process in which wool is compacted in a specific way to create felt. The design on such a panel can be anything: it all depends on the skill of the needlewoman.
If you want to take a single-color piece of fabric and draw a certain picture on it, then keep in mind that this is not as simple as it seems. It’s worth practicing on a rough draft, and then moving on to the fabric that you plan to use on the panel.
From beads
In this version of the panel, all or part of its elements are made of beads. First, the elements themselves are made, and then they are fixed to the base and, if desired, framed.
From threads and nails
This is far from new, but very interesting way make a panel with your own hands! Minimalism reigns here in the choice of materials, but this does not make the panel bland and boring, but, on the contrary, attracts admiring glances.
The whole point is that cloves are hammered onto a solid base. This can be done chaotically, or it can be done according to a certain pattern, which can be successfully found on the Internet. Threads are stretched between the nails in several layers. Thanks to this, a certain pattern is created.
From buttons
Ideal for beginners! You can use buttons to decorate a panel made of fabric or paper, or you can create a product made entirely of buttons. For this you will need
- PVA glue;
- Buttons;
- The basis.
Execution order:
- Draw a sketch on the basis: where the buttons will be located and what pattern they should represent together.
- Glue the buttons to the base with PVA glue.
The design can be anything: inscriptions, abstraction, flora and fauna and others.
Mirror panel
A modern panel created from pieces of mirrors. Complex versions of it can only be made by specialists, but simple ones are very accessible to independent work. Mirror panel will become additional lighting in the room.
Necessary materials:
- Mirror tiles;
- Liquid Nails;
- Base with wooden planks, if you plan to stick the mirrors not directly on the wall.
The principle of operation is clear: we combine various mirror pieces and attach them to in the right order to a wall or other base using liquid nails.
They are usually made in an abstract style from a variety of wood types. Very profitable in classic interior wooden panels with inlaid semi-precious stones look great.
Dried flowers and leaves
Great for children's creativity. Deciding on the plot future work, and then glue dried flowers and leaves (juniper branches, tree leaves - any flora will do) onto a solid base (cardboard, fiberboard) using glue. Grains, seeds and twigs would be an excellent addition.
Cereals and seeds
A sketch of the future painting is applied to a solid, already painted base. Then, cereals and seeds are attached to the base using PVA glue. Large grains should be glued individually, and small grains, for example, rice, should be poured onto the glue already applied to the base.


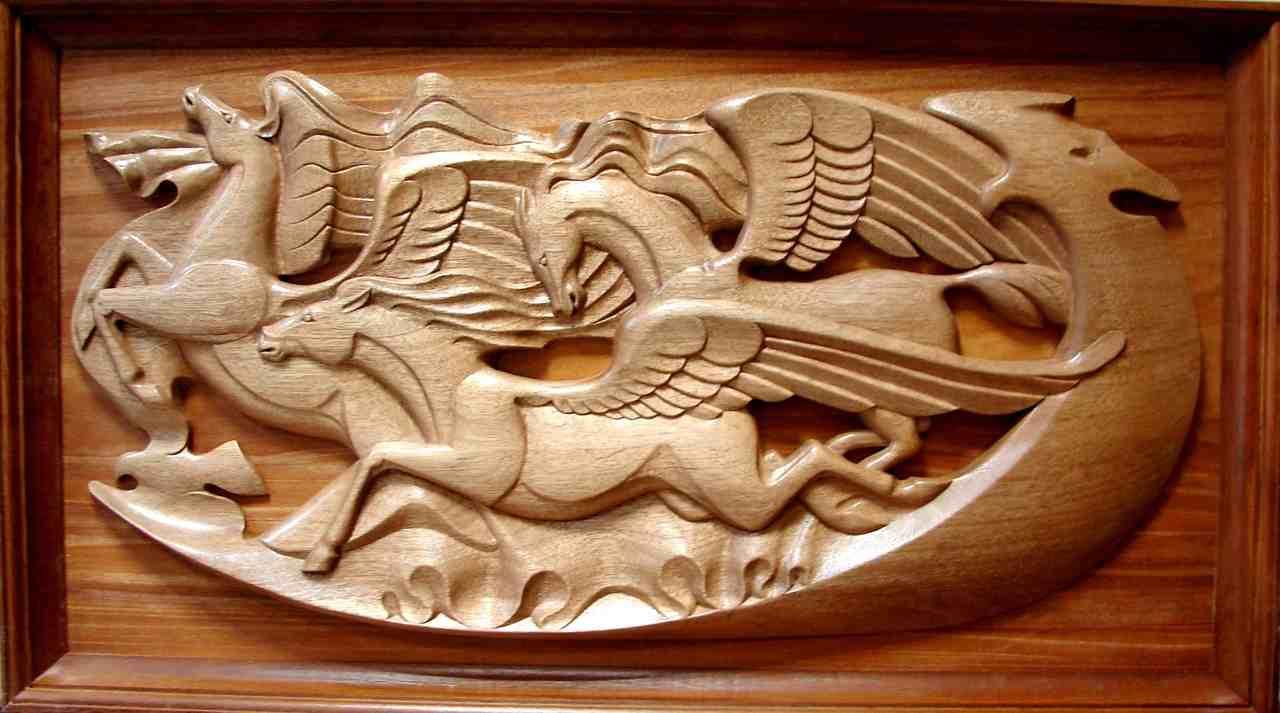
Such products are gaining popularity every year, since it is with their help that you can create the most comfortable, elegant and original design. It is worth noting that if a wooden panel is made using all technologies, then it can be safely purchased for any interior and regardless of the purpose of the room. For example, it can be hung in the hallway, living room and even in the bathhouse. Modern designers Exclusive carved wooden panels are often used to decorate offices and hallways.
Carved decor, wood paintings are considered one of the most popular decorations for rooms. By carving a design on a wooden plate, craftsmen create three-dimensional, beautiful images.

In order to make a high-quality craft, you will need to use only durable and noble wood.
For example:
- Pine;
- Birch;
- Alder.
In the old days, such carved paintings from teak or pine were made exclusively with their own hands, and they depicted exclusively pictures from life, as well as images of animals and plants.
A good option is to paint a wooden panel using ornate painting or a variety of ornaments using species of different shades.

Amber and silver are often used to decorate carved panels. It is worth noting that creating such a product as carved wood panels for a bathhouse and home is not just a hobby, but an entire art that requires skill, talent and, most importantly, the soul that is put into the work.
Wooden panel from a cut tree
If it is not possible to buy or create a carved wood panel, then you can choose wall paintings created from cut trees and branches as decoration.
It is much easier and faster to create such paintings yourself, and for the work you will need to use a sheet of plywood and a frame in the form of wooden branches.
The sizes of such paintings can be very different, from small to large.

It all depends on the taste and preference of the customer, or on your own wishes. For example, if there is an opportunity, it is quite possible to make a carved panel clock that will be suitable for both the hallway and the kitchen and will delight you with the fact that it is a product created with your own hands.
Panel made from cut wood in the interior of an apartment (video)
Carved wooden panels made of wood in the interior
Working with wood and creating the most beautiful things out of it various products not so simple, since you need skills, artistic taste, the ability to correctly emphasize the side and texture of the material, and also create from it a real masterpiece. A carved panel is a picture with a finished image that can be brought into any home and room. Previously, it seemed too easy to use wooden paintings for the interior, but now they are so popular that they can even be found in the design of enterprises and companies.
Naturally, it is worth considering the fact that if a carved panel is used in the design of the room, then the rest of the design should be appropriate.
Some of those who prefer to decorate their home with wooden products, they order many paintings and the corresponding decoration of the house at once.

If you combine such interior items as massive wooden table, paintings from carved panels and all this is complemented with pleasant warm lighting, then this will become the most attractive solution for creating a beautiful composition.
Esotericists believe that the use of wood products, especially handmade ones, can create not just a living atmosphere, but fill it positive energy, comfort and aura of creativity.
How a carved wooden panel is made
The technology for making a carved wooden panel is not as simple as it seems, so those who want to immerse themselves in such an activity should study it thoroughly to avoid mistakes.

What should be done:
- Initially, you should select the necessary picture from which the layout will be created, or in other words, the image is detailed using the marquetry technique, in which you need to mark each detail of the picture with its specific shade.
- After this, you need to select veneer and wood. The tracing paper on which the sketch is applied is fixed on the veneer, which will become the basis of the canvas with the selected composition.
- The general background is created using details various types and the type of wood onto which the design layout is transferred.
- Using a knife, you need to cut out every detail to avoid breaks, chips and nicks, and also select veneer species according to shades and corresponding details of the future picture.
It is worth noting that the parts should be cut larger than they actually should be. After this, all the elements of the future panel are placed for firing in heated sand or salt, where they are saturated with color and its certain depth.
A selection of parts is being carried out for required sizes, and each edge of the veneer is coated with contact glue and the complete picture is assembled.

In order to make a three-dimensional carved image, you will need to use a special cutter, which is used on the finished wooden canvas. At the end of the work, the painting is coated with varnish or special wood paint.
How to decorate a room using carved wood panels
A carved panel, as well as a three-dimensional picture made of wood or glued veneer is great way create individual style in the decor of the room. It can become a worthy picture in the living room or office, including in the bedroom, dining room and country houses.

Housewives who prefer to spend most of their time in the kitchen will be able to appreciate elements such as wood panels, since only with them can they achieve that same coziness and comfort. If you add carved ones to the room wooden stools, benches or huge round family table on handmade twisted legs, this will become the most attractive place in the house.
Modern carved wood panels allow you to make even such banal rooms as baths the most unusual and creative, as they lift your spirits and create special atmosphere, in which everyone will be pleased to be.
Bath panels are made from solid wood, and therefore they are not afraid of moisture and high temperatures.
3D wood panel (video)
A carved wood panel is a modern, unique decoration that can be made to order and according to your preference. It is important to note that a wooden panel will last long years and will delight with its appearance many generations of the family in which it will be purchased.
Examples of carved wood panels (interior photos)


Since ancient times, people have valued such material as wood. It was considered the main material in the manufacture of a wide variety of products, from the construction of living quarters to toys for children. Wood occupied the main place among the materials serving man in time immemorial and remains the main one to this day. natural material V various fields life. Just like today, those who could afford to live in luxury used various unique wooden products as decoration for their property, bringing uniqueness and style to the interior of any room.
Wood paintings in the interior - where it all began
Many millennia ago, the history of panels, bas-reliefs, figurines, furniture and wood carving itself began. At that time, people believed and worshiped various idols, and had an unshakable faith in the power of wooden amulets. At first, figures of animals, people, and various ornaments were cut out of wood. life situations, hunting scenes and more. They truly believed in the good luck and protection that these items brought.
In ancient times, craftsmen who practiced and made money from artistic carving there was plenty. A little later, a wide variety of objects were made from wood, the technique of which became more and more complex, including carved panels that caused delight and attracted attention. Artistic carving acquired national and local flavor.
But later, over several decades, during the emergence and development of many technologies, unfortunately, this type art has become irrelevant and almost forgotten. And only a few years ago, artistic carving began to revive and, I would like to note, that its popularity has grown greatly. The love for panels is understandable, because all people, without exception, strive to decorate the interior of their apartment, country house, the cottage is a unique masterpiece that you can admire and be proud of.
Panel as a decorative element - what are its positive aspects
The panel, as a decorative element, is a three-dimensional image that is carved on wood. This type of art has long been considered a sign of luxury and wealth of the owner. Particularly valuable and delightful are the exhibitions, which include several carved panels united by a common theme.
3dekor offers you both already produced amazing panels and gives you the opportunity individual order regarding the size, pattern and material of the panel. Do you want to decorate the interior with luxurious carved panels, then you have done right choice by visiting us. Our goal is to realize your dreams and wishes regarding a beautiful panel that will decorate your interior and give individuality and solidity to your home.
You can choose from traditional artistic panels (in this section), decorative panels for the interior, as well as panels with religious themes, depicting various scenes from the Bible and more. Also offered to your attention are painted panels, bright and colorful.
The positive features of wood paintings from 3dekor are:
- Natural and environmentally friendly. All our panels are made of high-quality and durable wood, which is environmentally friendly;
- Uniqueness. Our products are made by experienced craftsmen in artistic carving. Talented works are unique;
- Availability and speed of purchasing any product from our range. All of them are of high quality and will perfectly complement any interior;
- Possibility of individual order according to a unique, special sketch of yours or ours. The limit of our capabilities in this case will be the boundaries of your imagination;
- The professionalism of our employees guarantees high quality, neatness and precision of work.
Majority designer interiors united by one drawback - lack of warmth and home comfort. Of course, over time new interior it will take on a lived-in look and little things that will be pleasant for the owners will appear in it, but only hand-made decor can become a real decoration.
In this article we will tell you how to make a panel on a wall made of wood, and we will describe two methods of making it, and you can already choose which option is closer and more pleasant to you.

Wall panels are a decorative element designed to create thematic and semantic accents in the interior. Sometimes even the smallest panel can say more about its owner than a carefully crafted design.
You can make a panel from any available materials: paper, glass (see Glass panel on the wall: how to make it and hang it correctly) and even pieces of wallpaper. Much more important is the soul put into the product, and of course, the sense of style. In fact, there are no restrictions on the appearance of the panels, but we will tell you about two ways how you can make them yourself and not infringe on the family budget.
All the wooden wall panels presented below will not require any specific knowledge or skills from you, moreover, you will not even need a sophisticated set of tools. Everything you need will probably be found at home, and even if not, then in a hardware store the price will not be more than a hundred rubles. So, let's start in order.

A very original and stylish wood panel for the wall, which can be made in just a few hours.
To make it we need the following set of tools:
- Hacksaw. It is advisable to use a hacksaw with a blade for metal work. It has smaller teeth and, accordingly, there will be no video notches.
- Miter box. A tool that allows you to cut workpieces at an angle of 45 degrees. We will need it to make a frame or baguette.
- Gun for applying hot melt glue. By the way, you can do without it if you use simple PVA rather than thermal glue.
- Brushes for varnish or paint. It is advisable to take more expensive brushes, since hairs do not come out of them when working, and you will not have to carefully select them later.
Well, that's basically all. Although we can also include a drill or a hammer drill in this list, we will need them not for making a panel, but for attaching it to the wall.
Now that we have figured out the tool, it’s time to prepare the materials we need, and here we are full flight fantasies:
- Branches different thicknesses. It is important that the branches be as diverse as possible. The originality and appearance our panel.
- As a basis for our panel we will need a sheet of thick cardboard or chipboard. In fact, it doesn’t matter what the backing is made of, since it will be completely hidden under the decorative layer.
- Wooden slats with decorative carvings or baguette. We will need them to make the frame. If you have any ideas of your own for making it, feel free to use it. Originality is very interesting.
Advice! If you are using it as a base chipboard sheet, and PVA as glue, use the side of the sheet that does not have a glossy coating. This way the glue will adhere much better, and decorative elements will not move from the base.
So, first of all we need to make a frame. It doesn’t matter what size your wooden wall panel is. It all depends on personal preference.
A miter box will help you cut the corner evenly. We simply put a strip in it and use a hacksaw to cut it along the tool stops. Thanks to the miter box, the corners will be smooth and the diagonal of the frame will be accurate.
Now we lay out the frame front side down and apply glue to the joints. It will take quite a long time to dry, and the parts will have to be constantly held in place, so it is more convenient to use hot-melt adhesive, which hardens in just a few minutes after application.


When the frame is dry, inside We attach the backing to it. This can be done using construction stapler or small nails.
The foundation is ready, and it's time to take on the most important thing. And first of all, we need to cut nickels from branches different sizes. There is no need to strictly observe the thickness of the heel; the more varied they are, the more natural the panel will look.
First of all, we place the largest nickels on the canvas. They should not stand close to each other; it is advisable to place them in different parts canvases. Now we take smaller nickels and arrange them just as chaotically. IN last resort there are the smallest cuts that completely fill all the voids on our canvas.
Look at the work of your hands from the outside. All good? Then you can start gluing them. We carefully take each patch and apply glue to it, after which we return it to its place.
After all the elements are glued, all that remains is to wait for the glue to dry, and as an additional decoration, you can apply a layer to the entire composition clear varnish, which will highlight all the nuances of the tree and make the picture glossy and shiny. That's all, our panel is ready, all that remains is to hang it on the wall and enjoy the result, while we move on to the next, no less interesting option.
Ikebana panel

Ikebana – japanese art creating artistic compositions from various plants. Strictly speaking, our panel cannot be called ikebana, since it implies a three-dimensional composition, and a wall panel is a two-dimensional composition. But this is not so important, the main thing is that we will use tree branches as materials, and such a work looks very original.
So, we need a frame or baguette. We have already described its production in the previous section; there will be nothing new here.
Any material can be used as a base, and it can be painted to give a certain style. We will not give any advice on this matter, as well as on the placement of branches in the composition.
It all depends entirely on your imagination, but there are several general advice and recommendations that must be followed when making such a wooden panel for the wall:
- Be sure to cover the branches with paint or varnish. This way they will last much longer, and most importantly, they will not lose their appearance.
- If you use branches covered with bark in your composition, be sure to clean small area, on which the glue will be applied. This is necessary in order to ensure reliable adhesion to the surface and so that our work simply does not crumble.
- If you decide to paint the substrate, do not use nitro paint for this.. It will quickly lose its color and the panel will peel off. A good option will car paint in aerosol cans.
- Shoe nails can be used as fasteners instead of glue.. They themselves are very small, and when hammered in, their caps will not be visible.


Important! Under no circumstances should you work with spray paint indoors and without personal protective equipment. It is best to go outside for this work, but if this is not possible, then at least put on a respirator and open all the windows in the house for ventilation.
As you can see, the process is very simple, but it is difficult to describe it in words, so we invite you to watch the video in this article, which shows instructions and a master class on making wooden wall panels.
And in conclusion

In fact, this is only a small part of what can be made from wood. Wooden wall panels can be so diverse that your imagination is not limited at all. And most importantly, don’t hold back. The more extravagant your work is, the better, the more soul invested in it will be felt, and this is the most important thing for any work of art.
By the way, do not forget to involve your child in this process. This will not only give you the opportunity to spend time doing something together, but will also help your baby better feel the process of giving birth to a work of art, and who knows, maybe someday he will become famous artist, and it was you who started his journey.
The monotonous bare walls of a house evoke melancholy, so many people try to decorate them with something. Panels are a great way to make your apartment feel more comfortable and attractive. In addition, you can make it yourself, from what you have in the house.
And it doesn’t matter that you are not an artist or designer, the most important thing is the desire to create beauty. And then you can make truly magnificent things that will decorate your home and delight others. And knowing how to make a wall panel with your own hands will help in decorating your apartment; use any master class that you find on the Internet.
The panel can be made from almost any material - leather, cardboard, fabric, colored paper, photographs, shells. Some even use pasta, cereals, bottle caps, matches, seeds and other items for this purpose. We present to your attention several original ideas, which will tell you in which direction to move.

Panel “Shine”
Perhaps you have it in your house old picture. Feel free to take it and remake it. First, take the painting out of the frame and upgrade the frame. Paint it silver, let the inside of the frame be white, for this you can use white paint. You don't need the painting itself, but you can create your own painting on the back.
Try sticking glitter patterns inside, decorating with silver braid or strips of paper. Your painting will create a wonderful impression with its extraordinary silvery shine and decorate the room. This way you can do something different, show your imagination and create.

Fabric panel
People have long made drawings from fabric and decorated their homes with them. Although now completely different technologies have come to our aid, things made with our own hands from fabric remain a priority. They look cute and give our home a special charm and coziness.
Surely, there is some kind of fabric in your home: chintz, satin, burlap, felt, silk, etc. Even a few multi-colored scraps will do, you can form a really beautiful pattern from them.
Take the base for your wall panel, it should be a thick sheet of cardboard or foam. You can simply stick the fabric onto the base and tape it at the back and then hang it on the wall. Take pieces of fabric of different colors and make panels from them, it will look great.

But a wall panel made from scraps of fabric will look much more beautiful. To make it, you need to draw a picture on cardboard and indicate where and what flaps will be located. Next, following this drawing, make shreds and attach them.
In order for the work to look neat, it is better to bend the scraps and sew them so that the cut parts are not visible. Only the folds of the fabric should show off on the base.
Felt can be used to create cute and fun designs that are then placed in a frame. Such paintings will decorate a child's room and fill it with a cheerful mood. Cut out animal figures or cartoon characters from felt using a stencil. Ready-made drawings can be found on the Internet and made by analogy with them. Then you can stick them onto a base - a thick sheet of cardboard or other material.
Burlap is an excellent material that will serve as a background for a panel. To do this, it will need to be pulled onto the frame. To make the base look more attractive, it is better to trim the borders of the frame with bright braid. You choose the design inside according to your own wishes.
You can make various designs from burlap or make flowers from them and decorate a frame. Everyone expresses their imagination as they wish.

Panel from photographs
This is a great idea, especially if you have a lot of pictures in your albums. Hang them on the wall in your living room or in another room to indulge pleasant memories looking at them. A photo collage can be made in any shape, but it is better to make it in the shape of a heart.
To make a panel from photographs, take a piece of cardboard or plywood and make a background on it. Think about where and what photos you will place on it. Then cut the photos to fit. Fill in inner space your panel with glue.

Marine panel
Many people bring back a lot of shells from their seaside vacations. This is an excellent material for decorating your home, which will remind you of warm, carefree days and warm your soul.
For the base you can use an old one vinyl record. To get an even background, you will need to paint over the white middle with a black marker or paint.

Seashells are best attached using liquid nails. Collect all your shells, pebbles from the seashore, fragments of shells and other things, try to make an attractive composition out of them. Use your imagination to the fullest. When the panel is ready, you will need to varnish it. This will make the picture stronger and more durable.
Handicraft techniques for creating panels
- Decoupage. This technique is easy to master and does not require any special artistic skills. Beautiful decorative panel can be created by gluing napkins or special cards. Some people prefer to create images on a computer using graphic designer. You can create an attractive panel for the kitchen by decorating a cutting board with drawings.

- Beadwork. Although you will have to tinker a lot with beads, the result will be simply excellent. Beads can be glued to panels using glue, or they can be embroidered on fabric. The weaving technique requires special skill. But what a variety of drawings you can make!

You can create your own pattern from beads in different colors, but if your imagination doesn’t work enough, then it’s better to search on the Internet.
- Embroidery. Beautiful pictures can be created using thread and a needle. To do this you need to master the technique of cross stitching. And every beginning needlewoman can do this.

- Weaving. Attractive things can be made using simple newspaper tubes. There will always be material for this. You just need to cut old newspapers and wind thin sticks. Next, interesting images are formed from such sticks. To make it more attractive, you can paint the tubes with paint. Finished work It’s better to varnish it so that it pleases you for a long time.
Weaving on nails is also a popular activity among needlewomen. The design is formed by attaching nails to the panel and weaving multi-colored threads into them.
Volumetric panels
Such a panel always looks great and is worthy of admiration. Three-dimensional paintings are formed from puff pastry, porcelain, and polymer clay.
Some people prefer to use ready-made preparations, such as decorative fruits and vegetables, decorative flowers.
Although to create volumetric images you can adapt a lot of available materials, such as porcelain cups, watches, plastic dishes, corks, buttons, etc.

Master class on creating puff pastry panels
Puff pastry is made from water, vegetable oil, flour and a little salt. For 125 ml of water, take two glasses of flour, one tablespoon of vegetable oil and a pinch of salt. The dough should be quite elastic and should not stick to your hands.
If you want to get multi-colored material, then you need to add dyes to the dough. Various spices will add aroma to the material.

Once your dough is ready, you can roll it out and form a picture directly onto the dough sheet. Another way is to sculpt various parts and decorate panels with them. You choose the details for the painting yourself, as well as the plot of the painting itself.

Once the pieces are ready, you will need to keep them in the oven for a while to secure the structure. In this case, the temperature in the oven must be controlled; it should not exceed eighty degrees.
If you are willing to wait, you can dry the dough naturally by placing it on the radiator. After 5 days it will be ready and can be glued to the panel.
To do volumetric panel more attractive, puff pastry figures can be painted in various colors. A layer of varnish and panels will be strong enough to decorate the spaces of your apartment for a long time.

If you try to decorate your apartment with panels self-made, then it will look better. And you don’t need to invite fashion designers to your home and pay them huge sums of money. Everything you need is near you and costs a penny, and the beauty you get is extraordinary.

Create and decorate your home with attractive homemade items. In addition, this activity will give you moments of peace and relaxation. Connect your household members, especially children, to it as well. This will surely keep them engaged.