Building a bathhouse is only half the battle. It is important to properly equip it from the inside: finish it, install a stove, arrange furniture, etc. High-quality finishing of the premises will make bath procedures truly soulful and as enjoyable as possible.
Traditionally, a bathhouse has several rooms with different humidity and temperature levels; accordingly, there are a number of restrictions on the use of certain finishing materials.
| Room. Conditions | Recommended materials | Materials that are undesirable to use for finishing |
|---|---|---|
Steam room. | 1. Tree. Finishing with paired wood lining is considered a classic. This material is best suited for finishing walls, floors and ceilings. Requires treatment with special impregnations (wood in a steam room cannot be coated with varnish or paint that is not natural). 2. Stone. It is often used for cladding the wall behind the stove, while simultaneously serving as a fireproof cut. The solution is practical, durable, and quite original. 3. Salt panels. Ideal material for medical procedures. Illuminated salt blocks will pleasantly transform your steam room. But it is better to use this material in saunas with electric stoves, because direct contact with water and excessive humidity have a detrimental effect on the material. 4. Facing brick. Can be used to cover the wall behind the stove. Goes well with wooden wall paneling. 5. Porcelain tiles and ceramic tiles with a non-slip surface for finishing the floor and/or wall behind the stove. Recommended as finishing coat for screeds with insulation. On wooden base It is better not to put tiles in a steam room. 6. Mosaic. Traditional material for finishing hammams. It is not often used in Russian and Finnish baths. | 1. Parquet and laminate. 2. Linoleum. 3. PVC panels for covering walls and ceilings. 4. Ceramic tiles are glossy (slippery). 5. Ceiling tiles all types. 6. Plaster. |
| 1. Porcelain tiles and tiles with an anti-slip surface, mosaic. Recommended in combination with elastic anti-fungal moisture-resistant grout. 2. Natural or artificial stone. 3. Wood impregnated with antiseptics and water-repellent compounds. The service life of the shower is quite short. The best type of wood for finishing a shower room is larch. 4. Moisture-resistant drywall. It is used for the construction of partitions, as a base for laying tiles. Plasterboard can be used to protect laminated timber walls from moisture. It is permissible to paint GVL with moisture-resistant paint, but this option is short-lived. 5. PVC panels. A good option for finishing walls and ceilings, provided that waterproofing is properly organized. Wooden wall finishing plastic panels permissible only after complete shrinkage. 6. Moisture-resistant plaster. The finishing can hardly be called budget, it requires additional processing wax. It is possible to bring unique patterns to life by choosing the right structure and shade of the composition. | 1. Parquet and laminate. 2. Linoleum. |
|
| Any available materials are suitable for finishing. | It is not recommended to decorate the wall bordering the steam room with wood or plastic. It is better to use facing brick, stone, decorative plaster. |
Let's look at several ways to decorate the inside of a bathhouse.

An example of finishing the ceiling of a recreation room with clapboard
Lining is used very often for wall decoration. These can be expensive panels made of cedar, larch or more budget-friendly ones made of aspen and linden. Often, bathhouse owners combine different types of wood; the finish is unusual and very beautiful. It is better to use pine lining for covering the dressing room; it is not suitable for a steam room. the best choice.


A combination of lining from different types of wood for finishing walls and ceilings

They fasten the lining vertically or horizontally, and also lay out patterns from the slats, fixing it to the sheathing beams. A foil vapor barrier must be used. But it’s difficult to surprise anyone with such a finish.

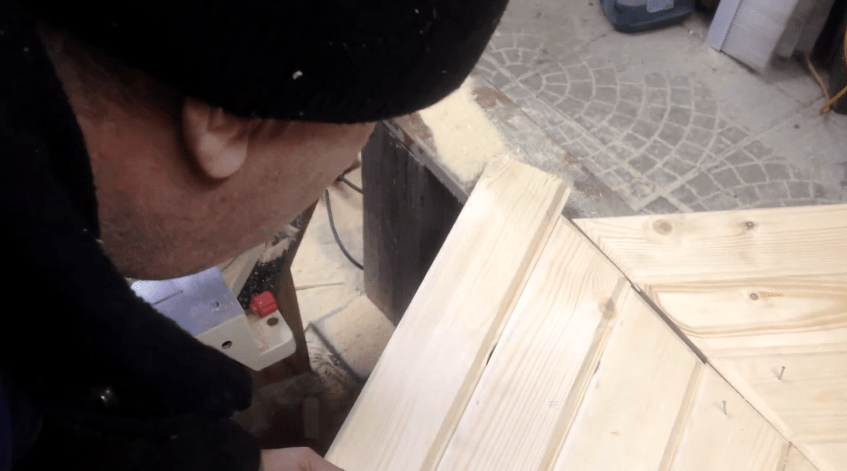
If you have a sufficient amount of free time and material, some diligence and accuracy, pay attention to method of installing lining in a herringbone pattern.
Step 1. Calculation of lining. Calculate the area of each wall in the steam room separately (you need to multiply the length of the wall by its height), sum up the results. You don’t have to subtract the area of the doorway, since it is necessary to provide a supply of material, taking into account the scraps.

When purchasing lining, pay attention to the label - manufacturers indicate the number of panels in the package, as well as the area of the finishing material. Divide the total area of your steam room by the area of one package and get the number of packages that will be needed for finishing.
If there is no information on the label, you will have to measure the length and width of each panel without taking into account the width of the tenon, and then calculate the number of panels for finishing. It is better to purchase material with a reserve.
Important! Do not use lining with knots to finish the steam room. The density of the knots is higher than the density of solid wood; when heated, the knots will fall out.
Step 2. Preparing the lining for installation. Unpack the purchased lining and store it in a heated room. You can begin finishing in two days.

During this period, prepare workplace and tools:
- jigsaw or circular saw;
- level, plumb line, tape measure, protractor, square, pencil;
- finishing nails, hammer;
- wooden plinth for floor and ceiling;
- mallet.
Step 3. It is better to fasten the lining with the tenon facing up. Based on this, we mark out the panels.

The herringbone can be angled up or down.

The photo shows the herringbone laying method with the corner pointing down.
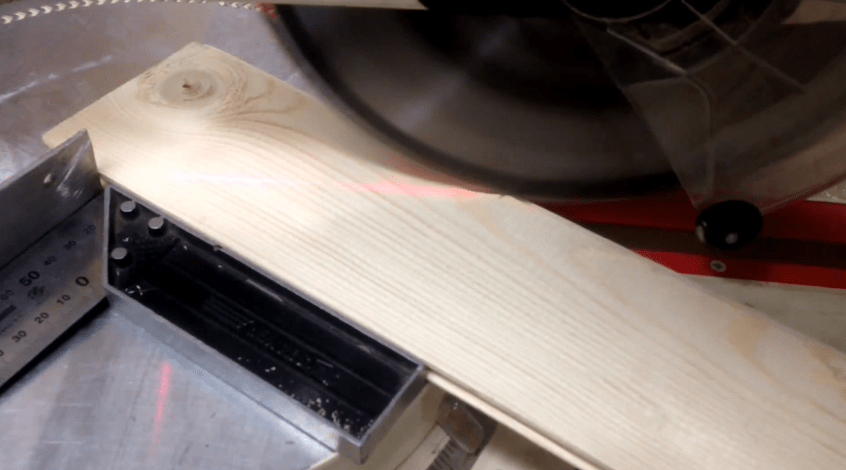
Cutting must be done at an angle of 45 degrees. The ends of the panels should be on the sheathing bars. For convenience, you can make a template and mark according to it.
Step 4. We start attaching the paneling from the top. We fix the first panel with finishing nails all the way through. If the bathhouse is wooden and has not yet shrunk, it is better to leave a gap of 3-5 cm between the ceiling and the casing, which will be covered with a plinth.
We insert the second panel with a tenon into the groove of the top panel, precisely aligning the ends of both panels. We fasten with a clamp. We insert the clamp into the groove, hammer three finishing nails into the holes of the clamp through a hammer. One panel will require at least two clamps, depending on the length of the lining.

We continue fastening from top to bottom until we reach the floor. Here it is also worth leaving a gap of up to two centimeters. Lastly, we attach triangles cut from the lining at the top and bottom, fixing them through with nails.
We install the next row in the same way, but we change the direction of the lining.
After installation, close the panel joints with thin wooden baseboard, fixing it with finishing nails strictly vertically.

There is another way to lay the “Christmas tree”. The technology is similar to laying parquet. The lining is sawn into rectangular planks. Laying is carried out with a shift equal to the width of the panel without taking into account the tenon. Fixation is done with clamps or construction staples.

Herringbone wall covering method
Prices for lining
Method of installation of lining "rhombus"
It is better to use boards rather than timber as sheathing. This will simplify the installation process. The method is applicable for both wall and ceiling finishing.
Step 1. It is necessary to draw a rhombus with angles of 30 and 60 degrees. We draw a straight line between the 30 degree angles, dividing the rhombus into 2 triangles. We cut the paper blank, transfer the drawing to the lining so that a spike is located on two faces of the diamond. We cut out the workpiece. Connect two triangles to form a rhombus. We fix the diamond with finishing nails right through to the sheathing (two nails for each triangle, we do not drive the nails all the way in).
Step 2. We take a whole panel of lining. We apply it to the diamond, connecting its tenon to the groove of the board. We make markings on the board for cutting.

We draw a straight line to the spike. On the tongue of the paneling we draw a line perpendicular to the board itself, continuing the pencil markings to the other side of the tenon of the panel.
We saw the board according to the markings. To do this, turn the paneling over with the pencil markings facing down and place the edge circular saw to the line marked on the spike. Turn on the saw and make a cut.


We take the second clapboard board. We apply it with a groove to the rhombus (on the edge where there is no spike). We mark for cutting, maintaining the accuracy of the angles. We check with a protractor and a long ruler. We saw according to the markings.
Advice! It is more convenient to connect the initial elements on a table or on the floor, nailing the wooden elements with finishing nails to a piece of FSF plywood.

Step 3. We continue to work. Rush is unacceptable. It is important to accurately mark and cut and join the corners. We mark or number each element to make it easier to install on the wall or ceiling in the future.
Step 4. When decorative element will reach the right size, you need to remove the nails and disassemble all the panels that were assembled on the table.

Let's assume that insulation and vapor barrier have already been completed, the sheathing has been filled. Using a level and a tape measure, you need to find the place where the center of the diamond will be. Accordingly, the center can only be located on the plane of one of the beams or sheathing boards. We nail the central diamond to the sheathing, driving finishing studs into a thorn For convenience, it is better to use a hammer to avoid breaking the lining with a hammer.
We attach the following lining boards to the central element, adjust them with light blows of the mallet and fix them in the same way.


Assembling a rhombus on the ceiling. When the decorative element is fixed, further cladding can be carried out parallel to the fixed panels or perpendicular
The joints of the rhombus can be covered with a thin wooden plinth, nailed through with finishing galvanized nails.
On a note! Positioning the lining panels in different directions, combining lining from different varieties wood, you can create an interesting pattern that will turn a simple steam room into a work of art. “Elite class” wood is considered to be cedar, fir, ebony and mahogany, rosewood, Canadian hemlock, African oak, pear and elm, and eucalyptus.


When the cladding is completed, impregnate the wood with a protective compound.
Video - Finishing premises with clapboards, the result of laying boards in different directions
Video - Ceilings made of lining
Mosaic wall decoration
If the walls of the bathhouse are wooden, you cannot, of course, put tiles or mosaics on them. Moisture-resistant plasterboard will serve as the basis for the mosaic. This material is quite hard, does not deform in conditions of high humidity, does not emit harmful substances into the atmosphere, that is, it is completely safe.

A frame for plasterboard is similar in structure to a frame for lining. To equip it, we will prepare 50x25 mm and 75x25 mm antiseptic timber, galvanized screws, perforated corners. We will mark using a tape measure, a plumb line and a level.

The timber must be antisepticized yourself or purchased material that has already been treated. Store timber indoors
Step 1. We fasten the beam under the ceiling with self-tapping screws (if made interior partition, That top beam needs to be attached to the ceiling). Using a plumb line, we make markings on the floor for attaching the bottom beam. They must be in the same plane.
Step 2. We fasten the lower beam to the wall with wood screws.
If the walls are made of blocks or bricks, fastening is done with dowels through pre-drilled holes in the wall.
Step 3. We measure the distance between the upper and lower bars, this will be the length of the vertical posts. We cut the timber with a jigsaw or saw. We install the first rack in the corner of the room. We attach the rack to the upper and lower bars perforated corners and self-tapping screws.
Step 4. At equal intervals we install the following racks in the same way. We check that the racks are in the same plane.
Step 5. We cut the timber to a length equal to the distance between the posts. Using corners and self-tapping screws, we secure intermediate jumpers between the posts.

Prices for moisture-resistant drywall
moisture resistant drywall
Frame made of metal profiles


Step 1. Using a laser level, we check the verticality of the wall. We set the level on the floor and use a tape measure to measure the distance from the wall to the beam in different places.
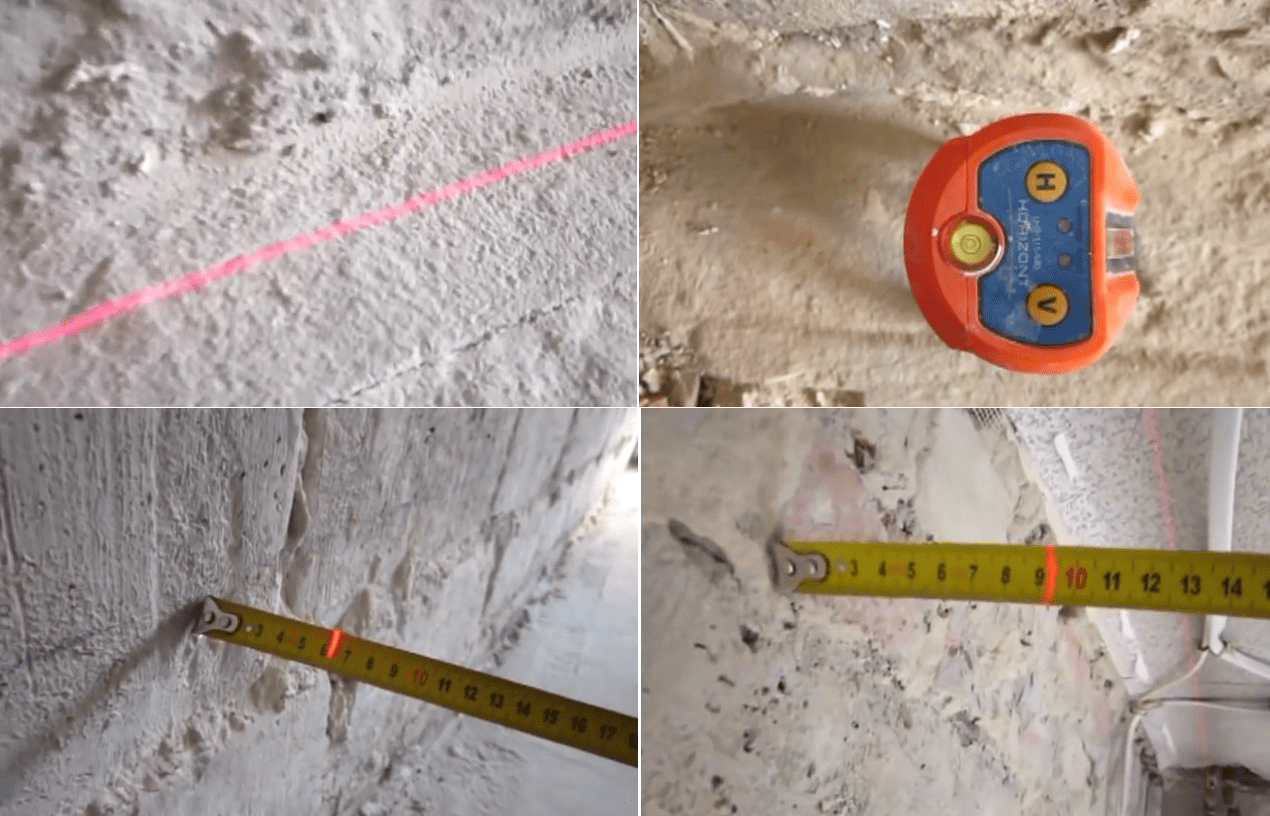

Step 2. If the differences are significant, we knock down the protrusions with a hammer drill. We remove debris and dust. We repeat the plane check operation again.

Step 3. Using a rule and a pencil, draw a line on the floor (we move away from the wall by about one and a half centimeters). The profile will be located along this line. We fasten the PN 50x40 profile to the floor with dowel nails.

Draw a line along which the profile will be located

Step 4. We insert vertical guides (PN 50x50) into the lower fixed profile and fasten them to the walls (in the corners of the room) with 6x60 mm dowel nails.


Step 5. We attach the PN profile to the ceiling. The upper and lower profiles must be located in the same plane. If the length of the room exceeds the length of the profiles, we make a joining, that is, we insert one section of the profile into another with an overlap of up to 40 cm.

We insert the profile into the vertical guides. Be sure to check the horizontality of the top guide; to do this, insert a vertical profile in the center and apply a level.

If necessary, we move the upper profile a little and only then fix it with self-tapping screws to the ceiling. We install fasteners at intervals of 50 cm.
Important! The installation of electrical wiring, pipes and other communications must be completed before finishing work begins.
Step 6. Installing intermediate profiles. We fix the ends at the top and bottom with self-tapping screws and a press washer. We take the distance between the profiles taking into account the dimensions of the plasterboard sheet. For example, from the outermost post we fix the next two at a distance of 40 cm, and install the fourth post so that its center is at a distance of 120 cm from the first (corner) profile.


Step 7 We check the position of the vertical posts with a level and begin fixing the profiles with hangers.


We insert the suspension between the vertical profile and the wall. Using a marker, mark the points for drilling holes. We drill holes with a hammer drill, insert dowels into the holes, attach hangers and fix them with self-tapping screws.
We bend the shelves of the hangers, screw in the “bug” screws to attach the hanger to the profile.


First we attach the hangers in the center of the profiles, then the rest. The vertical step between the hangers is approximately 50-60 cm.
On a note! To prevent the vertical profiles from shifting or rotating along their axis during the installation of the suspensions, we fasten them with a horizontal profile, screwing it with self-tapping screws and a press washer.

Step 8 We install jumpers. We mark the profiles for cutting. According to the markings, we cut the profile with a grinder.

We stretch the cord horizontally and, according to this marking, fix the jumpers with self-tapping screws and a press washer.


Installed jumpers. They are necessary if the size of the plasterboard sheet is smaller than the height of the walls
On a note! Use magnetic screwdriver bits. This will simplify and speed up installation.

Installation of plasterboard sheets on the frame
Let's look at an example of installation on a metal profile frame. Installing sheets on wooden frame It is performed in the same way, the joints of the sheets should be located in the center of the profiles. Direct contact of drywall with the floor should not be allowed; plastic pads will be placed under the sheets. Also, you should not attach the sheets tightly end to end; it is better to leave a gap of 1 mm between the edges for ease of puttying.


We use sheets for cladding moisture-resistant plasterboard 12 mm thick. We fix the sheet with self-tapping screws 25 mm long. The pitch between the screws is approximately 15-17 cm. We screw the screws in a checkerboard pattern.
First, we fasten the sheets along the perimeter, then along the line of vertical profiles. We draw a vertical line according to the level and make fastenings along this line. We recess the screw caps into the sheet by 1 mm.


Prices for metal profiles
Puttying seams
The joints of the sheets must be puttied using a mesh and moisture-resistant putty. If the drywall edges have a hand-cut edge, chamfer it at a 45-degree angle with a sharp knife. A primer is applied to the joints. The mesh is embedded in the putty mixture. After the putty has dried, the seams are sanded with sandpaper.


Mosaic wall decoration
To fix the mosaic on the walls of the bathhouse, it is better to use moisture-resistant glue, for example, Ceresit CM 115.

Step 1. Prepare the glue.
The room temperature should be from +5 to +30°C. The recommended water temperature for the adhesive mixture is from +15 to +20°C.
Gradually add the dry mixture to the water. For 1.5 liters of water, 5 kg of mixture is required. We do mixing construction mixer or a drill with an appropriate attachment. The speed of the drill or mixer should not exceed 400-800 rpm. After the first mixing, pause for 5 minutes and repeat mixing.

Advice! You should not prepare a lot of glue at once; the time of its use is limited to 20-30 minutes. Do not dilute the finished glue with water. If it thickens slightly, you need to stir the mixture well.
Step 2. Apply glue to the wall. We start gluing the mosaic from the upper left corner. Scoop up a little glue with a regular spatula and apply the mixture to the edge of a notched trowel. Distribute the glue evenly over the drywall.
Step 3. Unpack the mosaic, take one fragment and press the mesh to the glue. Carefully straighten so that there is an equal distance between the elements. Roll the entire fragment with a roller or wide rubber spatula.

It is important to lay them level so that the rows are even. The area of applied glue should not greatly exceed the size of one fragment.
You can only cut the mesh; it is not recommended to deform the pieces of ceramics or glass themselves.
Step 4. 24 hours later (or more, depending on the speed of drying of the glue) after laying the mosaic, we grout it. To fill the seams we use a moisture-repellent composition with antifungal properties, for example, Ceresit CE 40 Aquastatic.
For 2 kilograms of dry mixture you will need 640 ml of cool water. Mixing is carried out with a construction mixer at a speed of up to 800 rpm. Gradually pour the dry mixture into the water. After mixing, take a five-minute break and repeat mixing the grout. Ready solution must be used in two hours. It is unacceptable to exceed the specified amount of water, so as not to deteriorate the properties of the grout.

Apply the grout to the mosaic with a rubber spatula, spreading it diagonally. After 15-20 minutes, remove the excess with a damp (but not wet) sponge or rag. We remove the remaining grout from the surface of the mosaic with a dry rag.

You can decorate a shower room or dressing room entirely with mosaics, or combine this finishing material with ceramic tiles or porcelain stoneware.


Soapstone chlorite is highly valued by bathhouse attendants for beneficial features. The stone accumulates heat well, cools down for a long time, and the vapors emanating from soapstone chlorite carry healing effect for the body.

Soapstone is used to decorate stoves and walls in steam rooms, but nothing will prevent you from decorating, for example, a relaxation room in a bathhouse or a shower room with tiles made from this stone.


Soapstone is available in various variations - it is a tile with smooth or textured surface, mosaics and even bricks. As additional elements Manufacturers offer baseboards, borders and corners made of soapstone. If you are finishing the wall in a steam room, you will need heat-resistant stone adhesive (used for lining stoves and fireplaces), and when lining a shower room it is better to use moisture-resistant mixtures.

The surface on which the tiles will be laid must be flat and pre-primed. The tiles are laid from the bottom up, keeping the rows horizontal. The adhesive is applied with a notched trowel and the tiles are carefully pressed against the wall. Laying is possible both end-to-end, that is, without gaps between adjacent elements, and under jointing. The second method is suitable for tiles of regular shape and with a smooth surface. Cutting tiles is done with a grinder diamond blade. The joints are grouted with a heat-resistant stone mixture.

The combination of soapstone tiles with different textures looks quite extraordinary.

A combination of smooth soapstone tiles and tiles with a torn stone texture
Prices for soapstone
soapstone
Video - Extraction and processing of soapstone
Video - Technology of gluing decorative stone
Remember - finishing the inside of a bath should not only be exclusive, but also practical. It is important that Decoration Materials did not contribute to the development of mold and mildew, were easy to clean, safe for health and extremely durable.
Relaxing outside the city, taking a steam bath, tasting aromatic barbecue - this is what we dream about throughout the working week. For your dream to become a reality, you need to build your own bathhouse on your site and arrange a recreation area nearby. You can take on the matter yourself. To do this, you need to learn how to choose the material for the construction and decoration of a bathhouse so that it becomes the center of attraction for household members and guests.
Let's try to make a design project ourselves.
Where to begin?
It will help you to carry out a bathhouse design project correctly step-by-step instruction technologies for its creation. You need to prepare graph paper to draw the plan and facades of the building to scale. All drawings are done in pencil. Complex projects are best coordinated with an architect, which will help calculate the load on the foundation and supporting structures.
Separately, plans are made for the first and second floors, plans for all internal and external walls are made, indicating the finishing materials and their quantities, a section of the floor is drawn, screeds with the required slope for draining water, walls and roofing with all layers of insulation or waterproofing.

The first step is choosing a location on the site. For construction you need to choose the most flat area so as not to waste resources on leveling or transporting soil. In areas with pronounced relief, you can use this factor by choosing a building design supported on a hillside or stepped terraces.
It is not advisable to use lowlands to place a bathhouse, since dampness will destroy the foundation, otherwise they will be introduced into construction works installation of a drainage system.

When inspecting the site, you must pay attention to the surrounding landscape, the orientation of the windows and the entrance of the future bathhouse. The windows of the steam room can have any orientation, but the windows of the rest room or terrace must have nice review , because it is much more pleasant to see a garden or a surface of water before your eyes than a neighbor’s barn or fence.
We think about the route in advance. It is necessary to install comfortable, sufficiently wide and non-slip paths with lighting, since the bathhouse is mainly used in the evening.

Having decided on the location, they think about the layout. At this stage, based on the number of users, the size and number of floors of the building are calculated.
Armed with a pencil, they make several versions of projects with a different set of premises. Basic premises – dressing room, wash room, steam room. Additional – rest room, bathroom, terrace.

The bath complex may include a swimming pool, a barbecue area under one roof, a billiard room, guest bedrooms, and a spa. This list is expanded at the discretion of the bathhouse owner, his financial capabilities and availability of space. All rooms are located on one floor or some are raised to the attic or second floor. The use of the attic will entail additional expenses for thermal insulation.

Next, the issue of seasonality of using the bathhouse is resolved. Year-round use will require insulation of the structure, the use of materials with high strength, resistance to temperature changes, low thermal conductivity, and the ability to maintain the desired temperature regime indoors.
What comes to the fore is the creation of a heating system using a long-burning stove, removal of the fireplace insert into a dressing room or rest room, and the purchase of stoves with a convection air or water circuit.
IN summer bath in the summer cottage, materials with low thermal conductivity and good insulating properties are used only for the construction of a steam room; the remaining rooms are built from lightweight materials that do not require special insulation.

The next step is the selection of finishing materials for exterior and interior decoration. The requirements for materials for interior finishing are the same for all planning solutions: naturalness, moisture resistance, resistance to high temperatures, hygiene.
External finishing is carried out based on the finishing of the main house, if the bathhouse is located nearby. At a remote location bath complex may have a separate design. On small area it is better to adhere to a single style solution for all outbuildings.

Materials are selected according to the chosen design style. A classification into modern styles, classic design or rustic decoration.
Modern styles involve concrete, metal, processed planed wood, glass. Classic - brick and wood. Rural style will suit natural or artificial tree in all types - logs, timber, edged and unedged boards, natural stone or brick.


Making a count necessary materials and make estimates and make adjustments. The estimate must include a drainage device and the laying of communications: water supply, electricity.
A summer bathhouse at the dacha may have the simplest drainage equipment - a drain into an unused part of the garden. The lack of electricity is replaced by a portable lantern, and running water is replaced by manually filling a container with water from a well.

The final stage is the approval of one of the construction options by the family council. Sketches of the bathhouse are made to scale in pencil according to actual dimensions. They take as a basis ready-made options or make them yourself.


Selection of materials
Materials for the construction of a bathhouse are divided into structural ones, from which the foundation, walls, ceilings, rafter system roofs, that is, for the construction of the facility itself, finishing - for cladding walls, floors and ceilings outside or inside, and technical - for waterproofing and thermal insulation. The choice of one or another finish depends on the choice of the type of wall and roof construction.
Let's try to figure out what to build a bathhouse from, what are the pros and cons of certain building materials, and how you can save money.

Tree
In the first place among building materials for the construction of a bathhouse is natural wood. It is difficult to overestimate the advantages of this ancient building material. Many generations of builders have perfected the technology of wooden architecture. It allows you to create complex architectural forms.
The beautiful pattern of wood fibers does not require additional decor, and can be easily painted without additional preparatory work such as putty or plaster.

Due to its light weight, it does not require a strong foundation. A columnar foundation for individual load-bearing elements is sufficient, which is laid to the freezing depth in a given region; a shallow strip foundation is made for the base.
For construction purposes, wood is produced in the form of logs of various profiles: circle or oval. Rectangular section timber makes the construction of the building simple and convenient. Wooden structures are characterized by strength and durability; shrinkage occurs evenly, without creating cracks or distortions.


Wood is a unique natural healer, which is very important at high temperatures in the steam room and during bath procedures. The porous structure of the fibers retains heat well and does not require additional thermal insulation, except for the jute layer between the logs.
The wood is durable, but needs regular treatment with anti-corrosion oils.
Some types of wood are highly resistant to moisture and are used in construction.


The most affordable type of wood for construction is pine. This inexpensive and common material has good characteristics strength and durability thanks to resinous wood. When heated, it releases medicinal phytoncides, creating a pleasant aroma, and is distinguished by a beautiful pattern of knotty wood of attractive yellow color. brown colors. Pine has soft wood, which makes it easier to process.
The disadvantages include poor resistance to atmospheric moisture, which will require regular treatment with anti-corrosion compounds, and a strong release of unsightly resinous stains when heated, so in the steam room the pine walls are sheathed with a different type of wood.

Its characteristics are close to pine spruce wood. It is less common on sale, has less resistance to unfavorable humidity conditions, and a spruce log house needs to be coated more often with anti-fungal and anti-destruction agents.

Of the coniferous building materials, it is better to prefer cedar. Its cost is much higher, but its performance characteristics are significantly superior to pine or spruce. Cedar buildings are very aesthetically pleasing.
This species has almost no drawbacks, it is the most durable, moisture-resistant type of wood, its dense wood does not deform from temperature or humidity changes, and is not exposed to microorganisms and fungi, which makes it easier to maintain the structure.

Larch occupies the very first place in terms of durability; the age of buildings made from it is estimated at several decades and is approaching the service life of buildings made of brick. But this material is expensive, difficult to process due to the thick and viscous resin, so it is rarely used for the construction of a log house, More often used as external or internal wall cladding or floor finishing.

For unlimited budget use the most expensive and durable material– oak. A bathhouse built from it will benefit not only you, but also your children, grandchildren and, possibly, great-grandchildren.
Aspen baths are very popular, although the tree has no resistance to negative external factors, not as durable as softwood or oak.


Wooden baths warm up quickly and retain heat indoors for a long time.
The disadvantages of wooden structures include low resistance fire, so they cannot be built closer than 8 meters from other buildings. There is a need to periodically caulk cracks in the joints of logs and protect the wood from insects and fungi.

Brick
The second most popular and environmentally safe construction structural material is a brick. Brick buildings are distinguished by their beautiful appearance and color, especially when finishing external walls. facing bricks. Complex architectural forms with excellent stability are created from this material.
The foundation for such baths is constructed using strip or slab foundations due to the heavy weight of the structure.
Life time brick buildings- approximately 100-120 years.

Brick is a fire-resistant material, which is important if there is open fire in the oven. A brick bathhouse can be located in close proximity to the house and outbuildings. Brick baths do not require external finishing due to their aesthetic texture. No need for hydro- and thermal insulation of walls, since the material has low thermal conductivity and good resistance to moisture and harmful microorganisms.
The internal cladding of such buildings is very diverse: cladding with edged and unedged boards, wallpapering, ceramic tiles, plastic panels, painting over plaster.

The disadvantages include the high cost of the material and the need for professional skills to perform high-quality masonry. Brick structures require more heating time than wooden ones. The costs of interior decoration of the walls of all rooms can amount to a significant amount, but they give scope to the design concept.


Blocks
IN Lately Private construction from blocks has become widespread. They are produced with slight variations in composition and have approximately the same qualities.

Aerated concrete is a material created on the basis chemical reaction sand, cement, foaming agents and water, the blocks themselves are formed in autoclaves under pressure and steam.
When producing gas silicate blocks, lime and aluminum powder are added to the composition, which gives them additional resistance to destruction, but the lime in the composition makes gas silicate blocks less resistant to moisture.
Foam blocks have similar characteristics, these are inexpensive option cellular concrete, but the coefficient of resistance to external influences it is lower than the first two types of blocks. In construction foam block is used as additional material for capital structures, but with proper insulation it will cope with this task well.


Finally, the most cheap material- cinder blocks. A bathhouse made of cinder blocks is not the best choice.. The service life of such a structure will be no more than 20 years, then major repairs will be required.
Slag is waste from the coal industry. The composition of such blocks includes cement and coal with foaming additives.

These are simple and inexpensive materials allow you to build a bathhouse on your own site in a short time. The construction is completed with high-quality technical characteristics, does not require a powerful foundation, as it is light in weight and has little shrinkage.
Blocks need good waterproofing, since the material absorbs moisture very easily and, as a result, collapses.
A bathhouse made of blocks for year-round use must be insulated, but for summer operation one waterproofing is enough.

A foam block structure needs cladding both inside and outside.. The walls are sheathed with edged or unedged boards, artificial or natural block house to imitate wooden log house, siding. The base or part of the walls is laid out with decorative or natural stone, the floor on the terrace and in the room is finished with boards and tiles. The interior walls are decorated with mosaics or tiles.


When drawing up a design project, regardless of the choice of material for building a bathhouse, you need to take into account the purchase of waterproofing. It is used for floor slabs and walls of the steam room and washing compartment or shower.
Waterproofing materials come in liquid, roll and sheet forms. In the steam room, a layer of foil is used between the trim and the wall for vapor barrier. This material is also placed in the upper floor if there is a second floor or a residential attic.
OSB boards are often used to insulate walls and roofs from the inside., but in rooms with high humidity It is worth taking care of protection from moisture.


Exterior Decoration Ideas
When the bathhouse is erected, the most interesting part of any construction begins - the exterior decoration. At the design stage of a design project, a design style is invented, and the type of materials for outdoor decor depends on this.
External finishing must have high resistance to moisture, frost resistance, resistance to deformation and corrosion, be durable and aesthetically pleasing.

The most popular option is to sheathe the facade with edged boards, since natural wood meets all the declared qualities. The board can be positioned in different directions and influence the shape of the facades. The vertical position of the board visually increases the height of the building, the horizontal position makes the house wider.
Fashionable architectural styles prefer simple geometry, natural colors, and large glazed surfaces.

To give artistic expression combine the pattern: the roof gable is sewn in one direction, and the walls in the other. There is a wide variety of different layouts for laying out boards on the outer wall: herringbone, diagonally, with a border around the perimeter.
To give a Russian national flavor, a simple rectilinear plank wall or log house decorated with carved aprons, ridge and trim. Openwork carved inserts add lightness and airiness to the building.

You can add variety by using contrasting inserts made of untreated wood or highlight structural elements in a different color.
Inexpensive wall decoration with unedged boards looks very impressive.
The board is cleared of bark, sanded, painted or coated oil composition, preserving the natural beauty of the cut. The uneven, knotty edges of the boards give the structure a touch of fabulousness.

The combination of materials in the design of facades looks beautiful. The best companion to wood for finishing is brick.
The pillars on the veranda and part of the wall for the outdoor barbecue under the bathhouse canopy can be conveniently lined with bricks, artificial or natural stone. This technique will ensure compliance fire safety when using open fire and will ennoble the building. A stone plinth gives the tree solidity and visual stability.

The building will look brutal if the façade is made entirely of stone.
The fundamental, squat structure will be associated with historical dwellings. In this case, it is better to choose a roof from tiles or straw.
Modern technologies and impregnation with fire-resistant mixtures make it possible to create a reliable and durable roof made of straw mats. A touch of antiquity and rusticity will give the structure an attractive and stylish look and will serve as good thermal insulation for the bathhouse.


Budget option plastic siding will be used for wall cladding. This material is easy to install, durable, not afraid of moisture, does not fade in the sun, is frost-resistant, has a variety of designs and a wide color palette. Plastic panels with a semi-cylindrical profile will create an imitation of a log bath from any type of wood, even exotic.
Block house made of natural wood does not crack or deform due to the manufacturing features.


Plastered walls decorated with textured facade plasters or just put on makeup. Due to the roofing material and window trim and entrance group you can maintain the Ukrainian rural style of a mud hut or make a bathhouse in the classic version.
At the peak of popularity today, buildings in Scandinavian style. Here you will need to paint the walls white and highlight the structural elements with brown.


We create the interior
Moving step by step to creating the interior, we must take into account the specifics of the bath room. Any bathhouse consists of several rooms with different temperature and humidity conditions.

Steam room
The heart of the bath is the steam room; it is constantly exposed to high temperatures, hot steam and high humidity. The finishing requirements for a steam room are the ability to withstand these factors.
Materials must be environmentally friendly, since during bath procedures a deep cleansing of the human body occurs, at the same time it is saturated with useful substances from the surrounding air.

The use of synthetic and paint materials is prohibited here.
Great importance is attached to the creation of non-slip surfaces, since under the influence of high temperatures, attention is dulled. Natural wood is ideal for the interior lining of the steam room., it retains heat well, has a pleasant texture to the touch, does not burn and creates a healthy microclimate.
When choosing lining for a steam room, it is advisable to avoid resinous conifers. Heated resin releases heavy essential oils, so only cedar and larch are suitable for finishing the inside of a sauna.

The most suitable and available types woods are linden and aspen. They are very durable, have healing properties, and have a beautiful cut with a uniform, pleasant light color. Walls, ceilings and shelves are built with lining made from these types of wood; the floor can be lined with larch.
Connoisseurs of bath procedures some elements of the steam room are made from valuable wood abash. Because of him high cost They rarely completely decorate a steam room; more often they are benches.


The wooden slats can be sewn horizontally - this will make the steam room wider, or vertically, which will visually raise the ceiling.
It is better to decorate a small steam room in light colors, this will give space and freshness. The passage to the canopy must be free.
If the firebox is in a steam room, a protective wall of stone or brick must be laid around it.
A special stone is also selected, which, when heated, releases beneficial substances.

Attention should be paid to the organization of lighting. Soft yellow light will create a comfortable and safe environment. The popularity of LED lighting has not escaped the sauna either. The unusual setting and futuristic design will make your visit to the steam room unforgettable.
Using the backlight different colors adds color and positive emotions during bathing procedures. LED strips have brightness and color controls that can be set depending on your mood.

Advanced bathhouse attendants use a unique mineral – Himalayan salt – to decorate the walls of the bathhouse.
Translucent blocks are inserted into the wall decoration and illuminated from the inside. When heated, such a salt block releases substances similar in composition to sea air.

A good option for planning a steam room is the installation of natural lighting. Daylight makes the bathing experience more enjoyable. The sauna is simple and concise, and the window allows you to admire the landscape.
This option will require protection from prying eyes; it may be necessary to use opaque glazing.

Washing room
In Russian village baths, the steam room was combined with a wash room, and to this day such baths function properly. But if a new building is being built, then a place for a shower must be allocated. The temperature here is much lower and the humidity is higher. Therefore, appropriate finishing materials are selected.

The most practical and durable material for cladding walls and floors is tiles.
If only aesthetic compliance is put forward for walls, then Only anti-slip coatings are used for the floors. Ceramic tiles are widely represented on the consumer market - both separately and as wall and floor sets, making up design ensembles. The room is sometimes complemented by a swimming pool. In this case, a uniform design will give a special character to this room. Mosaics or tiles with floral patterns will add an oriental flavor.

Solidity and nobility will be given by the status finishing of the shower and pool with natural or artificial stone or marble. Competent organization lighting will highlight the texture of marble. Copper-colored faucets highlight the luxurious ambience. Although the area of the room may be quite small, interesting game The color of the marble slabs gives relief and fullness to the shower room with a swimming pool.

It is better to cover the ceiling in the shower with plastic panels. They can imitate wood or other natural material. White ceiling panels with gold or silver metallic inserts look beautiful and practical.
An original solution for a shower with a swimming pool is to use a ceiling or wall panel with an ornament or image of your favorite theme. Panels with perspective expand the space.

Restroom
If the steam room is the heart of the bathhouse, then the relaxation room is its soul. Here they rest after procedures, drink tea and relax after a week of work. Temperature and humidity here are normal, so any materials can be used for decoration.
This room is decorated with special love and decorated according to your preferences. Priority is given to practical and easy-to-care hygienic materials.

The inside walls are lined with wooden slats, plastic panels or a block house to imitate a log house. The walls can be simply painted or tiled.
Wallpaper should not be used in bath rooms due to high humidity.
It is preferable to make floors from larch or oak wood; in some cases it is appropriate to lay the floor with porcelain stoneware or stone. The ceiling is covered with plastic or whitewashed with acrylic-based interior moisture-resistant paints.

Thinking through the design of the rest room, Special attention pay attention to the possibility of installing a fireplace or stove with an open fire. The play of flames and pleasant warmth create a cozy and relaxing atmosphere.
For these purposes, you can move the stove firebox to the rest room; it will be comfortable to heat it in a dry, cool room and after that it will be convenient to remove wood chips and combustion products.
The firebox is equipped with transparent heat-resistant glass, which provides additional heating and allows you to admire the fire. Craftsmen can afford to build a real stove or fireplace from stone and brick in the recreation room.

Modern sauna stoves often heated with gas or electricity. In this case, it would be useful to spend time and money and equip artificial fireplace. The portal for the fireplace is made of plasterboard, lined with tiles or decorative stone, and a bio-fireplace or electric heater with imitation fire is installed inside. To give solidity to the structure, the chimney is beautifully decorated. It is also constructed from plasterboard.


The presence of a massive fireplace in the recreation room makes it a center of attraction and an artistic accent chalet style interior. This is the most picturesque and beautiful rural northern style.
It requires finishing with natural wood or stone, large windows or panoramic glazing with a natural landscape behind the glass.

The closest thing to national Russian traditions are log walls. They give a rural, rustic flavor, especially if you make an analogue of a Russian stove in the recreation room. To build a real stove with a stove bench, you will have to invite a specialist, but the costs will be justified, since this room can be used as a summer kitchen.
It’s easy to make a decorative stove with your own hands. The stove is whitewashed or lined with tiles, which give a royal atmosphere to the entire room.

Room in Russian style furnished with wooden furniture; tables and benches are often made of pine or oak. The walls are decorated with peasant household items.
Burnt wood looks impressive in the decoration of massive furniture and walls.. This technique gives a touch of antiquity and adds durability to the material. Burnt wood becomes practically invulnerable to pests and fungus, is less susceptible to moisture and can be used not only for internal but also for external cladding.

Fashionable minimalism suitable for small spaces. Simple geometric shapes, slatted cladding, and the absence of unnecessary decor literally force you to focus on relaxation.
Light colors, lots of light and air, smooth surfaces visually increase the space. Transparent partitions serve to combine the functional areas of the bathhouse, maintaining the desired temperature and humidity in each room. The convenience and comfort of minimalism can hardly be overestimated for the modern pace of life.

A very small area is needed for arrangement rest rooms in Japanese style - this is the simplicity and asceticism of the furnishings, natural finishing materials, strict forms.
Great importance is attached to the plant decor of the room. This theme is present in the design on wall panels or accessories in the form of living or artificial bonsai gardens.
Furniture may be completely absent; it is replaced by very high-quality coating the floor on which vacationers are located. This also brings a kind of exclusivity to bath procedures. Stone, wood, water are necessary attributes of a Japanese interior.

For people who are not experienced in the intricacies of the design of the latest styles, it is better choose modern classics . The walls are plastered and painted in light colors, light furniture with seats covered in leatherette is selected. The fireplace is made into an ergonomic rectangular shape; decorative stone or stylized brick can be added to its decoration.
This design will not require large financial investments and will meet all the requirements of safety, hygiene and ease of use.

Beautiful examples for inspiration
Simple rustic small bathhouse, where the washing room is combined with a steam room, will be a great place for taking bath procedures and evening tea, if you attach a canopy with a terrace, place benches or wicker chairs on the veranda, it will be suitable for this and easy to use plastic furniture. In the clearing in front of the bathhouse, you can arrange a barbecue area or a small pond, which will greatly decorate your family vacation.

A Russian bathhouse, decorated in antique style, will be a win-win option. Squat buildings, traditional for cold climates, with a small steam room and sink for better heat retention, are wonderfully stylized using burnt wood, signs and relief compositions with a bath theme, and wood carvings. Equipment wooden ladles, buckets and tubs will add national flavor.

Spectacular buildings are achieved through exterior decoration. Rectangular shape baths with smooth walls without protrusions with an ordinary gable roof, it turns from a boring structure into a stylish modern bathhouse after lining the walls with wooden slats in light colors and lining the central facade with decorative stone. Of the complex elements - only unusual shape windows that break the monotony of facades.
The minimalism of design features does not require additional costs for decoration, but creates a unique design object using small means.
From time immemorial, not only the Slavs, but also Finnish, Ugric and even nomadic tribes made a significant contribution to the creation, which over time began to be called “”. In those days, the technology was very simple: a massive log house was used, which did not have any insulation inside. In our technological world, this option is not very practical, since it will require a significant amount of firewood and a lot of time to fire the bathhouse. Wood was once the cheapest material - this is no longer the case. A modern bathhouse is easier to sheathe. There is enough information and photos for this. How to do it inexpensively and beautifully? This will be discussed further.
What sauna lining should I use and is it needed at all? An important question for steam room owners. Let's first figure out what functions it performs. The main task of the cladding is to reduce heat energy consumption and reduce the combustion time from 4 to 1-1.5 hours. Although, perhaps, this does not apply to baths that were competently built using old technologies - from solid timber. In this case, no insulation is required. However, construction costs will be completely different.
 Steam room made of solid timber
 So, when choosing a material, first of all, you need to think about the properties it should have. Of course, it must be non-flammable, steam-resistant and, undoubtedly, harmless to your health. It is not recommended to use non-natural materials for lining the internal walls of a bathhouse.
The favorite material for interior decoration is lining; a little less often they prefer a block house with a spectacular appearance, or magnetite, which is just developing on the market. What, after all, should you prefer? Let's look at all the options in more detail.
Cladding
Builders associate lining with beauty, practicality and reasonable cost. High-quality lining partially regulates the air humidity in the steam room, prevents the appearance of fungal mold and condensation, and allows the walls to “breathe.”
Advice. Eat little secret when choosing lining, which allows you to significantly reduce the cost of its purchase. Very often on the building materials market, lining up to 1.5 m long costs much less than 2 m and above. And covering a bathhouse with material of this length is quite simple - you just need to make a strip in the middle.
Most often, lining is preferable for finishing the interior of a bathhouse, since it has a number of undoubted advantages:
- Saves heat. Lining significantly reduces heat loss and, accordingly, the amount of firewood (electricity, gas) used.
- Gives the room an aesthetic appearance, hiding communications and uneven finishes.
- Prevents the formation of dampness.
- It lasts a long time.
 Steam room lined with clapboard
 You should also take the choice of wood for lining seriously, because the level of reliability of the material and the degree of financial costs depend on it.
- Linden- ideal for a steam room. The essential oils it produces have a disinfecting and anti-inflammatory effect. It enhances sweating without burning the skin and respiratory tract due to low thermal conductivity.
- A less costly alternative to linden will be aspen. It draws diseases out of the body and is not susceptible to rotting after prolonged contact with water. This wood is very soft and cuts easily.
- The best option for shower walls would be larch. It has a positive effect on well-being and increases resistance to infections. And floors made from this wood will be extremely durable and reliable. Even various small rodents and bugs will not be afraid of them.
- Leader in strength among tree species is undoubtedly white share. It is even stronger than oak and will only get stronger over time. Acacia is not subject to deformation and rotting. Products made from this wood will be very durable and wear-resistant, so acacia is perfect for finishing doors and floors in a steam room.
Choosing a block house
Block house for a bathhouse - the optimal combination of price and quality. This material is so close in its external characteristics to the log house, that it is almost impossible to distinguish a bathhouse lined with a block house from a log one. This material undergoes special drying, so it is not afraid of deformation or cracks. But periodic (once every few years) bactericidal treatment is still desirable.
 Block house
 There is a classification of block houses according to quality:
- Class "C" - low quality material, processed only superficially. Various types of deformations are allowed (cracks, remains of bark, etc.);
- Class “B” - average quality block house, allowing only a limited number of deformations (small cracks, knots up to 3 cm, etc.);
- Class “A” - perfectly processed material, without any irregularities (except for small knots - up to 3 cm);
- “Extra” class is the highest level of material quality with ideal surface treatment.
For the interior decoration of the bathhouse, a block house of the last two classes is recommended. Deciduous and coniferous wood is used as material for the block house, with the exception of spruce and pine (since they have high thermal conductivity and can cause burns when touched).
Advice. In a steam room, you should never use chipboard or fiberboard, as they release toxins when heated.
MAGELAN
A self-confident newcomer to the building materials market is a glass-magnesium sheet. It is made from fine wood chips, magnesium and other components reinforced with fiberglass mesh. This is acceptable, but not the best best material for interior decoration. However, certain advantages of this material cannot be denied:
- Insensitive to temperature changes and combustion.
- Does not rot and is impervious to moisture
- Easy to install.
 Glass magnesium sheet Magellan
 We introduced you to this material With possible options finishing interior spaces baths starting from natural wood and ending with modern materials. Now, knowing the advantages of certain materials, it will be easier for you to make a choice depending on your wishes and financial capabilities.
Arranging a bathhouse requires careful selection of materials for construction. Decorating the inside of the room is especially important, because the comfort of use depends on it. This task can be achieved using a variety of materials and finishing options, each of which has its own characteristics.
Interior decoration of the bath: purpose and features
The classic Russian bath includes three main rooms: a steam room, a washing room and a vestibule. Additionally, there may be a recreation room, a billiard room and other rooms. In any case, interior decoration is necessary, which not only creates comfort, but is also needed to create an optimal atmosphere and preserve heat.
The bathhouse building can be built from timber or another type of wood. This material is accessible, in demand and effective. Log structures for summer use they do not require complex finishing. A bathhouse in a log house should have well-caulked lower rims; the inside walls do not require additional materials. This is due to the fact that wood is able to “breathe”, removing moisture and steam outside. Application synthetic insulation will disrupt this process. However, thermal insulation is necessary for a winter bath; clapboard finishing is appropriate. Log walls look aesthetically pleasing even without additional finishing.
The construction of foam blocks is reliable, can be used at any time of the year, but requires interior finishing. In a steam room, they almost always use lining, under which layers of hydro- and thermal insulation are placed. In the rest room and locker room, it is appropriate to use ceramic tiles, PVC panels, and lining. Walls made of foam blocks are pre-treated with antiseptic compounds. The floor is often finished with ceramic tiles with an anti-slip surface, which ensures comfort.
Brick is rarely used for the construction of baths, but such structures are reliable, very durable, and environmentally friendly. Brick structures do not require external finishing, but inside you can use porcelain tiles for the floor, ceramic tiles, and lining. In the locker room, the walls are often lined with PVC panels, but they are not suitable for the steam room due to the high temperature in the room.
Wooden lining made of larch is a universal solution for interior decoration of a bathhouse. This material is affordable, practical and durable. If a more reliable coating of walls or floors is required, then use porcelain stoneware or ceramic tiles. A bathhouse made of any building material requires interior finishing that will provide comfort, aesthetics and protect the main walls from moisture.
Interior finishing options
All rooms of the bathhouse are exposed to high humidity, which requires careful selection of material for interior decoration. There are several main options, each of which has certain properties. The advantages, disadvantages, purpose and operating features must be taken into account when choosing an option for the interior decoration of a bathhouse from any material.
Table: advantages and disadvantages of materials
| Material | Advantages | Flaws | Optimal application |
| Wood paneling | Eco-friendly, nice texture, possibility of combination with other materials, variety of wood species | Difficult installation and maintenance operation, fragility, fire hazard | For walls in any bathhouse, built from any material |
| Ceramic tile, porcelain stoneware | Strength and reliability, resistance to mechanical and chemical influences, wide selection, durability, environmental friendliness, fire safety | It's important to follow the rules installation, high cost, uncomfortable texture | In any bathhouse for finishing the floor, walls, firebox |
| PVC panels | Affordable price, variety of colors, easy installation, simple maintenance during use | Fragility, low resistance to high temperatures, fragility | For changing rooms, rest rooms, showers |
Photo gallery: clapboard finishing options
Log walls make the bathhouse cozy and do not require additional finishing  Combination of lining and ceramic tiles - practical solution
  All surfaces inside the steam room can be finished with clapboard
  The lining is easy to install both on the ceiling and on the walls
  Clapboard finishing is convenient for a small steam room
  Lining easily combines with stone and tiles
  It’s easy to decorate a relaxation room luxuriously
Selecting the type of finish
The interior decoration of the bath not only performs an aesthetic function, but also provides comfort and an optimal atmosphere in the premises. Therefore, materials for arranging a steam room, shower, relaxation room or other space must meet the following requirements:
- environmental friendliness, non-toxicity, safety for human health when heating the material;
- resistance to mechanical and temperature loads;
- easy maintenance during operation;
- simple installation technology.
Popular materials such as wood and ceramic tiles meet these requirements. They are easily combined with each other, allowing you to create a comfortable and safe environment inside any bathhouse.
When choosing a material, its purpose is taken into account. Tiles are appropriate for the floor and walls, and the ceiling is decorated with planed boards and clapboard. This combination is optimal for a shower room, and in a steam room, often all surfaces are made of wood. This allows you to create comfort and a spectacular atmosphere of a Russian bath. Suitable for drier rooms stretch ceiling, but don't do it plasterboard structures. This is due to high humidity in all rooms of the bathhouse, and drywall is not resistant to moisture.
Wood and lining made from different types of wood are popular materials for interior decoration of a bathhouse. This is due to the fact that wood is available, environmentally friendly, and the installation of elements does not require special preparation. The optimal types of wood for a bathhouse are larch, aspen, abashi, and alder. They are durable, resistant to humidity and temperature changes.
Preparation: calculating the working area
Before starting work, you should calculate the area of surfaces that need finishing. Lining is used for walls and ceilings, and the floor is made of boards. For high-quality finishing, high quality wood is required, with lowest content resin Therefore, pine is rarely a material for landscaping, as it emits resin.
The finishing of each room consists of several stages. First, the installation of the floor covering is carried out, which is a flooring made of boards with a thickness of 50 mm. The elements are laid on logs 300 mm high, which are installed on a sand cushion arranged on the ground. After this, calculate the area of the walls and ceiling, which they plan to finish with clapboard. To do this, you need to calculate the area of each wall and ceiling and add up the data obtained.
Selection and calculation of material
Larch lining is the optimal solution for finishing a steam room or washing room. Under the influence of time and humidity, its wood becomes harder, which makes the decoration of the premises durable. When choosing a lining, you should pay attention to the following features:
- lining for finishing a steam room or washing room must be marked “Class Extra” or “Class A”. This material is devoid of large knots, has a uniform structure, and a smooth surface;
- wooden elements should not show signs of rotting, cracks, or deformation. Smooth and dense lining is easy to install and looks aesthetically pleasing;
- for finishing you need not only lining, but also steam, thermal insulation materials. Finishing carried out only after installation of these layers;
- The thickness of the board must be at least 12.5 mm, a tenon of 8 mm corresponds to the depth of the groove. Material humidity - no more than 12%;
- high-quality material has a flat, smooth surface.
It is also important to correctly calculate the amount of material. Lining is often calculated in square meters. In this case, its quantity is equal to the area of the working surfaces. This figure needs to be increased by 5%, since damage to the material is possible during operation, so the lining is purchased with a reserve.
For work you need bars or thin slats. If the thermal insulation of the bathhouse was carried out outside, then only the installation of vapor barrier and finishing is carried out inside. Therefore, you need to purchase a vapor barrier film that will provide comfort indoors. Otherwise, insulation is carried out from the inside and you will need insulation, a waterproofing film and bars for the sheathing.
Video: how to choose lining
Tools and Supplies
Construction and arrangement of any facility involves the use of reliable tools. Special meaning When constructing a bathhouse, the quality of fastening materials is important, because the durability of the finish depends on this.
List of tools and consumables:
- construction stapler with staples;
- roulette;
- pencil;
- building level;
- nails;
- self-tapping screws with anti-corrosion coating;
- screwdriver;
- hammer;
- hacksaw.
Tools need to be prepared in advance, and fasteners must be purchased with a reserve. This makes it possible to securely fix all materials and elements.
Step-by-step instructions for interior finishing of a bath
Wall finishing is carried out after installation of heat and vapor barrier. To do this, you need to attach vertical or horizontal bars to the wall, the distance between which is equal to the width of the insulation used. Fixed on top of the posts with staples waterproofing film, and then the insulation is also fixed to staples or glue. After this, a vapor barrier layer is attached, which protects the supporting structures from condensation.
Plating the walls of a bathhouse from the inside involves the following steps:
- Slats are attached on top of the vapor barrier film, the distance between which should be 50 cm. A gap of 3 cm should be left between the vertical slats of the frame and the ceiling and the same distance on the floor side. This is necessary for the structure to shrink.
- TO wooden surface without internal insulation the slats are fastened with self-tapping screws and to the brick base with dowels. In this case, it is important to control the verticality of the slats using a plumb line, and check the plane with cords stretched between the outer bars. Clamps are installed on the back side of the lining board, then the panel is secured to the sheathing using nails.
- Next, the canvas is assembled from the lining, inserting one element into the groove of the other. A clamp is attached to the back wall of each panel, with which the lining is fixed to the sheathing. You can also fix the parts simply with nails, deepening their heads into the wood. The step between the fasteners is about 60 cm. It is important to connect the parts tightly, but leave a gap of about 2 mm, since wood swells from moisture.
Lathing when covering walls with clapboard is necessary for walls made of any materials. The bars allow you to create a ventilation gap, and vapor barrier film provides moisture removal. This preserves the quality of load-bearing structures and appearance finishing. The ceiling is sheathed with clapboard using the same technology, having previously fixed a vapor barrier film.
Video: preparing the ceiling for clapboard cladding
Finishing a bathhouse with clapboard is a popular arrangement method. At the same time, wood is successfully combined with ceramic tiles and stone. Therefore, the interior decoration of the bathhouse can be varied, but it is important to choose the installation technology of the appropriate material.