Drywall is wonderful and universal material, which allows you to bring any ideas to life. It is used not only to create perfect smooth walls, but also for the formation of non-standard structures in the room. The material is attractive in that it is affordable, easy to work with, and has some thermal insulation properties. In addition, to work with it you do not need to have professional tools and work skills. The essence of working with it is to form a frame from metal or wooden slats and attach sheets to them.
In this article we will look at the areas of application of plasterboard in the interior, learn the features of working with it, as well as how to make shelves from plasterboard with your own hands. It will be step-by-step instruction, which will help transform your apartment or house.
Scope of application of drywall
Designers love drywall because of its versatility. Thanks to this material you can create a variety of decorative elements. The scope of its application is so wide that it can only be limited by the designer’s imagination. With drywall you can solve any design issues, regardless of complexity.

Here's what you can do if you use drywall in interior design:
- Beautiful niches.
- Ordinary arches.
- Cabinets made of plasterboard.
- Ceiling structures with different levels.
- Plasterboard shelves.
And, of course, plasterboard is used in wall decoration. In any case, the base is a metal or wooden frame. It is he who forms future design. This is important, since the shelves on the plasterboard wall, as in the photo, will depend on the configuration of the frame.

Note! Since lathing is used, various communications (wiring, pipes) can be hidden under the drywall.
You can also further insulate the room if you place it in the space under drywall. insulation material(foam plastic, mineral wool, polyurethane foam, penoplex).
With drywall large room can be beautifully zoned into different areas. Moreover, the load-bearing elements of the structure are not affected, which means that permission for such work is not needed. For example, one room can be divided into two by a partition. Shelves are made of plasterboard in one of the walls, which will become not only attractive, but also very useful. Shelves made of plasterboard photo.

We mentioned that communications can be carried out under drywall. It’s also easy to equip such shelves, arches or ceilings with spotlights. The effect is simply amazing. This way you can emphasize one of the zones and bring more light into the room. As you know, a large amount of light and white colors will help visually expand the room. Therefore, if you small room, this solution is simply ideal.

As you can see, this is universal construction material, thanks to which you can add individuality to the room, beautiful appearance, originality and functionality. Let's take a closer look at how to make shelves out of it with your own hands. Just before that you need to pay attention to some nuances.
What to Consider Before Building a Drywall Shelf
All builders understand how important it is to plan and calculate every detail before building or creating any structure. The same goes for plasterboard shelves. If the owner wants his shelves to be not only beautiful, but also durable, then it is important to consider the following nuances:

If the owner wants his plasterboard shelves to last a long time, be beautiful and functional, then these aspects need to be taken into account. This is not at all difficult, however, simple steps will help you make the shelves correctly. Now you can begin the first stage of creating plasterboard shelves.
Let's start calculating future plasterboard shelves
Let's start with the fact that shelves can be very different. We first mentioned that their design is limited only by a person's imagination. There is no standard or rules for what the shelves will be. Therefore, it is important to determine and think through the design and construction of the shelves in advance. This is their number, size, shape, design, etc. To make it easier for you to decide on a design or come up with something of your own, you can watch this video.

This matter requires imagination. Therefore, you should not hold back and make all your desires come true. Drywall is the material that will help in creating the most extraordinary designs. There is arched plasterboard on sale, thanks to which you can get curves and rounded structures and bends.
I would like to point out that if the room is small, usable space and it’s not enough, but you want to have shelves, then you can create corner shelves. They use space efficiently and do not take up much space. Their creation is also simple, but it looks beautiful, and the functionality is also excellent. You can see the drywall corner shelves in this photo.

So, all that remains is to compose detailed project designs on paper, apply all dimensions and proceed to other stages of work. Here's how a drawing or design of gypsum plasterboard shelves can be made.
Tools and materials for work
When the project is ready, you can start working. However, you will not be able to complete the job without the right tools and materials. Therefore, you need to make sure you have everything you need. What is it about? Let's start with the materials:

Now regarding the tools. They are also simple and every owner has most of them. But some will have to be purchased. Here is the list of tools:
- fasteners such as dowels and screws;
- cordless or corded screwdriver;
- plane;
- level, plumb line and plane;
- set of spatulas;
- regular paint brush or roller;
- sandpaper;
- tape measure, pencil;
- stationery knife and metal scissors.

Now you are completely prepared for the process of creating plasterboard shelves. All that remains is to study the instructions and do all the work yourself.
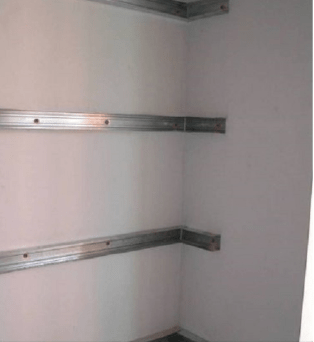
Stage No. 1 - creating a metal frame
This is the most complex look works All further actions depend on it. Therefore, you need to be especially careful and careful here. To work, you will need galvanized steel profiles measuring 50x25 mm, as well as dowels, thanks to which the frame is attached to the walls. In this case, installation of the frame can be done in two ways:

In any case, when creating a frame you will have to adhere to some rules. The first of them is that you will have to take measurements correctly and carefully and apply marks to the walls. In this case, a level and plumb line are used to ensure that the shelves are perfectly level. Next, the profiles are fastened with dowels or self-tapping screws according to ready plan on paper. Optimal distance there is no more than 25 cm between them. But if the load on the shelves is large, then the distance is reduced. Metal scissors are needed to adjust the size of profiles and cut them.

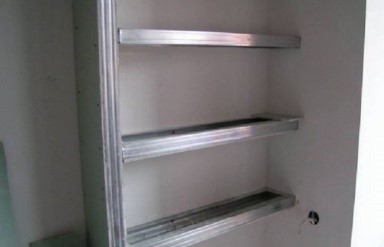
When load-bearing profile fixed, installation of guide profiles is in progress. They allow you to make the structure three-dimensional. And to strengthen the frame, the guides are fixed to the ceiling and wall and connected with a jumper profile. This completes the most difficult stage. To make things easier for you, we have prepared a video on how to attach the frame.
Stage No. 2 - installing built-in lamps
If you are already creating shelves with your own hands, then it is better not to spare effort and money on creating lamps. This is a simple job that will make plasterboard shelves even more attractive and the room illuminated. To complete all the work, you need to have a drill and a special round bit-crown designed for drilling holes of the appropriate diameter. Holes are made in the right places in the plasterboard sheets.

The wiring is done in advance. If you are not an electrician, we recommend calling specialists who can professionally carry out wiring to the lamps. Recommendation: hide the wiring in a protective corrugation. This will protect the room from ignition of the wiring and harmful consequences. You can also replace spotlights with a simple LED strip. It is flexible, so it is ideal for plasterboard shelves that have curves and arches.

We invite you to watch visual video on how to insert spotlights into plasterboard sheet.
Stage No. 3 - we cover the frame with plasterboard
As for this stage, it is one of the simplest. You just need to prepare the plasterboard sheets. They must be cut to size to hide the frame. It's like cutting material into parts. Here step by step instructions frame covering:

DIY plasterboard shelves photo.

To ensure that the appearance of the shelves is impeccable, you need to carefully process the joints. They are carefully sanded, covered with reinforcing mesh and treated with putty. And to strengthen the structure and prevent chipping at the corners, you can cover them with metal or plastic corners.
Stage No. 4 - finishing
And finally, it is important to bring the plasterboard shelves to perfection. This means that they should be treated with putty. But before this, the surface is treated with a primer. To do this, use a paint brush or roller. It is easier to process large and even surfaces with a roller, while with a brush hard to reach places. It is important to ensure that you do not skip any sections. All you have to do is wait for the primer to dry. This will take about 24 hours or less.

Then apply finishing putty. To do this you need to prepare it using construction mixer. After this, using spatulas, apply the composition in an even layer on the surface of the plasterboard shelves. There can be two layers. When the putty has dried, it can be rubbed off using sandpaper. The surface of the shelves is ready for further manipulation. It can be painted or applied with decorative plaster.

This way you can create shelves in any room, be it a living room, bathroom, kitchen or bedroom. You decide for yourself where exactly you need to make them. Plasterboard shelves in the bedroom photo:

Plasterboard shelves in the living room photo:

Plasterboard shelves in the bathroom photo:

Conclusion
Now you know how to make these plasterboard shelves with your own hands. As you can see, this is not a difficult job. You just need to allocate the time and money to follow the instructions in this article and create them. These shelves will be a great addition to your room. In the end, we want to offer you video instructions on how to make plasterboard shelves with your own hands from start to finish.
In order to create beauty and comfort in the apartment, there is no need to spend a lot of money on purchasing expensive furniture and household appliances. As a rule, in order to radically change and refresh the interior of a living room or bedroom, the simplest and most affordable materials available in any hardware store are sufficient. Such a material is drywall. It can be used to make arches, columns, dropped ceilings, walls, partitions and all kinds of shelves. Combination of different unique properties made it an indispensable material for DIY repairs and construction.
Plasterboard shelves will add individual design room, and will also help you get rid of furniture that takes up significant space.
Properties of plasterboard sheet
A plasterboard sheet is a product consisting of two strips of thick mounting paper and a solid gypsum-based plasticizer between them. GCR has many unique features.
So, it has the following advantages:
- environmental Safety;
- flexibility allowing the creation of curved structures;
- affordable price;
- ease of processing and installation;
- no thermal expansion;
- water resistance after appropriate treatment;
- non-flammability;
- possibility of equipping with lamps various types;
- strength to withstand significant loads.
By installing plasterboard shelves in the hall, you can not only decorate it, but also hide some defects and unevenness on the wall.
Place of plasterboard shelves in the interior
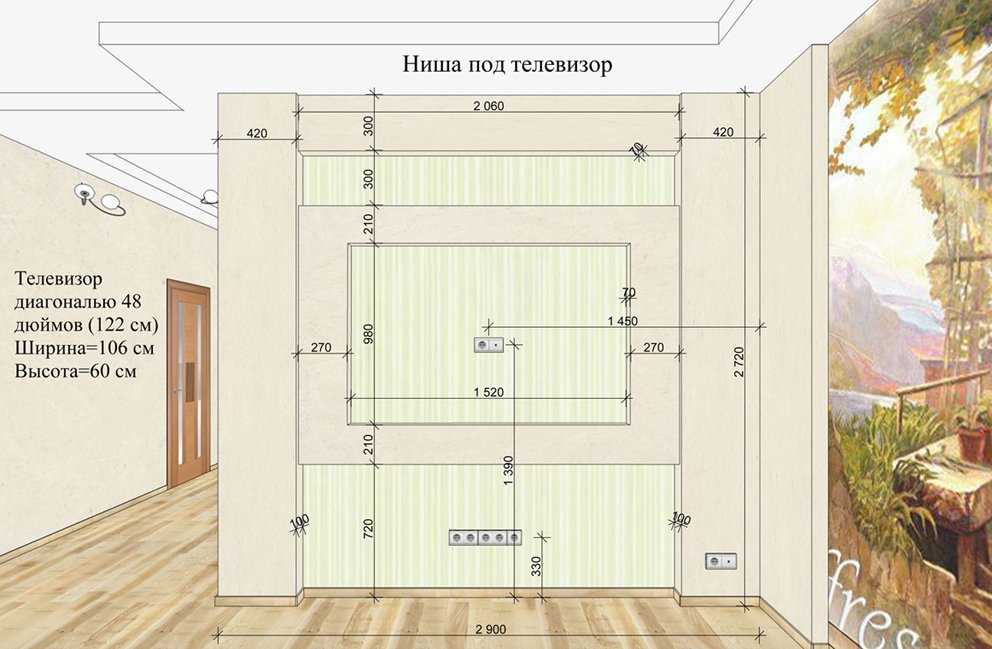
Scheme of a plasterboard niche with lighting.
With the help of gypsum plasterboard products, you can not only get rid of furniture that takes up significant space in the room, but also create an individual design of both color and shape. Shelves on the wall can be used to display photographs, souvenirs, vases and flowers. Larger wall shelves can be used to display books and magazines, or as a stand for an aquarium or household appliances.
Shelves can be made from plasterboard in a wide variety of shapes. The most common options are:
- niches in the wall for a TV or related equipment;
- protruding volumetric frames;
- corner straight and curved structures;
- arches;
- vertical and horizontal bends.
Shelves made of plasterboard, located on the wall, can serve as a practical task, serving as a basis for placing various items, and purely aesthetic, being a decoration and an integral element of design. So, in the hall, semicircular shelves located below similar suspended ceiling structures will look very good.
In order to install plasterboard shelves on a wall or partition in the hall, basic construction skills and tools that are found in every apartment are sufficient.
Tools and materials
Before starting work, a drawing of the shelf is drawn up. The drawing can be executed on a sheet or used for this on a personal computer.
The project determines the location of the plasterboard shelf on the wall so that it looks harmonious against the background of the interior of the room.
When the project is completed, materials are calculated and tools are prepared.
For making a shelf for wall or floor option fastening you will need the following tools:

Tools for making plasterboard shelves.
- perforator;
- screwdriver;
- Bulgarian;
- hammer;
- belt grinder;
- building level:
- metal scissors;
- roulette;
- pencil;
- spatulas 8 cm and 20 cm;
- sandpaper;
- paint brush.
The instrument must be checked and completed.
The list of materials required for the work is relatively small.
It includes:
- galvanized steel CD and UD profiles;
- arched profile;
- GKL thickness from 8 mm to 12 mm;
- reinforcing mesh;
- metal screws;
- dowels or anchor bolts;
- aluminum or plastic corners;
- starting and finishing putty;
- liquid primer;
- finishing material.
If the shelf is backlit, then the calculation and purchase of electrical wiring, lamps and switches is carried out.
Installation of a steel profile frame
The frame must withstand not only the weight of the finishing material, but also the weight of the objects that will stand on it. This must be taken into account when mounting it on the wall.
The frame for the shelf in the hall is installed in the following order:

Scheme of assembling the frame by installing a galvanized profile under plasterboard.
- Lines for placing load-bearing profiles are drawn on the wall (floor, ceiling).
- Load-bearing elements of the required length are measured and sawed off. Holes for fastening are drilled in them every 25-35 cm.
- The load-bearing profile is applied to the load-bearing and supporting surfaces, and places for dowels are marked.
- Holes are drilled into which dowels are inserted.
- The supporting profile is attached to the wall (floor, ceiling).
- The frame structure is assembled from the CD profile, side and T-shaped connectors. The parts are fastened to each other using special metal screws.
Upon completion of installation, the strength of the frame is checked by pressing on it from different sides. If the structure meets the strength requirements, then electrical wiring is installed inside it in a special protective box.
Frame covering

Diagram of the correct joining of drywall sheets.
In order not to make mistakes when preparing blanks from gypsum plasterboard, it is recommended to make a pattern for each of them. Newspapers, sheets of Whatman paper or wallpaper are suitable for this. Only after careful fitting can you apply the pattern to a sheet of finishing material and cut out the part.
You can do this using:
- sharp knife;
- hacksaws for wood or metal;
- jigsaw.
The finished fragment is placed on the frame and screwed to it with metal screws. Their caps need to be recessed into the surface by 1-2 mm. Curvilinear gypsum plasterboard fragments are wetted and, after achieving the required flexibility, attached to the profile. After drying, they can be processed.
Excess material protruding beyond the edges of the frame can be sanded off using a belt grinder. Finer sanding of the edges is done by hand with sandpaper.
Surface finishing
To ensure that the surface of the shelf is smooth and durable, it is finished.
It consists of the following:

Scheme for filling drywall joints.
- The entire surface is treated with a liquid primer.
- Holes from screw heads and joints between individual parts are sealed with starting putty.
- The edges and corners are covered with plastic or aluminum corners. A reinforcing mesh is glued over the joints between individual gypsum plasterboard fragments.
- Finishing putty is applied to the entire surface. Allow at least a day for it to dry completely.
- Grinding and polishing are carried out using fine-grained sandpaper.
- A liquid primer is applied to the treated surface.
The finishing touches are complete, you can move on to decoration.
Decoration of gypsum plasterboard structures
The hall will have a presentable appearance only if all the interior details look organic and fit together. To do this, the created shelf must be finished to match the surrounding environment.
This can be done using the following materials:
- oil, acrylic or water-based paint;
- wallpaper or colored paper;
- paintings;
- mirrors;
- tiles;
- mosaic;
- decorative plaster;
- stained glass;
- natural or artificial stone;
- applique.
The bottom of the niche should not be made darker than the wall on which it is placed; it is better to make it somewhat lighter.
A good visual result is achieved by illuminating a shelf on the wall. With the help of various types of lamps you can give the room a rather elegant look.
The wiring for the lamps is installed immediately after the frame is made. For its laying it is used plastic box or corrugated hose.
For illumination, spotlights and LED strips. To enhance the visual effect, you can use lighting devices of varying power and color range. This will make the wall even more beautiful.
With the help of this unique material, like drywall, you can create structures of absolutely any shape that your imagination is capable of.
Plasterboard shelves look stylish and unusual, and also accommodate a large number of things. You can even put electronics on additionally reinforced plasterboard shelves. To turn your plans into reality, you need to decide on the shape of the shelves and choose the material and tools. If you are not confident in your abilities, contact specialists who will tell you how to cut the shelves correctly.
You can make plasterboard shelves with your own hands. Before carrying out work, it is necessary to draw up a plan, accurately select the shape of the shelves, and carefully take all measurements. Prepare a diagram, calculate and purchase required amount plasterboard sheets, fasteners, wooden beams or metal profile for the frame.

Shelves made of plasterboard are universal, they can be created in any room:
- Bedroom;
- Living room;
- Children's;
- Bathroom;
- Kitchen.
The options for placing shelves are also different - you can install them on the wall or in a niche. The advantage of plasterboard shelves is the variety of shapes, imagination in in this case is not limited, you can create absolutely any pattern and bend.
You can make an interesting shelf design with your own hands, drywall - available material, so you won’t have any difficulties in creating an original interior.
Interior of a room with shelves on a plasterboard wall
Shelves can replace furniture, such as a cabinet or rack. At the same time, they are quite roomy; books, vases, even dishes and flower pots can be placed on them.

Plasterboard shelves save a lot of space and make the room more modern and original:
- Drywall allows you to realize the most daring design ideas; shelves can be used both as a decorative component of the room and as a functional element;
- Most often, shelves are created in rooms designed in modern style, plasterboard elements the interior will be complemented by a living room or bedroom in a minimalist or modern style;
- Drywall is an excellent material for a nursery; shelves made from this material can become the basis for the design of the room; they can be made around the perimeter of the room;
- Such shelves also look great in a library, because they allow lamps to be built into them, which is convenient for those who like to read;
- In the kitchen, plasterboard shelves can serve as a bar counter or table.
Plasterboard shelves are multifunctional, they can be created in any room - they will look creative and interesting.
How to make shelves from drywall
You can make plasterboard shelves with your own hands at home.
To do this you will need:
- Sharp knife or hacksaw;
- Wooden beams or metal profile;
- Fasteners;
- Drill;
- Corners made of plastic.

Remember that before carrying out work you must have a clear work plan and know what you want to get in the end. Execute necessary measurements, do everything without haste and very carefully.
The step-by-step sequence for creating shelves is as follows:
- Cut shelf parts from drywall using a sharp knife.
- Attach the figured shelves using arched profiles.
- Make a base from the profile, a profile 50 by 25 mm.
- Drill holes according to the size of the screws, hang the profile and attach the structure. Drywall parts for niches and shelves can be cut with a hacksaw or a sharp shoe knife.
- Curved shelves are made from thinner plasterboard, and they are secured using arched profiles. As a last resort, if there are none, you can bend ordinary profiles by making cuts along the entire length.
If you are making shelves from thick material for heavy things, then use special fasteners for drywall. These are butterfly screws; you can also additionally secure the structure with traverses or a frame.
If the shelf consists of several parts, it is best to cover it with a mounting mesh and secure the corners with plastic or aluminum elements so that the structure retains its aesthetic appearance longer.
Decorative plasterboard shelves: functions and advantages
Depending on the material chosen, shelves can be either very light or quite heavy and durable.

You can create shelves for storing:
- Books and stationery;
- Decorative items;
- Crockery;
- Toys;
- Electronics.
If you additionally secure the plasterboard shelves, you can get a really strong structure on which the TV or stereo system will firmly stand.
Drywall has several advantages:
- Availability;
- Environmental Safety;
- Ease of installation;
- It can also be painted with any paint.
But at the same time, drywall is a rather fragile material and is completely unstable to moisture. If you want to make shelves or niches in the bathroom, buy only moisture-resistant drywall.
How to fix a shelf to drywall
To attach a small and lightweight shelf to gypsum board sheets, you will have to use special dowels, which tend to open up and be fixed in the hollow base.

Suitable for these purposes:
- Dowel-umbrella;
- Butterfly dowel.
Take a close look at how much load a particular dowel can withstand and compare it with your shelf. Wall shelves it must be fixed into drywall using these dowels, as well as self-tapping screws, which should be slightly longer than the dowel itself. When screwing in a screw or self-tapping screw, the dowel head will open and take most of the load.
To hang shelves in drywall, you can use this sequence:
- Drill a hole in the wall of the required size;
- Install the dowel into the hole;
- Install the shelf mount onto the fastener;
- Hang a shelf.
If you have a heavy shelf, you won’t be able to attach it without a profile.
In this case, you need to use the following method:
- Drill holes in drywall;
- Insert a butterfly dowel or a dowel-drive, insert a self-tapping screw;
- Clamp the structure and screw in the dowel, but be careful not to destroy the wall.
Instead of such dowels you can use anchor bolts. The entire sequence of actions does not change, only bolts are inserted instead of screws and dowels.
Corner shelves made of plasterboard
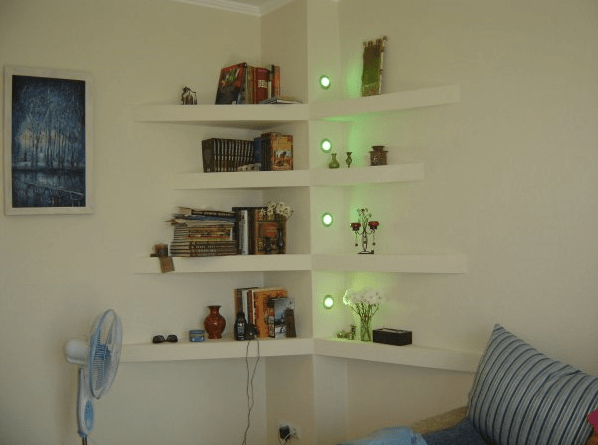
Corner shelves made of plasterboard look very stylish. These beautiful designs look great in the interior of modern living rooms and bedrooms. Built-in lights that can be inserted into corner shelves, will add comfort and warmth to any room.

Small corner shelves can often be found in small rooms, where every centimeter plays a huge role. The decoration in such rooms is light, there is a lot of light to further increase the space.
Small things are placed on the corner shelves:
- Watch;
- Books;
- Stuffed Toys;
- Small lamps;
- Vases and boxes.
Thus, corner shelves help save space, but at the same time hold quite a lot of things. This option of plasterboard shelves is best suited for a children's room, bedroom and living room. Some even create it in the bathroom to place soap, washcloths, various means body care. But remember that drywall is very sensitive to moisture - choose moisture-resistant materials.
How to find a profile under drywall
You need to look for a profile under drywall in certain situations.

Namely:
- When you need to hang a picture on the wall;
- Hang a mirror;
- Attach a wall-mounted TV;
- Attach the lamp to the wall;
- Nail the baseboards;
- Attach wall cabinets.
In any of the above situations, it is necessary to find a metal profile under the drywall. If you installed drywall using a frameless structure, then the problem of finding a profile disappears by itself. Otherwise you will have to look for a profile different ways, which depend on the material.
In the case of a metal profile, use a regular magnet. You can use it to find the profile if the sheets of drywall are thin enough. A large and powerful magnet is best. Tie a string around a magnet and slowly move it across the drywall; when you feel the magnet not moving, make a note.
If wood was used, you can find the beams by tapping (the sound will no longer be dull above the slats), also try driving a nail.
However, the latter method is less practical if the hole was made in wrong place, you will have to putty it. If you have a drawing of the room, study it and find wooden slats.
Assembling a plasterboard shelf (video)
In conclusion, it should be said that drywall is universal and modern material. Plasterboard shelves will fit into the interior of any room and will save a lot of space. Anyone can make them out of it, the main thing is to approach it responsibly. Draw up a drawing, select materials, take the necessary measurements and then you will definitely have beautiful and durable shelves that will serve you for a long time.
Examples of plasterboard shelves (photos in interiors)


Progress and innovations in the construction industry force the use of increasingly cheaper and safe materials, sometimes taking a completely unexpected approach. Let us recall, for example, the buildings of the 50s of the last century - solid wood panels, timber, boards, ceramic and silicate bricks reigned in the decoration of the rooms of a house or apartment. Since the 70s, chipboard, fiberboard, and alabaster blocks have appeared. Now the time has come for plasterboard sheets, metal profiles and all kinds of structures made from them. Why not try making your own plasterboard shelves.
As a material for homemade products, gypsum board is quite suitable for plasterboard shelves, despite its apparent fragility. Among its closest competitors - plywood, solid wood panels, particle boards and fiber boards - gypsum board sheets have lower specific strength and require increased accuracy in work.
But its main advantages are:
- The plasterboard sheet maintains an ideal surface plane and dimensional stability over a long service life;
- The price of gypsum plasterboard is significantly less than a sheet of plywood or OSB of equal area, not to mention solid wood;
- The material can be perfectly cut, drilled, puttied, painted, sanded, and at the same time is absolutely harmless to human health.
At the same time, working with the material, even in the case of simply making a plasterboard shelf with your own hands, requires the worker to think through the design in advance so that assembled form the shelf could withstand the planned load.
Important ! Techniques for processing drywall sheets are fundamentally different from processing wood or OSB. If you don’t have enough experience working with gypsum boards, rehearse any problematic operation using scraps or waste.
Which plasterboard shelf design should you prefer?
If you have certain skills, you can make more than just a shelf or stand from plasterboard. You can easily assemble the most intricate designs from it, as is easily demonstrated by the photo of do-it-yourself plasterboard shelves.

The main principle of constructing plasterboard shelves
In wooden or plastic products shelf material of the product usually provides decorative surface design and works as a solid foundation, absorbing all the loads from things or objects located on the shelf.
You can do the same with a plasterboard sheet, but the strength of a single sheet of plasterboard, even 18mm thick, may not be enough. In this case, the shelf is made of two sheets, and if the length of the product exceeds a meter, it is even possible to use plywood or wooden insert. For a small decorative shelf of 40-50cm for a vase or a dozen books, a single sheet of plasterboard 12-15mm thick can be used. The shelf must be secured along the entire line of contact between the sheet and the walls using self-tapping screws, but the appearance of such a shelf does not cause much enthusiasm due to the difficulties in processing the end edges.

Advice ! Even for small, cantilevered shelves, use the frame design of the product. This will ensure its strength under any form of loading.
The separation principle is always used in plasterboard structures:
- The drywall sheet only provides decorative functions, the gypsum board’s own strength is sufficient only to resist loads directed parallel to the plane of the sheet. All other forces must be transferred to the reinforcing system from wooden slats or metal profile.
- GCR is always attached to solid foundation frame using self-tapping screws or glue. Exactly frame construction will ensure the lightness and strength of the product - shelf, cabinet or wall.
This makes working with drywall much easier. The metal profile itself for the shelf frame is made of thin-sheet galvanized metal, easily cut with metal scissors, and bends and bends in the most intricate ways.
Options for plasterboard shelves

Thanks to the wide range of reinforcing profiles, you can quite simply select and assemble the shelf frame on your own:
- corner shelf made of plasterboard, several options are possible, combined into one small project;
- Very practical shelf from plasterboard for a TV.

Among the many options, you should choose a scheme with a minimum number of joints and connections.
Important ! When working with drywall, a layer of fine alabaster dust is formed, even with certain guarantees of the safety of the material, try to remove waste and calcium sulfate shavings more often with a vacuum cleaner or a damp sponge.
The sequence of making shelves with your own hands
Most often the house remains empty corner areas premises, therefore, to give a more sophisticated look or for utilitarian reasons, you can always make several shelves on the wall from plasterboard with your own hands.
For work we use a sheet of plasterboard, a 25x50 metal profile, putty for sealing seams and gypsum-metal fastening screws.
Unlike wood or metal, where the product is manufactured separately and then hung on the wall, when using plasterboard, the shelf structure is formed as a single unit, with supports, a supporting frame and wall mounting.
Determining dimensions and connecting points
On the wall, draw with a pencil the attachment points, the length of the load-bearing surface of the shelves and the connection points of the frame elements. After that, fragments of wall mounting are cut out of the profile and secured according to the markings with self-tapping screws.
Installation of vertical racks
Next they are “sewn on” vertical racks profiles along the edges of the shelves. By using building level and the plumb line are carefully aligned horizontally and vertically external elements frame of each shelf. We sew up the vertical support post on both sides with sheets of plasterboard, cut to the size of the opening with a small allowance for processing of 1-2mm.

Installation of drywall sheets
Along the leveled horizons of the shelves, we cut out the remaining sections of the frame and secure them in the structure. We sew up the planes of the shelves with sheets of plasterboard, first the lower horizontal surface, then the upper.
Advice! Sheets of plasterboard for the upper surface of the shelf can be cut a couple of centimeters larger, this will allow you to additionally decorate the end surface of the shelf using the ceiling plinth.
After sticking the decor, carefully putty all the cracks and joints in the structure, and after drying, sand the surface for painting with water-based paint.

This method is universal and makes it easy to produce the most simple shelves from plasterboard in the bathroom.

After some practice, a complex but attractive version of a plasterboard shelf in the bedroom is quite possible.
Features of constructing a frame for the load-bearing structure of the shelf
As you can see above, working with drywall does not present any particular difficulties for neat and thoughtful people. The construction of even the most complex shelves or cabinets is more reminiscent of the “Lego principle”, and even a novice master can do it. But for professional work With shelves or partitions, there are a few things to consider.

Drywall sheets cut into thin strips are prone to breaking even under light load. Therefore, when starting any dizzying project, avoid using thin and long strips of material to cover the frame. For example, a piece of gypsum board with an aspect ratio of 1:5 or more is almost guaranteed to burst either when fastening it to the frame, or under load, after all the work is completed.
The thickness of the frame elements is commensurate with the overall dimensions of the structure. An example is a very competent construction of the size of the windows and the thickness of the racks of a plasterboard shelf for a TV. Thanks to optimal thickness vertical and horizontal partitions, this design is highly stable and will withstand significant loads.

The most difficult option, from the point of view of fastening, can be considered the installation of a single shelf on the wall without the use of additional support posts. Often, to ensure the longitudinal and vertical stability of the shelves, additional side canopies are installed. If you show some imagination, they will not only not spoil the appearance of the shelf, but will also give it a more attractive look.

As a rule, plasterboard construction is heavier than wood board or plastic, so to hang it on the wall you should use maximum amount attachment points. If you need to fix the shelf on a wall lined with plasterboard, use a special fastener.

Home » Wall design
Drywall is a modern building material, consisting of two sheets of cardboard 120 mm wide, glued together with a special gypsum dough. Intended for finishing walls, erecting arches, slides, niches, etc.
Wall finishing with plasterboard Lately became very popular because the material is publicly available, relatively cheap and easy to use. Wall cladding, creating cabinets and many many other uses for drywall can be cited.
Interesting! Drywall was invented in America in the 19th century. In the USSR it has been used since the 50s of the 20th century.

Wall finishing with plasterboard
To finish or level walls for painting, pasting or plastering, plasterboard sheets are used, which easily fit together and make the wall perfectly flat.
Also, using sheets of plasterboard, you can delimit the space of the room using decorative or additional partitions. The advantages of plasterboard partitions also lie in the fact that you can make various cutouts, waves and arches in them.


Drywall arches
Arches - are semicircular cutouts intended for decoration. doorways or entrances to the living room, hall, etc. The arch can be blank or adjacent to the wall. They can be decorated with lighting and additionally painted.


Plasterboard niches
Niches made of plasterboard can easily replace a bedside table for a TV, help build a slide in a room, a wardrobe in a hallway without special costs. The niches are painted the same color as the wall on which it is made.


Plasterboard cabinets
Using drywall, you can create structures to place various things on them. Plasterboard cabinets can be equipped with additional lighting and create an original room design.
Designing plasterboard walls is a fascinating and interesting thing. Use it to create captivating images of a room.


Today, plasterboard can be used to make not only beautiful ceiling, but also exclusive inexpensive furniture.
For example, a wardrobe beautiful shelves for books and souvenirs, flower stands.
Plasterboard furniture
How to make shelves from plasterboard?
Anyone can design plasterboard furniture with their own hands. You don't have to be for this professional craftsman, but it is enough to have minimal skills repair work and handling construction tools.
If you are planning a regular decorative shelf for family photos or dried flowers, it will be enough to assemble a lightweight frame and cover it with plasterboard in one layer.
For more complex furniture: bookshelves, stands for house plants, and even more so for heavy plasma panels or an aquarium, increased structural strength will be required. In this case, the frame needs to be strengthened with additional profiles and sheathed with plasterboard in two layers, and sometimes the standard profile should be completely replaced with special welded brackets, consisting of reinforced reinforcement, a rolled angle, a channel, a single- or I-beam.
In order for the internal and external corners of plasterboard shelves to be perfectly even, they should be reinforced with special thin steel profile and then paste on top plaster mesh and make amends for her thin layer putties.
If you decide to make corner shelves from plasterboard in the kitchen, be sure to use moisture-resistant sheets.
In the process of designing furniture, you can avoid the “drum effect” - a booming sound that hollow structures will emit under mechanical stress - by filling the internal cavity with sound-insulating insulation or mineral wool.
This is especially necessary when the shelf serves as an interior partition or is mounted on the wall behind which people live noisy neighbors. If more powerful sound insulation is required, we recommend filling the cavities cement mortar- in this case, the plasterboard sheet will turn into permanent formwork.
Various plasterboard shelves are shown in the photo above.
To save money, you can cover only the vertical walls of the rack with plasterboard, and make the shelves from thick waterproof plywood or impact-resistant mirror glass.
Plasterboard cabinet
The most popular type of plasterboard furniture is a built-in wardrobe, which many people want to build in their hallway (see.
on the picture). At the first stage, we do not level the walls and ceiling in the closet area, but immediately make a frame and line it with plasterboard. The depth of the cabinet being built is selected depending on how you want to place the clothes - on hooks, hangers or a rod. The size and number of shelves are limited only by the height and width of the hallway. In cases where the length of the shelves exceeds 1 meter, the frame must be made with a margin of strength and not bend under load.
You can additionally decorate a plasterboard cabinet using original spotlights, placing them along the perimeter of long shelves.
Sofa made of plasterboard
If you wish, you can build very unusual furniture from plasterboard, for example a small sofa - of course, not huge, but on which you can sleep.
Sometimes, when creating an interior, there is a feeling of a “hole” between furniture elements or a feeling of emptiness - in this case, a decorative sofa will come in handy. And when decorating a studio apartment for owners who often receive guests in large quantities, a miniature plasterboard sofa will look great as a separator for the dance floor and cinema area.
DIY Plasterboard shelves (PHOTO)
If somehow the old-fashioned one falls bookshelf with glass door and twelve identical shelves, you can go an alternative way - that the fantastic flight is not specifically limited to drywalls according to their models.
These bookshelves are made from plasterboard (see photo).
photo below), drywall shelves or under the trolley under your favorite GCR belt if the load calculation is correct, as the shelf will be a reliable and functional level that complements the internal elements.
Shelves made of plasterboard (PHOTO)

Photo 1 - Corner plates made of gypsum boards - good way organize a real dead space, making it functional or decorative

Photo 2 - Plasterboard wall panels can be of any size and shape.
For the opportunity to experiment with forms of construction, this material is rated

Photo 3 - Functional drywall design in the living room

Photo 4 - Semicircular structures of this type of plaster boards will be located inside the kitchen next to the living room

Photo 5 - There is no need to fix the drywall in the bedroom above the couch, as in any other room in the apartment, on the wall.
Walls within a wall made in a row of niches seem much more interesting
How to make plasterboard shelves yourself: step-by-step instructions
The following materials and tools will be needed for construction wall panels from plasterboard.
materials:
- galvanized profile 50×25 mm;
- curved profile profile (if curved structures are made, for example, on arches made of gypsum slabs with shelves or curved shelves);
- guide rails;
- Self-tapping screws and dowel spacer;
- drywall;
- primiranje;
- reinforcing mesh for treating joints (special paper tape or serzhanka).
tools:
- screwdriver;
- electric cutters;
- Bulgarian;
- rake level;
- roulette;
- plumb bob;
- pencil;
- hammer;
- pliers;
- saw;
- putty knife;
- brush;
- sandpaper.

Photo 6 - Another shelf of dry walls in the corner
Installation of gypsum boards
Draw a shelf.
First, you need a sketch of how the shelf should be installed.
Shelves for dry floors: 20 photos
Under the sketch, take the necessary measurements and mark the intended location for attaching the shelf to the wall.
Frame made of plasterboard.
There are several mounting options. Firstly, installing a shelf while installing gypsum boards, and secondly, installing a gypsum board shelf on an already made wall.
In the first case, you will get shelves that are built into the body (for example, niches), and the other - projection decorative or functional surfaces.
The base of the shelf is a frame made of a metal profile measuring 50 x 25 mm.
Mark the wall level.

Photo 7 - Fields and gypsum boards in the nursery
Use a screwdriver and self-tapping screws to secure the metal frame to the wall.
The fixation step must be at least 250 mm.
What profiles are best to use when building drywall structures, which we wrote in one of the previous articles. Most of the information you are interested in on this topic can be gleaned from it.
Assuming you have good shelving is not the main criterion: you are interested in a durable structure that can carry important weight (for example, a home library or television).
If the shelf is designed for high loads, you need:
- Instead of standard 9.5 to 12.5 mm thick plasterboard, only thick gypsum boards (18 mm thick or more) and other fasteners (such as butterfly screws) should be used, since securing the shelf with conventional screws has not been possible;
- the profile on the wall is fixed in more frequent increments;
- When installing, use a gateway and frames that reinforce the structure several times.
After determining the profile, the installation of conductors begins, which create the volume of the structure frame.
They have transverse and longitudinal rails. To strengthen the structure, the guides must be attached to the ceiling or floor, as well as to the jumper between the profile and the guides.
For clarity, look at the work as an example of how to attach a shelf to the ceiling under hidden lighting. Arranging the same 60 centimeters below for flowers on a window in the hall or on a shoe stand in the hallway will not be a problem.
The only difference is that the second version of the shelf will not have ceiling mounting elements.
Hang the frame:

Scheme 1 - prefabricated profiles on the wall and ceiling, joint connections together
Cover the frame with plasterboard:

Scheme 2 - It is better to start laying by fixing the vertical part

Scheme 3 - Fixing a horizontal sheet

Pattern 4 - Completing the Tile
We install lighting on the shelf:

Diagram 5 - Installation of LED strip and reflector

Chart 6 - Check your calculations
Corner shelves are fixed in the same way as longitudinal ones.
IMPORTANT!
To secure the shelf design to the wall, you need to install two main profiles. In this case, the shelf will become thicker, but stronger.
Lining carcasses with drywall.
Plasterboard sheets are attached to the frame with a higher loading speed; most often it is necessary to attach the sheets to the profile.
If your job is to hang gypsum boards in the bathroom, only use a waterproof dry sieve, that is. GKLV (this type of gypsum board is green).
IMPORTANT! When covering the frame with plasterboard, remember: metal joints must be installed in the middle of the profiles.
The seams of gypsum boards must be covered with serpentine and masked after installation.
IMPORTANT! If a shelf or partition with lighting is planned, electrical installation begins on the frame before the drywall begins.
Before installation on the frame, holes are drilled for fastening the elements to the plaster.
Drywall can be attached as a separate piece or hung in continuous panels that can be cut away with a knife.
If you can see with dry walls, what kind of shelves should be hung on drywall walls?
How to hang a shelf on drywall?
First, even at the level of the wall coverings, it is necessary to determine the location of the articulated structures and in the places that they intend to be fixed to strengthen the frame:
- place an additional sheet of dry wall between the wall and the sheet of finished leather if the installation is on a metal frame;
- cover the dry film with glue over the entire plane of the sheet, and not to the right if the installation is carried out without a frame on glue.
If this is not the case, the shelves should be attached to special zippers - “butterflies” (the picture below shows a clear attachment).
Butterfly devices can withstand loads of up to 5 kg. Mounting guides can be used to attach heavier structures (up to 15 kg load).

Figure 1 - “Butterfly of fasteners”
Can I exceed the permitted maximum load?
If the load on the shelf attached to the drywall exceeds permissible limits, creating more reliable protection floor or ceiling using cables, transfer most of the load from the wall to another surface.
Drywall shelves: price
- in Moscow - from 230 rubles / m²;
- in Kyiv - from 55 UAH / m².
DIY drywall shelves - photo

How to make plasterboard shelves
- You'll need it
- Instructions for making a DIY drywall shelf
- An example of how to build a plasterboard shelf with lighting
- Corner boards made of plasterboard - video
- Tips for making a drywall shelf
We've looked at a lot of plasterboards, but haven't figured out how to do it?
Famous people told us how to make gypsum boards with their own hands. Study the material and remember to put your knowledge into practice.
You'll need it
- Profile 50x25 mm (if the shelves are semicircular, curved - in a word, with a turn - then a different locus profile is required)
- Guides
- Self-tapping screws and dowels with spacer
- drywall
- example
- Reinforcing mesh or colored tape to cover joints
- Metal corner for strengthening the edges of the shelf
- Screwdriver or drill
- Straight and water lines
- Pencil and tape recorder
- colored knife
- sandpaper
- Scissors for cutting metal profiles
Instructions for making a drywall shelf
- Draw paper on paper.
Choose a place for this. Consider the dimensions of the shelf.
- Mark the place where the regiment will be. To read accurately, use water lines for vertical lines and level for horizontal lines.
- Create frames for frames.
To do this, attach metal profiles to the labels. Drill holes in increments of at least 25 cm, tilt it in Right place and wrap a pencil around the hole to see where you want to drill holes in the wall. Drill drill bits into the wall and insert dowels. Attach the shelves and secure them with screws.
If the TV shelf is made from dry walls, we recommend:
- buy drywall with minimum thickness 18 mm
- use butterfly or other strong fasteners instead of screws
- reduce the distance between holes
- strengthen the structure, use meadows and frames
After securing the profile, attach the transverse and longitudinal guide (guide).
If you want the shelves to be secure, attach them to the ceiling or floor. Insert a jumper between the guides and the profile.
If you are emphasizing, then fix the wires in place until the frame is indicated.
- The frame is covered with plasterboard. The more elaborate your shelves are, the smaller the pitch between the screws that secure the panels from the dry walls to the shelf.
The sheets should be in the middle of the profiles.
- The measures then depend on the type of final material you will be using.
- If the shelf is under the TV, it is better to paint it. Insert colored tape at the joints and caulk them. After applying the whale to the entire surface, after drying, spray it on smooth surface. After boiling and dyeing.
- If you make shelves in the hall, you can insert them both.
The preparatory work is the same as in the example described above.
- If you're making shelves in the bathroom, paint or tile them. In the second case, do not putty, just pound and lay the tiles.
If you plan to lighten it, then before installing the drywall shelf, keep all wires in correct position. If reflectors are used, holes for them are cut in the drywall before installation on the frame.
An example of how to build a plasterboard shelf with lighting
Corner boards made of plasterboard - video
Gypsum corner plates are made in the same way as described above.
But there were no questions, watch the video.
- If you are making shelves in the bathroom, use stable sheets.
- To make the structure very durable, install two main profiles.
But don't forget - in this case, hell will become thicker.
- If you are sure that the household will often wipe the corners of the shelf, then install metal corners before puttingty.
If you read the article “How to make a wardrobe from plasterboard with my own hands”, then you will notice that the drywall shelves are made according to the same principle. This is good. Because if you have already made a drywall cabinet, creating a shelf will not be much for you. That's all.

