If the furniture that needs updating does not have great artistic value and its dimensions are small, then with some skills you can carry out the restoration yourself.
To do this, it is not necessary to have a large suitable premises- workshop, garage, country house. What tools and materials you will need can be understood from the description of the process.

Actually, the process of self-restoration itself includes at least 6 main stages: disassembling the product, removing the old paintwork, eliminating defects, sanding, painting, assembly.
Most likely, you will not be able to completely disassemble the item. You can only disassemble what is nailed with small nails, screwed with screws, and fastened with screws, and in cases where the adhesive joints are loose, these parts can be separated.
Now we begin to remove the old varnish or paint. As a rule, chemicals sold in stores intended for such operations do not work. Therefore, it is better to use a proven, and not so bad-smelling (unlike the above-mentioned) product - acetone.
So that it does not evaporate so much, it can be diluted by a quarter with turpentine. If the part intended for processing has small sizes, then it can be placed in a suitable container and filled at least half with acetone. After a few hours, the old coating will soften and can be removed with a rough brush or broom.

For larger parts, use the following method. The part is wrapped in rags, placed on a pallet, watered with acetone and the whole thing is placed in plastic bag or carefully cover with film.
It happens that a part is so large (for example, a chest of drawers that cannot be disassembled) that this method is not suitable for them. In this case, we do this: take a large rag, fold it in 2-3 layers (in this case, its dimensions should exceed the dimensions of the surface being treated) and dip it in a container with acetone. Then, after squeezing it slightly, we place it on a horizontally located surface to be treated (it is clear that if this is, for example, the side of a chest of drawers, then the chest of drawers should be placed on the floor with the opposite side).
Immediately cover the rag with film. After 20-30 minutes, remove this “blanket” and scrape off the exfoliated varnish with a spatula or the smooth edge of a piece of plywood. As a rule, it will not be possible to remove everything the first time, so we repeat the operation until an acceptable result is achieved.
.
Small islands of non-flaking varnish can be removed using a scraper or sanding paper. We process all sides of our product in the same way.
After this operation, restore the adhesive joints if, when disassembling the furniture, you had to separate poorly glued parts. It is best to use PVA glue for this.
The next operation is grinding. Either belt sanders or round sanders are used for it. grinding attachments for drill.
You can simply wrap a piece of wood sanding paper and sand by hand. They start sanding with coarse-grain paper, then moving on to fine-grain paper.

After sanding, thoroughly clean the parts from dust so that all the defects that you have to putty are visible. If you intend to paint your work clear varnish, then the putty must be of a suitable color.
You can putty with a spatula or a short metal ruler. After drying, the putty areas are treated first with medium and then fine sandpaper.
Now you need to decide whether to leave the color of the product natural, or stain it, i.e. painting wood with dyes. It is best to give the product the color it had before the repair. The easiest way to dye is with aniline dyes or ready-made stains, which can be bought at household chemical stores.
Having prepared the solution desired color, with a brush or swab, paint all the parts evenly. After the surface has dried, they must be carefully sanded with the finest used sandpaper to remove any raised lint.
Now our product is ready for painting. Naturally, it should be done in a warm, well-ventilated room, in which you did not forget to do wet cleaning.
You can paint with a brush, swab, but it is best to use a paint sprayer - electric or pneumatic. If you don’t have them, you can rent them from tool stores or ask friends. The paint coating is usually applied in 2 layers. But, if it is a nitro varnish, then to get a decent result you need to cover it in 4-6 layers.
After the paint coating has dried, we assemble the product and present it to the public at home.

If you once repainted your old table or repaired a chair leg, this does not mean that you are a restorer. Before deciding to take the path of restoring old furniture with your own hands, you need to thoroughly assess the prospects for further work.So, step one is under the experienced eye of a restorer. Every self-respecting connoisseur of antiquity will always be interested in the question of who brought this miracle into the world. Therefore, after we bring home some old junk, it should be thoroughly inspected. Not only to assess the condition of the item and outline the scope of upcoming work, but to try to determine the manufacturer. For all restorers - famous name manufacturer is very valuable. And it’s not just about the cost of the restored item, but also about the honor and pride of touching history and real craftsmanship. Therefore, if you find any identification mark on furniture, be sure to find out what kind of company it is. Perhaps you got lucky and stumbled upon a real masterpiece. But if you accidentally remove an identification mark, you will significantly reduce the value of this work.
No money! Start earning money right now without initial capital. Here they buy up your intellectual property and copyright at a very high price. Write any one yourself unique text on any topic and put it up for free sale. Go through a quick absolutely free registration on the largest exchange for selling texts “Textsale” and start earning money right from this minute! Register using the banners on this page and immediately start a high-paying job:
Non-lazy users of the Textsale exchange earn on average up to 30,000 rubles per month, without leaving home. average cost for 1000 letters of text (this is less than half a standard A4 page) – 1 US dollar. You can set a price or more at your discretion. Spit on your boring main job and start receiving money today, without leaving your favorite couch! Or make yourself some extra income in your free time. This is not a scam, but a real opportunity to make good money without entry fees. As much as I wrote, I received as much. This is a reliable exchange founded over 10 years ago and has a solid reputation. Rejoice - you have received a new job and a prestigious creative position!
Now the second step is cleaning the surface. It must be done with special care. Perhaps in the process of restoring old furniture with your own hands, under an old layer of dirt you will find a perfectly preserved finish that can be easily restored. We begin cleaning with soap procedures. We take plant-based soap, a sponge, warm water and wash our furniture. Often old furniture is decorated with all sorts of carved scrolls. In order to reach the most inaccessible corners, we use a soft brush (or a toothbrush). A toothpick will help to clean the narrowest crevices. If you decide to clean the surface with sandpaper, take a sandpaper and do everything very carefully: strong pressure will only dull the finish.
.
Step three is replacing broken parts. This part of the work sometimes lasts for long hours of selecting missing parts. You can, of course, stumble upon the right arm or leg at a flea market, but this is very rare. Most often, such things have to be made to order. Having received the required part, you still need to install it. If you are not confident in your abilities, ask someone from your family for help. They always make restoring old furniture with my own hands easier for me. Sometimes it’s enough just to tighten the bolts or screws and the wobbly furniture will come back to order. And if they are rusty, they should be replaced.
So restoring old furniture is not always that difficult. Tiny cracks can be sealed, larger cracks can be puttied. After all preparatory classes, you can begin cosmetic work on restoring old furniture with your own hands.
First of all, assess the amount of work to be done - determine what condition your furniture is in and
what needs to be done. Find out if there are any serious damages or if parts of the furniture need complete replacement.

Materials for repair
Having determined the condition of the furniture and the scope of repair work, find out what varnish the furniture was originally coated with, what wood it was made from, what the properties of the wood are, and also what technique was used in the manufacture of the furniture. Find out if the wood and varnish you need is available for sale. Depending on the type of polishing, choose a cleaning method that will achieve maximum efficiency with minimal damage to furniture.
Cleaning
Before proceeding directly with the restoration, thoroughly clean the product. Movements must be precise. You will need soft cotton napkins, paper towels, a soft brush and Toothbrush, toothpicks, a wooden dowel (the size of a pencil) and sandpaper of various grits. Be patient and go around all the nooks and crannies - these are where the most dust and dirt collects.
· Gold plating is usually water soluble, so areas with gold plating tend to accumulate the most dirt and dust.
· To clean dust from furniture, use a soft cotton cloth.
· IN hard to reach places use a soft brush or toothbrush.
· Do not use feather brushes, they will scratch the surface of the furniture.
· To remove wax stains, oil stains, use gasoline, alcohol or paint and varnish thinner. Dip a cotton ball into the solvent and use it on the back of the product to make sure it is harmless..
· Determine what exactly needs to be restored - what needs to be restored to give the furniture its original appearance. Carry out structural and redecorating, try to do this with caution and stick to your chosen technology. If necessary, seek advice from a professional furniture maker. The entire process includes repairs, replacing parts that cannot be repaired, replacing springs, gluing decorative parts, reupholstering soft parts, and updating varnish. You may have to resort to a complete structural reconstruction of one or another part of the furniture or the product as a whole.
· Remove stains, discoloration, scratches. You can easily find the tools you need in your kitchen or garage. You will have to remove all stains, traces of hot dishes, paint, water, stuck pieces of paper, wax, chewing gum and other visible defects on the surface of the furniture.
· Remove stains from furniture with a soft cotton cloth lightly moistened with denatured alcohol; if they cannot be removed, use a homemade abrasive. Mix tobacco ash with a few drops vegetable oil, for example, flax. Rub this paste into the stain, let the mixture soak in a little, and then rub it with a soft cloth.
Repeat this procedure until the stain disappears completely, and if it still proves ineffective, mix lime powder with linseed oil and try to remove the stain with this mixture. Go slowly, without undue pressure. After this procedure, rub the surface with wax or polish. In some cases, two coats of coating may be required.
· Remove pinkish stains that usually appear on old varnished furniture. The technique for removing these defects is the same as for removing other stains.
· Get rid of dark stains caused by water seeping into wood. This process may result in partial damage to the polish. However, re-applying varnish can be avoided. After removing dark spots, etch the entire surface of the product with a solution of oxalic acid. After this, the surface can be painted or varnished.
· To remove build-up of wax or stuck chewing gum, rub the area with a piece of ice wrapped in a cotton napkin and, once hardened, scrape it off the surface with your thumbnail. This will avoid unnecessary scratches. Polish the area with a suitable product.
Steegle.com - Google Sites Tweet Button
The final appearance of the furniture depends to a large extent on how thorough the restoration was. If during further use you follow our care tips, your furniture will regain its former charm, will serve you for a long time and bring joy to you and those around you.
There are many apartments and private houses where furniture made from chipboard gradually takes on a non-marketable appearance. To put a closet, chest of drawers or table in order, it is not at all necessary to turn to specialists or change things to new ones if they are familiar and comfortable for the owners of the home.
High-quality restoration of furniture is a labor-intensive and slow process.
Old furniture can be restored using available materials in the house. Additional materials and tools can be purchased at any hardware store.

If the need arises, you can contact specialists, or you can study all the intricacies and do it yourself.
Restoring the appearance of chipboard objects is a low-cost process. In addition, it has a number of undeniable advantages:
- no need to take a cabinet or table to the workshop;
- all tools are usually at hand;
- You yourself monitor the progress of work and make adjustments if necessary.

During restoration, you do not use the help of expensive specialists; you can estimate the costs and labor yourself. The process develops everyday ingenuity, and sometimes unites fathers and children if you involve the latter in joint work.
Restoration methods
It is important to understand what material you are dealing with. A compressed wood-resin mixture is the basis of the slab. The easiest way to recover fresh look Chipboard - high-quality painting.

Natural crushed material is mixed with synthetic resins and hot-pressed.
Restoring chipboard furniture by tinting, varnishing and decorating allows you to update the facade and internal surfaces of the piece of furniture. In this form it will last for a very long time. The main materials for restoration are paint, varnish, sandpaper.

Chipboard (chipboard) is made from coniferous shavings and hardwood trees.
The second method, which is not too time-consuming, is using adhesive film in natural tones. It does not require glue - its base is quite durable, the film sets and smoothes over the surface very well.
Materials and tools needed for work
When working, you will need different materials. In order to disassemble old furniture, you will need a screwdriver. Glue is needed only if the surface was previously coated and it came off. Sandpaper and a spatula are needed to clean the surface from uneven surfaces.

The slab produced in this way is resistant to aggressive environmental influences and has excellent noise and heat insulation properties.
Updating the color will require:
- aerosols with paint;
- hairdryer;
- tassels;
- rubber gloves.

Before starting restoration, degrease the slab using detergent.
Sometimes putties for wooden surfaces are used, since solid wood can dry out - for further work you need to seal small cracks and crevices.

Such restoration of furniture will allow you to get rid of minor scratches and change the boring shade.
Using varnish as a final coating, you can achieve a more impressive look for the item being restored, so its use will not be superfluous.
Materials may vary depending on the scope of work, vision of the final result and method of restoration.

If there are significant defects on the surface, it is better to choose a different method.
If inserts from fabric, wallpaper, decoupage napkins, film are expected, then scissors are needed.
To quickly dry painted surfaces you will need powerful hair dryer– it’s better to use a construction one.

Chipboard is a specific material, and it must be painted using a special technique.
Restoration process: step-by-step instructions
Take help from members of your household if they have the skills to carry out restoration work. Maybe they’ll tell you how to quickly restore chipboard with your own hands.
Prepare your tools and necessary materials– everything should be within walking distance. Since the process is labor-intensive, it is better to carry out the work on a weekend.

Before starting work, you should disassemble the furniture.
Painting
Step 1: Carefully disassemble the furniture using a screwdriver .
Step 2. Degrease the surface. Clean out uneven areas and rough spots sandpaper and a spatula. If necessary, fill cracks and cavities. Let the boards dry.
Step 3. Apply tint (prefer acrylic paint) evenly to the surface of the elements using an aerosol. If necessary - in 2-3 layers, taking breaks for them to dry.
Step 4: Apply polish and let it dry. Secure it by applying another coat.
The paint will lie evenly if there are no drafts in the room while it is drying.
If you decide to use another method - gluing film, then the materials used are quite inexpensive. No glue is used for this work - back side the film is sticky.

It is necessary to paint each element separately, this will allow you to more carefully work out all the joints and avoid the formation of drips.

After drying, all facades should be wiped with a weak solution of vinegar. This treatment will remove a thin film of grease that will interfere with the adhesion of the slab and the self-adhesive film.
Step 1. See paragraphs. 1-2 painting instructions.
Step 2. Accurately measure the amount of film. It is better to make a small allowance, as the axes may be uneven. Then you can remove it by carefully cutting it with a stationery knife.
Step 3. Level the pasted area with force so that there are no air bubbles.
It is better to choose a film in a natural color - shades of wood, light or dark, depending on which one you like best. The advantage of the film is that it can be washed repeatedly - a high-quality coating does not lose color and does not form streaks.

If the furniture has been previously painted, you can remove the paint using special solvents or sandpaper. It will be more difficult to dismantle the coating if the facades are covered
Finishing the product – decoration
Old furniture can not only be renewed, but also decorated, giving it original look. As unusual elements design uses drawings or ornaments. To apply the print evenly, use a stencil cut from thick paper or a file folder. You need to apply the paint very carefully so as not to splash the areas around the ornament. It is better to place it around the perimeter.

In order for furniture restoration to meet expectations, the coating must be applied carefully, avoiding the formation of gaps and smudges.
A large, subtle design looks good in large central areas or at the bottom. From above it will “weight” visual space. You can also use a combination of contrasting colorful elements - plain sides and decoupage parts with floral or thematic designs.

The DIY furniture restoration is almost complete, all that remains is to bring the new coating to perfection.
You can also decorate chipboard with your own hands using applications made from self-adhesive film or fabric.

If a defect is discovered after drying, the problem area must be processed again with sandpaper and covered with an additional layer of paint.
Carved elements must be introduced into the overall design with caution - the slab is very fragile. When carving, you must use a sharp chisel and sandpaper to clean out the grooves. We recommend that you first make a sketch of the future ornament - this way you can evaluate the aesthetics of the future decor.

Often, a good-quality and reliable table is sent into exile to the country only because its design is hopelessly outdated.
Using wallpaper or patterned fabric you can further freshen up painted furniture. Such inserts look interesting on the facades of tables, cabinets and chests of drawers. In this case, you will need glue. You need to choose a fabric that is waterproof; thin fabric will quickly become soaked and will look sloppy. This method is suitable for updating furnishings in country houses, apartment kitchens, bedrooms and children's rooms.

But any furniture can be given a second chance, just modernize its appearance, and external restoration will help with this.
These materials can also be used to decorate internal surfaces – walls and shelves. It does not require much effort, and the result often exceeds expectations.
Using decorative elements to decorate large items, do not miss the opportunity to add the same stylish note to the rest of the decor. For example, you can enhance the harmony of colors by upholstering the seats of old chairs with the same fabric that was used to decorate a cabinet or table.

The main thing is to purchase high-quality materials and carefully study step by step diagram work and follow all recommendations.
To finish objects made of chipboard, napkins are often used. victorian style or Provence style. Pastoral elements perfectly refresh the interior, making it light and bright.
Decoration is also carried out through the use of certain paints - gold, silver, copper. They make furniture more sophisticated. They can be complemented by an impressive-looking craquelure. For this you will need a special varnish. This method is perfect for classic interiors, where there is a lot of vintage furniture of unusual shape.

The easiest way to update a cabinet or desk is to simply repaint it.
Small mosaic inserts made of colored glass or plastic, glued to the facade, will give the closet or bedside table a new look.

The main thing is to know what material to use and how exactly, and then the restoration of furniture with your own hands will be completed quickly and with an excellent result.
Coffee tables look unusual with a “kaleidoscope” of newspaper clippings. To add immobility, glue them to the tabletop. Arrange them asymmetrically, but while maintaining overall compositional harmony. Then cover with glass or seal with two coats of clear varnish.
Replacing the fittings can also add a new note to the appearance of the furniture. Instead of simple pens choose bronze or silver ones with relief shapes. Or paint them a different color.

After all, what could be more pleasant than updating and decorating your home without significant expenses.
If the furniture has legs, you can use twine for them, securing it with glue.
An old mirror can be used as an insert in one of the cabinet doors. An oval shape will look better.

But it is not at all necessary to change your favorite table or cabinet; furniture restoration will help, and you can do it yourself.
The decor should not be too colorful or garishly contrasting. Colors should be harmoniously selected and not irritate with excessive eclecticism.
You need to figure out how to decorate furniture that has lost its former appearance in advance. There are a great many ideas, so anyone can make an unpresentable cabinet or table look advantageous and stylish, even at home.

When selecting the right materials and studying master classes, the updated table or cabinet will delight you with its appearance for many years to come.
VIDEO: Restoration and decoration of an old Soviet-era kitchen cabinet
Owners of antique furniture evoke sincere envy among lovers of rarities.
Unfortunately, not all lucky people are able to realize the value of old furniture, cabinets, sofas, chests of drawers, dressing tables and other items that seem to have outlived their usefulness.
The advantage is that in the old days there were no such technologies and materials that today make it possible to quickly and cheaply build any element or an entire set.
The furniture was made from valuable wood, covered with varnishes and drying oils from natural ingredients, and used for fittings. forged elements. Modern materials- plastic, MDF, fiberboard and chipboard do not require special skill.
They are easy and accessible to process, and restoring furniture at home with your own hands should not be a problem.
However, products made from them do not have the same energy, do not give a feeling of warmth and comfort, like those made many years ago by a master by hand, using basic tools or machines.
That's why you shouldn't rush to part with antique furniture, even if it is not the ultimate dream of collectors.
Preparatory stage
Before you begin restoring furniture at home, it is important to correctly assess the scale of the work ahead.
First you need to determine which defects you will have to deal with. There are several types of furniture damage that you can restore yourself:
- Scratches and abrasions;
- Deep mechanical damage- chips, cracks;
- spots;
- Damage caused by insects;
- Missing or worn-out fittings;
- Broken parts.
Once the extent of the damage has been determined, the restoration process can begin. First you need to clean the surface of dirt and, if necessary, rinse it warm water and detergents, dry.
Removing scuffs and scratches
There are many ways to remove scratches on furniture, both professional and popular.
IN furniture stores, selling fittings and spare parts, sells a special touch.
It is accessible and easy to use: just shake it well, then apply it with a brush to the damaged area. If necessary, make several layers.
Leave to dry for 15 minutes, then wipe with a flannel or viscose cloth, leveling the surface.
Another remedy is furniture wax. It comes in two types, soft and hard. The soft ones are enough to rub the desired area, the hard ones are first melted, applied, allowed to harden and sanded.
Craftsmen offer no less simple ways disguise small scratches and abrasions.
With help walnut, iodine, machine oil, mayonnaise, olive oil and vinegar, children's wax pencils.
The method of application for all options is approximately the same: carefully treat the damaged area, leave to dry and absorb for a few minutes, wipe with a soft cloth.
You can also make your own mastic. For this you will need:
- Turpentine (30g);
- Petrol;
- Alcohol (20g);
- Wax (40g);
- Wool fabric.
Melt the wax in a metal bowl, add turpentine, stir and add alcohol. Dip a cloth soaked in gasoline into the mixture and gently rub the mastic until shiny.
These were ways to remove and disguise surface damage on polished wooden surface.
Now let's look at the possibilities of restoring more serious damage.
Removing chips and cracks
Getting rid of chips and cracks in wood is much more difficult than getting rid of surface scratches.
Therefore, if you are not sure that you will be able to carry out repairs at home, it is better to contact a specialist.
If you decide to do it yourself, you need to stock up on the necessary minimum tools:
- White spirit (nail polish remover);
- stain the desired shade;
- Wood primer;
- Fine sandpaper (100, 180, 300, 800, 1200 and 3000);
- Wood putty;
- Masking tape;
- Roller or brush.
If the restoration does not require complete disassembly into parts, then the remaining surfaces should be protected with masking tape.
Clean the damaged area from the varnish coating using white spirit, treat the wood with a primer, then putty.
After drying, level the putty with the surface using sandpaper. Remove dust with a damp cloth and apply stain to obtain the desired shade.
It is important to apply the stain exclusively to the putty area, without getting it on the wood. Otherwise, the wood will change color, and then major repairs will be impossible.
Tip: You need to make the color a shade lighter, as the stain will darken when varnished.
After complete drying, you can varnish. The varnish should be applied with a brush or roller, depending on the area of the area.
Each new layer can be applied only after the previous one has completely dried and preliminary sanding with sandpaper with a fraction of 600 or 800 units.
The last layer is smoothed over the old polish using the finest grit sandpaper.
First at 1200, and then at 2500 or 3000. When finished, wipe with polish or furniture wax until a glossy surface is obtained.
Removing stains
Often on a polished surface there are stains from spilled coffee, iodine, oil, wine or other unknown coloring liquid. You can deal with them by wiping the stains with gasoline.
If necessary, repeat the procedure several times until it disappears completely. Finally, wipe with a mixture of denatured alcohol and linseed oil, this will restore the polish.
Stains from hot mugs, irons, kettles are removed using ammonia, or regular vodka.
Recovery from insect pests
Parts that have been eaten away by beetles are best replaced, since the density of the wood is compromised, and with a small load, it will certainly break. If replacement is not possible, the furniture must be disassembled.
Clean the part from varnish using a solvent and a spatula, sand it, and disinfect it with special preparations.
Fill the holes left by insects with putty, cover with stain to match, and varnish.
Restoration of fittings
If the old fittings are suitable for further use, they can be restored. First you need to remove it from the furniture and completely disassemble it into parts.
Then it needs to be cleaned of dirt, rust and paint.
To facilitate the cleaning process, you can soak the parts in vinegar, a solution citric acid or special chemical solutions. If necessary, you can sand it with fine sandpaper and polish it with Goya paste.
After all the manipulations, you need to assemble and attach the parts in place.
It is better to lubricate the canopies - this will protect them from new rust in the future.
Missing or unrepairable fittings can be replaced with new ones. Furniture fittings any design can be easily found in specialized stores or ordered on special websites.
How to glue a broken part or peeling veneer
Some broken parts do not need to be replaced; they can be glued together at home.
To do this you need wood glue or PVA. The area to be glued must be cleaned, sanded with coarse sandpaper, treated with an adhesive compound, left for 5 minutes, and then joined by squeezing strongly.
Clamps are useful for this.
It should take at least a day for it to dry completely. After the parts have been glued, the remaining glue should be removed.
It's time to move on to cosmetic restoration - tinting with stain and varnishing.
The peeled veneer is also glued with PVA. If it is not possible to leave it under pressure, an iron will help. You need to apply glue to the joints and let it dry a little, then, pressing firmly, smooth the veneer with a heated iron.
Tip: To protect the veneer from overheating, place a sheet of paper between it and the iron.
With the help of veneer, you can radically change the appearance of furniture.
An old and fairly worn tabletop will be transformed and become a work of art if it is decorated with veneer mosaics.
Veneer is also used to cover the facades of cabinets and any other surfaces. Even products made from inexpensive wood will look like good quality expensive furniture, if you cover them with walnut oak, cherry or birch veneer.
Conclusion on the topic
Of course, not all furniture is worth restoring.
But if it’s a pity to part with grandma’s tatty sideboard or grandpa’s clumsy chest of drawers, you should try to give them a chance for a second youth.
To buy new furniture you will need a decent amount of money, which not everyone has. In addition, the renovation itself and new finishing were not cheap. How to solve the current problem? The answer is very simple - a second life for old furniture. It is enough to devote a little time and effort, and also use inexpensive materials. Thus, any inconspicuous element will become exclusive and original, which will allow it to fit into the new one. Do-it-yourself restoration of old furniture is carried out in accordance with the recommendations and rules. All the subtleties of the process will be discussed in this article.
Furniture preparation is the basis of the process
Any type of work requires careful preparation to improve the final result. This also applies to furniture restoration: before you start finishing, you should carefully prepare the surface, regardless of whether it is wooden or upholstered. Since the main part (body) is made of wood, then Special attention is given specifically to her.

To carry out proper preparation, you need to follow a simple algorithm of actions:
- Carefully inspect the surface for defects and damage. It is necessary to take into account not only major damage, but also scratches.
- Washing away dirt and dust using warm water And detergents. Drying.
- Analysis wooden furniture in parts, to the maximum. For example, when restoring table legs, you need to disconnect them from the tabletop - this will make the process easier. In addition, the remaining elements that are not involved in the alteration will not get dirty or deteriorate.
- If it is impossible to separate the part that needs to be changed, then it is necessary to seal the remaining parts with tape and film. Experts recommend using masking tape, which will not leave marks on the surface when peeled off.
- WITH soft objects and the details must be extremely careful. The upholstery is removed carefully so that it can be used to make a pattern from new material. The packing is also removed and replaced.
Note! In order not to forget anything and completely eliminate defects, it is worth writing them down on a piece of paper. This will allow you not to forget about even the most minor abrasions that will affect the overall appearance.
Polishing layer removal technology

If it is necessary to remove a layer of polish from furniture during its restoration, you must prepare in advance:
- special composition for removing polish;
- metal wool;
- sandpaper (coarse fraction);
- paper towels or napkins;
- natural bristle brush;
- putty knife.
Note! Compositions for removing the polishing layer can be of two types: thick and liquid. Thick compositions are used for the restoration of vertical surfaces. Liquids will be absorbed into the most inaccessible corners and carved elements.
Using an example, let’s look at the technology for removing polish using a thick compound:
- The binder is poured from a bottle into a mug or other container with a wide neck. Using a brush, apply a thick layer of the mixture to the wooden surface.
- Wait the time specified by the manufacturer on the packaging. Upper layer should soften, after which it is removed. It is necessary to scrape strictly in the direction of the wood fibers using a spatula. If the polishing does not come off completely the first time, the procedure must be repeated. In hard-to-reach places, the layer is removed using an old toothbrush.
- Residues of the thick composition and polishing are cleaned with steel wool: a thin layer is applied to the surface and wiped on top with a paper towel.
- Cleaning and correcting irregularities is carried out with medium-grit sandpaper.

It is very important to adhere to safety rules when restoring old furniture. Carry out work only in a well-ventilated area. To protect your respiratory system, wear a respirator and rubber gloves on your hands.
Note! When applying a thick composition, it is important to adhere to the technology, that is, follow only one direction. This will allow the layer to lay down evenly.
Removing damage and deformation

After polishing is removed, defects and damage may appear on the surface in the form of deep cracks and scratches. Before proceeding with restoration, they must be eliminated. Each of them has its own technology and means.
- The cracks are covered up soft wax, which must be rubbed into the surface (choose a suitable shade).
- Chips and deep gaps are repaired with wood putty. It is applied with a spatula and the residue is removed with it. After 24 hours - this is exactly the time needed for complete drying - the surface is sanded.
- Before applying the paint layer, it is necessary to carry out priming, which will strengthen the connection with the wooden surface.

Note! Experts recommend using polyester or water-based putty.
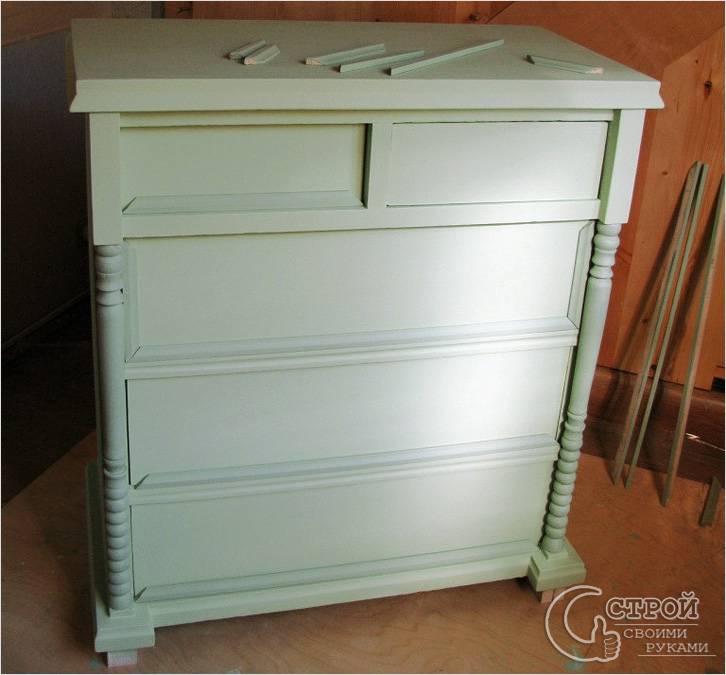
Restoration of an old chest of drawers

A chest of drawers is part of a furniture set for a bedroom, children's room or living room. It can fit a large number of of things. When changing the interior, it may not fit into the room, so as not to throw it away, it is enough to carry out restoration. To do this, you need to choose a tool such as:
- sandpaper (coarse and fine);
- protective equipment (goggles and respirator);
- screwdriver or screwdriver;
- rag;
- brushes of different sizes;
- paints.
- If possible, the chest of drawers is disassembled into individual elements.
- The varnish layer is removed using coarse sandpaper. To make the process easier and faster, you can use a grinder with a special circular attachment. Thus, they reach the wood layer.
- All surfaces of the chest of drawers are cleaned using fine-grain sandpaper. The result should be smooth surface sans serif.
- Using a damp soft cloth, wipe the chest of drawers - this will remove dust and small particles of debris.
- After complete drying, the wood is primed to ensure better adhesion to the paint layer.
- The final stage is painting. It is best to use enamels with a glossy color. It is best to apply paint with brushes along the wooden fibers: the layer must be thin, otherwise drips will form. To obtain a more saturated color, apply a second layer of paint every other day. After complete drying, the elements of the chest of drawers are twisted and the fittings are fixed.
Note! When restoring a chest of drawers for a children's room, you can use stencils. The result is a bright and original element that the baby will love.
This is what the restoration process looks like:


Video
Here's a video on restoring a chest of drawers:
Restoration of chairs and stools
The furniture in the kitchen wears out the fastest, since this is where people spend most of their time. Because of high price for headsets, not everyone can afford to purchase new ones every 5–10 years, and the old ones do not fit into the interior after renovation. In this case it is also worth using various methods and methods for restoring kitchen furniture.

For example, although stools lose their appeal over time, they are still functional. It is enough to devote a little time and effort to carry out the update. You can do this by following the step-by-step instructions:
- A stool with a soft seat must first be carefully disassembled and the upholstery removed. It will be possible to cut out new material, foam rubber is also cut to the size of the filler (the desired thickness is 5 cm).
- After all the elements of the chair have been disassembled, you can clean it, remove the old paint layer and remove defects. As with the cabinet, sandpaper, putty and a putty knife are used.
- The prepared and primed surfaces are opened with varnish or paint to match the kitchen finish.

- The soft part is covered with new fabric using a construction stapler.
- After complete drying, everything is fastened again. Experts recommend using new fasteners.

There is another way to quickly restore chairs with backs - covers made of any textile. To do this, you need to take measurements, make a pattern and sew a cover according to it. This type of restoration is called fabric draping.
Note! When upholstering the soft part of stools or chairs for the kitchen, it is recommended to use thick textiles or artificial leather. They are least susceptible to wear and tear, so they will last longer.
Basic techniques for restoring wooden furniture
To carry out the final stage of decoration during furniture restoration, you can use not only paints and varnishes. So, today designers and furniture makers use various restoration techniques, with the help of which they can turn a nondescript element into a vintage and exclusive one.

Painting with paints. The most accessible and simple method restorations are considered to be stained paint and varnish materials. To do this, apply to the prepared surface thin layer the main color, which should match the color of the room or other decorative elements. After complete drying, using stencils or carbon paper, you can draw the outlines of any design and then paint it. You can find such patterns on the Internet.

You can make decorations using this technique together with your children, as it is very simple and interesting. Thus, various patterns are cut out of fabric and paper; many people use napkins for these purposes. The resulting elements are placed on the surface, for example, of a table, and then glued, not forgetting to smooth them well. Afterwards it is covered with a layer of varnish.

The technology combines two methods at once: decoupage and varnishing. With its help you can give the furniture an antique look. To do this, apply a layer of varnish, and until it is completely dry, cover the top craquelure varnish. When drying, small cracks will form, which imitate the surface of an antique. In the future, they can be filled, for example, with gold paint. The most interesting is the combination of contrasting colors of paints and varnishes.
Veneering. This technology got its name due to the main material – veneer. It is presented in the form thin sheets wood of various species. Elements are cut out from sheets according to pre-made measurements. So, using ordinary stationery PVA glue, they are fixed to a previously prepared and primed surface. To smooth it, you need to iron the surface with a hot iron.
Note! A combination of several techniques will look most advantageous on one piece of furniture. Experts recommend using acrylic paints for painting wooden surfaces. For lacquered furniture can be applied car paints in cans.
As you can see, all elements of wooden furniture that have not lost their strength and functionality can be updated using various technologies. Thus, restoration can be carried out during repair work and every time the old cabinet will look more impressive and better than the previous one. In addition, it will fit well into the existing interior.
Video
See how to restore an old one wooden chair using decoupage technique:
Today, restoring old furniture with your own hands is becoming increasingly popular. For some, this is a way to save money on purchasing other interior items; for others, it is an opportunity to preserve a memorable or valuable item. Furniture update – labor-intensive process, but even those home craftsmen who do not have much experience or skills can do it. 
Similar articles:
The advantages of restoring old furniture with your own hands
Over time even quality furniture wears out: paint fades, varnish cracks, upholstery wears out. You can take it to a specialized workshop for restoration. If we are talking about valuable, antique items, it is best to do so. And you can handle updating inexpensive furniture yourself.
Most often we are talking about high-quality Soviet-style furniture manufactured before 1980. Often Soviet furniture is made from quality materials– solid, well-dried timber, durable chipboard, plywood, – has a reliable frame and can be restored.
It is easiest to work with interior items made from natural wood or chipboard. They can be repaired, updated in appearance or radically changed using various original ideas restoration of old furniture.
This will not only save a lot of money on updating the interior, but also completely change its style to a more refined one, and fit old furniture into any design project at your discretion. The restored set will have the color and decor that is needed in the interior.
Repair of cabinets and bedside tables
Restoration of cabinet furniture begins with repairs. It is necessary to check and restore connections, tighten fasteners, and replace broken parts.
Restoration of the surfaces of cabinets and cabinets is carried out according to the same principle as tables. Damage is repaired with putty. The old coating is removed and then painted or decorated using another technique. Another option for updating cabinet furniture is complete or partial replacement of facades.
Inserts are partially replaced: glass, rattan fabric, laminated MDF. You can use the same, but not used, material or completely change the design concept of the finished product.
Facades are replaced with wooden ones, frames, made of laminated film or MDF plastic and chipboard. Doors may have inserts or mirror surfaces, be differently decorated, covered with metal.
Restoration of tables and chairs
Do-it-yourself restoration of an antique table allows you to restore and decorate a dilapidated, worn-out tabletop, recreate its former appearance, or even improve its performance characteristics.
Old furniture varnish can be removed from the surface with sandpaper or grinder. A product made of chipboard or MDF will have to be pre-prepared - remove the lamination from its surface. A hair dryer and a spatula are suitable for this.
Restoration of tables and chairs begins with repairing parts and tightening fasteners. Sometimes a product needs to be completely disassembled and all elements reattached, simultaneously replacing broken or too dilapidated ones. Simple legs are replaced with carved balusters and vice versa.
After sanding, they begin to repair the surfaces. Deep defects can be eliminated using a special semi-synthetic putty or wood compounds. When the patches dry, they will have to be sanded again with sandpaper.
You can update solid surfaces by covering furniture with self-adhesive film or veneer.
The countertop is covered with ceramic tiles or mosaics. Tile covering will increase the strength and endurance of the working surface of the table. It's not afraid high temperatures, detergents and mechanical damage.
On soft chair seats, it is enough to change the upholstery. You can replace hard seats with soft ones or sew covers for them.
Tools and materials
Regardless of the chosen technique, in order to restore old furniture with your own hands, you will need the following tools and materials:
- Sandpaper of different grits.
- Grinder machine.
- Tools – screwdrivers, wrenches, screwdriver, stapler.
- Construction hairdryer.
- Protective equipment – gloves, goggles, respirator.
- Putty, synthetic or for woodworking.
- Primer for wood or wood-containing materials.
- Selected top coat. This can be stain, varnish, shellac, alkyd or enamel paint of the desired shade, wax. You can choose products for patination, decoupage, craquelure.
- Brushes of various sizes, roller for large surfaces.
Basic furniture restoration techniques
Can be done in different ways. In upholstered furniture, springs, lining, upholstery or covers are changed, and decorated with rollers. Products made of wood, chipboard or MDF are veneered, painted, varnished, and covered with PVC film. Additionally, the fittings are replaced or restored. In addition to restoring and updating surfaces, restoration may be accompanied by decoration.
Upholstery of upholstered furniture
The technology of how to make (couches, chairs, armchairs) includes several steps:
- The bolts and locks are removed. If necessary, disassemble and repair the frame. Replace broken frame beams chipboard details, accessories.
- Removed old upholstery and lining.
- An old plywood base, straps and spring blocks are replaced by others.
- Another seal is glued to the base of the couch or seat - foam rubber or padding polyester 3-4 cm wide. The edges are cut off, giving the lining the shape of the base. The glue must dry completely before continuing work.
- The seal can be additionally covered with a layer of matting.
- Another fabric is stretched. Its edges are tucked in and secured using a carpenter's stapler or furniture nails along the bottom of the product. The corners are laid during the work process, or the cover can be sewn in advance.
- When nailing the fabric, it must be constantly smoothed with your hands, preventing the appearance of creases. Work begins from the middle in order to be able to hide or sew in excess fabric. The inside is covered with lining fabric. The cutting of the lining is done taking into account a 3-4 cm hem, shooting it from the corners, pulling the material tightly. You need to carefully cut holes for the bolts in the lining.
Decoration
If we restore old furniture with our own hands, we can choose techniques such as decoupage, craquelure, patination and their combinations as decoration. The most common technique today is decoupage.
To perform it you will need PVA glue, brushes, acrylic lacquer water based. An image printed on paper, fabric, or lace is used as decoration. Furniture can be pre-painted acrylic paint or varnish of the desired color. Then the prepared surface is lubricated with glue. A decorative element is applied to it, smoothed, allowed to dry and opened with varnish. Craquelure varnish can be used as a top coat.
Another way to decorate is to apply a design to a painted surface yourself or through a stencil. Lace or lace is used as a stamp, which is secured with tape, and then paint is applied with a brush or spray can. The stencil is removed after the paint has completely dried.
Renewing the existing building using plywood
To update old furniture at home, use plywood overlays. You can cut the plywood yourself using a jigsaw or have it cut at a workshop.
For each extrusion, you will need 5 rectangular blanks of the appropriate size, covering all its parts: outer, inner, rear, front and top. They are fastened from the inside using corners and screws. The surface is sanded with sandpaper. Ready product can be painted, varnished or decorated in any other way. It can be given a different shape, such as a table or shelf. Ready design put on the place like a cover.