The flower garden is the highlight of every summer cottage and vegetable garden. With a bright and rich spot, it transforms the area, delivering aesthetic pleasure. That's why many gardeners strive to decorate their flower beds in every possible way. And very often, decorative fences and borders are made for these purposes, which harmoniously frame the bed with vegetation. Read about what types of fencing for flower beds are, what and how you can make them with your own hands in this material.
Many gardeners grow flowers and plants without any decoration of flower beds. Flowers, of course, are beautiful in themselves, but using a fence also has its undeniable advantages:
- Decorates the garden. Thanks to its simple design, the flower garden looks well-groomed, neat and interesting.
- Protects from children. Restless children love active games on fresh air, therefore, their active activity is not excluded in a summer cottage or garden, where they can accidentally touch and damage plants by stepping on the garden bed, but thanks to the fence this will be much more difficult to do.
- Protects against pets. Of course, a fence is not a 100% guarantee of protection from pets, but it will nevertheless serve as a barrier against unnecessary pet attention.
- Helps harmoniously divide the area into zones. Thanks to this function, you can conveniently distinguish between beds and flower beds, which makes caring for them easier. different plants and cultures.
- Prevents plant overgrowth. If you grow plants that tend to grow rapidly, then the fence will become a barrier and preserve the integrity of the garden bed.

How to make a fence for a flower garden with your own hands
There are a great variety of options for making decorative fences for flower gardens. To choose what to make a fencing for a flower bed with your own hands, you should learn about the advantages and disadvantages of popular materials, as well as study the instructions for making the structures. All this will help you decide which fence will be easier and more convenient to make for you.
Wooden fences
Wood is a favorite material of summer residents and landscape designers. It makes wonderful decorative ornaments and buildings for cottages and gardens, for example, gazebos, benches, artificial bridges, mills and much more. No less popular wooden fencing for flower beds
It is worth giving preference to wood for the following reasons:
- All designs with it turn out to be surprisingly cozy, stylish and attractive.
- This material is easy to work with. You can make excellent fencing even if you have no experience working with this material.
- To make a fence from this material, you can use the most standard tools.
- If the material becomes damaged or deteriorates, you can easily replace the entire structure or some individual parts.
- Wood does not heat up and does not reflect the rays of the sun, so you don’t have to worry about the plants getting burned or damaged.
- The material is environmentally friendly.

However, it should be noted that the only disadvantage of using wood is that it is short-lived. But such imperfection is not critical, because the material can be treated with special substances, and sometimes fresh paint can be applied.
Advice! Before implementing any wooden structure into the ground, it is recommended to treat the wood with an antiseptic, and wrap the part that will be in the ground with a small piece of roofing felt.
The following decorative wooden fences are most often made with your own hands:
- wattle fence;
- fence made of wooden logs;
- fence made from transverse cuts of wood;
- fence.
Below you can study the instructions for making these wooden structures.
Wattle
The design in the best rustic traditions will add comfort to even the most pragmatic garden. The height of the fence can vary depending on your desires - from a high hedge to mini garden fence.

Garden fences for flower beds and beds are made by hand according to the following scheme:
- First of all, you should install stakes along the border of the flowerbed; they need to be deepened so that they stand securely. They must be quite dense to support the rods. Please note that the smaller the distance between them, the stronger the structure will be.
- Then you should prepare the rods - just clear them of bark and equalize them in length. To make wattle fence, you need to choose flexible rods (willow rods are ideal).
- Now you can start weaving: first the twig is passed from the front side of the peg, and then from the back side.
- To secure the rods, you need to nail their ends to the pegs.
- Gently tap each row with a hammer to compact the structure.
Video: how to make a wattle fence for a flower bed.
As you can see in the pictures, cozy wicker fences perfectly frame the garden vegetation.


Fence made of wooden logs
Features an attractive design wooden logs, buried in the ground (composition like a palisade). Very often used by gardeners when decorating flower beds.

You can make a wooden fence for a flower bed from logs with your own hands according to the following scheme:
- Take logs of the same length and width. You can leave them in their original form or remove the bark. When selecting instances with required height, you should remember that you need to choose logs that are about 20-25 centimeters longer, since they need to be deepened into the ground.
- Dig a groove along the borders of the flower bed; its depth should be about 20-25 centimeters.
- Then the logs should be buried in the groove, covered with earth and thoroughly compacted.
Video: demonstration of making a wooden structure.
The fence is very interesting, looking at these photographs it is difficult to argue with it.


Fence made from cross cuts of wood
Construction from saw cuts - small and cozy decoration for flower beds and gardens. Making such a mini-fence with your own hands is not difficult:
- you need to buy or make wood cross-cuts yourself;
- bury the cuts halfway into the ground around the perimeter of the bed (you can install them in one row or several);
- for greater beauty of the decorative fence, you can lay the saw cuts horizontally next to the vertical row (in the photo below).

Fence
From a classic wooden fence to enclose a site, it’s a good idea to make a mini-copy for a flower garden. A picket fence can be made very original, you will have the opportunity to choose an interesting color for painting, different shape material, height. That is, it can be a massive, tall hedge, or a small, neat fence.

Do beautiful fence for a flower garden and beds, you can use the following algorithm:
- First of all, you need to prepare the materials: you will need thin wooden blocks or cuttings of boards (they should not be very large in size), long and thin boards for the base, longer bars as support posts.
- Two long thin boards, which act as a base, are nailed horizontally (one on top, the other below) to the bars or scraps of boards in a vertical position.
- Support posts must be nailed to the two ends of the horizontal board.
- Then you should deepen the columns into pre-dug holes, cover them with earth and compact them.
Video:


Metal
Fencing made of this material can be cast, welded, or forged. Almost any metal flower bed fencing will fit perfectly into country cottage area and decorate it.
You can make some products yourself (if your skills allow), buy them in specialized stores, and you can also order them from an organization that produces metal products. In addition, the product can be ordered according to an individual design.

Benefits metal fencing for flower beds are durability, attractive, solid and stylish appearance, protection of beds. The disadvantages of this design include the cost, which is often not very low, as well as corrosion.
The photographs show options for metal fencing:


Stone
Stone is a wonderful friend for a flower bed. Together with the vegetation in the garden bed, the stones look very organic and make the flower bed complete. Most often, limestone, basalt, tuff, shale, and sandstone are used to create stone fencing.

Do decorative fence for flowerbeds with your own hands made of stone is very easy and profitable. You can simply stack the stones next to the bed in the form fencing, and make a cement foundation. The latter option is, of course, more reliable and durable.
Photo gallery stone fences for flower beds:


From scrap materials
Beautiful does not mean expensive and difficult. You can create it in your garden beautiful fencing for a flowerbed with your own hands from scrap materials, while saving money. So, you will not only decorate flower beds and beds, but also give a second life to forgotten and unnecessary things. For example, it is practical to use optical discs, slate, plastic and glass bottles, old car tires, and ceramic products. Let's look at the most popular options:
Glass bottle fence
To create a decorative fence from glass bottles, you can use both transparent and colored containers, and you can also paint the glass container yourself.

You can make a glass fence for a flowerbed with your own hands:
- Prepare the container: fill it with water for a while so that the labels come off, then remove the bottles, clean them of any remaining dirt and labels, and let them dry.
- Mark the lines along which you will place the bottles. The outline of a decorative fence can be either strict (rectangular, round, square) or ornate or non-standard.
- Dig a trench that is as wide as the bottles and about fifteen centimeters deep.
- Place the bottles, neck down, around the perimeter of the bed.
- Fill the trench with soil and compact it well.
You can enjoy the photos simple fencing for a flower bed from this improvised material:


From plastic bottles
From plastic bottles we get and . Previously, it was already described how to build a regular fence, now it’s time to tell you how to make a fence for a flower bed with your own hands from this plastic material at hand. The technology is exactly the same as in the case of glass bottles, only for greater stability it is better to fill the bottles with sand. A little tip: to add bright accents, you can paint plastic bottles in your favorite color or in several colors at once.


From tires
Tires are a popular material at hand for gardeners. It makes excellent compositions. For example, in provides detailed information on how to do flower beds made from tires, and different ideas about this theme. From the old ones car tires also turn out great swans, you can read detailed information about making swans.


Photo gallery of ideas for inspiration
Entertaining summer residents have come up with many original fencing for flower beds from purchased and scrap materials. Each of them has its own charm and uniqueness. To understand this, you can just look at the photographs original compositions:


Beautiful flower garden- this is not only timely care of plants and flowers, fertilizing, watering, eliminating weeds, but also edging the flower bed. No need to be experienced landscape designer or a jack of all trades to decorate flower beds in an interesting and original way. You just need to be patient, show diligence and imagination.
In contact with
Oh how good garden beds, spreading delicate aromas and pleasing the eye with a riot of color. However, it is not enough to simply dig up a bed and plant seeds; a real flowerbed requires proper fencing that will prevent the soil from crumbling and protect the delicate roots of the plants.

Before turning your garden plot into a masterpiece of landscape design, decide whether your flowerbed will be temporary or whether you plan to install a fence that will last for many years.


Plastic modular fencing, which is sold in gardening departments, is quite attractive in appearance and very diverse. Such “fences” are installed in a matter of minutes and just as quickly removed in the fall or if it is necessary to dig up the soil.


You can also use profiled plastic sheets (PVC or polycarbonate) or cellular polycarbonate as fencing. You should dig a narrow trench around the perimeter of the flowerbed, insert cut plastic into it, fill it and compact the soil.


Joints plastic panels It is advisable to coat it with construction adhesive or sealant. Cellular polycarbonate glued with one-component transparent glue.

The disadvantages of such fencing are the high cost of materials and their low resistance to mechanical damage. Plastic fences often warp during watering or precipitation.


If you have an accumulation of glass containers or plastic bottles, it’s time to make a creative flower garden.
Option one - vertical single-tier

This method of arranging a fence is so simple that even a child can handle it.

Step 1. Prepare the container. We wash, remove all stickers, fill each bottle with soil/sand, and screw on the caps.
Step 2. Using a tape measure, measure the length of the bottle. We divide the resulting value in half. This result is the depth of the trench that needs to be dug around the perimeter of the flower bed. The radius of the bottle, accordingly, determines the width of the groove.
Step 3. Turn the first bottle upside down, insert it into the trench, add soil, pour it from a watering can, and tamp it down. We insert the second bottle tightly and repeat the tamping operation. We continue until the entire flowerbed is fenced.

It is important that the “fence” does not wobble!
You don't have to use the same bottles. By alternately inserting one and a half and half liter plastic bottles, you will see how the fence becomes much more interesting.

Step 4. If the bottoms sticking up do not cause joy, you can decorate the fence by painting it with any paint for exterior use. You can also use flowers cut out of plastic and glued to the fence in any desired order as decoration.

Bottle flower beds
Option two - vertical multi-tiered

Stock up on enough fertile soil, shovel, watering can and pre-prepared bottles.
To begin with, we dig a groove around the perimeter of the outermost big ring flower garden We insert a row of bottles, add soil to the level of the bottle bottoms.
We place the second ring inside the first. The second tier will rise above the first. Carefully dig a new ditch, insert bottles and add soil to the center.
Narrow rings can be tied with wire around the perimeter to strengthen the walls of the fence.

It is not recommended to make an excessively wide multi-tiered flower bed, as it will be inconvenient to plant plants in the central rings.
Multi-tiered flower beds resemble a wedding cake. Plant low-growing flowers in them and enjoy the beauty of the garden.
Option three - horizontal


Step one. Prepare a sufficient number of clean empty glass bottles and cut them iron barrel across in two. The bottom can be left after making several drainage holes, or cut off altogether, which is more preferable.
Step two. Cooking cement-sand mortar. In a bucket, mix cement with sand and water so that the solution is thick enough and does not spread.
Step three. We put the barrel in the place where the flower garden will be located in the future. Using a trowel, we place a small pile of solution on the outer wall of the barrel, into which we immediately insert the bottle, pressing its neck against the iron. We apply a new pile of solution to the wall and insert the second bottle as close as possible. We continue until the barrel is completely framed by the first row of bottles.
Step four. We lay out the second row in the same way, placing the bottles on the first row in a checkerboard pattern. We continue until the barrel turns into a stylish flowerpot. While the cement dries (about two weeks), it is better to cover the structure with polyethylene. This way the hardened solution will be much stronger, and the risk of cracking will be greatly reduced.
Step five. If the flowerpot has a bottom, then pour crushed stone on its bottom, broken brick or other drainage. If you cut off the bottom of the barrel, you can immediately fill it with soil and plant flower seeds. It is recommended to decorate the upper part of this unusual fence with beautiful colored pebbles, shells, cones, or hide a noticeable strip of cement with moss.


Even if you and your friends are not car owners and don’t store old tires in your garage, auto repair shops will happily sell you several suitable used tires for pennies.

How to make a flower bed - flower
Tires can be dug vertically into the ground, subsequently painted in different colors, carved into unusual animal figures, or cut into petal-shaped tops. If you are lucky enough to become the owner of a tire from a tractor or KAMAZ, then it makes sense to place it horizontally, filling it with soil and breaking up a flower bed.

If you acquire several tires of different diameters, build a multi-tiered fence for a flower bed, simply arranging the tires like a pyramid. Of course, soil must be filled inside each ring before installing the next, smaller diameter.


Advice! For painting, use only waterproof enamels!
Video - DIY fences for flower beds made from old tires
We build fences for flower beds from bricks
If you plan to build a permanent flower garden, then you should take care of a reliable fence, for example, a brick one.
Prepare before construction following materials: bricks, cement-sand mortar, sand, level, tape measure, pegs, cord, shovel and trowel.
Step one. We make markings on the ground, determining the perimeter of the future flower bed.

Step two. According to the markings, we dig a trench about 10 cm deep.
Step three. Fill the sand with a layer of 5 cm and tamp it thoroughly, spilling it with water.

Step four. We lay out the first two rows of bricks without fastening them with cement and leaving a gap of 0.5 cm between the bricks. This is necessary to prevent stagnation of moisture in the soil and rotting of the roots. We check the evenness of the masonry with a level and hit the bricks with a mallet.
Step five. We drive in the pegs and tighten the cord to make laying easier. Lay out the third and subsequent rows without gaps using cement mortar. Immediately scrape off the excess from the wall. If desired, you can undo the joints immediately after laying.
The cement will dry for about a week. During this period it is not recommended to carry out earthworks and plant a flower garden. When the cement has set, add a layer of drainage, fertilizer, soil into the flowerbed, and plant the plants.


Advice! If you use bricks in the construction of fencing different color, then the flowerbed will be much more interesting.

If the flowerbed is small, then the bricks can be laid without mortar at all, filling it with a sand cushion. In this case, it is not necessary to lay the brick flat; a fence made of bricks installed in a sand cushion at an angle looks original.


You can also use natural stones and sand instead of bricks. The stones are laid without constructing a foundation, and the stones themselves are fastened together with mortar. It is advisable to lay it out so that there are minimal gaps between the stones.
Video - Options for fencing for flower beds
Fences for flower beds made of wood
- Wattle is a classic of the genre. We drive in pegs or dry branches at equal distances, which we braid with flexible willow twigs. Finally, we pour soil into the fence and plant flowers.

- Decorative fence made of boards. We lay out the boards in a row and nail the horizontal fastening lintels. We assemble several of these “panels” of the desired height. We dig several holes in the ground. We take the distance between the pits equal to the width of the panels. We insert wooden blocks into the holes, treated with an antiseptic and coated with bitumen on the bottom, after which we pour the concrete and wait for it to dry, making sure that the columns are strictly vertical.


At the end, all that remains is to nail the board panels to the posts, add soil and paint the fence.
- Fence made of bars. Such a fence can be installed in compliance with single level all the bars, driving each of them into the ground to different depths. Don’t forget to treat the posts with an antiseptic so that the flowerbed lasts as long as possible.

Don't be afraid to experiment with your ideas non-standard designs for flower beds and decorating the garden in an original way. An old one can serve as a fence for a flower bed. wooden boat, plastic and ceramic tableware, flower pots, displayed in a row, a wooden two-wheeled wheelbarrow, a large wicker basket, an antique chest without a bottom and much more.


Also read the article on our website - how to make a flowerbed with your own hands.
Video - DIY fencing for flower beds. Design ideas
Today, a person who decides to build a house on his own must be prepared for significant costs. Most of the money is often spent on the foundation and laying the walls, but in most cases you have to spend a lot on things that at first glance do not seem obvious. We're talking about a fence.
A smart owner of a future home sets the goal of saving on such details. Moreover, this is a completely justified and feasible solution.
A key way to reduce the cost of a fence is to do it yourself. Do not underestimate the importance of this process, since the fence is not only decorative structure, which hides the territory from prying eyes, but also a protective fence designed to prevent suspicious persons from entering the site.

In other words, the design must be reliable, durable and aesthetically pleasing. Only under such conditions will it satisfy all the requirements placed on it. In our case, ease of installation should also be added to the list of conditions.
Materials for building a fence

There are several basic materials that allow you to build an inexpensive and functional structure:
- tree;
- Rabitz;
- corrugated sheeting;
- plastic.
The main limiter in construction technology and combination of materials is financial costs. First, you should select the material that will become the basis for the fence, then find a suitable economical construction technology, and then make basic calculations.
Wooden fence: pros and cons


Modern hardware stores offer a large number of wood options suitable for construction reliable design. This material has some advantages over others, which makes it almost the most popular product.
Advantages of wooden structures:

Flaws:

Materials for installing a wooden fence
To build a standard wooden fence, you will need materials such as: picket fence, cross boards, support posts, pegs, ropes, cement, sand, shovel, saw, fasteners, special remedy against wood rotting.

It is best if the entire set of tools is collected in one place within reach to facilitate access to components.

Construction of a wooden fence
Stage 1. We mark the site for the structure and determine the location of the gate. We use pegs and rope. The distance between the pillars is 2 meters. This is how the structure’s resistance to external influences is ensured.
Stage 2. Take a shovel and dig holes for the support pillars.
Stage 3. We immerse the pillars in the ground by about one-fourth of their length.
Stage 4. We install spacers to secure the pillars and fill the hole with cement mixed with sand.
Stage 5. We drive in the cross boards.
Stage 6. We fix the picket fence vertically on the transverse boards.

Stage 7. Paint the finished fence in the chosen color.

At this point, the construction of the wooden fence is considered completed. This is a relatively simple fence option that is usually installed as a temporary option.

A fence made of mesh is considered the most economical option, available today. Among the advantages of such fences it should be noted:

Clarifying the last point, it should be noted that installation will require tools that are easy to find in every home. In addition, modern stores offer a wide range of meshes of the most different colors and sizes, which allows you to move away from the banal appearance of the fence.
Materials for building a fence:

For those who adhere more original solutions, exist vinyl coverings, however, they tend to lose color over time.
Construction of a chain-link fence

Step 1. Carry out the markings.
Step 2. We dig holes for the support pillars.
Step 3. Place the pipes in the holes.

Mesh fence
Step 4. Fill the holes with pre-prepared concrete mortar. In some cases, builders simply drive pipes into the ground using a sledgehammer. This is possible provided the soil is sufficiently soft.
Step 5. We begin to secure the mesh. We fasten the beginning of the roll at the first pipe, which acts as the beginning of the future fence.
Step 6. We stretch the mesh around the remaining supports, gradually securing it. It is important to ensure that the mesh does not sag, otherwise all work will be useless.


Stages of work during sectional construction of a fence
Step 1. Lay the foundation.
Step 2. We build a tension frame from metal corners.
Step 3. Fasten the corners between the supports.
Step 4. Attach the mesh inside the corners using welding.
Chain-link fences are very easy to erect without the help of specialists, which allows you to save a lot and try your hand at it.
Corrugated fencing

This type of fence can rightfully be called the most common. It is most often used for fencing summer cottages and private houses. To build such a fence you will need welding machine and a little patience. In general, the installation technology is very simple, which can be attributed to the advantages of the design.
Modern construction markets offer corrugated sheets various colors and sizes, so buyers should not limit themselves in their fantasies.
As additional components you should purchase anti-corrosion paint, support structures, logs, shovels, screws, and also make cement mortar.
Installation of a corrugated fence

Step 1. We mark for the future fence. It is important that the distance between adjacent supports does not exceed two and a half meters. As auxiliary elements pegs and twine are used.
Step 2. We make indentations in the established places. In the future, supporting elements will be inserted into these holes. This task can be accomplished using a special drill or simply digging a hole with a shovel. The standard depth of the pit is one hundred and thirty centimeters.
Step 3. We install support pillars at the corners of the territory, and then along the entire perimeter.
Step 4. Strengthen the bases of the pillars with cement.
Step 5. Install the logs that are necessary for further attaching the corrugated sheeting.
Step 6. Attach the sheets to the joists using self-tapping screws.
Step 7. Painting metal elements enamel. In some cases, a primer is used.
Ultimately, the fence turns out to be quite pleasant in terms of aesthetic characteristics, as well as durable and reliable. It looks much more solid than a fence made of wood or chain-link mesh, and therefore can be regarded as a full-fledged fence.
Plastic fence

Plastic deservedly bears the title of one of the most affordable materials for building a fence. This is a real salvation for summer residents who do not want to build expensive structures on their plots.
The positive aspects of such fences are as follows:
- strength;
- durability;
- ease of installation;
- low cost;
- nice appearance.
Installation of a plastic fence


Stage 1. We mark the area where we plan to install the fence.
Stage 2. Mark the places where the wicket and gate will be.
Stage 3. In established places, we drive support pillars into the ground.
Stage 4. We fix piles made of durable metal in the corners.
Stage 5. We stretch the piles along the perimeter of the site.
Stage 6. Secure the pillars with spacers.
Stage 7. Attach the sections between the supports.

Thus, as a result of simple machinations, a beautiful and functional fence is obtained, which in its external qualities, although it cannot compete with structures made of decorative stone or forged elements, but completely satisfies the owners of the territory.
This article discussed the most simple ways construction of fences, the choice of which is determined only by your preferences. Now you can build cheap fence with your own hands.
Video – Construction of a wooden fence
Video - Construction of a mesh fence
Video - Installation of a fence made of corrugated sheets
Video - Installing a plastic fence
Plot near country house or cottage should look not only interesting and attractive, but also individual. Of course, you can use the services of a designer and order a project, but it will still be a set of certain template modules. And individually made elements will be quite expensive. Most economical option- try to do everything yourself. If the area is small, you don’t have to spend money on a massive fence for fencing. Use decorative. It will only outline the boundaries of your site and will not hide it from prying eyes.
Functions and uses of a decorative fence
An abundance of flowers, well-groomed lawns, smooth paths, decorative pond - it seems that everything is already there. But over time, you always want to change something, add something. In this case, with the help of decorative fences, the area can be divided into several zones. Indeed, in city apartments, each room is decorated in its own way, for each family member. The same principle can be used for garden plot. Zoning can be done using different kinds decorative fences. Bright and colorful picket fences will separate the children's area, wattle fences will outline the area in a rustic style, strict ones made of log components will indicate the men's territory or the guest area.
Gallery of fences with different purposes
A fence made of willow twigs will decorate any area  Multicolored
  A pencil fence will decorate the children's area
  A fence separates the recreation area
A decorative fence will first of all give a finished look to the flower bed and emphasize the beauty of the flowers. In addition to the aesthetic function, it also has a number of practical ones:
- Flowers will grow only within the boundaries specified for them and will not grow throughout the entire area.
- The fence will protect the plants from strong winds and accidental damage - the flowers will not be trampled and there will be no broken branches.
- Caring for flowers will be greatly simplified and the problem of accidentally mowed plants will disappear.
- If there are quite a lot of different types of flowers on the site, then thanks to the installed fences and mini-fences, the problem of searching “where which flower was sitting” will disappear. in early spring. It is enough to look at the photographs taken last summer, and everything becomes clear. This is especially true for perennials that bloom by mid-summer.
- Thanks to zoning, it will be possible to plant separately flowers that need certain type soil and a certain degree of moisture.
- For each type of flower, you can choose a fence of a certain height.
Types of fences
Today you can purchase fences of a wide variety of types and sizes, made of plastic, wood, and metal. But I wouldn’t want to see the same one at my neighbor’s. There should be individuality in everything. Therefore, it is more interesting and easier to design and make a fence yourself, using improvised means. It doesn’t have to be large - sometimes one or two spans are enough to give a plot or flowerbed a certain charm.
Gallery of products made from scrap materials
 A woven corina fence and at the same time a flower bed for different types of plants
  Fence made of tall plastic bottles
  Fence-flower bed made of car tires
  Traditional Ukrainian wattle fence
  On one site you can combine different types fences
To make a fence, you can use a wide variety of materials: wire, stone, plastic or glass bottles, PVC pipe, old tires, reeds. Also suitable various elements made of wood: branches of vine, hazel, willow twig, picket fence, wood cuts, wooden chocks, etc. Almost everything that is on the farm.
More and more often you can find wicker fences. These are traditional wattle fences that can be easily made from pre-cut and prepared willow twigs, vine branches, hazel, raspberry, cherry branches, and reeds. Easy to make, they go well with almost any plant. With certain skills, you can build a basket fence for a flower bed. Weaving can be horizontal or vertical. For beginners, it is better to start with vertical weaving to understand how it works. If the wattle fence is made in the spring from unprocessed willow branches, it will turn out to be a hedge, since the willow takes root well and quickly.
Types of fences made of different materials in the photo
 Slab fence
  Simple fence for zoning
  Wattle goes well with hedges
  You can decorate a flowerbed with such a fence
  Original fence made of glass bottles
  Hedge from willow
  Vertical wattle can be very dense
  Original fence made of willow twigs
  Stone fence for decorating a flower bed with low-growing flowers
  Gabion - a fence made of mesh filled with stone
Preparing for construction: determining the type, location, size
Before you begin construction, carefully plan where the fence will be installed. Make a preliminary sketch according to which you will work. Take the time to draw in detail what types of plants will be planted and the color of the future fence. It is better if there are several sketches linked to existing buildings. So you can choose more interesting option. For example, if the main fence around the site is made of stone, it is good to combine it with various types wooden fences- wattle fence, picket fence, wooden posts.
The fence is installed before the plants are planted, so in the sketch take into account the approximate height of the flowers - the data is indicated on the seed packages. It is important to pay attention to the direction of the world. If you plan to plant shade-loving plants, the fence should be installed so as to create maximum shade during the day and be high enough. For sun loving plants there should be a fence minimum height and do not shade the plants.
A decorative fence can be installed by going deep into the ground if you plan to plant plants that reproduce by root shoots, and by raising it a short distance above the ground if the plants are tall or curling. As a rule, the fence has a height of 40 cm and above.
Since the fence is a decorative element, it means that we are not making it for “the rest of our lives.” It should serve us for at least 5–7 years, and then we will still want to change something, because new design ideas or new flowers will appear. You need to choose the material with which you will be comfortable working. Let's look at the most common ones.
Wood is the most environmentally friendly and available material. Fairly easy to use. With proper preparatory treatment it can last up to 10 years.
Plastic and glass bottles are the easiest materials to work with. Of the minuses - plastic is not environmentally friendly material and can release toxins into the soil. Glass bottles are easy to break and can cause injury in the future.
Options for building materials in the photo
 Original fence made of thin PVC pipes
  Colored plastic bottles make a fun fence
  Glass bottles not only for storing alcohol
  The easiest picket fence to use
  Fence-fortress made of tires
Car tires will last a long time, but like plastic, they emit toxins. They look pretty rough.
PVC pipe will last a long time. If you have a special soldering iron, you can simply make an original fence from it.
Calculations
If the fence is installed along the entire perimeter of the site, you must first determine its corner points, drive pegs into them and pull the cord. Once you have established the exact perimeter of the fence, you can move on to planning the spans. To do this, you need to divide the length of the fence by the span. As a rule, for high decorative fences this is 1–1.5 m. Low fences can be made with smaller spans, this will make them more stable.
For example, our plot has dimensions of 4x5.5 m. We plan to make a span of 1 m. The 2 widths of the plot will consist of 8 spans. When dividing the length, 5.5 m does not give a whole number. In this case, you need to increase the length of each span by 10 cm. We get 10 spans of 1.1 m each. The increase is insignificant, but we will avoid two fragments of 0.5 m each, which will disrupt the completed appearance of the fence.
If the fence will be installed in a small fragment (for example, one span of fence), draw it exact dimensions and think about the installation method. It should have a stronger mount, since there is no connection to other parts. It will be secured only by the main pegs and will be more susceptible to the influence of strong wind and rain.
Having calculated the required number of spans, you can begin to calculate the material. Draw a span on paper, count the required number of pickets (posts, branches, planks, etc.), and then multiply by the number of spans. This way you can quite accurately calculate the required amount of material.
Making your own wattle fence
Materials and tools required for work:
- Posts for side supports - 2 pcs. for each span
- Cross bars - 3 pcs. for each span
- Rods for weaving - blanks of the same height
- Garden secateurs
- Axe
- Nails
- Building level
- Shovel
- Hand protection gloves
Wattle is the easiest type of fence to make. It can be made from either thin branches or thicker poles.
Using a shovel and building level install side pegs. We deepen them to a third of the height. It is better to first treat the part that will be in the ground with resin or seal it with fire so that it does not rot so quickly.
Using a screwdriver and self-tapping screws or a hammer and nails at equal distances, we attach the crossbars to the posts.
We prepare branches of the same length. We use for this sharp knife or pruning shears. To do this, use a template - a thicker branch of the required length. The wattle fence is usually not made higher than 1.7 m.
We start weaving from the side that will be less visible. The branches go around the crossbars alternating: if the first one is braided from the outside, then the next one is braided from the inside. We press the branches tightly against each other.
We continue weaving until it is completely filled with twigs. At the end of the weaving, use pruning shears to trim the sharp corners of the rods, if any.
Sectional small fence made of wooden pickets
Even a woman can make such a fence from the simplest pieces left over from construction work. The work is quite simple and easy, and you will be pleased with the result.
Materials and tools needed for work
Cross bars - 2 pcs. for each span
Side posts - 2 pcs. for each span
Pattern for maintaining the distance between the pickets - 1 pc.
Pattern for maintaining the distance between the slats - 1 pc.
Pickets pre-treated with sandpaper - 9 pieces per span
Screwdriver
Self-tapping screws
Sandpaper
The peculiarity of installing such a fence is that if the side posts are made with pointed lower ends, it will be easy to install by pressing it into the ground. You don't need to use a shovel. The corners are easy to connect with self-tapping screws or nails.
We lay transverse planks on the ground. Between them we place a special pattern (a piece of picket fence), which will determine the distance between the crossbars.
We attach the first plank to the beginning of each of the crossbars using a screwdriver and self-tapping screws. We lay an additional pattern and the next plank close to it. We also secure it with self-tapping screws. We attach side posts along the edges.
When the first section of the fence is ready, we begin assembling the next one in a similar way.
We prepare several sections in this way, paint or varnish them. Our fence is ready for installation.
If the fence was made of wood - pickets, chocks, saw cuts - pre-treatment with an antiseptic is required. This will protect against damage by fungus and various pest beetles. After this, if necessary, you can treat it with stain and varnish if you need a natural beautiful colour. If the design calls for some interesting colors, you can paint it in a variety of colors using exterior paints. They withstand temperature changes well and protect the wood from moisture, which means the fence will last quite a long time.
If the fence was woven from willow, cherry, or hazel branches, it is best to coat the prepared rods with varnish or paint before weaving. This ensures both protection of the material and complete staining of the fence.
Almost any decorative fence can be easily made at home. As you can see, it does not take much time and does not require certain skills. Makes your imagination work and transform your cozy area to the storehouse of ideas. Having made one small fence according to your own sketch, you can gradually learn how to make more complex and interesting designs. The main thing is to start.
Every owner local area tries to ennoble it as much as possible or according to his aesthetic idea. Fences and borders play an important role in decorating a site. They will help to implement zoning, for example, to separate part of the space for recreation with a barbecue, benches, gazebos. With their help, you can select beds for vegetables or berries, as well as decorate flower beds in a beautiful and original way, and preserve the geometry of flower beds. In this article we will look at different types of decorative fences and methods of their manufacture.
Such fences will not only give a neat appearance to the site, but will also cope with their intended purpose - they will protect the plantings from careless guests and serve as a barrier for domestic animals. And here it doesn’t matter at all whether it’s a dacha where only a few seasons are held, or a private house for year-round use.

It should be noted right away that all of the fencing options listed below can frame absolutely any shape of paths, flower beds and create dividing zones. There are no limits to imagination in these works; they are mounted in the form of strict geometric shapes or non-standard lines.
Plastic decorative fences
There is a huge range of fences of this kind on the market, thanks to technical specifications the material from which they are made. Its thermoplasticity makes it possible to create borders for paths and fencing flower plantings, front gardens of various shapes, and a special lamination method - in various colors.

- Here you can give preference to a strip or sectional type border, which will serve as a border marking garden paths, and will also become an additional decoration for plant compositions.
- Each section is equipped with pegs, so the installation process consists of light pressure until the supports are completely embedded in the ground. Installation can be carried out both on absolutely flat surfaces and on ground with a slight slope.
- Decorative fences for a summer residence made of plastic can imitate wooden picket fence, wattle, clinker or masonry, forged elements. Typically, such sections are made in height from 13 to 20 cm.
Decorative wooden fences
The most popular material for making a yard look well-groomed is still wood. Such fences look quite relaxed in the landscape and do not create any disharmony.

Another advantage of the material is its availability, because for finishing, for example, flower beds, any lumber is suitable: boards, slats, pegs, logs and even branches. Here we mean the production of standard fences, only in miniature sizes.
Before carrying out any work, wood requires mandatory processing:
- the lower part of the supports, entering the ground, must be burned or dipped into liquid roofing material;
- all other structural elements are impregnated with special solutions that slow down the rotting process and protect from insects.
"Plank fence"

To make a structure 40 cm high to frame a flower bed 70x70 cm you will need:
- 4 beams 50x50x700 mm;
- 8 boards 20x100x700 mm (here, if desired, you can use both edged and unprocessed lumber);
- 32 wood screws or the same number of nails;
- screwdriver, hammer.
Stages of work
- Drive the supports into the ground 700 mm from each other, check the vertical and adjust their height.
- A board is attached to the top of the beam in two places, where its end part should not protrude beyond the edge of the peg.
- The second cross member is mounted at a distance of 100 mm from the bottom edge of the board.
- The same manipulations are performed on other sides of the flower bed.
"Lattice"
This lightweight slatted fence can be used to enclose a flower bed with tall plants, such as window sill or cornflower. If you make it in a larger size, then it will be perfect for separating a recreation area.

To implement it, one section with dimensions 900x630 mm will require:
- for supports 2 bars 30x30x950 mm;
- for crossbars 2 pieces 20x30x900 mm;
- 12 slats 10x20x520 mm;
- 12 wood screws 3x25 mm, 4 screws 3x40 mm.
Stages of work
- The section is assembled on any flat surface. 30 mm is removed from the upper parts of the supports, and the logs are fastened with 3x40 mm screws.
- Having retreated 500 mm from the attachment point of the upper cross member, a similar installation of the lower beam is carried out.
- The slats are fastened first from left to right, using 3x25 mm screws. At the point of attachment of the upper cross member and the support, the first rail is mounted, to the lower frame - at a distance of 150 mm from the support. Their subsequent installation to the purlins is carried out in increments of 150 mm from the previous attachment points.
- Installation of slats is done in a similar way, now from right to left. The result will be a diamond-shaped pattern.
- You can fence any area, even if it has an irregular contour, by making the required number of such sections.
- Important: when making a square or rectangular shape, the material consumption will be much less than when constructing a multifaceted structure.
- The finished structure is painted alkyd paint one color or coated with a protective varnish. You can give your fence a more “joyful” look if you paint it in multi-colored tones.
"Wattle"
This kind of fence can be completed in a fairly short time.

- It is better to cut willow, birch or apple twigs for its production in spring or autumn, the thickness of which should not exceed 2 cm.
- Quantity consumables determined by the height and length of the structure. In general, to implement this idea you need stakes or bars, rods, wood screws, and wire.
Tip: instead of vines, you can use old multi-colored hoses or wires with a rubber sheath.
Stages of work
- As a rule, vertical supports are installed in increments of 0.5 m.
- Weaving starts from the bottom row. The vine is fastened to the first support using wire or screws. Next, the rod is passed in a horizontal direction, bending around each bar. It is recommended to fix the joints of the rods with wire.
- If there is no desire or opportunity to study self-production fencing of this kind, you can purchase ready-made option. For example, modular fences up to 0.5 meters high made of natural pine are offered. Treatment with antiseptic solutions and painting with varnish to give the slats an attractive appearance is carried out in the factory.
- Those who are interested not only in the appearance of the fence, but also in its strength and resistance to precipitation can opt for products made from wood-polymer composite. This material makes it possible to produce sections of any complexity and configuration.
Decorative fences for flower beds made of stone
Cobblestones of various shapes are selected for masonry, thus creating a fence of the “medieval” period. Here the rough texture of the stones will create a wonderful contrast with delicate flowers and greens. Without exaggeration, it will last forever.

Stages of work
- The material can be sandstone, dolomite, shungite, both round and bedded. As a rule, the first row is laid out on concrete mortar, trying to use slab-like rubble.
- They are selected in such a way that the same row height is maintained. In this case, the laying is done “in a staggered manner”, where the seams between the top and bottom layers should not coincide.
- A sand-cement mixture will help give additional reliability to such masonry.
Metal decorative fence
Any product made from such material has a fairly long service life, but at the same time it requires maintenance - annual painting. The fence can be purchased at finished form or order according to an individual sketch.

But it is quite possible to make it on your own; for one section (900x550 mm) you will need:
- supports - 2 reinforcements Ø 12 mm and length 950 mm;
- crossbars - 2 reinforcements Ø 12 mm, length 900 mm;
- horizontal crossbars - 5 rods Ø 10 mm, length 39 cm;
- decorative elements - 6 rods Ø 10 mm, length 14.5 cm;
- welding machine.
Stages of work
- Step back 50 mm from the top of the supports and weld the cross member, measure 40 cm from it and mount the lower part of the frame.
- Horizontal crossbars are attached in increments of 150 mm.
- Next, decorative vertical elements are welded in a checkerboard pattern. To do this, first a rod is welded, departing 100 mm from the lower cross member, and in the next section it is attached, counting the same distance, but from the upper cross member.
- Such a fence is installed by pressing its supports into the ground, leaving a distance of 100 mm from the ground to the bottom of the frame.
Manufacturers also offer galvanized borders, intended not so much for fencing flower beds, but for creating them. They are available in heights of 17 cm and lengths from 25 to 100 cm, which allows you to design flower beds quite in an original way. Thanks to the universal connection, there is a great opportunity to assemble a flower bed from them different sizes and in the form of any geometric figure.
Decorative concrete fences
Of course, when many people mention such material, they associate it with a massive, gray fence. But don't rush to give up concrete products, are presented on the market various options borders intended for garden paths, fencing lawns and decorating flower beds.

- These products have not been produced in dull colors for a long time; now they can be of different shades and have a pattern on the front surface.
- Making this kind of fence with your own hands will not be difficult if you use decorative fence molds made of polyurethane or plastic.
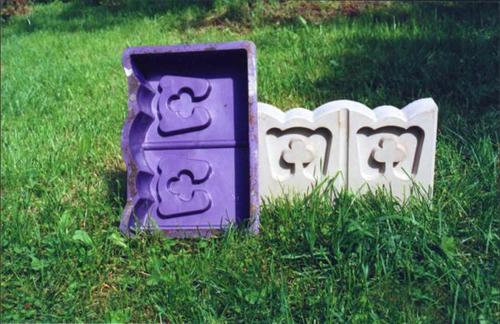
Stages of work
- All work consists only of lubricating the matrix and filling it with concrete mixture.
- Next, you need to let the solution harden (24 hours is enough) and you can remove the finished section. Thus, the required number of curb stones is prepared.
Some tips
- the matrix can be lubricated with ordinary vegetable oil;
- For the solution, take one part of M250 cement and two parts of sand, add enough water to make the mixture thick;
- The more sand in the mixture, the darker the product will be.
- if you plan to paint a concrete fence, then before doing this it is necessary to treat it with a deep penetration primer.
Decorative brick fence
This material firmly holds its leading position as a fencing for lawns, flower beds, lawns and paths in the garden and country house. This is due to its characteristics, availability and ease of installation.

Stages of work
- Usually the brick is laid along the perimeter of the flowerbed at an angle on its end side, creating a kind of “jagged” fence.
But there are several more ways to do masonry:
- lay clinker around the flowerbed, forming a circle or oval. The second row is done in the same way, making sure that the seams do not match the previous layer. Masonry is done without concrete mortar, so the design is unreliable. But it can also be done using a sand-cement mixture;
- perform the first two rows using conventional masonry using concrete mortar. The clinker in the next row is placed on a spoon (this is the narrow and long side of the brick). Since the width of this layer is greater here, the alignment is performed according to inside masonry;
- the brick can be placed on the butt (on its narrow, short side). The seams between them can be quite wide - about 2 cm.
Photos of decorative fences made by yourself
- Car tires are most often used to create flower beds and flower beds. They also separate beds, paths, and lawns by simply digging them into the ground;

- Beer bottles can serve as a mini-fence by placing them upside down. The use of bottles made of white, green, and brown glass will help to add even more originality to this design;

- Plastic 5-liter water bottles will work just as well. They are filled with colored pebbles or sand so that they do not lose their shape, and the top is painted with any color;

- logs Ø 15-20 cm are dug or driven into the ground close to each other; any lumber left over from the construction site is suitable for this purpose.

Every owner of a summer house, vegetable garden or garden dreams of creating an ideal design on his land space. And for this it is not at all necessary to purchase expensive factory-made fences; it is quite possible to make them, for example, from the material left over after building a house, and using all your wild imagination. You can take one type of material or combine them, thereby giving the surrounding area an amazing and rather original look.