Before you begin decorating the walls, you must decide where to start in the room. Each room (be it a kitchen, a corridor, etc.) has its own characteristics, manifested in the presence/absence of niches, protrusions, corners, as well as in the nuances of lighting. In addition, you also need to take into account the type of wallpaper and the layout of the apartment.

Preparing for wallpapering

First, decide what the sequence of actions will be. And the first stage should always be, which includes:
- purchasing everything you need (wallpaper, adhesive, edging, etc.);
- preparing the required tools (for work you will need a roller, knife, brushes, tape measure, scissors);
- covering the floor with protective material;
- preparation of communications and, of course, walls.

Purchase materials in advance. Moreover, you need to think not only about how much glue and wallpaper will be needed, but also about the tools with which the composition will be applied. You can use PET film to cover the floor, although old newspapers will also work. It is recommended to turn off the electricity supply; it would be a good idea to remove the sockets and lighting. It’s better to move the furniture out (alternatively, just move it to the center of the room and cover it with foil) to make the room as spacious as possible.

Walls that will be covered need special care. Old covering in mandatory is removed, then the walls are puttied and primed. Also, before gluing, the room is well ventilated, after which the doors/windows are tightly closed to avoid drafts.


Note! Also make sure that there is a special place on the floor where you will mark, cut and apply glue to the wallpaper. And we will talk about that in different rooms below.

Wallpapering walls is the most popular and simplest type of wall decoration. The technique for performing this type of finishing cannot be called intricate. Therefore, it is quite possible for a non-professional to do the wallpapering of walls in an apartment with his own hands. However, high-quality wall pasting requires compliance with certain rules and nuances during the work process.
Selecting wallpaper and preparing the necessary tools
In the modern construction market, wallpaper for the walls of any type of premises is presented in such a rich assortment that it is difficult to choose just one. Therefore, to begin with, it is worth deciding on priorities and choosing the most suitable material to decorate your home.
It is better to cover the kitchen and hallway with the most durable and wear-resistant wallpaper. Thick, moisture-resistant vinyl, the so-called washable wallpaper, suitable for wiping with a damp sponge or rag, is suitable here.

The bedroom can be decorated with any type of wallpaper in accordance with the design of the room. It is better to cover a children's room with inexpensive, environmentally friendly paper wallpaper, and here you can experiment with combining different colors. Expensive ones are suitable for the living room textile wallpaper or silkscreen printing.
Wallpapering walls requires the preparation of available materials and tools; these should also be purchased in advance. Here is the list:
- wallpaper glue and a container for diluting it;
- putty and a narrow spatula;
- sandpaper and holder for it;
- large ruler and plumb line;
- knife or scissors for trimming edges;
- wallpaper brush or rubber roller;
- sponge or rags for wiping.
When everything is ready for repair, you can proceed directly to the process. Let's consider the sequence of stages of pasting walls with your own hands.
Return to contents
Alignment and marking of walls

The first step is to clean the walls of old wallpaper, if any. To do this, wet them with a damp sponge or roller and scrape them off the wall using a spatula. Then, using acrylic putty and a spatula, you must carefully level out all the depressions and potholes on the walls, after first removing any nails, screws, or hooks protruding from the wall.
After drying, the putty layer must be sanded using sandpaper secured in a special holder. Then apply a layer of primer. This will strengthen the strength of the putty and increase the degree of adhesion of the wallpaper to the wall.
Now you can move on to marking the wall. To do this, in the corner located next to the window, draw a strictly vertical line with a pencil using a plumb line or level; it will help to evenly paste the first strip of wallpaper. Then we decide on the top and bottom edges, measure the distance between them, and add 5-7 spare centimeters to this number. This will be the length of the wallpaper. The preparation and marking of the walls is completed, you can move on to the next stage.
Return to contents
Cutting wallpaper and preparing glue
The usual roll length is a little more than 10 meters. If the wallpaper pattern does not require adjustment, one roll will yield 4 canvases, and taking into account the adjustment of the pattern, only 3 canvases will be obtained. The remaining large pieces are usually used when pasting walls above window and door openings.

Let's start cutting. We lay out the roll on the floor with the pattern facing up, measure the required length (not forgetting about the spare 5-7 cm), make notches along the edges, bend the fabric along these notches and use a knife to go along the fold line. The first canvas is ready. We roll out another roll next to it, adjust the pattern, usually the shift of the pattern is from 15 to 50 cm. We cut out the second sheet to the size of the first. In a similar way, measure and cut out the next 5-6 canvases.
After cutting the wallpaper, prepare the glue. Modern market offers a wide variety of adhesives: colored, colorless, for heavy vinyl and thin wallpaper. Having chosen the appropriate glue, dilute it according to the instructions. This is usually not a very difficult process.
In a container with warm water pour in a thin stream of adhesive powder, stirring it constantly and not allowing lumps to form. Then let the glue swell, let it sit for a few minutes and mix vigorously again. Now the glue is ready to be applied to the wallpaper. Let's move on to the next stage.
Return to contents
Applying glue and starting gluing
First of all, the finished glue is applied with a roller or brush to the wall surface as additional primer. Then we turn the prepared canvases face down and begin to apply glue evenly and thickly along the entire length, thoroughly coating the corners and edges. It is very convenient to use colored glue; when applied, you can clearly see where the uncoated areas remain, and after drying it becomes discolored.

When the canvas is completely covered with glue, fold it like an accordion with the glue side inward, without pressing along the fold. We soak the wallpaper for the time indicated on the glue package, usually 5-7 minutes. IN in this case You should follow the instructions exactly, since thick, underexposed wallpaper can peel off, and thin, overexposed wallpaper can swell and spread.
When the glue has been absorbed, take the canvas by the upper edge, climb onto a stepladder or chair, place it right up to the ceiling, carefully unfold it, while simultaneously directing the edge of the canvas exactly along the intended vertical line. After making sure that the edge of the wallpaper coincides with the reference line along its entire length, you can smooth the canvas using a special wallpaper brush or rubber roller.
We carefully straighten the canvas, starting from the top and gradually moving the brush down and to the sides, trying to expel the air remaining under the wallpaper and smoothing out any wrinkles that have appeared. Remove any glue that gets on the front side of the canvas with a rag or sponge so that after drying there are no stains left. Immediately after gluing the first strip, use a knife to cut off the excess wallpaper from above along the intended line and from below along the line of the baseboard.
In the same way, we glue the second and subsequent strips of wallpaper end-to-end to the previous one, trying to fit the edges of the strips well, without leaving gaps or cracks and not forgetting to carefully combine the wallpaper pattern. When one wall is pasted over, you should carefully coat all the edges of the canvases with a thin brush, as they most often come off.
Decorating walls with wallpaper of two types - very popular design technique. Due to the fact that its variations are inexhaustible, it allows you to create a truly unique interior every time.
All leading manufacturers take this into account and annually release new original wallpaper collections. But interesting combinations canvases different color you can choose it yourself. And since stores often reduce prices on leftovers, such wrapping can be much cheaper.


Of course, in order for the walls to look harmonious, you need to select paired wallpapers thoughtfully and taking into account functional features each room. Let's look at the examples in the photo of how to beautifully hang wallpaper of two colors in the living room and bedroom.
Combining two types of wallpaper: eight basic gluing techniques
It is important to understand that the main condition for creating comfortable interior- a harmonious combination of all its components, including wallpaper. They serve as a background or, figuratively speaking, as a canvas on which the entire interior landscape is painted.

Therefore, before going to the store to buy them, it would not be superfluous to carefully consider successful examples design combined wallpaper two types for a bedroom or living room in the photo finished interiors. Analyze them, mentally imagine how good they will look in the decor of your room and, based on this, choose the most suitable one for yourself. suitable option.

Despite the fact that there are a lot of methods for gluing combined wallpaper and each designer brings some personal ideas to them, eight main technical techniques can be roughly identified from them.

Basic visual techniques for combining two types of wallpaper of different colors or textures
Having studied the basic techniques for gluing two types of wallpaper on walls, you can move on to the question of how you can aesthetically decorate the interior with canvases of different colors and thicknesses. The main techniques for combining wallpapers that differ in these characteristics are as follows:

Features of combining wallpaper of two colors in the living room
Hall - the main room in the house, a place for gatherings with friends, family holidays, and sometimes meetings with business partners.


Its interior should be designed in such a way that it is not only comfortable for the owners of the house, but also helps maintain their image successful people with good taste. Therefore, no matter how attractive budget wallpaper may seem to you, remember that the quality of this type of finishing materials almost always corresponds to its cost and there is no need to save on it. 

For the hall, it is preferable to choose wallpaper with an interesting texture: silk-screen printing, glass wallpaper, vinyl or non-woven on a good quality basis, and they are not cheap. 

Besides, in small apartments the hall often combines the functions of several rooms: a dining room, a bedroom or, for example, a corner where an older child does his homework while his brother or sister sleeps in the nursery. Therefore, when looking at photos of interiors with two-color wall designs and thinking about how to beautifully hang wallpaper of two colors in the room, pay attention to how, with the help of wallpaper from partners, professionals divide the space into thematic zones.


The main role when choosing the color of the walls is played by the size of the room. In a small room it is recommended to use light shades. In a spacious living room, you can not limit your imagination and feel free to experiment with any combination of textures and colors.


But in any case, the recreation area, and it is present in every room, will be more comfortable if it is highlighted with light wallpaper - plain or with a small pattern. The remaining areas: the wall where the plasma TV is located (home theater), fireplace, shelves with family heirlooms, will look more advantageous if they are covered with wallpaper in rich colors with a beautiful pattern.
Features of combining wallpaper of two colors in the bedroom
A bedroom is a personal room, the main purpose of which is to provide complete rest. Therefore, you can choose wallpaper for it without regard to other people’s opinions, starting only from your own preferences. But still, you should not get carried away with the game of contrasts, too bright colors and flashy patterns, but rather prefer canvases of calm, peaceful colors.


Wallpaper with a relatively smooth texture is best suited for the bedroom: paper, vinyl, acrylic, silk-screen printing. In addition, this is one of the few rooms where fabric wallpaper, which is very fashionable today, can be successfully used for combination.


With them, the interior looks especially cozy and relaxing. They should be matched to the textiles present in the setting: curtains, furniture upholstery, bedspreads, carpet. The only negative is that fabric wallpaper is very thin, so combining it with other types is not easy and the joints in this case will have to be decorated with moldings or decorative slats.


A special charm will be given to the bedroom by well-chosen combinations of two types of wallpaper with different textures of similar shades of the same color: coffee and beige, blue and light blue, green and light green. At the same time, the main wall covering is made smooth and lighter, and the area at the head of the bed is decorated with textured and darker canvases, placing emphasis on this particular area.


The design looks very interesting, in which the accent fabric above the head of the bed is glued to the very top and, without interruption, goes to the ceiling. This decor will allow you to make sleeping area more comfortable and make it stand out even more. For insertion, you can choose non-woven wallpaper. On the ceiling they look no worse than expensive plaster, and over time they can be repainted without need. special effort refresh the renovation.
Wall decor automatically determines the main color scheme the entire room, and the colors of at least one type of wallpaper from a pair must be duplicated in the interior: furnishings, furniture upholstery, door design, floor and ceiling coverings.


The possibilities that open up when decorating walls with wallpaper in two colors are endless. And since in creating a personal space you must first of all be guided by your own preferences, it is possible that you will open your original technology gluing.

And if suddenly at the end of your renovation you get too extravagant and unusual interior, do not rush to redo it. Remember that your know-how may turn out to be a new word in interior design and will subsequently gain a huge number of fans.
We will send the material to you by e-mail
Rarely does an apartment renovation complete without wallpapering. This universal look decorative covering suitable for any interior, it is loved for its ease of installation and perfect view.. In this article we will tell you how to correctly build an algorithm for working with wallpaper: from preparing walls and choosing tools to final finishing seams.
Wallpaper is a covering that is found in every second modern apartment
Doing it yourself is not a difficult task, especially if you have everyone necessary tools. People with experience make do with a brush and roller, but for a beginner, other devices may be useful:
- paint tray and roller for applying glue. It is better to select a roller with medium-length pile, and the dimensions of the bath should correspond to the roller. You can replace it with a wide brush with a comfortable handle. In addition, keep a small brush on hand for taping seams;
- rubber roller for smoothing stripes on the wall and removing air bubbles on thin wallpaper. For thick people, instead of a roller, you can use ;
- roller with a roller for pressing the canvas in the inner corners;
- container for diluting glue: it is better to use a large saucepan or bucket with a lid. Sealed containers will keep the glue ready for use for several days;
- drill or construction mixer for mixing glue. If we are talking about a small amount of work, you can do it manually;
- pencil, long ruler, tape measure and scissors for marking and cutting fabrics. Can be used for cutting construction knife– the edges are smoother;
- a plumb line or building level for marking the vertical line from which you will glue the wallpaper;
- a sponge to remove excess glue and a dry rag to remove debris.
In addition to the wallpaper itself, you need to prepare glue. The composition is selected according to the type of coating. You can buy glue at the store and dilute it according to the instructions.
Note! Instructions for preparing the glue are located on the packaging. It indicates the proportions of water and powder, glue consumption per square meter surfaces and application specifics.

The preparatory stage before sticking wallpaper on the wall with your own hands
Don’t rush to start wallpapering right away. It’s not enough just to purchase tools and materials, you also need to carry out preparatory work. Examine the condition of the walls, remove the old coating and carefully prime the surface.
How to remove old coating from walls
If the walls were previously decorated with wallpaper, they need to be removed. In most cases, the material comes off easily, but if you have pieces or entire strips left that cannot be torn off, you will have to use special tools. Compositions for removing old wallpaper can be bought in the store, but it is cheaper and easier to make such a mixture yourself. The recipe is simple: in warm water add dishwashing detergent and a little wallpaper glue. Using a sponge, apply the product to the wallpaper and leave for half an hour until the coating softens.
Ask a Question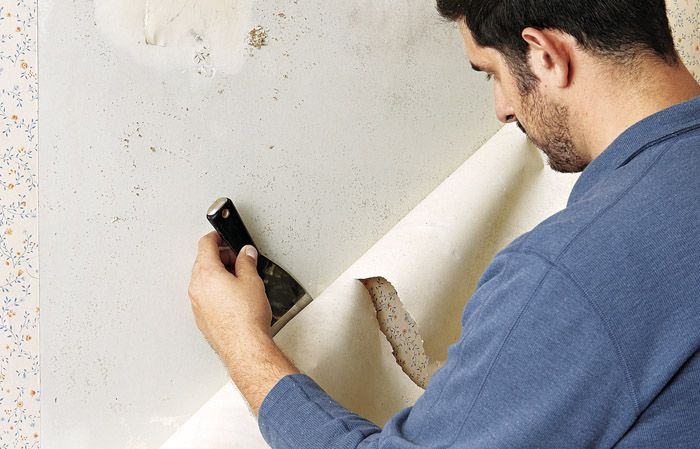
“Any leveling of walls is accompanied by the formation large quantity garbage and dust. Remember to use a respirator to protect your respiratory tract and close doors to other rooms."
Primer of walls
Don't neglect priming the walls. If you skip this preparation stage, you risk getting an extremely unpleasant result - the wallpaper will simply peel off. In addition, the primer will even out the color of the wall, and the gray concrete will not show through under the thin coating. The primer mixture will fill the voids in the porous surface, you will use less glue.

For walls made of concrete and wood, use a universal acrylic primer. It is easy to apply, diluted with plain water and dries quite quickly.
For your information! Unscrupulous sellers may offer you instead acrylic primer, PVA glue solution. Be careful, the compositions are very similar in appearance, but the glue has a specific smell.
For walls made of wood, plywood, or you can use alkyd primer. It takes a long time to dry - almost a day, but provides excellent adhesion even for heavy wallpaper. Metal walls are treated with glyphthalic primer, similar to enamel. Only she guarantees you high-quality coating. The same primer can also be used for plastic. This coating will dry overnight. Another option for a mixture for metal is perchlorovinyl primer, but it is not recommended for use in residential premises due to its high toxicity.

How to glue wallpaper correctly - basic techniques
After you have well prepared the walls before the main stage of work, you need to solve several important issues: where to start gluing, how to properly cut the wallpaper and paste it in complex and hard-to-reach places.
Related article:
interesting solutions for the living room, bedroom, children's room, kitchen and corridor. Read our review for the basic rules for selecting canvases and designers’ recommendations.
Where to start gluing wallpaper and how to adjust the pattern
Elder relatives, wise from their own experience, will tell you that you need to glue wallpaper from the window. Indeed, old paper panels were glued this way for one simple reason: the joints were made overlapping, and so that when natural light the seams were not conspicuous; they should have been directed away from the window. Modern manufacturers offer panels that are glued end-to-end. Such seams are less noticeable, but they require a perfectly flat base. So the question of where to start work becomes less relevant: start from any side on which it is convenient for you to draw a vertical line, and glue in a circle.

Please pay attention to several important nuances:
- what the wallpaper will look like in the opening between the windows. It's not always good if narrow opening the seam will be placed;
- where the furniture will be located. If you plan to install wallpaper and not place it behind it in order to save money, you need to decide on a starting point;
- if you plan to place it on one of the walls, you need to accurately measure the location of the picture and continue pasting from this place.
The first canvas is the most difficult task. It is important to place it strictly vertically so that the slightest distortion does not later ruin the entire work.


Expert's point of view
Dmitry Kholodok
Technical director of the repair and construction company "ILASSTROY"
Ask a Question“If you use a plumb line, rub the rope with chalk or paint. Secure the upper end of the plumb line and slightly pull the lower end - the paint will remain on the wall and indicate the desired line.”
Most often, rooms in apartments have imperfect angles. Therefore, it is better to mark the vertical on each wall. Wallpaper gluing technology requires adjusting the pattern. Fashionable finishing It is distinguished by complex ornaments and bright images. You should know that on the wallpaper packaging, manufacturers indicate the offset distance to adjust the pattern. But in practice, it is easier to do the adjustment manually, visually matching the pattern. And this should be done not only at the stage of cutting the canvases, but also during the process of gluing them.
Video: wallpapering with a large pattern
Glue on wallpaper or on a wall - how to apply it correctly
The answer to this question depends on what type of wallpaper you chose for your renovation. If you have paper wallpaper, the glue is applied directly to the canvas. For secure adhesion of thick vinyl or non-woven coverings adhesive composition applied both to wallpaper and to the wall. Non-woven wallpaper can be glued without applying the composition to the canvas, limiting itself only to wall treatment.
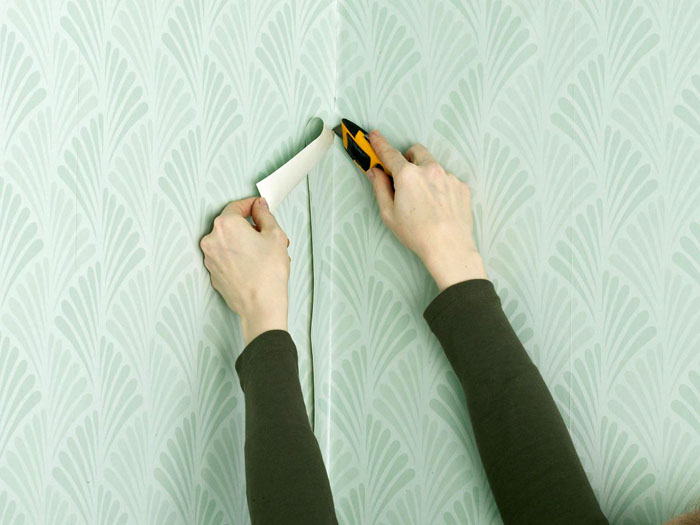
How to properly glue wallpaper in the corners of a room
Most often in the process of work you have to deal with internal corners. Here you should make sure that the strip covers the corner and a few centimeters beyond it. Even if the canvases are glued end-to-end, you need to overlap in the corners. That's the only way you'll get flat angle. Use a level or plumb line as a guide. To prevent the overlap on thick wallpaper from being noticeable, after applying the sticker, cut both layers along the ruler sharp knife, and while the wallpaper is still wet, remove excess stripes from one side and the other. If necessary, add glue using a small brush.
You will also have to tinker with the outer corners. They are rarely perfectly even, so here you also need to use an overlap of 3 centimeters. After the first canvas has been glued, you need to trim it, leaving a thin edge at the corner. The second strip is aligned vertically on the other wall and secured so that there is minimal overlap on the first strip. How to properly glue wallpaper in corners in a short video course.
How to glue wallpaper near windows, doors and behind the radiator
So, you are gluing wallpaper with your own hands, and you have reached. Feel free to fasten the new canvas so that it forms an overhang on the window. If you need to seal the slopes, make two horizontal cuts and fold the panel over. If it does not reach the frame, you will have to make another cut, preferably joining it at the corner (see gluing technology external corners, described above).

- a serious obstacle. You won't be able to place wallpaper behind them, so you'll have to cut them off. This must be done so that it is not noticeable that there is a bare wall behind the battery. To do this, leave a part of the canvas so that it extends 10 centimeters onto the radiator, and then tuck it behind the device, pressing and smoothing it with a spatula. How to properly hang wallpaper behind the battery yourself in the video.
How to make joints invisible
Why can seams between panels remain noticeable? There are several reasons for this effect:
- defective coloring of the edge of the wallpaper. A minimum strip of tenths of a millimeter without paint can cause the seams to be visible;
- an error in gluing the canvas - skewed to one side leads to minimal overlap or the appearance of a gap;
- poor adhesion of the material to the base; part of the strip may fall behind due to an air bubble.

It happens that you noticed a marriage too late, what to do? There are several ways to disguise a seam so that it becomes invisible. If there is an unplanned overlap, you just need to cut through both sheets as when working with internal corners and remove the excess strips.
Important! To ensure that the edges of the wallpaper stick tightly to the base, additionally coat them with glue and roll them with a rubber roller.
Noticed uneven edge paint? It is best to return such wallpaper to the store, it is a defective product. If for some reason this is not possible, for example, you bought the material in another city, then try cutting off the unpainted edge. It's complicated, and new joint problems will inevitably arise. It is best to do this during the gluing process, deliberately making an overlap and cutting off the edge already on the wall. An alternative to this method is to use paint that matches the color. It is better to take a color half a tone darker.
How to properly apply different types of wallpaper
The wide range of wallpaper in modern stores includes products not only for every taste, but also for every budget. You can limit yourself to buying cheap wallpaper on paper based or purchase more expensive non-woven or vinyl options. Is there a difference in the sticker? different types wallpaper?
How to properly glue paper wallpaper
Paper is an inexpensive and environmentally friendly coating. Experts advise applying glue to the panels when gluing paper trim. Keep in mind: the paper quickly absorbs the glue, so you will have to work very quickly, otherwise the strip will get wet and tear when gluing.

Do not be alarmed if, even after careful leveling, unevenness appears on the surface after a few minutes - after drying, the canvas will “tighten up” and will be smooth again.
How to properly glue vinyl wallpaper
For vinyl wallpaper, you definitely need to purchase a special glue. This material is thick and should only be placed end-to-end. On the packaging of vinyl wallpaper it is usually written where the glue should be applied: on the panel or on the wall. Unlike paper strips, vinyl strips must be saturated with glue within 10-15 minutes. The video below gives recommendations on how to glue vinyl wallpaper with your own hands:
Article
To wallpaper walls with your own hands, you can use the most different kinds this material. When choosing it, you should take into account the features that the future coating should have, for example, the ability to hide small defects in the walls or be resistant to moisture.
Paper wallpaper for walls
They are the most popular; prices for such wallpapers vary, but are not high. Manufacturers produce single-layer simplex and duplex materials, which have two layers. There are smooth wallpapers, with embossing and relief.
Their advantages are affordable prices, simple pasting and a large assortment, and the disadvantages are average quality, low wear resistance and moisture resistance.
Non-woven wallpaper for walls

This is a relatively “young” type of wallpaper. And although it appeared not so long ago, it has already managed to take its rightful place in the construction market. The material has it all necessary qualities to create a cozy and impressive interior.
The list of advantages of non-woven fabrics includes: relatively low price, the ability to mask small flaws in walls and paint surfaces up to 4-5 times. Wallpaper is hygroscopic, so it does not interfere with air circulation in the premises. This prevents the appearance of condensation on the walls.
The disadvantages of such wallpapers are their limited pattern and satisfactory insulating properties.
Vinyl wall wallpaper

These wallpapers have significant durability; their service life can exceed 15 years. Often vinyl sheets have a non-woven base, that is, such material concentrates best qualities both types of products.
Vinyl covering has a very attractive appearance, it often imitates any texture, from textiles to natural wood or a stone. There are types of vinyl wallpaper, the surface of which can be painted.
The advantages of the material are high strength, good water resistance and antibacterial properties. Its disadvantages are its large weight, depending on the thickness of the canvas, high cost and low hygroscopicity. The first time after covering the walls with vinyl wallpaper, there may be an unpleasant odor in the room.
The work of installing wallpaper is not particularly difficult, but before performing it, special attention should be paid to preparing the walls and choosing an adhesive that matches the type of painting.
Calculation of the amount of wallpaper for walls

Calculate required quantity Wallpaper for covering the walls of a room is a serious task. The easiest option is to use a special program for calculating the number of rolls. Such a calculator can be found on many construction sites. Self-calculation should begin with determining the size of the room.
The calculation of wall wallpaper along the perimeter is carried out as follows:
- First you need to measure the perimeter of the room and the height of the walls. For example, let’s take a room 6x3 m. Its perimeter will be 18 linear meters. If it is planned to cover the walls not up to the ceiling, the calculation is made based on its actual height.
- To calculate the number of sheets of one roll, its footage should be divided by the height of the pasting. For example, the height of the room is 2.5 m, the footage of the roll is 10 m. Then it will be enough for four strips: 10/2.5=4. With a pasting height of 2.7 m, the result is: 10/2.7 = 3.7. That is, a roll is enough for three sheets of 2.7 m each, and 0.7 of its footage still remains. To determine the length of the remainder, you need to multiply the value of 0.7 by the height of the pasting: 0.7x2.7 = 1.89 m. This piece can be used for pasting walls behind heating radiators, above windows or doors.
- The required number of canvases is determined by dividing the perimeter of the room by the width of the roll, which is usually 0.53 m. Using simple calculations, it turns out: 18/0.53 = 33.9. If this figure is rounded to a whole value, it turns out that the room will need 34 wallpaper sheets.
- The number of wallpaper rolls is calculated by dividing the total number of wallpapers for the room by their number in one roll. With a pasting height of 2.5 m, it turns out: 34/4 = 8.5 rolls. For a pasting height of 2.7 m, the calculation is the same: 34/3 = 11.3. When rounding these values, we get 9 and 12 rolls, respectively.
- This calculation does not take into account the area of window and doorways. If they are large, then their width can be subtracted from the perimeter of the room and the amount of wallpaper can be calculated using the new values. However, you should take into account the need to have a stock of wallpaper for unforeseen cases.
- With a room area of 3x6 = 18 m 2, its perimeter is 3 + 3 + 6 + 6 = 18 linear meters. If you multiply the perimeter value by the height of the pasting, you can get total area all wallpapers. For example, with H = 2.5 m it turns out: 2.5x18 = 45 m 2.
- The area of an unfolded roll of wallpaper is: 10x0.53=5.3 m2, that is, one roll is enough to cover a 5 m2 wall. The remainder does not need to be taken into account.
- To calculate the number of rolls, the wall area of 45 m2 must be divided by the area of the unfolded roll: 45/5=9. As in the previous calculation for the perimeter, the total is 9 rolls.
When covering walls with wallpaper with a pattern, the material consumption is always higher than usual. There is only one rule here: greater repeat increases the waste of canvases when fitting them to the pattern. This factor should be taken into account when purchasing material. As a reserve, it is recommended to purchase an extra roll in case of an error in operation.
Important! Rolls of wallpaper should always be purchased from one delivery batch. Otherwise, the shades of the patterns of the canvas of different rolls may differ.
Choosing adhesive for wall wallpaper

For quality work It is necessary to follow not only the technology of wallpapering walls, but also to make correct selection glue. Despite the variety of its types presented on the construction market, you need to buy a composition designed for a specific type of rolled material.
For paper wallpaper will do glue having the most low price, but of sufficient quality to ensure reliable and simple pasting.
Fabric, vinyl and embossed wallpaper require an adhesive mixture on vinyl components for installation. The peculiarity of this composition is that the covering sheet can be re-glued without much difficulty if it was installed incorrectly.
If necessary, this should be done while glue mixture- fresh, but there is usually always enough time to correct the error. It is not recommended to buy quick-drying compounds; using them may deteriorate the quality of the pasting.
To cover walls with non-woven wallpaper, you need special composition, which is applied not to the canvas, but to the wall. There is no need to wait for the surface to be impregnated with glue; the wallpaper is pasted immediately after the surface has been coated.
Glue for heavy textile and velor wallpaper is a special type of similar mixtures; it must withstand the weight of the material.
Universal types of glue are recommended to be used only in extreme cases. Such compositions are diluted with water to a concentration depending on the type of wallpaper. Universal glue is excellent for installing light paper wallpaper; in all other cases it is recommended to buy a special mixture.
Preparing walls for wallpapering

Preparing the walls is crucial for obtaining a high-quality result of their further pasting. First you need to remove the old coating, inspect the walls and, if necessary, level them, first filling in potholes and cracks.
To work, you need to stock up on the following materials and tools: wallpaper, glue and a container for diluting it, a drill with a mixer attachment, a roller, a primer and a brush, a sharp knife, a metal ruler, building level and a tape measure, a spatula, a plumb bob and a roller for rolling edges.
Apartments in new buildings are often bought without finishing at all. This greatly simplifies the task of preparing walls for wallpapering, although it requires a lot of time and money. To give concrete surface To achieve some roughness, which is necessary for successful further work, the walls should be plastered:
- At the first stage of work you need to knead plaster mortar to the consistency of thick sour cream and spray it with a layer of 3-9 mm on the walls using a special falcon painting tool. In this case, all irregularities should be filled.
- After the surface has dried, it is necessary to apply a primer plaster layer up to 6 mm thick. It can be applied 2-3 times.
- Covering last layer plaster mortar is applied after priming. Its thickness should be 2-4 mm. Construction mixture in this case, it is mixed with less water than when spraying the solution in the previous case.
- After plastering, the walls should be thoroughly rubbed to compact and level the surface, and then treated sandpaper.
To remove old wallpaper, you need to work carefully so as not to damage the surface of the walls before gluing the new material:
- To clean the walls you will need a metal spatula, pure water, detergent or vinegar and spray.
- The surface of the wallpaper should be moistened with a solution consisting of water, vinegar or household chemical agent. For this purpose it is convenient to use a spray bottle.
- Further work you need to do it with a spatula, carefully removing the soaked wallpaper with it, trying not to damage the surface of the walls.
- After removing all traces of the old coating, you need to inspect the cleaned surface. If it is smooth, the walls just need to be sanded.
- If there are defects, the walls will have to be leveled with a starting coarse-grained gypsum mortar.
- Construction hairdryer. It's long and hard work, requiring a respirator and periodic ventilation of the room.
- Angular grinder"Bulgarian". It will quickly remove the paint, but this work is very dusty, you will have to close the doors tightly and plug the cracks with a rag.
- Special paint removers. This is the most suitable option. The wall surface is not damaged during such cleaning, old layer The coating is easily removed. Before working with the wash, you should protect your eyes, hands and respiratory organs with special glasses, gloves and a respirator.
Before gluing wallpaper, the walls must be primed taking into account the type finishing material. In many cases, it is required as an intermediate layer that increases the adhesion of glue and plaster.
Marking the surface of the walls before wallpapering
After completing the preparation of the walls, you can mark them for correct placement canvases For this purpose, you should use a plumb line, chalk and a long metal ruler. The marking starts from the window with gradual movement to the left along the perimeter of the room.
The first strip of wallpaper should be aligned with the edge of the window opening. At this point it is worth drawing the first vertical marking line along the wall. Further movement is carried out taking into account the width of the canvas, a two-centimeter margin of distance and finishing of the corners towards front door.
In general, the markup scheme looks like this:
- From the window to the left, markings should be made to the corner of the wall on which the doorway is located. It is recommended to number the marked areas.
- Further marking is done to the right side of the window opening and continues to the door.
Wallpapering technology for walls

It depends on the type of wallpaper chosen and includes two methods of gluing them: end-to-end and overlapping. The first method of wallpapering walls is modern and involves combining adjacent strips with edges. When using the second method, the canvases are alternately overlapped with edges at a distance of 1-1.5 cm.
Work on continuous wall covering should be carried out in the following order:
- Clear the room's floor surface of anything that might interfere with the process and cover it with clean plastic wrap.
- Dilute the glue with water in the proportion indicated on its packaging and mix thoroughly.
- Brush the back of the canvas or the wall, depending on the type of wallpaper.
- Place the canvases with glue-coated sides facing each other for impregnation for 1.5-2 minutes.
- You need to start gluing the walls strictly according to the scheme. In this case, the folded canvas should be applied to the top of the wall and carefully straightened in a vertical position, smoothing it with front side.
- The work should be done using a rubber roller or a clean rag from the center of the canvas diagonally downwards, removing air bubbles and leaving no creases.
Wallpapering in the corners of the walls requires attention Special attention. There are several rules for it:
- The canvases in the corners must be joined so that they do not overlap any of the wall surfaces by more than 4-5 cm.
- The next canvas must be glued with an overlap of the remaining 4-5 centimeters.
- All corner joints of the canvases should be additionally coated with glue and rolled with a special roller for a tighter press to the wall.
Important! Wallpapering walls should be done in the absence of any draft in the room. Do not ventilate it for 12-24 hours; wait until the material is completely dry.

There are some nuances of working with wallpaper that should be taken into account to achieve the best result:
- Before pasting the walls, it is recommended to turn off the power to the room and remove the covers of all sockets and switches. Holes for them should be cut immediately after gluing the canvas, and not wait until it dries.
- To make wallpapered walls look neat, you must first remove the baseboards. This will allow you to glue the wallpaper to the floor, and after installing the baseboards in their rightful place, there will be no gaps or joints.
- The wall around the perimeter of the doorway should be coated well with glue and carefully place the edges of the panels behind the trim using a spatula. Excess glue must be removed immediately with a clean rag.
- Paper wallpaper You should first cut them into sheets, coat them with glue and fold them together with their back sides for 10 minutes. After impregnation, the canvas will no longer bend. It is also recommended to cover the walls with glue, paying attention to the places of wall joints. It is better to glue paper wallpaper with an overlap.
- Proper wallpapering of walls with vinyl wallpaper is carried out on a primer layer. The glue must be applied to the structure and wait a couple of minutes, after which the material should be glued end-to-end. Vinyl wallpapers are prone to stretching, so you need to work with them carefully. Some types of such material require an additional adhesive layer to be applied to the panel.
- Non-woven wallpaper should only be applied to clean surface, covered with putty. You need to generously apply adhesive to the walls and install such wallpaper end-to-end, removing bubbles and folds by smoothing the material with a rag or roller.
That's all. We hope that our material was useful to you. Good luck!
