There is a computer in every home, and it needs a convenient one, with all the shelves and drawers necessary for comfortable work.
Of course, this piece of furniture can be bought in a store; the range of computer desks is very large, and choosing a design to suit your needs will not be difficult.
But the cost of exclusive custom-made models is quite high. Therefore, many ordinary people are thinking about how to do computer desk yourself.
 Before you start creating this piece of furniture, you need to decide on the location of its installation, and only after that start designing the structure. Eat three types computer tables:
- straight;
- angular;
- combined.
Important! To make the workplace comfortable and convenient, you need to choose the right type of structure, while building a table at minimal cost.
Straight
The straight design is a classic. If you look at it, it's simple desk, with some additional add-ons. This option is suitable for those people who use the computer from time to time, for example, to communicate on social media. networks. This computer desk is installed against the wall.
Angular
This model is for advanced users who spend a lot of time at the computer. Corner design is preferable in apartments and rooms with a small area, since they occupy the dead zone of the corner. You don’t need a lot of material for this design.
Important! The corner design is not suitable for people who work at a computer; documents and office supplies will constantly get in the way.
Combined
A combined table is an ideal option for professionals, as the design has many bedside tables, shelves, and niches. This piece of furniture takes up a lot of space, so it’s not suitable for a small room.
Assembling this structure is more difficult than the first two, but if you are patient, you will be pleased with the result.
Components
Any computer desk, unless of course it is the most simple model, has some functional areas:
- shelf for system unit, should be positioned in such a way that there is free access to the unit, but at the same time all wires are hidden behind work area. The size of the shelf must correspond to the dimensions of the system unit;
- table top– an integral part of the structure, the monitor will stand on it;
- speaker stands– element is required. An audio system takes up a lot of space and it is uneconomical to place them on a table, and the table space should be as ergonomic as possible;
- scanner, printer, MFP - should stand separately, and on the very top shelf, since they are not used every day;
- keyboard stand– although some believe that this element is harmful to health.

Advice! Convenience of work can be increased by providing drawers for storing office supplies.
How to customize a drawing with your own hands?

Once you have decided what configuration of table you need, you can proceed to the practical part - direct manufacturing with your own hands. At the very beginning of the project, the dimensions of the structure, specifically the height, are determined. Standard table has a height of 75 cm, but there is a special calculation formula:
Important! Table height = Height multiplied by 75 and divided by 175.
If a person’s height is 180 cm, then using this formula it can be calculated that the height of the computer desk will be 77 cm.
If you find it difficult to create your own drawing, adapt an existing one on the Internet with your own hands. Classic table for a computer is easy to manufacture and has such components How:
- table top for the monitor;
- keyboard shelf;
- shelves for stationery items;
- drawers for papers;
- two upper shelves for acoustics or decor.
If everything is designed correctly, then there will be a place on the computer desk for all the necessary elements.
After everything has been decided with the project, you need to draw up detailed plan action, which will describe step-by-step instruction assembly of the structure.
Materials and tools
Before starting work at home, prepare everything you need. Materials:
- furniture panels 1.8x20x200 cm – 2 pcs;
- shields 1.8x60x200 and 1.8x40x200 - 3 pairs;
- boards 1.2x12 cm - 6.2 meters;
- plywood 6 mm – 1 sheet;
- guides for drawers – 3 pairs;
- a pair of guides for a shelf under the keyboard;
- accessories and fasteners.
Tools:
- screwdriver and drill;
- hacksaw;
- construction stapler;
- grinder;
- chisels;
- construction corner and ruler;
- roulette;
- sandpaper different factions;
- glue;
- brushes and varnish;
- furniture tape.
The materials are indicated based on the assumption that a classic design will be assembled. When creating a custom computer desk, this list needs to be adjusted to suit the project.
Advice! When choosing guides for pull-out shelves and drawers, it is better to prefer ball-type models, despite the fact that their cost is higher than roller ones. The disadvantage of roller elements is that they do not last long, do not extend completely, and do not have a reliable stop.
How to make?
The assembly of the structure is carried out strictly according to the drawing that was prepared earlier.
How to assemble the lower tier yourself?
The first step is to carry out marking parts on the surface of the material: 
- three vertical walls;
- table top;
- bedside table covers.
- All actions are carried out according to the project.
Vertical walls need to be sawed down - the front and top corners are cut 2x2 cm, the cuts are cleaned.
Usually a computer desk is installed close to the wall, so the lower corners are cut down to fit the size of the plinth. Typically this distance is 4.5x5.5 mm.
On the vertical wall at the back, which runs in the center, you need to make a sample; it will be at a height of 26.5 cm. The width of the sample is 20 cm, the depth is 1.8 cm. During assembly, a crossbar will be installed at this place. The sampling is done so that the element is screwed with self-tapping screws flush to the side walls. This panel replaces the rear wall of the structure. In this case, the table will receive proper rigidity and stability.
Once all the elements are ready, holes for fasteners are drilled in the right places. If this is not done, then during assembly the furniture panel may crack at the attachment point. Tighten the elements with self-tapping screws.
It's time to make a niche for installing the system unit. If you are a system administrator or programmer, then you constantly need access to the system unit and its components. Therefore, it is worth equipping a stationary, strong and stable shelf with self-tapping screws.
The horizontal shelf and side wall are cut out according to the dimensions of the drawing. U side element cut off the front corner from above and sand it down. It’s also worth filing the lower rear corner under the baseboard. Screw the shelf to the side wall, then fasten the structure to the side table stand and the rear cross member. The openings under the shelf and cabinet must be closed with panels cut for the base. Fastening in in this case there will be dowels. In this case, they are not treated with glue..
The lower part of the computer desk is ready. You can begin building the superstructure with shelves.
Computer add-on
 In order for a computer desk to be as functional and convenient for work as possible, the project must include not only shelves, a table top and a bottom for the system unit, but also a top part with stripes.
The superstructure is not only extra bed for storing small items, but also performs a decorative function.
Step-by-step instruction:
- Mark the required elements on furniture panel, cut out.
- Carefully sand all cuts so that sharp corners are rounded.
- The sides will be attached to the tabletop, so you need to determine the attachment points.
- Make a template 1.8 cm thick.
- Attach the template to the tabletop and make markings. For more accurate markings at the ends of the template, you need to make holes using a drill and drill bit.
- Then drill holes in the tabletop according to the markings as follows:
- drill with drill bit the required section drill through holes in the countertop;
- Drill blind holes at the ends of the sidewalls with a drill of the same section.
- To install the side elements of the superstructure on the tabletop, use a construction angle; it will help to avoid distortion in the structure.
- The side racks are screwed onto self-tapping screws under the tabletop, with the through and blind holes aligned.
- Next comes the fastening of the upper shelf of the superstructure; for this, an element of the required length with a width of 31.5 cm is cut out of a 40x200 cm shield.
- The middle post is cut out of a 20x200 cm board. It should be arranged like the side walls and installed on the tabletop using self-tapping screws, adjusting the perpendicularity of the structure with the construction angle.
- The next step will be to arrange the rear side. Which is screwed to the sides and the end of the middle element. This process is also regulated by the corner.
- Now you need to arrange a place for the printer, which is usually located on the left side. Please note that the printer has significant specific gravity, therefore the shelf under it must be strong and stable. For greater structural strength, the shelf is not simply screwed onto self-tapping screws, but is additionally secured to the side walls using furniture corners.
At this point, the work on arranging the superstructure is completed, and you can proceed to the next stage.
Pull-out panel and drawers
Drawers are necessary in a design such as a computer desk. The functionality of these elements is undeniable. How to properly arrange drawers We will now look at: 
- For the bottom of the structure you will need plywood, from which we cut out elements of the required size.
- We form the side walls from the board.
- Connect the 4 side elements with self-tapping screws.
- With help construction stapler and staples, connect the bottom and sides of the box.
- Important! The width and depth of the inner drawer are adjusted based on the thickness of the guides that will be installed with inside bedside tables.
- Secure the guides so that there is a gap of 1.8 cm between them and the edge of the bedside table. This is exactly the thickness of the front panel of the drawer.
The remaining drawers are emptied in the same way.
Screw the guide profile at the required distance from the tabletop, install the brake elements and the shelf.
The construction of the structure is not completed yet. Now it needs to be torn into components and the parts treated with varnish. Once all the elements are completely dry, you can produce final assembly computer desk.
Advice! To strengthen the structure, all end elements and fasteners are treated with wood glue before assembly.
Finishing and decorating at home
 Once the structure is finally assembled, they begin to build it. cladding and decoration:
- The first step is to install the facades on the retractable elements.
- Cut out the façade elements and sand the cuts. Drill holes at the handle installation locations.
- Attach the front to the front wall of the drawer and mark the mounting location.
- Attach the front panel and secure it to the drawer with the bolts that will secure the handle.
- For added reliability facing panel secured with self-tapping screws on the inside of the drawers. Self-tapping screws must be taken of such length that they fit into the facing panel a maximum of 2/3.
- natural wood;
- hacksaw, electric jigsaw;
- Grinder;
- drill;
- screwdriver;
- chisel;
- roulette;
- square
- Using a screwdriver and self-tapping screws, we attach the side parts with guides.
- The side modules are assembled using dowels. Greater strength can be achieved using special glue
- We use 4 mm thick MDF as the back wall and assemble the table walls into a single whole.
- Using the drawing, we cut out the elements of the drawers and shelves, make a fitting and secure the drawers with clamps. Side surfaces processed with edge tape.
- On bottom side on the tabletop of the computer table with our own hands we mark the places where the support stands are attached. Using a drill, drill out blind holes.
- Using screws, we attach the cabinets to the inverted tabletop.
- We turn it over, fasten the hinges, hang the doors and put the drawers and shelves in place;
- We attach the stand under the monitor using round blocks of wood, piping and glue.
- We cover the made table with a primer and paint it desired color and begin to use it for its intended purpose.
- screwdriver or screwdriver;
- drill;
- clamps;
- wooden dowels;
- electric saw;
- knife, sharp enough;
- iron, edge tape, ruler, square and pencil;
- wood glue;
- self-tapping screws
- tabletop material;
- side wall material;
- screws or self-tapping screws;
- 4 folding fasteners with a lock.
- The most convenient configuration, providing placement of the computer and peripherals and the ability to use it for its intended purpose without any preparation.
- The dimensions of the table should be user-friendly and fit optimally into the interior of the room.
- The overall design should also match the decor of the room and not stand out or create an unpleasant feeling.
- The composition of the elements that make up the table is designed for the most successful performance of work, activities or other actions with the computer.
- Classic (straight).
- Angular.
- Children's.
- Mobile (on wheels).
- With racks.
- With open shelves.
- With closed drawers and cabinets.
- Modular. Elements of the same type are used, allowing you to compose them in any order and obtain various options designs.
- Prefabricated. A design that allows disassembly and subsequent assembly if necessary (for example, for moving, during repairs, etc.).
- Built-in. Such tables are parts of large furniture or structural arrays, performing their functions within them.
- Tape measure, ruler, square.
- Pliers, hammer, awl, screwdriver (straight or Phillips).
- Electric drill, jigsaw, grinder.
- Iron (for gluing edging material).
- Forstner drill with a diameter of 35 mm for door hinges.
- Screwdriver with a set of bits.
- Grinder with cutting disc.
- Electric drill with a set of drills.
- File, sandpaper for finishing edges.
- Accessories for assembling the body and door hinges.
- Sets of slides for drawers or keyboard trays.
- Edge material.
- Legs, supporting elements.
- Handles of doors, drawers.
- Cut components according to the specifications of the assembly drawing.
- Cover the edges of the parts with edging material. Uses a thin edge with a pre-applied adhesive layer or thick vinyl, placed on the edge of the canvas.
- Drill all over the right points for the possibility of assembly, installation of accessories and door hinges. This point is the most important and requires precision and accuracy. It is recommended to take the time to prepare a template in advance to ensure accurate installation of elements and drilling of holes.
- Assemble a computer desk. Are used different ways assembly, using confirmat, eccentric couplers, screws, angles, etc.
- Install drawer slides or keyboard trays.
- Install handles, plugs, additional elements.
- Drill holes for wires (if necessary).
- Place the table in place and start using it.
- Cutting and assembling a metal frame.
- Cladding of horizontal surfaces (walls), installation of working surfaces.
- straight shape;
- angular shape;
- combined form.
- the presence of a retractable shelf for the keyboard;
- monitor space;
- shelf for storing small items;
- presence of boxes;
- several upper shelves on which you can put books.
- jigsaw;
- electric drill, drill;
- screwdriver;
- pencil.
- two side racks;
- central stand;
- table;
- back wall;
- pull-out keyboard stand;
- several internal shelves.
- Laminated chipboard or MDF, the first will cost less. Of course, a computer desk made of wood, made by yourself, will look much more interesting, but it will also cost significantly more;
- melamine edge - more convenient than PVC trim, as it is easily fixed with a hot iron;
- glue and furniture wax;
- confirmations, dowels and screws.
- hacksaw or Circular Saw if the material is supposed to be cut independently;
- electric drill and screwdriver;
- You will need a jigsaw if some parts have a curved shape;
- sander;
- hex wrench for confirmations, chisel, square, tape measure and ruler.
- depth – 60 cm, or 50 cm if the monitor is on a stand;
- The length of the table top consists of the operator's seat - 60 cm and no less, the width of the compartment for the system unit - 25 cm, the width of the cabinet, if there is one - 40 cm and tolerance. As a rule, this is 130 cm. But if at least a scanner appears, and no add-ons are made, then the length of the tabletop increases;
- height – 75 cm or slightly more, depending on the user’s height. The exact formula is: the product of the operator's height and 75 cm is divided by 175, and the result is the recommended tabletop height;
- The height of the monitor stand determines the viewing angle. It is 0–20 degrees from direct view. With large screen sizes, the need for it may not arise;
- The height of the keyboard shelf is 50–70 cm below the line of best vision. The position of the keyboard in which the operator types text with his elbows hanging and his wrists raised is unacceptable;
- a combined computer-writing desk will have larger dimensions, since it should, in fact, include another operator’s seat - the same 60 cm of free space.
- Patterns are made according to the drawing or the pattern is immediately transferred to chipboard sheets. The parts are cut out with a hacksaw or saw. A jigsaw is used to cut curved elements.
- The ends can be covered with PVC film if necessary.
- Assemble or blind compartment for the cabinet. The box consists of 3 walls, a bottom and a front. The walls are assembled into a kind of box with confirmations, for which holes are pre-formed at the fastening points. The bottom is a thin sheet of fiberboard, simply placed on top and secured to the ends of the product. The workpiece is then set aside.
- They assemble the cabinet - the sides and the bottom, also for confirmations. If there are not drawers, but shelves, then they are screwed to the sides. If drawers are being built, then slats and guides are attached to the sides at the required distance from each other. Better Kulkov balls, not rollers.
- The compartment for the system unit is mounted in the same way: the side of the table, the compartment and the bottom are assembled. Then the finished compartments are fastened together with a rear cross member.
- Guides for the pull-out shelf are secured to the sides with self-tapping screws. Better are Kulkov ball guides or metaboxes - the latter are more expensive.
- Cut out the tabletop and shelf. Their ends are covered with melamine film. The tabletop is secured to the ends of the vertical parts with dowels, since the confirmations will protrude above the surface of the table. The dowels are installed with glue.
- The drawers are finished either after installing the countertop or before. The fact is that in order to properly secure the facade, the box must be in a finished cabinet. The façade is fixed after “trying on”. To do this, tape is attached to the edge of the facade, a ruler is placed on the bottom of the cabinet, and the panel is applied to the ends of the walls of the box. Then the ruler is placed on the top edge of the half-finished box and the same procedure is repeated with the top one. This ensures that there is a gap between the facades, and there are no difficulties when pulling out the drawers.
- If everything is in order, the facades are fixed from the inside with self-tapping screws. The handles on the facades are fixed before installation.
- If the project includes add-ons, then their installation begins after the table is manufactured. The structure is first assembled into confirmaments, and then fixed to the tabletop.
- The standard size of the corner model is the length along the outer edge of the tabletop is 120 cm. Such a table is cut literally from one chipboard sheet, since there are enough scraps to cut out the sides and even the shelves. Increasing the edge to 160 cm gives big advantage: there is room for elbow support and free space for a shelf with a scanner, for example, or a narrow cabinet.
- The system unit is installed on a shelf or even on furniture corners, although the first option is more reliable. The guides for the pull-out shelf are fixed with screws to the tabletop.
- Otherwise, the assembly of the corner model is no different from the straight one. Self-tapping screws and dowels are used for installation.
- The depth of the tabletop is reduced to 50 cm, or even less.
- Width – up to 70 cm, excluding the compartment for the system unit, especially the cabinet. For the system unit you can do mobile stand on casters, which can be positioned with outside sidewalls.
- Whether or not a monitor stand is needed is determined based on sanitary standards and screen size. If the conditions are met when placing the monitor on a tabletop, a stand is not needed.
- A pull-out shelf is a must.
Useful video
Conclusion
As is clear from the article, there is nothing difficult in creating a computer desk with your own hands. It is enough to follow the instructions exactly and be patient.
Important! If you decide to make a structure from MDF panels, then experts advise ordering the cutting of the material into individual parts in a specialized workshop. It won’t cost a lot of money, and the parts will turn out smooth and neat, with the edge removed.
You shouldn’t immediately take on too much complex designs, if you have no carpentry experience, start with something simple.
In contact with
Century modern technologies characterized primarily by an abundance of functional equipment, the task of which is to make a person’s life easier. Not least of all are computers and laptops. Agree, today you rarely meet a person who does not have this technique. This is, of course, good. But a computer or laptop needs to be placed somewhere, and it’s not always possible to buy ready-made furniture the best option. It’s expensive, and you don’t always find what you want in your room. Eat great way To solve this problem - make a computer desk with your own hands. This is what we will do in our article.
Where to start
Before you make a computer desk with your own hands, you need to clearly imagine what you want to get in the end. In other words, we need a project. And if you are determined and want to end up with furniture that will be a real solution, you should think it through down to the smallest detail.
First of all, pay attention to the functionality of the table. Consider whether additional shelves, drawers, or special stands will be needed. It might make sense to make pull-out shelves.
Next, it is important to consider the height of the structure. Standard regular table for a computer with your own hands, it is recommended to do it within 750 mm. These dimensions also include the tabletop. For a child, you can choose a lower height.
Do not lose sight of the expected size of office equipment and the number of items. Before cutting out shelves and making drawers, you need to measure everything using a ruler or tape measure. Then you won't have to redo it in the future.
And finally, you need to take into account the general parameters of the room and the place where you plan to put the furniture. It should be comfortable and the lighting should be correct. Only then will the person sitting at the table not feel discomfort while working. The same parameters should be taken into account if you want to make a laptop table with your own hands.
DIY table video
Video: How to make a computer table
Materials and tools that will be required for work
Making a computer desk with your own hands is a labor-intensive process that requires patience and attention. After drawing up the project, you need to decide on the materials that will be used. Most often, tables are made from:
A table for a computer or laptop made of wood is preferable to others, but it will cost much more and will still have to be varnished. MDF and chipboard are much cheaper materials and are not much inferior to solid wood. In addition, they tolerate well high humidity and are insensitive to damage.
What material to choose is a matter of taste. But the tool with which the work will be performed must be available. Most often, the usual set is used, which every man has, even a not very experienced master:
Naturally, this list may be slightly different, since it all depends on the design of the homemade computer desk with your own hands.
Several ways to make a table for office equipment
As mentioned above, it is not necessary to have special construction skills in order to make a computer desk with your own hands. Initial knowledge, desire and patience will be enough. For a more complete picture of the upcoming scope of work, we will give several ways to make a table for a computer with your own hands.
Method one: a simple rectangular table made of MDF
For work we need MDF board thickness of at least 16 mm, a set of tools from the list above, screws, glue, fittings. First of all, we measure the place where the furniture is planned to be installed: width, length and depth. Based on these parameters, when making a computer desk with your own hands, drawings are drawn up. Only after completing these steps can you cut the MDF into pieces and then mount the table:
Tip: in this way you can make a computer desk from chipboard with your own hands and use any other material.
Method two: corner computer desk
Now let's look at how to make a corner computer desk with your own hands. This work will require a little more attention, but the result will please you - an empty corner of the room will function, and free space, however, will not become smaller.
So, for work we will need the following tools and materials:
We will take 16 mm thick MDF sheets as the material, and hardwood for the support elements.
To begin with, we measure the space and make a drawing, according to which we carry out the detailing of the objects.
If you don't know how to work with drawings, look up ready material. To make a corner computer desk with your own hands, drawings can be found on the Internet.
Having prepared all the parts, we adjust everything to size and proceed to assembly, which must be done in stages.
1. We assemble the side parts of the table on dowels, screw in the guides for the shelves inside and the drawers that will be pulled out. You can strengthen the fastening with glue.
2. We secure the rear walls with self-tapping screws.
3. We process the side edges of all structures with edging tape, gluing it with paper and a hot iron. Cut off the excess part with a knife.
4. On the inside of the tabletop, mark the places for the support pedestals and drill blind sockets. We turn the tabletop over and attach the cabinets in this position.
5. Next, we return the table to its normal position, fasten the side doors, install drawers and shelves.
6. We fasten the upper structure of shelves with ties and place it on the table, installing a stand under the monitor.
7. The table is ready. All that remains is to paint it to match general interior. Thus, assembling a computer desk with your own hands is not as difficult as it seems.
If there is a laptop in the house
We've discussed how to make a computer desk yourself. But what to do if there is a laptop in the house instead of a computer? It would seem that the thing is quite mobile and does not require additional stands. But, as practice shows, lying in bed or on the sofa with a laptop in your hands is not always comfortable. Therefore, now we will make a laptop table with our own hands.
The easiest and free option
First of all, let's consider a design that does not require special construction skills and not a penny of financial investment. It’s tempting to make such a table for a laptop with your own hands. You can use the details old furniture, remnants from repairs and other scraps of any building material.
You only need three parts: 2 side parts and a tabletop. Its size will depend on the size of the equipment. We will make a tabletop 270x660 mm. It’s easy to cut, the main thing is to measure it exactly.
It will be a little more difficult with the side strips: they must have a beveled side, which is attached to the tabletop. The dimensions of the side walls are 270×205×255×280 mm. it turns out that the back of our table will be raised by 280 mm, and the front will be lowered by 205 mm. Thus, a small DIY computer desk for a laptop will have a slope, which will make it very convenient for work.
The side parts are attached to the tabletop using self-tapping screws and are additionally reinforced with small corners. This enhances the strength and reliability of the structure. All that remains is to paint or finish it to your taste and preference. There is nothing difficult in such a design, and if a person likes to study or have fun while reclining, then why not think about how to make a laptop table with your own hands.
Another way: a folding table for a laptop
The folding design of the table is a little more difficult to make, but if you often move from place to place, it’s worth thinking about how to make a laptop table convenient and mobile. Will be required following materials and components:
You can use any material that is available. We cut out the tabletop 600×400 mm, the side legs - 400×310 mm. Using a ruler and pencil, mark the installation locations for the leg fasteners on the inside of the tabletop. We make holes for the screws, fasten everything securely and that’s it - our DIY computer desk, the photo of which you see, is ready.
Under no circumstances forget to record folding design in the right position. When folding the table, be sure to remove the latch.
As you can see, there are a lot of ways to make a computer desk with your own hands. The article discussed only the most accessible and simple ones. But there are craftsmen who are able to create furniture that you cannot find in any store.
Well, for clarity, watch the video on how to quickly and easily make a computer desk with your own hands, using the information from which you will cope with the problem easily and naturally.
Video: Do-it-yourself computer desk from chipboard scraps
Video: Computer desk
Video: DIY plywood computer and desktop table weight 140 kg
Video: DIY table/PC case/system unit
The computer is firmly established in life modern man. He reports the latest news, gives necessary information, provides communication with business partners, entertains, educates, provides work and performs it. There is a large group of people who spend most of their time at the computer. Remote workers who do not need a physical presence in the office and who have every opportunity to do their work without leaving home are actively being recruited. For them, their workplace is a computer desk. The importance of a properly organized and equipped workplace is undeniable, but not everyone has the opportunity to create it. The reason lies in the lack of a suitable table that allows you to place all the accessories necessary for work in a convenient order. Often, users are not satisfied with the size or configuration that does not fit into the interior of the room. Long searches take a lot of time and effort, without guaranteeing a positive result. People who know how to handle tools and materials, in such cases, begin to think about how to make a computer desk with their own hands, to create the best option for themselves. The procedure is not the most complicated, but some knowledge and skills will be required to implement it. Let's look at the question in order.
What is a computer desk
A computer is a complex of several elements, each of which must be placed in in a certain order or in its place. You need your own platforms for the system unit, monitor, work surface for the keyboard and mouse.
There are more compact types of computers - a laptop, an all-in-one computer - but they also need a working surface.

A computer desk is a combination of a desk and work desk with additional elements, the number and composition of which may vary. Depending on the needs and capabilities of the room, small planes with two or three additional platforms, or large sets combining racks for working materials, can be used. hanging shelves and other useful and user-friendly elements. There are also usually drawers and closed cabinets, which combine computer desks with desks. The configuration of the computer desk is aimed at ensuring maximum ease of use, the ability to have access to any point in the workspace without unnecessary movements or movements that distract from activities.
What are the requirements for the design of a computer desk?
A computer desk should provide ease of use and comfort for the user. Design requirements:
The listed requirements are general and apply to all types and structural types of tables. For people various professions, carrying out activities of one type or another, may require any additional elements or functions. For example, special planes may be needed for installing instruments, equipment, placing diagrams, drawings, etc.

Therefore, planning self-production computer desk, you should carefully consider its configuration and composition of working surfaces, the number of containers and shelves, drawers and surfaces. Meeting your own requirements means creating the most suitable table for yourself, which cannot be found ready-made.
Types of computer desks
There are many types of computer desks:
In addition, there are different types table designs:
There are a lot of options, and they can combine the features of two or three of these groups. There are no restrictions other than personal preferences and capabilities. People with developed artistic or creative abilities create exclusive, unique designs of tables made on the basis of various mechanisms, devices, and objects.

Many people use non-standard methods painting or pasting surfaces, using different design options, etc. Such specimens are created by amateurs, but many of them are very attractive in appearance and can decorate a room.
What are computer desks made of?
The most commonly used material for a computer desk is laminated chipboard. This material is most convenient for the manufacture of cabinet structures; it is not for nothing that it is called “furniture in rolls.” Laminated chipboard is easy to process, for joining or fastening various elements All necessary spare parts and accessories are sold. In addition, there is huge selection color options, allowing you to choose an option that best suits the rest of the room’s interior or the user’s wishes.
 Alternatively, you can use laminated MDF. Its properties are similar to laminated chipboard, but it has a smaller filler fraction, making it less fragile and not so prone to delamination when screwing fasteners. The principles of processing and assembly of these materials are almost the same.
Some masters prefer tougher ones, durable structures. They use metal parts that can withstand significant loads. At the same time, most often only the table frame is made of metal; the working surfaces are made of sheet materials(chipboard, LMDF, table top for kitchen sets, plywood, etc.).
 In order to make a computer desk from metal with your own hands, you need to have some skill in working with the material and the appropriate tools. Used as a frame steel pipes round or rectangular section, chrome plated or untreated (needing painting).
Most labor-intensive option- DIY computer desk made of wood. Working with wood is easier than working with metal, but creating a finished product requires a large number of tools, materials, and consumables.
 Cutting, grinding, planing and finishing work and other intermediate operations will be required. It is possible to perform these operations at home, but for family members such actions can be quite a serious test. In addition, finishing work involves the use of paints and varnishes that emit a considerable amount of volatile components with a pungent odor that are harmful to health. A computer desk made of solid wood will be quite expensive, since you will need to purchase a lot of expensive materials, tools, and consumables. If all the work is done at the proper level, then the result more than justifies all the efforts and money spent.
What to consider when designing a computer desk
Before starting work, you should create a working drawing, a table design. This is necessary in order to fully imagine the assembly order, calculate the amount of materials and accessories, and finally work out the design and configuration of the table. You need to start developing a project with general parameters - decide on the style, decide what size or shape table will do to the existing interior or room size, choose optimal color, material, other characteristics. Then you need to decide the issue with the countertop - size, shape, material, one or more. This point is important because the tabletop is not always made of the same material as the walls of the cabinets and other vertical planes. When planning to make a computer desk with your own hands, drawings, photos, diagrams, and other information can easily be found on the Internet. Acquainted with existing options, samples are useful for realizing your own ideas.
Important! If you have no experience or skills, you can use one of the design programs, such as “Basis Furniture Maker” or similar. The programs are simple, they guarantee against errors in calculations of dimensions or fittings, they determine marking points and other important components. Upon completion of work finished drawing You can print it out and get it in paper form.
What tools and materials may be useful
The set of tools is determined by the material that is chosen to create the table. At the same time, there is a certain mandatory list that is needed in any case:
To make a table from laminated chipboard or LMDF you will need:
For metal frame table must be used:
You will also need materials:
Besides the most necessary materials Others may also come in handy, not so important, but capable of reviving the product, giving it an elegant, winning look. appearance. You can come up with many options for how to decorate a computer desk with your own hands, in the absence of interesting ideas You should look for photos on the Internet. Samples, worthy of emulation, there are a great variety, something suitable will definitely be found.
How to assemble a computer desk
Assembly is carried out according to the working drawing. According to its specification in the right amount the components are manufactured, processed as necessary, after which the table is assembled and installed in the designated place. This is general scheme making a computer desk. More specifically, table assembly can only be considered in relation to a specific material.
Making a table from chipboard or LMDF
Laminated chipboard has sufficient strength and rigidity, so a frame for the table is not needed. For production you will need:
Making a metal table
Fully metal tables Usually they don’t do it, they use only a metal frame. Alternatively, a base is created from metal legs and rectangular metal tubes. Working surfaces are most often made of laminated chipboard, in Lately kitchen countertops have become popular.
Assembly is carried out in two stages:
The first stage can be carried out in an apartment or in a workshop. If used welding work, then they should be produced in a specially prepared room or at outdoors. With absence welding machine Bolted connections can be used, but this option is less accurate and does not provide sufficient compactness of the connections. Depending on the project, either a table frame or a complete table frame and shelving is assembled. If a chrome-plated tube is used, then welding work is not used, assembly is carried out only with bolted connections or with special corner connecting elements.

The finished frame is installed in place, work surfaces, shelves, walls, and other cladding elements are attached to it. Typically, designs of this kind do not have a large number of closed cabinets, drawers, etc. additional elements. An openwork, light-looking design, free from unnecessary planes, is used. This type of table looks good in a Hi Tech style interior.
Assembling a wooden table
Working with wood requires a large number of machines and equipment. Treatment wooden parts- a noisy, very dusty activity, so it is recommended to carry out only final assembly or finishing at home. All basic operations are best performed in a specialized workshop, this way you can achieve the best results.
It is quite difficult to make a completely wooden computer desk. It will require a lot of machine operations, tongue-and-groove joints, gluing and other actions that require the use of machines.
 Most often, combined tables are made when creating wooden table top and external planes, and the frame and other load-bearing elements are made of rectangular metal tubes. In this version, the table externally looks like it is completely assembled from solid wood, but from a design point of view it is a metal frame covered wooden shields. The assembly of such a product is no different from the already discussed assembly of a metal frame, so there is no point in dwelling on it separately.
Wood finishing is done using stains and varnishes. Considering the specifics of the product, it is recommended to use matte varnishes that are not afraid of minor scratches or abrasions that stand out on the glossy surface. In addition, matte varnish can simply be applied by spraying, while glossy coatings have to be sanded and polished, which requires time and skill. The varnish must be durable and resistant to mechanical stress. It is recommended to use two-component parquet varnish; one-component polyurethane varnish also works well.
Self-production of a computer desk is carried out if necessary. a certain form, size or configuration. It is irrational to take on the creation of conventional models, since it is easier to buy a ready-made sample without wasting time. Manufacturing does not require special training; it is enough to have basic skills. The main key to success is accuracy, thoroughness in detail, thoughtfulness of every step. Significant help in creating a project and in technical matters can be obtained on the Internet, where there are a lot of images or drawings of finished products that are useful for understanding your own project.
A good computer desk helps make working on a computer more convenient and efficient. Modern table models have interesting design, which will harmoniously fit into any interior.
The choice of model can be made based on the set of devices that need to be placed on the table. It all depends on the type of computer, you can put a laptop on the table, or you can stationary device. The latter takes up much more space, and the existing printer needs its own corner on the table.

If you have a large selection of computer literature, you need to choose a type of table with many shelves for books or disks. The table can be angular or straight. Before choosing it, you should decide on the place where the furniture will be placed.


Types of computer desks
There are three main types of computer desks:

The straight table is classic version for users who do not use the computer very often. This uniform is perfect for office work; it will not distract attention from work.

The corner shape of the table is suitable for those who spend a lot of time at the computer. It is worth considering that there is little space on such a table surface. Therefore, it will not be possible to place various stationery and paper supplies on it.
IMPORTANT! A table located in the corner has a bad effect on the psyche. In offices corner tables are not used.
The combined form combines the two previous table options. The disadvantage is that the design requires a lot of space to accommodate. It has many shelves and drawers for storing documentation and other things.


Design and drawings
The types and sizes of homemade computer desks are limited only by imagination, material, and location. Having chosen the appropriate shape, you can begin to design the dimensions.

A comfortable table will be obtained when it suits the user’s height. It should be multiplied by 75, and the resulting result is divided by 175. As a result, we have the desired table height.

Then, a diagram and drawing are made for the manufacture of a computer desk. Its complexity depends on the chosen model. Therefore, if you don’t want to tinker with the design for a long time, you should choose the simplest type of design.

The design of a simple table should include the following components:

This option has enough space for all computer peripherals. The location of all parts of the table depends on the designer's imagination.


How to assemble a table
Having found necessary instructions how to make a computer desk with your own hands, you should start preparing the tool:

When making a table from chipboard, to ensure smooth edges, you should carefully cut the material. In this case, a lot of sawdust will appear, and it is better to prepare a vacuum cleaner in advance.

If you don’t have the skills to work with a jigsaw, then you can use the services furniture factory. They will make an even cut, and the edges will turn out without chips.

The overall design of the table should have the following elements:


After cutting out the parts is completed, you can begin assembly. You need to make 2 holes in two side and B-pillar. They are needed to attach the bottom shelf, which is attached to self-tapping screws or confirmants. The top shelf is mounted using the same method.

Next, the back wall is installed. It is attached so that the upper corners coincide with the corners of the side posts and the central wall. They are also attached with self-tapping screws. For a pull-out shelf, guide rails are attached to the table. The same action is done with the shelf itself.


The tabletop is attached to the side walls. Holes are drilled in them into which dowels lubricated with PVA are mounted. Holes should be drilled in the countertop, not through, but with sufficient depth. The holes of the racks and the table top must match, otherwise they will not be able to be secured.

If there are not enough shelves on top, then additional ones can be installed on dowels. The assembly of the wooden table can be considered complete. All that remains is to place it in the chosen location.

There are many on the Internet various photos computer tables. Every fan will find a suitable option for themselves.


Constructions wooden tables- these are the simplest and most accessible products for self made. Not many people can make their own table out of metal and plastic.

DIY photo of computer desks


The design looks complicated. In fact, its structure is quite simple and minimal skills in handling tools are required - cutting chipboard and screwing screws. Moreover, even cutting can be entrusted to specialists in a hardware store.
First of all, you need a table design. This could be a ready-made drawing found on the appropriate website, with suitable dimensions, or it could be a personal project, taking into account all the features of the room and your own needs. In any case, the future table must comply with sanitary standards and ergonomic requirements.
Materials for a computer desk you will need:
The following tools are needed:
And the edges are matched to the interior. The number of add-ons is determined by needs and experience.
Photo of a stylish DIY computer desk
How to make a computer desk with your own hands?
By finished project calculate the required amount of materials. When purchasing, it is recommended to increase the volume of chipboard and fasteners by 15% in anticipation of possible defects and shortcomings during assembly.
Straight
The prototype of a straight computer desk is a desk, but zoned in height and depth to suit the requirements for the equipment. Therefore, its parameters must satisfy not only the size of the room, but also the position of the operator and the dimensions of the equipment.
The optimal model dimensions for a PC without complex peripherals are:
Mandatory accessories should include a pull-out shelf for the keyboard - especially if the depth of the table is small, and a compartment for the system unit - there is nothing worse than constantly bumping into it with your feet. A straight table necessarily includes an element such as a back crossbar, since it ensures the rigidity of the entire structure. Its width is at least 1/3 of the height of the table, the thickness should be as large as possible. Made from the most common chipboard.
If, in addition to speakers, you need to place other equipment - a printer, scanner, MFP, you cannot do without add-ons. Moreover, most devices are simply inconvenient to place below. So, you should immediately abandon the various lower shelves, which also interfere with the operator.
Assembly is not so much complicated as it is time-consuming and requires care, especially when drilling the ends. Also, in the absence of experience, difficulties may arise with wooden dowels. You can use plastic ones, although their service life is shorter - 5-7 years.
However, you can make such furniture in more simple version- from an old table you have. The video below will tell you how to make a computer desk with your own hands:
Angular
A small triangular table is even more popular than a straight one. Firstly, it takes less space, secondly, it is more stable and does not require reinforcement of the structure, and thanks to its great depth it allows you to easily place speakers.
However, a closed corner leaves a person alone with virtual reality, and with psychological point From a perspective this decision is unsuccessful. The operator literally has nowhere to take his eyes, which does not contribute to concentration, but, on the contrary, to rapid fatigue. Having an open space in front of your eyes is much more useful, especially when working for a long time, 8-9 hours.
An L-shaped corner table will require longer calculations, and its design is more complex. Here you will need additional support and a rear cross member.
Photo DIY corner computer desk

Small
The small table is distinguished not so much by its simple design as by its size.
To increase the functionality of the model, it is often made in the form of a combined table-rack. In this case, the main part is a shelving box 1.3–1.5 m high and always with a back wall, or rather, the third component of the frame. The third wall is made of the same material. Rollers are often attached to the base. The tabletop is essentially a protruding deep shelf. You will most likely need a monitor stand here. A top shelf appears - for a scanner or printer, possible side external shelves for speakers, for example.
The product is installed in the same way. But here they immediately begin assembling the case, and then installing the shelves. In principle, the system unit can be located on the base, but if it is inconvenient during operation, it is still advisable to move it to its own stand.
To know how to make a corner, simple straight or small computer desk with your own hands, you should look at the drawings and diagrams presented below.
Do you still have chipboard scraps left and have a great desire to make a computer desk on your own? Then carefully watch the following video:
Drawings, diagrams and photos
The value of a drawing when assembling furniture is difficult to overestimate, especially in cases where an incorrectly calculated value can lead to complete non-functionality of the item.
Drawings can be found on construction sites, and are quite detailed and even indicate the appropriate fasteners for each part. Diagrams with photographs of each stage of assembly will be more informative. In this kind of work, an image is more useful than text.
More difficult is assessing how suitable the found drawing is. To do this, it is necessary to correlate the height of the main user and the size of the monitor. Only on the condition that the distance from the eyes to the screen is sufficient, that the viewing angle is appropriate, that the operator’s hands when working with the keyboard are not raised too high, that there is room to stretch out the legs, and so on - only if all these requirements are met can it be recognized model is suitable.
Drawings and diagrams of computer desks
 Corner small
  Angular wavy
  Straight with drawers
 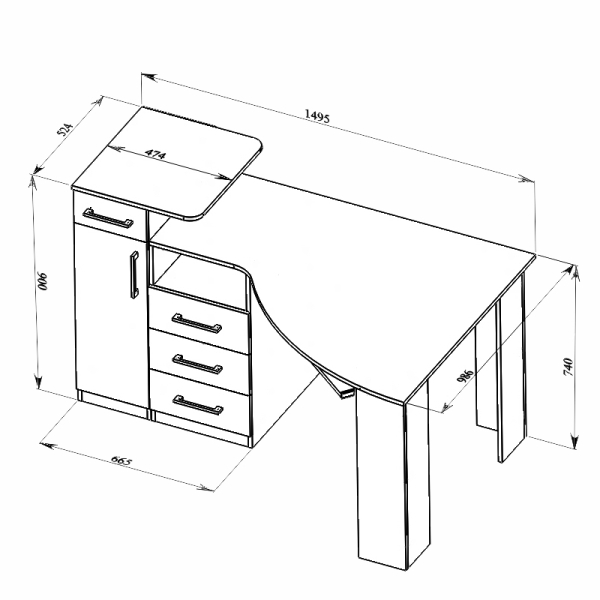 Angular letter P