Today, purchasing a ready-made multi-body hive is not difficult. A similar design can be purchased at almost any store that specializes in selling equipment for. But if you want to save money and at the same time realize your Creative skills, then you can make a similar hive with your own hands.
What will you need?
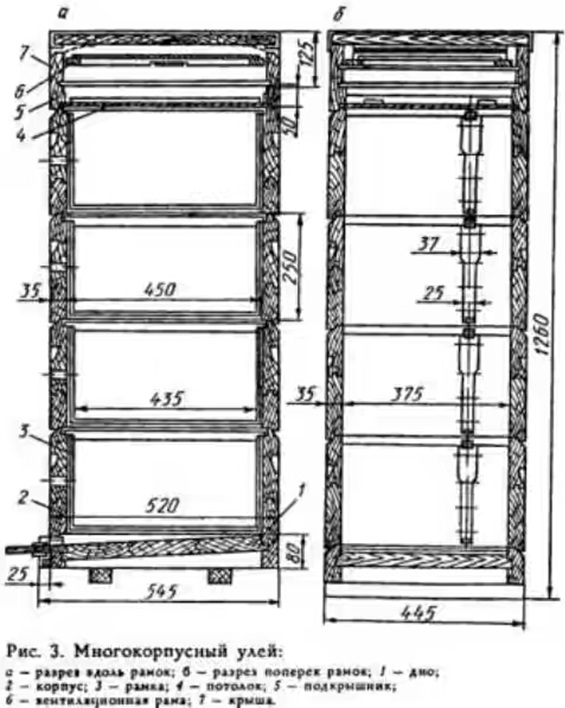
The design of a multi-body hive itself is quite simple, thanks to which it can be assembled by a person who has almost no idea about carpentry.  The internal structure of the structure includes the following elements:
- pillow;
- canvas;
- mesh with strapping;
- lower and upper open tapholes;
- , in which food is sealed, as well as empty cells;
- semi-hull with free space.
The best types of wood are pine and. The thickness of the boards must be at least 35 mm.
Important! When creating a hive, do not use metal constructions. A material such as metal can have negative impact on the general condition and development of the bee colony.
The optimal frame size for a multi-body hive is 435x230 mm. It is best for the apiary to imitate the natural habitat conditions of bees as much as possible.
Typically in the wild, the tree hollow where winged birds make their hive is approximately 300 mm in size.  The roof liner can be made from small ceiling boards. To ensure reliable fastening, the elements must be thoroughly coated with glue.
It is better to refrain from using metal nails. To insulate the structure, you can use small pads, sold in a store with goods for.
Step-by-step instructions with drawings and dimensions
Strict adherence to the specified dimensions and the use of high-quality materials for manufacturing will be the key to creating a strong and reliable structure.  The technology for constructing a multi-hull hive, just like other types of hives, has its own characteristics. And they need to be considered in more detail.
Did you know? The ancestor of the modern multi-body hive is the frame hive, invented in the mid-nineteenth century by the American beekeeper L. L. Langstroth. After entrepreneur A.I. Ruth finalized this design, the hive underwent virtually no major changes and is now widely used by beekeepers.
Roof
The roof base is made of durable boards, which provide rigidity to the entire structure. The roof is the only part where metal can be used.  Typically the roof is wrapped sheet metal. The thickness of the roof boards should be 25 mm. This optimal thickness, which, if necessary, will allow the use of an insulating pillow.
The roof is installed tightly so that no gaps form between it and the walls.
It is also necessary to make several holes in the roof for ventilation. The optimal number of such holes is 4 pieces.Frame
Solid boards are used to make the body. When cutting the workpiece, you need to take an allowance of 2.5-3 mm on each side. For trimming, you can leave an allowance of 10 mm.  The dimensions of this part of the multi-body hive should be as follows:
- Back and front walls - length - 465 mm, width - 245 mm.
- Side walls - length 540 mm, width 245 mm.
Did you know? The annals of Ancient Rome describe that exclusively natural materials were used to make hives. These were: baked clay, woven straw, cork bark and even stone.
Then the side wall is laid out face down on the workbench, and a wall with spikes for marking the eyes is placed on top in a vertical position.  The front edges should be at the same level. Each tenon is outlined with a pencil, and the lines are transferred to a board lying horizontally.
It is advisable to mark each corner with numbers so as not to confuse them during the assembly process. After marking the eyes, use a chisel to remove all excess from both sides.
A fold is made on the front and back walls of the case for subsequent installation of frames. Along the upper edge of the inner side of the walls, folds 11 mm wide and 17 mm deep are removed. The frame is positioned so that its upper edge is 7 mm below the top edge of the case - this will make it easy to install another case on top. The inside walls are sanded and cleaned with a sander.
The body is assembled like this: a wall with lugs is placed on the workbench, and a wall with spikes is placed on top of it. With light blows of a hammer, the spikes are driven into the eyes. To prevent damage to the spikes, you can lay them on wooden block and hit through it.
Important! When assembling the body, it is best to use a carpenter's hammer made of wood.
To make it easier to transport the body, shells (handles in the form of a recess) should be made on each wall of the hive. It is best to place sinks 70 mm below the top edge of the body, closer to the middle of the wall. 
Bottom
The bottom must be double-sided and removable. To make it easier to create this part of a multi-body hive, you can draw schematic drawings.
So, to create a bottom frame you need to take 3 bars:
- Two side bars. Dimensions - 570x65x35 mm.
- Rear bar. Dimensions - 445x65x35 mm.
 It is also necessary to make a stand for the hive, which will make it easier to transport the bee house around the apiary. In addition, this design helps to avoid direct contact of the hive with the surface of the earth.
 When building a home for bees, adhere to the following recommendations:
- Take care of insulation in advance. Previously, beekeepers insulated their hives with cotton wool, but today there are materials more suitable for this, for example, polystyrene foam.
- Stock up on tools for cutting parts and other work. You will need a hammer, a saw, stationery knife and corners for interior decoration.
- Each structural element must be smoothly planed, there should be no scratches, chips or roughness on their surface.
- The hive should not be located in an open area. But if there is no other place for it, then you need to provide good shading with the help of shields or wooden mats. This will reduce the risk of possible overheating for winged insects.
A multi-hull hive is one of the most common ways to develop a bee colony during the season and ensure maximum honey yield. Unlike large, but single-hulled beds, its design is optimal for the development of a bee colony: as experts have established, bees most willingly build a frame by moving vertically rather than horizontally. However, 145 mm magazines are sometimes used in sunbeds.
In apiaries, there are hives consisting of several buildings, both Dadan-Blat (in the jargon of beekeepers, “Dadanovskie” or simply “Dadanov”), and Langsroth-Rut (respectively, “Rutovskie”). Traditionally in Soviet time Dadan hives were used, but this is due not so much to their advantages, but to the fact that mass production and provision of apiaries with them was established. As multi-body hives, Rutov hives are in many ways preferable. Their design was initially designed for the fact that beekeeping work will be carried out not in pieces, but as a whole body. Actually, this is one of the reasons why Rutov hives do not provide a reduced frame for a 145 mm magazine extension - they are designed for one size.
How the enclosures are installed
- A new case or magazine is placed on top of a 145 mm frame. This method of working with a bee colony is typical for dadans during active honey collection.
- The first body rises, and the second one is placed under it. This technology is used on Rutov hives, as well as in cases where bees overwinter in two buildings rather than being squeezed into one. This rearrangement leads to the fact that the lower body, which has already been freed from brood over the winter, is again mastered by the queen and bees, as a result of which the reproduction of bees is accelerated. Then, by the beginning of the honey harvest, the number of bees increases, and they fill each empty frame faster.
What frame size is optimal?
A multi-body hive can be designed to fit any frame. However, now the size of 145 mm in height is becoming more and more popular. This is due to the following reasons:
- Rutov's hives are designed for almost this frame - and they are, not without reason, considered more progressive than old-fashioned dadans. However, 145 mm is not alien to Dadan either - such is the height of its magazines.
- Work with a 145 mm frame is easier. It weighs less (on average 1-1.5 kg less than a full-size 300 mm one.
- It is possible to use carrying boxes and honey extractors without alteration, if they were originally designed for the Dadan frame. In this case, instead of one, two 145 mm in size are installed.
- Cutting the foundation to this size is much more convenient than cutting it to a longer length.
 However, a multi-body hive can be designed for a 300 or 230 mm frame. Here everything depends on the habits of a particular beekeeper, climate (dadans are more suitable for northern apiaries), as well as on what drawings were available when making beekeeping equipment. It is impossible to say unequivocally which size is better - there are too many factors here.
It should be noted that the remaining sizes are usually unified. Typically, the length of the frame is always 435 mm, top – 37 mm, bottom – 25 mm. The length reserve for hangers for mounting in the case is also almost always the same - 35 mm. Therefore, if there is an urgent need and there is a shortage of suitable parts, you can use a Rutov hive in a dadan body, and in extreme cases, install a store-bought one. Usually this is not recommended at all, but if you need to temporarily accommodate a swarm that has flown out, this is possible.
Making your own hive
You can purchase beekeeping equipment, or you can make a multi-hull hive with your own hands. The manufacturing technology is not too complicated for a person who has experience in carpentry and knows how to handle wood. To do this you will need the following:

To make a multi-body hive, in principle, all you need is a workbench, a plane, a hacksaw and fasteners (screwdrivers and self-tapping screws or even a hammer and nails). However, it is best if you have access to woodworking machines - at least the simplest ones. In this case, the precision of manufacturing parts is much higher, and so is the quality. And the better the hive is made, the longer it will last.
Where to get the drawing
Drawings of any parts can be obtained in different ways: 
- Copy from beekeeping literature. It’s labor-intensive and not very reliable, but it’s great for beekeepers from the outback where there is no Internet access.
- Download and print. Nowadays there are many websites for beekeepers. There you can find drawings of products designed for any height: 145, 300, and 230 mm.
- Finally, an experienced beekeeper can make the drawings himself to his liking. Now, if you wish, you can experiment using original materials and sizes. In particular, products designed for 145 mm honeycombs are mostly experimental.
After you have decided to become a beekeeper and have bought a couple of colonies, the time comes for you to need new hives. Families grow and swarm, and they need to be moved to new houses. You can, of course, buy ready-made ones, but buying used ones is dangerous. It is unknown what diseases can be purchased with them, and the new prices are steep. There is only one thing left - to make beehives for bees with your own hands according to the drawings. If you know all the manufacturing rules, then it’s not difficult at all.
In this article we will just talk about making beehives with your own hands, correct sizes and drawings for them. Let's find out what a beehive is and how to make it.
In ancient times, beekeepers extracted honey from hollow trees, then they began to hollow out logs for bees. With the development of beekeeping, they began to make evidence for bees with their own hands of different designs, and the material used for them is different.
Tree
A classic option for making bee hives. In such houses, bees feel in natural conditions, close to natural ones. The best type of wood for manufacturing is cedar, although linden and aspen are also possible. Such hives breathe better, smell nice and are dry.
Hives made from aspen and linden require additional insulation. And these are expensive materials.
Some beekeepers make their own hives from cheaper materials. This is pine, spruce, fir. But the bees are not comfortable in such evidence. They collect moisture and resins, especially in new ones.. Pine smell. There is only one good thing about them, they are warm and require minimal insulation for the winter.
Plywood
Durable and environmentally friendly material. A house made from it must be painted and insulated from the inside with polystyrene foam, then it will be dry and warm. But plywood is afraid of moisture and requires constant and proper care.
Expanded polystyrene
Modern material used by beekeepers to make hives. It has a low cost and does not require additional insulation in winter.
The disadvantage of this material is fragility and brittleness. If you choose poor quality, the honey may deteriorate.
Styrofoam
The most economical option. It is possible to use packaging from household appliances. The advantage of this material is its lightness even with filled frames. Excellent thermal insulation. The disadvantage of this material is its fragility and permanent coloring so that it does not crumble from exposure to sunlight.
Polyurethane
Excellent thermal insulation properties. Does not rot, does not decompose. Fungus and bacteria do not develop in it. It does not allow moisture to pass through and it does not accumulate inside. Bees, mice and birds do not like to chew on it.
A small downside is that it is flammable and requires ventilation because it does not allow air to pass through.
After carefully studying the characteristics of the material, you can begin building the hive. Let's consider options for building wooden and foam houses.
Types and designs of hives
Bee houses are divided according to their design:
- collapsible;
- non-separable.
Almost no one uses the latter because they are difficult to care for.. All beekeepers use frame hives, where the number of frames can vary. A DIY beehive with 24 frames is popular. However, there are options for 16 and 20 frames.

In turn, frame hives are divided into:
- horizontal;
- vertical.
The horizontal or “bed” consists of one body. The expansion goes to the sides. It is easy to work with such evidence and change the number of frames, but they have a drawback - they are bulky and heavy.
Vertical ones consist of several buildings. This form is lightweight and mobile.
Both forms use multiple sections. They are separated by partitions, which allows you to change volumes in any direction.
Popular designs
Dadanovsky
Used in almost all apiaries. Made from wood (cedar, spruce, pine, linden, aspen). It is simple and spacious. Consists of 12 frames and can be supplemented with shops or cases as the family grows. In winter, bees are kept in the nesting compartment. As the weather gets warmer and the family grows, they are added to the buildings.

Alpine
Multi-body hive. The creator is French beekeeper Roger Delon. Made according to the hollow principle. That is, the natural living conditions of bees have been created and taken into account.
Compact design is convenient for tight spaces. It has no partitions or ventilation holes. Air naturally enters through the tap hole.

Ruta
This DIY bee house designed for keeping bees in the southern regions, because due to constant rearrangements of the buildings, hypothermia occurs in the house. Consists of 6 cases of 10 frames each.
Cassette
Due to the increase in the incidence of bees, cassette hives have become popular among beekeepers. Such evidence have thin partitions, so bees create a microclimate on their own.
They are made only from wood and impregnated with wax, so the bees in them are less susceptible to diseases.

Ukrainian lounger
This hive design is the largest in size suitable for beginners. They are easy to maintain. Easy to build, which will allow you to master beekeeping skills. Usually such hives have 20 frames. The sides of the house are insulated, so the bees winter well in them.

There are many designs of evidence, but we will dwell in more detail on the classic one, a sunbed with a different number of frames, and a multi-frame unrebated one. In this case, there are beehives with 16, 20 and 24 frames.
How to build a classic hive step by step
Due to the ease of manufacture, the Dadanovsky hive is considered a classic option.
To make hives, it is better to use natural materials.
The classic design for hive production consists of:
- One or more buildings.
- One or two stores.
- Liner.
- The bottom of the hive.
- Ceiling.
- Roofs.
- Framework.
- Feeders.
- Insert board.

Bee house instructions with drawings
Now let's talk about how to make a beehive with your own hands step by step. The sizes of a bee hive can be very different, but we will focus on one option. To do this you will need:

A 15 mm thick board is required for the lid and liner. Collect and cover with tin to prevent water from entering. Paint it. Make ventilation holes with a diameter of 1.4 cm.

- back and front shield (cm): width 53, height 32, thickness 4.
- side shield (cm): width 48, height 32, thickness 4.
- internal (cm): width 45, height 45, thickness 32.
In order to place the frames in the body, folds need to be made.
Dimensions 1.1 * 2 cm.
If there is a multihull Bee hive, then the dimensions will be different: 1 * 1.4 cm.


The frame located in the nest is 43.5 * 30 cm;
Magazine frame - 43.5 * 14.5 cm;
The distance from the walls of the case to the side strips is 0.07 cm;
The space for the frame is 2.5 cm;
The width of the side of the frame is 3.7 cm.
Hive-bed for 16, 20 and 24 frames: drawings and dimensions
 Hive-bed for 16, 20 and 24 frames
 What tools and materials will be needed?
- Wood, plywood, foam.
- Rulers or tape measures.
- Squares;
- Hacksaws.
- Hammers.
- Drill, drill, self-tapping screws.
- Chisels.
- Glue.
- Carrying handles.
- Galvanized sheet for the roof.
- Frames in the amount of 24 pieces.
Hive dimensions:
- frames 30 * 43.5 cm;
- body (cm): length 87, width 56.5, height 63.5;
- roof length (cm): outside 93.5, inside 81;
- bottom thickness 3.5 cm;
- lower entrance - 1.2 * 14 cm;
- the upper tap hole is 2.5 cm in diameter.
Instructions for making a hive for 24 frames
- Cut out parts from the prepared material according to the drawings.
Observe the dimensions exactly so that the construction of the bee trap with your own hands is even and without large gaps.
 Instructions for making a hive-lounger
 - Assemble the bottom. Connect the two slats and the deck using primer and nails.
- Connect the side walls and attach to the bottom. Make a protrusion beyond the bars of 2 cm.
- Make grooves for frames on the front and back walls. Size 1.8 * 1.1 cm.
- Cut holes from below.
- Attach the valve and the landing board.
- Make a roof. Fasten the boards with nails into tenons.
- Attach opening hinges to the roof.
- Cover the roof with tin.
- Make a ventilation hole 20 * 0.03 cm on the back side of the roof.
- On the front wall drill a hole with a diameter of 2.5 cm.
- Cover them with a net.
- The legs are strong to the bottom.
- Dry and paint.
- Attach handles to make it convenient when carrying.
Should be painted white. Bees remember this color better. White color repels sun rays.
How to make an evidence bed for 20 and 16 frames
It is made according to the same principle with a difference in size.

Multi-body beehive: dimensions and drawings.

Over the years, this hive has not lost its popularity in use. Convenient design allows them to be used everywhere. And it’s easy to make.
In order to build a hive correctly, you need to know what the structure consists of:
- Lid.
- Roof liner or ceiling.
- The shops.
- Cases.
- Stand.
- Framework.
- Dividing grid.

The body looks like a box. Its size from the inside (cm): width 37.5; length 45; height 24.
It includes 10 - 12 frames measuring 43.5 * 23 cm.
These sizes are more suitable for regions with warm climates, and for the Russian climate the width is made half a centimeter larger.
Reducing the size leads to inconvenience in working with frames. It is impossible to get them out when they are heavily polished or swollen from moisture. Therefore, some increase the width of the case to 38 cm.
To make cases, you need to take carefully dried boards. They should dry out within a year. When cutting out parts, the boards should have a small margin (3-5 mm). The stock is left for further fitting of parts. For trimming, it is recommended to leave an overlap of 1 cm.
Make folds on the front and back parts of the body to place frames on them. Sizes 1.1 and 1.7 cm. This depth allows you to freely place the upper body.
Handles or small recesses need to be attached to the side walls.
A 25 mm hole is drilled from the end of the hive under the roof to ventilate the house.
Boxes with frames are tightly connected to each other. In this case, folds are not used. This constructive solution more convenient to use and simpler to build.
In cases using folds, during transportation or movement, bees most often get stuck in the lower part and hide in the folded recesses, subsequently dying. Most often, the queen dies in them and beekeepers abandoned such hives in favor of a non-rebated design.
To make the roof, a 2 cm thick die is taken. A shield is knocked together from it, which is covered with galvanized sheet.
It is better to make the bottom removable, double-sided.
- three bars 57*6.5*3.5 cm - side;
- one 44.5*6.5*3. cm is installed at the rear.
Make grooves in them. Width 3.5 and depth 1 cm. Assemble a U-shaped structure. The grooves are designed for installing a floor slab.

It is necessary to provide a front projection of 50 mm. It serves as an arrival board.
The roof liner (ceiling) is a solid shield assembled from dies, measuring 52 * 44 cm. Around it is a rim made of slats. They are 3.5 cm wide and 1.5 cm thick. There is a hole in the center. It is needed for ventilation between the buildings or a feeder is placed on it.
The liner is placed on the body with the smooth side without the rim, which allows the bees to move freely. It can also serve as a dividing grid; in this case, a mesh is stuffed over the hole.
Stand. It is made from bars according to the size of the bottom. A wide die is nailed into the front part at an angle of 45°. This will be the arrival board.

A recess measuring 2.5*9 cm is cut into the side bars. They are designed for convenience when you need to lift the hive or secure it when moving.
To increase the service life of the bars, impregnate them with liquid bitumen. Dissolve it with gasoline. This procedure will make the wood waterproof.
Dimensions of the dividing grid. Designed to isolate the temporary isolation of the uterus. To separate the body with brood from the honey ones.
The size of the grille must match the size of the inner housing. It is placed on bars. Made from wire mesh.
Frame sizes. Case and magazine frames can also be made with your own hands. They must correspond to the drawings.

Drawings of multi-body hives.


Frames for the hive: dimensions and description of how to make it yourself
Frames are an important part of hives and the main work is done with them. From constant use they become unusable and need to be added. Therefore, the beekeeper should always have a large supply. To save money, it is better to make them yourself than to constantly purchase them.

To make frames we will use the following tools:
- hammer;
- pliers;
- awl;
- shoe nails;
- a skein of thin wire.


For production, use natural materials. It is better if these are boards that have been dried for a year. To make a frame you need to know what parts it consists of:
Top bar.
Grooved or uniform.
Bottom bar.
Regular, grooved or through-gap.
Side bars.
They have holes for pulling the wire under the foundation.
Frame sizes depend on the design of your hive. Standard sizes are:
- the width of the top and side boards is 2.5 cm;
- height of the top block is 2 cm;
- bottom width 1.5 - 2.5 cm;
- height 1 cm;
- external dimensions vary depending on the design of the hive, but usually 43.5 * 30 cm.
After we have chosen the material and decided on the dimensions, we proceed to the actual production of the frame.
- Cut out parts from dry boards according to the dimensions of the drawing.
- Using shoe nails, connect all the parts.
- Drill 4 holes and two double holes on the side strips for attaching the wire. The distances between the holes must be equal.
- Pull the wire. Start from the top hole and snake it through. Make sure that the wire does not intersect anywhere. Fasten it securely so that the heavy honeycomb does not accidentally break off. As a result, you should have 4 lines.
The foundation is fixed onto the frames prepared in this way.
Now you know how to make bee hives yourself with your own hands with drawings. Using the drawings and dimensions, you can easily build it yourself, thereby saving your budget and providing it to the bees comfortable conditions accommodation.
Let's look together at drawing 10 of the frame hive, the history of its appearance and design features. Let's figure out why many beekeepers choose it as the main one in their apiaries.
Content:
Types, characteristics and features of hives
10 frame hive, its design and manufacture
The advantage of this design system
Types, characteristics and features of hives
IN contemporary art there is quite a lot of beekeeping a large number of various designs of bee houses. Many continue to use those that were inherited from the previous owner of the apiary, some buy new ones. The longer the master uses a large amount various products, the more inclined one is to one type or another.
Some are even beginning to produce new types, assembling various components of various systems. This is how new hives are obtained, during the operation of which they either take root among beekeepers, or everyone forgets about them.
There are quite a few such professionals, and we will not list the new features that constantly appear in this environment. I would like to talk about designs that have long been recognized as classics and are considered one of the best examples.
One of the most outstanding beekeepers was the French master Charles Dadan, who developed a design that is still considered one of the best and is used in many apiaries in our country.

Beekeepers have appreciated this system, which consists of one large housing on the bottom and several, half the size of the main one, on top for storing honey.
All types of frame hives divided into horizontal and vertical. Very convenient for those who for some reason cannot lift heavy weights.
Such a hive is also good for peace of mind, when there is no need to accumulate a lot of honey, especially when the beekeeper’s main attention is paid to raising a bee and understanding its inner world and structure.
For beginners, it would be a good idea to start familiarizing yourself with these design features.
Horizontal - hive-beds. They are good because there is no need to operate with heavy bodies, and when forming new family(layering) you can insert a partition next to the main frames, then transfer the frames with the newly formed family before the birth of the uterus.
There are several options for beehives, which are the most common:
- Ukrainian;
- Lyansa;
- Slavic;
- Galician;
- Levitsky;
- Warsaw;
- Vashchenko;
- Dokuchaeva;
- Dolinsky.
All hives of this type differ from vertical ones in that they have a large frame, which is almost twice the size. Accordingly, the design and location of the socket differs slightly from multi-body structures.
Worth knowing!Most of the above designs have quite big size and weight, therefore cannot be used in apiaries that move closer to the honey collection site.
If we talk about vertical structures, then it must immediately be said that such hives are most common in apiary lands and outdoor areas. In recent years, beekeepers have increasingly leaned towards this basis, and communication with beekeepers at numerous fairs and gatherings confirms this.
What are the benefits of multi-tiered products? The answer is simple. They are the ones who most effectively make it possible to accumulate honey for its subsequent collection and sale.

When creating a large apiary (over 10 families), you are unlikely to think about calming your soul and doing what you love. The apiary becomes your job and earning a living.
It takes up almost all of your time and requires a lot of attention. Therefore, for maximum efficiency, multi-body hives are chosen.
The arrangement of parts in them has some consistency. In the spring, the first body with a formed nest and queen is placed.
Then, when the family and the first young animals expand, a second building is installed, into which the first honey collection begins. After the family has grown stronger, the third building is erected. The fourth - during the period of maximum honey collection.
At some points you can see the installation of the fifth extension. This occurs when it is necessary to form a new layer. The difficulty with all this is that it is constantly necessary to swap bodies in order to achieve certain results, which is quite troublesome and requires a certain amount of physical effort.
Speaking about our 10 frame hive, you also need to know all the subtleties of this art, but the physical costs will be an order of magnitude less, due to the fact that it has a body half the size of the standard lower one, or as in the Langstroth-Ruth design.

To compare our Dadan hive, let's give some characteristics of its main competitor, namely the Langstroth-Ruth multi-body hive.
This hive is a leader in the industrial production of multi-tiered houses due to its size. R The amki in this product exceed the dimensions of Dadanovsky, Accordingly, you can collect more honey from them, however, as mentioned above, they are quite cumbersome.
Advantages of this type:
- All frames are the same size;
- Easy to find repair units;
- Possibility of increasing the bee colony;
- The dimensions of the cases are the same, easy to transport.
In principle, all this can be attributed to our hive, but there are some differences, which we will talk about in the next chapter.
10 frame hive, its design and manufacture
Making a hive at home is quite easy, but you must have some tools and some basic carpentry skills. During the long winter days, when the main work in the apiary is absent, it’s time to start preparing for the new season.
One of these issues that every beekeeper faces is houses for bee colonies, because every spring the issue of swarming arises and, perhaps, you need to increase your apiary to more bee colonies.
To make hives, you need to take willow or alder wood, but ordinary pine will also work well.
What you need to have in your arsenal:
- Rail or beam;
- A board 1-1.5 centimeters thick for the roof;
- 2.2-4 centimeter board for the body;
- Saw;
- Hammer;
- Screwdriver;
- Plane;
- Connecting material (screws, nails).
Before starting production, it is necessary to process all the material with a plane so that there are smooth edges.
 After the board is prepared, it is necessary to begin assembly from the inside of the tier/hive, connecting the boards cut to the required size using glue.
The outer part is made like shields, inside which we place the inner body and fasten both bodies together with nails.
Note!It is not permissible for the fastening material to protrude on the inner walls of the house when connecting. Give it your time Special attention when choosing the required length of a nail or screw.
All parts are fastened at an angle of 90 degrees using a special tool. Before you begin installing the bottom and lid, you need to cut out the tapholes of the required size. The size of the tapholes is standard: lower (10x250 mm), upper (10x100 mm).
The top cover is made with a pediment and a ceiling for ventilation, this distance is vital in summer period. For the winter, the ceiling can be filled with insulating material.
The lower part of the hive (bottom) can be made either blank or with a special tray for cleaning dead mites and bee waste, which is very convenient when servicing large beekeeping farms.
If the hives are made with a solid bottom, during operation, try placing a small thick sheet of corrugated paper on the bottom, consisting of 2 parts - this will simplify the task of removing debris.

Also remember that you only need to choose dry wood, which, with prolonged use, will have minimal drying characteristics. The bees will solve small shortcomings themselves by covering up the resulting cracks with propolis.
So, you have become the owner of a new house for bees. Don’t forget to completely dry it before use and treat the inside with a special solution, or simply burn it with a blowtorch.
The advantage of this design system
As stated above, this design a multi-body hive performs quite well in large outdoor apiaries.
It is especially good to use them on large special platforms for bees, where during the first spring trips you can install only one housing, and in the process of expanding the colony and increasing honey yield, deliver the housings without removing them from the transport structure.
It will be quite easy for you to transport them to another field and to large honey fields by installing the high sides that come with such a trailer. At the moment, for the size of the frames that are installed in them, there are big choice various instruments(honey extractors, etc.).
The distribution of such houses is constantly growing, which is good news. Many who have been trained to manage standard beehives are gradually switching to multi-tiered products, as the advantages of such systems are obvious.


sitepchelavodstvo.ru
Drawing of a 10-frame hive, frames, feeder.
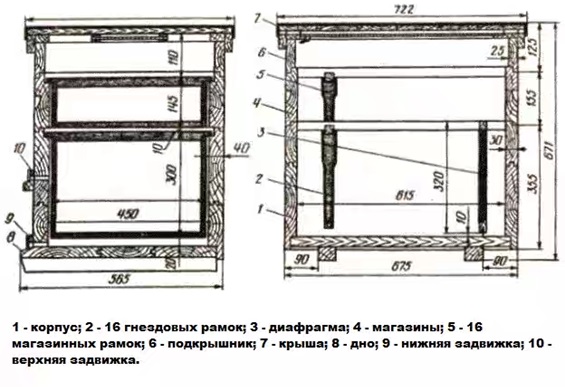
Beehive drawing. U-10.00.00.00.00.SB consists of a detachable bottom-1, two buildings-2, two magazines-3, roof liner-5, roof-6, feeder-7, 20 nesting frames-9 and 20 magazine frames-8.
At the customer's request, the hive can, in addition, be equipped with a horizontal diaphragm-ceiling -4.
The hive has a collapsible design. All elements must be interchangeable; customization is not permitted. All external surfaces are finished oil paint light colors.
Each case-2 accommodates 10 nesting frames and consists of 4 walls, 35 mm thick, connected at the corners in a quarter. The walls can also be made of separate sections, joined together on a plywood strip with glue. The front wall of the housing is equipped with one upper entrance, 10 mm high and 120 mm long, with a landing shelf. The design of the entrance devices is the same as that of a single-hull hive.
The bottom of the hive-1 is detachable and consists of a harness into which a shield is inserted on plywood slats.
The entrance has a slope of 1:2.65. Corner connections in a tenon with a metal corner edging.
The magazine, like the body, was designed from 35mm thick walls and can accommodate 10 frames measuring 435x145mm.
Podkryshnik-5 is made of boards 25 mm thick, connected at the corners into a straight box tenon with a metal edging. The height of the roof liner is 80mm.
The roof-6 is flat and fits “overlapping”.
Frames 3.5 are self-dividing, have a size of 435x300mm for nests and 435x145mm for magazines.
Feeder-7 consists of a strapping formed by three transverse walls 1,2,8 and two shackle walls 12,14 of a lid-4 with a valve-5, a bottom-6 and a partition-3.
The walls of the feeder are designed from coniferous or soft hardwood, the lid and valve are made from waterproof plywood 4mm thick.
Overall dimensions of the feeder: 440x360x80mm, capacity – 9 liters.
The feeder is assembled using nails and waterproof glue. After manufacturing, the feeder must be oiled and coated with paraffin on the inside.
The lid is nailed to the feeder with small nails and opens when cleaning. The syrup is poured through the hole closed by valve 5.
Diaphragm 4 is made in the form of a strap, to which a 10 mm thick ceiling is sewn from below. In the front part of the ceiling there is a window with a section of 116x36mm. for installing a bee remover, as well as their access to the feeder when using the diaphragm as a ceiling. At the customer's request, the hive can be equipped with 3-4 buildings.
Bracket(U10.01.00.00.06)

Corner(U-10.01.00.00.05)


Hive 10-tier (U-10.00.00.00.00.GC)

10-frame hive with magazines (U10.00.00.00.00.SB)


Bottom with retractable mesh and tray (U-10.01.00.00.00.SB)

Shield. Assembly drawing (U-10.01.01.00.00.SB)

Support beam (U-10.01.01.00.03)

Bar(U-10.01.01.00.02)

Frame (U-10.01.02.00.00.SB)

Front wall (U-10.01.02.00.01)

Side wall (U-10.01.02.00.03)
Rear wall (U-10.01.02.00.02)
Side wall (U-10.01.02.00.04)
Grille (U-10.01.03.00.00.SB)

Corner(U-10.01.00.00.SB)

Tray (U-10.01.04.00.00.SB)

Taphole valve (U-10.01.00.00.02)
Rear wall valve (U-10.01.00.00.03)

Arrival board (U-10.01.00.00.01)
Corner(U-10.01.00.00.04)

Building (U-10.02.00.00.00.SB)

Wall (U-10.02.01.00.00.SB)

Bar(U-10.02.01.00.01)

Bar(U-10.02.01.00.02)

Wall (U-10.02.03.00.00.SB)

Wall (U-10.02.02.00.00.SB)

Bar (U-10.09.00.00.02)
Store (U-10.03.00.00.00.SB)

Store wall (U-10.03.00.00.01)

Store wall (U-10.03.00.00.02)
Wall U-10.04.00.00.01)
Diaphragm U-10.04.00.00.00.SB

Board with hole U-10.04.00.00.03
Wall U-10.04.00.00.02
Wall U-10.07.00.00.07

BarU-10.06.00.00.01

Liner U-10.05.00.00.00.SB

Wall U-10.05.00.00.01

Wall U-10.05.00.00.02

Cover U-10.06.00.00.00.SB

Shield U-10.06.01.00.00.SB

Frame U-10.06.02.00.00.sb

Wall U-10.06.02.00.01
Wall U-10.06.02.00.02

Nest frame

Shop frame

www.beehives.ru
How to make a Dadanovsky hive with your own hands, frame dimensions, video
Beekeepers use their own experience to determine which beehives are more convenient for them to maintain. Some prefer to work with single-frame simple hives, while others prefer multi-frame hives.
One of the famous and popular designs of bee hives is the Dadanovsky hive. The design of the Dadan hive is simple, and even a beginner can handle it.
The author of this hive is the French beekeeper Charlier Dadant. He came up with the idea to create a new type of hive that would be suitable for winter. The peculiarity of this hive is its low height. The new model was accepted by the beekeeping society and has since been actively used.

Design of the Dadanovsky hive
The Dadan hive allows you to place 10-12 frames inside, in one case.
The main parts of this type of hive: roof, bottom, magazine extensions, one nesting body. The housing for the nests is made in the shape of a cube. In order for all components to fit harmoniously and tightly to each other, it is necessary to comply with the recommended dimensions.
Read: We make a double-hull hive ourselves
What does Dadan's hive consist of?
It is necessary to make a hole in the front part of the Dadan hive. It is also prudently equipped with a removable arrival board, designed to facilitate bees’ access to the hive during a large honey harvest.
The bottom of the hive must be made removable in order to be able to easily separate it from the harness. The recommended thickness of the boards for making the bottom is 38 cm. It is necessary to provide ventilation ducts at the ends, equipped with an additional metal mesh.

Care must be taken when transporting Dadan hives along with bees to another place of detention. Since insects may regard such a movement as an attack on the hive. For this reason, the hive entrance must be covered.
Read Multihull Hive
The number of frames in one store may vary. The most commonly used are 12 frame hives. To produce the Dadan hive, wood from coniferous species. The parts are produced according to the recommended dimensions, and the resulting gaps are sealed with putty.
How to make a Dadonovsky hive
Often, if it is necessary to reduce the load on the hive body, only 10 frames are used. These compact enclosures are a little easier to work with, although the hive design remains the same.
The best material for a hive would be linden or willow wood, since they do not contain resin. I advise you to read more about this in the article Building houses for bees, which trees to use.
You need to take the following tools: several tubes of high-quality glue, paint, a special machine for processing wood and other working tools.
Preliminary work:
- you should process the wood with high quality;
- cut the grooves connecting the walls of the housings;
- Next you need to make strips, make them narrow, 18*4mm in size;
- in order to connect the boards into 1 board, lubricate the grooves with glue in advance;
- using glue and nails, assemble all the existing parts together;
- the hive needs to be painted;
- Next you need to drill out the tap holes;
- To provide ventilation to the hive, make holes in the hive with a diameter of 14 mm.
Dimensions for 12 frame Dadana hive
- Frame for nest 435*300mm;
- Magazine frame 435*145mm;
- The space above the frame implies a gap of 10mm;
- A free distance of 7mm is required between the wall and the side bar;
- The distance under the frame is 25mm.
- The side dividing strip must be 37mm wide;
- The height of one magazine is 165mm, and the upper entrance is 120*100mm in size.
- In this case, we obtain a hive height of 325 mm, a hive width of 445 mm, and a hive length of 450 mm.
See also the article, very useful for beekeepers: Making and sizing bee frames for hives with your own hands
Hive drawing for 12 frames
I suggest you carefully consider the drawing, which shows in detail the dimensions of the 12-frame hive; be sure to take them into account during manufacture.

Dimensions 10 - Dadana frame hive
- The front shield is 530mm wide, 320mm high and 40mm thick. And the rear shield is the same;
- Side shield 490mm, height 320mm and thickness 40mm;
- The internal size of the hive is 450*450*320 mm;
- Folds size 10*21 mm.
Hive drawing for 10 frames

Single-body Dadanovsky hive
And here is the design of a single-hull hive, which accommodates 2 magazines. On the left you can see a cut made along the frame, and on the right - across the frame.

DIY hive extension
As you know, the extension must be placed on the hives for the entire duration of the main honey collection. It will make it possible to obtain more full-bodied honeycombs, and it will also limit the queens from working in stores. The extension usually consists of a box, a roof, and a shield.
Step 1: In order to make an extension for a dadan hive with your own hands, you will need: a stationery knife, a ruler, a pen, high-quality glue, wood screws (which have the appropriate length) and a screwdriver.
We will make the extension from polystyrene foam, a fairly reliable material. From one sheet of polystyrene foam board you will get one extension (you can make the support strips from scraps to save money).
Step 2: First, make a layout of the extension, indicating the exact dimensions. Measure the material and cut out the required parts using self-tapping screws. How to correctly mold them together is not difficult. The main thing is to do everything carefully and do not rush. But I can tell you something about the support.
Step 3: I recommend replacing the folds with strips of polystyrene foam; they will support the half-frames, and it is on them that the hangers will rest. They should be more than 5 cm in width. Since almost the entire load is on these strips, the area of the bonded surfaces should be sufficient. Use the glue well, don’t skimp. 
How to make entrances in a dadan hive
The entrances are made using wooden inserts. In winter, the hive liner needs to be replaced with another one, this will reduce heat consumption and protect against the penetration of mice. The size of the entrance should correspond to the strength of the bee colony, that is, you can change its size.
Upper entrance. This tap hole should be round and have dimensions of 120*100mm. From the side of the entrance, the floor protrudes 50 mm forward, forming a landing board on which bees returning to the hive sit. The width of this board is gradually increased to make landing easier for loaded bees.
Lower entrance. The back and side walls should cover the bottom, and the front wall does not reach the bottom by 15 mm. In this way, a lower one is formed in summer; its dimensions are regulated by taphole valves. When the entrance is located at the bottom, it is easier to remove dead bees, pieces of wax, and it is easier to remove debris. If the bottom of the hive is detachable, the lower entrance is arranged in the bottom trim. In the schematic drawing you can see the taphole (5). 
Benefits of the Dadan hive
- easy to use and does not cause any complaints from experienced beekeepers;
- with normal maintenance and stable care of the structure, the hives will last at least 25 years;
- efficient and easy to use, etc.
DIY Dadanovsky hive + video
recipemeda.ru
Dimensions of the Dadan hive for 10 frames and others: frame of the Dadan hive
The Dadan hive is a unique design that helps automate the extraction of honey. It meets all the requirements necessary for the life of bees. The Dadan hive is able to withstand any climate change. In our country you can purchase models of single-walled and double-walled hives. Let's consider hive frame design features and its main characteristics.
Dimensions of the hive dadan for 10 frames
The dadan frame has an automated operating principle. It lies in the fact that honey can be easily extracted from the structure. In this case, there is no need to transplant the inhabitants of the hive to another place. It is worth noting that a larger amount of honey can fit in the house. This happens due to additional installations, which help simplify the process of collecting honey.
The Dadan hive is made of several parts.
- Case of 12 frames. Variations of the case with eight or ten frames are possible.
- Stores with half-frames. Their dimensions are 435 by 145 millimeters.
- The overall size of the hive is 435 by 300 millimeters.
Thanks to their standard size of 12 or 10 frames, insects can room temperature be in the hive in winter period. At the same time, bee losses during the cold season are minimal. In an ordinary hive During wintering, up to 25% of insects die. It is worth noting that the operation of Dadanov’s structures is no different from conventional ones. The work consists of the following processes.
- At the end of the cold season, insects are fed.
- At first spring period a beekeeper inspects a bee's nest. The main thing is not to miss the moment when the bees begin to settle down. At this point, the beekeeper needs to install an additional magazine.
Dadan Hive: History
 The classic Dadan-Blatt hive has existed for several decades. This is one of the most common bee hive designs. Create amazing house A Frenchman who immigrated to America wanted it for the bees. He was trying to make a unique hive. In its development Dadan I wanted to implement a design that could simplify the wintering of bees and thereby optimize the honey harvest. As a result, he wanted to get a structure that would serve itself.
Dadan spent his entire life creating a universal hive, but, unfortunately, died suddenly. The world never saw the design in his vision, because he was unable to complete the job. But over time, his calculations were adopted by another beekeeper, Blatt. He registered the invention in his name. He was able to calculate the correct and necessary dimensions of the structure, perhaps exactly those which Dadan wanted to fulfill.
Frame size given
The dimensions of the dadan frame may differ from each other. In order to create a frame, as a rule, a board of soft medium wood, forty millimeters thick, is taken. In Europe, pine is used as a basis. There are five main designs in total.
- Standard size. It includes a design with 12 frames. There are two sizes - internal and external. The internal size is 450 millimeters by 450 millimeters. The external size or height of the case is 310 millimeters, and the base is 90 millimeters. Lid future design is 160 millimeters and the roof liner is 90 millimeters. The external width and depth of the case is 530 millimeters. The magazine setting is presented in 165 millimeters.
- Design for 10 frames. Differs in body width from the previous model. The dimensions are four hundred and ninety millimeters by four hundred and ten millimeters, respectively. The remaining measurements of individual parts should be reduced by forty centimeters. The magazine and lid shrink in this case by themselves.
- Removable and non-removable bottom. A distinctive characteristic of this is the bottom of the structure. It must be sealed and have no exits. In this regard, the design becomes impractical. Regardless of what the bottom is, you need to keep in mind that the bottom should not have cracks or leak.
- Stores for the hive must be present. Externally, they cannot change the size of the bee house. It is best to place them to the side. The optimal number of stores per home is considered to be three.
- Ventilation, board and other differ in design features. They serve as ventilation in the house. A gate or mesh can be installed in the center.
- The interior space of a single-frame house consists of the following frame sizes.
- Standard frame with a main canvas size of 435 by 300 millimeters and a magazine size of 435 by 145 millimeters.
- Leave 10 millimeters of free space above the frames.
- Leave at least 25 millimeters under the frames (for free movement, family life and for cleaning).
- Side bar with a divider at least 37 millimeters wide.
DIY Dadan hive
 To make a beehive with your own hands Dadan and frame, you need to carefully select the tree - the basis of the house for the bees, and then begin construction work.
Firstly, it is best to choose dry wood. It is recommended to build a house for bees in a room with optimal temperature conditions and an appropriate level of humidity. The temperature should not exceed room temperature, and the humidity should not be higher than 75%. It is not recommended to build hives on fresh air. The street is not the optimal place to build frames. Otherwise, the structure may dry out.
Thirdly, only new wood can be used. It should not have any foreign odor. There should be no signs of rotting on it. Rotting wood can cause voids inside it. Construction in this case will be impossible.
The construction of a Dadanovsky house consists of several stages; we will consider each of them.
First, the wood is inspected and sanded. Afterwards it is opened to the required width. Wood blanks are cut according to the required drawings. Next, grooves are formed to tightly connect all parts. Next, the construction of the body and bottom of the hive is carried out.
Firstly, the body boards are connected well, pre-gluing them with glue.
Secondly, the seams of the body walls are separated into the front and rear parts. They are connected to a wide board on top. And with a narrow one, they will connect from below. The sides are connected in the reverse order. This order of connecting parts is necessary in order to evenly distribute the weight of the structure.
Thirdly, the connection at the end can be fixed with pins, nails or self-tapping screws.
Fourthly, you can drill a tap hole by selecting a hole for ventilation of the housing from below.
Fifthly, the bottom structure can be assembled according to the same scheme. The bottom boards must fit into the hull strip in the center in different directions. Another bar is installed inside.
Sixthly, the design is made in the form of a fold for frames. In this case, the supporting surface for the frames and steps is selected.
Seventh, the structure is treated from the outside using water-repellent material. She can use water-based varnishes or facade paints.
During the manufacture of stores, it is best to line up the blanks in height. For this purpose, the wall material is selected no thinner than twenty millimeters. This approach makes it easier to build the structure during the harvest period. In addition, the bar can only be stuffed along the contour of the magazine to support the frame.
Which Dadan hive is better to choose?
 Classic version Dadan's house is currently practically not used. A modified hive consisting of several buildings and stores is the only right choice. In this version, there is more space for the insect family. But the main thing is to have enough space for the queen to lay eggs. In addition, there is space in the hive for storing honey and feeding.
In the spring season, it is necessary to clean the hive, feed it and expand the nest. It can have not only ten, but also twelve frames. To ensure that a busy building with a family does not disturb the temperature regime, an additional magazine is placed under it. Every detail of the bee house is an integral part of it. During the period of active nectar intake, a store can also be delivered. On him bees will place food on top of the nest. If you need to do this, install an additional housing between the socket and the magazine.
In the last days of July, the bees will settle down on the lower part of the house in order to continue collecting honey at a fast pace. At the end of summer, the bees will have time to prepare for the winter period. By the end of November, winter actually begins for insects. Therefore, before this period, it is necessary to create the most comfortable conditions for the stay of insects during cold weather.
Drawing of a hive with frames, where can I get it?
Drawings of Dadan's hive can be found on any thematic site on the Internet. During the manufacture of the structure Do-it-yourself houses for bees, a drawing is required. Having a drawing in front of you, you can find out the dimensions of the future hive and focus on them.
Much more often, beekeepers prefer to install a structure with 12 frames. You can make such a hive yourself using wood, metal and polystyrene foam. In order to get the perfect hive, you need to take a closer look at the drawing, which shows the exact dimensions of the future structure. Even if cracks appear in the house. Don't be upset, they can be puttied and then sanded. In this case, it is especially important to paint the insect house.
In order to reduce the load on the body, the hives are made with their own hands from ten frames. Such a hive has a number of advantages. It is compact and much easier to work with. It has the same design as for twelve frames, it does not require a drawing. Regardless of whether you make a Dadan hive from ten frames or twelve, following all the recommendations with precision, you will be able to recreate a practical home for your insects.
As a result of making the Dadan hive you will receive:
- A supply of food that can be neatly stored.
- Efficient and maximum honey production.
- High-quality construction of honeycombs.
- Hatching of the young generation of bees.
- Laying the maximum number of eggs in the uterus.
The Dadanovsky hive, today, is one of the best modern developments in the field of beekeeping. Having a Dadanovsky hive in your apiary, you will have an excellent opportunity to reduce the loss of bees in the winter, as well as increase the offspring of insects in the summer. The efficiency of nectar storage will also be noted by you. The main thing is maximum honey yield. Unlike other hives, Dadanovsky has unique frame sizes, which allow maximum protection of insects and achieve tremendous success in a short time.
ferma.guru
DIY Dadan-Blatt hive for 10 and 12 frames: drawings, dimensions

French beekeeper Charles Dadan for a long time I studied the designs of different scientists, compared everything, recalculated, I knew that if the queen is young, she lays up to 3000 eggs per day. They also calculated that in order for all the honeycombs to be filled with honey, up to 1,500 cells are needed per day. Therefore, the Dadanovsky hive has 12 frames, so the bees will definitely have enough space to place honey. Since ancient times, this type of hive has been popular among beekeepers.
Changes made to Dadan's hive by Blatt
Another beekeeper slightly changed the design of the hives because it was not perceived in European countries, was not suitable for wintering bees. Blatt reduced the width of the hive, so the frame was 435 cm, but it was 470 cm. Therefore, you can often find the name Dadan Blatt hive.
Do-it-yourself Dadan hive manufacturing technology
Need to pick up wooden board, it is best to prefer linden or willow, they do not contain resin. In extreme cases, it is recommended to use a board made from spruce or pine. The tool will be a special machine for processing wood; it is on it that a large amount of wood can be processed, as well as all working tools, glue and paint.

It’s not difficult to make a hive with your own hands, the main thing is to take into account all the dimensions, the drawings will help with this.
It is important to carry out the following preparatory work:
- Wood processing, boards should be 40 mm thick, with their help you can make the bottom and body of the hive.
- Cut the grooves; they will connect the body walls.
- The cutter is necessary to connect the boards to each other, the gap should remain 7 mm, it should be in the middle where the boards are connected.
- Making planks, they should be thin and measure 18 by 4 mm.
- To connect the boards into one board, you need to lubricate the pre-prepared grooves with glue, PVA is suitable for this, please note that they must be tightly connected to each other.
- As a result, you should get up to five shields - 4 of them will function as walls, one shield will be the bottom.
- Using glue and nails, everything needs to be assembled into one whole. This is how Dadan’s hive with one body turned out.
- Then the hives must be painted or other substances applied. Wood treatment is an important prevention of various bee diseases. Then drill out the tap holes.
- To make a roof liner or roof with your own hands, you need to select a high-quality board, its dimensions are 15 mm thick. Then be sure to cover it with a material that is waterproof and paint it. Ventilation is ensured; holes with a diameter of 14 mm are specially made for this purpose.
Dimensions of Dadan hives
It is very important to use a drawing when making a structure, and also to focus on the dimensions of the Dadan hive. The front shield is 530 mm wide, 320 mm high and 40 mm thick. The rear shield has the same dimensions, and the side shield is 480 mm wide, 320 mm high and 40 mm thick.
The internal size of the hive will be 450 mm by 450 mm by 320 mm. To place the frames in the upper case, it is necessary to use folds, their dimensions are 11 mm by 20 mm. If you want to increase the number of cases or add magazines, you need to select 10mm by 14mm folds.
Drawings of Dadanov hives
Pay attention to the lower drawing, it shows in detail the dimensions of a 12-frame hive; they must be taken into account when designing. This is a beehive lounger.

Features of Dadan's 12 frame hive
Most often, the beekeeper prefers to use a hive with 12 frames; to make it yourself, you can use different materials– wood, polystyrene foam, metal. It is very important to have a drawing and follow the dimensions, so the parts will be connected neatly. The cracks that appeared during construction must be filled with putty. Then sand it on a machine. Coloring is also very important.
A twelve-frame hive can have a large number of bodies, magazine extensions, nest frames and magazines.
Features of the 10th frame Dadan hive
To relieve the load from the body, a design with 10 frames is often used. This way you can achieve a compact body and it is very easy to work with. The design of Dadan hives for 10 frames will be the same. Below is a drawing that shows the features of the 10 frame hive from the front, side and top.

Drawing. “Design of Dadan hives for 10 frames”
You can easily make Dadan-Blat hives with your own hands, taking into account the drawings and dimensions. The table shows the main dimensions of each design detail.
Table “Dimensions of Dadanov hives”
As a result, the height of the Dadan-blat body should be up to 325 mm, width up to 445 mm, and length 450 mm. Stores must be 165 mm high. The upper entrance should have a size of 12 by 10.
The design can be seen in detail in the drawing below; it is a single-hull hive, which includes two stores. On the left in front of you is a cut that is made along the frame, and on the right - across the frame.

Drawing. “Design of a single-hull Dadan hive”
Using Dadan hives in the apiary
A single-hull hive, which has only one store and the nest is not particularly convenient for collecting honey, it is best to pay attention to multi-hull Dadan hives or a single-hull hive, but with several stores.
Most beekeepers prefer to use a hive that has two bodies, three magazine extensions and a bottom so that it can be removed.
With this design, bees will be able to:
- Efficiently process the product into honey, carefully organize food for storage.
- Build quality honeycombs and raise your brood.
- The queen will lay a large number of eggs.
The basic rules for using Dadan-blat hives include the following:
- When bribes increase, there must be more shops, it is better to have it in excess than for the bees to not have enough honeycombs.
- If the store is already completely filled with honey, you need to change the extension to an empty one.
- Be sure to place food in the hive for the winter - sugar syrup.
Advantages and disadvantages of Dadan single-hull hives
- You can keep a strong family in one building.
- The store collects a large amount of honey.
- Simplicity of design, no need to constantly move heavy upper bodies.
- The beekeeper can check each frame.
- The bees are protected from swarming; you can see the condition of the frames.
- In winter, you can place two families - the main one and the spare one, and separate them with partitions.
- The beekeeper can make layering while the bees are swarming.
The disadvantages include the slow development of insects in the spring, they do not tolerate wintering well, and dadan hives are heavy, bulky, and difficult to transport.
Thus, having designed the hive, Dadan took into account all the features of the bee family, which is why many beekeepers are satisfied with this type and often use it in their apiaries. Like every design, Dadan-Blata hives have their pros and cons. With your own hands, using the drawings, it’s easy to try to make housing for bees, you just need to first decide how many frames it will be - 12 or 10.
roypchel.ru
10 frame hives according to Dadan's drawing

10-frame hives according to Dadan’s drawing are very often installed on the territory of modern apiary farms. Why are they so popular?
Content:
10 frame hives
Beehives Dadan for 10 frames
Drawing for making a bee house
Recommended sizes
10 frame hives
How to choose the right bee house to install on your apiary farm? There are many factors to consider here.
If you are a new beekeeper, you will likely benefit from consulting with your more experienced colleagues. And, of course, it will not be superfluous for you to read educational and reference literature on keeping bees.

10-frame hives must be manufactured according to drawings, taking into account the features of such a design. What elements should such houses for winged apiary workers include?
Let's list such elements according to one of the drawings:
- detachable bottom;
- frame;
- shop;
- feeders;
- roof;
- liner;
- framework.
If some elements of a similar design are found within the framework of one similar house in the singular, for example, the bottom and roof, then many elements are paired: the body, the store, the feeder.
But the frames in this design are numerous. And they can be divided into two main types: nesting and store-bought.
Number of frames It is not strictly regulated, but the house for winged apiary workers, inside of which there are up to ten similar elements, is popular.
Since there are two buildings in such a house, there will be twenty frames in total: ten in each individual box. This hive is convenient because it is prefabricated.
This means that each individual element of such a structure can be separated from the overall whole and replaced with some other element. This means that if any individual part fails, it can be quickly replaced with a similar one.
It is also well known to experienced beekeepers. that apiary farming is associated with constant movements and transformations associated with the relocation of bees. Therefore, a prefabricated structure will be optimal in such conditions.
Beehives Dadan for 10 frames
Many beekeepers prefer Dadan hives. What are the advantages of such a design?
We have already mentioned that such a dwelling for winged apiary workers is very easy to assemble and disassemble: these processes will not take any special effort from you.
But, of course, this is not the only advantage of such a home for insects. A house like this is perfect for keeping strong bee colonies.
In such communities you can simultaneously count on big harvest, which will be gradually collected by insects and stored on the territory of a special store.
The advantages of the hive according to Dadan’s drawing are its simplicity and special lightness individual elements a similar house. And thanks to the fact that it is prefabricated, it is not difficult for the beekeeper to care for the bees, inspect each frame, harvest and monitor the condition of the home of his charges.
You can be sure that, most likely, swarming processes will not occur in the territory of such a hive. But all experienced beekeepers try to combat this state of the bee colony, however, not everyone successfully copes with this task.
And if the swarming process could not be avoided, then the design of such a dwelling for winged apiary workers suggests the possibility of a special layering, on the territory of which this process will take place. This is very practical from the point of view of experienced beekeepers.
In winter, you can place two bee colonies in such a structure at once, because such a bee house consists of two buildings. Just remember to take precautions when taking such measures: it is better to separate two families from each other with special partitions.
For the material to make a hive you will need wood, plywood and some hardware. Don't forget about supplies such as glue and nails.
Drawing for making a bee house
If you decide to make a bee house yourself, then you will definitely need original drawing, on the basis of which you will do your work.
When creating such a bee house on your own, you must strictly observe the dimensions and dimensions that will be recommended to you according to the diagram that you use in the process of work.
The fact is that it will not be possible to adjust the sizes of individual structural elements to each other: they should all fit each other perfectly, like a construction set.
In order for the house to serve you for a long time, the finished product will need to be coated with special oil paint. It will help maintain the original appearance and beneficial features such a device for a long time.
However, this is the last stage of work. And everything should start with the choice of materials. Of course, they must be durable and resistant to the harsh climatic conditions that characterize our country.
Individual elements of a bee house can be made from different raw materials. Such a hive design fully suggests this.
So, for example, one of the materials may be plywood. It is used to make elements such as walls.
For the valve and lid, it is best to use waterproof plywood rather than ordinary plywood. This will increase the service life of the bee house and provide the insects with comfortable living conditions.
But it would be best to make the feeder from solid wood. If we talk about a specific type of wood, then this is no longer so important: you can use both coniferous and hardwoods. The main thing is that they are quite soft.
How to determine the dimensions of the future structure? Of course, you should not engage in amateur activities.

You can find many ready-made drawings of similar bee houses that are consistent with the dimensions original design, developed by Dadan. Therefore, you don’t have to invent anything extra.
Remember that frames can be divided into store and nesting ones. And if the specified parameter is more suitable for the first type of frame, then the second should be a little larger: 435 by 300 millimeters.
Another parameter you take into account should be the height of the roof liner. It is better that it is 80 millimeters. Don't forget about the size of the cap and valve as well. These elements are relatively small with a thickness of 4 millimeters.
Insect feeder should be a fairly spacious container. Based on the number of frames, its volume should be 9 liters.
Don’t forget also about other details of the bee house that will help provide them with comfortable living conditions. For example, do not forget to arrange a special window in the hive: its cross-section should be 116 by 36 millimeters.
10-frame structures are very popular in modern apiaries. This is due to the convenience and practicality of this design.
Regardless of whether you are going to buy such a hive or make it yourself, you will have to spend some time studying the materials associated with the features of keeping insects in such a structure. This will help you determine the rationality of using this model in the territory of your specific apiary.
sitepchelavodstvo.ru
sizes for 10 and 12 frames
Every beekeeper wants to increase the productivity of his bee colony. The double-hull hive meets all the requirements of the beekeeper. Using the device, you can reduce swarming and properly prepare nests for winter. It’s easy to make a hive with your own hands, if you have a drawing and dimensions.

Double hive
Basics of designing a double-hull hive
Before making a hive, please note that it should be dry and warm. Take care of ventilation in your home. The reliability of the design is of no small importance. The beekeeper must carefully ensure that after connecting the parts of the hive, there are no drafts in it. When designing, it is important to pay attention to the dimensions:
- The gap between the side bars of the frames is no more than 0.8 cm.
- Frames should be no more than 2.5 cm thick.
- Inter-frame distance is about 3.8 cm.
To construct a hive with your own hands, pine, spruce, cedar, fir, and aspen are suitable. The humidity of the material should be no more than 15%. If there are a large number of holes in the boards, it is necessary to take care of their sealing in a timely manner. It is better to use boards made of wood harvested and sawn for the winter. This material does not rot. Summer wood is also suitable, but must be thoroughly dried before use.
The main structural elements of a two-body hive
You can make a hive with your own hands for 12 or 10 frames. Use the drawing below.

Drawing for making a hive
You can make a hive with your own hands for 12 or 10 frames. Use the above drawing. 1 - Flat roof. This is the main component; it protects the bees’ housing from rain, snow, and other natural phenomena. To ensure ventilation, do not forget to make slots on the sides of the roof. 2 - Ceiling boards. 3. - Liner. Ceiling boards and insulation are attached to this part. 4, 8 - Nesting frames in superstructures, buildings. In this place the bees build their honeycombs. 5, 9 - Insert boards. They make it possible to reduce the size of the nest and adapt it to a specific family of bees. Insulation is placed behind the boards during cold winters.
Upper body. A box made of boards, its size is 45 by 45 by 31 cm. 7.11 - Two flying boards. 10 - Lower body. 12 - Bottom. It is removable or permanent and consists of a harness and a shield. A ledge is left, and the landing board is attached to it. 13 - Arrival board below. This part is important, it is a runway for insects. It can be dismantled for the winter or before transportation. 14 - Summer minelayers.
Two identical cases are designed for 12 or 10 frames. Dimensions – 45 by 30 cm. In the drawing you can familiarize yourself in detail with the parameters of a two-hull hive.

Drawing of a two-body hive
Pros and cons of a double-hull hive
The two-body device has the following advantages:
- Favorable conditions for keeping bee colonies.
- As a result, their egg production increases.
- The family is constantly replenished with brood.
- Bee families practically do not swarm in a two-hull hive.
- Family productivity increases by 40%.
- The task for the beekeeper is simplified; he can easily prepare the hive for wintering.
Increases wax productivity. Bee families turn out to be strong and have good heredity.
There are also disadvantages of a two-body hive. The device is very heavy, weighing up to 50 kg. You have to constantly clear the frames of honey; when pumping out, you need to remove the superstructure; for a beekeeper this is hard work.
Manufacturing technology of a double-hull hive
For the device you will need:
- Board.
- Beam – 7 cm.
- Screws, nails, washers, staples.
- Galvanized steel for roofing and mesh.
- Overhead additions for the arrival board.
- Grated whitewash, drying oil, chalk and glue.
- A milling cutter, hacksaw, lathe, surface planer, chisel will make production easier.

The hive consists of two identically sized interchangeable buildings
Pre-prepare a blank from a 40 mm board, for this use sawing machine, if not, then a hacksaw. The surface of the boards must be flat. The top of the case must be equipped with folds, they are necessary for frames of 12 or 10. Also make folds on the outside, they are required for the second floor. In the front and rear walls, for stability, strength and protection from drafts, end folds are required. Dimensions 4 by 2.
We retreat 7 cm from the top and make a 2.5 cm hole in the front part of the body. This way you will have a tap hole. To clog it, you need to grind out a round sleeve. We proceed to fastening the boards; as a result, a 1.5 cm gap should form between the wall and the bottom. As a result, a tap hole is formed, its size is adjusted using two valves. Then we take nails and fasten the ends of the walls.
Making a double-hull hive with magazine extensions
The second building should not be an absolute copy of the first. You can make two magazine extensions, they will have the length and width of the first body, the dimensions of the side wall are 16.5 cm, the thickness is about 3 cm. It is recommended to use different boards in width. For structural strength, a large wide board of the side wall is attached from below, and the same board is attached from above for the rear and front walls.
The roof is the main part of the hive. It consists of a roofing shield and strapping. You need to take 150 mm strapping and 2 cm boards. To ensure the stability of the lid, you need to nail the strips around the entire trim. Monitor the ventilation of the hive; 2 cm holes are made in the side of the harness. Please note that bees may mistake them for entrances, so seal them with mesh. Afterwards the harness is covered with a board. Using galvanized iron, reinforce the roof.
Drawing for making a liner
The easiest way to make a liner is to pay attention to the drawing.
- Prepare the blanks, use a 20 mm board for this.
- Process the boards using a machine.
- Make tenons 2 x 2 x 2 cm, they are necessary for connection.
- Glue the pieces together using casein glue.
- Wait for the device to dry.
- Reinforce with wooden pins.
When cutting tenons, you need to be extremely precise. First, the blanks are connected using nails, then everything is clearly marked and cut out.
Making other elements for a two-body hive
To make the ceiling you need planks. We shorten them, they should fit freely between the walls. After this, we process the planks using a machine. Please note, there is no need to pack the boards tightly, leave some space, the bees will fill it with propolis.
The bottom for a hive with 12 or 10 frames must be removable. We first prepare 3.5 cm bars. Three pieces are enough. Dimensions 48 by 54 cm. First step back 2 cm, make a groove 3.5 cm wide, deepen only 1 cm. Then everything needs to be connected. The floor is inserted into the grooves. The protrusion of the bottom should be about 3.5 cm. Don’t forget about floor ventilation; to do this, make a 20 by 20 hole. Tighten the ventilation with a mesh. The bottom can be nailed to the body, but some do not secure it at all.
The frame for 10 or 12 is made of upper bars with hangers, as well as lower bars and slats on the sides. The dimensions are visible in the drawing below.

Drawing for making a frame
A double-hull hive is made with 10 or 12 frames; when making it yourself, it is important to use a drawing and know the dimensions of the hive. All components of the hive must be carried out strictly according to the instructions. Use quality material, this way you will extend the service life, increase the reliability of the structure and protect it from rotting.
The advantage of the modern beehive is the LL Langstroth hive, invented in the mid-19th century. AI Root's final design for mass production of the hive to this day has resulted in little to no major improvements and minor changes that modern beekeepers use.
In the Soviet Union, the perennial hive was made according to two standard designs.
The unit of a vessel with several chambers (MP P. 808-5-1) consists of a removable bottom, three or four blocks of ten frame nests measuring 435 x 230 mm, a roof liner and roofs.
2. The double body from the magazine (m. Ul. 3.808-2) consists of a removable bottom, two blocks of ten slots measuring 435 x 230 mm and three magazines for storing ten frames measuring 435 x 145 mm, a roof liner, feeders and roofs.

If you look at these drawings from the point of view of a modern beekeeper, you will see a number of shortcomings:
The hive should be lightened, especially for the lower hive in project 808-5-1.
2. The thickness of the shell side walls can be reduced to 25-30mm, so that the shell is lighter.
Well, let's get started or...
Using multi-service extensions in apiaries is not practical because these are already low-level frames for body and size, which are the main benefits of multiple hives.
Examples are made from 35mm thick plates that are quarter-joined at the corners. The upper and lower edges of the body have wrinkles.
The internal dimensions of the case are 375×450 mm. The front wall has a 10x120mm rectangular top channel and hand basins in the side walls.
When placing hives, it should be taken into account that any design changes should not affect interchangeability with hive parts made in accordance with the drawings.


Article “Which stems are better”
Hive Blueprints (16" chalk, no chalk deck for 20 frames)
Drawing a beehive
Hive dimensions dadan 10 frames
The dimensions of the hive are 10 frames, single-body design with one magazine extension.
Multi-body hive and beekeeping methods

The DADANA-BLATTA hive is the most common design used in apiaries in the Commonwealth countries. It is easy to maintain and has proven itself in areas with temperate climate, provides behavioral characteristics of bees by analogy with the natural habitat.
We will look at the dimensions of the body and bottom in the article: “Making a hive with your own hands”
We continue to describe the components of the structure.
ROOF FOR THE HIVE

Designed to protect the house from precipitation and other factors.
Consists of the following elements:
Liner (1)
cover (2)
protective coating (3)

COVER

We will make it from dry boards with a thickness of 22…25 (mm).
We drill through ventilation holes on the sides at an angle to the plane of the board (from bottom to top). This is necessary for water to roll down during rain along the outer, and not along the inner, walls of the hive.
The liner is installed on the body. It is necessary for placing insulation.
LID

Let's make it by analogy with the bottom.
Let's squeeze assembled structure. Using metal staples or construction staples, we fasten the boards together on both sides (bottom and top).
PROTECTIVE COVERING

We will make it from thin sheet galvanized steel GOST 14918-80. To protect against excessive heating, a layer of thin insulation can be placed under galvanized steel.
The development without taking into account the thickness of the insulation is shown in the figure.

When using insulation, add its thickness to size 22 (mm).
The roof can be made flat so that the houses can be stacked on top of each other when transporting them.
Reference: Dadan hive 8..10 frames are best used for young bee colonies; 12…14 frames – for those who are stronger.

In the article: “How to make a dadan hive,” we’ll talk about a store extension.
Hive designs can be very different. All of them must be adapted to the biology of bees. If this is not observed during the construction of the hive, it will not be suitable for use. Even if such a hive will be made by a carpenter highest qualifications, without observing the exact dimensions in it separate parts, the bees will develop in it incorrectly.
These hive sizes must be observed in any design. In the inner part of the hive, where the bees work and live, the following dimensions must be strictly observed: transitions for bees between frames and honeycombs (streets) - 11 or 12 mm, at the walls of the hives and side slats of the frames - 8 mm, at the bottom bars of the frames of the upper body and the upper bars of the lower body - 8-10 mm, and 37 mm between the centers of two adjacent frames.
These dimensions of the hive were established by the bees themselves, and the person only had to notice that the bees needed them.
During the manufacture of any type of hive, these distances and dimensions must be strictly observed. If the size of the gap between the wall of the hive and the side bar of the frame is made less than 7-8 mm, you can cripple or crush the bees when removing the frame, and they, in turn, getting irritated, will sting the beekeeper; at 6 mm - the bees will glue the side strips of the frames to the walls, and the frames will become difficult to remove from the hives and then put back in place; more than 12-15 mm - in this place the bees will build combs and glue the frames to the walls of the hive.
If the gap between the frames of the lower body and the upper one or the extension and the lower body is less than 8 mm, the bees can glue them together with wax or propolis, which will subsequently make it difficult to pull the frames out of the hives and return them to their place; more than 12-15 mm - bees can build honeycombs in this space and will also glue the frames of the lower and upper housings.
If you grossly violate the size of the gap between the frames, the bees will begin to build honeycombs past them, regardless of the presence of foundation, and for beekeepers with little experience, quite often not within the frames, but across them. When the distance is greater than necessary between the frames with correctly constructed honeycombs (for example, 15-17mm), to reduce the passages, the bees thicken the honeycombs so that the passages become normal (10-12mm).
If after this you move the frames apart again, thereby making passages 15-17 mm wide, then the bees will again build on the honeycombs and try to make them thicker and the cells deeper. The normal cell depth is 12.5 mm, and in a thickened honeycomb it can reach up to 20 mm. The queen will not lay eggs in very deep cells.
The frame is the main part of the hive.
The top frame bar - 25 mm wide - must correspond to the thickness of the honeycomb that the bees will build in it.
Nest, or full, frame in external size - 300 X 435 mm, half-frame for extension and magazine - 145 X 435 mm, frame for a multi-body hive - 230 X 435 mm (reduced). When assembling a nest, the beekeeper makes the required distance between the frames by eye, and with some experience it is quite accurate.
To install the frame with a given accuracy, they need to be made with dividers - with the side strips at the top frame bar extended by 5-6 mm on both sides.
These dividers, in addition to ensuring that frames are positioned at the required distance, also secure them in place during transportation.
In beekeeping, separators and other various designs can be used.
Frames with separators also have disadvantages: when pumping honey from such frames, you will have to make a hole in the mesh of the honey extractor for the separator so that the honeycomb fits well to the rotor mesh. Manufacturing such frames increases their cost. When removing frames for storage, the gap between them should be left 12 mm, while without dividers you can, without any damage, reduce it to 4-5 mm, which will reduce the volume for storing them. For frames with standard dimensions, the top bar is 20 X 470 X 25 mm in thickness, length and width.
Side bars - 8 X 290 X 25 mm, bottom bar– 8 X 418 X 25. Some beekeepers use slightly improved frames. The thickness of the upper bar is 15 mm, and the lower one is square in section - 10 X 10 mm, placed at an angle inside the frame. The thickness of the top bar, which is reduced, makes more usable area each individual frame by 20 cm. The lower bar, which is installed on the edge to the bottom and top of the frame, makes it possible to clean it from various blockages better than a flat, wide one.
The dimensions of the hives, as well as the dimensions of the frames for them, are calculated so that all the “bee needs” inside the hive are satisfied.
The external dimensions of the hive do not have much influence on bee activity, and they can be installed arbitrarily, but at the same time ensure the interchangeability of all its parts, maximum compactness, minimum weight and the greatest degree of convenience when working for the beekeeper. Because of this, in double-walled hives the outer roof and walls are made of thin boards (10-15 mm).
The roof of the hive can be flat, pitched or gable.
In apiaries transporting bees for honey collection or pollination, flat roofs are made to make it more convenient to stack them on top of each other when loading onto vehicles. To make hives, boards from trees with soft wood are used - alder, aspen, spruce, etc. Aspen is enough good material for the manufacture of hives, as well as parts for them, bodies, frames and other parts.
I consider it necessary to understand the reasons
my transfer of the apiary to a 145 mm frame,
give a little history.
It so happened that for more than twenty years of beekeeping practice, I had to keep bees in various types of hives.
At first these were beds with 16 frames, received in the middle of the 1984 season from a beekeeper who, due to illness, was no longer able to work with bees. In the first year, the apiary, consisting of ten hives-loungers and two double-hulled hives for 12 Dadan-Blat frames with a permanent bottom, did not bring any profit besides rich experience in communicating with bees. It should be noted that the first winter was disgusting. After that there were three years of searching for the optimal way to drive bees.
The choice fell on package beekeeping, which made it possible to completely eliminate wintering from the process. Every year 60–70 packages were purchased, and in the fall all the honey was pumped out and the bees were released “into the wild.” It should be noted that the method is not particularly humane.
And everything, in general, went smoothly: package families developed amicably and quickly in the spring, and migration to seed clover, at the end of summer, made it possible to receive 50–60 kg of marketable honey per family.
I didn’t have a headache about assembling the nest for the winter, about food supplies, or the results of wintering. Although, there was one fly in the ointment in this abundance of honey - this was the loading and unloading of heavy “boxes” that reached a hundredweight.
Dimensions of the hive given for 12 frames drawing
At this time, I came across an old magazine “Beekeeping” with a description of the Finnish technology for keeping bees. This article was a turning point in understanding the principles and technology of beekeeping.
In subsequent years, multi-body hives on the Ruth frame appeared, with a wall thickness of 20 mm. The choice was made in favor of nine-frame cases, because a honeycomb-free package weighing one and a half kilograms fit perfectly in one case. We developed our own driving technique and began experimenting with wintering.
The bees overwintered outside and in the winter hut. Outdoor results were not good enough, due to the fact that bees often died in snowless, frosty winters - they happen often here. Wintering in the wild, without stable snow cover, in the conditions of Western Siberia is a risky undertaking. In the winter hut the result was better. However, main problem it was not possible to solve it radically. Although the weight of the honey case became smaller - about 35 kg, it was still far from ideal. A new search has begun, because an experiment once started cannot be stopped...
It became clear that the beekeeping standards adopted at the beginning of the twentieth century were, to put it mildly, outdated.
It was necessary to rethink all the canons and established statements. It was decided to prioritize the convenience and manufacturability of working with the hive. At the same time, I wanted to solve the problem that had haunted me from the very beginning - not the best wintering.
Thus began the work of refining the hive, which would most fully satisfy all needs.
For the last eight years, I have been using multi-body nine-frame hives, which replaced the multi-body hives of Ruth, with a frame height of 145 mm. We have verified from our own experience that they provide maximum ease of use.

Here are some distinctive features and the advantages of the method of driving bees onto a 145 mm frame.
Firstly, the thickness of the walls of the housings was changed.
Excessive thickening does not provide additional heat in the nest, makes the hive structure heavier and increases its cost, therefore, it was decided to settle on a thickness of 20 mm.
The maximum weight of the full-copper body was limited to twenty kilograms. The calculation was quite simple: nine frames of 2 kg each and a body of 2.5–3 kg. The design of the frame also underwent a number of changes: the total height was 145 mm, which is a multiple of the standard of the produced foundation; the thickness of the upper and lower strips was reduced to 8 and 6 mm, respectively.

Frame with printed brood

Frame with printed honey
This became possible due to the fact that the maximum weight of the frame was reduced to two kilograms and, therefore, there was no need for excessive strengthening.
The side strips remained ten-millimeter thick, which, along with the small size of the side strip, eliminated its deflection when the wire was tensioned. The absence of deflection was a necessary condition for the mechanization of the honey pumping process. A machine was developed and built that allows automatic printing of frames of this type.
A conventional three-frame honey extractor was converted into a radial honey extractor with 12 frames, and an electric drive was installed on it. Automation of cell printing and acceleration of their pumping made it possible to increase labor productivity by an order of magnitude.
Structurally, the frame is made with permanent dividers, which eliminates the time spent on unfastening before moving, there is no need to interfere with the family’s work or disrupt its working spirit.
When installing a body with low frames, there is no too much rupture of the nest with foundation, the bees willingly begin to master the frames and within a week, the entire body is completely rebuilt.
145 mm frames allow you to use all existing honey extractors, apiary knives and other beekeeping devices and equipment with minimal modification to get started.
The main advantage of multi-body bee keeping is that it works in whole bodies.
Because they all have one standard size, are easily interchangeable, it became possible to conduct quick and effective work on expanding the family, dividing it, selecting honey. In addition, the standard body can be used as a flyby without any modifications.
Same frames different time can be in a nest or used as a store-bought one, it becomes possible to significantly extend their service life.
If there is a lack of dry land, nesting frames, which for some reason are no longer suitable for sowing, are placed in housings for collecting honey. The assembly of the bodies and the discarding of the frames are carried out in advance in a place inaccessible to bees, and work in the apiary requires only placing the finished body on the nest. Using the high building ability of bees on frames of this type allows you to quickly increase their number.
In winter, thanks to the narrow upper and lower slats of the frames, the transition of bees from housing to housing was simplified, and the gap between the housings made it possible for the club to move freely across the streets, which increased the success of wintering.
To guarantee the wintering of bees, a temperature-controlled wintering method was used. Research by leading specialists in the field of beekeeping has shown that best results Wintering is achieved by maintaining the temperature in the bees' wintering place in the range from +4 to +8°C.
Honey consumption per family, however, is about 4.5 – 6 kg over the seven winter months. Low feed consumption has a beneficial effect on the condition of the bees' intestines, eliminates their overcrowding, and, as a result, excellent wintering results are achieved.
Previously, to form a nest in winter, at the end of the season it was necessary to select frames filled with honey in a certain way, while simultaneously pumping.
In practice, this was quite problematic, but now, throughout the entire honey collection period, the best full-copper frames are selected. With the onset of autumn, the housing already equipped with these frames is simply installed on top of the nesting one.
Another difficult and disturbing operation for bees is bringing the hives into the winter hut and their spring exhibition. In my practice, I decided to abandon the winter shelter in the classical sense of the word. It was decided not to move the bees, but to arrange a shelter around the hives.
But this technique can be carried out only under one condition - if you apply linear method keeping bees. The essence of the method is to arrange the hives in one line with minimal technological gaps between families.
This allows you to make a group shelter for hives, placing a heating element inside with a basic means of regulating and controlling the temperature.

In the early spring, when recurrent cold is possible and cold nights are frequent, setting up a dry enclosure using a high frame is very difficult, due to the risk of excessive cooling of the nest, which does not contribute to the rapid development of the family.
This does not happen when using housings on a low frame, the expansion of the colony occurs without complications, excessive expansion of the nest and hypothermia of the brood are excluded.
In summer and early autumn, when the likelihood of unwanted swarming is high, specially developed anti-swarm measures can effectively contain and control colonies.
Someone may object - for this type of hive, twice as many buildings are needed than when keeping bees in a Dadan-Blat hive, which will require more time to work with the family.
This could indeed be the case if we go through the entire body step by step, but using the right driving technology, this minus turns into a plus. When using a low body, there is no need to work with frames, and all the work of the beekeeper consists of installing the body with pre-arranged frames or removing it, and the bees do not even notice the changes in the nest.
The use of “small” mechanization means, such as dividing grids, bee removers, devices for automatically unsealing honeycombs, radial honey extractors with electric drive, the descriptions of which will be given in subsequent articles, make it possible to make working with a large number of families easy.
The small size of the frame reduces the size and weight of these devices, making them convenient and transportable, which allows them to be used in field conditions. The use of the above devices makes it possible to reach new level and move from the level of an amateur beekeeper to the level of an industrial beekeeper. At the same time, paradoxically, labor costs are reduced while the number of families served increases.
8 frame dadan
Is it possible to work with a dadan hive as with a multi-body rue hive? To simplify work in the apiary and reduce labor costs. After all, the multi-body beekeeping system is much more efficient, it’s not for nothing that it is used in most industrial apiaries in the world...
The body of the 8-frame dadan is approximately equal to the body of the root in terms of the number of buildable cells.
Does this mean that if you make such hives, you can get all the benefits of a multi-body hive? Not really, because the frame of the dadan still differs from the frame of the rue in height. Here you cannot use an extension with a body that goes against the socket, because...
Dimensions of the Dadan hive for 10 frames: DIY Dadan hive
the gap between the buildings will be large. And bees are more willing to pass through the dividing grid into the store when the nesting frame is low. If you use a root frame under the nest box, the bees will least problems work in stores. In the case of the Dadan frame, the following problem is sometimes observed: the bees begin to accumulate honey at the top of the nesting frame due to its great height and reluctantly go up to the store.
The instinct of bees to put honey in dark places above the nest has been known for a long time. At the height of the upper part of the Dadan frame in the nesting building it is already dark enough to store honey, and it will not be so easy for thieving bees to get there.
For laying eggs, the queen looks for places near the entrance where there is more oxygen, so at the top of the frame in a housing with one lower entrance she will work less willingly, thereby allowing the worker bees to calmly store honey in the nest at the top of the frame. Undoubtedly, in this regard, the hive on the Rutov frame wins, where the brood is often from the top bar to the bottom, and transitions to the store are possible without problems.
And one more thing: Dadan’s 8-frame hive, unlike Ruta’s multi-frame hive, is not standard.
In this regard, huge problems will arise with the acquisition of ready-made equipment: after all, the hives and all the components will need to be made by yourself or a special order to the workshop.
Pillows, canvas, liners, etc. - all of these are non-standard sizes and are not produced by industry. However, when using a multi-body hive on a Dadan frame instead of a Rutov one, there are also advantages: after all, the entire Soviet bee industry has been designed specifically for the Dadan frame since ancient times, so in the territory of the former Soviet Union there are no problems with purchasing equipment, the dimensions of which do not depend on the size of the hive bodies: this honey extractors, insulators, etc.
And the easiest way to buy or sell a bee family or a bee package is with a Dadan frame.
Whether all beekeeping technologies used on a Ruta hive will work with an 8-frame dadan, and how bees will behave in this 8-frame dadan is a question that has been little studied in practice. Few beekeepers have tried this hive. Some were disappointed in it, saying that not everything here works out the way it sounds good in theory, while others, on the contrary, managed to use almost all the technologies for working with multi-hull hives.
Often this hive is used using only one housing for the nest, and expansion is carried out only with magazines or housings for honey. It is not for nothing that the Dadant company itself mostly sells Dadant hives with 8 and 10 frames, producing all the necessary additional components for them, but it does not make bodies of other sizes.
Moreover, these hives provide for work exactly like with Langstroth hives according to the American system: detachable bottom, rotation of bodies, etc.
There is no talk of any dishonest work here.
Using a Dadanov hive with 8 frames using a multi-body system saves the beekeeper from many problems: the work is carried out not in frames, but in frames; there is no need to use dividing boards or side cushions. Working with case technology undoubtedly increases labor efficiency, and the beekeeper can serve a larger number of bee colonies.