There are several ways to expand the living space of your home. One of them is the construction and arrangement attic floor. We will tell you how to make an attic, what work needs to be done and in what order, as well as what you should pay attention to Special attention when designing and constructing an attic space.
Attic design: what needs to be considered
Any construction or reconstruction always begins with drawing up a project. It is needed in order to identify everything, even the smallest nodes and moments, the omission of which in the future can cost considerable investments. In addition, when constructing an attic floor above an already residential building it is necessary to conduct an examination load-bearing walls and foundation. This is especially important in private construction, since in most cases all the work was done by hand, and over time cracks and other defects could form.

When constructing an attic, it is necessary to consider some points:
- Roof angle. The quantity directly depends on it usable space in the attic room. The slope also depends on climatic conditions. For temperate climates with little precipitation in winter period Roofs with a low slope are more suitable, and for areas with frequent and heavy rainfall it is better to choose higher roofs.
- Attic room requires good thermal and waterproofing. Remember that this floor borders on the external environment as much as possible, which means that heat transfer without appropriate thermal insulation will be very large. And this is fraught with additional costs for heating in winter and cooling in summer time. And condensation from the roof can lead to big troubles.
- The choice of roofing material from the point of view of sound insulation and protection from possible leaks. In addition, we must not forget about treating the wooden part with fire protection.
- Location of the stairs. To save space, you can install it outside the house. An internal staircase is much more convenient for moving around inside the house, but it usually takes up a lot of space. As an option, you can mount a folding ceiling ladder.
- Layout of rooms, designs and installation location of interior partitions.
- The number of electrical equipment, its power, wiring placement.
- Location of pipelines, radiators, their power and location.
- The location of future windows, their sizes.

Before starting work, you need to make a plan, a list necessary materials, the general construction estimate.
Installation of a wooden structure
The wooden roof structure can be divided into two parts: Mauerlat and rafter system. Let's consider the installation of these elements separately.
The Mauerlat is installed first. This wooden beam with dimensions from 10x10 to 40x40 cm. The Mauerlat is mounted on top of the wall on a pre-laid waterproofing layer made of ordinary roofing felt, Euroroofing felt, a special film made of dense polypropylene or PVC membrane.

More often the Mauerlat is attached to the wall with studs through through holes in the beam. Then the nuts are screwed onto the studs.
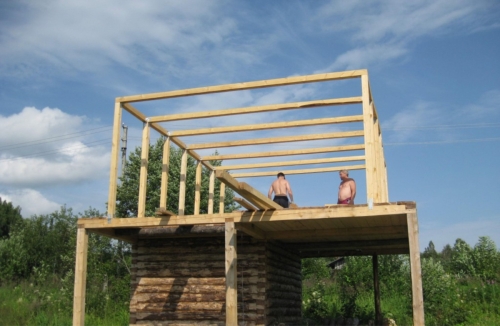
Let's move on to installing the rafter system. This is the most important element roofs. The rafters are considered load-bearing, since the entire roof along with thermal insulation rests on them. They must be able to withstand the weight of snow winter time and exposure to wind.
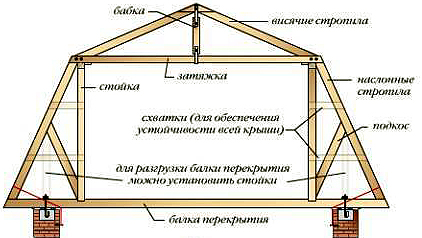
 One of the options for the attic rafter system: 1 - hanging rafters; 2 - grandma; 3 - tightening; 4 - run; 5 - layered rafters; 6 - stand; 7 - strut; 8 - Mauerlat; 9 - floor beams
For the rafter system, pine wood with a moisture content of up to 20% is best suited. Before assembling the roof frame, its wood must be treated with impregnation against pests, mold and fire.

At the first stage of erecting the truss structure, you can make a template for measuring the remaining trusses. To do this, you need to connect the boards at the desired angle at the top of the building, then attach them with a crossbar. After this, cutouts are made on the Mauerlat for the rafters. Using this template, trusses are assembled on the ground, lifted and installed. The upper corners of the rafters are connected by flat side brackets. Installation must be carried out first along the edges, then the rest are mounted.

The rafters are attached to the mauerlat with studs and brackets. It is recommended to fasten the trusses together with light boards. This design of the rafters prevents them from moving under the influence of wind. Possible deflections of the rafters can be prevented by installing vertical crossbars at their upper connection.

After installing the rafters, you need to check the horizontal and evenness of the installation using a level. You also need to evaluate how tightly and securely the rafters and beams are held. The roof must be strong and reliable.
Installation of the attic roofing part
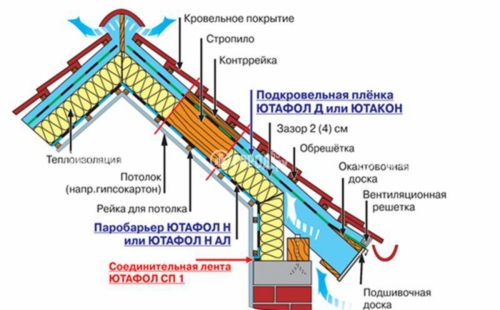
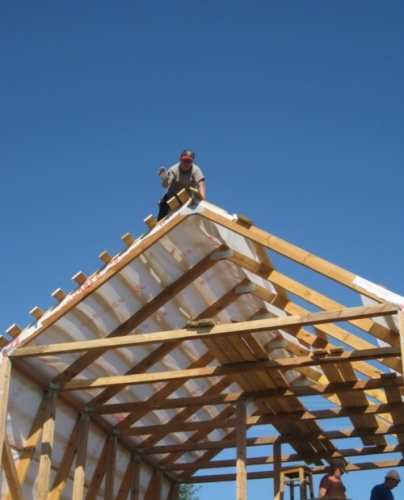
So, the roof skeleton has been created. On next stage Sheathing slats are nailed to the rafters for future roofing material. It is overlapped onto the sheathing using staples from bottom to top. waterproofing film or a superdiffusion membrane, on top of which you need to nail, depending on the type of roofing material, counter battens or moisture-resistant plywood.

Insulation is installed underneath the waterproofing. Typically, thermal insulation made of basalt or fiberglass is used, less often other types of material, for example, ecowool. Thermal insulation should completely fill the space between the rafters. There should be a vapor barrier film under the insulation. It prevents moisture from entering the insulation from the room.

During the work, you need to remember about the tie-ins in the roof for roof windows. In the places where they are installed, it is necessary to strengthen the rafter system with several bars. The total area of the windows should be approximately 10 times less area the premises where they are installed. After all this work, you can install the roofing material.

On this external works After the construction of the attic, the houses are finished. You can begin to carry out communications and interior decoration of the rooms.
This is the most popular look premises, since most structures are constructed in this way - the attic requires much less money for construction and is built very quickly. The rafter leg should be made of timber 150x50 mm, this is the calculation for an ordinary house 7x10 meters. With such dimensions, you don’t have to come up with anything extra - regular one will do rafter system structures. The angle of inclination of the leg will be from 45 to 60 degrees, it is advisable to make the angle smaller so that the parameters of the room are suitable not only for life, but also for normal rest.
The length of the rafter leg will be about 640 centimeters, while the width of the living space will be 450 centimeters and the height 230-250. Such parameters will satisfy the requirements of most builders, but if more space is required, then you need to give preference to sloping roofs, but they will cost much more. Let's consider the simplest and effective drawing attics under a regular gable roof.
The extension board can be exactly the same size as the leg to make construction more convenient, but the vertical supports can be reduced so as not to overpay a lot. A beam of 80x80 centimeters will be sufficient, taking into account the fact that the crossbar is laid 120x80. It is better not to skimp on the crossbar, since it serves as a supporting element; it will support the suspended ceiling, chandeliers and other decorations. It is advisable to install racks more often, as this will significantly facilitate Finishing work Then. Building an attic under a gable roof is simple, inexpensive, and practical.


How to make an attic with your own hands under a sloping roof
Despite the fact that the roof itself is quite expensive to manufacture and requires a little more labor for its installation, building an attic with your own hands will take much less time. You get a ready-made box for its construction; you just need to cover everything with finishing materials, insulate it, and an excellent, spacious room is already ready. A prerequisite for construction is that the width of the house must be at least 5 meters. Since for comfortable living in the attic you will need a height of 220 centimeters or more, and a width of at least 3 meters, preferably even more.
The top frame is made of 80x80 timber, the ridge rafters are 60x60 millimeters. Such small bars are the result of the fact that there are a large number of them and they are installed every 70 centimeters ( see drawing). Side rafters fastened with brackets, beams attic floor must be at least 50x50 centimeters, preferably a little larger so that there is a margin of safety. The calculation is made for a house of 6x6 meters; as the width of the building increases, the strength of the materials will increase proportionally, since the load on the load-bearing elements will be much greater.
The cladding is made from clapboards, plywood, fiberboard or OSB boards. These are the cheapest materials, which, with proper insulation, will be in no way inferior to European building materials. They can be installed on profiles, in the same way as when creating frame structures. No need to install heavy load-bearing structures– minimal pressure will be exerted on the walls. If it is necessary to make heavy units (for attaching a plasma panel, under an aquarium, etc.), it will be possible to install reinforcements precisely in the places where the object is attached, thus saving a large amount of money on furnishing the room.


Insulation of the room
If you initially want to make a house with good thermal insulation, so that a 400 W heater is enough to heat the attic, then you need to give preference to roofs with continuous sheathing. Let's take a closer look at how to make a truly “profitable” roof that will save you money in all subsequent years.
- Making the top of the attic. There must be a vapor barrier, since the temperature in the room and in the air chamber above the ceiling will differ by 15-20 degrees in winter, and heat will “escape” from the room. You stuff plasterboard on the bottom of the tie, onto which you can then apply finishing materials (plaster, stretch film, etc.), place foil on top of the tie to isolate steam, and insulate it with any roll insulation, which you will like. Such a system will eliminate condensation and increase thermal efficiency by 35%.
- Before you make an attic, you need to decide what you will use to cover the roof. Perfect option– slate, roofing felt, OSB sheet and sheathing. Such a system will significantly save on home heating costs, although the installation of building materials itself is expensive. It is better to make the lathing thick so that the OSB board does not “play” on it and is perfectly flat. Next, we cover it with resin, lay thick roofing felt, it is advisable to choose the most flexible one. You can simply nail slate onto it. Some builders also use a 0.5 cm layer of insulation so that the slate fits more tightly to a solid surface and does not loosen over time. Thermal efficiency, of course, also increases significantly.
- We insulate from the inside. One of the most important aspects of home insulation is the installation of fiberboard and insulation boards. Between the rafters, the entire space (without “windows”) should be occupied by insulation, the joints of which should be glued or knocked down tightly (depending on the type of material). If funds allow, you can apply liquid polyurethane foam directly over the sheathing and the inside of the OSB. Cost of one square meter it will cost about 200 rubles, but it’s worth it - you will eliminate possible condensation and insulate all roof slopes without seams.
When insulating, you can use ordinary polystyrene foam - its effectiveness is low, but with a solid material thickness (up to 8-10 centimeters) it will be no worse than alternatives building mixtures. The only big disadvantage is that it is not suitable for dense insulation everywhere, and it also takes up a lot of space.
Floor insulation is very important point, since a lot of heat is lost through it, especially in brick houses, where the role of overlap is played by concrete slab. But even a wooden frame must be insulated between floors. To do this, simply lay the roofing material in two layers, and attach a fiberboard slab, mainly PT-100 or M-20, to it. Then you can lay the usual floor, for example, warm linoleum. With minimal heating of the room, walking around it will be very warm; it heats up even when the first floor is heated.


How to build an attic the first time or the main mistakes of beginners
When we build an attic with our own hands, the main task is strength and few people pay attention to thermal efficiency, durability, and practicality. But within a few years, or even months, these “shoals” will gradually appear, and their elimination will be very expensive. Let's consider typical mistakes newcomers.
- No anti-corrosion treatment. All materials, especially natural wood, must be treated with impregnations, by special means from insects and moisture-repellent suspensions. If this is not done, the service life of the wood will decrease many times.
- Fastening different boards one rafter leg “by eye”, without a level, without taking into account the natural load on the roof in a snowy winter. As a result, the deflection of the rafters is ensured by 15-20%, therefore, the entire roof will “move.”
- The insulation is laid with gaps; there is no obligatory bandaging of layers. Some craftsmen initially lay a layer of insulation that is not at all suitable for our climate zone, so the thermal efficiency of the room immediately decreases significantly.
- No air cushion between top layer insulation and roof. Thus, fungi can form, as well as condensation, which will not lead to anything good.
- Use of overly “light” materials. The strength characteristics of the walls are not the primary goal, but they should not be put on the back burner. It is better to install an OSB board with a thickness of 15 mm or more - it is not much more expensive, but the strength properties will be several times higher than the material with a thickness of 0.5 mm.
Pay attention to the environmental safety of materials, purchase wood and insulation materials only from well-known suppliers, since low-quality goods can cause a lot of harm to your health. You should also not use anti-corrosion agents for external use, which contain a lot of dangerous chemicals. It is necessary to use suspensions intended for interior decoration, having hazard class 3 (not dangerous to humans). Preference should be given to well-established manufacturing companies.
The modern mansard roof is a great opportunity without unnecessary hassle, significantly expand the living space of your home. But if you involve builders in the work, it can cost a pretty penny. It is quite understandable that each of us has thought about the question of whether it is possible to do everything on our own without experience. We assure you that a do-it-yourself attic roof is more than possible. We offer you comprehensive instructions.
Currently the best option- broken attic. It is quite spacious and can really become a full-fledged living space with a large area. Naturally, for this you need to make accurate calculations.
Construction of an attic roof will require you to consider many factors before. Let's list the main ones.
Video about the attic roof of a house with your own hands
It is quite clear that the smaller the angle of inclination, the more usable space there will be in your attic. But it is not always necessary to strive for the most flat placement. Let's list some features of the choice:
- If your home is located in an area with temperate climate where the weather is often windy and snow is rare, then you can safely make a roof with a slight slope;
- If snowfalls and downpours are a frequent occurrence in your area, a flat roof should be abandoned;
- Do not forget that you need to take care of high-quality heat, sound and waterproofing. The attic is a living space like the rest of the rooms in your house;
- The best materials for roofing are tiles or slate. Many people mistakenly put metal coating, but with the arrival of cold weather they are faced with problems of heat conservation in the attic. Please note that materials must be fireproof and moisture resistant. The roof always consists of wooden elements. For better preservation, it is recommended to treat all such surfaces with an antifungal solution;
- An external staircase for the attic will significantly save space in the house. An internal staircase is a much more convenient option, but it also takes up a lot of space. It’s great if you take care of installing a ceiling ladder. It takes up practically no space. Alternatively, you can install spiral staircase, but its convenience is often questioned.

An external staircase for the attic will significantly save space in the house
- To begin with, you will need wooden beams 10x10 cm in cross section. They are applied on top of the waterproofing. The best material for it is roofing felt or roofing felt, which is sold in rolls. Working with them is quite convenient and you don’t need any additional skills. If your ceiling is also made of wood, then additional beam There is no need to lay it under the main beams.
- The next step is to install the racks on the beams. The same timber with a section of 10x10 cm will suit you. These racks are a kind of skeleton of the walls of your attic. In order for them to fully perform their functions, they must be placed no further than two meters from each other. Make sure each one is perfectly level. We recommend checking each one with a level and, if necessary, filing in the right places. When the racks are installed, they must be sheathed on both sides. For inside An excellent option is plasterboard or ordinary plywood, for the exterior - slab. It is important not to forget at this stage to lay the insulation between the racks. Each rack is separately secured with spikes and brackets. To prevent them from tilting, we recommend using temporary braces to secure them properly.
- Next, lay the top beam. Its cross-section should be the same as in the previous paragraphs. You can secure it in any way that is convenient for you. But make sure that the beams are held tightly and firmly.

Each rack is separately secured with spikes and brackets
- Now you need to install the Mauerlat. This is a kind of support for the rafter leg, which is located at the bottom of the structure. For the Mauerlat you will need a beam with a section of 40x40 cm or a board with the same thickness. Thanks to the Mauerlat, high strength of fastening of the roof rafters to the walls will be ensured. It allows you to redirect the weight of the roof directly onto the walls. It is not necessary to take a section larger than 40 cm. All the same, the Mauerlat lies directly on the wall and the load on it is relatively small. Just be sure to put waterproofing underneath it, otherwise it will start to rot over time.
- A well-fixed Mauerlat protects your roof from the effects of wind, snow in winter and other loads. Therefore, make sure that it is secured carefully. For this you can use wire with a diameter of up to 5 mm. It is best to choose annealed wire, which is specifically intended for tying. To make the walls more durable, the wire is embedded directly into them.
- Now you need to install the rafter legs. Make markings on the rafter frame and mauerlat in the places where the rafters will be installed. Usually the pitch is 1-1.2 m. For rafters, you will need a board with a cross-section of 4-5 cm and a width of 15 cm. Choose only perfectly flat boards. It’s better to overpay a little money for them, but be sure that a residential attic with your own hands will not cause your attic roof to collapse.

For rafters, you will need a board with a cross section of 4-5 cm and a width of 15 cm
- The rafter legs should rest on the ridge beam. If your attic has a large area, then the weight of its roof will be large. Therefore the beam is mandatory element designs. It is not needed only if the rafter length is less than eight meters. IN in this case You can get by with regular stretches.
- Installation of fillies. Produce it according to the same scheme as the rafters. To simplify the process, start with the two outermost ones, stretch the twine between them and align with it when installing the next ones.
- Now you need to nail the hem board to the fillies. It will become an obstacle to wind and almost any precipitation.
- Before you make a mansard roof, you must think about where the windows will be installed. Remember that their area should occupy at least 12-13% of the area of the side walls. Where you decide to install windows, you need to strengthen the rafters. To do this, install cross beams. They will take on the role of the lower and upper parts of the opening, where the window frame will be installed and fastened.

Before you make a mansard roof, you must think about where the windows will be installed
When the previous ten points are completed, you need to carefully double-check everything that has been done. Already at this stage you will understand how to make a roof with an attic without any problems, but you should always play it safe. Especially if you are doing this for the first time.
Carefully go through all the rafters and beams with a level, check if they really hold tightly and reliably, if there is insulation everywhere, if any work needs to be done problem areas. It would be better if you ask one of the more experienced builders to evaluate with a trained eye whether everything is really done as it should be. Remember that the roof of your home must be safe and strong. But if everything is fine and the structure holds securely, you can proceed to further work:
- You have already created the roof skeleton. Now you need to nail the furring slats to the rafters. The step depends on what roofing material you choose for your roof.
- When the sheathing is installed, you need to install a water barrier on it. In most cases, regular plastic film is best suited for this. It is inexpensive, effectively protects the attic from moisture getting inside and is easily attached using construction staples. The main thing to remember is that the layers of film must be laid from bottom to top with the layers overlapping each other.
- A thermal insulation layer must be placed on top of the film. One of the best materials, which serves for these purposes, - mineral wool. It is lightweight, retains heat well and is completely safe for your health, unlike many other thermal insulation materials. In addition, it effectively prevents the spread of rodents in your home.

A thermal insulation layer must be placed on top of the film.
- When you reach the roof, follow the same procedure as in the case of plastic film. The roofing ball also lies from bottom to top, and the elements overlap each other. Make sure that in those places where there is a break in the roof, the upper ball of the roof protrudes above the lower one. It is very important. Otherwise, with the slightest rain, your roof will leak and the structure will gradually rot.
- The ridge must be installed in such a way that its design completely eliminates the possibility of precipitation getting under the roof of your roof.
Completion of installation
The main part of the work has come to an end. It is recommended to make attic roofs multi-layered so that they provide better heat, sound and waterproofing of the entire attic. Do not forget also that the attic must “breathe”. Modern windows and doors are an integral element of any such roof.
If you have not completely decided on the installation of the stairs, then it is better to install an external one first. It will be cheaper and easier this way. In any case, if you feel that this option is not suitable for you, you can make a staircase indoors at any time, sacrificing space in the house.
Video about a gable roof
Now you know how to build an attic roof according to all the rules and without resorting to the help of an expensive team of builders. Be patient, select high-quality materials and tools, and then follow our instructions. Good luck!
The mansard roof is one of the the best ways increase total area your home, with minimal financial costs. Having erected similar design, you get an additional fairly spacious room, which can become a good nursery or your personal account. You can also simply invite guests there; in general, there are a lot of options for you to choose from. When arranging it, you need to be prepared that it is important to do everything correctly and step by step. The mansard roof itself is a converted attic; its creation requires a structural approach to the overall redevelopment, roofing and thermal insulation. Construction of a mansard roof country house, is almost no different from building a regular roof. Below we will carefully study how to properly build an attic roof with your own hands.
First of all, you need to consider the advantages and disadvantages of such a roof in order to finally decide whether it is worth starting its construction.
Advantages and disadvantages of an attic roof
The advantages of attic roofs include:
- additional room. As we have already discussed above, the main advantage of the attic is the additional spacious room, which you can equip as you please to suit your taste;
- moderate financial expenses. The second factor of such a floor is the relatively low cost of its construction. Indeed, building an attic will cost you much less than adding an extension to the house additional rooms due to the general expansion of the area of the house;
- view from the window. Beautiful view from the attic window will not leave anyone indifferent, since the view of the world around you from above is always beautiful.
One of the disadvantages of the attic floor is the need for additional heating. In the video you can clearly see the construction process:
Types of mansard roofs
If you decide to start building an attic roof, then first of all you need to start by designing what your work will look like in the end result, and also how exactly to implement your plan. Basic decisions regarding the type of roofs must be made taking into account design features Houses.
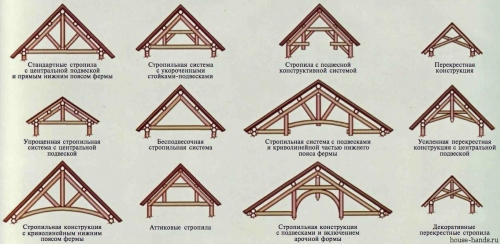
The main types of roofs include:
In the video you can see how a mansard roof is erected:
Below we will look at the structure of this roof, which you can build yourself
Attic construction
Mansard roofs are very similar to simple ones pitched roofs. Each type of similar roof has its own design features, but in general they all have common elements, let’s look at them:
- Roof. The surface of the roof, which is located outside, serves to protect against rain, snow and other bad weather;
- Lathing. Basically these are boards of wood, the roofing is attached to them;
- Ridge run. The outer part of the entire roof structure;
- Rafters. These are layered or hanging stiffening ribs of the entire structure. For the attic, it is layered rafters that are used;
- Internal supports. Vertical beams serve to ensure the strength and stability of the roof;
- Insulating layer. An insulating cake of several layers is placed between the walls of the premises and the roof, which allows maintaining the temperature regime throughout the attic. Insulation includes sound insulation, vapor barrier, and a thick layer of thermal insulation. Of course, the safety of the roof itself directly depends on proper insulation roofs.
Video to help you with your work:
Construction of the attic. Technology
Quite often, when designing a roof, architects overlook significant errors in ventilation and insulation. These mistakes are fraught with the fact that mold and mildew appear on the roof and, in general, it begins to leak within just two years. This happens because the attic construction technology is violated. Due to the fact that it is strongly pressed against the wall indoors, it is very difficult to achieve good heat transfer. The entire attic structure must include good ventilation, thermal insulation, as well as a rafter structure, which will be made of wood treated with fire retardants.
The thickness of the thermal insulation should be at least 20cm, since the climate in our area is quite cold in winter, and in summer period hot enough. The main disadvantages of the attic design are that a lot of heat is lost in winter, and in the summer it is very hot in the attic. Correct thermal insulation is able to fully solve this problem, it will retain heat inside in the winter, and will also not allow a large amount of heat in the extreme heat in the summer.
It is also necessary to properly arrange roof ventilation. In summer, with sufficient high temperature, the roof tends to get very hot, this process significantly increases the temperature inside the attic. Properly installed ventilation guarantees comfortable living indoors and also protects the roof from damage during the winter. Sound insulation is necessary in order to reduce the noise level inside the attic when there is hail, rain or strong gusts of wind outside.
Important! It is preferable to carry out installation of any type of insulation in tandem with a person who has experience in this matter.
Step-by-step construction of an attic
Well, it's time to consider how you can build step by step this roof with his own hand. To build an attic you will need some experience in similar works. Building an attic is much more difficult than a regular roof, since the angles of the slopes must be respected. To learn how to build such a floor correctly with your own hands, you need to carefully study the work plan:
We should start, of course, with the development of the floor itself. A specialist can help you with this, or, if your computer knowledge is at a sufficient level, you can do everything yourself in a special program. Next, you absolutely need to correctly calculate the slopes of the roof angles, loads, etc. To do everything correctly, you need to carefully study a book such as “Loads and Impacts.”
Advice! The book “Loads and Impacts on Buildings and Structures,” ed., will help you understand everything correctly. Perelmutera A.V. 2007 or ed. Gordeeva V.N. and others, 2008 or 2009, which can be downloaded http://dwg.ru/dnl/4183
This video will help you to make rafters correctly:
How to build a rafter frame
At this stage you will have to work hard and to complete the task efficiently, you need at least 3-4 workers. We begin the construction of the roof by laying and securing mauerlats over the entire area of the house. In this case, a beam with a cross section of 100x100 mm is used.
This should be followed by installing the frame of the room; its racks will be used as supports for the entire rafter structure. The sections of the beams must correspond to the sections of the longitudinal beams, because the racks will rest on them. First, you need to install vertical posts on both sides of the building. They need to be secured to the longitudinal beams, using self-tapping screws and metal corners.
Advice! A screwdriver will greatly facilitate the fastening process.

So, we got two arches, a cord should be stretched between them, if its direction is strictly horizontal, then this will mean that everything is done correctly, but if not, then one of the arches will have to be shortened a little. Next, with the required spacing for the rafters, we place the following arches strictly along the cord. Using jumpers we secure the arches, and to secure the jumpers themselves we use special stamped corners.

Installation follows upper rafters, and that's pretty hard work. They must be installed at certain angles and alignment, this is where the difficulty lies. Make a template from two boards, they should completely match the connected rafters that we plan to make. When using this template, you should trim the rafters that are on the ground, and then place them on Right place. Installation of rafters occurs in the same way as during the construction of an interior room.
The installation of the rafter structure ends with the need to nail the sheathing. The material from which it can be made is plywood, chipboard or simple boards.
How to arrange a room under a roof, you can see this in the video:
How to insulate an attic roof with your own hands
Once the installation of the sheathing and rafters is completed, we can begin the insulation layer. The vapor barrier is laid on the inside of the roof; for this we attach it with staples to the rafters. Then comes the installation of thermal insulation. It is necessary to carefully ensure that the layer of thermal insulation is tightly laid on the surface of the rafters. There should be no gaps, otherwise it will lead to very negative consequences. The lathing is attached to the thermal insulation in increments of 50 cm.

Waterproofing is laid on the outside of the rafters, its direct function is to protect against moisture getting inside. The roofing is placed on the waterproofing surface.
Attention! When conducting construction work Safety precautions must be strictly observed.
How to build an attic with your own hands can be seen in the video:
I think you have noticed that the construction of an attic is quite a serious event. The durability of your creation depends on how responsibly you approach the matter.
There are many examples of what a mansard roof can look like. Among its varieties, everyone can choose something of their own. If you need sufficient daylight, you can install a large window. Attic shapes can be rounded or with strictly right angles and lines. Whatever choice you make, your approach to this matter must be serious and well thought out.
The attic roof makes it possible to significantly increase the total living space, while the financial investment will be minimal. The most common option is a gable broken structure, which is easy to build yourself.
How to make a mansard roof yourself
Living rooms can be arranged under the attic roof. The shape of the building can be different, but in most cases the attic is built under a roof with two slopes. The optimal solution, which allows you to obtain a significant area of living space, is a broken structure.
broken roof is the best option for arranging an attic
Drawings and calculations of a mansard roof
The first step is to decide on the frame diagram. Rafters can be layered or hanging type. Layered ones rest on the walls of the building. They are mounted in structures where the distance between the walls is less than 6.5 m. Hanging rafters placed on fillies and mauerlat. If the width of the spans is large, then the rafter system will need to be reinforced with auxiliary ties.
The main condition for the comfortable construction of an attic is the ceiling level - it must be higher than 2.5 m. To ensure a similar height, the break line must be placed at a height of more than 2.8 m, taking into account the thickness of the layer of material for insulation and cladding of the structure. It is also important to consider the thickness of the floor.
An example of a drawing can be seen in the image:
 Minimum height the ceiling of the attic roof is 2.5 m
 To calculate the expected snow loads, you will need to apply this formula: S = Sg x µ, where S is the snow load, Sg is the weight of the snow cover per 1 m 2 area, µ is the value that depends on the roof slope (1.0 - for a flat structure with a slope of 25°, 0. 7 - for a design with an inclination of 25–60°).
Parameters Sg and Wo can be found in the relevant SNiP, in the “Rafter systems” section. If the roof has a steep slope, then the snow load can be ignored.
Roof structure
The frame structure includes the following parts:
- Mauerlat - a support bar that transfers the load from the rafters to the walls of the building;
- racks - supporting parts that support the rafter system in a vertical position;
- floor beams - planks that form half of the attic and the ceiling of the lower floor;
- rafters - slats that form the main contour of the roof;
- purlins - horizontal supporting parts for rafters;
- sheathing - slats or plywood sheets that are intended for laying roofing material;
- fillies - strips that are attached along the axis at the bottom rafter legs.
 The frame consists of a mauerlat, racks, purlins, floor beams and other elements
 A sloping roof differs from an ordinary structure with two slopes. The difference is that the slopes, which are placed opposite each other, have a special shape: they do not form a straight line, but consist of several slopes that are fastened to one another at an obtuse angle. The design is also symmetrical.
The extreme part of the rafters is generally set at an angle of about 60°. The support posts that support the rafters form the frame structure of the interior walls. The upper part of the rafters is mounted at a small angle, it can be from 15 to 45°. This makes it possible to reduce material consumption, while maintaining the functional properties of the roof and resistance to loads from snow.
Vertical racks, which abut against the floor planks, purlins and crossbars fastening them, form a parallelepiped. The design limits the dimensions of the attic from the inside. To give the product additional rigidity, struts should be installed between the floor slats and the lower rafters.
 If the roof span is more than 8 m, then you will need to install struts
 After installing the upper elements, to fix the truss and prevent sagging of the crossbars, you should install hanging support elements - headstocks. For auxiliary fixation of the lower rafter legs, they must be pulled together with the uprights using tacks. The parts are fastened using nails and bolts.
Stages of self-construction of an attic
If you decide to make such a structure yourself, it is important to provide for the use of the following materials in the project:
- roofing material;
- vapor barrier;
- waterproofing;
- insulation material.
The choice of insulation affects such a parameter as the pitch of the rafters. To reduce the amount of insulation, it is best to place the rafters so that the slab or mat fits tightly between them. The type of sheathing and its pitch will depend on the choice of material for roofing. You need to pay attention not only to choosing high-quality material for insulation, but also to creating an effective ventilation system.
 Ventilation is arranged by preparing technological gaps
 The construction of the rafter system must be carried out using fireproof materials. All parts should be treated with fire retardants. You will need to prepare the following elements:
- wooden blocks cross section from 100x50 mm;
- slats 50x150 mm;
- unedged boards;
- building level;
- self-tapping screws;
- nails;
- steel wire with a diameter of 4–5 mm;
- plumb line;
- roulette;
- hacksaw;
- axe;
- hammer;
- sharp knife.
Drafting
One of the most important parts of the work is drafting the project. It is very important to analyze the layout features of a private house. It is necessary to determine the dimensions and shape of the structure being built, and also provide for the placement of windows and a balcony.
 Everything on the project should be marked structural elements
 In the process of drawing up a project, the following requirements must be taken into account:
- It is important to decide in advance what the height of the attic should be. It should be remembered that the distance from floor base to the highest point of the structure there should be a minimum of 0.5 m.
- It is recommended to take into account the heating area and the main interior elements.
- The attic layout should be expanded. If you plan to install windows, they must be indicated on the drawing.
Drawing up a drawing must begin with choosing a shape, determining the cross-section of the rafter legs and the step of their placement. To determine the size of the rafters, you need to take into account the following parameters:
- slope;
- roof roofing material;
- climate features in the construction region.
It is also important to provide the required number of rafters in the project. They can be layered or hanging type.
 Rafters can be hanging or layered
 At the end, you should determine the number of parts to fix. In the figure below you can see some of the data necessary for the calculation, but drawing up a project is a complex process. This work It is recommended to entrust it to qualified specialists.
Mauerlat installation
The design of the attic roof rafter system should be selected based on the type of roof, as well as the prepared project attic space. A simple option is a design with two slopes.
The main details of a roof rafter system with two slopes are:
- linear elements (column, rod system, beam);
- flat parts (slab, flooring, panel);
- spatial elements (vault, shell, volumetric part).
Before carrying out work, you will need to thoroughly dry the wood. The first step is to mark and install the Mauerlat. It is fixed to the walls of the building. The part can be made from a block or a powerful lath. If you plan to build a roof with two slopes, then the Mauerlat is laid on the long walls of the building. The element is necessary not only for reliable fixation of the lower part of the rafters, but also for the correct distribution of the load on the walls and the main part of the building.
To fix the Mauerlat, you should use metal pins that are attached to a beam made of monolithic concrete.
 To fix the Mauerlat, you need to install metal pins
 The beam should be placed at the top of the wall. It is also possible to use steel wire embedded in brickwork.
To secure the Mauerlat to the upper rim of a wooden wall, you need to use wooden dowels. Auerlat requires execution high-quality waterproofing wooden beams. Therefore, it is necessary to use roofing felt or other material with water-repellent properties.
 Before installing the Mauerlat, the base must be covered with roofing felt.
 The installation of a Mauerlat is required if it is planned to erect a roof frame, the rafters of which rest against the upper part of the wall with beveled ends or prepared cutouts.
If you plan to make an attic, the width of which corresponds to the width of the building, the rafter legs should rest with their lower ends against the external supporting parts. It is possible to use powerful beams laid across long walls as supports. The number of supporting elements corresponds to the number of rafters. The beams must be secured to the walls in the same way as the Mauerlat.
Sequencing:

Frame construction
 The frame of the attic roof consists of floor beams, rafters, purlins and racks
 Bars are often used as a material coniferous species 200x100 mm. The floor slats are placed on top of the mauerlat with an indentation of 30–50 cm beyond the surface of the walls or into prepared grooves in the masonry. In the first case, the parts are fixed using angles and self-tapping screws.
 Fixing the timber to the mauerlat can be done using steel corners
 To make an even floor, the planks should be installed in this sequence:
- First of all, the outer parts are placed level.
- Next, you should tighten the cord and install intermediate elements along it.
- The pitch of the beams should be from 60 to 100 cm. A distance of 60 cm makes it possible to install insulation boards without cutting.
- To level the beams in height, they can be trimmed. Another option is to use plank underlays.
- If beams are inserted into prepared pockets, their outer parts must be processed liquid waterproofing and wrap it in roofing felt.
You need to place the racks on the outer planks:

After installing the racks, crossbars and purlins, you can get reliable design, which will limit interior rooms attics. To increase its strength, it should be secured in the future with struts and tacks.
Installation of rafters
At this stage, the installation of the lower rafters is carried out:

After this, the upper elements are installed:
- The first step is to mark the central part of the roof. This can be done using a stand that was previously attached to the Mauerlat and a tie from the end of the roof. The outermost part of the board should run along the center of the roof. The rafter legs need to be aligned along this board.
- Next, you need to prepare a template from a 150x25 mm slats. It should be applied to the extreme part of the mounted batten at the required level and to the purlin on which the lower rafter legs will rest.
- You should mark the upper and lower cuts and cut out a template. The device is applied in turn to two sides of the roof. This will make it possible to check the accuracy of the marking of the central part. If the rows of racks are placed in parallel, then there will be no difficulties in securing the upper elements - they will have identical dimensions.
- According to the preparation, you need to prepare the required number of rafters. The parts are placed on purlins and tied together in the upper parts using iron plates or trim strips. In the latter case, self-tapping screws are used as fasteners. In the purlin, the rafter strips rest against the cuts and are caught with iron corners. To ensure that the parts stand straight, they are secured using struts, mounted with the lower part on ties. All rafters are installed using this method.
- The hanging racks are fixed - pieces of 150x25 mm planks. The upper part of the batten is attached to the place where the rafters are fixed, the lower part is attached to the tie.
Video: mansard roof rafter system
Installation of struts and gables
Sequencing:

Sheathing of the structure
The sheathing is needed for:
- distribution and transfer of the weight of the roofing material to the rafters;
- performing additional fastening of the rafter system;
- bases for fixing roofing material.
The sheathing can be made in one or two layers, continuous or with vacuum.
 The sheathing can be solid or with relief
 The installation method depends on what material is planned to be used to cover the structure. If a roof is being built from slate or metal tiles, the sheathing should be made of slats that are attached to the rafters with nails. In this case, the installation step of adjacent planks can be 27–30 cm.
Continuous sheathing used in case of fastening soft material in rolls.
Solid sheathing is necessary for a soft roof
In this case, you can use moisture-resistant plywood sheets or particle boards. It is allowed to use pine wood material- trim strips.
It is important to take into account the fact that when installing such a sheathing, the material that will be laid must follow the contours external base. That's why frame construction must be strong and level.
When laying out the material, you should use a cord, with which the slats or slabs will lie flat. The parts must be placed parallel to each other. Before fixing, the material must be treated with an antiseptic composition to protect it from rotting, fungus and dampness. The workpieces must be smooth and of high quality. It is recommended to give preference to wood grades 1 and 2. There should be no knots on it. To prevent the boards from warping, they must first be dried.
Sequence of actions for installing the sheathing:

Waterproofing a mansard roof
Roofing material does not have thermal insulation properties, so you will need to prepare quality material, which will be environmentally safe for human health. Quite often mineral wool or glass wool is used. Both materials have excellent sound and heat insulation parameters. It is also important to take into account that if the roof is made of metal, if the insulation gets wet, all its qualities can be reduced to zero. Therefore, it is important to carefully consider the design.
Insulate an attic without a gasket waterproofing material will not work, so the process should be considered in its entirety. Step by step guide for waterproofing the structure:

Practice has shown that it is better to protect insulation with modern materials, for example, Tyvek or Izospan. The use of ordinary polyethylene film gives poor results, as condensation may appear. Experienced craftsmen believe that it is not necessary to waterproof the structure with roofing felt.
Before proceeding with the work, you need to decide on thermal insulation material.
 Mineral wool is a fairly popular material used for roof insulation.
 The most commonly used heat insulators are:
- glass wool;
- mineral wool;
- Styrofoam;
- foam glass;
- wood shavings;
- straw.
The material must be selected taking into account four parameters.
- Thermal conductivity index. For roof insulation, 0.05 W/m*K or lower is optimal.
- Water resistance. The higher the score, the better.
- Fire resistance.
- Environmental Safety.
The insulating qualities of mineral wool deteriorate significantly after some time. The material can also be damaged under the influence of mechanical loads. However, mineral wool has a low cost, so the material is used quite often. Polyfoam is not afraid of water and has excellent thermal insulation characteristics. If you plan to build a house only from environmentally friendly materials, then you can use foam glass or straw.
Step-by-step guide to roof insulation:

Laying roofing materials and installing window openings
As an example, we will consider the installation of metal tiles, since this material is used quite often:

The number of windows is determined by the relation usable area glazing to the base of the floor 1:10. For example, if the attic area is 100 m2, then the glazing should be approximately 10 m2. When installing windows, you need to take into account such nuances.