Wooden houses are quite attractive in themselves, but when correct cladding you can give them an even more aesthetic appearance. The main rule is to choose the finishing materials wisely. At the same time, they should reflect the personal preferences of the owner of the house and not be very expensive. Many modern materials finishing not only gives the facade an aesthetic appearance, but also performs the function of insulation. You should familiarize yourself with the most popular options for finishing wooden buildings in more detail. The exterior decoration of a wooden house has a number of subtleties that must be taken into account when choosing a specific material.
The need for wall cladding
Why is it worth decorating the outside of a wooden house with cladding material? There may be several answers to this question:
- With the correct selection of finishing materials, the aesthetics of a building can be improved without spending a lot of effort on its installation. Thanks to the large selection of finishing materials, the walls of wooden buildings can be covered in one of many ways.
- The finishing acts as protection for the walls from rodents. If the structure is not protected from pests, beetles and mice will quickly damage the wood. As a result, the walls will lose their attractiveness, and the building itself will lose strength. By doing a reliable finish, pests will enter the house.
- Modern facing materials protect the house from adverse weather conditions. With high humidity, as well as constant exposure to snow and rain, the wood begins to rot. To protect the walls they must be treated antiseptic. If you treat the facade regularly, a lot of money is spent on it.
- The cladding plays the role of a heat-protective barrier. In cold weather, the house stays warm better, and in hot weather, it stays cool.
- Finishing materials are highly fire resistant, which helps protect the house from fire.
Panels for cladding the facade of a house must have a certain degree of fire protection in order to wooden building was reliably protected from fire.
Finish classification
Various materials for facade finishing wooden houses are divided into two large groups - according to the type of design and installation method. You should be very careful when finishing plastic windows on the outside. Installation method facing material must be selected taking into account the selected material.

The installation method can be dry or wet. Dry is a method that does not require gluing panels or priming the surface. In this case, compositions based on water are not used. For example, this method includes finishing the outside of a wooden house with a block house or plastic panels. They are attached to the surface using self-tapping screws or dowels.
For wet installation, it is necessary to use aqueous compounds. The surface of the walls can be covered with plaster or clinker tiles. This installation method has some features. It is better to finish the house at a positive temperature, when the street is not lower than -5 degrees.

Depending on the type of construction, facing materials can be:
- ventilated;
- no ventilation.
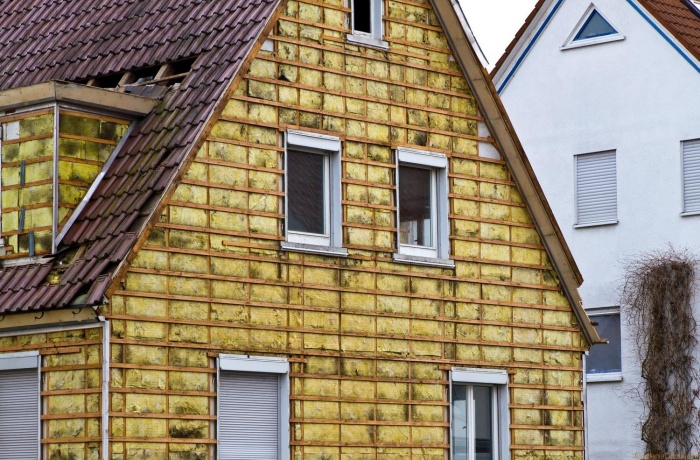
Structures that are classified as ventilated are installed in such a way that there is a certain gap between the facing material and the facade of the house. Thanks to this solution, the walls are protected from condensation, and mold and mildew do not develop. In addition, installing a facade with ventilation will allow you to insulate the walls.
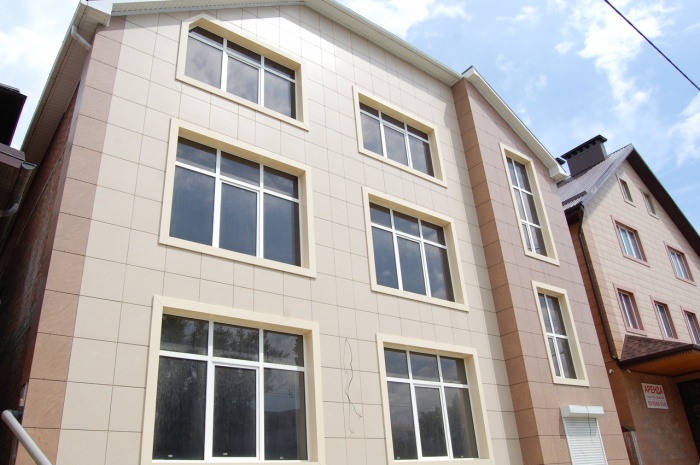
If ventilation is not expected, the exterior finishing is fixed to the facade without gaps. In this case, the insulation must be installed from inside the building. A photo of the exterior window decoration in a wooden house is presented below.

Experienced experts still recommend choosing a ventilated façade. This will reduce the likelihood of mold and mildew appearing on the walls. At the same time, the house can be insulated in such a way that it becomes much warmer, and the living area does not decrease.
Finishing materials
Wooden houses are often finished with a variety of materials that have different properties and characteristics. Among them may be:
- siding;
- imitation timber;
- facade paint;
- brick;
- Block House panels;
- clinker thermal panels;
- porcelain stoneware
Important! In any case, before installing the cladding, it is worth leveling and cleaning the surface. In addition, the walls are treated with an antiseptic.
Log houses must be caulked. Exterior decoration wooden house includes many tasks that are performed in accordance with the selected material.

Siding
Siding panels are most often used for cladding wooden buildings. They can be made of vinyl or metal. If the fire risk of a particular house is higher than the standard indicator, it is better to use concrete siding for finishing the facade. It has the following advantages:
- simplicity and high speed of installation;
- reliable protection of walls from mechanical influences;
- large selection of textures and colors;
- the material does not rot;
- it is easy to care for;
- concrete siding can be attached with a gap;
- the thermal insulation of the house turns out to be quite high;
- The walls are reliably protected from moisture.

Siding can be installed on walls in any weather. This work is done simply and quickly if you follow the instructions.
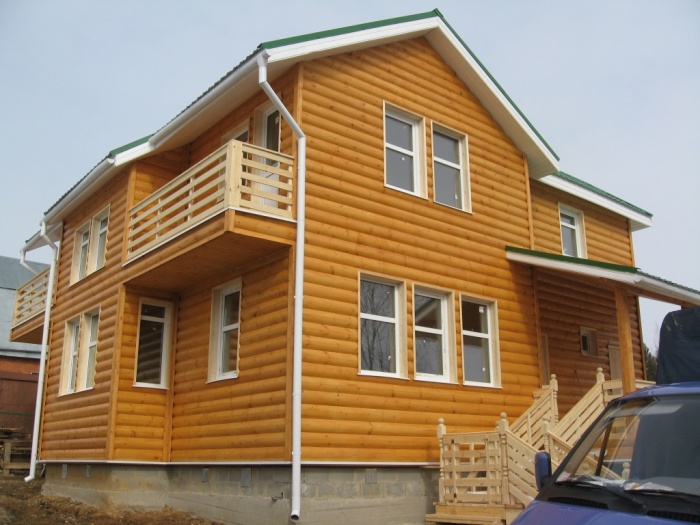
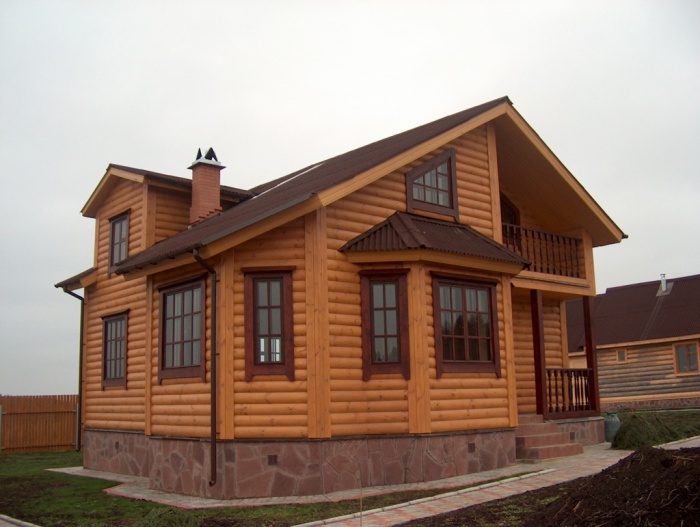
Block house
This material is extremely popular among lovers of the “original Russian” style. The house, lined with a block house, resembles a log cabin. The material is wooden boards, which have a convexity on one side.
Advantages of the material:
- the façade takes on an attractive shape;
- the material is very easy to install;
- sound insulation and thermal insulation of the building are very high;
- The block house serves for many decades without changing its characteristics.
This material also has several disadvantages:
- wooden elements must be impregnated with an antiseptic;
- the cost of such material is higher than that of siding;
- The fire hazard of such material is higher.
When purchasing cladding, you must take into account both the positive and negative sides.

Imitation of timber
Such products are a type wooden lining. For reliable protection The façade is made from 2 cm thick boards. There are many advantages of finishing a house with imitation timber:
- high environmental friendliness of the material;
- even an inexperienced builder can install the panels correctly;
- the service life of imitation timber is quite long;
- The thermal insulation of walls when using such material increases significantly;
- cladding is completed quite quickly;
- Wall defects are much easier to hide.

The disadvantages of imitation timber include a high degree of fire hazard and the need for regular treatment with protective substances.
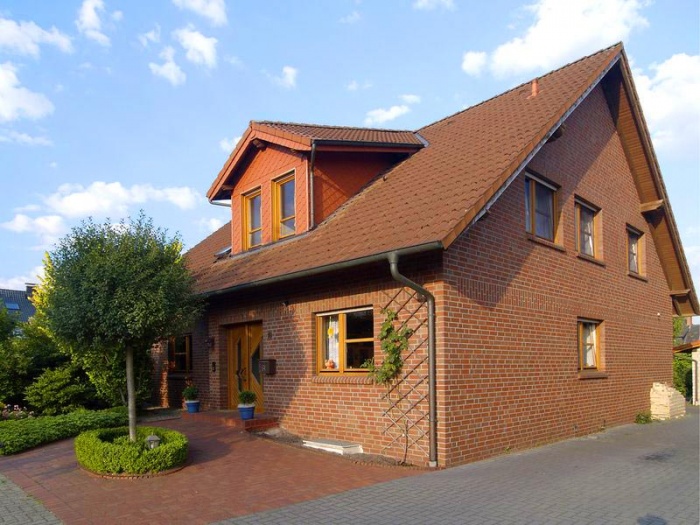
Brick
Brick cladding for a home is a fairly aesthetic finish, superior in many ways to cheaper options. It has a lot of advantages:
- increased thermal insulation of the building;
- low level of moisture absorption;
- high degree of frost resistance;
- long service life;
- high reliability and strength of the material.
The disadvantages of brick include the complexity of the installation process, as well as the need to strengthen the foundation. In addition, such cladding has a high price.
Clinker panels
Today, wooden houses are increasingly being clad with clinker thermal panels. This is due to the many advantages of the material - low cost, high level of thermal insulation.
Additional properties of clinker panels include:
- high resistance to mechanical influences;
- environmental friendliness;
- low degree of moisture absorption and vapor permeability;
- long service life of the product;
- non-exposure to solar radiation;
- ease of care.
Clinker thermal panels are attached to the sheathing.

Porcelain tiles
Porcelain stoneware slabs are made from clay and dyes. This material also contains feldspar, kaolin and quartz sand. Clinker slabs are an excellent material that is perfect for attaching to the walls of wooden buildings.
They have a lot of advantages:
- fairly high mechanical strength;
- resistance to low temperatures;
- clinker slabs can be installed using the “wet” method;
- high degree of fire resistance.
Porcelain stoneware slabs are attached to a metal sheathing.
Painting
Quite often, owners of private wooden houses do not install cladding material on the walls. They simply paint the facade with special paint. This solution has several undoubted advantages:
- walls become protected from weather conditions;
- paint protects wood from temperature changes;
- the wood is protected from fading as a result of exposure to ultraviolet radiation.

In order for such paint functions to really perform, you need to carefully consider the selection of the coloring composition. It is better to choose from these options:
- paint diluted with water - polyvinyl acetate;
- glazes and varnishes;
- acrylic emulsion;
- oil-acrylate compositions.
Each of these compositions has its own characteristics. Many of them have properties that should be taken into account when working. For this reason, before choosing a composition, it is necessary to familiarize yourself with the characteristics of the composition.
conclusions
As you can see, the exterior of a wooden house can be cladding different ways and using a variety of materials. This work is quite painstaking and requires the fulfillment of a number of conditions. It is necessary to choose the right material and observe some installation features.
October 5, 2016
Specialization: facade finishing, interior finishing, construction of summer houses, garages. Experience of an amateur gardener and gardener. We also have experience in repairing cars and motorcycles. Hobbies: playing the guitar and many other things that I don’t have time for :)
After a difficult journey from laying out the foundation to installing the roof of a wooden house, private builders are faced with the need to finish their future housing. On the one hand, this procedure is simpler than, for example, erecting a box, but on the other hand, it contains a number of nuances that you need to know. To help in this matter, below I will tell you in detail how to finish a wooden house from the outside and inside.
Features of exterior finishing
Wooden houses built from timber or logs look quite attractive even without finishing. Therefore, their walls often only cover protective impregnation. However, in some cases it is impossible to do without full finishing.
As a rule, the need for it arises if:
- the house is intended not only for summer, but also winter holiday or permanent residence. In this case, it must be insulated;
- the house is old, as a result of which it has lost its attractiveness or even its geometry.
It should be noted that not all existing options exterior decoration is suitable for wooden houses. For example, it is better to abandon the “wet facade” technology, since it involves performing “wet” work, which is undesirable for wood. In addition, in this case, condensation may form between the insulation and the wall, which will negatively affect the durability of the structure.
Therefore, it is best to decorate the outside of a wooden house in the following ways:
- using curtain façade technology;
- by brick cladding.
Below we will take a look at each method.

Curtain façade technology
This technology consists of installing a frame on the walls, which is subsequently covered with any facade finishing material. In this case, insulation and vapor barrier can be installed in the space between the sheathing and the wall. Thus, curtain façade is great solution in cases where it is necessary to insulate the house.
The finishing process in this case includes several stages:

Preparation of materials
So, first of all, it is necessary to prepare materials for exterior finishing. For this you will need:
- protective impregnation for wood;
- interventional insulation;
- construction sealant;
- wooden beams for assembling the frame, as well as adjustable brackets or metal corners;
- vapor barrier membrane;
- thermal insulation material (if the walls will be insulated). The best option is mineral mats.

In addition, you need to decide what to decorate the outside of the walls with. There are quite a lot of options:
- wooden finishing materials - these include lining, block house, imitation timber, etc. Besides, in Lately Planken finishing of facades is popular. The latter is a finishing strip with beveled ends.

The main advantage of these materials is environmental friendliness; in addition, they allow you to preserve the natural appearance wooden housing. The price of these materials starts from 300-350 rubles per m2, and largely depends on the type of wood and its quality;

- vinyl siding is a practical coating that looks like wood. Among the advantages are resistance to moisture and negative atmospheric influences. In addition, vinyl siding is cheaper than its wooden counterparts - from 200 rubles per m2;

- metal siding is an analogue of vinyl siding, but is made of galvanized steel or aluminum. I must say that these panels look quite attractive, since a photograph of the wood texture is applied to the surface.
The disadvantages include the noise of the material during precipitation and wind, as well as high thermal conductivity. Therefore, metal siding is rarely used for cladding. residential buildings. The cost of this coating starts from 400-500 rubles 1 per m2;

- façade panels – according to performance qualities They resemble vinyl siding because they are made of PVC. The difference lies in appearance - their surface can imitate natural stone, brickwork and other materials. The cost of the panels is about the same as for vinyl siding;

- basement siding - consists of panels made of fiber cement or durable plastic. They can imitate various materials, ranging from wood to brickwork. Their main feature is increased strength, which allows the use of panels for finishing the plinth.
Price basement siding starts on average from 600 rubles. for 1m2.
Each of these materials is capable of decorating walls and protecting them from influences. environment. Therefore, everyone must choose for themselves how best to decorate the facade, depending on their own preferences and financial capabilities.

Preparing the walls
Before finishing the exterior of the facade, the walls must be prepared. this work carried out in the following sequence:
- if the house has already been used, you need to dismantle the hanging parts. These include visors, ebb tides, antennas, etc.;
- then the surface of the walls should be treated with impregnation, which will protect the walls from moisture, as well as all kinds of negative biological influences;

- Next, it is necessary to insulate the inter-crown cracks. For these purposes, tow, special rope, polyurethane cords and others can be used. thermal insulation materials. On top of the insulation, the space between the crowns can be filled with construction sealant.
On this preparatory work completed.
Frame installation
The most critical stage of work is the installation of the frame. At the same time, you can easily cope with this task yourself. The main thing is to follow a certain sequence of actions:
- Before installing the frame posts, you should attach a vapor barrier film to the wall. The canvases must be overlapped.
To fix the film, use a construction stapler; - Next, you need to attach the racks to the walls using metal brackets or corners. In itself, attaching the racks is not difficult; the only thing is that they need to be positioned vertically and in the same plane. Therefore, the process of installing them is somewhat reminiscent of installing guide beacons for plastering walls.

To ensure that the racks are located in the same plane, it is advisable to install the bars outermost from the corners, using a level. Then you need to stretch ropes between them, which will serve as beacons for intermediate posts.
Keep in mind that the distance between the posts must correspond to the width of the insulation. Moreover, in the case of using mineral mats, it is advisable to take a step a few centimeters smaller than the width of the insulation so that it fits tightly into the space;

- When the frame is assembled, insulation should be laid. Wherein it is necessary to ensure that there are no gaps between the mats that form cold bridges;
- then another layer of vapor barrier film is attached to the frame;
- after that, slats are attached to the racks on top of the film, which will serve as a counter-lattice.
This completes the frame installation process.

Sheathing
The final stage is covering the frame. It must be said that all the materials described above are installed approximately the same way, with the exception of some nuances. Therefore, as an example, I will tell you how to cover the outside of a wooden house with vinyl siding:
- First of all, the starting profile should be attached to the frame from below along the perimeter of the house using self-tapping screws. Keep in mind that it must be positioned strictly horizontally, so during the installation process it is necessary to use a building level;

- Next, you need to install corners on the internal and external corners;
- Now you can proceed directly to the plating. This is done very simply - they are inserted into the starting profile from below, after which they are fixed to the frame with self-tapping screws from above. In the corners, before fixing them with self-tapping screws, they should be inserted into the corner profiles;
- then the second row of panels is installed according to the same principle, with the only difference being that their lower part is connected by a lock to the upper part of the panels of the first row;
- Before installing the last row of panels, you should secure the finishing profile, having previously marked its position;
- now attached the last row panels, which is attached to the previous row from below, and inserted into the finishing layer from above;
- Finally, additional elements are installed - slopes, ebbs, etc.
An alternative to a suspended facade are thermal panels, which serve as insulation and at the same time a finishing material. They are attached directly to the wall without a frame using special fasteners. The cost of this material starts from 1000 rubles per square meter.

The same applies to cladding with wooden finishing materials. The only thing is that starting and finishing profiles are not used for their installation. In addition, corners on external and internal corners are installed after covering the walls.
Brick cladding
It is better to clad an old wooden house that has lost its geometry with brick. This finish is the most durable, reliably protecting external walls from external mechanical loads. In addition, such a solution will make the building much more presentable in appearance.
True, brick cladding also has some disadvantages:
- high cost of bricks - starts from 10-15 rubles per piece;
- facing masonry is difficult work which requires highly qualified mason If you do not have the necessary experience, you will have to seek help from specialists, which will increase costs;
- brick has a lot of weight, resulting in facing walls foundation needs to be completed.

If, despite these shortcomings, you decide to decorate the house with brick, the work should be done in this order:
- It is necessary to begin work by preparing the facade according to the scheme described above. If necessary, you can even fix a vapor barrier on the walls and then cover them with mineral mats. The latter are attached using special umbrella dowels;
- further along the perimeter of the house it is necessary to make a strip foundation. As a rule, a shallow foundation is sufficient, however, much depends on the characteristics of the soil. Therefore, before completing the foundation, you should consult with specialists.
As for the process of arranging the foundation itself, you can familiarize yourself with it in detail from other articles on our resource dedicated to the construction of the foundation; - Next you need to waterproof the foundation. As a rule, for this purpose several layers of roofing material are laid on the base;

- then the first three rows of masonry are erected. In the second row, the seams between the bricks should not be filled with mortar so that vents are formed to ventilate the space, as in the photo below;
- flexible connections are placed in the seam between the third and fourth rows, which connect the load-bearing wall to the facing wall. The step in one row should be no more than 50 cm;

- All walls are built according to this principle. In the penultimate row under the visor, ventilation should be done, as in the second row.
This completes the exterior finishing of the wooden housing.
Finishing the house inside
Walls
Decorating the inside of a wooden house is rarely done. Most often, homeowners prefer to see natural wood walls and beams. That's why wooden surfaces only treated with protective impregnation and varnish.
However, in some cases this procedure may still be required, for example, if you want to additionally insulate the house from the inside or decorate the walls with traditional materials. So the shower room, where the level of humidity is often high, is often lined with plastic panels or even ceramic tiles.
In addition, the interior decoration of an old wooden house, the walls of which have lost their natural attractiveness, may be required. In this case, it performs a purely decorative function.
It should be noted that the classic finishing option is plastering over shingles (a wooden lattice made of slats that is nailed to the walls). However, recently plaster is used extremely rarely in wooden houses for a number of reasons. Therefore, next we will consider exclusively “dry” options for interior decoration.

So, regardless of what material the walls will be sheathed with, the first step is to install the frame. Most often it is made from wooden beams.
This work is carried out like this:
- Before finishing the walls inside the house, they need to be prepared, just like the outside - treated with a protective compound and insulated between the roof spaces;
- if the walls will be insulated, it is necessary to provide a ventilation gap. To do this, slats are attached to the walls in a horizontal position. Each belt should be located at a distance of about 50 cm;
- then a vapor barrier film is attached to the slats. As a result, a ventilation gap should form;
- then fastened vertical racks, according to the same principle as on external walls;
- if necessary, the space between the racks is filled with insulation, after which another layer of vapor barrier film is stretched;
- Next, the counter-lattice slats are installed. Keep in mind that their location depends on the location of the finishing material. For example, if the lining will be located vertically, the counter-lattice must be made horizontal.

If further decoration of the rooms will be carried out finishing materials, for example, clapboard or plastic panels, then they are simply attached to the counter-lattice with self-tapping screws and connected to each other with a locking connection.
If you plan to decorate the walls with more traditional materials, for example, wallpaper or tiles, then you should sheathe the frame sheet materials. The best option is GVL (gypsum fiber sheets) and gypsum board (gypsum plasterboard sheets). On our portal you can find detailed information about how these materials differ.
To decorate the bathroom you must use moisture-resistant GVL sheets or gypsum board.

The process of finishing walls using such sheets looks a little different:
- First of all, the sheets need to be cut and attached to the walls with self-tapping screws. Let me remind you that the latter should be located in increments of about 25 cm. The caps of the screws must be slightly recessed;
- after covering the walls, it is necessary to prepare the joints of the sheets for further puttying - from the ends it is necessary to remove a chamfer about 5 mm wide using a mounting knife, after which it is necessary to stick a self-adhesive reinforcing mesh;

- Next, the surface of the walls should be treated with primer, which is applied in two layers using a painter or brushes. During this procedure, make sure that the soil is laid down in an even, thin layer.;
- now you need to fill the joints of the sheets and the heads of the screws with starting putty;
- After the composition dries, the entire surface of the walls is puttied. You can find out more about puttying techniques on our portal;

- Next, the surface is pre-grinded using a special jointer and a mesh that is stretched over it. At this stage, it is necessary to remove all significant surface irregularities;
- After this, the walls should be wiped with a damp cloth and primed again. If wallpaper or tiles are glued to the surface, the work can be completed;
- If paint is to be applied to the walls, it is necessary to perform a final putty and carefully sand the surface with a fine mesh to remove even the smallest irregularities and scratches.
This completes the process of finishing the walls from the inside.
Ceiling
There are quite a lot of options for finishing the ceiling. Many people leave the beams exposed altogether. This gives the interior a special flavor, especially if it is decorated in a rustic style.
In this case, finishing the beams consists of processing them protective compounds or even opening with varnish. This procedure is not difficult at all.

If the house has a second floor, ceiling finishing may be required to ensure sound insulation. In this case, the easiest way to finish is as follows:
- From the side of the first floor, lathing should be done. To do this, the slats need to be nailed to the floor beams;
- Further on the side of the second floor it is necessary to lay a vapor barrier film on the sheathing;
- then insulation is laid on the film - this can be mineral mats, ecowool or other suitable thermal insulation material;
- after this, another layer of waterproofing is laid;
- then a substrate should be laid on the beams, for example, cork, this will also improve sound insulation;
- At the end of the work, floor boards are laid, after which installation is carried out finishing coating;

- Now you can attach drywall, plastic panels or other finishing material to the bottom of the sheathing. The best way to decorate the ceiling is up to you to decide, taking into account the interior design and your own preferences.
It must be said that the same principle can be used to insulate the attic of a house.
Floor
Finally, I will tell you how to finish the floor in a wooden house. Of course, installation of materials that are laid in a “dry” way is carried out according to standard scheme, and does not contain any special features. Such materials include laminate, linoleum, carpet, etc.
But performing screeding requires a special approach. The latter may be required in the bathroom or kitchen, for example, for subsequent laying of tiles.

This procedure is carried out as follows:
- First of all, you need to properly waterproof the floor. To do this, waterproofing is laid on it with a turn on the walls. Moreover The joints must be taped;
- then the beacons are installed, as when pouring a regular screed;
- After this, concrete is poured according to the standard scheme. The only thing is that reinforcing fiber should be added to the composition, which is used instead of reinforcing mesh. It is advisable to avoid the latter because it can damage the waterproofing film.

Conclusion
The exterior decoration of a wooden house, like the exterior, contains a number of nuances and can be done in several ways. Above we looked at the most optimal options, which allow you to preserve wooden walls and at the same time achieve the desired result. The only thing is that during the work you must strictly adhere to the above recommendations, otherwise it may affect the durability of the entire house.
If you have any questions regarding the finishing or some points are not completely clear, write in the comments and I will be happy to answer you.
What the appearance of a wooden house will be, first of all, depends on its decoration. Many owners of wooden buildings prefer to sheathe the house with a variety of finishing materials, which at the same time decorate, insulate and protect wooden walls from adverse factors. However, the casing log house has some difficulties, their reason is the corner connections of the log house. The corners interfere with the installation of the sheathing, without which it is impossible to frame the house. Finishing the corners of a wooden house outside and inside the room causes the greatest difficulty when carrying out finishing works. How to properly finish corner joints, and how to sheathe corners without damaging the wooden structure? We will talk about this in the article.
The finishing of the corners of the log house, as well as the entire house, begins after the initial shrinkage process, about a year after construction.
Directly finishing the corners inside and outside a wooden house can be done after performing the following work:
- grinding;
- protective treatment;
- insulation.
Grinding
If in the future it is planned to cover the outside of a house made of timber with clapboard, siding or other material, you can adopt the following insulation method: the corner is completely covered with foil, the shiny side out, the foil can also be secured with a furniture stapler.
The view at the corners is not very presentable, but this does not matter, because the top of the house will be covered decorative cladding, which will completely hide the insulation.
Other possible options insulation of external corners:
- basalt insulation;
- fiberglass;
- polystyrene foam;
- foamed polyethylene.
Externally, corners cannot be insulated using polyurethane foam, which accumulates moisture and contributes to dampening of the wood.
Features of finishing external corners
Regardless of what kind of lumber, timber or logs the house is made of, there are two main ways to connect corners:
- “into the bowl”, after the junction there is a certain piece of log;
- “in the paw”, beams or logs are cut without leaving any residue.
 When using this method of cutting corners, a very beautiful form of joint is obtained, which can be decorated in an original way, for example, by painting different elements of the log with contrasting colors.
With a corner connection without any residue, special meaning acquires insulation, since in this option, the corner remains unprotected and in the absence good insulation lets in the cold.
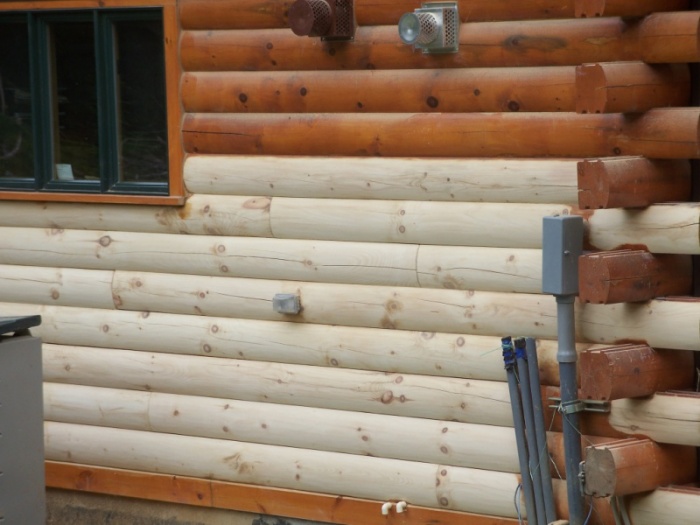
Typically, this method of cutting a log house is used if the cladding of the log house is planned in the future. Closed corners, chopped without leaving any residue, become warmer and more airtight.
However, if you cladding a log house that has not undergone complete shrinkage, the cladding may become deformed. At the same time, corners should not be left open for a long time. The ends of logs can crack under the influence of precipitation and sunlight.
 You can cover the pre-caulked corners with a regular board. If you fix the board rigidly, then when the log house settles, the logs may hang and cracks may appear. To avoid this, it is necessary to make a vertical slot 2 cm long in the board and, when screwing it to the corner joint, screw a self-tapping screw into the highest point of the slot.
A board nailed in this way will not interfere with the natural shrinkage of the house. If over time the length of the slot turns out to be insufficient, you can unscrew the screw and screw it again to the top point.
After the shrinkage processes are completed, the corners can be sheathed with clapboard or siding. Cladding corner joints chopped into a paw does not cause any particular difficulty, since the corner is cut without leaving any residue, it will not interfere with making the sheathing in the usual way.
 In another way, this angle is called “warm”, and this is no coincidence. With this type of cutting, the corners allow less cold to pass through, making the house warmer. Nose outside building logs protrude outwards, often the ends are of unequal length, this does not allow the frame to be installed correctly. The question arises: how to sheathe the corners of a log house in this case?
In some sources you can find advice: gradually cut down the protruding structural elements, and fasten them with staples to strengthen them. However, as a result of sawing off the ends, which are elements of the supporting structure and give strength to the house, the building may lose stability and weaken.
 If pins were not installed during construction, then for a weakened structure any the slightest effort is fraught with destruction. Therefore, you should think carefully before making such a decision.
The cladding of a log house must be done in such a way as to keep all corners intact. When installing the sheathing, it is necessary that the distance from the wall of the house corresponds to the length of the protruding elements.
If the ends have different lengths, they are filed in such a way that they form straight line. It is quite possible that in this case the frame will recede greatly from the wall, then the dimensions will have to be equalized using thick bars with a cross-section of 50x50 mm.
You can use alternative option, which involves mounting the frame separately for the wall and separately for the corner. In this case, the corner frame is an independent structural element and is made in four planes. The presence of additional corner elements will increase material consumption, but finished form such a structure looks very impressive.
Finishing the internal, as well as external corners of the log house, begins with the obligatory grinding and caulking of the joints. Often, especially if the corners are cut “into a bowl,” they look very beautiful, and you don’t want to hide them under the trim, but on the contrary, you want to emphasize their beauty.
 To highlight the smooth outlines of the lines, it is enough to place a jute or linen rope on top of the caulk. Internal corners connected using the claw method do not look as impressive, but they can also be beautifully played out decorative rope. For the same purpose, you can use contrasting paints, covering the joints and ends of the logs with them.
If there are wide gaps at the corner joints of the logs that are unlikely to be closed with rope, you can decorate the corner using two edged polished boards. They need to be tightly connected to each other so that there are no gaps and an even vertical angle is obtained.
You can also close gusset using one board installed vertically at an angle of 45 degrees to both walls. But such finishing is used much less frequently.
Regarding finishing internal corners timber house, then it is not particularly difficult. A house made of timber has flat walls with even corners, which can be sheathed with any material: clapboard, block house, imitation timber.
The corner connections of a log house are the most difficult areas and always cause difficulties when processed by non-professional craftsmen. Not only the appearance of the house, but also how comfortable its residents will feel depends on the quality of their finishing.
If you want your wooden house to be warm, cozy and beautiful, entrust its finishing to the Master Srubov company. There are no impossible tasks for our specialists; we can easily cope with the most complex finishing and implement any interior solutions.
Our company employs not only experienced craftsmen, but also qualified designers who will offer you various options design in the design of your home.
You can contact us by phone or send us a message. You will find all our coordinates in the section.

Calculate the cost of painting and insulating your home right now
June 13, 2017Specialization: facade finishing, interior finishing, construction of summer houses, garages. Experience of an amateur gardener and gardener. We also have experience in repairing cars and motorcycles. Hobbies: playing the guitar and many other things that I don’t have time for :)
How to finish the corners of the walls so that they turn out smooth, durable and beautiful? Previously, I was often interested in this question, but now, having gained experience, I myself will tell you how corners are finished - external corners inside and outside the building. I am sure that this information will help beginners cope with the task.
Finish options
The difficulty of finishing corners lies not only in the fact that they must be even. The fact is that these sections of the walls are often subjected to shock loads, therefore it is necessary to provide them with sufficient strength.
Currently, there are several ways to solve this problem. The choice of method depends on the type of wall decoration, which can be as follows:

Option 1: plastered or plasterboard walls
If the walls are plastered or covered with plasterboard, then special plaster corners are usually used to finish the corners. They come in two types:
- Aluminum perforated. Used for finishing flat areas;

- Arched. Made of plastic. Their main feature is their increased flexibility, which allows them to be used for finishing curved surfaces;

The corners are glued with plaster or putty at the stage of rough finishing of the walls. During their installation, be sure to use a level. This allows you to install them strictly vertically or horizontally.
I must say that this decision used both for interior walls, and for facades. But, most importantly, this finishing of the outer corners of the house allows not only to level them, but also to protect them from mechanical damage.
Price:
Please note that all prices are current as of Spring 2017.

Option 2: finished with PVC clapboard
Recently, PVC (polyvinyl chloride) lining, which is simply called plastic panels, has become very popular. Most often this material is used in the following rooms:
- Bathrooms;
- Kitchens;
- Hallways.
If the walls are finished with plastic, the corners can be decorated in the following ways:
- Using profiles. This is the simplest method, the essence of which is to use corner profiles. They are installed on the lathing using a level, just like plaster corners.
As a rule, profiles are fixed to the sheathing using a stapler. Then the panels are simply inserted into special grooves;

- By bending the panels. To bend plastic panel with your own hands, you need to cut its inner side along the fold line. It is even advisable to cut a thin strip, as shown in the photo diagram above.
Before bending, it is advisable to heat the front side, for example, using a hairdryer.
Price. The price of guides for PVC panels starts from 25-30 rubles per 3 m (standard length).
Option 3: finished with wooden paneling
Not so long ago, when finishing walls with clapboards, the boards for corner joints were cut and adjusted. At the same time, the remaining cracks were filled with putty. Nowadays, you can purchase a special wooden corner to decorate corners.

You can secure it to the lining using window nails. The only thing is that it is advisable to bite off the nail heads so that they are invisible.
It must be said that in this way you can finish not only external, but also internal corner joints.
Price. The cost of wooden corners averages about 50 rubles per linear meter.

Option 4: facade finished with siding
Many beginners are interested in how to decorate the corners of the house on the facade? As I said above, perforated plaster corners can be used for wet facades.
If the facade is sheathed with siding or other facade panels, you should use special additional elements, which are usually sold complete with panels.

Such corners perform several functions at once:
- Provide fixation of panels;
- Design the joint of the panels;
- Protect the ends of the panels from mechanical loads;
- Serve as guides for siding.
In fact, installing siding corners is similar to installing guides for PVC lining. They are also mounted on the sheathing, but not with a stapler, but with self-tapping screws. In this case, a level must be used.

Option 5: wooden walls
At first glance, there is no need to decorate the corners of a wooden house from the outside, since they themselves look quite attractive and are quite durable. However, not everyone knows that the ends of lumber are the areas that are least resistant to moisture and rot.
To protect them, special sealants and impregnations are used for the corners of a wooden house.
Price. Below are the most popular formulations and their costs:
You can use compounds for the ends of lumber not only outside, but also inside a wooden house.

Option 6: wallpapered or finished with liquid materials
Above, I have already talked about the rough method of finishing plastered walls. Finally, let's look at how it's done decorative finishing such walls.
So, there are two most common ways to solve this problem:
- Decorative overlays. Finishing external corners in the apartment implies PVC installation or polyurethane corners.

These products can be made to look like wood or even look like an expensive baguette. The latter are usually made of polyurethane. They look rich and are used in classic interiors;

- Decorative stone. In this case, the corners are covered decorative stone, which can be made of plaster, cement or even natural stone.
It must be said that this method can be used not only for interior walls, but also for the facade.
Installation instructions decorative corners requires removal of the finishing coating in the area adjacent to the wall. This is especially true for heavy polyurethane linings.
Price. Below is the cost of some materials for decorating corners:
Conclusion
Now you know what methods and materials are used to decorate the corners of a house outside and inside. Additionally, watch the video in this article. If you have any questions on this topic, you can contact me in the comments.
When constructing a new building or during the renovation of an old facade, the question arises about its further decoration. The finishing of the external walls of the house is carried out using various building materials. Each of them has its own advantages and disadvantages, which should be taken into account when choosing. Installation technologies differ greatly. In addition to the decorative function, a well-installed facing covering helps to increase the service life of the entire building. A wide variety of finishing options allows you to decorate the building beautifully, in the desired style. The combined method of façade design is shown in the following photograph.
Functions of facade finishing
Decorating the walls outside is a necessary job, but creating a spectacular façade decoration is not easy. The use of various facing coatings makes it possible to achieve, when improving the appearance of a building, effects that improve its operational characteristics and living conditions inside the building. External cladding structures, when chosen correctly, allows:
- ensure protection of the walls of the structure from the destructive effects of environmental factors: moisture, temperature fluctuations;
- improve (in most cases) the level of thermal insulation of the structure, which significantly saves money on heating;
- create an additional soundproofing layer that prevents external noise from entering the home, which is especially important when located nearby noisy neighbors, motorways;
- decorate the house efficiently and beautifully;
- increase the fire safety level of wooden buildings;
- maintain natural circulation of steam and air.

Insulation of the facade allows you to maintain comfortable temperature and in summer period without the use of air conditioning systems.
The achieved diversity in design is incalculable. One example of harmonious decoration is shown in the photo below.
It is easier to properly clad a house and maintain the functional state of the created cladding than to repair load-bearing structures. Decoration is one of the main tasks when arranging a facade.
Cladding methods
Facade work places increased demands on finishing materials. Despite their wide variety used for wall cladding, there are 2 groups. They are presented below in the table.
Under wet facades understand a set of materials, the installation technology of which requires the use of plaster solutions mixed with water and adhesive compositions. This is the most large group. The peculiarity of such decorative coatings is their integrity with supporting structures.

Dry facades are installed on a pre-assembled frame made of metal profiles or wooden slats. In this case, no binding solutions are used. This option is considered easy to install and maintain. The ventilated siding façade is shown in the following photograph.
Decorating the walls of the house different types requires different technological approaches. Wet and dry options have their own advantages and disadvantages, determined not only by the installation method, but, first of all, by the material used. In practice, a combination of cladding coatings is often found, which gives originality and uniqueness. The choice of how to decorate the outside of a building is very large.
Plastering and painting
Among the “wet” methods of finishing the outside walls of a house, a popular option is plaster for bases made of brick, monolith, cinder block, and aerated concrete. It is applied directly to the rough surface, or on top of the layer. It is also common to use it for interior decoration, but the composition is different. Facade varieties are widely used in rooms with high level humidity.
The traditional option is mixtures based on sand and cement. New formulations are becoming increasingly common:
- silicate;
- acrylic;
- polymer;
- silicone.
For external work, only moisture-resistant mixtures are used. Compositions based on gypsum or clay are not suitable.
By the type being created On the finished surface, plaster is divided into textured and smooth.
The first one is well suited for both professionals and beginners, because it makes it easier to hide minor flaws.
Creating a smooth facade for subsequent painting is a complex, highly skilled job.
The main advantages are the following:
- relative cheapness compared to other materials used to decorate the exterior walls of buildings;
- a wide variety of colors, application options (created textures, patterns) allows you to implement various design solutions;
- the simplest design methods are available to beginners in construction;
- combines well with other finishing coatings;
- plaster solutions are easily applied to the insulation.
The disadvantages are:
- relatively short operating time (about 20 years) compared to analogues;
- Often after repairs its traces remain visible.
The technology of working with decorative compositions differs in obtaining different effects on the surface. The result of finishing (“bark beetle”) is shown in the photo below.

Using paint, decorate surfaces from various materials: plastered, brick, stone, wooden, panel. The created layer protects from moisture, dust, and solar radiation.
When applying paint, the surface is first prepared accordingly.
For coloring, compositions are used based on the type of base.
The created plaster layer closes cracks, joints, and levels the surface. At the same time, sound and heat insulation is improved. The coating protects the base well.
Using bricks for decoration
Brick is an expensive material for exterior finishing. The job also requires certain skills. A beginner will not be able to do high-quality veneering. The work process itself is highly labor-intensive.
An attractive point when using brick is the durability and reliability of the created finish. In this case, it is possible between load-bearing walls and lay insulation over the cladding. And his flammability, environmental Safety do not play a special role.
Bricks are made from different components. As a result, the final product is distinguished by its characteristics and appearance. The following types of bricks are laid out as facings:
- : produced by strong pressing without firing, has high strength, resistance to low temperatures, ease of processing, but has poor thermal insulation properties;
- ceramic: has good thermal insulation properties, durable, attractive in appearance;
- clinker: characterized by a wide variety of textures and colors.

The photo above shows a brick-clad house.
When using bricks, you should take into account its significant weight. The foundation must be able to withstand the load created by such a decorative coating.
Finishing with natural and artificial stone
Decorating walls with natural materials is evidence of success and prosperity, a demonstration of taste. The formed coating has a number of the following advantages:
- long service life;
- high strength;
- spectacular appearance;
- processing with modern compounds gives excellent performance characteristics even to inexpensive (porous) varieties of natural stone.
The material is used for both full and partial finishing (for example, plinth, corners). Pre-treated stones are used, or natural form. Working with the latter with your own hands is more problematic.
The following types of stone are available on the market:
- granite;
- marble;
- sandstone;
- calcareous tuff (travertine);
- slate;
- limestone;
- quartzite;
- gabbro;
- syenite;
- labradorite and others.
Each of them differs in price and properties.
The main disadvantages of using natural stone:
- heavy weight of the cladding;
- high cost of material and installation;
- labor intensity, complexity of work.

The option of incompletely finishing a house with natural materials is not shown in the photo above.
Artificial finishing stone is a good option for finishing the walls of the house outside. In its properties it is close to natural material. Its appearance is also aesthetic. When using it, less costs will be required than when using a natural analogue.
Choice of textures and colors of natural and artificial stone large, which allows you to give buildings a magnificent, unique look. However, “fake” analogues are more affordable.
Facing tiles
When choosing decor, this option deserves special attention. Different kinds material can be fixed dry, or wet method. Common varieties are porcelain tiles and clinker tiles. They perfectly imitate natural analogues.
The advantages of the material are as follows:
- light weight;
- fire resistance
- durability;
- high strength;
- compared with natural stone and brick - lower price;
- ease of replacement during repairs;
- large selection of colors;
- resistance to frost.

The decoration of the building with porcelain stoneware is shown in the photo above.
Cladding tiles are a good option for covering a building at an affordable price, while still obtaining a high-quality coating.
Decoration with facade panels
Cladding the walls of a house with facades, which are made from various materials, is a very broad category. It includes the following products:
- siding;
- thermal panels;
- sandwich panels.
Also applicable the following types panels:
- glass;
- vinyl;
- metal;
- polyurethane foam;
- fiber cement.
Examples of the appearance of the panels are presented in the photo below.

The varieties differ in their characteristics, structure and dimensions. The advantages and disadvantages of all panels are different.
Among all the options, siding is popular. Its advantages are:
- attractive appearance;
- resistance to temperature fluctuations and biological effects, corrosion;
- ease of installation and maintenance;
- long service life;
- mechanical strength;
- Not high price.
Install siding frame method. Insulation is often additionally used. The disadvantage is poor compatibility with other types of design.
Facade panels are widely used in exterior finishing of buildings due to their affordability and relative ease of installation.
Wooden lining in the exterior of the house

This is finishing natural material for the external walls of the house. Cladding with boards allows you to give the building an attractive appearance, insulate it and further reduce external noise.
Lining has all the disadvantages of wood. Additional processing is definitely required.
Often boards are made from:
- pine trees;
- oak;
- ash;
- alders;
- linden trees
For the facade it is better to use moisture-resistant wood species. They have a higher price, but at the same time they are durable. Lately, imitation logs and eurolining have been gaining popularity.
Recommendations for choosing material and carrying out work

To decorate the walls of a house outside, you can choose from the existing variety of materials that are affordable and have suitable properties. Plastering and painting remain the cheapest and available types registration They also combine well with other types of decorative coatings.
The photo above contains an image successful combination plasters with artificial stone.
Materials popular for exterior wall decoration are noise- and thermal insulation characteristics, resistance to fire, to one degree or another, so they are selected for a specific type of base and operating conditions. For example, wooden structures should be additionally protected from fires, but their thermal insulation performance is much higher than that of concrete or brick, so the insulating properties of the cladding are less important than its fire resistance.
When planning to replace the casing, it is important right choice finishing material for specific conditions. It is also recommended to take into account its harmonious combination with the surrounding environment and structural elements that will not be affected by repair work.
When choosing a heavy facing material, a calculation will be required bearing capacity structures, mainly the foundation.
- Exterior work should not begin before the installation of window and door units;
- before carrying out decorating activities, it is better to wait some time so that the building shrinks (one year) and the created coating does not deform;
- after this process, it is necessary to check the condition of the walls with a level, and, if necessary, perform alignment;
- in most cases, installation of decorative coating can be carried out all year round, but when using some materials for finishing, work should be carried out at a temperature ranging from +5 to +25 degrees to avoid compression and expansion of the cladding material;
- it is necessary to take into account the permissibility of additional load on the base.
The correct choice of material for cladding and adherence to the technology of its installation are an integral guarantee of obtaining a high-quality result. To save money Money It is recommended to purchase the type of cladding that you can install yourself with your existing experience and skills.
External wall decoration requires a serious approach. Not only the appearance of the building, but also, to a certain extent, its durability depends on it. The saturation of the modern construction market allows you to choose the facing coating for Various types grounds. When choosing a design method, an important role is played by the possibility self-installation materials. Some of them can be installed quite easily with your own hands, while the use of others requires the involvement of professional builders.
Popular façade design options are shown in the following video.
The video below contains examples of beautiful and practical home decoration.
A limiting factor in the spread of some types of coatings, which also have a number of positive characteristics, is their high price. But any of the considered cladding options, with high-quality finishing work, allows you to beautifully decorate the house.