Installation decorative panels allows you to solve many pressing problems. And it’s not just about the design of the premises as such, of course. But simply buying suitable products is not enough; you also need to carefully study their features and understand how to install them correctly.


Criterias of choice
Speaking about plastic (PVC) decorative sheet materials, about their installation, one cannot ignore the question of what exactly is to be installed. Even the most scrupulous adherence to technology will not allow you to achieve good results when using bad products. Most wall panels are purchased for bathrooms, so resistance to humidity and microorganisms is of great importance. Since any wall periodically experiences mechanical stress, the surface must be resistant to such developments.
First of all, it depends on the thickness of the outer surface. Reliable wall blocks should have a layer of 0.25 cm, while in the ultra-budget category this figure reaches only 0.15 cm (if it still reaches). Appearance is also important: good product always smooth not only in its own geometry, but also in color.


Strength is determined not only by the depth of the panel, but also by the number of ribs. The most reliable designs are equipped with 29 such parts, and the average is 20. But edge to edge is different, they must also be perfectly smooth and not differ in thickness; Any placement other than at right angles to the surface is prohibited.
It is also useful to look at the joints of the panels, which should fit together as tightly as possible. Since thick walls and additional fins cannot be created from thin air, good block quite heavy. This can even be considered one of the practical advantages. One more circumstance should be taken into account: you can decorate the walls of a house either well or cheaply. Experienced owners always purchase at least mid-price panels, and qualified builders approve of this.


In addition to these obvious considerations, it is worth paying attention to the chalk, or more precisely, its concentration. Standard-compliant panels contain this mineral only in trace amounts. When they bend halfway, they will straighten and there will be no dents on the surface. But even flawless wall blocks can be damaged by improper work.
Preparatory stage
You won’t be able to do everything right if you don’t prepare for installation. Meticulous work is not required, but accurate measurements of the surfaces to be finished and calculation of the required volume of material are extremely important. At the preliminary stage, they decide how to install the panels. Ideally smooth surfaces that only need to be decorated are simply pasted over. And if there are deviations from strict verticals, then you will need to create frames; They will also have to be used to disguise communications.
Initially, the lowest point on the ceiling is found, and marks equal to the width of one panel are drawn from it. With a level around the entire perimeter, make marks where anchors or dowels are to be secured. These fasteners will help attach the frame to the walls.


The profiles should be attached at an angle of 90 degrees to the slabs that are to be placed on them. You can make installation easier if, in addition to setting marks and checking the level, you add pulling a thin cord, the edges of which are covered with colored chalk and pressed against the surface to be treated.
The profile itself can be formed from wood, metal and even plastic. The choice of a suitable material is determined primarily by the conditions in which it will be used. So, wood performs well in a “regular” room, but its prospects are much worse in bathrooms or on open balconies. And even where high humidity is unlikely to occur, you will have to use specially selected impregnation. This is the only way to prevent exposure to liquid and the occurrence of mold.


Tools and accessories
To work you will need:
- stepladder (more convenient than a moving table or stool);
- drill (replaced with a hammer drill);
- roulette;
- hydraulic level;
- metal saw;
- painting knife;
- self-tapping screws;
- hammer.

In addition to additional tools, it is worth noting the importance of prepared accessories. You will definitely need a so-called starting profile, which helps close the borders of the panels at the ends. In addition to it, you will need an F-shaped profile, which provides the best decorative qualities of the end blocks. Specialized moldings help connect the various panels into a single structure. There are different types of profiles for external and internal corners.
Since the panels will be adjacent to floors and ceilings, two types of baseboards must be used. Soft universal corners are useful. Fastening to frame parts is ensured with self-tapping screws or galvanized nails. All components, with the exception of frame guides that are not visible from the outside, must have the same color as the panels. Even experienced designers do not recommend experimenting with color contrasts in this case.


Calculation
In order for wall surfaces to be finished properly, you need to carefully and scrupulously calculate the need for the blocks used and the components for them.
Standard dimensions of wall panels are:
- thickness 0.6-1 cm;
- width 25-30 cm;
- length 250-600 cm.
The key importance, according to professionals, is the width. If you choose the largest possible products, you can reduce the number of seams, and the appearance of the installation will be closer to a continuous surface. But during the work itself, narrow structures are more practical because they are easier to bend. And the relative lightness of each block makes itself felt.
A compromise is achieved by using panels with a width of 250 mm.


The calculation itself begins with determining the perimeter of the sheathed base. From this figure the perimeter of each door, each window or other part that for some reason cannot be sheathed is subtracted. The result obtained is divided by the perimeter of a single block (only remembering that part of the block material will go into segments). Rounding in calculations is always carried out upward, and a margin for cuts is provided in the amount of 10%. If you have no experience, you can even leave 12-14%.
- slats will have to be placed not only on the edges of the walls, they need to surround the openings of doors and windows;
- the standard profile gap is 0.3 m;
- the very first profile is always turned at right angles to the future installation plane;
- the slats themselves are fastened to the walls using self-tapping screws or dowels with a gap of 400 mm;
- The guides are attached to the slats at a distance of 500 mm.


Installation methods
On the frame
When all the PVC panels have been selected and purchased, when the components for installation have been prepared, you can begin immediately. And in many cases, the most practical solution is to use a frame. Decorative blocks can be secured with self-tapping screws even on relatively uneven surfaces. But there is a problem - you will have to either use a screwdriver or spend a lot of time. To screw in self-tapping screws, it is advisable to use a wooden sheathing, so first the timber is sawed and impregnated with antiseptic mixtures.
Alternatively, you can fasten the panels yourself using clamps. Such details ensure reliable retention of decorative blocks. When using clamps, the lathing is formed from metal, and the covering can be assembled without additional effort. Each deformed block is quickly replaced with a new product, and even if the entire cladding is no longer satisfactory, it can be easily replaced. Installation of frames is carried out exclusively on levels to avoid distortions.


There is no need to measure each individual batten, you just need to mark the walls. The lowest stroke of the frame is created 10-20 mm above the floor. A line is drawn from the selected point using a level. Similarly, they show features under the ceilings or along the edges of the trim. Then, from the lowest strip that needs to be sheathed, they retreat upward 400 - 500 mm, set up a beacon, and so systematically move to the top strip; Beacons will help ensure parallel lines.
It is important to take into account that horizontal frames should be mounted in a vertical plane, vertical ones – horizontally. If you need to hang panels on uneven walls, the sheathing is mounted on top of wooden wedges. Wires running along the walls are hidden under the finishing.
Since you can’t joke with electricity, all work is carried out only after measurements. Clamps are used to press the wiring so that it does not protrude beyond the boundaries of the sheathing.


The slats are placed moving from the most distant (relative to the entrance) corners. But if for some reason another place is most noticeable, they still work from there. The panel is fastened by inserting it into the side moldings, applying it to the corner and attaching it to the sheathing on the reverse side. The next block is inserted into a special groove on the first one, the joints are thoroughly pressed and attached to the frame slats. You can increase the tightness of the joints by lubricating the sides with silicone.
The following panels are connected according to exactly the same scheme. To prepare holes for sockets or switches, use sharply sharpened knives. When installation is completed, the treated areas are covered with plastic boxes. But to insert the last lamella, it is cut to width. First, try on the wall, mark with a pencil, and then take a hacksaw.


Every corner, every connection should be covered with moldings. With their help, panels are inserted with edges on both sides, and all intersections immediately become more pleasing to look at. The final stage of the work is the installation of decorative molding along the entire perimeter of the ceiling and a baseboard that repeats it at the bottom. If you use the panels installed in this way carefully, they will retain their attractive appearance for a long time and will not require repairs.
Before you begin, be sure to:
- remove peeling coatings;
- look for cracks and chips;
- if they are detected, immediately putty or plaster the problem areas.


An additional challenge is the installation of PVC panels in rooms exposed to moisture. The primary surface must be covered with waterproofing. It is applied to a pre-moistened base. When the product dries, treatment against mold fungi is carried out. When using wooden sheathing, all calculations of distances from the wall should take into account an amendment of 0.2 - 0.3 cm associated with possible deviations from the ideal shape.
The upper and lower levels are verified by the hydraulic level, and the side lines by the plumb line. Fastening is carried out through hangers that set the indentation. After installing the sheathing, carefully check whether its outer edges are on the same line. Adjustment, if necessary, is carried out either by cutting the timber with a plane, or by adding substrates. If screws are used to create the frame, the gap between them will be from 200 to 250 mm for wooden products and from 150 to 250 mm for metal products.

Frameless
Fastening PVC panels does not necessarily mean using frames. Installation is often done using glue. The procedure itself is not complicated, you just have to carefully prepare for it. Naturally, it is necessary to remove all the previous coating completely and seal the cracks. If with the frame method the remaining intact layer could be tolerable, then here the situation is different.
Make it perfect the perfect wall It doesn't always work out. But even inexperienced people can reduce the height difference to 5 mm or less. In addition, before attaching the panels with glue, it is necessary to wash off the whitewash, remove greasy traces with detergents and apply a primer. After all this work, the correct choice and use of glue is of decisive importance. Allowed to use universal adhesives, but it is much more correct to choose compounds that are specially made for joining plastics.


High quality adhesive:
- forms a frozen transparent film;
- immune to getting wet, cooling (even alternating with overheating);
- adheres two surfaces in a short time and retains its ability to hold them together for a long time.
Hot-melt adhesive is not suitable at all. It holds the panel too tightly and does not allow the plastic, which rapidly expands when heated, to move. As a result, it quickly disappears. It is advisable to use polyurethane-based sealants or “liquid nails”. They allow you to avoid such unpleasant developments.
Before gluing, the panels themselves are rubbed with a damp cloth on the reverse side. This allows you to remove dust.


Then glue is applied pointwise, at a distance of 0.25 - 0.35 m. Contrary to the obvious, when using liquid nails The attached panel must be tapped and removed. Only contact with air for 5 - 7 minutes ensures the stability of the connection upon repeated application. Frameless installation almost always avoids creating external and internal corners.
Plastic corners without grooves are used instead. Such products are covered with transparent silicone, rubbing with a damp cloth to remove excess mixture. The insert can, depending on the severity of the angle, reach 2 - 5 cm. Places where it should be placed electric outlet, are cut out. Turn off the power supply in advance; The installation is completed by laying skirting boards at the joints with the floor and ceiling, which are screwed in with self-tapping screws.
Panel borders cover polyurethane foam or silicone-based sealant. The second option is optimal where humidity is excessively high. If you have to cut off the glued parts, use hand saws or electric jigsaws. Sometimes frameless installation of PVC panels is carried out using a construction network.


Covering the wall with PVC panels, whether frame or frameless methods, is produced only in rooms where there are no temperature fluctuations exceeding 20 degrees. Installation in a room where the air is colder than +10 is not allowed. If the panels were stored or transported at lower temperatures, they should be kept in normal conditions for at least 48 hours. It is advisable to install heat-protective material under the cladding. The lathing is installed in maximum increments of 0.5 m; no considerations justify exceeding this distance.


Cladding slats should surround not only openings for windows and doors, but also kitchen vents, as well as ventilation outlets in other rooms. The recommended dimensions of the slats are 3x1 or 3x2 cm. When it is clear that the room will be particularly wet, the lathing is equipped with cuts. This will improve ventilation. When connecting plastic blocks horizontally on facades, the groove edges are oriented downward to prevent the grooves from filling with water.


Leaving upper and lower gaps of 0.5 cm helps to compensate for temperature shifts. The vertical layout of panels with a pattern is from left to right, from one corner to another. For blocks that are colored monotonously or form a pattern that is symmetrical in any direction, the choice of primary angle is subjective. In addition to the tools listed above, the work may require pobedit drills, screwdrivers, miter boxes, pliers, squares, furniture staplers with staples 1 cm long. When using a finish without seams, maximum attention should be paid to the tightness of the bow of its parts, otherwise it will turn out unsightly.


It is extremely difficult to decorate walls with your own hands using panels decorated with bright and rich designs characterized by abundant detail. Judging by the reviews, such work inevitably causes difficulties, especially when placing components and complementary elements. The relief of the mosaic forces us to completely abandon the idea of removing the corner slots. You should carefully choose the color of the panels to be mounted, because errors of this kind are difficult to correct. The closer the parts of the frame are to each other, the stronger it becomes as a whole, but the fastenings cannot be brought closer than 300 mm.


It is not advisable to use adhesive fastening if you know for sure that PVC panels will have to be removed in the future. And the need for this sometimes arises suddenly, so you should definitely think about frame installation. To attach the cladding to metal profiles, it is recommended to use self-tapping screws with press washers. Irregularities in a concrete wall are corrected by placing a block required thickness. You can use PVC panels in the hallway without any doubt, you just need to select them carefully.
Most often they choose to imitate natural wood. Regardless of the reproduced breed and dark or lightened color, a calm and benevolent interior is created. In modern settings, tones such as wenge or bleached oak are used.


It is worth remembering all the time that in small corridors, excess darkness is contraindicated. Be sure to achieve contrast in the color of walls and furniture.
Duplicating the appearance of a stone is becoming increasingly popular. A variety of PVC coloring with specially selected pigments makes this task easier. When choosing a suitable option for a “stone” wall, you must first ask yourself whether you want to emphasize the luxury and solidity of the image or create a laconic ensemble. Regardless of the approach taken, there is ample room to demonstrate originality. It is not even necessary to use only panels; they combine well with other materials (paint and varnish, various wallpapers, frescoes).
Corridors with dim, subdued lighting should be finished with light-colored materials. Otherwise, the space will be visually absorbed. Large rooms can already be covered with large-scale drawings and geometric patterns. If the walls are made light and the flooring is dark, the room will expand. Attention should be paid to the selection of accessories for PVC panels.


Thus, profile H is used at joints and joints, and L is used to start laying and at the ends, although both products are 3 m long and are intended for 0.8 cm panels. Plastic profiles in the shape of the letter U are inexpensive and weigh little, make it easier to fasten. At the same time, they are extremely resistant to humidity, water vapor, and temperature fluctuations. Such blocks need to be placed at intervals of 30 cm. But screws or dowels are screwed in every 100 cm.
Profile grooves in the shape of the letter U can be used for pulling cables. If you choose to use metal sheathing, the cable should be pulled through PVC pipes with a corrugated sheath. Only it prevents the destruction of the braids by the cutting parts of the profile. For technical reasons, it is unacceptable to install any polyvinyl chloride blocks in places where temperatures may exceed 40 degrees, with high humidity or without it. Instead of cutting the end panels to width, you can unfold them, bringing the locks to the opposite side and cutting the groove from the outside.


All work with PVC must be carried out more carefully than with wood. It is fragile and any sudden movement can create cracks in the outer layer. There is no way to remove them; the panel will be hopelessly damaged.
Plastic panels are an excellent material that is widely used to impart various decor to the surface. Conveniently, this product can be used in almost any room. There is an opportunity to create a truly unique interior. And decorating walls with plastic panels is a fairly simple undertaking that does not require construction experience. Although you still need to know how to do everything most correctly.
Plastic panels (lining) have another name - PVC. This is an abbreviated name for the main ingredient of the material - polyvinyl chloride. The production is quite simple and involves passing the molten substance through special molds. This creates a strip that is cooled and cut to the desired size. The result is an excellent finishing material that can withstand almost any temperature (within residential premises).
Wall panels vary in size:
- There are two types of thickness - five and ten (eight) millimeters. The second indicator is combined into one; there are identical additional elements.
- The width varies, ranging from twenty to thirty-seven centimeters.
- There are three main sizes in terms of height – 2.6 m; 2.7 m; 3m.
Of course, there are many more sizes. Thus, the width of the plastic lining reaches 120 cm. You can also make any desired non-standard to order.
Advantages and disadvantages
It is impossible to imagine a finishing and building material that would not have its pros and cons.
Wall panels have the following advantages:
- The service life is practically unlimited.
- Excellent moisture resistance. When connected correctly, the seams create a complete seal.
- The material protects the room from extraneous noise.
- Reliability and good resistance to abrasion.
- The cellular structure provides additional thermal insulation. When covering walls with your own hands using lathing, it appears extra bed for the insulating layer.
- Modern technologies make it possible to create different kinds decor. More recently, the choice was quite limited, if not primitive.
- Easy to install. No complex tools required.
- Low price compared to other products.
- Environmental friendliness.
Flaws:
- Inability to withstand constant temperature changes. This does not apply to seasonal phenomena.
- When a fire occurs, plastic elements release corrosive substances.
- Incorrect installation reduces many positive qualities to zero.
Like any other plastic, PVC panels are “afraid” of high temperatures, and when ignited they release harmful substances
On a note! Currently, there are panels that are distinguished by their ability to withstand high temperatures. But they must have special markings.
Material selection
Naturally, you want to quickly cover the walls with plastic panels, but you need to select them first. And this should be approached with the utmost care. After all, the final result depends on the correct choice. The following rules are taken into account:
- For bathrooms and shower rooms, as well as for all types of wet rooms, panels that are moisture resistant and have no relief are suitable.
- For corridors and balconies (loggias), it is better to choose products that are resistant to mechanical damage.
- Wall decoration with wall panels in living rooms is carried out with PVC coatings, which have different reliefs and patterns. They also imitate natural materials.
When purchasing, you need to pay attention to the following indicators:
- Appearance of the packaging. It must be intact, without damage. It is important to choose material from the same batch.
- Number of cells. The bigger, the better. You can also navigate by weight. Light products are a sign of deficiency.
- Lock. To do this, check the two selected panels for connection - it must be reliable.
- Price. Products that are too cheap are most likely a fake.
Additionally, we suggest watching a video that explains how to select and attach wall panels.
Calculations
Covering walls with PVC panels requires preliminary calculations. They concern all stages of work. This helps to avoid problems in the future, as well as significantly save money and time.
Frame:
- The location of the profiles is taken into account. It can be vertical or horizontal. This depends on the installation of plastic panels. In any case, they are always perpendicular to the sheathing posts.
- The distance between them is also taken into account, which is 30 - 45 cm. From everything it is calculated required quantity frame parts (+ two profiles along the edges of the wall).
Fasteners:
- The number of dowel nails is taken into account in increments of 35-50 cm.
- There are 20-25 clasps per square meter.
Panels:
- The size of the wall and the selected panel is measured. One indicator is divided by the other, and we get required amount.
- The material in the form of tiles is calculated based on square meters.
This group includes all other parts and moldings. For calculations, measure the entire perimeter of the room. The number of external and internal corners is taken into account.
On a note! All calculations are made with a margin of 10%. Such a reserve is due to the fact that various damage to products or other unforeseen circumstances are possible. Door and window openings are also taken into account.
Frame methods of wall finishing
Do-it-yourself wall cladding with plastic panels can be done in various ways. But, before choosing the most suitable one, you should prepare necessary tool and purchase material.
To work you will need:
- Hammer and set of drills.
- Drill and drill bits.
- Screwdriver or set of screwdrivers.
- Caulk gun.
- Level and construction knife.
- Hardware and other consumables.
- Stapler.
- Hammer.
- Necessary material and additional elements.
Preparation
After calculations, it is necessary to prepare the surface for cladding with plastic panels. This is done based on the chosen method.
- Regardless of the options, the necessary calculations are made and all dimensions are taken.
- The racks for the frame are marked and cut - they are numbered in order.
- Everything unnecessary is removed from the walls. If there is damage in the form of cracks, they are puttied.
- The surface is coated with an antiseptic. It is better to use two in one - a primer with the addition of substances against fungus and mold.
- If it is assumed that the surface will be covered with PVC, then it must first be leveled.
- The use of wooden elements should begin with their impregnation. This is done with antifungal compounds.
On a note! The primer is applied in two layers. The first strengthens the surface, the second fixes the result. Wait for them to dry completely, this takes at least 6-12 hours.
Lathing and its installation
The frame is made when there are large surface imperfections, and too much effort will have to be made to correct them. Finishing with PVC panels on the sheathing helps to hide all the unevenness of the walls. U this method there are two more noticeable advantages: it is possible to install additional insulation elements and hide communications. To achieve the desired result, different materials are used, which do not differ much in the installation method.
Creating a wooden frame
- For this purpose, wooden blocks are used, which have a cross-section of 40*40 (40*30) mm. Fastening is done using dowels to concrete bases and self-tapping screws to wooden bases.
- When paneling a room is done vertically, installation begins from the edges. Namely, they screw in the two initial guides. Next, calculate the same distance and install the remaining racks.
- Cross members are attached between them.
- If it is necessary to achieve greater rigidity, then additional vertical slats are installed.
- It must be taken into account that each part is checked for level. If it is necessary to level, then use linings from the remains of the timber. They are pre-attached to the wall.
- For greater effect, the joints of the racks and crossbars are coated silicone sealant.
Advice! Wooden cladding material is best used for dry rooms with a moderate internal climate.
Lathing made of metal profiles
This option literally repeats the installation of gypsum board slabs. After such work, a lot of scraps remain, which, if desired, can be used for cladding. PVC walls panels.
This method is not used as often as others. The fact is that the cost of such a frame is very high.
- First, secure the upper and lower guides. This is done respectively to the floor and ceiling. They are first aligned with each other.
- Now comes the turn of the vertical guides. They are aligned with each other and fixed to the wall. This happens due to U-shaped brackets.
- Horizontal crossbars are attached at equal intervals. In general, this is not necessary; the metal profile already creates sufficient rigidity.
When you have to go around doorways, the vertical posts are first reinforced with wooden beams.
Use of plastic profiles
Plastic profiles for installing PVC lining
Finishing with plastic panels using this method is one of the most modern. It is in many ways superior to all the types described above, but its popularity is not yet so high. This is explained by both cost and increased requirements for the surface. But the plastic sheathing is not afraid of moisture and mold.
- Installation of such a structure on the wall occurs in a very short time. This is done using dowels. Often such guides are already drilled, which makes the process much easier.
- They are attached in small increments of thirty centimeters. This is done in order to give the greatest rigidity.
- In principle, when working with such elements, nothing more is required. But it is very important to maintain thorough perpendicularity. This is the only way to ensure correct cladding with PVC panels.
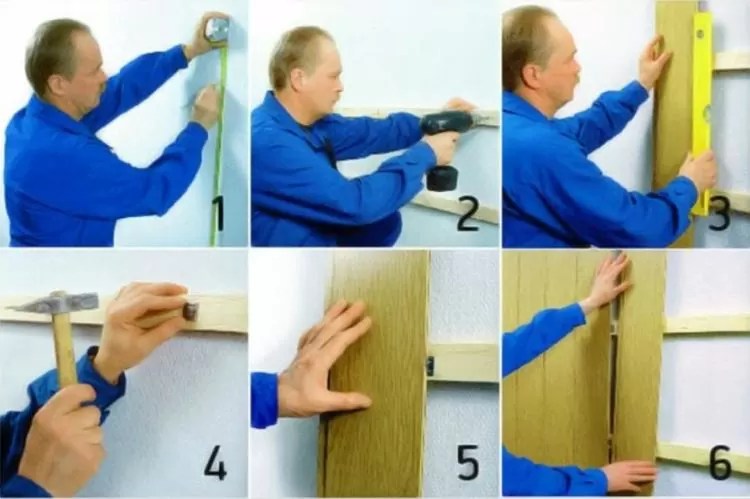
1 – fastening plastic profiles to the wall; 2 – installation of a corner element; 3 – installation of plastic panels, fastening to profiles using clamps; 4 - installation of the upper plinth.
On a note! Plastic profiles are excellent for interior walls of bath complexes.
Installation of plastic panels
When the frame is finally ready and checked for level, the main process begins. It gives a complete understanding of how to cover walls with plastic panels.
Cladding walls with panels when using a plastic profile is much faster. It already has grooves into which the clamps are attached. They securely fix each element. They also make it possible to disassemble the entire structure without damage.
Glue mounting
If the walls are fairly smooth, then work can be carried out without using a frame. Liquid nails are used as fasteners.
When choosing an adhesive, you need to pay attention to its composition. It must not contain solvent. Otherwise, the lining will simply collapse.
Preparation
When decorating walls with PVC panels with your own hands is done using the adhesive option, then the preparation of the walls is approached most carefully. It will not be enough to simply remove excess - you need to completely clean the surface. And in some cases, create a new layer of putty. And be sure to apply an antibacterial primer.
On a note! Currently, there are types of putty that include antifungal substances.
Pasting
The whole process must happen quickly enough, and all movements must be verified. The fact is that it will be almost impossible to correct the shortcomings. That is why this method requires some skills.
So:
- The primer layer should dry well. After all, finishing with plastic cannot be carried out according to wet wall. Nothing will stick.
- The glue is prepared according to the instructions. When canned formulations are used, they are thoroughly mixed beforehand.
- For work, use a special gun, roller or brush. The area of application of the adhesive composition should not exceed two structural elements.
- The corner element is installed first. The lining is inserted behind it and pressed against the wall. This must be done without extra effort, and even more so - point pressure. It is very easy to damage the cellular structure of the material.
- So, sequentially, they cover the entire area with plastic with their own hands. At the end, the finishing moldings are secured.
- Now comes the turn of decorative elements.
Finishing with wall panels can also take place on duct tape. This method is not yet sealed, so you should not trust it. And the point is precisely in the tape used. Its quality does not always meet the required parameters.
Of course, each master can offer his own variations, which certainly deserve respect. But, when real experience is insignificant or completely absent, then it is better to go along the proven path, even if it takes a little longer. After the first success, it will become extremely clear: how to cover the walls with plastic.
PVC panels are also well suited for exterior decoration of a house. Manufacturers make them in different colors and with interesting patterns.
This will diversify the inexpressive appearance of the building. The design is so simple that they are very easy to install. In order to do everything yourself, you should ask how to attach plastic panels to the wall from those who have already encountered such work.
How can I attach
Wall plastic parts can be attached to the base using:
- Nails or self-tapping screws - in this case, the elements cannot be dismantled; they will break at the point of attachment.
- A special stapler is a very convenient and fast way; the staples can be easily removed when disassembling such a finish.
- Glue liquid nails - this option is even more convenient than the previous one, but dismantling is impossible.
Each method reliably attaches installed PVC panels both to the frame and to a bare wall.
Is a frame needed?
Fastening of plastic panels is carried out on a wooden or metal frame, or without it. How do you know if a frame is needed? If the base is smooth without bumps or depressions, without cracks that must be repaired, then you can do without a frame. Any mounting method will do, the main thing is to choose according to the base.
If the walls are wooden, you can install wall panels using a stapler, nails or self-tapping screws, but if the base is concrete, you will have to stock up on dowels. Glue is a universal option and can be used on any surface.
If the walls are completely uneven, you should build a frame before attaching the panels. As mentioned earlier, the sheathing can be wooden or metal. Wood is a fairly strong, but short-lived material. It quickly rots, especially if there is high humidity in the environment.
The wooden grille on which plastic panels are installed must be treated with antiseptic and antifungal agents before installation. This will help slightly extend the life of the material. To construct such a frame, absolutely dry timber measuring at least 20x20 mm is used.
Metal sheathing will last much longer. This material does not rot and does not corrode thanks to a special coating. It is also not eaten by rodents or insects, which often happens with wood.
Preparation
Before you begin to install the trim on the wall or build a frame, you must prepare the surface well. This will determine how firmly the elements will hold and whether there will be problems with mold. For this:
- Removes all dirty and greasy stains.
- Remove traces of fungus.
- If there is an old coating, dismantle it.
- Severe unevenness or cracks are repaired.
- Treat the surface with a primer.
If the installation of plastic wall panels is carried out without a frame, then you can begin after the primer has completely dried.
Frame installation rules
A correctly installed frame will help to secure the PVC panels evenly and avoid tilting to one side or the other. It is important to consider that the sheathing should be placed perpendicular to the parts being laid. That is, if the elements are attached horizontally, then the frame strips are installed vertically on the wall, and vice versa, if the elements are vertical, then the sheathing is horizontal.
The first step is to make markings on the walls. This saves a lot of time. Mark the starting line at the bottom of the wall (horizontal frame) or at the corner (vertical). For the first option, be sure to use a level so that the line is perfectly straight, for the second - a plumb line.
Next, a finishing mark is made on top of the wall or on the opposite corner. Additional lines are drawn between these two lines. The step between them must correspond to the width of the part so that it can be attached. After the marking is completed, you can fix the sheathing elements.
To increase heat and sound insulation, you can install insulation in the sheathing cells before attaching the wall panels.
How to pin elements
Considering that not everyone knows how to properly attach plastic panels, we will understand everything in the smallest detail.
- First you need to install the starting, finishing and corner moldings. These are special strips into which parts of the structure are inserted. They help to fix the entire installed canvas and hide the edges.
- Next, install the first element and fix it with nails or glue. It needs to be set perfectly level, since subsequent parts are attached based on the first. In order to check whether everything is correct, you should use a plumb line or building level.
- Subsequent installation of plastic panels is simple. The spike of one element is inserted into another and fixed. But you need to take into account the fact that as the temperature rises, the material can expand, so do not tighten the screws all the way and do not nail the nails too tightly. Otherwise, the plastic will crack at the attachment point.
- To ensure that the joints are as tight as possible, the edges of the panels are treated with a small amount of sealant.
- If the panels are fastened to a metal sheathing, then special clips are used for fixation. They make the process easier.
Installation with glue
Glue for PVC products is very toxic, so when working with it you need to use a respirator.
Fastening panels to a flat wall with glue is very quick and convenient way. There is no need to make additional holes in the wall.
- moldings are also installed first;
- a small amount of glue is applied to the prepared base;
- attach the first element, slightly pressing it against the wall. For good fixation, you can walk over the surface of the panel with a rubber roller. You can move the element for another 15 minutes, leveling it, but then the glue will harden;
- Then all the remaining parts are attached.
Before attaching wall finishing panels with your own hands, you should carefully prepare and the façade updated in this way will last a very long time. Moreover, this surface does not require special care. Just warm soapy water will be enough.
How to attach plastic panels to the wall: installation rules
There are several ways to attach plastic panels. But you don’t need to choose the simplest one, you should choose one that is suitable for the material the wall is made of.How to attach plastic panels - step-by-step instructions
When thinking about renovation, we always want to get an excellent result, and at the same time do without extra expenses and meet the minimum deadlines. Another important point is that renovation work They didn’t cause much trouble, didn’t leave dirt behind, and didn’t disturb their neighbors too much.
An excellent solution in this case would be to install plastic panels. Our instructions will help you understand how to attach plastic panels. They are easily mounted on walls or ceilings and do not require leveling the surface in advance.
Plastic panels are easy to clean and ideal for rooms with high humidity (bathroom, sauna, boiler room). A variety of colors and textures will help create a unique and cozy interior. To install such panels, it is enough to have several tools on hand.
Necessary tools and preliminary preparation
The tools necessary for attaching plastic panels can be found in almost every home:
- electric drill;
- wood hacksaw;
- scissors and hacksaw for metal;
- screwdriver or screwdriver;
- tape measure, building level, pencil or marker;
- hammer, stapler;
- ladder.
First, use a tape measure to measure work surface, this will allow you to correctly calculate the required amount of materials.
The surface must be cleared of wallpaper. If the panels stick, be sure to clean the walls or tiles of paint and dust.
Installation features and procedure
The panels are fastened either directly to the wall or to a pre-prepared sheathing. To mount it on the wall, it must be perfectly flat. Lathing is wooden beams or slats that are screwed to the surface at a certain distance from each other. For walls, the width between the slats should not exceed 30 - 40 cm, for the ceiling - no more than 30 cm. The lathing slats are attached to the wall perpendicularly to the direction of the panels.
If the wall to which the slats are attached is wooden or any other into which self-tapping screws can be easily screwed, then it is best to use them to attach the bars. If the wall is concrete or brick, then it is best to fasten the bars using dowel-nails or using ordinary dowels and self-tapping screws.
An example of fastening sheathing under plastic panels.
Before you get started, you must understand how to properly attach plastic panels to the wall.
- If you decide to fasten the panels to the sheathing with nails, keep in mind that reuse material will be impossible, since, most likely, during dismantling the integrity of the panel will be compromised.
- The best method of fastening is with clamps.
- But using staples that are driven in using a special stapler is also a good option.
- Another good option for fastening panels is self-tapping screws.
The most common methods of fastening plastic panels.
Once you have decided on the method of attaching the panels, you need to do the following:
First install the fittings: finishing element, external or internal corner. If the panel covers the wall to the ceiling, then top beam secure the ceiling plinth.
Available types of fittings for plastic panels.
Insert the panel into the fastening element using the narrow fastening flange. The panel is secured on the side of the wide mounting shelf using nails or brackets.
After making sure that the first panel is installed level, insert the next one with the narrow end into the groove of the previous panel. Try to mount the panels tightly to each other.
Installation of the necessary fittings and the first plastic panel.
The last plastic panel that completes the row must be inserted with force between the final element and the previous panel. If the panel needs to be reduced in width, cut off the excess using a knife, moving along the panel.
Features of installing plastic panels on walls
If the room is dry and the walls are smooth, then the panels can be mounted directly on the wall without using lathing.
Fastening panels with glue directly to the walls without using lathing.
In rooms with high humidity, a plastic or metal mounting profile should be used as lathing. In this case, the panels are attached to the slats with special clips, which greatly facilitates the installation and dismantling of the structure.
Fastening panels using a plastic profile using special clips.
You should take into account the expansion of the material when the temperature changes, so when adjusting the panels in height, leave a small gap. If you use a wide beam for the sheathing, then insulation or soundproofing material can be placed in the resulting space between the wall and the panels.
Features of installing plastic panels on the ceiling
Now let's look at ways to attach plastic panels to the ceiling. Before installation, you need to determine the distance between the panels and the ceiling. This gap will depend on the type of lighting. If you plan to install built-in lamps, then the distance should be at least 10-15 cm, so you can completely hide the wiring. Mark the locations of the lamps in advance with a pencil, cut out the holes and install the lamp bases.
Metal lathing for mounting plastic panels on the ceiling in the bathroom.
Next, you perform the same steps as when installing the panels on the walls. In a room with a flat ceiling, you can do without lathing. Install the ceiling plinth on three walls before starting work. Use a building level to position the panels evenly.
When installing plastic panels in a room with high humidity, fill the ceiling gaps with silicone sealant to achieve complete waterproofness.
1. Cut and drill panels by turning front side up. Use a hacksaw, handsaw, or utility knife to cut. Always wear special glasses to protect your eyes.
2. Apply the glue directly to the wall. Smooth lines draw the grid without leaving any empty areas. Use only special construction adhesive “liquid nails”.
3. When driving nails into the panel during installation, be careful not to hit the surface with a hammer, otherwise dents will remain.
4. Plastic panels should be cleaned with soapy water. Do not use abrasive cleaners, rough scourers or solvent-based products for cleaning.
Now you know how to attach plastic panels to the wall and how to care for them. Installing plastic panels does not require much time and can be done by any beginner. By choosing this easy-to-install material, you can create a unique interior with your own hands. Among the variety of panels imitating stone, wood, paper of various colors, you are sure to find an option to your liking.
How to attach plastic panels to a ceiling or wall correctly and without errors
Step-by-step instructions will help you decide how to attach plastic panels to walls or ceilings; you will learn fastening methods, various tips and nuances.How to attach plastic panels to the wall with your own hands: detailed instructions
If you are thinking about finishing the walls or ceiling in the bathroom, hallway, kitchen, balcony or other rooms with high humidity, pay attention to PVC panels. This optimal choice for price, practicality and quality. They wash well, do not fade or deform from moisture. And the biggest advantage is the simple installation of the panels. They are ideal for leveling walls and provide the opportunity to realize many design ideas. How to attach plastic panels to the wall: all the subtleties and nuances.
Required materials and tools
Plastic panels are quite easy to install, so it is possible to cover the walls or ceiling with your own hands. To carry out the installation yourself you will need the following tools:
- Drill or hammer drill depending on the walls that will be covered with panels. For brick and concrete walls, it is better to take a hammer drill; for the rest, a drill is suitable.
- Metal scissors will be needed to cut a metal profile; you can use a grinder.
- Screwdriver. Needed for connecting frame parts and attaching PVC panels to the profile.
- A stapler and staples will be needed when attaching plastic to a wooden sheathing.
- Construction knife or hacksaw - for cutting panels and moldings.
- Miter box – indispensable tool for correct cutting at the right angle.
- Tape measure, marker, level. For performing minor construction work.
If the necessary tool is ready, you can go shopping for finishing materials. You will need:
- plastic panels;
- slats for fastening plastic;
- metal profile and fittings for it or wooden beam 20x40 mm;
- dowels, screws.
But before you make purchases, you should take measurements of the room and calculate the required amount of materials for future finishing.
Calculation of materials for installation
Plastic panels are produced in various colors and sizes. Most often, the length of the panels is 2.7, 3 or 6 m, and the width is 10, 25, 37.5 and 50 cm. The thickness of the panels is 8 or 10 mm. Therefore, having decided on the choice of plastic and the size of the walls, you can make the necessary calculation of the amount of material.
To do this, you need to take measurements of the length and width of each wall, determine the direction of laying the plastic panels (along the wall or across) and calculate the consumption based on these dimensions.
To install the sheathing, you should purchase a metal profile or wooden beam.
Fastening plastic panels to walls
PVC panels can be finished in two ways:
- on the frame (recommended for large uneven walls)
- for glue or liquid nails.
Installation of plastic panels using a metal or wooden frame.
To decorate walls with plastic panels, a frame made of metal or wood is required. Before installation, we clean the walls from excess dirt and dust, treat them with a special antifungal agent and draw the sheathing grid on the wall using a level. We set the gap between the slats to 40–50 cm. Along the marking lines, we drill holes at a distance of 50 cm and fasten the profile to the wall with suitable fasteners.
For relatively flat walls (difference no more than 5 mm), you can make a frame from wooden beam, and for very curves it is better to use a metal profile, since it can be fixed at some distance from the wall using special fittings. Once you are sure that the sheathing is securely installed, you can begin finishing.
It is better to start work from a corner distant from the entrance, since this is the most visible part of the room and any trimming will be very noticeable. First, the starting strip is attached at the bottom and top of the sheathing, and at the side - the internal (external) corner, depending on the installation location. These slats perform the function of securing the plastic and hiding the unaesthetic appearance of the panel cuts. After this you can install the plastic. Cutting off the panel the right size(about 0.5 cm less, taking into account deformation from temperature changes) and insert it into the guides, first at the top and bottom, and then at the side. We fasten the plastic with a screwdriver or stapler into each strip of the sheathing. We fasten the following strips accordingly.
The most difficult stage is installing the last panel. To do this, cut the panel 0.5 cm smaller than the required size. First insert it into corner profile, and then snap it into the groove of the previous panel. This way you will not deform the guides and will finish the installation on the wall accurately.
Home heating solution: electric boiler
Installation of PVC panels using special glue or liquid nails.
If your house has perfectly smooth walls, it is possible to install plastic panels without a frame. This method has many advantages and virtually no disadvantages:
- saving space (which is important for small rooms);
- absence of dirt and dust during installation;
- quick installation;
- lower costs (no need to buy materials for the frame);
- no special skills required.
This method of installing plastic panels requires careful preparation of the walls. Clean them of foreign objects (wallpaper, old paint, crumbling putty), repair visible irregularities and prime them. Now you can attach the panels. If the wall allows, during the installation process you need to secure the panel with one self-tapping screw to the wall approximately in the middle - this will ensure a more reliable fastening. A special flexible corner is glued to the corners of the room, the dimensions of which vary from 2 to 5 cm. It gives the room completeness, forms internal and external corners and hides the curvature of the corners.
This installation method has only one drawback - you cannot hide the wiring and install built-in lights. Therefore, the choice is yours.
Fastening plastic panels to the ceiling
One of the advantages of using PVC panels on the ceiling is the ability to hide wiring, exhaust pipes and other communications, as well as place built-in lighting.
To install plastic panels on the ceiling, a special frame made of metal profiles is used (it provides more opportunities for embedding various communications through the use of various special fittings (hangers, crabs, etc.), and does not deform from moisture, unlike wood). Before installing the frame, it is worth preparing the surface of the ceiling (clean it of old paint, whitewash, falling plaster and dust, treat it with an antifungal coating to avoid the development of fungus in the room).
First, using a level, we make markings on the walls of the room at a distance of 5–10 cm from the ceiling. Next, we install the grid elements at intervals of 30 – 40 cm from each other. At a greater distance, the plastic may sag. Next, we attach a starting profile or a special molding for plastic around the perimeter; it is better to trim the corners using a miter box or directly at the installation site with a construction knife. Now we install the plastic panels.
How to attach plastic panels to the wall - recommendations for DIY installation
How to attach plastic panels to the wall, description of the process. Possible methods installation Installation of PVC panels on the ceiling. Recommendations for self-careHow to properly attach plastic panels to the wall: with and without lathing
In skillful hands, covering walls with plastic panels is reminiscent of assembling crafts from a children's construction set: the same pleasant-to-touch details, the same principles of fastening PVC panels: either with glue on a pre-prepared surface, or with bolts on a pre-prepared frame.
But if you take a closer look, each method of their installation will have its own nuances that must be taken into account.
Do-it-yourself frame method for installing plastic panels
The essence of this method is to attach the panels with your own hands to a special frame called sheathing. Its main difficulty is to correctly calculate the upper and lower levels of the sheathing, which must run strictly parallel to each other: the uniform distribution of the guides, on which the PVC panels will subsequently be attached, depends on this.
However, this does not mean that such installation does not require additional preparation. The latter directly depends on the purpose of the room.
In rooms with stable temperature and humidity - such as living rooms, as a rule - it is enough normal removal from the walls of the old peeling coating using a spatula, carefully inspecting for cracks, crevices and chips and, if necessary, sealing them with putty or plaster.
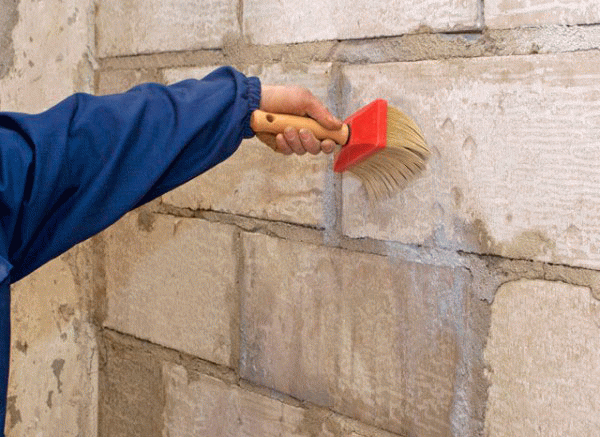
If there are temperature changes and humidity in the room - common occurrence(remember, for example, bathrooms, kitchens, balconies), additional waterproofing of the walls will be required.
Waterproofing layer using a roller or paint brush applied to pre-moistened walls. And after it dries, the walls are treated with an anti-mold and mildew agent.
Most often, the sheathing is made of either wood or metal.
Wooden blocks of at least 20x20 mm in thickness are cheaper, but they are less durable and are not suitable for rooms with high level humidity. Therefore, they must be dried thoroughly before use ( permissible humidity wood should not exceed 12-15%) and must be treated with an antiseptic to protect against rotting and insects.
The metal profile is more expensive, but suitable for any premises, stronger and more durable. In this case, a distinction is made between the UD profile, with the help of which the outline of the sheathing is formed, and the CD profile inserted into it, which serves as intermediate elements (guides).
But regardless of the material, before installing it you need to stock up on:
- building level and plumb line - to determine the position of the main elements of the sheathing;
- dowels - for attaching it to the wall;
- screws - for fastening its elements to each other;
- tape measure - to measure the distance between the guides;
- material for supports under the guides - wood or thick plywood;
- a screwdriver and a drill - to make work easier.
To cut a metal profile, you will need metal scissors. For additional work with wooden blocks - a saw with medium teeth, a chisel, a mallet.
Installation of sheathing to the wall
Installation of the sheathing can be divided into several stages
Marking the frame for wall panels
It begins with determining the lower level, running along the floor in such a way that subsequently the baseboard can be screwed onto it. The “reference point” in this case is the most protruding part of the wall: focusing on it, determine the distance by which the sheathing will subsequently retreat from the wall.
Then comes the determination of the top level, running along the intended ceiling height, and then the side levels. When installing the upper and lower levels, you must use a building level, and when installing the side levels, use a plumb line.
Bringing the frame to the proper level
In general, all levels are not attached to the walls tightly, but on straight hangers, maintaining the required indentation. The outer edges of the sheathing should be located at the same level, which can be adjusted either by grinding off the sheathing bars or using backings.
The distance between the screws on which the profile is attached should be 20-25 cm for a wooden profile and 15-25 cm for a metal profile.
Fastening the guides inside the frame frame
To begin with, they cover all protruding wall elements, as well as window and door openings.
The purpose of this action is to securely secure the edges of the sheathing elements along their boundaries. Then intermediate profiles are mounted.
When installing them, you need to take into account how the PVC panels will be fastened - horizontally or vertically: they are fastened perpendicular to the guides.
Wooden blocks (for wooden sheathing) and CD profiles (for metal) are inserted into the frame frame and secured at the edges with screws. To give the metal profile additional rigidity, it is recommended to use U-shaped profiles - they are screwed to its guides after the profile is installed and secured.
Naturally, when carrying out this type of work, do not forget to use a building level. But now the sheathing is ready. And it’s time to start installing PVC panels.
How to attach?
To do this you need to stock up:
- plastic panels, which must “acclimatize” before starting work by staying in the room intended for finishing for at least a day;
- moldings, that is, special corner profiles that ensure smooth joining;
- clamps - special brackets for fastening;
- a building level, which helps to accurately determine the location of the first PVC panel on the sheathing, which serves as a guide for further installation;
- a special knife or metal file for cutting panels.
The installation of PVC panels does not begin with the installation of moldings - internal and external: it is from them that you will have to build on in the future.
The first panel is installed with a tenon in the profile, attaching it to the sheathing using clamps. The second panel is installed in the groove of the previous one and fastened in the same way. In this way they reach the end of the wall.
The latter is cut in such a way that it can be installed all the way into the finishing corner, while the distance between its tenon and the groove of the previous panel should be 2-3 mm.
The cut edge is inserted into the profile, then the panel is pulled out and connected to the previous panel.
If it is necessary to hide the moldings, the technology for installing plastic wall panels becomes more complicated. The first panel is attached strictly in the very corner, the next one – close to it. A tenon is removed from one of the corner panels, resulting in a groove at the end.
This panel is pushed onto hook brackets installed on the second profile. The next corner panel is inserted into the starting profile.
Installation of PVC panels without lathing
The essence of installing panels without lathing is to glue the panels directly to the wall. And its main difficulty is in the preparation of walls, which require careful alignment, and correct selection adhesive composition.
The initial preparation of the walls is the same as with the frame method: the old coating is removed and the cracks are sealed. It is, of course, difficult to perfectly level the wall, but the permissible size of differences, bumps and holes should not exceed 5 mm, otherwise peeling or damage to the plastic is possible.
And taking into account the fact that a dusty, dirty and greasy surface is not able to provide sufficient adhesion to any glue, there is a need for high-quality cleaning of the walls: washing off whitewash, removing grease detergents, priming.
The range of glues on the modern market is large. Perfect for installing plastic panels with your own hands universal means such as Kleyberit 636, Emfikol 34012A or Moment Crystal, but it is best to use glue designed specifically for gluing plastic. Good glue:
- after drying it becomes transparent and forms a film layer;
- not afraid of moisture, frost and temperature changes;
- bonds surfaces to a long period and sets quickly.
It provides too rigid a fixation and, “interacting” with plastic, which has a considerable coefficient of thermal expansion, deprives panels made from it of free movement, thereby facilitating their separation from the walls.
More reliable non-expanding polyurethane sealant and liquid nails - their sufficient plasticity does not allow the panel to come off the wall during temperature fluctuations.
PVC panels are glued to the wall like this:
- take the panel and wipe it from the back with a damp cloth to remove dust;
- glue is applied to the back side in a dotted manner, the distance between the drops varies from 25 cm to 35 cm;
- then the panel is applied to the wall.
If liquid nails were used when trying to glue it, it is better to tap it and tear it off: this type The glue requires airing for 5-7 minutes - only then will it acquire additional rigidity and will not allow the panel, after pressing it again, to lag behind the wall until it is completely dry.
They simply need to be glued onto transparent silicone and wiped with a damp cloth to remove any excess. The size of such inserts ranges from 20 mm to 50 mm, depending on the curvature of the corners. If you need to glue PVC panels around the socket, the place for the socket is first cut out, and the electricity is turned off.
At the last stage of installation, floor and ceiling skirting boards, which are attached using self-tapping screws. The joints between the panels are treated with polyurethane foam or transparent silicone sealant (the latter is preferable in rooms with high humidity).
Latest materials
When renovating the balcony, I decided to decorate the walls with plastic panels. And even though I had never worked with this material, I took the risk of trying it. It turned out that there is nothing complicated in working with PVC panels. I used metal lathing, the main thing is to install it correctly, observing all levels. And than further work does not present any difficulty. The panels are installed quickly, I did all the work in one day without any experience.
My grandmother inherited an apartment, which was naturally not in the best condition, so we decided to do some minor renovations. My husband suggested finishing the toilet with PVC panels, not expensive and neat. We found a master from an advertisement, and in the end we got a very nice toilet, but what was our surprise when we saw that on one wall the panels were attached upside down)) This “jamb” didn’t immediately catch our eye, but then it became offensive, After all, we paid normal money for the work and hoped to receive quality work. After everything that happened, dear friends, I can advise you to hire craftsmen only on the recommendations of friends or from reputable repair companies!
How to attach plastic panels to the wall: basic DIY installation methods
Correctly attaching PVC panels at first glance is quite simple. However, this work has its own nuances, depending on the condition of the walls, the method used and the presence of certain knowledge on working with plastic as such.Panels made of polyvinyl chloride are considered durable and practical material, they are widely used for decorative wall decoration. They are suitable for any room. A variety of shapes, colors and textures will allow you to create a cozy and stylish interior. Installing PVC panels on walls is quite simple; even a novice master can cope with the task.
Panel selection
Among the wide range of such panels you can get confused. To avoid mistakes when choosing, you should familiarize yourself with all the characteristics and varieties in advance. finishing material. Low-quality panels quickly fade, they do not have the necessary strength, so you need to buy only certified material.
TO advantages of PVC panels include:
- ease of installation;
- increased moisture resistance;
- hygiene;
- fire safety;
- long term services unchanged appearance;
- resistance to the influence of any microorganisms.
One of the disadvantages is low impact resistance, so you need to be very careful when transporting and installing plastic wall panels.
The material can be divided into glossy and matte. The design technology can be printed or film. Strength will depend both on the thickness of the walls and on how many stiffening ribs are located inside. It is enough to press your finger on the surface to check the strength: bending plastic is a clear sign that it will not last long.
You should not take the material if:
- there are scratches on the surface;
- coatings differ in tone;
- panel sizes do not match;
- stiffeners are damaged or deformed;
- on the front side there is a fuzzy pattern with blurred edges.
It all starts with preliminary calculations: how much is needed finishing material. Typically, panels can be mounted horizontally and vertically. When mounting vertically, calculating the quantity is simple: you need to measure the perimeter of the room, subtract the width of the openings and divide by the width of one wall panel. Several lamellas are added to the resulting number so that there is a small margin.
If horizontal installation of PVC panels on walls is assumed, then the area is measured minus windows and doors, then divided by the area of one lamella. The margin should be 10%, since material consumption increases due to trimming. The height of the walls must be divided by the sheathing pitch (usually 0.5 meters), then multiplied by the perimeter. The resulting number will indicate the length of the slats (calculated in linear meters). When measuring the height of the corners and multiplying by their number, you get the total footage of the profiles for the corners.
Mounting methods
The lamellas are attached in three ways at the discretion of the master: with self-tapping screws, clamps or with glue. The last option will only work in case of smooth walls. Select glue “liquid nails” or special for PVC. Due to this, installation of panels becomes cheaper - you don’t have to spend money on lathing. But there are also disadvantages: you are unlikely to be able to easily replace a damaged lamella.
Fastening with self-tapping screws is considered a convenient and reliable option, which does not require a perfectly flat surface. You will need a screwdriver so that the process does not take too long. The disadvantages of this method include the fact that it is best suited for self-tapping screws. wooden frame Therefore, you will have to spend time cutting the timber and processing it.
Claymers are the best option. They are quickly and conveniently attached to the lathing, fixing the lamella to the wall. The lathing is assembled from metal profiles; there is nothing complicated about it. At the same time, damaged panels are very easy to replace without damaging adjacent ones.
The method of fastening is selected individually: everything depends directly on the condition of the walls and on the individual preferences of the person planning the repair. But in any case, glue is not used on surfaces with strong unevenness, because then it will not be possible to securely fasten the panels and it will not be possible to achieve a smooth and neat appearance. Then all your efforts will be in vain.
Everything should be at hand when working. Therefore it is necessary find out in advance what materials and tools may be required. Taking this into account, a list of everything necessary is compiled:
- the plastic panels themselves;
- fine-toothed hacksaw;
- square and level;
- tape measure and pencil;
- plastic profile or slats;
- self-tapping screws, dowel-nails or clamps;
- hammer drill and screwdriver;
- sealant and antiseptic composition;
- ceiling plinth.
It is worth noting that due to their versatility and ease of maintenance, plastic panels are often installed in the bathroom.
Step-by-step installation instructions
Before covering the wall, it is necessary to clean, seal existing cracks, level out defects if any, and treat the working surface antifungal agent. Then dust will not accumulate under the plastic and mold will not develop, which negatively affects the microclimate in the room. If the cladding is done on a frame, then the surface does not need to be carefully leveled first.
Wall marking
The sheathing is attached strictly level to avoid distortions. Markings on the walls are needed so as not to measure each rail separately. The bottom row of the sheathing is located a couple of centimeters above the floor, so you need to mark the height point on the wall with a pencil, and then use a level to draw a horizontal line along the perimeter of the entire room.
The same line will be required under the ceiling or along the edge of the trim (if the walls do not need to be sheathed to the full height). Then 50 centimeters are measured upward from the bottom line, a beacon is placed, and so on until the top. Parallel lines are drawn through the lighthouses. After this, the markup can be considered complete.
PVC panels are attached to the sheathing perpendicularly, so that the vertical frame is sheathed horizontally, and vice versa. For vertical sheathing The marking is done as follows: the first line is drawn from the ceiling in the corner to the floor, using a plumb line. Then the second angle is marked and the remaining lines are drawn (steps of 50 centimeters).
Installation of sheathing
It is imperative to prime all slats with an antiseptic if wood was chosen for the lathing. Drill along the marking lines holes for dowels maintaining a distance of 50 centimeters, then the slats themselves are applied, aligned horizontally and fixed directly to the wall. If there are irregularities on the wall, then you need to place wooden wedges under the sheathing. The wiring running along the wall is hidden under the trim. But to do this, you also need to take measurements in advance, drill holes and secure the wires with clamps so that they do not protrude beyond the sheathing.
Fastening the slats
After that, you can move on to the most important thing. The first lamella must be installed from the entrance in the far corner. You need to take measurements and, if necessary, cut the panel to the required length using a hacksaw. The panel is inserted with one edge into the side molding, applied to the corner and attached from the back to the sheathing.
The second lamella must be inserted into the mounting groove already installed panel, press the joints tightly, fix them on the slats of the created frame. Usually, the side edges are lightly coated with silicone before insertion: this ensures good sealing of the joints. Subsequent elements are mounted in the same way until all walls are covered with the selected panels.
Holes are cut out in the panels for sockets and switches with a sharp knife, then these areas are covered with plastic boxes. The last lamella usually requires cutting to width, so you need to try it on the wall, mark the cutting line with a pencil and carefully cut off all excess with a hacksaw.
Installation of moldings
In order for the surface to look smooth and monolithic after installation, without gaps around the perimeter and at the seams, it is necessary to close special moldings all joints, corners and joints. These moldings are usually made of plastic. Their design allows you to insert panel edges on both sides, this will give the corners a finished look.
It remains to install decorative molding along the perimeter of the ceiling, and a plastic plinth along the perimeter of the floor. After this, finishing the walls with plastic panels can be considered complete. With careful use, such material can last a very long time without losing its original attractiveness and without requiring any repairs.
Even without the appropriate knowledge, there is nothing difficult about installing decorative panels yourself; you just need to strictly follow the instructions and do everything carefully - there is no need to rush into repairs. And caring for them is as easy as shelling pears: just wipe them with a damp cloth from time to time. Then PVC panels can decorate any room in the apartment. Even in the bathroom or kitchen they will look stylish, creating a cozy atmosphere.
Panels made of polyvinyl chloride are considered one of the most popular materials. They are used for finishing various surfaces, including walls. The advantages of this finishing material include reasonable cost and wide selection color solutions. Another advantage is the possibility of self-installation.
You need to purchase only certified products, since low-quality fakes are not durable enough and quickly lose their original color.
Main advantages and disadvantages
The advantages of plastic-based slabs and panels include:
- increased resistance to moisture and chemicals;
- ease and convenience of installation;
- hygiene;
- fire resistance;
- long service life;
- resistance to fungus and mold;
- democratic price.
The disadvantage of such panels is their low resistance to mechanical stress; therefore, care must be taken during their transportation and installation.
The strength parameters are affected by the thickness of the walls, as well as the number of rigid ribs inside the slab. It’s easy to check the strength: to do this, you need to press your finger on the slab - if it bends, the material will be short-lived.
In accordance with the production technology, PVC panels are classified into two main types: printed and film.
Varies this material and by type of coating - with shiny and matte texture. The main criteria for choosing panel products are color and pattern, but there are a number of points that should be taken into account when purchasing slats. If the panels are packaged, it is recommended that you unpack them and examine each panel.
- Inspect the cut. The strength of the material is indicated by thick polymer coating on the back side of the slab and a lintel of sufficient thickness. You can navigate by weight; thick panels are heavier.
- The plastic must have an identical thickness throughout the entire panel, excluding thickening and thin areas.
- Evaluate the shape: there should be no defects on the cells and edges.
- Check the quality and clarity of the pattern from the outside. The presence of scratches and blurred marks is a reason to refuse the purchase.
- Buy panels from the same batch; if this is not possible, match the pattern and color scheme so that the products do not differ in shade.
- When choosing, be guided by the purpose of the room to be decorated.
Manufacturers offer several types of panel products:
- Classic lamellas, connected using grooves and tenons, which are plastic boards.
- Sheet boards similar to plywood sheets.
- Lining made of plastic, similar to thin wooden panels of different colors.
When selecting materials, take into account the purpose and interior of a particular room. Plastic lining is a wonderful analogue wood panels, it is considered more resistant to heat loss.
Sheet-type lamellas are used for cladding spacious rooms. Wall slabs are perfect for finishing kitchens, bathrooms, corridors and other rooms, since they are easy to care for: dirt can be easily removed using wet wipes or sponges.
Main advantage plastic sheathing lies in the low price. The width of the panels is from 20 to 35 cm, the length is from 2.7 to 3 meters, and the thickness is in the range of 8-10 mm. Such parameters and reasonable price make it possible to perform cladding with plastic boards at minimal cost.
How important is the sequence of work when and how to create step-by-step plan: tips and tricks on how to make full renovation step by step for cosmetic and major renovation housing.
Read about which grout is best for grouting tiles in the bathroom.
Preparation of surfaces and tools
Finishing work is preceded by calculating the required amount of plastic. Measure the room, and then take measurements of the doors and windows.
The amount of material is calculated based on the method of fastening the lamellas. They can be fixed both vertically and horizontally. In the first case, from the length of the perimeter of the room you need to subtract the width of the door and window openings and divide by the width of the slab. To the resulting value, add two or three panels for reserve.
In the second option, calculate the area of the room and divide it by the area of one finishing element.
Important! Material consumption with this method of fastening increases, since the workpieces have to be cut, so you need to buy 10 percent more - in reserve.
You can calculate the number of slats required for lathing by dividing the height of the wall by the distance between the slatted elements and multiplying this value by the perimeter of the room. The resulting figure is the required number of slats. The calculation is carried out in linear meters.
If plastic sheets will be attached directly to the wall, it is necessary to prepare for their installation.
Clean surfaces of existing finishes, repair walls, seal all cracks and smooth out noticeable defects. Treat the area with an anti-fungal agent. This way, you will protect the walls under the plastic panels from mold, which negatively affects the microclimate of the room.
Fastening PVC panels to a frame base does not require surface preparation.
On a note! Under plastic coated communications can be hidden.
Frame materials
The frame base can be made of a metal profile, slats of plastic or wood. Each option has its pros and cons.
Wooden frames are used in rare cases and exclusively for dry rooms. The wood is exposed Negative influence temperature changes and high humidity. Because of this, they are not installed where there is a significant impact of climatic conditions (on loggias, balcony areas and verandas).
The timber is selected with a small cross-section - for example, 3x3 cm. To insulate the walls, a timber with a large cross-section is needed.
U-shaped plastic profiles have many advantages:
- affordable price;
- convenience and ease of installation;
- small weight;
- resistance to humidity and high temperatures.
The profiles are fixed at a distance of 30 cm. Self-tapping screws or dowels are used for this purpose. The profile elements are joined at a certain angle, the material is cut with a hacksaw or special tool- miter box. Thanks to this, smooth cuts are obtained that are tightly adjacent to each other.
Another advantage of PVC profiles is the channels for cables formed by internal holes - communications can be laid in them. The thin frame makes it possible to save internal space, which is especially important for small rooms.
An iron frame is in most cases used for fastening plasterboard boards, since it weighs more.
If a metal frame base is used, pipes with corrugated polyvinyl chloride must be used for laying wires. This ensures protection of cables from the sharp edges of the iron frame and increases fire safety.
To implement finishing works The following tools will be required:
- level with tape measure for measurements;
- hacksaw;
- hammer;
- electric drill (or a hammer drill);
- sharpened knife;
- miter box.
Marking the walls and assembling the frame
Based on the direction of the cladding, the lathing can be fixed in a vertical or horizontal position and markings can be applied accordingly.
At the border between the ceiling and the slats, install a beautiful plastic plinth, having previously drilled slots for self-tapping screws with a drill for mounting the strips and fastening the plinth. Make grooves for fastening the corner strips in the same way.
Before installing the frame, you need to decide where hanging cabinets, shelves and other things will be located. decorative elements. In the selected places, secure additional bars in the horizontal plane.
Important! Before installation, do not forget to coat the wood parts with antiseptic compounds.
To avoid distortions that give the wall an unpresentable appearance, when attaching the sheathing, strictly observe the horizontal and vertical, and use a level. Frame slats must be located in a single plane. Make markings on the wall surface so you don't have to try on every detail.
Place the bottom line a couple of centimeters higher in relation to the floor.
Make a mark on the surface of the wall with a simple pencil and draw a line horizontally along the entire perimeter with a level. The same line must be drawn under the ceiling or along the edge of the cladding if it does not reach the surface of the ceiling.
Read about methods of use in the apartment: varieties, materials, color palette, photo examples of ready-made interior solutions.
How to glaze a balcony in a Khrushchev building yourself? All the main features of glazing are described.
Laying order and methods parquet board diagonally with your own hands are described in the article at:
Then you need to measure 40-50 cm from the bottom horizontal line for horizontal fastening of the frame and draw a new line along the perimeter parallel to it. In the same way, keeping parallel, horizontal lines are drawn to the ceiling.
Watch the following video to understand how to properly attach PVC panels to the wall yourself:
The slats are fixed perpendicular to the frame base. If horizontal arrangement of sheets is necessary, a vertical frame base is assembled. The first line from the ceiling to flooring, the step from the corner is measured using a level. After this, the second corner is marked. Lines are drawn parallel to the corners at a distance of 50 cm.
Experts advise marking the walls with a level and an ordinary thin rope - this way you will get the job done faster. Color the rope with multi-colored crayons and apply it to the wall; colored marks will remain at the points of contact with the surface. Thanks to this technique, you will save energy and, most importantly, time when preparing the wall.
Using the markings at a distance of 50 cm from each other, make grooves for the screws and, attaching slats, secure them. If there are irregularities on the walls, level the frame with wood wedges. If necessary, hide the wires under the cladding. Make grooves in the wall and secure the cables to the wall with clamps: make sure that they are securely hidden behind the frame.
Step by step installation
If you need to insulate the walls, lay insulating material between the frame bars.
Important! The cross-section of the beam must be selected in accordance with the thickness of the insulation.
Polystyrene boards can be used as thermal insulation material. Secure them with glue and additionally secure them with dowels in the form of mushrooms.
The next step is to attach the insulation to the insulated sheathing.
The installation of plastic panels should begin from the corner of the wall - the initial strip is fixed there. The comb of the first plate is inserted into the hole of this strip. If necessary, plastic elements are adjusted to length, and the material is cut with a hacksaw.
WITH reverse side the lamella is attached to the frame base with a stapler. Then the second lamella is mounted in the hole of the first. The parts must fit tightly to each other. Attach them securely to the sheathing. Applying silicone before installation will help to properly seal the joints.
The remaining elements are attached in the same way. The last lamella is inserted into the hole of the pre-assembled end strip. If the panel is too wide, cut it to the optimal size, but no more than a third of the original width.
Important! Don't forget to make holes in the trim for switches and sockets.
After installing the panels, cover the grooves with boxes.
Sheathed walls should look monolithic; the presence of cracks is unacceptable. This type of defect can be avoided by installing plastic moldings in the corners and at joints, which have a specific design that allows the edges of finishing elements to be mounted on both sides. Thanks to them, the corners will take on a more presentable appearance.
At the very end, you need to install moldings around the perimeter of the ceiling surface and openings. A plastic plinth installed around the perimeter of the floor will also help give the finish an attractive look.
Watch another video on the installation of PVC panels:
When decorating indoor walls with plastic panels with your own hands, you need to follow the recommendations of the craftsmen and take note of those tips that will make the work much easier.
- If the panels are attached to a frame base, there is no need to level the walls to perfect smoothness - it is enough to eliminate obvious unevenness. This way you will reduce the finishing time.
- The wooden sheathing is fastened exclusively with galvanized dowels and self-tapping screws.
- The first lamellas need to be perfectly aligned, since the rest of the finishing elements will be aligned with them. If the first sheet is installed unevenly, the entire finish will turn out crooked.
- The panels must lie down before installation. If finishing is done in the summer, keep them in room conditions day. In winter, the material needs to lie down for two days if it was stored at temperatures down to minus ten degrees.
- If plastic panels are installed in a room with a high level of humidity (toilet, bathroom), holes must be made in the frame base for ventilation.
- Unpack the material carefully as it is easily damaged. Pull the panels out by the edge, each sheet separately.
- To obtain neat cuts, use a hacksaw with small teeth; It is better to use a metal tool.
- When installing patterned slats, start trimming from the left corner piece and work your way to the right.
- The quality of cladding with PVC panels is affected by the evenness of the installation of the frame. Fit the elements closely, then the finish will be smooth.
Follow these tips, and the cladding will look presentable, last a long time and give the premises a cozy look.